Getting started with Jenkins for Network Automation

As I have mentioned my previous post about Getting started with Gitlab-CI for Network Automation, Jenkins is another continuous integration pipelining tool you can use for network automation. Have a look about how to install Jenkins: https://wiki.jenkins.io/display/JENKINS/Installing+Jenkins+on+Ubuntu

To use the Jenkins with Vagrant and KVM (libvirt) there are a few changes needed on the linux server similar with the Gitlab-Runner. The Jenkins user account needs to be able to control KVM and you need to install the vagrant-libvirt plugin:

usermod -aG libvirtd jenkins
sudo su jenkins
vagrant plugin install vagrant-libvirt

Optional: you may need to copy custom Vagrant boxes into the users vagrant folder ‘/var/lib/jenkins/.vagrant.d/boxes/*’. Note that the Jenkins home directory is not located under /home.

Now lets start configuring a Jenkins CI-pipeline, click on ‘New item’:

This creates an empty pipeline where you need to add the different stages  of what needs to be executed:

Below is an example Jenkins pipeline script which is very similar to the Gitlab-CI pipeline I have used with my Cumulus Linux Lab in the past.

pipeline {
    agent any
    stages {
        stage('Clean and prep workspace') {
            steps {
                sh 'rm -r *'
                git 'https://github.com/berndonline/cumulus-lab-provision'
                sh 'git clone --origin master https://github.com/berndonline/cumulus-lab-vagrant'
            }
        }
        stage('Validate Ansible') {
            steps {
                sh 'bash ./linter.sh'
            }
        }
        stage('Staging') {
            steps {
                sh 'cd ./cumulus-lab-vagrant/ && ./vagrant_create.sh'
                sh 'cd ./cumulus-lab-vagrant/ && bash ../staging.sh'
            }
        }
        stage('Deploy production approval') {
            steps {
                input 'Deploy to prod?'
            }
        }
        stage('Production') {
            steps {
                sh 'cd ./cumulus-lab-vagrant/ && ./vagrant_create.sh'
                sh 'cd ./cumulus-lab-vagrant/ && bash ../production.sh'
            }
        }
    }
}

Let’s run the build pipeline:

The stages get executed one by one and, as you can see below, the production stage has an manual approval build-in that nothing gets deployed to production without someone to approve before, for a controlled production deployment:

Finished pipeline:

This is just a simple example of a network automation pipeline, this can of course be more complex if needed. It should just help you a bit on how to start using Jenkins for network automation.

Please share your feedback and leave a comment.

Ansible Automation with Cisco ASA Multi-Context Mode

I thought I’d share my experience using Ansible and Cisco ASA firewalls in multi-context mode. Right from the beginning I had a few issues deploying the configuration and the switch between the different security context didn’t work well. I got the error you see below when I tried to run a playbook. Other times the changeto context didn’t work well and applied the wrong config:

berndonline@lab:~$ ansible-playbook -i inventory site.yml --ask-vault-pass
Vault password:

PLAY [all] ***************************************************************************************************************************************************************************

TASK [hostname : set dns and hostname] ***********************************************************************************************************************************************
An exception occurred during task execution. To see the full traceback, use -vvv. The error was: error: [Errno 61] Connection refused
fatal: [fwcontext01]: FAILED! => {"changed": false, "err": "[Errno 61] Connection refused", "msg": "unable to connect to socket"}
ok: [fwcontext02]

TASK [interfaces : write interfaces config] ******************************************************************************************************************************************
ok: [fwcontext02]

....

After a bit of troubleshooting I found a workaround to limit the amount of processes Ansible use and set this limit to one in the Ansible.cfg. The default is five processes if forks is not defined as far as I remember.

[defaults]
inventory = ./inventory
host_key_checking=False
jinja2_extensions=jinja2.ext.do
forks = 1

In the example inventory file, the “inventory_hostname” variable represents the security context and as you see the “ansible_ssh_host” is set to the IP address of the admin context:

fwcontext01 ansible_ssh_host=192.168.0.1 ansible_ssh_port=22 ansible_ssh_user='ansible' ansible_ssh_pass='cisco'
fwcontext02 ansible_ssh_host=192.168.0.1 ansible_ssh_port=22 ansible_ssh_user='ansible' ansible_ssh_pass='cisco'

When you run the playbook again you can see that the playbook runs successfully but deploys the changes one by one to each firewall security context, the disadvantage is that the playbook takes much longer to run:

berndonline@lab:~$ ansible-playbook site.yml

PLAY [all] ***************************************************************************************************************************************************************************

TASK [hostname : set dns and hostname] ***********************************************************************************************************************************************
ok: [fwcontext01]
ok: [fwcontext02]

TASK [interfaces : write interfaces config] ******************************************************************************************************************************************
ok: [fwcontext01]
ok: [fwcontext02]

Example site.yml

---

- hosts: all
  connection: local
  gather_facts: 'no'

  vars:
    cli:
      username: "{{ ansible_ssh_user }}"
      password: "{{ ansible_ssh_pass }}"
      host: "{{ ansible_ssh_host }}"

  roles:
    - interfaces

In the example Interface role you see that the context is set to “inventory_hostname” variable:

---

- name: write interfaces config
  asa_config:
    src: "templates/interfaces.j2"
    provider: "{{ cli }}"
    context: "{{ inventory_hostname }}"
  register: result

- name: enable interfaces
  asa_config:
    parents: "interface {{ item.0 }}"
    lines: "no shutdown"
    match: none
    provider: "{{ cli }}"
    context: "{{ inventory_hostname }}"
  when: result.changed
  with_items:
    - "{{ interfaces.items() }}"

After modifying the forks, the Ansible playbook runs well with Cisco ASA in multi-context mode, like mentioned before it is a bit slow to deploy the configuration if I compare this to Cumulus Linux or any other Linux system.

Please share your feedback.

Leave a comment

Getting started with Gitlab-CI for Network Automation

Ken Murphy from networkautomationblog.com asked me to do a more detailed post about how to setup Gitlab-Runner on your local server to use with Gitlab-CI. I will not get into too much detail about the installation because Gitlab has a very detailed information about it which you can find here: https://docs.gitlab.com/runner/install/linux-repository.html

Once the Gitlab Runner is installed on your server you need to configure and register the runner with your Gitlab repo. If you are interested in information about this, you can find the documentation here: https://docs.gitlab.com/runner/register/ but lets continue with how to register the runner.

In your project go to ‘Settings -> CI / CD’ to find the registration token:

It is important to disable the shared runners:

Now let’s register the gitlab runner:

berndonline@lab ~ # sudo gitlab-runner register
Running in system-mode.

Please enter the gitlab-ci coordinator URL (e.g. https://gitlab.com/):
https://gitlab.com
Please enter the gitlab-ci token for this runner:
xxxxxxxxx
Please enter the gitlab-ci description for this runner:
[lab]:
Please enter the gitlab-ci tags for this runner (comma separated):
lab
Whether to run untagged builds [true/false]:
[false]: true
Whether to lock the Runner to current project [true/false]:
[true]: false
Registering runner... succeeded                     runner=xxxxx
Please enter the executor: docker-ssh, parallels, ssh, virtualbox, kubernetes, docker, shell, docker+machine, docker-ssh+machine:
shell
Runner registered successfully. Feel free to start it, but if it's running already the config should be automatically reloaded!
berndonline@lab ~ #

You will find the main configuration file under /etc/gitlab-runner/config.toml.

When everything goes well the runner is registered and active, and ready to apply the CI pipeline what is defined in the .gitlab-ci.yml.

To use the runner with Vagrant and KVM (libvirt) there are a few changes needed on the linux server itself, first the gitlab-runner user account needs to be able to control KVM, second the vagrant-libvirt plugin needs to be installed:

usermod -aG libvirtd gitlab-runner
sudo su gitlab-runner
vagrant plugin install vagrant-libvirt

Optional: you may need to copy custom Vagrant boxes into the users vagrant folder ‘/home/gitlab-runner/.vagrant.d/boxes/*’.

Here the example from my Cumulus CI-pipeline .gitlab-ci.yml that I have already shared in my other blog post about Continuous Integration and Delivery for Networking with Cumulus Linux:

---
stages:
    - validate ansible
    - staging
    - production
validate:
    stage: validate ansible
    script:
        - bash ./linter.sh
staging:
    before_script:
        - git clone https://github.com/berndonline/cumulus-lab-vagrant.git
        - cd cumulus-lab-vagrant/
        - python ./topology_converter.py ./topology-production.dot
          -p libvirt --ansible-hostfile
    stage: staging
    script:
        - bash ../staging.sh
production:
    before_script:
        - git clone https://github.com/berndonline/cumulus-lab-vagrant.git
        - cd cumulus-lab-vagrant/
        - python ./topology_converter.py ./topology-production.dot
          -p libvirt --ansible-hostfile
    stage: production
    when: manual
    script:
        - bash ../production.sh
    only:
        - master

The next step is the staging.sh shell script which boots up the vagrant instances and executes the Ansible playbooks. It is better to use a script and report the exit state so that if something goes wrong the Vagrant instances are correctly destroyed.

#!/bin/bash

EXIT=0
vagrant up mgmt-1 --color <<< 'mgmt-1 boot' || EXIT=$?
vagrant up netq-1 --color <<< 'netq-1 boot' || EXIT=$?
sleep 300
vagrant up spine-1 --color <<< 'spine-1 boot' || EXIT=$?
vagrant up spine-2 --color <<< 'spine-2 boot' || EXIT=$?
sleep 60
vagrant up edge-1 --color <<< 'edge-1 boot' || EXIT=$?
vagrant up edge-2 --color <<< 'edge-2 boot' || EXIT=$?
sleep 60
vagrant up leaf-1 --color <<< 'leaf-1 boot' || EXIT=$?
vagrant up leaf-2 --color <<< 'leaf-2 boot' || EXIT=$?
vagrant up leaf-3 --color <<< 'leaf-3 boot' || EXIT=$?
vagrant up leaf-4 --color <<< 'leaf-4 boot' || EXIT=$?
vagrant up leaf-5 --color <<< 'leaf-5 boot' || EXIT=$?
vagrant up leaf-6 --color <<< 'leaf-6 boot' || EXIT=$?
sleep 60
vagrant up server-1 --color <<< 'server-1 boot' || EXIT=$?
vagrant up server-2 --color <<< 'server-2 boot' || EXIT=$?
vagrant up server-3 --color <<< 'server-3 boot' || EXIT=$?
vagrant up server-4 --color <<< 'server-4 boot' || EXIT=$?
vagrant up server-5 --color <<< 'server-5 boot' || EXIT=$?
vagrant up server-6 --color <<< 'server-6 boot' || EXIT=$?
sleep 60
export ANSIBLE_FORCE_COLOR=true
ansible-playbook ./helper_scripts/configure_servers.yml <<< 'ansible playbook' || EXIT=$?
ansible-playbook ../site.yml <<< 'ansible playbook' || EXIT=$?
sleep 60
ansible-playbook ../icmp_check.yml <<< 'icmp check' || EXIT=$?
vagrant destroy -f
echo $EXIT
exit $EXIT

Basically any change in the repository triggers the .gitlab-ci.yml and executes the pipeline; starting with the stage validating the Ansible syntax:

Continue with staging the configuration and deploying to production. The production stage is a manual trigger to have a controlled deployment:

In one of my next posts I will explain how to use Jenkins instead of Gitlab-CI for Network Automation. Jenkins is very similar to the runner but more flexible with what you can do with it.

Leave a comment

Open Source Routing GRE over IPSec with StrongSwan and Cisco IOS-XE

In my previous post about the Ansible Playbook for VyOS and BGP Routing, I wrote that I was looking for some Open Source alternatives for software routers to use in AWS Transit VPCs.

Here is the example using a Debian Linux,  FRR (Free Range Routing) and StrongSwan connecting over a GRE over IPSec tunnel to a Cisco IOS-XE (CSRv) router:

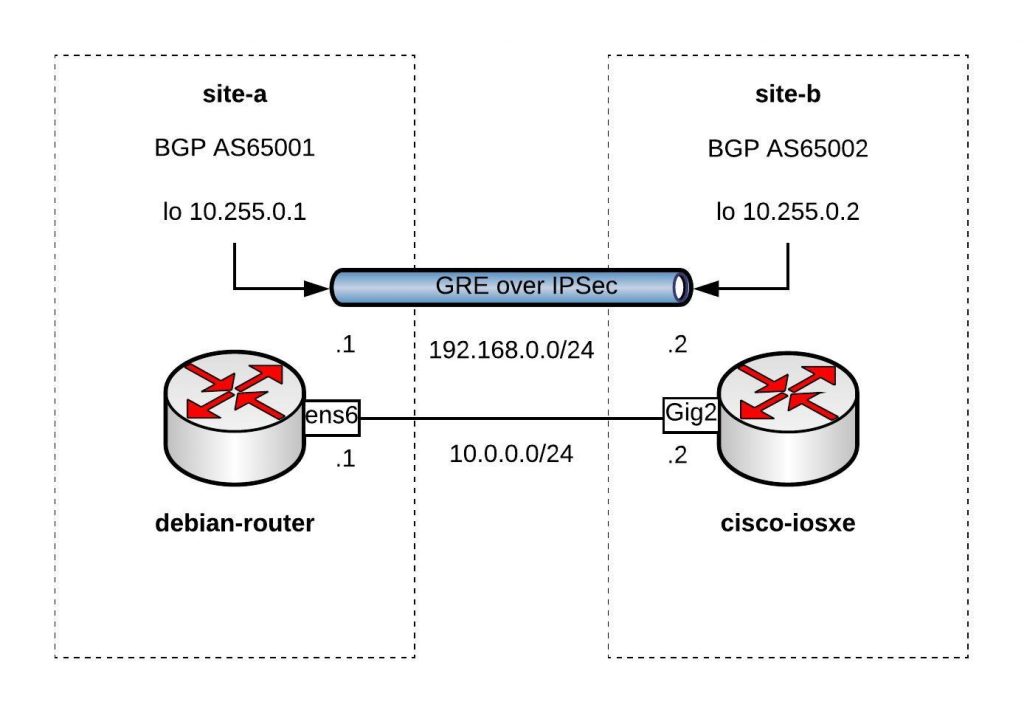
You can find the Vagrantfile in my Github repo https://github.com/berndonline/debian-router-vagrant. During the boot Ansible runs and pre-configures both nodes but continue reading about the detailed configuration:

sudo apt-get update
sudo apt-get upgrade -y

Enable IP routing by adding the following line to /etc/sysctl.conf:

sudo vi /etc/sysctl.conf
net.ipv4.ip_forward = 1
sudo sysctl -p /etc/sysctl.conf

Download the latest FRR release for Debian 9 x86_64 from https://github.com/FRRouting/frr/releases

Install FRR and don’t worry about any dependency errors from the first command, the second command will install the missing dependencies. Next, enable the needed FRR daemons and start the service:

wget https://github.com/FRRouting/frr/releases/download/frr-3.0.3/frr_3.0.3-1_debian9.1_amd64.deb
wget https://github.com/FRRouting/frr/releases/download/frr-3.0.3/frr-pythontools_3.0.3-1_debian9.1_all.deb
wget https://github.com/FRRouting/frr/releases/download/frr-3.0.3/frr-doc_3.0.3-1_debian9.1_all.deb
sudo dpkg -i frr_3.0.3-1_debian9.1_amd64.deb frr-pythontools_3.0.3-1_debian9.1_all.deb frr-doc_3.0.3-1_debian9.1_all.deb
sudo apt-get install -f -y

sudo bash -c 'cat << EOF > /etc/frr/daemons
zebra=yes
bgpd=yes
ospfd=no
ospf6d=no
ripd=no
ripngd=no
isisd=no
pimd=no
ldpd=no
nhrpd=no
EOF'

sudo bash -c 'cat << EOF > /etc/frr/frr.conf
!
frr version 3.0.3
frr defaults traditional
no ipv6 forwarding
!
router bgp 65001
 neighbor 192.168.0.2 remote-as 65002
 !
 address-family ipv4 unicast
  network 10.255.0.1/32
 exit-address-family
 vnc defaults
  response-lifetime 3600
  exit-vnc
!
line vty
!
EOF'

sudo systemctl enable frr
sudo systemctl start frr

Install StrongSwan and change a few settings before you can enable and start the service:

sudo apt-get install -y strongswan-swanctl charon-systemd

sudo bash -c 'cat << EOF > /etc/strongswan.d/charon/connmark.conf
connmark {
 
    # Disable connmark plugin
    # Needed for tunnels - see https://wiki.strongswan.org/projects/strongswan/wiki/RouteBasedVPN
    load = no
 
}
EOF'
sudo bash -c 'cat << EOF > /etc/strongswan.d/charon.conf
charon {
 
    # Cisco IKEv2 wants to use reauth - need to set make_before_break otherwise
    # strongSwan will have a very brief outage during IKEv2 reauth
    make_before_break = yes
 
    # Needed for tunnels - see https://wiki.strongswan.org/projects/strongswan/wiki/RouteBasedVPN
    install_routes = no
 
}
EOF'

sudo systemctl enable strongswan-swanctl
sudo systemctl start strongswan-swanctl

Setting TCP MSS to path MTU with iptables:

sudo DEBIAN_FRONTEND=noninteractive apt-get install -y -q iptables-persistent

sudo bash -c 'cat << EOF > /etc/iptables/rules.v4
*filter
:INPUT ACCEPT [0:0]
:FORWARD ACCEPT [0:0]
:OUTPUT ACCEPT [0:0]
COMMIT
*mangle
:PREROUTING ACCEPT [0:0]
:INPUT ACCEPT [0:0]
:FORWARD ACCEPT [0:0]
:OUTPUT ACCEPT [0:0]
:POSTROUTING ACCEPT [0:0]
-A FORWARD -p tcp --tcp-flags SYN,RST SYN -j TCPMSS --clamp-mss-to-pmtu
COMMIT
EOF'

Let us continue with the Debian router interface configuration, here you also find the GRE tunnel settings:

sudo bash -c 'cat << EOF > /etc/network/interfaces
source-directory /etc/network/interfaces.d
auto lo
iface lo inet loopback

auto lo:1
iface lo:1 inet static
      address 10.255.0.1
      netmask 255.255.255.255

auto ens5
iface ens5 inet dhcp

auto ens6
iface ens6 inet static
      address 10.0.0.1
      netmask 255.255.255.0

auto gre1
iface gre1 inet tunnel
      address 192.168.0.1
      netmask 255.255.255.0
      mode gre
      endpoint 10.0.0.2
EOF'

sudo systemctl restart networking

In StrongSwan you configure the IPSec settings:

sudo bash -c 'cat << EOF > /etc/swanctl/swanctl.conf
connections {
    my-vpn {
        remote_addrs = 10.0.0.2
        version = 1
        proposals = aes256-sha1-modp1536
        reauth_time = 1440m
        local-1 {
            auth = psk
            id = debian-router.domain.com
        }
        remote-1 {
            # id field here is inferred from the remote address
            auth = psk
        }
        children {
            my-vpn-1 {
                local_ts = 10.0.0.1/32[gre]
                remote_ts = 10.0.0.2/32[gre]
                mode = transport
                esp_proposals = aes128-sha1-modp1536
                rekey_time = 60m
                start_action = trap
                dpd_action = restart
            }
        }
    }

}
secrets {
    ike-my-vpn-1 {
        id-1 = cisco-iosxe.domain.com
        id-2 = 10.0.0.2
        secret = "secret"
    }
}
EOF'

sudo systemctl restart strongswan-swanctl

We finished the Debian host configuration and continue with the Cisco  router configuration to connect the Debian router to the tunnel 0 interface on the Cisco router:

conf t
hostname cisco-iosxe

crypto keyring my-keyring  
  pre-shared-key address 10.0.0.1 key secret
  exit

crypto isakmp policy 20
 encr aes 256
 authentication pre-share
 group 5
crypto isakmp identity hostname
crypto isakmp profile my-isakmp-profile
   keyring my-keyring
   match identity host debian-router.domain.com
   exit
crypto ipsec transform-set my-transform-set esp-aes esp-sha-hmac
 mode transport
 exit
crypto ipsec profile my-ipsec-profile
 set transform-set my-transform-set
 set pfs group5
 set isakmp-profile my-isakmp-profile
 exit

interface Loopback1
 ip address 10.255.0.2 255.255.255.255
 exit

interface Tunnel0
 ip address 192.168.0.2 255.255.255.0
 tunnel source GigabitEthernet2
 tunnel destination 10.0.0.1
 tunnel protection ipsec profile my-ipsec-profile
 no shut
 exit

interface GigabitEthernet2
 ip address 10.0.0.2 255.255.255.0
 no shut
 exit

router bgp 65002
 bgp log-neighbor-changes
 neighbor 192.168.0.1 remote-as 65001
 address-family ipv4
  network 10.255.0.2 mask 255.255.255.255
  neighbor 192.168.0.1 activate
 exit-address-family
 exit

exit
wr mem

Clone my Github repo https://github.com/berndonline/debian-router-vagrant and boot the environment with “./vagrant_up.sh”. After the two VMs are booted wait a few seconds and run the validation playbook to check the connectivity between the nodes:

berndonline@lab:~/debian-router-vagrant$ ansible-playbook ./validate_connectivity.yml

PLAY [debian-router] ***********************************************************************************************************************************************

TASK [check connectivity from debian router] ***********************************************************************************************************************
changed: [debian-router]

PLAY [cisco-iosxe] *************************************************************************************************************************************************

TASK [check connectivity from cisco iosxe] *************************************************************************************************************************
ok: [cisco-iosxe]

PLAY RECAP *********************************************************************************************************************************************************
cisco-iosxe                : ok=1    changed=0    unreachable=0    failed=0
debian-router              : ok=1    changed=1    unreachable=0    failed=0

berndonline@lab:~/debian-router-vagrant$

I will continue improving the config, and do some more testing with AWS VPN gateways (VGW).

Please share your feedback.

Leave a comment

Ansible Playbook for VyOS and BGP Routing

I am currently looking into different possibilities for Open Source alternatives to commercial routers from Cisco or Juniper to use in Amazon AWS Transit VPCs. One option is to completely build the software router by myself with a Debian Linux, FRR (Free Range Routing) and StrongSwan, read my post about the self-build software router: Open Source Routing GRE over IPSec with StrongSwan and Cisco IOS-XE

A few years back I was working with Juniper JunOS routers and I thought I’d give VyOS a try because the command line which is very similar.

I replicated the same Vagrant topology for my Ansible Playbook for Cisco BGP Routing Topology but used VyOS instead of Cisco.

Network overview:

Here are the repositories for the Vagrant topology https://github.com/berndonline/vyos-lab-vagrant and the Ansible Playbook https://github.com/berndonline/vyos-lab-provision.

The Ansible Playbook site.yml is very simple, using the Ansible vyos_system for changing the hostname and the module vyos_config for interface and routing configuration:

---

- hosts: all

  connection: local
  user: '{{ ansible_ssh_user }}'
  gather_facts: 'no'

  roles:
    - hostname
    - interfaces
    - routing

Here is an example from host_vars rtr-1.yml:

---

hostname: rtr-1
domain_name: lab.local

loopback:
  dum0:
    alias: dummy loopback0
    address: 10.255.0.1
    mask: /32

interfaces:
  eth1:
    alias: connection rtr-2
    address: 10.0.255.1
    mask: /30

  eth2:
    alias: connection rtr-3
    address: 10.0.255.5
    mask: /30

bgp:
  asn: 65001
  neighbor:
    - {address: 10.0.255.2, remote_as: 65000}
    - {address: 10.0.255.6, remote_as: 65000}
  networks:
    - {network: 10.0.255.0, mask: /30}
    - {network: 10.0.255.4, mask: /30}
    - {network: 10.255.0.1, mask: /32}
  maxpath: 2

The template interfaces.j2 for the interface configuration:

{% if loopback is defined %}
{% for port, value in loopback.items() %}
set interfaces dummy {{ port }} address '{{ value.address }}{{ value.mask }}'
set interfaces dummy {{ port }} description '{{ value.alias }}'
{% endfor %}
{% endif %}

{% if interfaces is defined %}
{% for port, value in interfaces.items() %}
set interfaces ethernet {{ port }} address '{{ value.address }}{{ value.mask }}'
set interfaces ethernet {{ port }} description '{{ value.alias }}'
{% endfor %}
{% endif %}

This is the template routing.j2 for the routing configuration:

{% if bgp is defined %}
{% if bgp.maxpath is defined %}
set protocols bgp {{ bgp.asn }} maximum-paths ebgp '{{ bgp.maxpath }}'
{% endif %}
{% for item in bgp.neighbor %}
set protocols bgp {{ bgp.asn }} neighbor {{ item.address }} ebgp-multihop '2'
set protocols bgp {{ bgp.asn }} neighbor {{ item.address }} remote-as '{{ item.remote_as }}'
{% endfor %}
{% for item in bgp.networks %}
set protocols bgp {{ bgp.asn }} network '{{ item.network }}{{ item.mask }}'
{% endfor %}
set protocols bgp {{ bgp.asn }} parameters router-id '{{ loopback.dum0.address }}'
{% endif %}

The output of the running Ansible Playbook:

PLAY [all] *********************************************************************

TASK [hostname : write hostname and domain-name] *******************************
changed: [rtr-3]
changed: [rtr-2]
changed: [rtr-4]
changed: [rtr-1]

TASK [interfaces : write interfaces config] ************************************
changed: [rtr-4]
changed: [rtr-1]
changed: [rtr-3]
changed: [rtr-2]

TASK [routing : write routing config] ******************************************
changed: [rtr-2]
changed: [rtr-4]
changed: [rtr-3]
changed: [rtr-1]

PLAY RECAP *********************************************************************
rtr-1                      : ok=3    changed=3    unreachable=0    failed=0   
rtr-2                      : ok=3    changed=3    unreachable=0    failed=0   
rtr-3                      : ok=3    changed=3    unreachable=0    failed=0   
rtr-4                      : ok=3    changed=3    unreachable=0    failed=0   

Like in all my other Ansible Playbooks I use some kind of validation, a simple ping check vyos_check_icmp.yml to see if the configuration is correctly deployed:

---

- hosts: all

  connection: local
  user: '{{ ansible_ssh_user }}'
  gather_facts: 'no'

  tasks:
    - name: validate connection from rtr-1
      vyos_command:
        commands: 'ping {{ item }} count 4'
      when: "'rtr-1' in inventory_hostname"
      with_items:
        - '10.0.255.2'
        - '10.0.255.6'

    - name: validate connection from rtr-2
      vyos_command:
        commands: 'ping {{ item }} count 4'
      when: "'rtr-2' in inventory_hostname"
      with_items:
        - '10.0.255.1'
        - '10.0.254.1'
        - '10.0.253.2'
...

The output of the icmp validation Playbook:

PLAY [all] *********************************************************************

TASK [validate connection from rtr-1] ******************************************
skipping: [rtr-3] => (item=10.0.255.2) 
skipping: [rtr-3] => (item=10.0.255.6) 
skipping: [rtr-2] => (item=10.0.255.2) 
skipping: [rtr-2] => (item=10.0.255.6) 
skipping: [rtr-4] => (item=10.0.255.2) 
skipping: [rtr-4] => (item=10.0.255.6) 
ok: [rtr-1] => (item=10.0.255.2)
ok: [rtr-1] => (item=10.0.255.6)

TASK [validate connection from rtr-2] ******************************************
skipping: [rtr-3] => (item=10.0.255.1) 
skipping: [rtr-3] => (item=10.0.254.1) 
skipping: [rtr-1] => (item=10.0.255.1) 
skipping: [rtr-3] => (item=10.0.253.2) 
skipping: [rtr-1] => (item=10.0.254.1) 
skipping: [rtr-1] => (item=10.0.253.2) 
skipping: [rtr-4] => (item=10.0.255.1) 
skipping: [rtr-4] => (item=10.0.254.1) 
skipping: [rtr-4] => (item=10.0.253.2) 
ok: [rtr-2] => (item=10.0.255.1)
ok: [rtr-2] => (item=10.0.254.1)
ok: [rtr-2] => (item=10.0.253.2)

TASK [validate connection from rtr-3] ******************************************
skipping: [rtr-1] => (item=10.0.255.5) 
skipping: [rtr-1] => (item=10.0.254.5) 
skipping: [rtr-2] => (item=10.0.255.5) 
skipping: [rtr-1] => (item=10.0.253.1) 
skipping: [rtr-2] => (item=10.0.254.5) 
skipping: [rtr-2] => (item=10.0.253.1) 
skipping: [rtr-4] => (item=10.0.255.5) 
skipping: [rtr-4] => (item=10.0.254.5) 
skipping: [rtr-4] => (item=10.0.253.1) 
ok: [rtr-3] => (item=10.0.255.5)
ok: [rtr-3] => (item=10.0.254.5)
ok: [rtr-3] => (item=10.0.253.1)

TASK [validate connection from rtr-4] ******************************************
skipping: [rtr-3] => (item=10.0.254.2) 
skipping: [rtr-3] => (item=10.0.254.6) 
skipping: [rtr-1] => (item=10.0.254.2) 
skipping: [rtr-1] => (item=10.0.254.6) 
skipping: [rtr-2] => (item=10.0.254.2) 
skipping: [rtr-2] => (item=10.0.254.6) 
ok: [rtr-4] => (item=10.0.254.2)
ok: [rtr-4] => (item=10.0.254.6)

TASK [validate bgp connection from rtr-1] **************************************
skipping: [rtr-3] => (item=10.255.0.4) 
skipping: [rtr-2] => (item=10.255.0.4) 
skipping: [rtr-4] => (item=10.255.0.4) 
ok: [rtr-1] => (item=10.255.0.4)

TASK [validate bgp connection from rtr-4] **************************************
skipping: [rtr-3] => (item=10.255.0.1) 
skipping: [rtr-1] => (item=10.255.0.1) 
skipping: [rtr-2] => (item=10.255.0.1) 
ok: [rtr-4] => (item=10.255.0.1)

PLAY RECAP *********************************************************************
rtr-1                      : ok=2    changed=0    unreachable=0    failed=0   
rtr-2                      : ok=1    changed=0    unreachable=0    failed=0   
rtr-3                      : ok=1    changed=0    unreachable=0    failed=0   
rtr-4                      : ok=2    changed=0    unreachable=0    failed=0   

As you see, the configuration is successfully deployed and BGP connectivity between the nodes.

Leave a comment