Install OpenShift/OKD 4.9.x Single Node Cluster (SNO) using OpenShift Hive/ACM

I haven’t written much since the summer 2021 and I thought I start the New Year with a little update regarding OpenShift/OKD 4.9 Single Node cluster (SNO) installation. The single node type is not new because I have been using these All-in-One or Single Node clusters since OpenShift 3.x and it worked great until OpenShift 4.7. When RedHat released OpenShift 4.8 the single node installation stopped working because of issue with the control-plane because it expected three nodes for high availability and this installation method was possible till then but not officially supported by RedHat.

When the OpenShift 4.9 release was announced the single node installation method called SNO became a supported way for deploying OpenShift Edge clusters on  bare-metal or virtual machine using the RedHat Cloud Assisted Installer.

This opened the possibility again to install OpenShift/OKD 4.9 as a single node (SNO) on any cloud provider like AWS, GCP or Azure through the openshift-install command line utility or through OpenShift Hive / Advanced Cluster Management operator.

The install-config.yaml for a single node cluster is pretty much the same like for a normal cluster only that you change the worker node replicas to zero and control-plane (master) nodes to one. Make sure your instance size has minimum 8x vCPUs and 32 GB of memory.

---
apiVersion: v1
baseDomain: k8s.domain.com
compute:
- name: worker
  platform:
    aws:
      rootVolume:
        iops: 100
        size: 22
        type: gp2
      type: m5.2xlarge
  replicas: 0
controlPlane:
  name: master
  platform:
    aws:
      rootVolume:
        iops: 100
        size: 22
        type: gp2
      type: m5.2xlarge
  replicas: 1
metadata:
  creationTimestamp: null
  name: okd-eu-west-1
networking:
  clusterNetwork:
  - cidr: 10.128.0.0/14
    hostPrefix: 23
  machineCIDR: 10.0.0.0/16
  networkType: OpenShiftSDN
  serviceNetwork:
  - 172.30.0.0/16
platform:
  aws:
    region: eu-west-1
pullSecret: ""
sshKey: ""

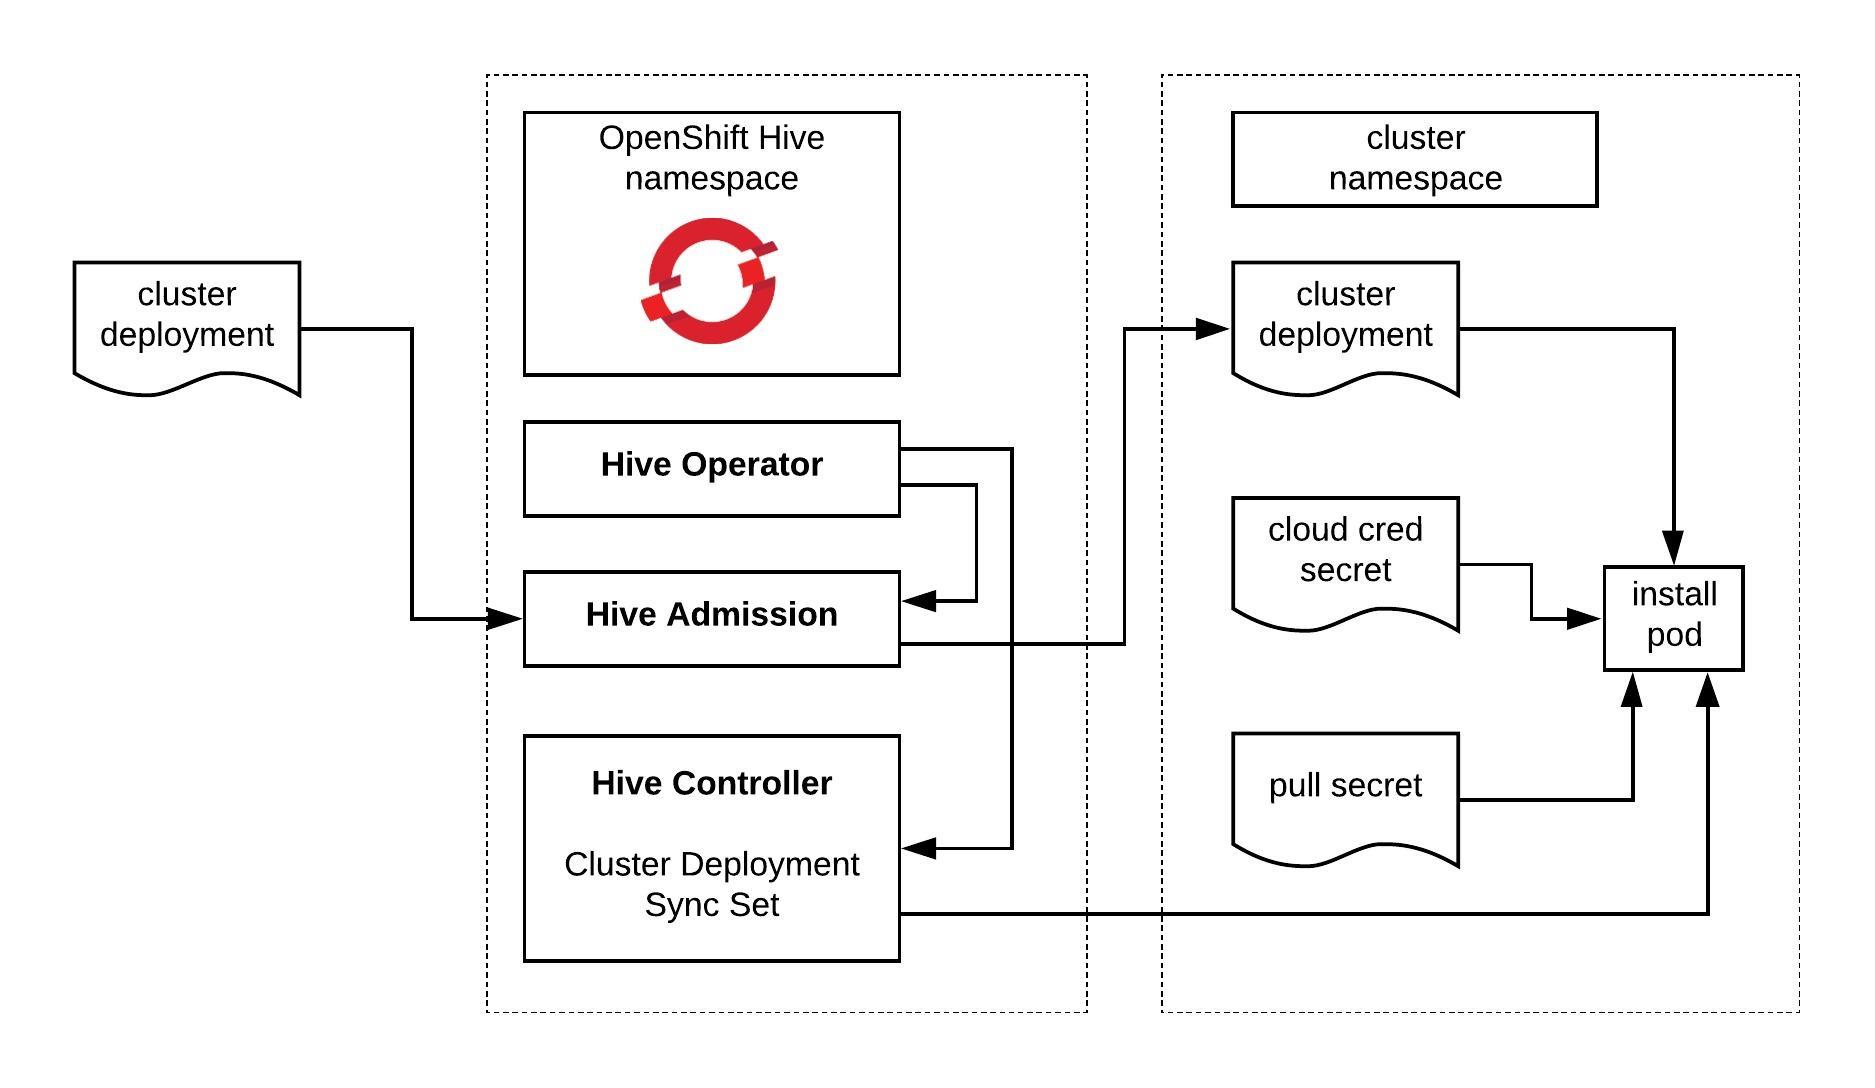
I am using OpenShift Hive for installing the OKD 4.9 single node cluster which requires Kubernetes to run the Hive operator.

Create a install-config secret:

$ kubectl create secret generic install-config -n okd --from-file=install-config.yaml=./okd-sno-install-config.yaml 

In the ClusterDeployment you specify AWS credentials, reference the install-config and the release image for OKD 4.9. Here you can find the latest OKD release image tags: https://quay.io/repository/openshift/okd

---
apiVersion: hive.openshift.io/v1
kind: ClusterDeployment
metadata:
  creationTimestamp: null
  name: okd-eu-west-1
  namespace: okd
spec:
  baseDomain: k8s.domain.com
  clusterName: okd-eu-west-1
  controlPlaneConfig:
    servingCertificates: {}
  installed: false
  platform:
    aws:
      credentialsSecretRef:
        name: aws-creds
      region: eu-west-1
  provisioning:
    releaseImage: quay.io/openshift/okd:4.9.0-0.okd-2022-01-14-230113
    installConfigSecretRef:
      name: install-config
  pullSecretRef:
    name: pull-secret

Apply the cluster deployment and wait for Hive to install the OpenShift/OKD cluster.

$ kubectl apply -f ./okd-clusterdeployment.yaml 

The provision pod will output the messages from the openshift-install binary and the cluster will be finish the installation in around 35mins.

$ kubectl logs okd-eu-west-1-0-8vhnf-provision-qrjrg -c hive -f
time="2022-01-15T15:51:32Z" level=debug msg="Couldn't find install logs provider environment variable. Skipping."
time="2022-01-15T15:51:32Z" level=debug msg="checking for SSH private key" installID=m2zcxsds
time="2022-01-15T15:51:32Z" level=info msg="unable to initialize host ssh key" error="cannot configure SSH agent as SSH_PRIV_KEY_PATH is unset or empty" installID=m2zcxsds
time="2022-01-15T15:51:32Z" level=info msg="waiting for files to be available: [/output/openshift-install /output/oc]" installID=m2zcxsds
time="2022-01-15T15:51:32Z" level=info msg="found file" installID=m2zcxsds path=/output/openshift-install
time="2022-01-15T15:51:32Z" level=info msg="found file" installID=m2zcxsds path=/output/oc
time="2022-01-15T15:51:32Z" level=info msg="all files found, ready to proceed" installID=m2zcxsds
time="2022-01-15T15:51:35Z" level=info msg="copied /output/openshift-install to /home/hive/openshift-install" installID=m2zcxsds
time="2022-01-15T15:51:36Z" level=info msg="copied /output/oc to /home/hive/oc" installID=m2zcxsds
time="2022-01-15T15:51:36Z" level=info msg="copying install-config.yaml" installID=m2zcxsds
time="2022-01-15T15:51:36Z" level=info msg="copied /installconfig/install-config.yaml to /output/install-config.yaml" installID=m2zcxsds
time="2022-01-15T15:51:36Z" level=info msg="waiting for files to be available: [/output/.openshift_install.log]" installID=m2zcxsds
time="2022-01-15T15:51:36Z" level=info msg="cleaning up from past install attempts" installID=m2zcxsds
time="2022-01-15T15:51:36Z" level=warning msg="skipping cleanup as no infra ID set" installID=m2zcxsds
time="2022-01-15T15:51:36Z" level=debug msg="object does not exist" installID=m2zcxsds object=okd/okd-eu-west-1-0-8vhnf-admin-kubeconfig
time="2022-01-15T15:51:36Z" level=debug msg="object does not exist" installID=m2zcxsds object=okd/okd-eu-west-1-0-8vhnf-admin-password
time="2022-01-15T15:51:36Z" level=info msg="generating assets" installID=m2zcxsds
time="2022-01-15T15:51:36Z" level=info msg="running openshift-install create manifests" installID=m2zcxsds
time="2022-01-15T15:51:36Z" level=info msg="running openshift-install binary" args="[create manifests]" installID=m2zcxsds
time="2022-01-15T15:51:37Z" level=info msg="found file" installID=m2zcxsds path=/output/.openshift_install.log
time="2022-01-15T15:51:37Z" level=info msg="all files found, ready to proceed" installID=m2zcxsds
time="2022-01-15T15:51:36Z" level=debug msg="OpenShift Installer unreleased-master-5011-geb132dae953888e736c382f1176c799c0e1aa49e-dirty"
time="2022-01-15T15:51:36Z" level=debug msg="Built from commit eb132dae953888e736c382f1176c799c0e1aa49e"
time="2022-01-15T15:51:36Z" level=debug msg="Fetching Master Machines..."
time="2022-01-15T15:51:36Z" level=debug msg="Loading Master Machines..."
time="2022-01-15T15:51:36Z" level=debug msg="  Loading Cluster ID..."
time="2022-01-15T15:51:36Z" level=debug msg="    Loading Install Config..."
time="2022-01-15T15:51:36Z" level=debug msg="      Loading SSH Key..."
time="2022-01-15T15:51:36Z" level=debug msg="      Loading Base Domain..."

....

time="2022-01-15T16:14:17Z" level=debug msg="Still waiting for the cluster to initialize: Working towards 4.9.0-0.okd-2022-01-14-230113"
time="2022-01-15T16:14:31Z" level=debug msg="Still waiting for the cluster to initialize: Working towards 4.9.0-0.okd-2022-01-14-230113: 529 of 744 done (71% complete)"
time="2022-01-15T16:14:32Z" level=debug msg="Still waiting for the cluster to initialize: Working towards 4.9.0-0.okd-2022-01-14-230113: 585 of 744 done (78% complete)"
time="2022-01-15T16:14:47Z" level=debug msg="Still waiting for the cluster to initialize: Working towards 4.9.0-0.okd-2022-01-14-230113: 702 of 744 done (94% complete)"
time="2022-01-15T16:15:02Z" level=debug msg="Still waiting for the cluster to initialize: Working towards 4.9.0-0.okd-2022-01-14-230113: 703 of 744 done (94% complete)"
time="2022-01-15T16:15:32Z" level=debug msg="Still waiting for the cluster to initialize: Working towards 4.9.0-0.okd-2022-01-14-230113: 708 of 744 done (95% complete)"
time="2022-01-15T16:15:47Z" level=debug msg="Still waiting for the cluster to initialize: Working towards 4.9.0-0.okd-2022-01-14-230113: 720 of 744 done (96% complete)"
time="2022-01-15T16:16:02Z" level=debug msg="Still waiting for the cluster to initialize: Working towards 4.9.0-0.okd-2022-01-14-230113: 722 of 744 done (97% complete)"
time="2022-01-15T16:17:17Z" level=debug msg="Still waiting for the cluster to initialize: Some cluster operators are still updating: authentication, console, monitoring"
time="2022-01-15T16:18:02Z" level=debug msg="Cluster is initialized"
time="2022-01-15T16:18:02Z" level=info msg="Waiting up to 10m0s for the openshift-console route to be created..."
time="2022-01-15T16:18:02Z" level=debug msg="Route found in openshift-console namespace: console"
time="2022-01-15T16:18:02Z" level=debug msg="OpenShift console route is admitted"
time="2022-01-15T16:18:02Z" level=info msg="Install complete!"
time="2022-01-15T16:18:02Z" level=info msg="To access the cluster as the system:admin user when using 'oc', run 'export KUBECONFIG=/output/auth/kubeconfig'"
time="2022-01-15T16:18:02Z" level=info msg="Access the OpenShift web-console here: https://console-openshift-console.apps.okd-eu-west-1.k8s.domain.com"
time="2022-01-15T16:18:02Z" level=debug msg="Time elapsed per stage:"
time="2022-01-15T16:18:02Z" level=debug msg="           cluster: 6m35s"
time="2022-01-15T16:18:02Z" level=debug msg="         bootstrap: 34s"
time="2022-01-15T16:18:02Z" level=debug msg="Bootstrap Complete: 12m46s"
time="2022-01-15T16:18:02Z" level=debug msg="               API: 4m2s"
time="2022-01-15T16:18:02Z" level=debug msg=" Bootstrap Destroy: 1m15s"
time="2022-01-15T16:18:02Z" level=debug msg=" Cluster Operators: 4m59s"
time="2022-01-15T16:18:02Z" level=info msg="Time elapsed: 26m13s"
time="2022-01-15T16:18:03Z" level=info msg="command completed successfully" installID=m2zcxsds
time="2022-01-15T16:18:03Z" level=info msg="saving installer output" installID=m2zcxsds
time="2022-01-15T16:18:03Z" level=info msg="install completed successfully" installID=m2zcxsds

Check the cluster deployment and get the kubeadmin password from the secret the Hive operator created during the installation and login to the web console:

$ kubectl get clusterdeployments
NAME            PLATFORM   REGION      CLUSTERTYPE   INSTALLED   INFRAID               VERSION   POWERSTATE   AGE
okd-eu-west-1   aws        eu-west-1                 true        okd-eu-west-1-l4g4n   4.9.0     Running      39m
$ kubectl get secrets okd-eu-west-1-0-8vhnf-admin-password -o jsonpath={.data.password} | base64 -d
EP5Fs-TZrKj-Vtst6-5GWZ9

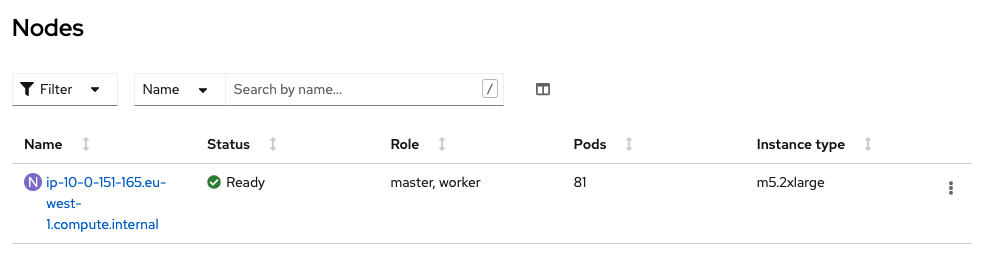
The cluster details show that the control plane runs as single master node:

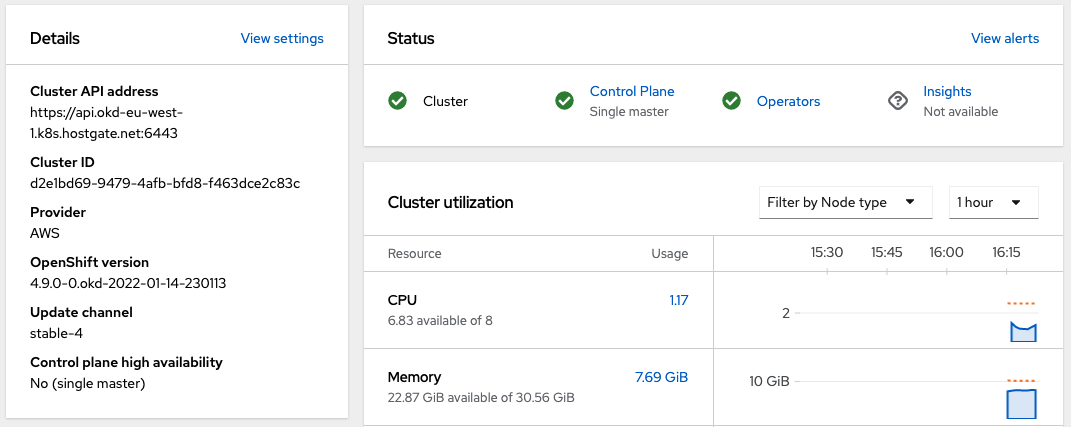
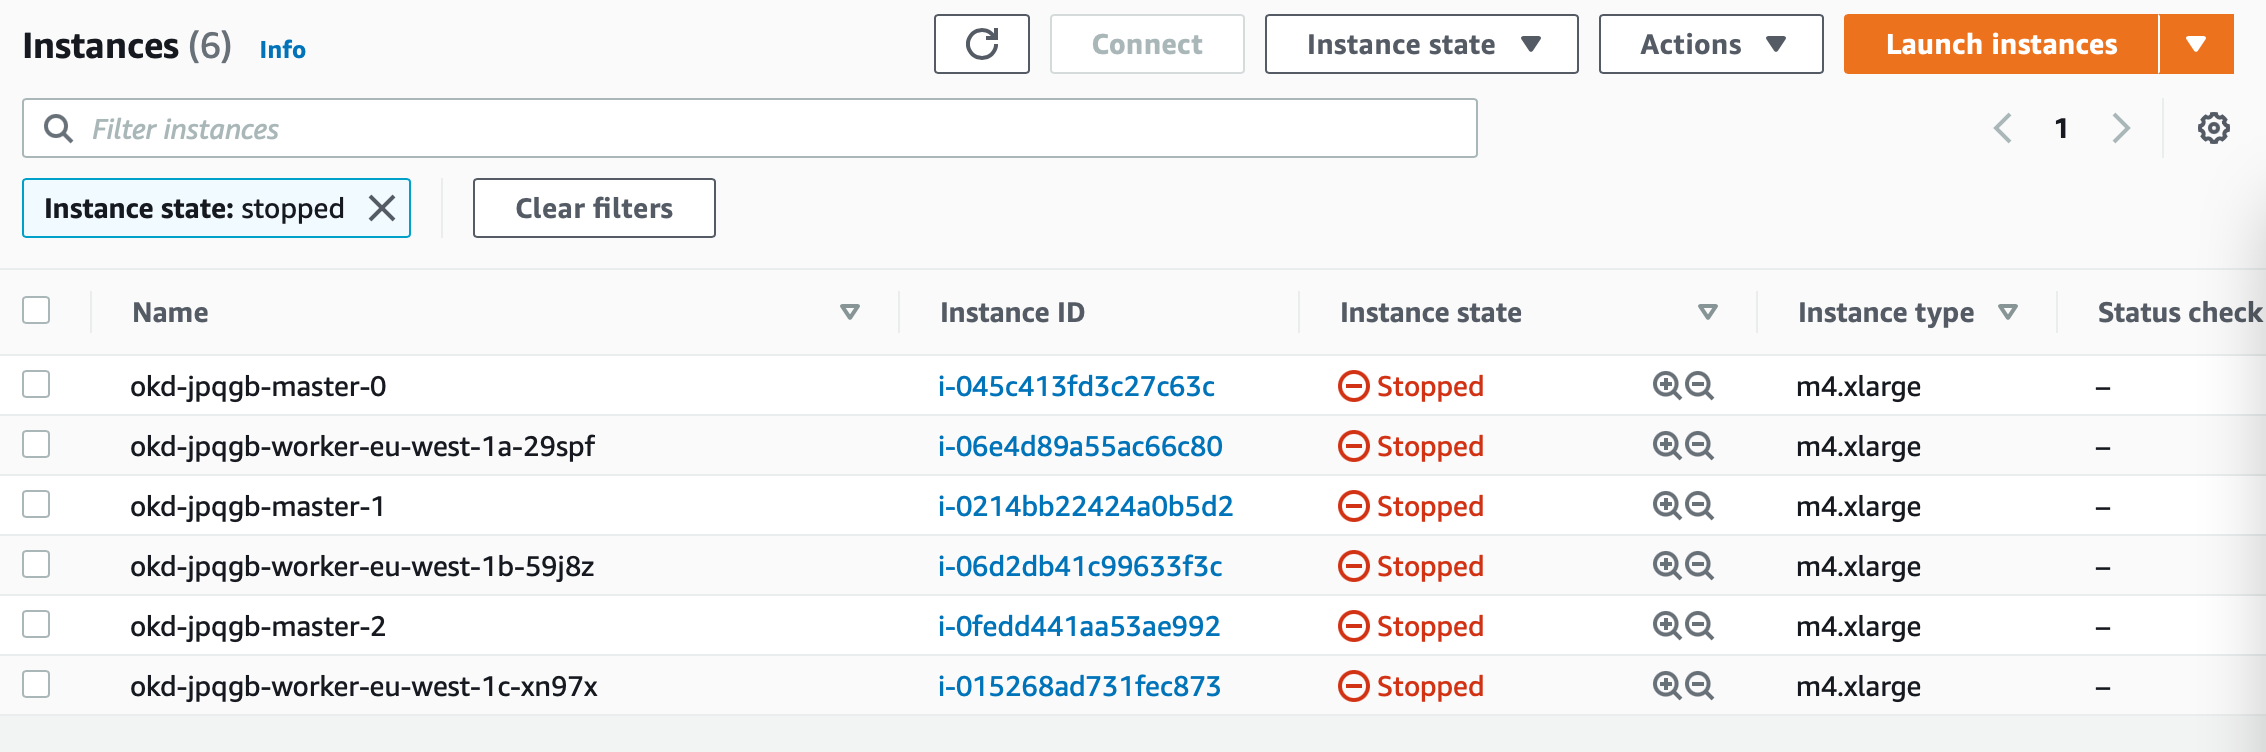
Your cluster has a single combined master/worker node:

These single node type clusters can be used in combination with OpenShift Hive ClusterPools to have an amount of pre-installed OpenShift/OKD clusters available for automated tests or as temporary development environment.

apiVersion: hive.openshift.io/v1
kind: ClusterPool
metadata:
  name: okd-eu-west-1-pool
  namespace: okd
spec:
  baseDomain: k8s.domain.com
  imageSetRef:
    name: 4.9.0-0.okd-2022-01-14
  installConfigSecretTemplateRef:
    name: install-config
  platform:
    aws:
      credentialsSecretRef:
        name: aws-creds
      region: eu-west-1
  pullSecretRef:
    name: pull-secret
  size: 3

The clusters are hibernating (shutdown) in the pool and will be powered on when you apply the ClusterClaim to allocate a cluster with a lifetime set to 8 hours. After 8 hours the cluster gets automatically deleted by the Hive operator.

apiVersion: hive.openshift.io/v1
kind: ClusterClaim
metadata:
  name: test-1
  namespace: okd
spec:
  clusterPoolName: okd-eu-west-1-pool
  lifetime: 8h

This sums up how to deploy a OpenShift/OKD 4.9 as single node cluster. I hope this article is helpful and leave a comment if you have questions.

OpenShift Hive v1.1.x – Latest updates & new features

Over a year has gone by since my first article about Getting started with OpenShift Hive and my talk at the RedHat OpenShift Gathering when the first stable OpenShift Hive v1 version got released. In between a lot has happened and OpenShift Hive v1.1.1 was released a few weeks ago. So I wanted to look into the new functionalities of OpenShift Hive.

  • Operator Lifecycle Manager (OLM) installation

Hive is now available through the Operator Hub community catalog and can be installed on both OpenShift or native Kubernetes cluster through the OLM. The install is straightforward by adding the operator-group and subscription manifests:

---
apiVersion: operators.coreos.com/v1alpha2
kind: OperatorGroup
metadata:
  name: operatorgroup
  namespace: hive
---
apiVersion: operators.coreos.com/v1alpha1
kind: Subscription
metadata:
  name: hive
  namespace: hive
spec:
  channel: alpha
  name: hive-operator
  source: operatorhubio-catalog
  sourceNamespace: olm

Alternatively the Hive subscription can be configured with a manual install plan. In this case the OLM will not automatically upgrade the Hive operator when a new version is released – I highly recommend this for production deployments!

---
apiVersion: operators.coreos.com/v1alpha1
kind: Subscription
metadata:
  name: hive
  namespace: hive
spec:
  channel: alpha
  name: hive-operator
  installPlanApproval: Manual
  source: operatorhubio-catalog
  sourceNamespace: olm

After a few seconds you see an install plan being added.

$ k get installplan
NAME            CSV                    APPROVAL   APPROVED
install-9drmh   hive-operator.v1.1.0   Manual     false

Edit the install plan and set approved value to true – the OLM will start and install or upgrade the Hive operator automatically.

...
spec:
  approval: Manual
  approved: true
  clusterServiceVersionNames:
  - hive-operator.v1.1.0
  generation: 1
...

After the Hive operator is installed you need to apply the Hiveconfig object for the operator to install all of the needed Hive components. On non-OpenShift installs (native Kubernetes) you still need to generate Hiveadmission certificates for the admission controller pods to start otherwise they are missing the hiveadmission-serving-cert secret.

  • Hiveconfig – Velero backup and delete protection

There are a few small but also very useful changes in the Hiveconfig object. You can now enable the deleteProtection option which prevents administrators from accidental deletions of ClusterDeployments or SyncSets. Another great addition is that you can enable automatic configuration of Velero to backup your cluster namespaces, meaning you’re not required to configure backups separately.

---
apiVersion: hive.openshift.io/v1
kind: HiveConfig
metadata:
  name: hive
spec:
  logLevel: info
  targetNamespace: hive
  deleteProtection: enabled
  backup:
    velero:
      enabled: true
      namespace: velero

Backups are configured in the Velero namespace as specified in the Hiveconfig.

$ k get backups -n velero
NAME                              AGE
backup-okd-2021-03-26t11-57-32z   3h12m
backup-okd-2021-03-26t12-00-32z   3h9m
backup-okd-2021-03-26t12-35-44z   154m
backup-okd-2021-03-26t12-38-44z   151m
...

With the deletion protection enabled in the hiveconfig, the controller automatically adds the annotation hive.openshift.io/protected-delete: “true” to all resources and prevents these from accidental deletions:

$ k delete cd okd --wait=0
The ClusterDeployment "okd" is invalid: metadata.annotations.hive.openshift.io/protected-delete: Invalid value: "true": cannot delete while annotation is present
  • ClusterSync and Scaling Hive controller

To check applied resources through SyncSets and SelectorSyncSets, where Hive has previously used Syncsetnstance but these no longer exists. This now has move to ClusterSync to collect status information about applied resources:

$ k get clustersync okd -o yaml
apiVersion: hiveinternal.openshift.io/v1alpha1
kind: ClusterSync
metadata:
  name: okd
  namespace: okd
spec: {}
status:
  conditions:
  - lastProbeTime: "2021-03-26T16:13:57Z"
    lastTransitionTime: "2021-03-26T16:13:57Z"
    message: All SyncSets and SelectorSyncSets have been applied to the cluster
    reason: Success
    status: "False"
    type: Failed
  firstSuccessTime: "2021-03-26T16:13:57Z"
...

It is also possible to horizontally scale the Hive controller to change the synchronisation frequency for running larger OpenShift deployments.

---
apiVersion: hive.openshift.io/v1
kind: HiveConfig
metadata:
  name: hive
spec:
  logLevel: info
  targetNamespace: hive
  deleteProtection: enabled
  backup:
    velero:
      enabled: true
      namespace: velero
  controllersConfig:
    controllers:
    - config:
        concurrentReconciles: 10
        replicas: 3
      name: clustersync

Please checkout the scaling test script which I found in the Github repo, you can simulate fake clusters by adding the annotation “hive.openshift.io/fake-cluster=true” to your ClusterDeployment.

  • Hibernating clusters

RedHat introduced that you can hibernate (shutdown) clusters in OpenShift 4.5 when they are not needed and switch them easily back on when you need them. This is now possible with OpenShift Hive: you can hibernate and change the power state of a cluster deployment.

$ kubectl patch cd okd --type='merge' -p $'spec:\n powerState: Hibernating'

Checking the cluster deployment and power state change to stopping.

$ kubectl get cd
NAME   PLATFORM   REGION      CLUSTERTYPE   INSTALLED   INFRAID     VERSION   POWERSTATE   AGE
okd    aws        eu-west-1                 true        okd-jpqgb   4.7.0     Stopping     44m

After a couple of minutes the power state of the cluster nodes will change to hibernating.

$ kubectl get cd
NAME   PLATFORM   REGION      CLUSTERTYPE   INSTALLED   INFRAID     VERSION   POWERSTATE    AGE
okd    aws        eu-west-1                 true        okd-jpqgb   4.7.0     Hibernating   47m

In the AWS console you see the cluster instances as stopped.

When turning the cluster back online, change the power state in the cluster deployment to running.

$ kubectl patch cd okd --type='merge' -p $'spec:\n powerState: Running'

Again the power state changes to resuming.

$ kubectl get cd
NAME   PLATFORM   REGION      CLUSTERTYPE   INSTALLED   INFRAID     VERSION   POWERSTATE   AGE
okd    aws        eu-west-1                 true        okd-jpqgb   4.7.0     Resuming     49m

A few minutes later the cluster changes to running and is ready to use again.

$ k get cd
NAME   PLATFORM   REGION      CLUSTERTYPE   INSTALLED   INFRAID     VERSION   POWERSTATE   AGE
okd    aws        eu-west-1                 true        okd-jpqgb   4.7.0     Running      61m
  • Cluster pools

Cluster pools is something which came together with the hibernating feature which allows you to pre-provision OpenShift clusters without actually allocating them and after the provisioning they will hibernate until you claim a cluster. Again a nice feature and ideal use-case for ephemeral type development or integration test environments which allows you to have clusters ready to go to claim when needed and dispose them afterwards.

Create a ClusterPool custom resource which is similar to a cluster deployment.

apiVersion: hive.openshift.io/v1
kind: ClusterPool
metadata:
  name: okd-eu-west-1
  namespace: hive
spec:
  baseDomain: okd.domain.com
  imageSetRef:
    name: okd-4.7-imageset
  installConfigSecretTemplateRef: 
    name: install-config
  skipMachinePools: true
  platform:
    aws:
      credentialsSecretRef:
        name: aws-creds
      region: eu-west-1
  pullSecretRef:
    name: pull-secret
  size: 3

To claim a cluster from a pool, apply the ClusterClaim resource.

apiVersion: hive.openshift.io/v1
kind: ClusterClaim
metadata:
  name: okd-claim
  namespace: hive
spec:
  clusterPoolName: okd-eu-west-1
  lifetime: 8h

I haven’t tested this yet but will definitely start using this in the coming weeks. Have a look at the Hive documentation on using ClusterPool and ClusterClaim.

  • Cluster relocation

For me, having used OpenShift Hive for over one and half years to run OpenShift 4 cluster, this is a very useful functionality because at some point you might need to rebuild or move your management services to a new Hive cluster. The ClusterRelocator object gives you the option to do this.

$ kubectl create secret generic new-hive-cluster-kubeconfig -n hive --from-file=kubeconfig=./new-hive-cluster.kubeconfig

Create the ClusterRelocator object and specify the kubeconfig of the remote Hive cluster, and also add a clusterDeploymentSelector:

apiVersion: hive.openshift.io/v1
kind: ClusterRelocate
metadata:
  name: migrate
spec:
  kubeconfigSecretRef:
    namespace: hive
    name: new-hive-cluster-kubeconfig
  clusterDeploymentSelector:
    matchLabels:
      migrate: cluster

To move cluster deployments, add the label migrate=cluster to your OpenShift clusters you want to move.

$ kubectl label clusterdeployment okd migrate=cluster

The cluster deployment will move to the new Hive cluster and will be removed from the source Hive cluster without the de-provision. It’s important to keep in mind that you need to copy any other resources you need, such as secrets, syncsets, selectorsyncsets and syncidentiyproviders, before moving the clusters. Take a look at the Hive documentation for the exact steps.

  • Useful annotation

Pause SyncSets by adding the annotation “hive.openshift.io/syncset-pause=true” to the clusterdeployment which stops the reconcile of defined resources and great for troubleshooting.

In a cluster deployment you can set the option to preserve cluster on delete which allows the user to disconnect a cluster from Hive without de-provisioning it.

$ kubectl patch cd okd --type='merge' -p $'spec:\n preserveOnDelete: true'

This sums up the new features and functionalities you can use with the latest OpenShift Hive version.

OpenShift Hive – Deploy Single Node (All-in-One) OKD Cluster on AWS

The concept of a single-node or All-in-One OpenShift / Kubernetes cluster isn’t something new, years ago when I was working with OpenShift 3 and before that with native Kubernetes, we were using single-node clusters as ephemeral development environment, integrations testing for pull-request or platform releases. It was only annoying because this required complex Jenkins pipelines, provision the node first, then install prerequisites and run the openshift-ansible installer playbook. Not always reliable and not a great experience but it done the job.

This is possible as well with the new OpenShift/OKD 4 version and with the help from OpenShift Hive. The experience is more reliable and quicker than previously and I don’t need to worry about de-provisioning, I will let Hive delete the cluster after a few hours automatically.

It requires a few simple modifications in the install-config. You need to add the Availability Zone you want where the instance will be created. When doing this the VPC will only have two subnets, one public and one private subnet in eu-west-1. You can also install the single-node cluster into an existing VPC you just have to specify subnet ids. Change the compute worker node replicas zero and control-plane replicas to one. Make sure to have an instance size with enough CPU and memory for all OpenShift components because they need to fit onto the single node. The rest of the install-config is pretty much standard.

---
apiVersion: v1
baseDomain: k8s.domain.com
compute:
- name: worker
  platform:
    aws:
      zones:
      - eu-west-1a
      rootVolume:
        iops: 100
        size: 22
        type: gp2
      type: r4.xlarge
  replicas: 0
controlPlane:
  name: master
  platform:
    aws:
      zones:
      - eu-west-1a
      rootVolume:
        iops: 100
        size: 22
        type: gp2
      type: r5.2xlarge
  replicas: 1
metadata:
  creationTimestamp: null
  name: okd-aio
networking:
  clusterNetwork:
  - cidr: 10.128.0.0/14
    hostPrefix: 23
  machineCIDR: 10.0.0.0/16
  networkType: OpenShiftSDN
  serviceNetwork:
  - 172.30.0.0/16
platform:
  aws:
    region: eu-west-1
pullSecret: ""
sshKey: ""

Create a new install-config secret for the cluster.

kubectl create secret generic install-config-aio -n okd --from-file=install-config.yaml=./install-config-aio.yaml

We will be using OpenShift Hive for the cluster deployment because the provision is more simplified and Hive can also apply any configuration using SyncSets or SelectorSyncSets which is needed. Add the annotation hive.openshift.io/delete-after: “2h” and Hive will automatically delete the cluster after 4 hours.

---
apiVersion: hive.openshift.io/v1
kind: ClusterDeployment
metadata:
  creationTimestamp: null
  annotations:
    hive.openshift.io/delete-after: "2h"
  name: okd-aio 
  namespace: okd
spec:
  baseDomain: k8s.domain.com
  clusterName: okd-aio
  controlPlaneConfig:
    servingCertificates: {}
  installed: false
  platform:
    aws:
      credentialsSecretRef:
        name: aws-creds
      region: eu-west-1
  provisioning:
    releaseImage: quay.io/openshift/okd:4.5.0-0.okd-2020-07-14-153706-ga
    installConfigSecretRef:
      name: install-config-aio
  pullSecretRef:
    name: pull-secret
  sshKey:
    name: ssh-key
status:
  clusterVersionStatus:
    availableUpdates: null
    desired:
      force: false
      image: ""
      version: ""
    observedGeneration: 0
    versionHash: ""

Apply the cluster deployment to your clusters namespace.

kubectl apply -f  ./clusterdeployment-aio.yaml

This is slightly faster than provision 6 nodes cluster and will take around 30mins until your ephemeral test cluster is ready to use.

Getting started with Kubernetes Operators in Go

In the past few weeks I started to learn Go and beginners like me can make quick progress once you understand the structure and some basics about the programming language. I felt that from all the learning and reading I’ve done on Go and Kubernetes operators, I had enough knowledge to start writing my own Kubernetes operator in Go.

At the beginning of last year, RedHat released the operator-sdk which helps to create the scaffolding for writing your own operators in Ansible, Helm or natively in Go. There has been quite a few changes along the way around the operator-sdk and it is maturing a lot over the course of the past year.

The instructions on how to install Go can be found on the Go website and we need the latest version of the operator-sdk:

$ wget https://github.com/operator-framework/operator-sdk/releases/download/v1.2.0/operator-sdk-v1.2.0-x86_64-linux-gnu
$ mv operator-sdk-v1.2.0-x86_64-linux-gnu operator-sdk
$ sudo mv operator-sdk /usr/local/bin/

Create a new folder and start to initialise the project. You see that I have already set the option --domain so all API groups will be <-group->.helloworld.io. The --repo option allows me to create the project folder outside of my $GOPATH environment. Infos about the folder structure you can find in the Kubebuilder documentation:

$ mkdir k8s-helloworld-operator
$ cd k8s-helloworld-operator
$ operator-sdk init --domain=helloworld.io --repo=github.com/berndonline/k8s-helloworld-operator

The last thing we need before we start writing the operator is to create a new API and Controller and this will scaffold the operator API at api/v1alpha1/operator_types.go and the controller at controllers/operator_controller.go.

$ operator-sdk create api --group app --version v1alpha1 --kind Operator
Create Resource [y/n]
y
Create Controller [y/n]
y
Writing scaffold for you to edit...
api/v1alpha1/operator_types.go
controllers/operator_controller.go
...
  • Define your API

Define your API for the operator custom resource by editing the Go type definitions at api/v1alpha1/operator_types.go

// OperatorSpec defines the desired state of Operator
type OperatorSpec struct {
	// INSERT ADDITIONAL SPEC FIELDS - desired state of cluster
	// Important: Run "make" to regenerate code after modifying this file

	// Foo is an example field of Operator. Edit Operator_types.go to remove/update
	Size     int32  `json:"size"`
	Image    string `json:"image"`
	Response string `json:"response"`
}
// OperatorStatus defines the observed state of Operator
type OperatorStatus struct {
	// INSERT ADDITIONAL STATUS FIELD - define observed state of cluster
	// Important: Run "make" to regenerate code after modifying this file
	Nodes []string `json:"nodes"`
}

// Operator is the Schema for the operators API
// +kubebuilder:subresource:status
type Operator struct {
	metav1.TypeMeta   `json:",inline"`
	metav1.ObjectMeta `json:"metadata,omitempty"`

	Spec   OperatorSpec   `json:"spec,omitempty"`
	Status OperatorStatus `json:"status,omitempty"`
}

After modifying the _types.go file you always need to run the following command to update the generated code for that resource type:

$ make generate 
/home/ubuntu/.go/bin/controller-gen object:headerFile="hack/boilerplate.go.txt" paths="./..."
  • Generate Custom Resource Definition (CRD) manifests

In the previous step we defined the API with spec and status fields of the CRD manifests, which can be generated and updated with the following command:

$ make manifests
/home/ubuntu/.go/bin/controller-gen "crd:trivialVersions=true" rbac:roleName=manager-role webhook paths="./..." output:crd:artifacts:config=config/crd/bases

This makefile will invoke the controller-gen to generate the CRD manifests at config/crd/bases/app.helloworld.io_operators.yaml and below you see my custom resource example for the operator:

apiVersion: app.helloworld.io/v1alpha1
kind: Operator
metadata:
  name: operator-sample
spec:
  size: 1
  response: "Hello, World!"
  image: "ghcr.io/berndonline/k8s/go-helloworld:latest"
  • Controller

In the beginning when I created the API, the operator-sdk automatically created the controller file for me at controllers/operator_controller.go which we now start to modify and add the Go code. I will not go into every detail because the different resources you will create will all look very similar and repeat like you will see in example code. I will mainly focus on the Deployment for my Helloworld container image which I want to deploy using the operator.

Let’s start looking at the deploymentForOperator function which defines and returns the Kubernetes Deployment object. You see there that I invoke an imported Go packages like &appsv1.Deployment and the import is defined at the top of the controller file. You can find details about this in the Go Doc reference: godoc.org/k8s.io/api/apps/v1

// deploymentForOperator returns a operator Deployment object
func (r *OperatorReconciler) deploymentForOperator(m *appv1alpha1.Operator) *appsv1.Deployment {
	ls := labelsForOperator(m.Name)
	replicas := m.Spec.Size

	dep := &appsv1.Deployment{
		ObjectMeta: metav1.ObjectMeta{
			Name:      m.Name,
			Namespace: m.Namespace,
		},
		Spec: appsv1.DeploymentSpec{
			Replicas: &replicas,
			Selector: &metav1.LabelSelector{
				MatchLabels: ls,
			},
			Template: corev1.PodTemplateSpec{
				ObjectMeta: metav1.ObjectMeta{
					Labels: ls,
				},
				Spec: corev1.PodSpec{
					Containers: []corev1.Container{{
						Image:           m.Spec.Image,
						ImagePullPolicy: "Always",
						Name:            "helloworld",
						Ports: []corev1.ContainerPort{{
							ContainerPort: 8080,
							Name:          "operator",
						}},
						Env: []corev1.EnvVar{{
							Name:  "RESPONSE",
							Value: m.Spec.Response,
						}},
						EnvFrom: []corev1.EnvFromSource{{
							ConfigMapRef: &corev1.ConfigMapEnvSource{
								LocalObjectReference: corev1.LocalObjectReference{
									Name: m.Name,
								},
							},
						}},
						VolumeMounts: []corev1.VolumeMount{{
							Name:      m.Name,
							ReadOnly:  true,
							MountPath: "/helloworld/",
						}},
					}},
					Volumes: []corev1.Volume{{
						Name: m.Name,
						VolumeSource: corev1.VolumeSource{
							ConfigMap: &corev1.ConfigMapVolumeSource{
								LocalObjectReference: corev1.LocalObjectReference{
									Name: m.Name,
								},
							},
						},
					}},
				},
			},
		},
	}

	// Set Operator instance as the owner and controller
	ctrl.SetControllerReference(m, dep, r.Scheme)
	return dep
}

We have defined the deploymentForOperator function and now we can look into the Reconcile function and add the step to check if the deployment already exists and, if not, to create the new deployment:

// Check if the deployment already exists, if not create a new one
found := &appsv1.Deployment{}
err = r.Get(ctx, types.NamespacedName{Name: operator.Name, Namespace: operator.Namespace}, found)
if err != nil && errors.IsNotFound(err) {
	// Define a new deployment
	dep := r.deploymentForOperator(operator)
	log.Info("Creating a new Deployment", "Deployment.Namespace", dep.Namespace, "Deployment.Name", dep.Name)
	err = r.Create(ctx, dep)
	if err != nil {
		log.Error(err, "Failed to create new Deployment", "Deployment.Namespace", dep.Namespace, "Deployment.Name", dep.Name)
		return ctrl.Result{}, err
	}
	// Deployment created successfully - return and requeue
	return ctrl.Result{Requeue: true}, nil
} else if err != nil {
	log.Error(err, "Failed to get Deployment")
	return ctrl.Result{}, err
}

Unfortunately this isn’t enough because this will only check if the deployment exists or not and create a new deployment, but it will not update the deployment if the custom resource is changed.

We need to add two more steps to check if the created Deployment Spec.Template matches the Spec.Template from the  deploymentForOperator function and the Deployment Spec.Replicas the defined size from the custom resource. I will make use of the defined variable found := &appsv1.Deployment{} from the previous step when I checked if the deployment exists.

// Check if the deployment Spec.Template, matches the found Spec.Template
deploy := r.deploymentForOperator(operator)
if !equality.Semantic.DeepDerivative(deploy.Spec.Template, found.Spec.Template) {
	found = deploy
	log.Info("Updating Deployment", "Deployment.Namespace", found.Namespace, "Deployment.Name", found.Name)
	err := r.Update(ctx, found)
	if err != nil {
		log.Error(err, "Failed to update Deployment", "Deployment.Namespace", found.Namespace, "Deployment.Name", found.Name)
		return ctrl.Result{}, err
	}
	return ctrl.Result{Requeue: true}, nil
}

// Ensure the deployment size is the same as the spec
size := operator.Spec.Size
if *found.Spec.Replicas != size {
	found.Spec.Replicas = &size
	err = r.Update(ctx, found)
	if err != nil {
		log.Error(err, "Failed to update Deployment", "Deployment.Namespace", found.Namespace, "Deployment.Name", found.Name)
		return ctrl.Result{}, err
	}
	// Spec updated - return and requeue
	return ctrl.Result{Requeue: true}, nil
}

The SetupWithManager() function in controllers/operator_controller.go specifies how the controller is built to watch a custom resource and other resources that are owned and managed by that controller.

func (r *OperatorReconciler) SetupWithManager(mgr ctrl.Manager) error {
	return ctrl.NewControllerManagedBy(mgr).
		For(&appv1alpha1.Operator{}).
		Owns(&appsv1.Deployment{}).
		Owns(&corev1.ConfigMap{}).
		Owns(&corev1.Service{}).
		Owns(&networkingv1beta1.Ingress{}).
		Complete(r)
}

Basically that’s all I need to write for the controller to deploy my Helloworld container image using an Kubernetes operator. In my code example you will find that I also create a Kubernetes Service, Ingress and ConfigMap but you see that this mostly repeats what I have done with the Deployment object.

  • RBAC permissions

Before we can start running the operator, we need to define the RBAC permissions the controller needs to interact with the resources it manages otherwise your controller will not work. These are specified via [RBAC markers] like these:

// +kubebuilder:rbac:groups=app.helloworld.io,resources=operators,verbs=get;list;watch;create;update;patch;delete
// +kubebuilder:rbac:groups=app.helloworld.io,resources=operators/status,verbs=get;update;patch
// +kubebuilder:rbac:groups=app.helloworld.io,resources=operators/finalizers,verbs=update
// +kubebuilder:rbac:groups=apps,resources=deployments,verbs=get;list;watch;create;update;patch;delete
// +kubebuilder:rbac:groups=core,resources=services,verbs=get;list;watch;create;update;patch;delete
// +kubebuilder:rbac:groups=core,resources=configmaps,verbs=get;list;watch;create;update;patch;delete
// +kubebuilder:rbac:groups=networking.k8s.io,resources=ingresses,verbs=get;list;watch;create;update;patch;delete
// +kubebuilder:rbac:groups=core,resources=pods,verbs=get;list;watch

The ClusterRole manifest at config/rbac/role.yaml is generated from the above markers via controller-gen with the following command:

$ make manifests 
/home/ubuntu/.go/bin/controller-gen "crd:trivialVersions=true" rbac:roleName=manager-role webhook paths="./..." output:crd:artifacts:config=config/crd/bases
  • Running the Operator

We need a Kubernetes cluster and admin privileges to run the operator. I will use Kind which will run a lightweight Kubernetes cluster in your local Docker engine, which is all I need to run and test my Helloworld operator:

$ ./scripts/create-kind-cluster.sh 
Creating cluster "kind" ...
 ✓ Ensuring node image (kindest/node:v1.19.1) 🖼 
 ✓ Preparing nodes 📦  
 ✓ Writing configuration 📜 
 ✓ Starting control-plane 🕹️ 
 ✓ Installing CNI 🔌 
 ✓ Installing StorageClass 💾 
Set kubectl context to "kind-kind"
You can now use your cluster with:

kubectl cluster-info --context kind-kind

Have a question, bug, or feature request? Let us know! https://kind.sigs.k8s.io/#community 🙂

Before running the operator the custom resource Definition must be registered with the Kubernetes apiserver:

$ make install
/home/ubuntu/.go/bin/controller-gen "crd:trivialVersions=true" rbac:roleName=manager-role webhook paths="./..." output:crd:artifacts:config=config/crd/bases
/usr/bin/kustomize build config/crd | kubectl apply -f -
Warning: apiextensions.k8s.io/v1beta1 CustomResourceDefinition is deprecated in v1.16+, unavailable in v1.22+; use apiextensions.k8s.io/v1 CustomResourceDefinition
customresourcedefinition.apiextensions.k8s.io/operators.app.helloworld.io created

We can now run the operator locally on my workstation:

$ make run
/home/ubuntu/.go/bin/controller-gen object:headerFile="hack/boilerplate.go.txt" paths="./..."
go fmt ./...
go vet ./...
/home/ubuntu/.go/bin/controller-gen "crd:trivialVersions=true" rbac:roleName=manager-role webhook paths="./..." output:crd:artifacts:config=config/crd/bases
go run ./main.go
2020-11-22T18:12:49.023Z	INFO	controller-runtime.metrics	metrics server is starting to listen	{"addr": ":8080"}
2020-11-22T18:12:49.024Z	INFO	setup	starting manager
2020-11-22T18:12:49.025Z	INFO	controller-runtime.manager	starting metrics server	{"path": "/metrics"}
2020-11-22T18:12:49.025Z	INFO	controller	Starting EventSource	{"reconcilerGroup": "app.helloworld.io", "reconcilerKind": "Operator", "controller": "operator", "source": "kind source: /, Kind="}
2020-11-22T18:12:49.126Z	INFO	controller	Starting EventSource	{"reconcilerGroup": "app.helloworld.io", "reconcilerKind": "Operator", "controller": "operator", "source": "kind source: /, Kind="}
2020-11-22T18:12:49.226Z	INFO	controller	Starting EventSource	{"reconcilerGroup": "app.helloworld.io", "reconcilerKind": "Operator", "controller": "operator", "source": "kind source: /, Kind="}
2020-11-22T18:12:49.327Z	INFO	controller	Starting EventSource	{"reconcilerGroup": "app.helloworld.io", "reconcilerKind": "Operator", "controller": "operator", "source": "kind source: /, Kind="}
2020-11-22T18:12:49.428Z	INFO	controller	Starting EventSource	{"reconcilerGroup": "app.helloworld.io", "reconcilerKind": "Operator", "controller": "operator", "source": "kind source: /, Kind="}
2020-11-22T18:12:49.528Z	INFO	controller	Starting Controller	{"reconcilerGroup": "app.helloworld.io", "reconcilerKind": "Operator", "controller": "operator"}
2020-11-22T18:12:49.528Z	INFO	controller	Starting workers	{"reconcilerGroup": "app.helloworld.io", "reconcilerKind": "Operator", "controller": "operator", "worker count": 1}

Let’s open a new terminal and apply the custom resource example:

$ kubectl apply -f config/samples/app_v1alpha1_operator.yaml 
operator.app.helloworld.io/operator-sample created

Going back to the terminal where the operator is running, you see the log messages that it invoke the different functions to deploy the defined resource objects:

2020-11-22T18:15:30.412Z	INFO	controllers.Operator	Creating a new Deployment	{"operator": "default/operator-sample", "Deployment.Namespace": "default", "Deployment.Name": "operator-sample"}
2020-11-22T18:15:30.446Z	INFO	controllers.Operator	Creating a new ConfigMap	{"operator": "default/operator-sample", "ConfigMap.Namespace": "default", "ConfigMap.Name": "operator-sample"}
2020-11-22T18:15:30.453Z	INFO	controllers.Operator	Creating a new Service	{"operator": "default/operator-sample", "Service.Namespace": "default", "Service.Name": "operator-sample"}
2020-11-22T18:15:30.470Z	INFO	controllers.Operator	Creating a new Ingress	{"operator": "default/operator-sample", "Ingress.Namespace": "default", "Ingress.Name": "operator-sample"}
2020-11-22T18:15:30.927Z	DEBUG	controller	Successfully Reconciled	{"reconcilerGroup": "app.helloworld.io", "reconcilerKind": "Operator", "controller": "operator", "name": "operator-sample", "namespace": "default"}
2020-11-22T18:15:33.776Z	DEBUG	controller	Successfully Reconciled	{"reconcilerGroup": "app.helloworld.io", "reconcilerKind": "Operator", "controller": "operator", "name": "operator-sample", "namespace": "default"}
2020-11-22T18:15:35.181Z	DEBUG	controller	Successfully Reconciled	{"reconcilerGroup": "app.helloworld.io", "reconcilerKind": "Operator", "controller": "operator", "name": "operator-sample", "namespace": "default"}

In the default namespace where I applied the custom resource you will see the deployed resources by the operator:

$ kubectl get operators.app.helloworld.io 
NAME              AGE
operator-sample   6m11s
$ kubectl get all
NAME                                   READY   STATUS    RESTARTS   AGE
pod/operator-sample-767897c4b9-8zwsd   1/1     Running   0          2m59s

NAME                      TYPE        CLUSTER-IP      EXTERNAL-IP   PORT(S)    AGE
service/kubernetes        ClusterIP   10.96.0.1               443/TCP    29m
service/operator-sample   ClusterIP   10.96.199.188           8080/TCP   2m59s

NAME                              READY   UP-TO-DATE   AVAILABLE   AGE
deployment.apps/operator-sample   1/1     1            1           2m59s

NAME                                         DESIRED   CURRENT   READY   AGE
replicaset.apps/operator-sample-767897c4b9   1         1         1       2m59s

There is not much else to do other than to build the operator image and push to an image registry so that I can run the operator on a Kubernetes cluster.

$ make docker-build IMG=ghcr.io/berndonline/k8s/helloworld-operator:latest
$ make docker-push IMG=ghcr.io/berndonline/k8s/helloworld-operator:latest
$ kustomize build config/default | kubectl apply -f -

I hope this article is useful for getting you started on writing your own Kubernetes operator in Go.

Getting started with OpenShift Hive

If you don’t know OpenShift Hive I recommend having a look at the video of my talk at RedHat OpenShift Commons about OpenShift Hive where I also talk about how you can provision and manage the lifecycle of OpenShift 4 clusters using the Kubernetes API and the OpenShift Hive operator.

The Hive operator has three main components the admission controller,  the Hive controller and the Hive operator itself. For more information about the Hive architecture visit the Hive docs:

You can use an OpenShift or native Kubernetes cluster to run the operator, in my case I use a EKS cluster. Let’s go through the prerequisites which are required to generate the manifests and the hiveutil:

$ curl -s "https://raw.githubusercontent.com/\
> kubernetes-sigs/kustomize/master/hack/install_kustomize.sh"  | bash
$ sudo mv ./kustomize /usr/bin/
$ wget https://dl.google.com/go/go1.13.3.linux-amd64.tar.gz
$ tar -xvf go1.13.3.linux-amd64.tar.gz
$ sudo mv go /usr/local

To setup the Go environment copy the content below and add to your .profile:

export GOPATH="${HOME}/.go"
export PATH="$PATH:/usr/local/go/bin"
export PATH="$PATH:${GOPATH}/bin:${GOROOT}/bin"

Continue with installing the Go dependencies and clone the OpenShift Hive Github repository:

$ mkdir -p ~/.go/src/github.com/openshift/
$ go get github.com/golang/mock/mockgen
$ go get github.com/golang/mock/gomock
$ go get github.com/cloudflare/cfssl/cmd/cfssl
$ go get github.com/cloudflare/cfssl/cmd/cfssljson
$ cd ~/.go/src/github.com/openshift/
$ git clone https://github.com/openshift/hive.git
$ cd hive/
$ git checkout remotes/origin/master

Before we run make deploy I would recommend modifying the Makefile that we only generate the Hive manifests without deploying them to Kubernetes:

$ sed -i -e 's#oc apply -f config/crds# #' -e 's#kustomize build overlays/deploy | oc apply -f -#kustomize build overlays/deploy > hive.yaml#' Makefile
$ make deploy
# The apis-path is explicitly specified so that CRDs are not created for v1alpha1
go run tools/vendor/sigs.k8s.io/controller-tools/cmd/controller-gen/main.go crd --apis-path=pkg/apis/hive/v1
CRD files generated, files can be found under path /home/ubuntu/.go/src/github.com/openshift/hive/config/crds.
go generate ./pkg/... ./cmd/...
hack/update-bindata.sh
# Deploy the operator manifests:
mkdir -p overlays/deploy
cp overlays/template/kustomization.yaml overlays/deploy
cd overlays/deploy && kustomize edit set image registry.svc.ci.openshift.org/openshift/hive-v4.0:hive=registry.svc.ci.openshift.org/openshift/hivev1:hive
kustomize build overlays/deploy > hive.yaml
rm -rf overlays/deploy

Quick look at the content of the hive.yaml manifest:

$ cat hive.yaml
apiVersion: v1
kind: Namespace
metadata:
  name: hive
---
apiVersion: v1
kind: ServiceAccount
metadata:
  name: hive-operator
  namespace: hive

...

---
apiVersion: apps/v1
kind: Deployment
metadata:
  labels:
    control-plane: hive-operator
    controller-tools.k8s.io: "1.0"
  name: hive-operator
  namespace: hive
spec:
  replicas: 1
  revisionHistoryLimit: 4
  selector:
    matchLabels:
      control-plane: hive-operator
      controller-tools.k8s.io: "1.0"
  template:
    metadata:
      labels:
        control-plane: hive-operator
        controller-tools.k8s.io: "1.0"
    spec:
      containers:
      - command:
        - /opt/services/hive-operator
        - --log-level
        - info
        env:
        - name: CLI_CACHE_DIR
          value: /var/cache/kubectl
        image: registry.svc.ci.openshift.org/openshift/hive-v4.0:hive
        imagePullPolicy: Always
        livenessProbe:
          failureThreshold: 1
          httpGet:
            path: /debug/health
            port: 8080
          initialDelaySeconds: 10
          periodSeconds: 10
        name: hive-operator
        resources:
          requests:
            cpu: 100m
            memory: 256Mi
        volumeMounts:
        - mountPath: /var/cache/kubectl
          name: kubectl-cache
      serviceAccountName: hive-operator
      terminationGracePeriodSeconds: 10
      volumes:
      - emptyDir: {}
        name: kubectl-cache

Now we can apply the Hive custom resource definition (crds):

$ kubectl apply -f ./config/crds/
customresourcedefinition.apiextensions.k8s.io/checkpoints.hive.openshift.io created
customresourcedefinition.apiextensions.k8s.io/clusterdeployments.hive.openshift.io created
customresourcedefinition.apiextensions.k8s.io/clusterdeprovisions.hive.openshift.io created
customresourcedefinition.apiextensions.k8s.io/clusterimagesets.hive.openshift.io created
customresourcedefinition.apiextensions.k8s.io/clusterprovisions.hive.openshift.io created
customresourcedefinition.apiextensions.k8s.io/clusterstates.hive.openshift.io created
customresourcedefinition.apiextensions.k8s.io/dnszones.hive.openshift.io created
customresourcedefinition.apiextensions.k8s.io/hiveconfigs.hive.openshift.io created
customresourcedefinition.apiextensions.k8s.io/machinepools.hive.openshift.io created
customresourcedefinition.apiextensions.k8s.io/selectorsyncidentityproviders.hive.openshift.io created
customresourcedefinition.apiextensions.k8s.io/selectorsyncsets.hive.openshift.io created
customresourcedefinition.apiextensions.k8s.io/syncidentityproviders.hive.openshift.io created
customresourcedefinition.apiextensions.k8s.io/syncsets.hive.openshift.io created
customresourcedefinition.apiextensions.k8s.io/syncsetinstances.hive.openshift.io created

And continue to apply the hive.yaml manifest for deploying the OpenShift Hive operator and its components:

$ kubectl apply -f hive.yaml
namespace/hive created
serviceaccount/hive-operator created
clusterrole.rbac.authorization.k8s.io/hive-frontend created
clusterrole.rbac.authorization.k8s.io/hive-operator-role created
clusterrole.rbac.authorization.k8s.io/manager-role created
clusterrole.rbac.authorization.k8s.io/system:openshift:hive:hiveadmission created
rolebinding.rbac.authorization.k8s.io/extension-server-authentication-reader-hiveadmission created
clusterrolebinding.rbac.authorization.k8s.io/auth-delegator-hiveadmission created
clusterrolebinding.rbac.authorization.k8s.io/hive-frontend created
clusterrolebinding.rbac.authorization.k8s.io/hive-operator-rolebinding created
clusterrolebinding.rbac.authorization.k8s.io/hiveadmission-hive-hiveadmission created
clusterrolebinding.rbac.authorization.k8s.io/hiveapi-cluster-admin created
clusterrolebinding.rbac.authorization.k8s.io/manager-rolebinding created
deployment.apps/hive-operator created

For the Hive admission controller you need to generate a SSL certifcate:

$ ./hack/hiveadmission-dev-cert.sh
~/Dropbox/hive/hiveadmission-certs ~/Dropbox/hive
2020/02/03 22:17:30 [INFO] generate received request
2020/02/03 22:17:30 [INFO] received CSR
2020/02/03 22:17:30 [INFO] generating key: ecdsa-256
2020/02/03 22:17:30 [INFO] encoded CSR
certificatesigningrequest.certificates.k8s.io/hiveadmission.hive configured
certificatesigningrequest.certificates.k8s.io/hiveadmission.hive approved
-----BEGIN CERTIFICATE-----
MIICaDCCAVCgAwIBAgIQHvvDPncIWHRcnDzzoWGjQDANBgkqhkiG9w0BAQsFADAv
MS0wKwYDVQQDEyRiOTk2MzhhNS04OWQyLTRhZTAtYjI4Ny1iMWIwOGNmOGYyYjAw
HhcNMjAwMjAzMjIxNTA3WhcNMjUwMjAxMjIxNTA3WjAhMR8wHQYDVQQDExZoaXZl
YWRtaXNzaW9uLmhpdmUuc3ZjMFkwEwYHKoZIzj0CAQYIKoZIzj0DAQcDQgAEea4N
UPbvzM3VdtOkdJ7lBytekRTvwGMqs9HgG14CtqCVCOFq8f+BeqqyrRbJsX83iBfn
gMc54moElb5kIQNjraNZMFcwDAYDVR0TAQH/BAIwADBHBgNVHREEQDA+ghZoaXZl
YWRtaXNzaW9uLmhpdmUuc3ZjgiRoaXZlYWRtaXNzaW9uLmhpdmUuc3ZjLmNsdXN0
ZXIubG9jYWwwDQYJKoZIhvcNAQELBQADggEBADhgT3tNnFs6hBIZFfWmoESe6nnZ
fy9GmlmF9qEBo8FZSk/LYvV0peOdgNZCHqsT2zaJjxULqzQ4zfSb/koYpxeS4+Bf
xwgHzIB/ylzf54wVkILWUFK3GnYepG5dzTXS7VHc4uiNJe0Hwc5JI4HBj7XdL3C7
cbPm7T2cBJi2jscoCWELWo/0hDxkcqZR7rdeltQQ+Uhz87LhTTqlknAMFzL7tM/+
pJePZMQgH97vANsbk97bCFzRZ4eABYSiN0iAB8GQM5M+vK33ZGSVQDJPKQQYH6th
Kzi9wrWEeyEtaWozD5poo9s/dxaLxFAdPDICkPB2yr5QZB+NuDgA+8IYffo=
-----END CERTIFICATE-----
secret/hiveadmission-serving-cert created
~/Dropbox/hive

Afterwards we can check if all the pods are running, this might take a few seconds:

$ kubectl get pods -n hive
NAME                                READY   STATUS    RESTARTS   AGE
hive-controllers-7c6ccc84b9-q7k7m   1/1     Running   0          31s
hive-operator-f9f4447fd-jbmkh       1/1     Running   0          55s
hiveadmission-6766c5bc6f-9667g      1/1     Running   0          27s
hiveadmission-6766c5bc6f-gvvlq      1/1     Running   0          27s

The Hive operator is successfully installed on your Kubernetes cluster but we are not finished yet. To create the required Cluster Deployment manifests we need to generate the hiveutil binary:

$ make hiveutil
go generate ./pkg/... ./cmd/...
hack/update-bindata.sh
go build -o bin/hiveutil github.com/openshift/hive/contrib/cmd/hiveutil

To generate Hive Cluster Deployment manifests just run the following hiveutil command below, I output the definition with -o into yaml:

$ bin/hiveutil create-cluster --base-domain=mydomain.example.com --cloud=aws mycluster -o yaml
apiVersion: v1
items:
- apiVersion: hive.openshift.io/v1
  kind: ClusterImageSet
  metadata:
    creationTimestamp: null
    name: mycluster-imageset
  spec:
    releaseImage: quay.io/openshift-release-dev/ocp-release:4.3.2-x86_64
  status: {}
- apiVersion: v1
  kind: Secret
  metadata:
    creationTimestamp: null
    name: mycluster-aws-creds
  stringData:
    aws_access_key_id: <-YOUR-AWS-ACCESS-KEY->
    aws_secret_access_key: <-YOUR-AWS-SECRET-KEY->
  type: Opaque
- apiVersion: v1
  data:
    install-config.yaml: <-BASE64-ENCODED-OPENSHIFT4-INSTALL-CONFIG->
  kind: Secret
  metadata:
    creationTimestamp: null
    name: mycluster-install-config
  type: Opaque
- apiVersion: hive.openshift.io/v1
  kind: ClusterDeployment
  metadata:
    creationTimestamp: null
    name: mycluster
  spec:
    baseDomain: mydomain.example.com
    clusterName: mycluster
    controlPlaneConfig:
      servingCertificates: {}
    installed: false
    platform:
      aws:
        credentialsSecretRef:
          name: mycluster-aws-creds
        region: us-east-1
    provisioning:
      imageSetRef:
        name: mycluster-imageset
      installConfigSecretRef:
        name: mycluster-install-config
  status:
    clusterVersionStatus:
      availableUpdates: null
      desired:
        force: false
        image: ""
        version: ""
      observedGeneration: 0
      versionHash: ""
- apiVersion: hive.openshift.io/v1
  kind: MachinePool
  metadata:
    creationTimestamp: null
    name: mycluster-worker
  spec:
    clusterDeploymentRef:
      name: mycluster
    name: worker
    platform:
      aws:
        rootVolume:
          iops: 100
          size: 22
          type: gp2
        type: m4.xlarge
    replicas: 3
  status:
    replicas: 0
kind: List
metadata: {}

I hope this post is useful in getting you started with OpenShift Hive. In my next article I will go through the details of the OpenShift 4 cluster deployment with Hive.

Read my new article about OpenShift / OKD 4.x Cluster Deployment using OpenShift Hive