Ansible Automation with Cisco ASA Multi-Context Mode

I thought I’d share my experience using Ansible and Cisco ASA firewalls in multi-context mode. Right from the beginning I had a few issues deploying the configuration and the switch between the different security context didn’t work well. I got the error you see below when I tried to run a playbook. Other times the changeto context didn’t work well and applied the wrong config:

berndonline@lab:~$ ansible-playbook -i inventory site.yml --ask-vault-pass
Vault password:

PLAY [all] ***************************************************************************************************************************************************************************

TASK [hostname : set dns and hostname] ***********************************************************************************************************************************************
An exception occurred during task execution. To see the full traceback, use -vvv. The error was: error: [Errno 61] Connection refused
fatal: [fwcontext01]: FAILED! => {"changed": false, "err": "[Errno 61] Connection refused", "msg": "unable to connect to socket"}
ok: [fwcontext02]

TASK [interfaces : write interfaces config] ******************************************************************************************************************************************
ok: [fwcontext02]

....

After a bit of troubleshooting I found a workaround to limit the amount of processes Ansible use and set this limit to one in the Ansible.cfg. The default is five processes if forks is not defined as far as I remember.

[defaults]
inventory = ./inventory
host_key_checking=False
jinja2_extensions=jinja2.ext.do
forks = 1

In the example inventory file, the “inventory_hostname” variable represents the security context and as you see the “ansible_ssh_host” is set to the IP address of the admin context:

fwcontext01 ansible_ssh_host=192.168.0.1 ansible_ssh_port=22 ansible_ssh_user='ansible' ansible_ssh_pass='cisco'
fwcontext02 ansible_ssh_host=192.168.0.1 ansible_ssh_port=22 ansible_ssh_user='ansible' ansible_ssh_pass='cisco'

When you run the playbook again you can see that the playbook runs successfully but deploys the changes one by one to each firewall security context, the disadvantage is that the playbook takes much longer to run:

berndonline@lab:~$ ansible-playbook site.yml

PLAY [all] ***************************************************************************************************************************************************************************

TASK [hostname : set dns and hostname] ***********************************************************************************************************************************************
ok: [fwcontext01]
ok: [fwcontext02]

TASK [interfaces : write interfaces config] ******************************************************************************************************************************************
ok: [fwcontext01]
ok: [fwcontext02]

Example site.yml

---

- hosts: all
  connection: local
  gather_facts: 'no'

  vars:
    cli:
      username: "{{ ansible_ssh_user }}"
      password: "{{ ansible_ssh_pass }}"
      host: "{{ ansible_ssh_host }}"

  roles:
    - interfaces

In the example Interface role you see that the context is set to “inventory_hostname” variable:

---

- name: write interfaces config
  asa_config:
    src: "templates/interfaces.j2"
    provider: "{{ cli }}"
    context: "{{ inventory_hostname }}"
  register: result

- name: enable interfaces
  asa_config:
    parents: "interface {{ item.0 }}"
    lines: "no shutdown"
    match: none
    provider: "{{ cli }}"
    context: "{{ inventory_hostname }}"
  when: result.changed
  with_items:
    - "{{ interfaces.items() }}"

After modifying the forks, the Ansible playbook runs well with Cisco ASA in multi-context mode, like mentioned before it is a bit slow to deploy the configuration if I compare this to Cumulus Linux or any other Linux system.

Please share your feedback.
Leave a comment

Cisco ASAv network simulation using Vagrant

After creating IOSv and IOS XE Vagrant images, now doing the same for Cisco ASAv. Like in my last post same basic idea to create an simulated on-demand  network environment for continuous integration testing.

You need to buy the Cisco ASAv to get access to the KVM image on the Cisco website!

The Cisco ASAv is pretty easy because you can get QCOW2 images directly on the Cisco website, there are a few changes you need to do before you can use this together with Vagrant.

Boot the ASAv QCOW2 image on KVM and add the configuration below:

conf t
interface Management0/0
 nameif management
 security-level 0
 ip address dhcp
 no shutdown
 exit

hostname asa
domain-name lab.local
username vagrant password vagrant privilege 15
aaa authentication ssh console LOCAL
aaa authorization exec LOCAL auto-enable
ssh version 2
ssh timeout 60
ssh key-exchange group dh-group14-sha1
ssh 0 0 management

username vagrant attributes
  service-type admin
  ssh authentication publickey AAAAB3NzaC1yc2EAAAABIwAAAQEA6NF8iallvQVp22WDkTkyrtvp9eWW6A8YVr+kz4TjGYe7gHzIw+niNltGEFHzD8+v1I2YJ6oXevct1YeS0o9HZyN1Q9qgCgzUFtdOKLv6IedplqoPkcmF0aYet2PkEDo3MlTBckFXPITAMzF8dJSIFo9D8HfdOV0IAdx4O7PtixWKn5y2hMNG0zQPyUecp4pzC6kivAIhyfHilFR61RGL+GPXQ2MWZWFYbAGjyiYJnAmCP3NOTd0jMZEnDkbUvxhMmBYSdETk1rRgm+R4LOzFUGaHqHDLKLX+FIPKcF96hrucXzcWyLbIbEgE98OHlnVYCzRdK8jlqm8tehUc9c9WhQ==

Now the image is ready to use with Vagrant. Create an instance folder under the user vagrant directory and copy the QCOW2 image. As well create an metadata.json file:

mkdir -p ~/.vagrant.d/boxes/asav/0/libvirt/
cp ASAv.qcow2 ~/.vagrant.d/boxes/asav/0/libvirt/box.img
printf '{"provider":"libvirt","format":"qcow2","virtual_size":2}' > metadata.json

Create a Vagrantfile with the needed configuration and boot up the VMs. You have to start the VMs one by one.

berndonline@lab:~/asa-lab-vagrant$ vagrant status
Current machine states:

asa-1                     not created (libvirt)
asa-2                     not created (libvirt)

This environment represents multiple VMs. The VMs are all listed
above with their current state. For more information about a specific
VM, run `vagrant status NAME`.
berndonline@lab:~/asa-lab-vagrant$ vagrant up asa-1
Bringing machine 'asa-1' up with 'libvirt' provider...
==> asa-1: Creating image (snapshot of base box volume).
==> asa-1: Creating domain with the following settings...
==> asa-1:  -- Name:              asa-lab-vagrant_asa-1
==> asa-1:  -- Domain type:       kvm
==> asa-1:  -- Cpus:              1
==> asa-1:  -- Feature:           acpi
==> asa-1:  -- Feature:           apic
==> asa-1:  -- Feature:           pae
==> asa-1:  -- Memory:            2048M
==> asa-1:  -- Management MAC:
==> asa-1:  -- Loader:
==> asa-1:  -- Base box:          asav
==> asa-1:  -- Storage pool:      default
==> asa-1:  -- Image:             /var/lib/libvirt/images/asa-lab-vagrant_asa-1.img (8G)
==> asa-1:  -- Volume Cache:      default
==> asa-1:  -- Kernel:
==> asa-1:  -- Initrd:
==> asa-1:  -- Graphics Type:     vnc
==> asa-1:  -- Graphics Port:     5900
==> asa-1:  -- Graphics IP:       127.0.0.1
==> asa-1:  -- Graphics Password: Not defined
==> asa-1:  -- Video Type:        cirrus
==> asa-1:  -- Video VRAM:        9216
==> asa-1:  -- Sound Type:
==> asa-1:  -- Keymap:            en-us
==> asa-1:  -- TPM Path:
==> asa-1:  -- INPUT:             type=mouse, bus=ps2
==> asa-1: Creating shared folders metadata...
==> asa-1: Starting domain.
==> asa-1: Waiting for domain to get an IP address...
==> asa-1: Waiting for SSH to become available...
==> asa-1: Configuring and enabling network interfaces...
    asa-1: SSH address: 10.255.1.238:22
    asa-1: SSH username: vagrant
    asa-1: SSH auth method: private key
    asa-1: Warning: Connection refused. Retrying...
==> asa-1: Running provisioner: ansible...
    asa-1: Running ansible-playbook...

PLAY [all] *********************************************************************

PLAY RECAP *********************************************************************

berndonline@lab:~/asa-lab-vagrant$ vagrant up asa-2
Bringing machine 'asa-2' up with 'libvirt' provider...
==> asa-2: Creating image (snapshot of base box volume).
==> asa-2: Creating domain with the following settings...
==> asa-2:  -- Name:              asa-lab-vagrant_asa-2
==> asa-2:  -- Domain type:       kvm
==> asa-2:  -- Cpus:              1
==> asa-2:  -- Feature:           acpi
==> asa-2:  -- Feature:           apic
==> asa-2:  -- Feature:           pae
==> asa-2:  -- Memory:            2048M
==> asa-2:  -- Management MAC:
==> asa-2:  -- Loader:
==> asa-2:  -- Base box:          asav
==> asa-2:  -- Storage pool:      default
==> asa-2:  -- Image:             /var/lib/libvirt/images/asa-lab-vagrant_asa-2.img (8G)
==> asa-2:  -- Volume Cache:      default
==> asa-2:  -- Kernel:
==> asa-2:  -- Initrd:
==> asa-2:  -- Graphics Type:     vnc
==> asa-2:  -- Graphics Port:     5900
==> asa-2:  -- Graphics IP:       127.0.0.1
==> asa-2:  -- Graphics Password: Not defined
==> asa-2:  -- Video Type:        cirrus
==> asa-2:  -- Video VRAM:        9216
==> asa-2:  -- Sound Type:
==> asa-2:  -- Keymap:            en-us
==> asa-2:  -- TPM Path:
==> asa-2:  -- INPUT:             type=mouse, bus=ps2
==> asa-2: Creating shared folders metadata...
==> asa-2: Starting domain.
==> asa-2: Waiting for domain to get an IP address...
==> asa-2: Waiting for SSH to become available...
==> asa-2: Configuring and enabling network interfaces...
    asa-2: SSH address: 10.255.1.131:22
    asa-2: SSH username: vagrant
    asa-2: SSH auth method: private key
==> asa-2: Running provisioner: ansible...
    asa-2: Running ansible-playbook...

PLAY [all] *********************************************************************

PLAY RECAP *********************************************************************

berndonline@lab:~/asa-lab-vagrant$ vagrant status
Current machine states:

asa-1                     running (libvirt)
asa-2                     running (libvirt)

berndonline@lab:~/asa-lab-vagrant$

After the VMs are successfully booted you can connect with vagrant ssh:

berndonline@lab:~/asa-lab-vagrant$ vagrant ssh asa-1
Type help or '?' for a list of available commands.
asa# show version

Cisco Adaptive Security Appliance Software Version 9.6(2)
Device Manager Version 7.6(2)

Compiled on Tue 23-Aug-16 18:38 PDT by builders
System image file is "boot:/asa962-smp-k8.bin"
Config file at boot was "startup-config"

asa up 10 mins 31 secs

Hardware:   ASAv, 2048 MB RAM, CPU Xeon E5 series 3600 MHz,
Model Id:   ASAv10
Internal ATA Compact Flash, 8192MB
Slot 1: ATA Compact Flash, 8192MB
BIOS Flash Firmware Hub @ 0x0, 0KB

....

Configuration has not been modified since last system restart.
asa# exit

Logoff

Connection to 10.255.1.238 closed by remote host.
Connection to 10.255.1.238 closed.
berndonline@lab:~/asa-lab-vagrant$ vagrant destroy
==> asa-2: Removing domain...
==> asa-2: Running triggers after destroy...
Removing known host entries
==> asa-1: Removing domain...
==> asa-1: Running triggers after destroy...
Removing known host entries
berndonline@lab:~/asa-lab-vagrant$

Here I have a virtual ASAv environment which I can spin-up and down as needed for automation testing.

The example Vagrantfile you can find in my Github repository:

https://github.com/berndonline/asa-lab-vagrant/blob/master/Vagrantfile

Read my new post about an Ansible Playbook for Cisco ASAv Firewall Topology

Data centre network redesign

Over the last month I was busy working on an data centre redesign for my company which I finished this weekend in one of the three data centre’s.

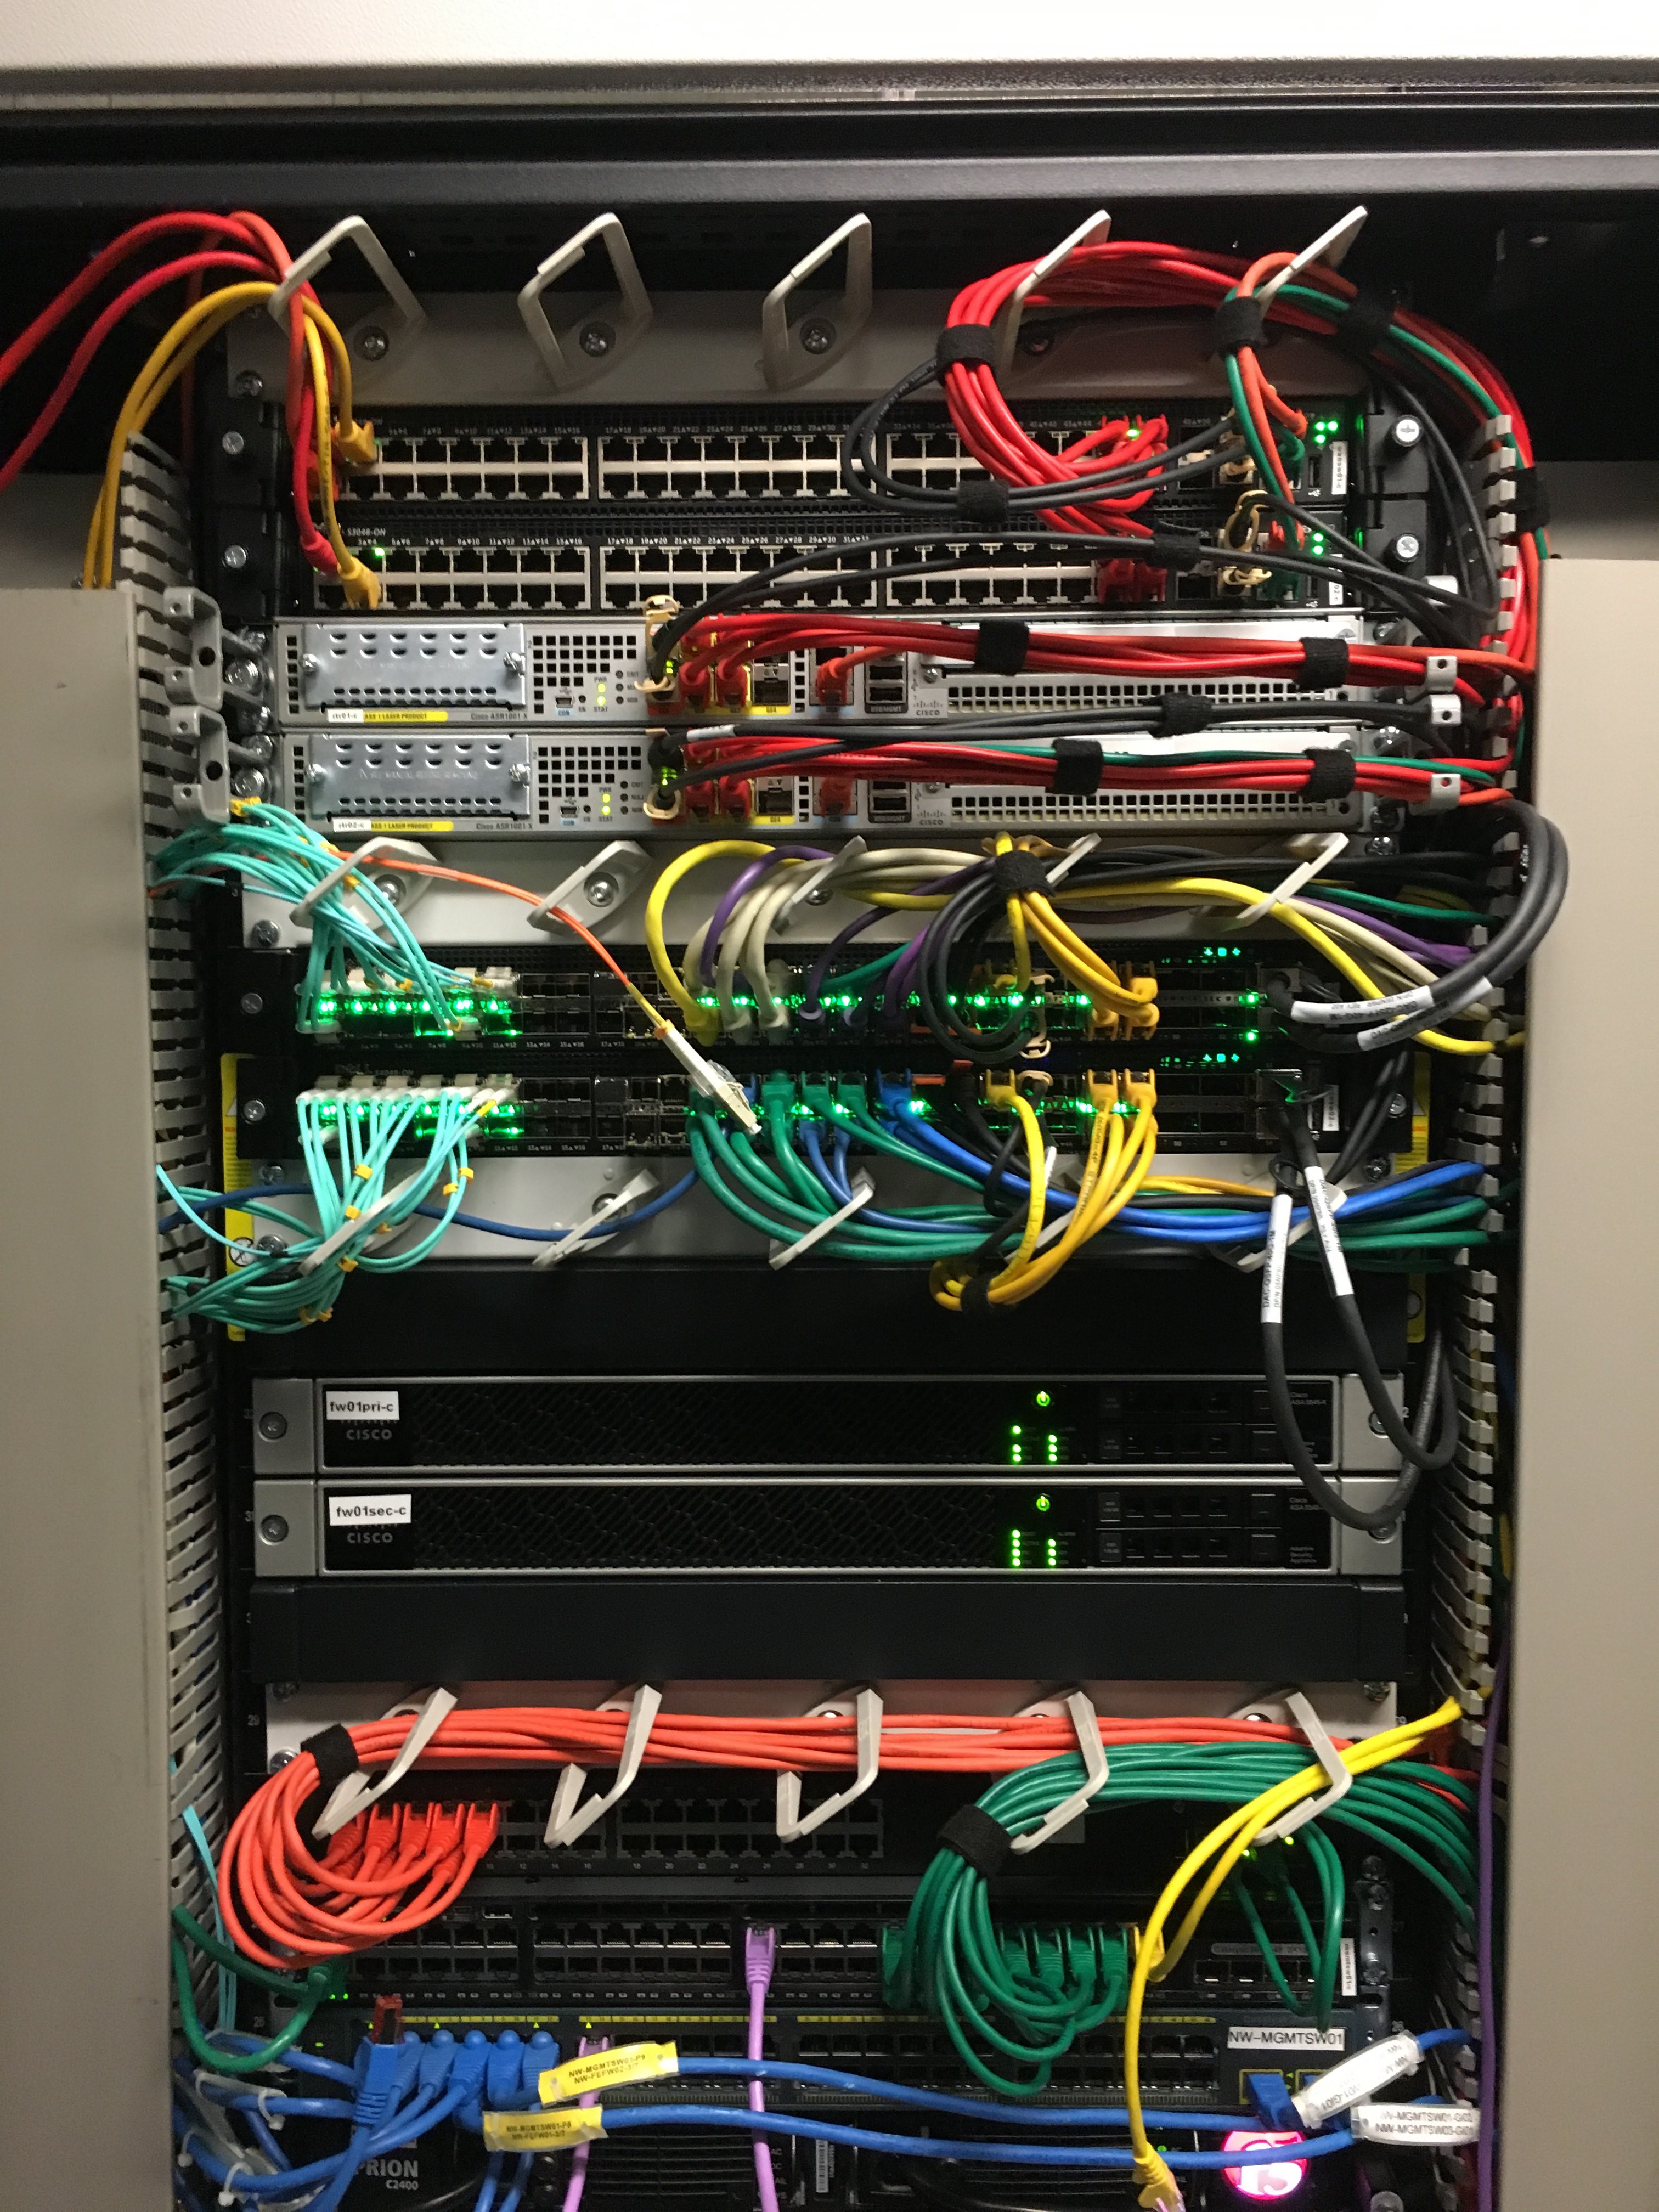
The old network design was very outdated and bad choice of network equipment; Cisco Catalyst 6500 core switch for a small data centre environment with 8 racks is total overkill, two firewall clusters Juniper ISG2000 and Cisco ASA 5550 which were badly integrated and the configuration was a mess.

For the new network I followed a more converged idea to use a small and compact network to be as flexible as possible but also downsize the overall footprint and remove complexity. We adopted parts of DevOps “I like to call it NetOps” and used Ansible to automate the configuration deployment, the whole network stack is deployed within 90 seconds.

Used equipment:

  1. Top two switches were Dell S3048-ON running Cumulus Networks OS and used for internet- and leased-lines
  2. Under the two Dell WAN switches are two Cisco ASR 1001-X router for internet and wide area network (OSPF) routing.
  3. Under the Cisco router, two Dell S4048-ON core switches running Cumulus Network OS and connected existing HP Blade Center’s and HP DL servers. The new Tintri storage for the VMware vSphere clusters was also connected directly to the core switches.
  4. Under the Dell core switches are two Cisco ASA 5545-X in multi-context mode running Production, Corporate and S2S VPN firewalls.
  5. On the bottom of the network stack were existing serial console server and Cisco Catalyst switch for management network.

Now I will start with the deployment of VMware NSX SDN (Software defined Network) in this data centre. Ones VMware NSX is finished and handed over to the Systems Engineers I will do the same exercise for the 2nd data centre in the UK.

About Cumulus Linux and VMware NSX SDN I will publish some more information and my experience in the coming month.

Cisco IOS automation with Ansible

Bin a long time since I wrote my last post, I am pretty busy with work redesigning the data centres for my employer. Implementing as well an SDN Software-defined Network from VMware NSX but more about this later.

Ansible released some weeks ago new core modules which allows you to push directly configuration to Cisco IOS devices. More information you find here: https://docs.ansible.com/ansible/list_of_network_modules.html

I created a small automation lab in GNS3 to test the deployment of configs via Ansible to the two Cisco routers you see below. I am running VMware Fusion and used the vmnet2 (192.168.100.0/24) network for management because I run there my CentOS VM from where I deploy the configuration.

Don’t forget you need to pre-configure your Cisco router that you can connect via SSH to deploy the configuration.

Here the folder and file script structure of my Ansible example, under roles you have the different tasks I would like to execute common and logging but as well dependencies writecfg which saves the running-config to startup-config:

site.yml
hosts
group_vars/all.yml
roles/common/meta/main.yml
roles/common/task/main.yml
roles/common/templates/common.j2
roles/logging/meta/main.yml
roles/logging/tasks/main.yml
roles/logging/templates/common.j2
roles/writecfg/handlers/main.yml

The site.yml is the main script which I execute with Ansible which includes different roles for common and logging configuration:

- name: Cisco baseline configuration
  connection: local
  hosts: ios 
  gather_facts: false

  roles:
    - role: common
      tags: common
    - role: logging
      tags: logging

In the hosts file, I define the hostname and IP addresses of my IOS devices

[ios]
rtr01 device_ip=192.168.100.130
rtr02 device_ip=192.168.100.132

The file group_vars/all.yml defines variables which I used when the script is executed:

---
username: "ansible"
password: "cisco"
secret: "cisco"
logserver: 192.168.100.131

Under the roles/../meta/main.yml I set a dependency on the writecfg handler to save the configuration later when I change anything on the device.

Under the roles/../tasks/main.yml I define the module which I want to execute and the template I would like to deploy

Under the roles/../templates/.. you find the Jinja2 template files which include the commands.

Under roles/writecfg/handler/main.yml is the dependencies I have with the two roles common and logging to save the configuration if something is changed on the router.

To execute the cisco-baseline Ansible script just execute the following command and see the result:

[user@desktop cisco-baseline]$ ansible-playbook site.yml -i hosts

PLAY [Ensure basic configuration of switches] **********************************

TASK [common : ensure common configuration exists] *****************************
ok: [rtr02]
ok: [rtr01]

TASK [logging : ensure logging configuration exists] ***************************
changed: [rtr02]
changed: [rtr01]

RUNNING HANDLER [writecfg : write config] **************************************
ok: [rtr01]
ok: [rtr02]

PLAY RECAP *********************************************************************
rtr01                      : ok=3    changed=1    unreachable=0    failed=0
rtr02                      : ok=3    changed=1    unreachable=0    failed=0

[user@desktop cisco-baseline]$

Read my new posts about Ansible Playbook for Cisco ASAv Firewall Topology or Ansible Playbook for Cisco BGP Routing Topology.

How correct network cabling should look like!

Network cabling in a data centre should not look like in the following picture 😉 there you have no structure and makes it difficult for someone else to look through how every server is connected.

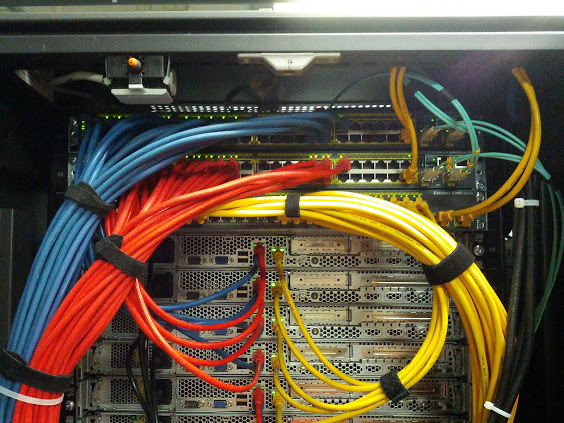
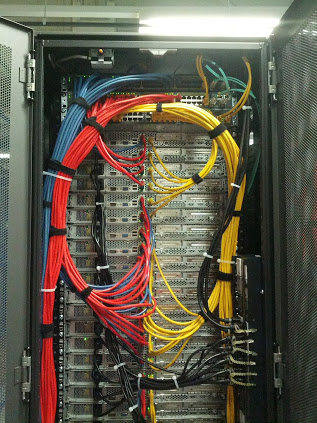
To make your life and work easier you just need to think before about what colors you use and then create an cabling standard what you always follow. Basically I choose three colors: blue, red and yellow. Yellow is management traffic, blue and red are main network connections (ports on the server must be teamed to have a redundant connectivity).

Here you clearly see that every server has an redundant connection to one of the switches in the rack. The blue cables are always connected to the top switch in the rack and the red to the second switch.

Here how the complete rack looks like, always look to keep it organised and follow your cabling standard.