Kubernetes GitOps at Scale with Cluster API and Flux CD

What does GitOps mean and how you run this at scale with Kubernetes? GitOps is basically a framework that takes traditional DevOps practices which where used for application development and apply them to platform automation.

This is nothing new and some maybe have done similar type of automation in the past but this wasn’t called GitOps back then. Kubernetes is great because of it’s declarative configuration management which makes it very easy to configure. This can become a challenge when you suddenly have to run 5, 10, 20 or 40 of these clusters across various cloud providers and multiple environments. We need a cluster management system feeding configuration from a code repository to run all our Kubernetes “cattle” workload clusters.

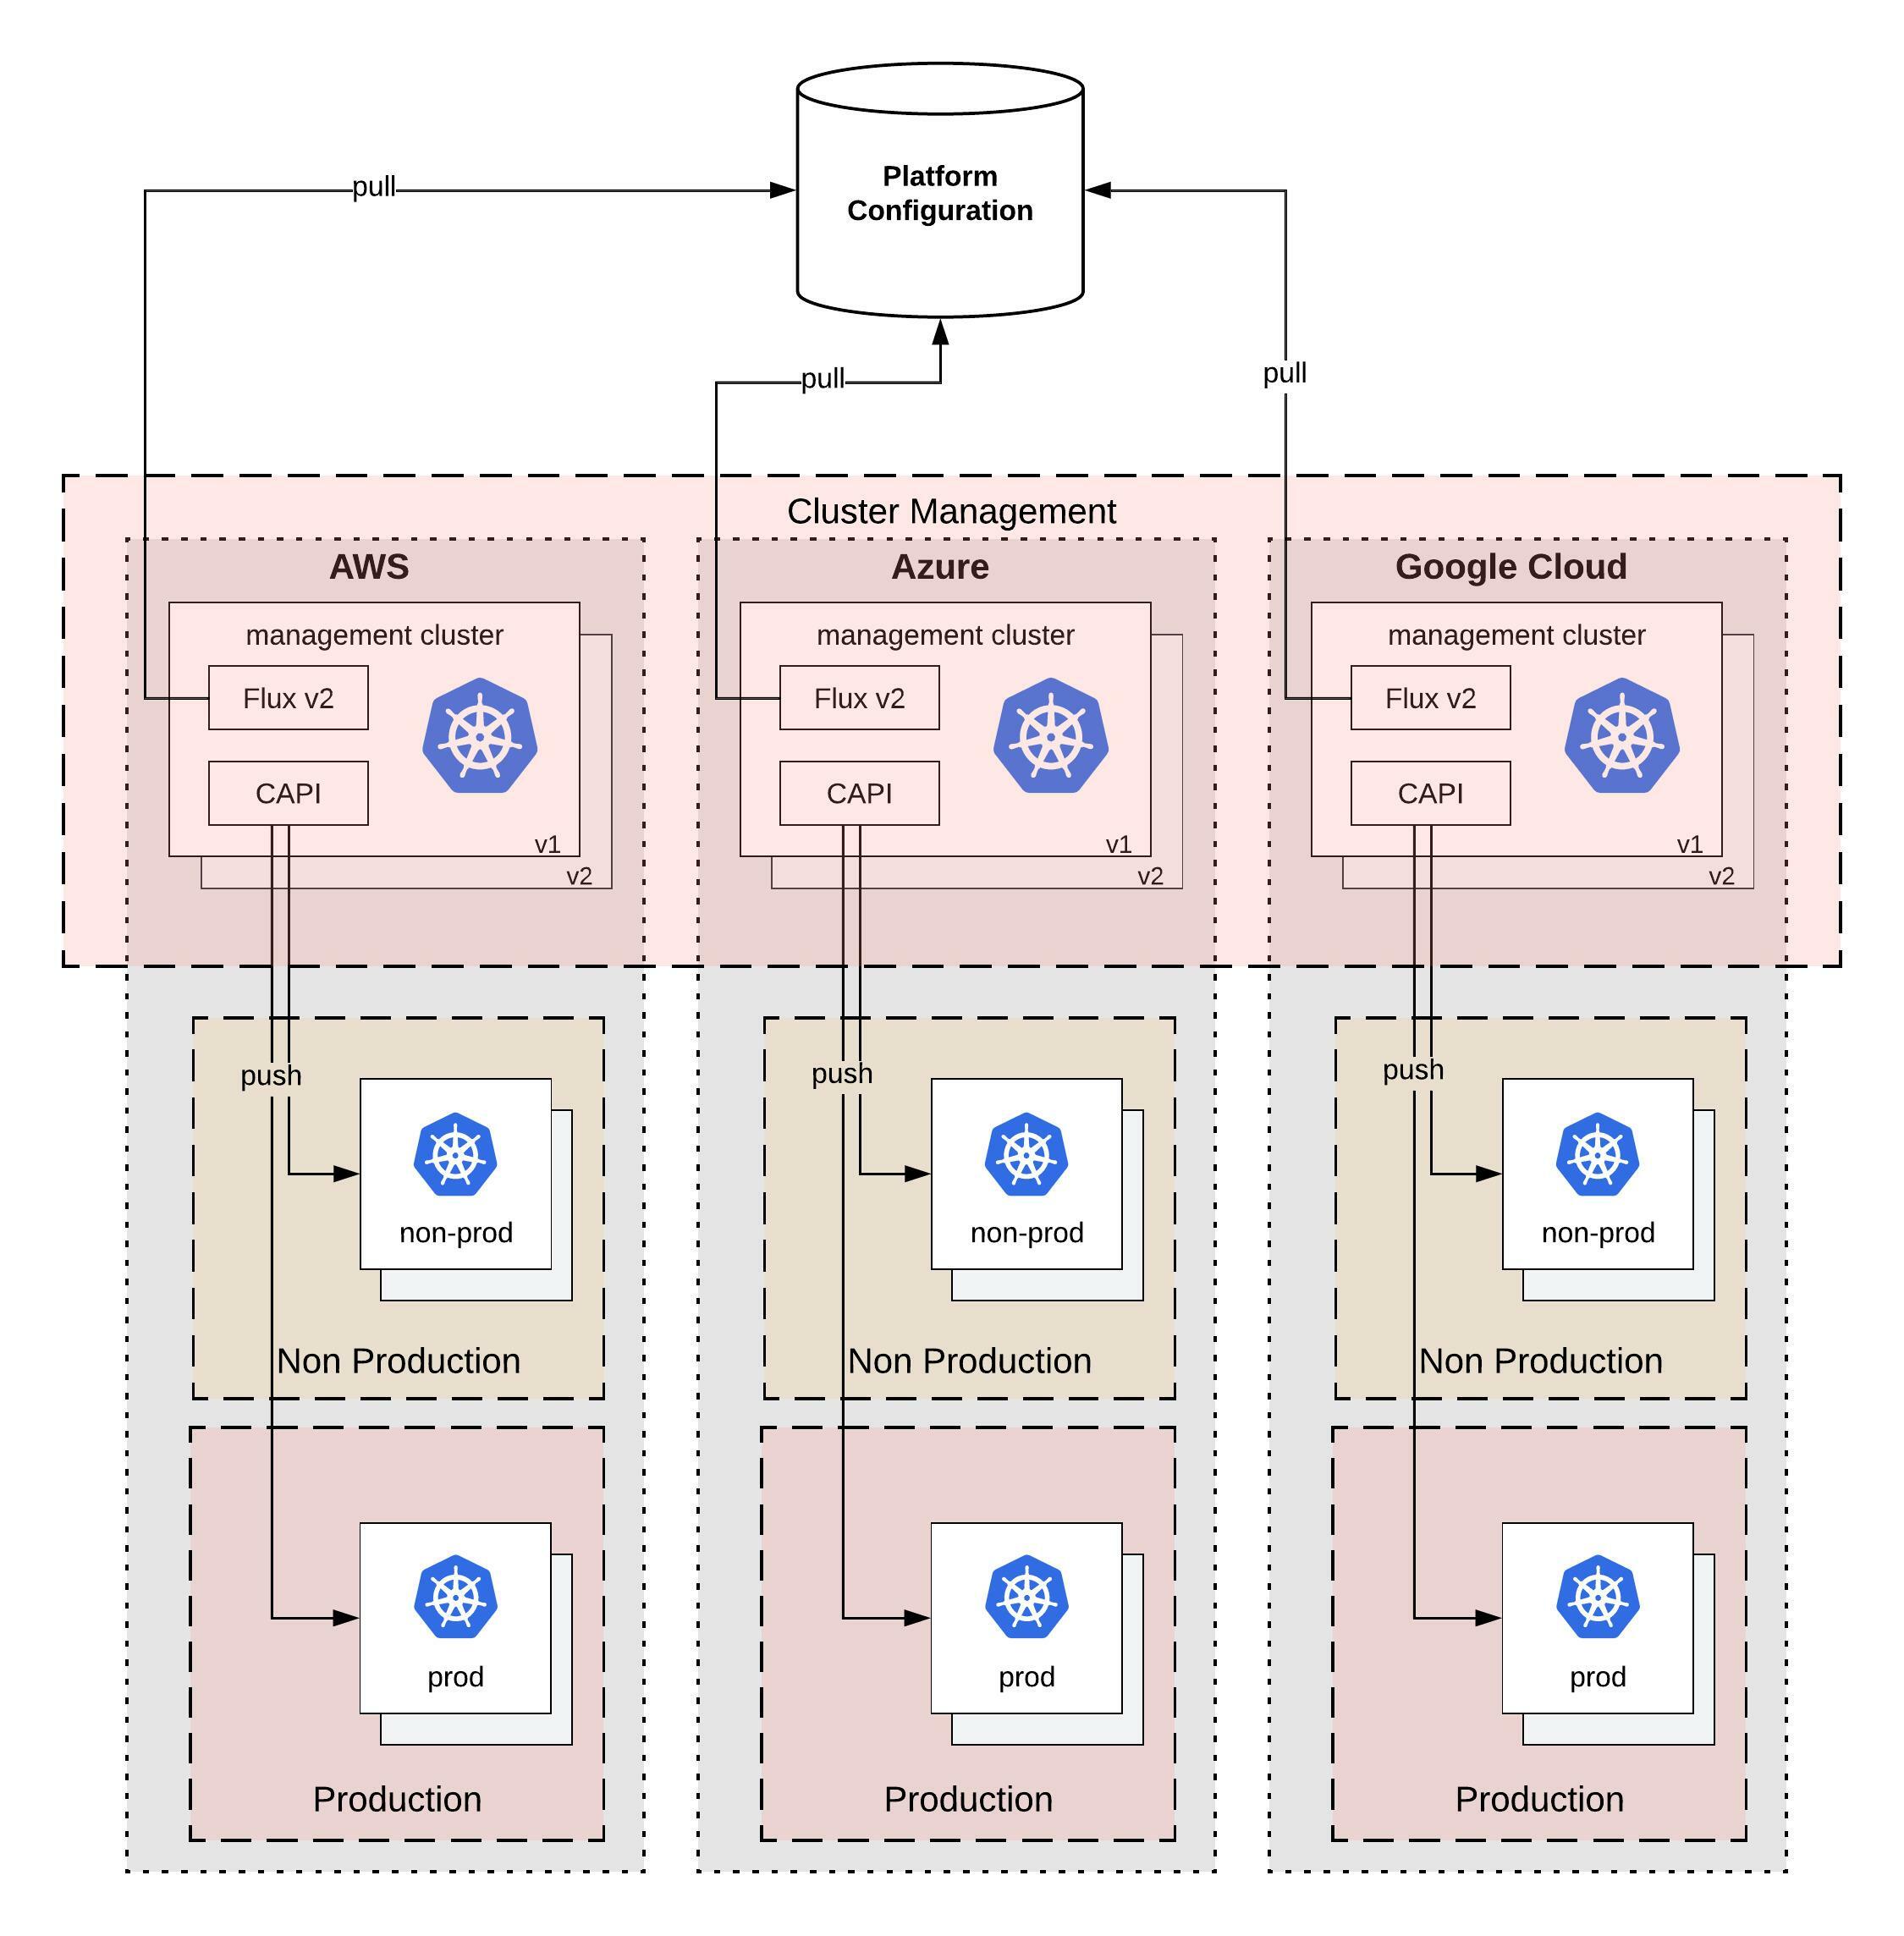
What I am trying to achieve with this design; that you can easily horizontally scale not only your workload clusters but also your cluster management system which is versioned across multiple cloud providers like you see in the diagram above.

There is of course a technical problem to all of this, finding the right tools to solve the problem and which work well together. In my example I will use the Cluster API for provisioning and managing the lifecycle of these Kubernetes workload clusters. Then we need Flux CD for the configuration management both the cluster management which runs the Cluster API components but also the configuration for the workload clusters. The Cluster API you can also replace with OpenShift Hive to run instead OKD or RedHat OpenShift clusters.

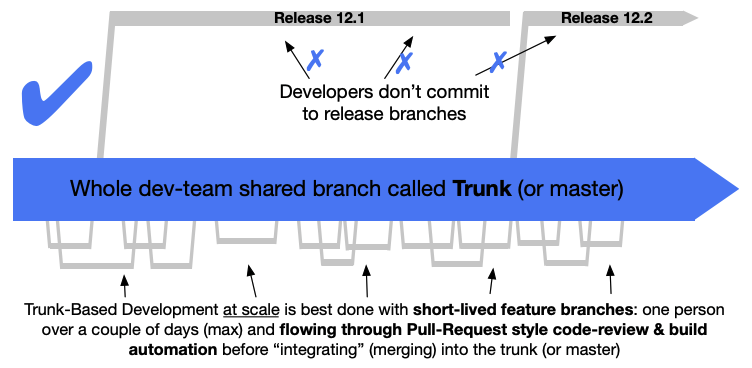
Another problem we need to think about is version control and the branching model for the platform configuration. The structure of the configuration is important but also how you implement changes or the versioning of your configuration through releases. I highly recommend reading about Trunk Based Development which is a modern branching model and specifically solves the versioning problem for us.

Git repository and folder structure

We need a git repository for storing the platform configuration both for the management- and workload-clusters, and the tenant namespace configuration (this also can be stored in a separate repositories). Let’s go through the folder structure of the repository and I will explain this in more detail. Checkout my example repository for more detail: github.com/berndonline/k8s-gitops-at-scale.
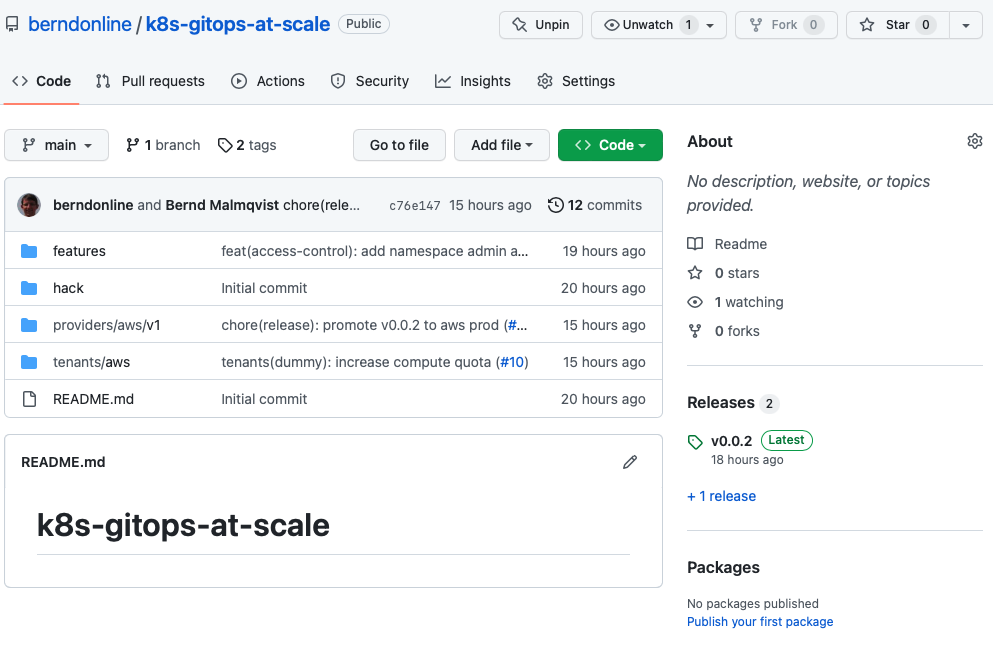
  • The features folder on the top-level will store configuration for specific features we want to enable and apply to our clusters (both management and worker). Under each <feature name> you find two subfolders for namespace(d)- and cluster-wide (non-namespaced) configuration. Features are part of platform configuration which will be promoted between environments. You will see namespaced and non-namespaced subfolders throughout the folder structure which is basically to group your configuration files.
    ├── features
    │   ├── access-control
    │   │   └── non-namespaced
    │   ├── helloworld-operator
    │   │   ├── namespaced
    │   │   └── non-namespaced
    │   └── ingress-nginx
    │       ├── namespaced
    │       └── non-namespaced
    
  • The providers folder will store the configuration based on cloud provider <name> and the <version> of your cluster management. The version below the cloud provider folder is needed to be able to spin up new management clusters in the future. You can be creative with the folder structure and have management cluster per environment and/or instead of the version if required. The mgmt folder will store the configuration for the management cluster which includes manifests for Flux CD controllers, the Cluster API to spin-up workload clusters which are separated by cluster name and anything else you want to configure on your management cluster. The clusters folder will store configuration for all workload clusters separated based on <environment> and common (applies across multiple clusters in the same environment) and by <cluster name> (applies to a dedicated cluster).
    ├── providers
    │   └── aws
    │       └── v1
    │           ├── clusters
    │           │   ├── non-prod
    │           │   │   ├── common
    │           │   │   │   ├── namespaced
    │           │   │   │   │   └── non-prod-common
    │           │   │   │   └── non-namespaced
    │           │   │   │       └── non-prod-common
    │           │   │   └── non-prod-eu-west-1
    │           │   │       ├── namespaced
    │           │   │       │   └── non-prod-eu-west-1
    │           │   │       └── non-namespaced
    │           │   │           └── non-prod-eu-west-1
    │           │   └── prod
    │           │       ├── common
    │           │       │   ├── namespaced
    │           │       │   │   └── prod-common
    │           │       │   └── non-namespaced
    │           │       │       └── prod-common
    │           │       └── prod-eu-west-1
    │           │           ├── namespaced
    │           │           │   └── prod-eu-west-1
    │           │           └── non-namespaced
    │           │               └── prod-eu-west-1
    │           └── mgmt
    │               ├── namespaced
    │               │   ├── flux-system
    │               │   ├── non-prod-eu-west-1
    │               │   └── prod-eu-west-1
    │               └── non-namespaced
    │                   ├── non-prod-eu-west-1
    │                   └── prod-eu-west-1
    
  • The tenants folder will store the namespace configuration of the onboarded teams and is applied to our workload clusters. Similar to the providers folder tenants has subfolders based on the cloud provider <name> and below subfolders for common (applies across environments) and <environments> (applied to a dedicated environment) configuration. There you find the tenant namespace <name> and all the needed manifests to create and configure the namespace/s.
    └── tenants
        └── aws
            ├── common
            │   └── dummy
            ├── non-prod
            │   └── dummy
            └── prod
                └── dummy
    

Why do we need a common folder for tenants? The common folder will contain namespace configuration which will be promoted between the environments from non-prod to prod using a release but more about release and promotion you find more down below.

Configuration changes

Applying changes to your platform configuration has to follow the Trunk Based Development model of doing small incremental changes through feature branches.

Let’s look into an example change the our dummy tenant onboarding pull-request. You see that I checked-out a branch called “tenant-dummy” to apply my changes, then push and publish the branch in the repository to raised the pull-request.
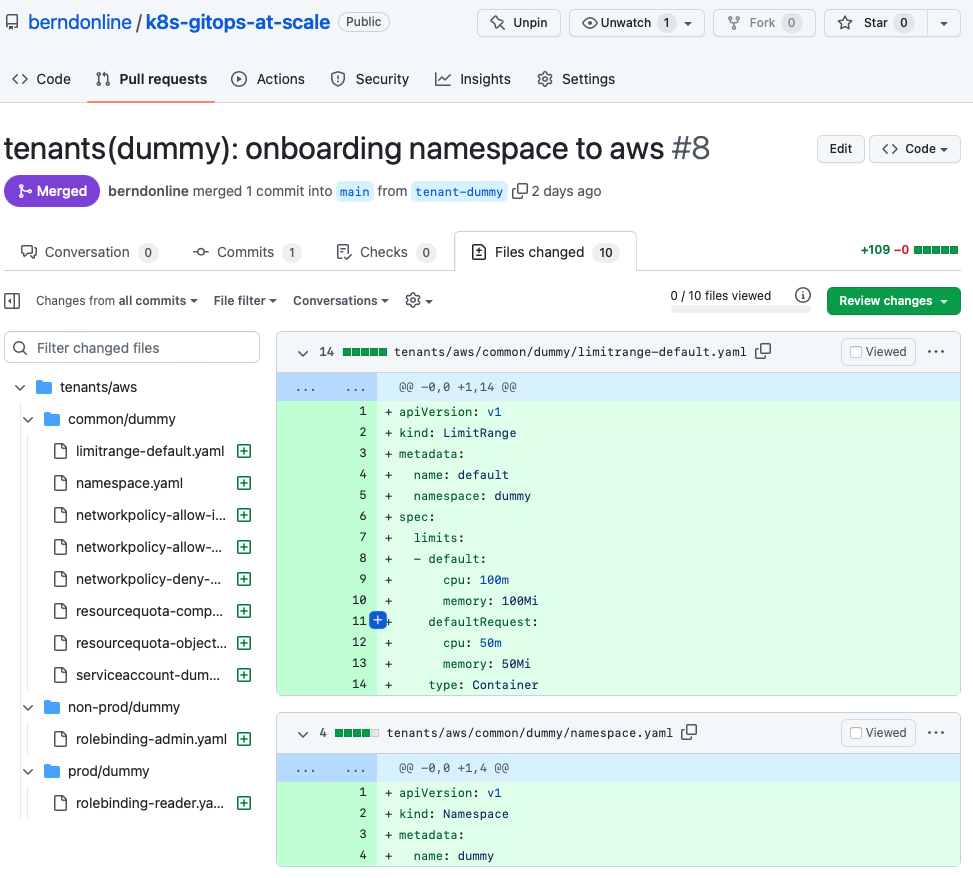
Important is that your commit messages and pull-request name are following a strict naming convention.
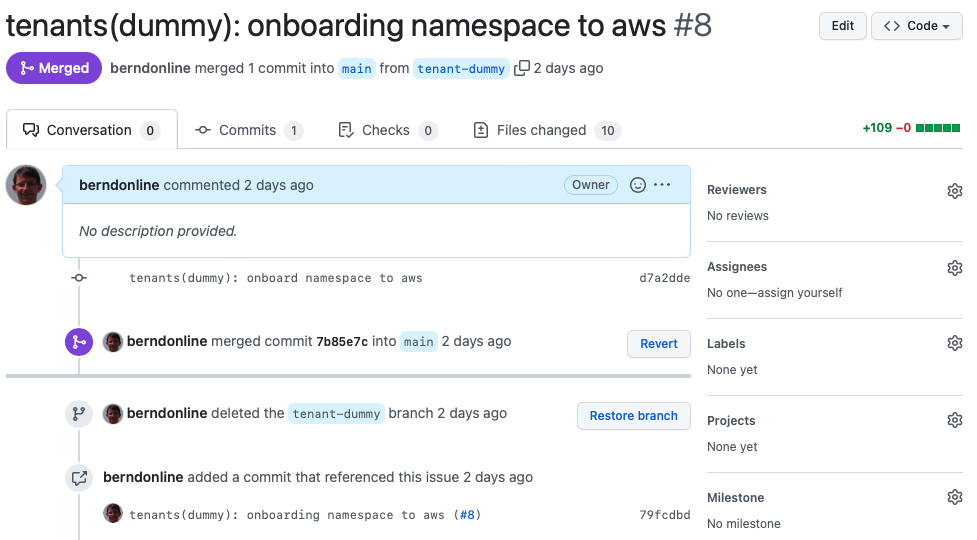
I would also strongly recommend to squash your commit messages into the name of your pull-request. This will keep your git history clean.
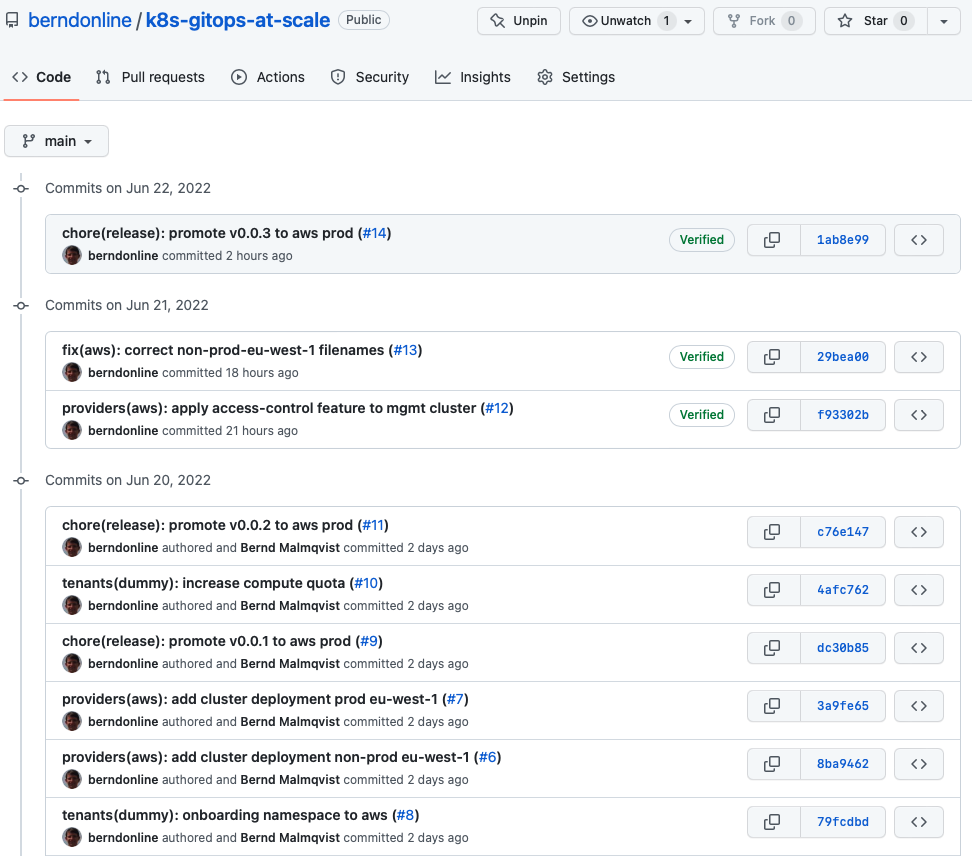
This naming convention makes it easier later for auto-generating your release notes when you publish your release. Having the clean well formatted git history combined with your release notes nicely cross references your changes for to a particular release tag.
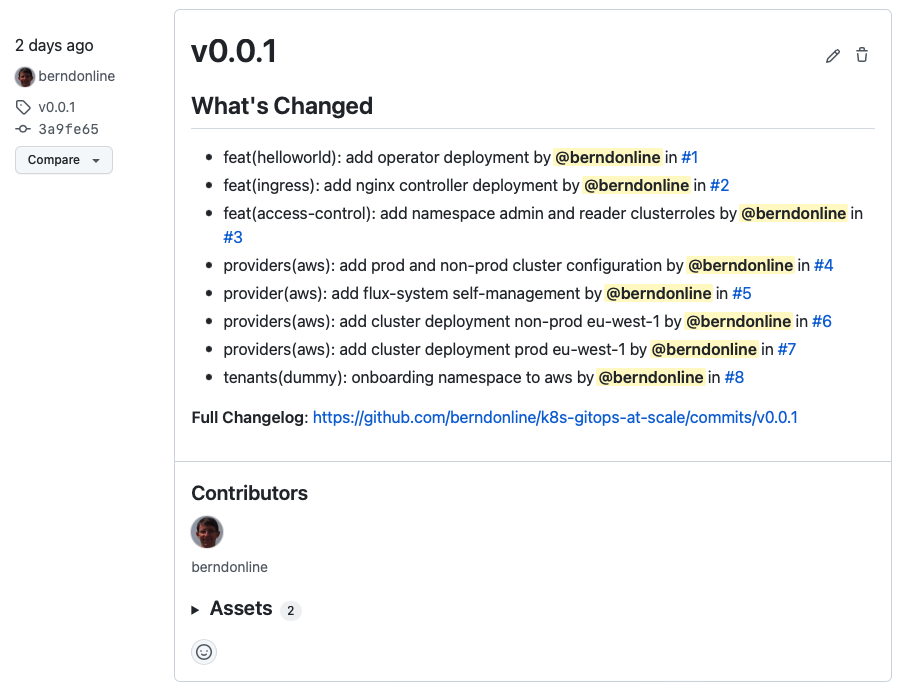
More about creating a release a bit later in this article.

GitOps configuration

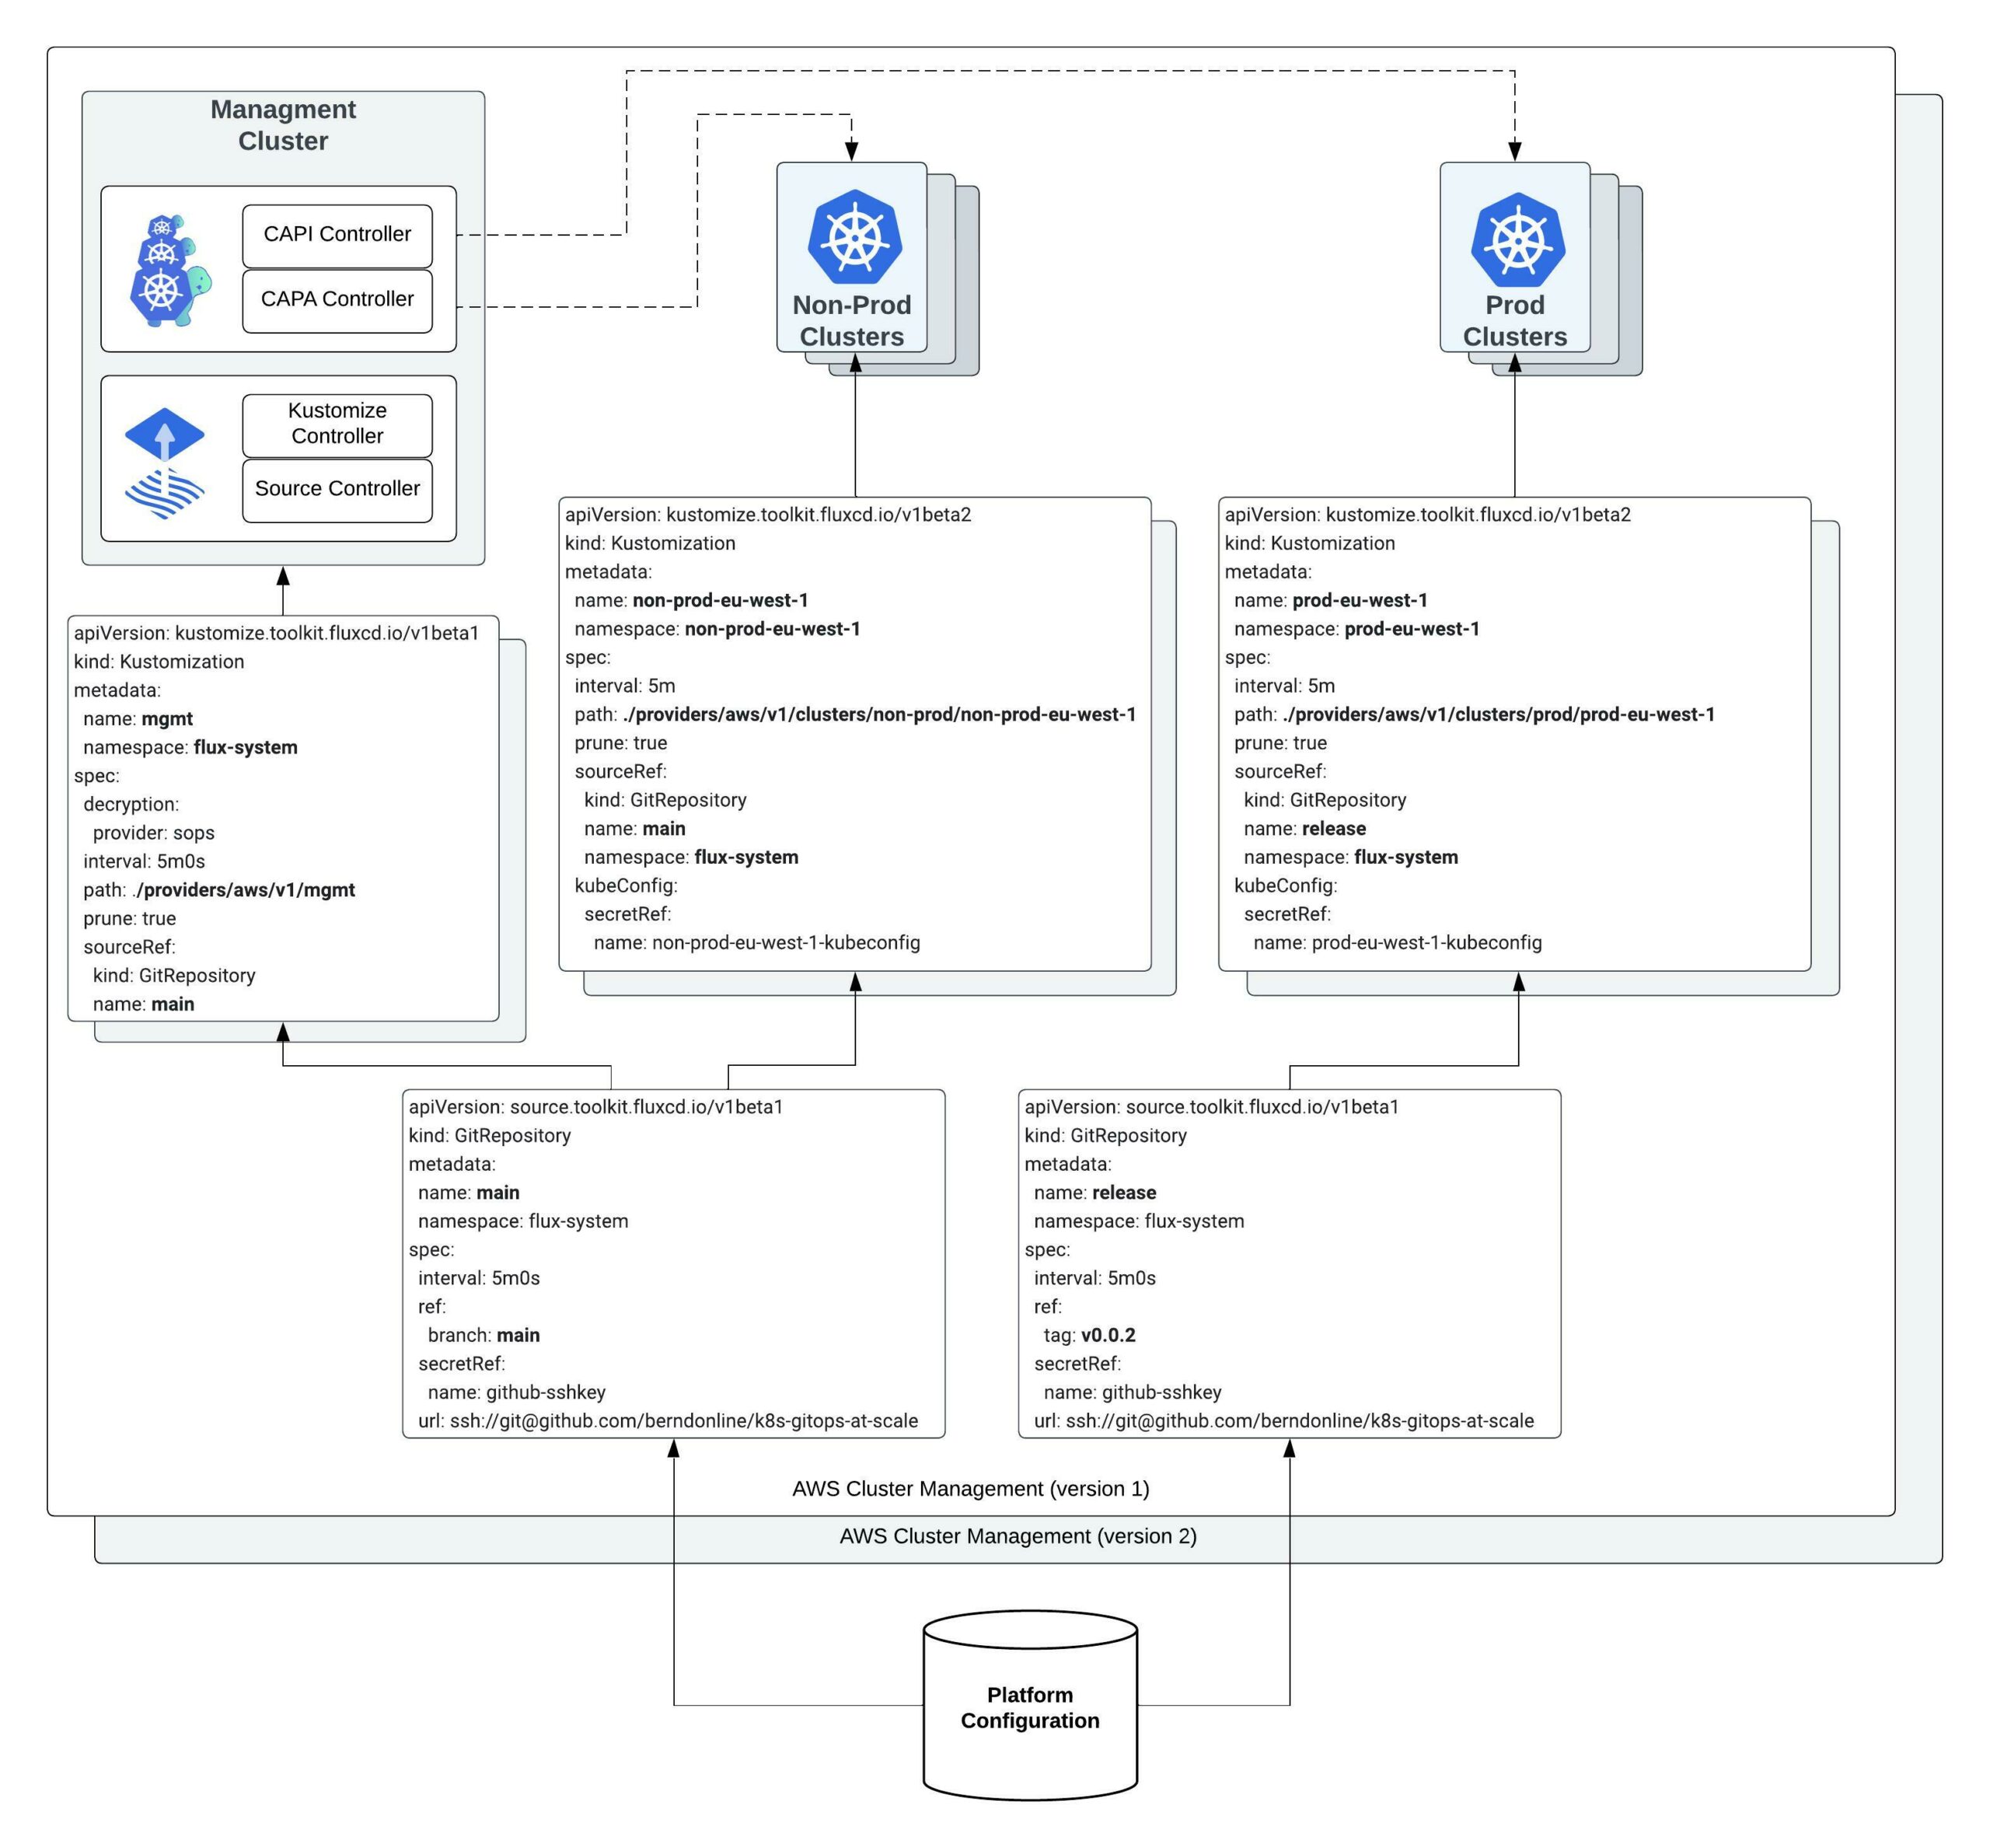
The configuration from the platform repository gets pulled on the management cluster using different gitrepository resources following the main branch or a version tag.

$ kubectl get gitrepositories.source.toolkit.fluxcd.io -A
NAMESPACE     NAME      URL                                                    AGE   READY   STATUS
flux-system   main      ssh://[email protected]/berndonline/k8s-gitops-at-scale   2d    True    stored artifact for revision 'main/ee3e71efb06628775fa19e9664b9194848c6450e'
flux-system   release   ssh://[email protected]/berndonline/k8s-gitops-at-scale   2d    True    stored artifact for revision 'v0.0.2/a5a5edd1194b629f6b41977483dca49aaad957ff'

The kustomization resources will then render and apply the configuration locally to the management cluster (diagram left-side) or remote clusters to our non-prod and prod workload clusters (diagram right-side) using the kubeconfig of the cluster created by the Cluster API stored during the bootstrap.

There are multiple kustomization resources to apply configuration based off the folder structure which I explained above. See the output below and checkout the repository for more details.

$ kubectl get kustomizations.kustomize.toolkit.fluxcd.io -A
NAMESPACE            NAME                          AGE   READY   STATUS
flux-system          feature-access-control        13h   True    Applied revision: v0.0.2/a5a5edd1194b629f6b41977483dca49aaad957ff
flux-system          mgmt                          2d    True    Applied revision: main/ee3e71efb06628775fa19e9664b9194848c6450e
non-prod-eu-west-1   common                        21m   True    Applied revision: main/ee3e71efb06628775fa19e9664b9194848c6450e
non-prod-eu-west-1   feature-access-control        21m   True    Applied revision: main/ee3e71efb06628775fa19e9664b9194848c6450e
non-prod-eu-west-1   feature-helloworld-operator   21m   True    Applied revision: main/ee3e71efb06628775fa19e9664b9194848c6450e
non-prod-eu-west-1   feature-ingress-nginx         21m   True    Applied revision: main/ee3e71efb06628775fa19e9664b9194848c6450e
non-prod-eu-west-1   non-prod-eu-west-1            21m   True    Applied revision: main/ee3e71efb06628775fa19e9664b9194848c6450e
non-prod-eu-west-1   tenants-common                21m   True    Applied revision: main/ee3e71efb06628775fa19e9664b9194848c6450e
non-prod-eu-west-1   tenants-non-prod              21m   True    Applied revision: main/ee3e71efb06628775fa19e9664b9194848c6450e
prod-eu-west-1       common                        15m   True    Applied revision: v0.0.2/a5a5edd1194b629f6b41977483dca49aaad957ff
prod-eu-west-1       feature-access-control        15m   True    Applied revision: v0.0.2/a5a5edd1194b629f6b41977483dca49aaad957ff
prod-eu-west-1       feature-helloworld-operator   15m   True    Applied revision: v0.0.2/a5a5edd1194b629f6b41977483dca49aaad957ff
prod-eu-west-1       feature-ingress-nginx         15m   True    Applied revision: v0.0.2/a5a5edd1194b629f6b41977483dca49aaad957ff
prod-eu-west-1       prod-eu-west-1                15m   True    Applied revision: v0.0.2/a5a5edd1194b629f6b41977483dca49aaad957ff
prod-eu-west-1       tenants-common                15m   True    Applied revision: v0.0.2/a5a5edd1194b629f6b41977483dca49aaad957ff
prod-eu-west-1       tenants-prod                  15m   True    Applied revision: v0.0.2/a5a5edd1194b629f6b41977483dca49aaad957ff

Release and promotion

The GitOps framework doesn’t explain about how to do promotion to higher environments and this is where the Trunk Based Development model comes in helpful together with the gitrepository resource to be able to pull a tagged version instead of a branch.

This allows us applying configuration first to lower environments to non-prod following the main branch, means pull-requests which are merged will be applied instantly. Configuration for higher environments to production requires to create a version tag and publish a release in the repository.

Why using a tag and not a release branch? A tag in your repository is a point in time snapshot of your configuration and can’t be easily modified which is required for creating the release. A branch on the other hand can be modified using pull-requests and you end up with lots of release branches which is less ideal.

To create a new version tag in the git repository I use the following commands:

$ git tag v0.0.3
$ git push origin --tags
Total 0 (delta 0), reused 0 (delta 0)
To github.com:berndonline/k8s-gitops-at-scale.git
* [new tag] v0.0.3 -> v0.0.3

This doesn’t do much after we pushed the new tag because the gitrepository release is set to v0.0.2 but I can see the new tag is available in the repository.
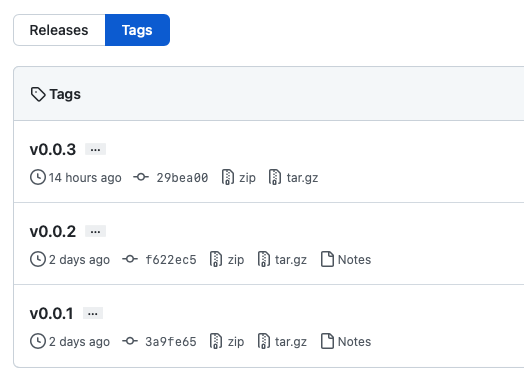
In the repository I can go to releases and click on “Draft a new release” and choose the new tag v0.0.3 I pushed previously.
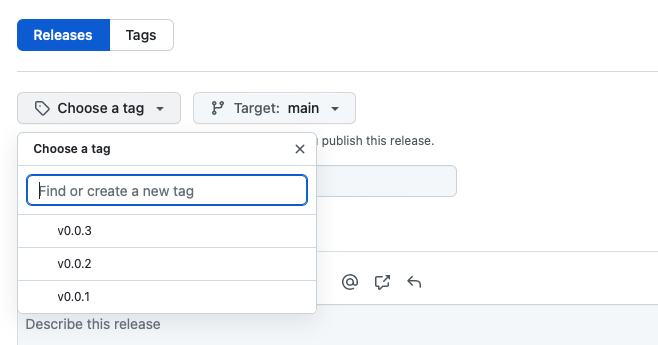
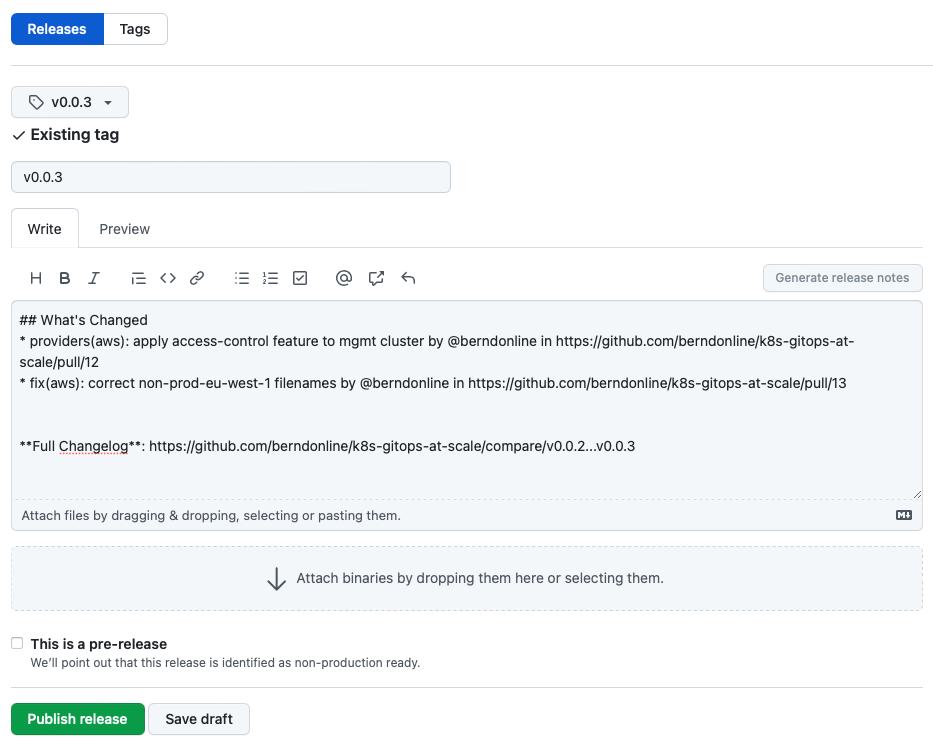
The release notes you see below can be auto-generate from the pull-requests you merged between v0.0.2 and v0.0.3 by clicking “Generate release notes”. To finish this off save and publish the release.

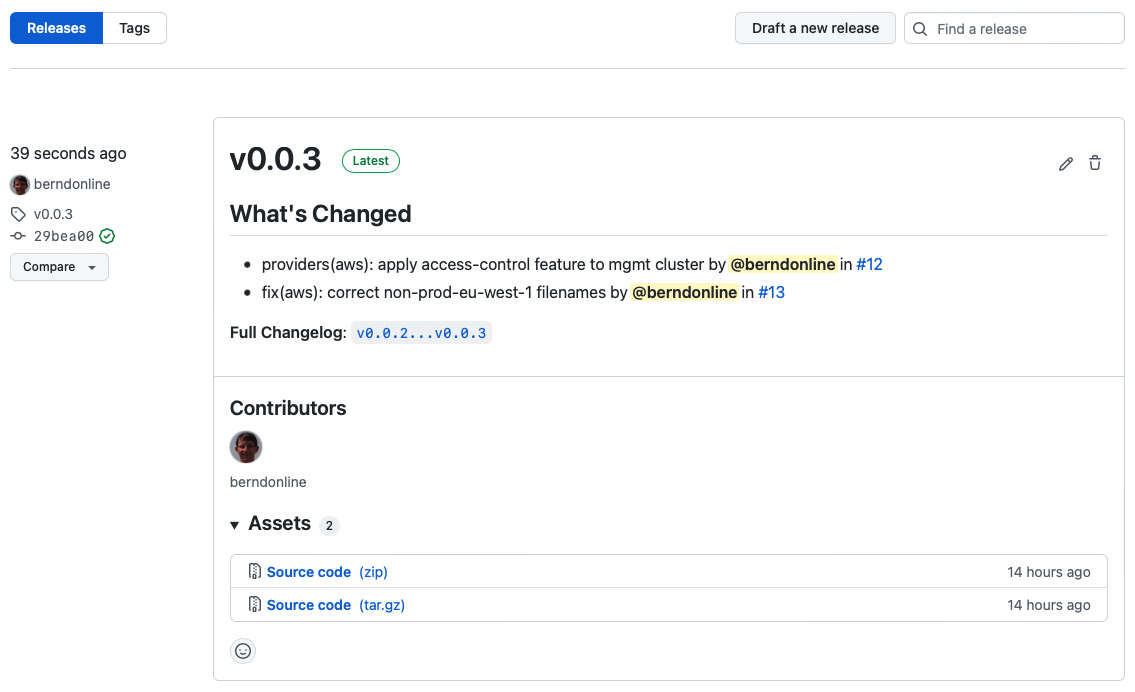
The release is publish and release notes are visible to everyone which is great for product teams on your platform because they will get visibility about upcoming changes including their own modifications to namespace configuration.
Until now all the changes are applied to our lower non-prod environment following the main branch and for doing the promotion we need to raise a pull-request and update the gitrepository release the new version v0.0.3.

If you follow ITIL change procedures then this is the point where you would normally raise a change for merging your pull-request because this triggers the rollout of your configuration to production.
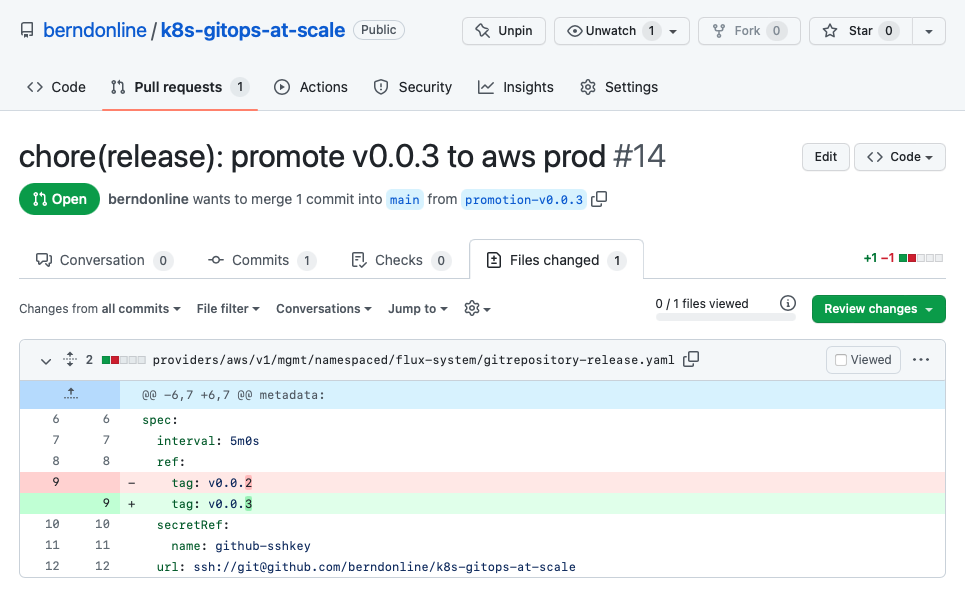
When the pull-request is merged the release gitrepository is updated by the kustomization resources through the main branch.

$ kubectl get gitrepositories.source.toolkit.fluxcd.io -A
NAMESPACE     NAME      URL                                           AGE   READY   STATUS
flux-system   main      ssh://[email protected]/berndonline/k8s-gitops   2d    True    stored artifact for revision 'main/83133756708d2526cca565880d069445f9619b70'
flux-system   release   ssh://[email protected]/berndonline/k8s-gitops   2d    True    stored artifact for revision 'v0.0.3/ee3e71efb06628885fa19e9664b9198a8c6450e8'

Shortly after the kustomization resources referencing the release will reconcile and automatically push down the new rendered configuration to the production clusters.

$ kubectl get kustomizations.kustomize.toolkit.fluxcd.io -A
NAMESPACE            NAME                          AGE   READY   STATUS
flux-system          feature-access-control        13h   True    Applied revision: v0.0.3/ee3e71efb06628885fa19e9664b9198a8c6450e8
flux-system          mgmt                          2d    True    Applied revision: main/83133756708d2526cca565880d069445f9619b70
non-prod-eu-west-1   common                        31m   True    Applied revision: main/83133756708d2526cca565880d069445f9619b70
non-prod-eu-west-1   feature-access-control        31m   True    Applied revision: main/83133756708d2526cca565880d069445f9619b70
non-prod-eu-west-1   feature-helloworld-operator   31m   True    Applied revision: main/83133756708d2526cca565880d069445f9619b70
non-prod-eu-west-1   feature-ingress-nginx         31m   True    Applied revision: main/83133756708d2526cca565880d069445f9619b70
non-prod-eu-west-1   non-prod-eu-west-1            31m   True    Applied revision: main/83133756708d2526cca565880d069445f9619b70
non-prod-eu-west-1   tenants-common                31m   True    Applied revision: main/83133756708d2526cca565880d069445f9619b70
non-prod-eu-west-1   tenants-non-prod              31m   True    Applied revision: main/83133756708d2526cca565880d069445f9619b70
prod-eu-west-1       common                        26m   True    Applied revision: v0.0.3/ee3e71efb06628885fa19e9664b9198a8c6450e8
prod-eu-west-1       feature-access-control        26m   True    Applied revision: v0.0.3/ee3e71efb06628885fa19e9664b9198a8c6450e8
prod-eu-west-1       feature-helloworld-operator   26m   True    Applied revision: v0.0.3/ee3e71efb06628885fa19e9664b9198a8c6450e8
prod-eu-west-1       feature-ingress-nginx         26m   True    Applied revision: v0.0.3/ee3e71efb06628885fa19e9664b9198a8c6450e8
prod-eu-west-1       prod-eu-west-1                26m   True    Applied revision: v0.0.3/ee3e71efb06628885fa19e9664b9198a8c6450e8
prod-eu-west-1       tenants-common                26m   True    Applied revision: v0.0.3/ee3e71efb06628885fa19e9664b9198a8c6450e8
prod-eu-west-1       tenants-prod                  26m   True    Applied revision: v0.0.3/ee3e71efb06628885fa19e9664b9198a8c6450e8

Why using Kustomize for managing the configuration and not Helm? I know the difficulties of managing these raw YAML manifests. Kustomize gets you going quick where with Helm there is a higher initial effort writing your Charts. In my next article I will focus specifically on Helm.

I showed a very simplistic example having a single cloud provider (aws) and a single management cluster but as you have seen you can easily add Azure or Google cloud providers in your configuration and scale horizontally. I think this is what makes Kubernetes and controllers like Flux CD great together that you don’t need to have complex pipelines or workflows to rollout and promote your changes completely pipeline-less.
 

Ansible Automation with Cisco ASA Multi-Context Mode

I thought I’d share my experience using Ansible and Cisco ASA firewalls in multi-context mode. Right from the beginning I had a few issues deploying the configuration and the switch between the different security context didn’t work well. I got the error you see below when I tried to run a playbook. Other times the changeto context didn’t work well and applied the wrong config:

berndonline@lab:~$ ansible-playbook -i inventory site.yml --ask-vault-pass
Vault password:

PLAY [all] ***************************************************************************************************************************************************************************

TASK [hostname : set dns and hostname] ***********************************************************************************************************************************************
An exception occurred during task execution. To see the full traceback, use -vvv. The error was: error: [Errno 61] Connection refused
fatal: [fwcontext01]: FAILED! => {"changed": false, "err": "[Errno 61] Connection refused", "msg": "unable to connect to socket"}
ok: [fwcontext02]

TASK [interfaces : write interfaces config] ******************************************************************************************************************************************
ok: [fwcontext02]

....

After a bit of troubleshooting I found a workaround to limit the amount of processes Ansible use and set this limit to one in the Ansible.cfg. The default is five processes if forks is not defined as far as I remember.

[defaults]
inventory = ./inventory
host_key_checking=False
jinja2_extensions=jinja2.ext.do
forks = 1

In the example inventory file, the “inventory_hostname” variable represents the security context and as you see the “ansible_ssh_host” is set to the IP address of the admin context:

fwcontext01 ansible_ssh_host=192.168.0.1 ansible_ssh_port=22 ansible_ssh_user='ansible' ansible_ssh_pass='cisco'
fwcontext02 ansible_ssh_host=192.168.0.1 ansible_ssh_port=22 ansible_ssh_user='ansible' ansible_ssh_pass='cisco'

When you run the playbook again you can see that the playbook runs successfully but deploys the changes one by one to each firewall security context, the disadvantage is that the playbook takes much longer to run:

berndonline@lab:~$ ansible-playbook site.yml

PLAY [all] ***************************************************************************************************************************************************************************

TASK [hostname : set dns and hostname] ***********************************************************************************************************************************************
ok: [fwcontext01]
ok: [fwcontext02]

TASK [interfaces : write interfaces config] ******************************************************************************************************************************************
ok: [fwcontext01]
ok: [fwcontext02]

Example site.yml

---

- hosts: all
  connection: local
  gather_facts: 'no'

  vars:
    cli:
      username: "{{ ansible_ssh_user }}"
      password: "{{ ansible_ssh_pass }}"
      host: "{{ ansible_ssh_host }}"

  roles:
    - interfaces

In the example Interface role you see that the context is set to “inventory_hostname” variable:

---

- name: write interfaces config
  asa_config:
    src: "templates/interfaces.j2"
    provider: "{{ cli }}"
    context: "{{ inventory_hostname }}"
  register: result

- name: enable interfaces
  asa_config:
    parents: "interface {{ item.0 }}"
    lines: "no shutdown"
    match: none
    provider: "{{ cli }}"
    context: "{{ inventory_hostname }}"
  when: result.changed
  with_items:
    - "{{ interfaces.items() }}"

After modifying the forks, the Ansible playbook runs well with Cisco ASA in multi-context mode, like mentioned before it is a bit slow to deploy the configuration if I compare this to Cumulus Linux or any other Linux system.

Please share your feedback.

Leave a comment

BGP EVPN and VXLAN with Cumulus Linux

I did some updates on my Cumulus Linux Vagrant topology and added new functions to my post about an Ansible Playbook for the Cumulus Linux BGP IP-Fabric.

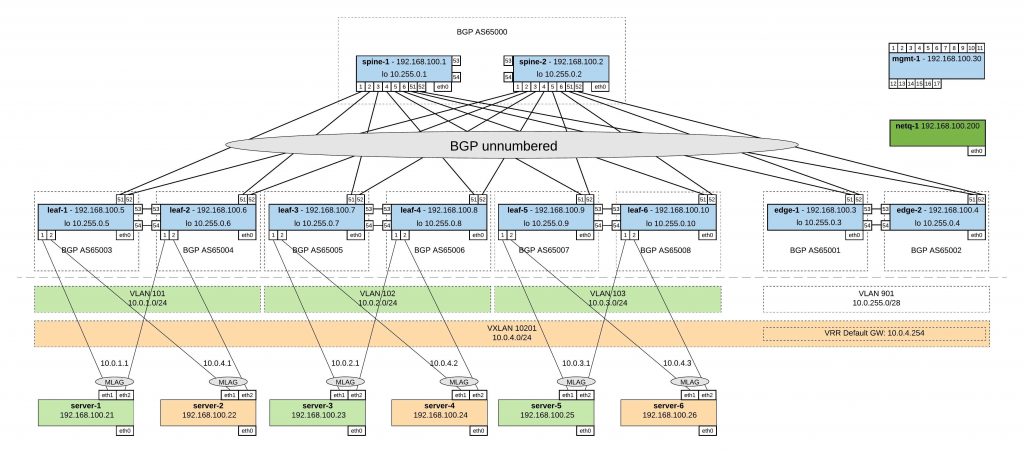
To the Vagrant topology, I added 6x servers and per clag-pair, each server is connected to a VLAN and the second server is connected to a VXLAN.

Here are the links to the repositories where you find the Ansible Playbook https://github.com/berndonline/cumulus-lab-provision and the Vagrantfile https://github.com/berndonline/cumulus-lab-vagrant

In the Ansible Playbook, I added BGP EVPN and one VXLAN which spreads over all Leaf and Edge switches. VXLAN routing is happening on the Edge switches into the rest of the virtual data centre network.

Here is an example of the additional variables I added to edge-1 for BGP EVPN and VXLAN:

group_vars/edge.yml:

clagd_vxlan_anycast_ip: 10.255.100.1

The VXLAN anycast IP is needed in BGP for EVPN and the same IP is shared between edge-1 and edge-2. The same is for the other leaf switches, per clag pair they share the same anycast IP address.

host_vars/edge-1.yml:

---

loopback: 10.255.0.3/32

bgp_fabric:
  asn: 65001
  router_id: 10.255.0.3
  neighbor:
    - swp51
    - swp52
  networks:
    - 10.0.4.0/24
    - 10.255.0.3/32
    - 10.255.100.1/32
    - 10.0.255.0/28
  evpn: true
  advertise_vni: true

peerlink:
  bond_slaves: swp53 swp54
  mtu: 9216
  vlan: 4094
  address: 169.254.1.1/30
  clagd_peer_ip: 169.254.1.2
  clagd_backup_ip: 192.168.100.4
  clagd_sys_mac: 44:38:39:FF:40:94
  clagd_priority: 4096

bridge:
  ports: peerlink vxlan10201
  vids: 901 201

vlans:
  901:
    alias: edge-transit-901
    vipv4: 10.0.255.14/28
    vmac: 00:00:5e:00:09:01
    pipv4: 10.0.255.12/28
  201:
    alias: prod-server-10201
    vipv4: 10.0.4.254/24
    vmac: 00:00:00:00:02:01
    pipv4: 10.0.4.252/24
    vlan_id: 201
    vlan_raw_device: bridge

vxlans:
  10201:
    alias: prod-server-10201
    vxlan_local_tunnelip: 10.255.0.3
    bridge_access: 201
    bridge_learning: 'off'
    bridge_arp_nd_suppress: 'on'

On the Edge switches, because of VXLAN routing, you find a mapping between VXLAN 10201 to VLAN 201 which has VRR running.

I needed to do some modifications to the interfaces template interfaces_config.j2:

{% if loopback is defined %}
auto lo
iface lo inet loopback
    address {{ loopback }}
{% if clagd_vxlan_anycast_ip is defined %}
    clagd-vxlan-anycast-ip {{ clagd_vxlan_anycast_ip }}
{% endif %}
{% endif %}
...
{% if bridge is defined %}
{% for vxlan_id, value in vxlans.items() %}
auto vxlan{{ vxlan_id }}
iface vxlan{{ vxlan_id }}
    alias {{ value.alias }}
    vxlan-id {{ vxlan_id }}
    vxlan-local-tunnelip {{ value.vxlan_local_tunnelip }}
    bridge-access {{ value.bridge_access }}
    bridge-learning {{ value.bridge_learning }}
    bridge-arp-nd-suppress {{ value.bridge_arp_nd_suppress }}
    mstpctl-bpduguard yes
    mstpctl-portbpdufilter yes

{% endfor %}
{% endif %}

There were also some modifications needed to the FRR template frr.j2 to add EVPN to the BGP configuration:

...
{% if bgp_fabric.evpn is defined %}
 address-family ipv6 unicast
  neighbor fabric activate
 exit-address-family
 !
 address-family l2vpn evpn
  neighbor fabric activate
{% if bgp_fabric.advertise_vni is defined %}
  advertise-all-vni
{% endif %}
 exit-address-family
{% endif %}
{% endif %}
...

For more detailed information about EVPN and VXLAN routing on Cumulus Linux, I recommend reading the documentation Ethernet Virtual Private Network – EVPN and VXLAN Routing.

Have fun testing the new features in my Ansible Playbook and please share your feedback.

Leave a comment

Ansible Playbook for Arista vEOS BGP IP-Fabric

Over the Christmas holidays, I was working just for fun on an Arista vEOS Vagrant topology and Ansible Playbook. I reused my Ansible Playbook from my previous post about an Ansible Playbook for Cumulus Linux BGP IP-Fabric and Cumulus NetQ Validation.

Arista only has a Virtualbox vEOS image and there is an ISO image to boot the virtual appliance which I don’t understand why they have done this, rather I prefer the way Cumulus provide their VX images for testing to use with Virtualbox or KVM.

I found an interesting blog post on how to run vEOS images with KVM (Libvirt). I tried it and I could run vEOS in KVM but unfortunately, it wasn’t  stable enough to run more complex virtual network topologies so I had to switch back to Virtualbox. I will give it a try again in a few month because I prefer KVM over Virtualbox.

Anyway, you’ll find more information about how to use vEOS with Virtualbox and Vagrant.

My Virtualbox Vagrantfile can be found in my Github repository: https://github.com/berndonline/arista-lab-vagrant

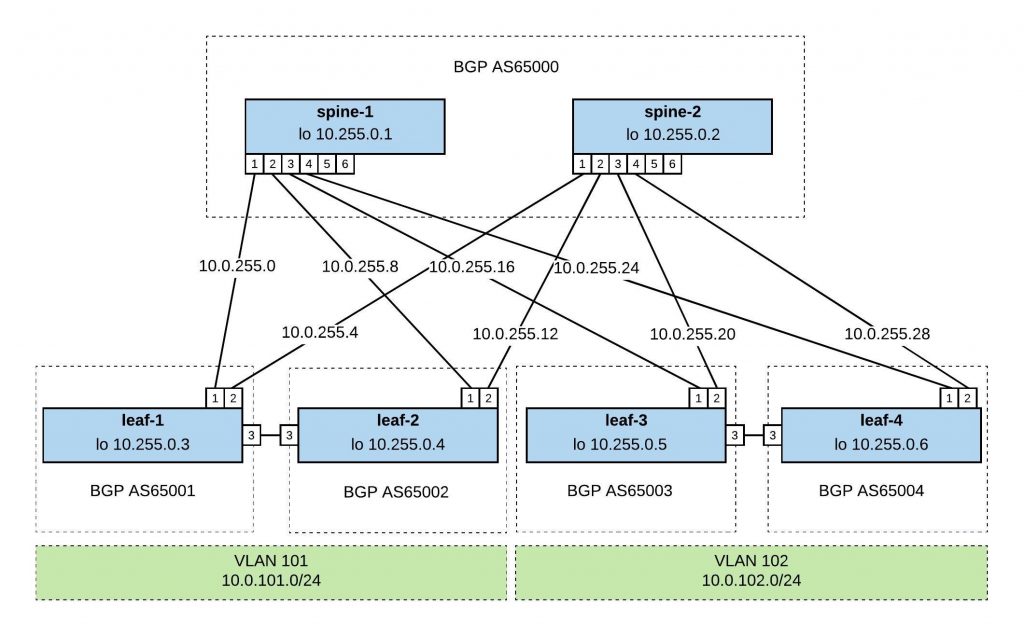
Network overview:

Ansible Playbook:

As I have mentioned before I tried to be close as possible to my Cumulus Linux Ansible Playbook and tried to keep the variables and roles the same. They are differences of course in the Jinja2 templates and tasks but the overall structure is similar.

Here you’ll find the repository with the Ansible Playbook: https://github.com/berndonline/arista-lab-provision

Because Arista didn’t prepare the images very well and only created a vagrant user without adding the ssh key for authentication I needed to use a CLI provider with a username and password. But this is only a minor issue otherwise it works the same. See the site.yml below:

---

- hosts: network

  connection: local
  gather_facts: 'False'

  vars:
    cli:
      username: vagrant
      password: vagrant

  roles:
    - leafgroups
    - hostname
    - interfaces
    - routing
    - ntp

In the roles, I have used the Arista EOS Ansible modules eos_config and eos_system.

Boot up the Vagrant environment and then run the Playbook afterwards:

PLAY [network] *****************************************************************

TASK [leafgroups : create leaf groups based on clag_pairs] *********************
ok: [leaf-1] => (item=(u'leafgroup1', [u'leaf-1', u'leaf-2']))
skipping: [leaf-1] => (item=(u'leafgroup2', [u'leaf-3', u'leaf-4'])) 
skipping: [leaf-3] => (item=(u'leafgroup1', [u'leaf-1', u'leaf-2'])) 
ok: [leaf-3] => (item=(u'leafgroup2', [u'leaf-3', u'leaf-4']))
skipping: [leaf-4] => (item=(u'leafgroup1', [u'leaf-1', u'leaf-2'])) 
ok: [leaf-2] => (item=(u'leafgroup1', [u'leaf-1', u'leaf-2']))
skipping: [leaf-2] => (item=(u'leafgroup2', [u'leaf-3', u'leaf-4'])) 
ok: [leaf-4] => (item=(u'leafgroup2', [u'leaf-3', u'leaf-4']))
skipping: [spine-1] => (item=(u'leafgroup1', [u'leaf-1', u'leaf-2'])) 
skipping: [spine-1] => (item=(u'leafgroup2', [u'leaf-3', u'leaf-4'])) 
skipping: [spine-2] => (item=(u'leafgroup1', [u'leaf-1', u'leaf-2'])) 
skipping: [spine-2] => (item=(u'leafgroup2', [u'leaf-3', u'leaf-4'])) 

TASK [leafgroups : include leaf group variables] *******************************
ok: [leaf-1] => (item=(u'leafgroup1', [u'leaf-1', u'leaf-2']))
skipping: [leaf-3] => (item=(u'leafgroup1', [u'leaf-1', u'leaf-2'])) 
skipping: [leaf-1] => (item=(u'leafgroup2', [u'leaf-3', u'leaf-4'])) 
skipping: [leaf-4] => (item=(u'leafgroup1', [u'leaf-1', u'leaf-2'])) 
skipping: [spine-1] => (item=(u'leafgroup1', [u'leaf-1', u'leaf-2'])) 
skipping: [spine-1] => (item=(u'leafgroup2', [u'leaf-3', u'leaf-4'])) 
ok: [leaf-3] => (item=(u'leafgroup2', [u'leaf-3', u'leaf-4']))
ok: [leaf-2] => (item=(u'leafgroup1', [u'leaf-1', u'leaf-2']))
skipping: [leaf-2] => (item=(u'leafgroup2', [u'leaf-3', u'leaf-4'])) 
ok: [leaf-4] => (item=(u'leafgroup2', [u'leaf-3', u'leaf-4']))
skipping: [spine-2] => (item=(u'leafgroup1', [u'leaf-1', u'leaf-2'])) 
skipping: [spine-2] => (item=(u'leafgroup2', [u'leaf-3', u'leaf-4'])) 

TASK [hostname : write hostname and domain name] *******************************
changed: [leaf-4]
changed: [spine-1]
changed: [leaf-1]
changed: [leaf-3]
changed: [leaf-2]
changed: [spine-2]

TASK [interfaces : write interface configuration] ******************************
changed: [spine-1]
changed: [leaf-2]
changed: [leaf-4]
changed: [leaf-3]
changed: [leaf-1]
changed: [spine-2]

TASK [routing : write routing configuration] ***********************************
changed: [leaf-1]
changed: [leaf-4]
changed: [spine-1]
changed: [leaf-2]
changed: [leaf-3]
changed: [spine-2]

TASK [ntp : write ntp configuration] *******************************************
changed: [leaf-2] => (item=216.239.35.8)
changed: [leaf-1] => (item=216.239.35.8)
changed: [leaf-3] => (item=216.239.35.8)
changed: [spine-1] => (item=216.239.35.8)
changed: [leaf-4] => (item=216.239.35.8)
changed: [spine-2] => (item=216.239.35.8)

PLAY RECAP *********************************************************************
leaf-1                     : ok=6    changed=4    unreachable=0    failed=0   
leaf-2                     : ok=6    changed=4    unreachable=0    failed=0   
leaf-3                     : ok=6    changed=4    unreachable=0    failed=0   
leaf-4                     : ok=6    changed=4    unreachable=0    failed=0   
spine-1                    : ok=4    changed=4    unreachable=0    failed=0   
spine-2                    : ok=4    changed=4    unreachable=0    failed=0   

I didn’t use the leafgroups role for variables in my Playbook but I left it just in case.

Because Arista has nothing similar to Cumulus NetQ to validate the configuration I create a simple arista_check_icmp.yml playbook and use ping from the leaf switches to test if the configuration is successfully deployed.

PLAY [leaf] ********************************************************************

TASK [validate connection from leaf-1] *****************************************
skipping: [leaf-3] => (item=10.255.0.4) 
skipping: [leaf-3] => (item=10.255.0.5) 
skipping: [leaf-3] => (item=10.255.0.6) 
skipping: [leaf-2] => (item=10.255.0.4) 
skipping: [leaf-2] => (item=10.255.0.5) 
skipping: [leaf-2] => (item=10.255.0.6) 
skipping: [leaf-3] => (item=10.0.102.252) 
skipping: [leaf-4] => (item=10.255.0.4) 
skipping: [leaf-3] => (item=10.0.102.253) 
skipping: [leaf-3] => (item=10.0.102.254) 
skipping: [leaf-4] => (item=10.255.0.5) 
skipping: [leaf-2] => (item=10.0.102.252) 
skipping: [leaf-4] => (item=10.255.0.6) 
skipping: [leaf-2] => (item=10.0.102.253) 
skipping: [leaf-2] => (item=10.0.102.254) 
skipping: [leaf-4] => (item=10.0.102.252) 
skipping: [leaf-4] => (item=10.0.102.253) 
skipping: [leaf-4] => (item=10.0.102.254) 
ok: [leaf-1] => (item=10.255.0.4)
ok: [leaf-1] => (item=10.255.0.5)
ok: [leaf-1] => (item=10.255.0.6)
ok: [leaf-1] => (item=10.0.102.252)
ok: [leaf-1] => (item=10.0.102.253)
ok: [leaf-1] => (item=10.0.102.254)

TASK [validate connection from leaf-2] *****************************************
skipping: [leaf-1] => (item=10.255.0.3) 
skipping: [leaf-3] => (item=10.255.0.3) 
skipping: [leaf-1] => (item=10.255.0.5) 
skipping: [leaf-3] => (item=10.255.0.5) 
skipping: [leaf-1] => (item=10.255.0.6) 
skipping: [leaf-3] => (item=10.255.0.6) 
skipping: [leaf-1] => (item=10.0.102.252) 
skipping: [leaf-1] => (item=10.0.102.253) 
skipping: [leaf-4] => (item=10.255.0.3) 
skipping: [leaf-3] => (item=10.0.102.252) 
skipping: [leaf-1] => (item=10.0.102.254) 
skipping: [leaf-3] => (item=10.0.102.253) 
skipping: [leaf-3] => (item=10.0.102.254) 
skipping: [leaf-4] => (item=10.255.0.5) 
skipping: [leaf-4] => (item=10.255.0.6) 
skipping: [leaf-4] => (item=10.0.102.252) 
skipping: [leaf-4] => (item=10.0.102.253) 
skipping: [leaf-4] => (item=10.0.102.254) 
ok: [leaf-2] => (item=10.255.0.3)
ok: [leaf-2] => (item=10.255.0.5)
ok: [leaf-2] => (item=10.255.0.6)
ok: [leaf-2] => (item=10.0.102.252)
ok: [leaf-2] => (item=10.0.102.253)
ok: [leaf-2] => (item=10.0.102.254)

TASK [validate connection from leaf-3] *****************************************
skipping: [leaf-1] => (item=10.255.0.3) 
skipping: [leaf-1] => (item=10.255.0.4) 
skipping: [leaf-2] => (item=10.255.0.3) 
skipping: [leaf-1] => (item=10.255.0.6) 
skipping: [leaf-1] => (item=10.0.101.252) 
skipping: [leaf-2] => (item=10.255.0.4) 
skipping: [leaf-2] => (item=10.255.0.6) 
skipping: [leaf-1] => (item=10.0.101.253) 
skipping: [leaf-4] => (item=10.255.0.3) 
skipping: [leaf-2] => (item=10.0.101.252) 
skipping: [leaf-4] => (item=10.255.0.4) 
skipping: [leaf-1] => (item=10.0.101.254) 
skipping: [leaf-4] => (item=10.255.0.6) 
skipping: [leaf-2] => (item=10.0.101.253) 
skipping: [leaf-4] => (item=10.0.101.252) 
skipping: [leaf-2] => (item=10.0.101.254) 
skipping: [leaf-4] => (item=10.0.101.253) 
skipping: [leaf-4] => (item=10.0.101.254) 
ok: [leaf-3] => (item=10.255.0.3)
ok: [leaf-3] => (item=10.255.0.4)
ok: [leaf-3] => (item=10.255.0.6)
ok: [leaf-3] => (item=10.0.101.252)
ok: [leaf-3] => (item=10.0.101.253)
ok: [leaf-3] => (item=10.0.101.254)

TASK [validate connection from leaf-4] *****************************************
skipping: [leaf-1] => (item=10.255.0.3) 
skipping: [leaf-3] => (item=10.255.0.3) 
skipping: [leaf-1] => (item=10.255.0.4) 
skipping: [leaf-3] => (item=10.255.0.4) 
skipping: [leaf-1] => (item=10.255.0.5) 
skipping: [leaf-2] => (item=10.255.0.3) 
skipping: [leaf-3] => (item=10.255.0.5) 
skipping: [leaf-3] => (item=10.0.101.252) 
skipping: [leaf-2] => (item=10.255.0.4) 
skipping: [leaf-1] => (item=10.0.101.252) 
skipping: [leaf-2] => (item=10.255.0.5) 
skipping: [leaf-2] => (item=10.0.101.252) 
skipping: [leaf-3] => (item=10.0.101.253) 
skipping: [leaf-1] => (item=10.0.101.253) 
skipping: [leaf-1] => (item=10.0.101.254) 
skipping: [leaf-3] => (item=10.0.101.254) 
skipping: [leaf-2] => (item=10.0.101.253) 
skipping: [leaf-2] => (item=10.0.101.254) 
ok: [leaf-4] => (item=10.255.0.3)
ok: [leaf-4] => (item=10.255.0.4)
ok: [leaf-4] => (item=10.255.0.5)
ok: [leaf-4] => (item=10.0.101.252)
ok: [leaf-4] => (item=10.0.101.253)
ok: [leaf-4] => (item=10.0.101.254)

PLAY RECAP *********************************************************************
leaf-1                     : ok=1    changed=0    unreachable=0    failed=0   
leaf-2                     : ok=1    changed=0    unreachable=0    failed=0   
leaf-3                     : ok=1    changed=0    unreachable=0    failed=0   
leaf-4                     : ok=1    changed=0    unreachable=0    failed=0   

I don’t usually work with Arista devices and this was a try to use a different switch vendor but still keep using the type of Ansible Playbook.

Please tell me if you like it and share your feedback.

Leave a comment

Ansible Playbook for Cisco ASAv Firewall Topology

More about Ansible network automation with Cisco ASAv and continuous integration testing like in my previous posts using Vagrant and Gitlab-CI.

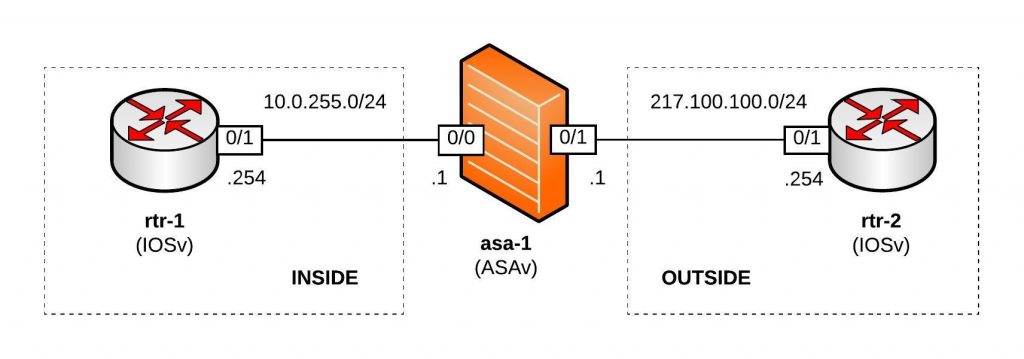
Network overview:

Here’s my Github repository where you can find the complete Ansible Playbook: https://github.com/berndonline/asa-lab-provision

Automating firewall configuration is not that easy and can get very complicated because you have different objects, access-lists and service policies to configure which all together makes the playbook complex rather than simple.

What you won’t find in my playbook is how to automate the cluster deployment because this wasn’t possible in my scenario using ASAv and Vagrant. I didn’t have physical Cisco ASA firewall on hand to do this but I might add this later in the coming months.

Let’s look at the different variable files I created; first the host_vars for asa-1.yml which is very similar to a Cisco router:

---

hostname: asa-1
domain_name: lab.local

interfaces:
  0/0:
    alias: connection rtr-1 inside
    nameif: inside
    security_level: 100
    address: 10.0.255.1
    mask: 255.255.255.0

  0/1:
    alias: connection rtr-2 outside
    nameif: outside
    security_level: 0
    address: 217.100.100.1
    mask: 255.255.255.0

routes:
  - route outside 0.0.0.0 0.0.0.0 217.100.100.254 1

I then use multiple files in group_vars for objects.ymlobject-groups.ymlaccess-lists.yml and nat.yml to configure specific firewall settings.

Roles:

  • Hostname: The task in main.yml uses the Ansible module asa_config and configures hostname and domain name.
  • Interfaces:  This role uses the Ansible module asa_config to deploy the template interfaces.j2 to configure the interfaces. In the main.yml is a second task to enable the interfaces when the previous template applied the configuration.
  • Routing: Similar to the interfaces role and uses also the asa_config module to deploy the template routing.j2 for the static routes
  • Objects: The first task in main.yml loads the objects.yml from group_vars, the second task deploys the template objects.j2.
  • Object-Groups: Uses same tasks in main.yml and template object-groups.j2 like the objects role but the commands are slightly different.
  • Access-Lists: One of the more complicated roles I needed to work on, in the main.yml are multiple tasks to load variables like in the previous roles, then runs a task to clear access-lists if the variable “override_acl” from access-lists.yml group_vars is set to “true” otherwise it skips the next tasks. When the variable are set to true and the access-lists are cleared it then writes new access-lists using the Ansible module asa_acl and finishes with a task to assigning the newly created access-lists to the interfaces.
  • NAT: This role is again similar to the objects role using a task main.yml to load variable file and deploys the template nat.j2. The NAT role uses object nat and only works if you created the object before in the objects group_vars.
  • Policy-Framework: Multiple tasks in main.yml first clears global policy and policy maps and afterwards recreates them. Similar approach like the access lists to keep it consistent.

Main Ansible Playbook site.yml

---

- hosts: asa-1

  connection: local
  user: vagrant
  gather_facts: 'no'

  roles:
    - hostname
    - interfaces
    - routing
    - objects
    - object-groups
    - access-lists
    - nat
    - policy-framework

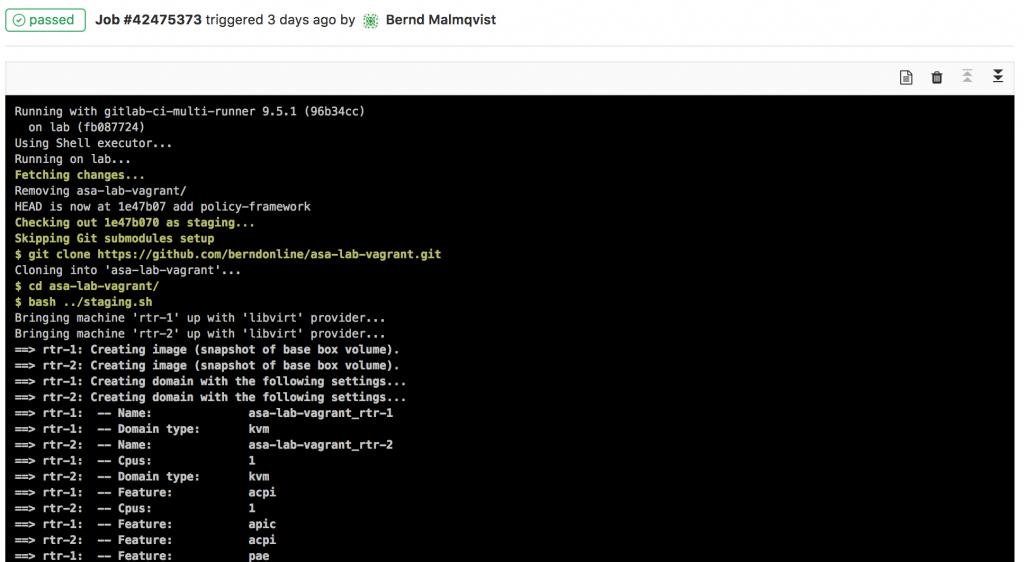
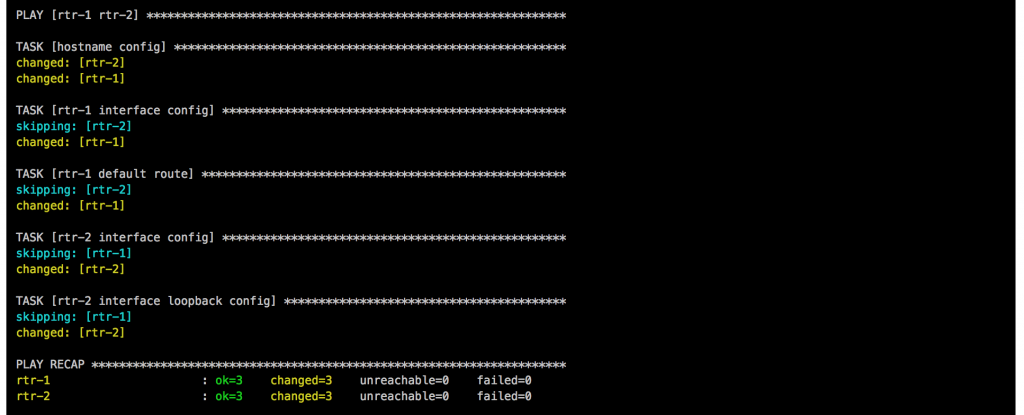
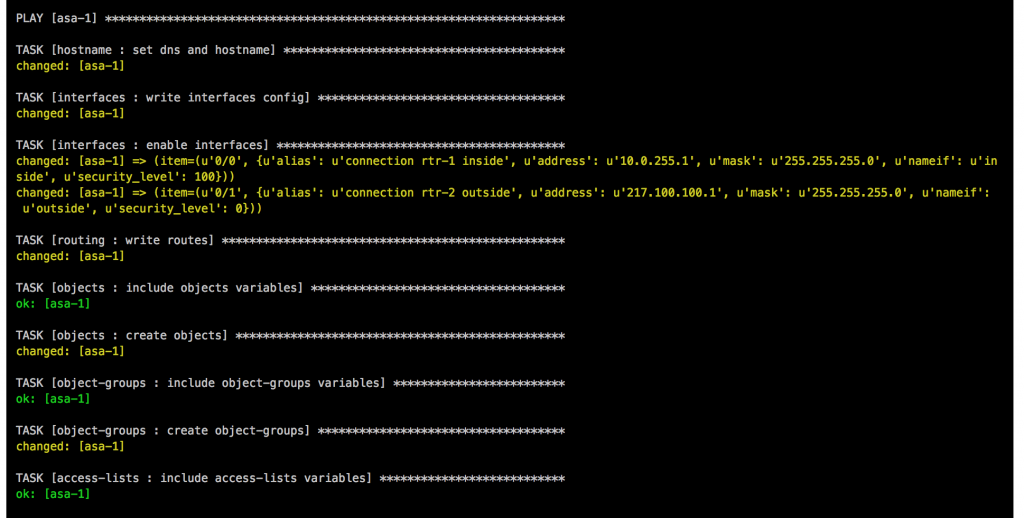
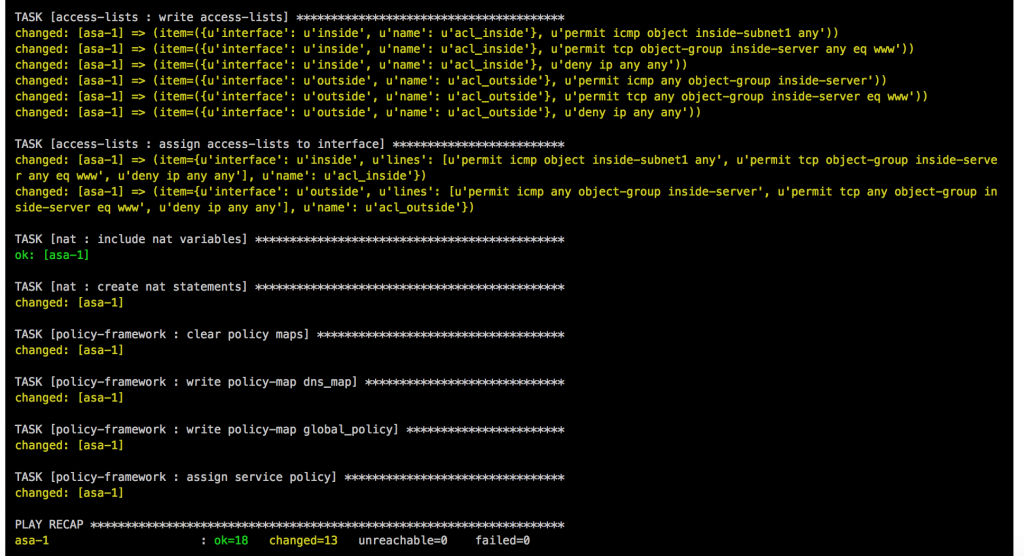
When a change triggers the gitlab-ci pipeline it spins up the Vagrant instances and executes the main Ansible Playbook. After the Vagrant instances are booted, first the two router rtr-1 and rtr-2 need to be configured with cisco_router_config.yml, then afterwards the main site.yml will be run.

Once the main playbook finishes for the Cisco ASA a last connectivity check will be execute using the playbook asa_check_icmp.yml. Just a simple ping to see if the base configuration is applied correctly.

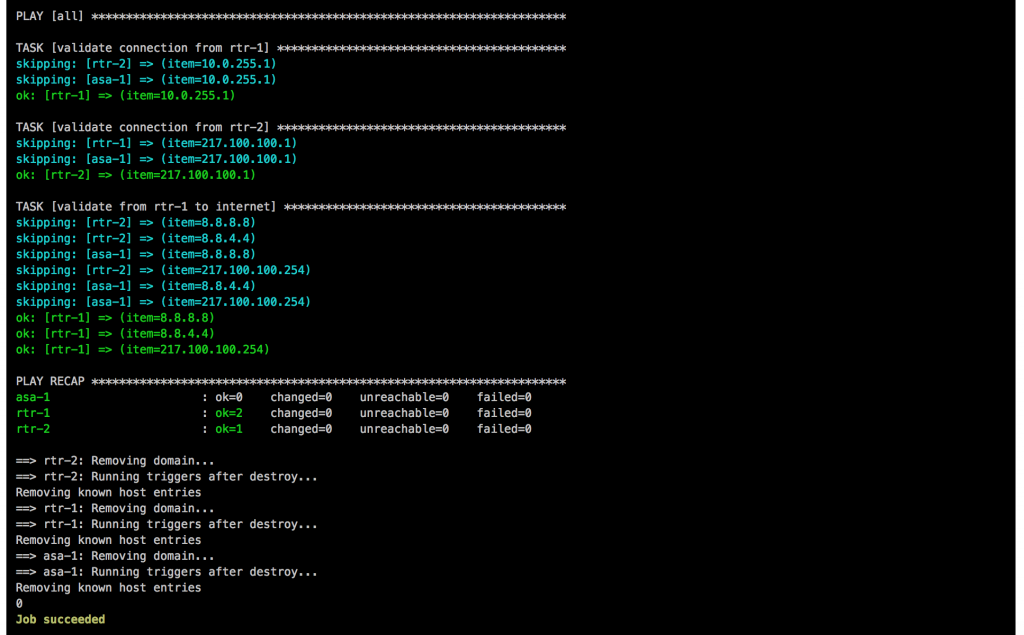
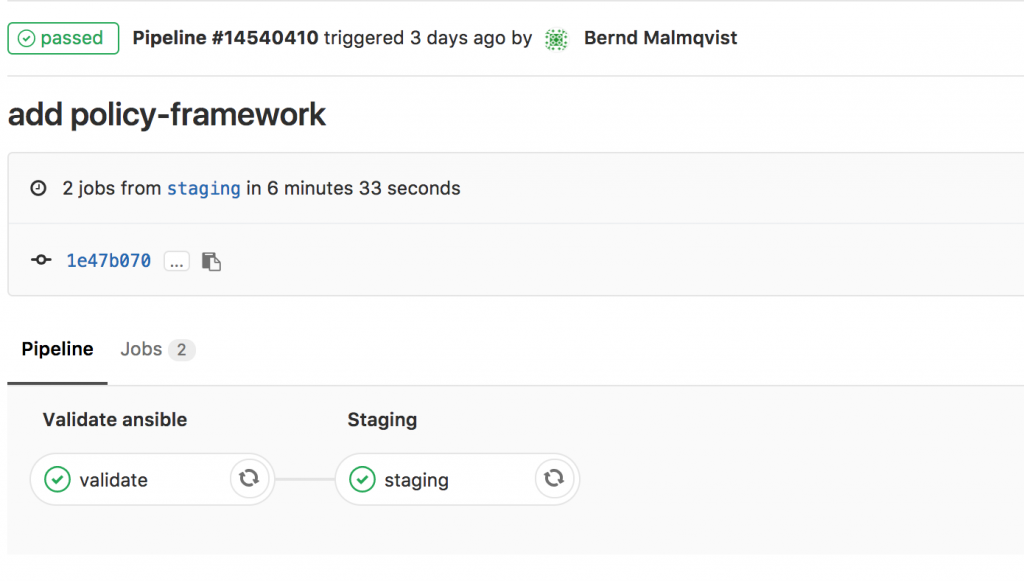
If everything goes well, like in this example, the job is successful:

I will continue to improve the Playbook and the CICD pipeline so come back later to check it out.

Leave a comment