Mozilla SOPS and GitOps Toolkit (Flux CD v2) to decrypt and apply Kubernetes secrets

Using GitOps way of working and tools like the GitOps toolkit (Flux CD v2) is great for applying configuration to your Kubernetes clusters but what about secrets and how can you store them securely in your repository? The perfect tool for this is Mozilla’s SOPS which uses a cloud based KMS, HashiCorp Vault or a PGP key to encrypt and decrypt your secrets and store them in encrypted form with the rest of your configuration in a code repostory. There is a guide in the Flux documentation about how to use SOPS but I did this slightly differently with a Google Cloud KMS.

Start by downloading the latest version of the Mozilla SOPS command-line binary. This is what makes SOPS so easy to use, there is not much you need to encrypt or decrypt secrets apart for an KMS system or a simple PGP key.

sudo wget -O /usr/local/bin/sops https://github.com/mozilla/sops/releases/download/v3.7.1/sops-v3.7.1.linux
sudo chmod 755 /usr/local/bin/sops

Next create the Google Cloud KMS, which I am using in my example.

$ gcloud auth application-default login
Go to the following link in your browser:

    https://accounts.google.com/o/oauth2/auth?code_challenge=xxxxxxx&prompt=select_account&code_challenge_method=S256&access_type=offline&redirect_uri=urn%3Aietf%3Awg%3Aoauth%3A2.0%3Aoob&response_type=code&client_id=xxxxxxxxx-xxxxxxxxxxxxxxxxxx.apps.googleusercontent.com&scope=https%3A%2F%2Fwww.googleapis.com%2Fauth%2Fuserinfo.email+https%3A%2F%2Fwww.googleapis.com%2Fauth%2Fcloud-platform+https%3A%2F%2Fwww.googleapis.com%2Fauth%2Faccounts.reauth


Enter verification code: xxxxxxxxxxxxxxx

Credentials saved to file: [/home/ubuntu/.config/gcloud/application_default_credentials.json]

These credentials will be used by any library that requests Application Default Credentials (ADC).
$ gcloud kms keyrings create sops --location global
$ gcloud kms keys create sops-key --location global --keyring sops --purpose encryption
$ gcloud kms keys list --location global --keyring sops
NAME                                                                           PURPOSE          ALGORITHM                    PROTECTION_LEVEL  LABELS  PRIMARY_ID  PRIMARY_STATE
projects/kubernetes-xxxxxx/locations/global/keyRings/sops/cryptoKeys/sops-key  ENCRYPT_DECRYPT  GOOGLE_SYMMETRIC_ENCRYPTION  SOFTWARE                  1           ENABLED

To encrypt secrets you need to create a .sops.yaml file in root your code repository.

creation_rules:
  - path_regex: \.yaml$
    gcp_kms: projects/kubernetes-xxxxxx/locations/global/keyRings/sops/cryptoKeys/sops-key
    encrypted_regex: ^(data|stringData)$

Let’s create a simple Kubernetes secret for testing.

$ cat secret.yaml
---
apiVersion: v1
kind: Secret
metadata:
  name: mysecret
  namespace: default
type: Opaque
data:
  username: YWRtaW4=
  password: MWYyZDFlMmU2N2Rm

Encrypt your secret.yaml using SOPS with the following example.

$ sops -e secret.yaml
apiVersion: v1
kind: Secret
metadata:
    name: mysecret
    namespace: default
type: Opaque
data:
    username: ENC[AES256_GCM,data:<-HASH->,type:str]
    password: ENC[AES256_GCM,data:<-HASH->,type:str]
sops:
    kms: []
    gcp_kms:
    -   resource_id: projects/kubernetes-xxxxxx/locations/global/keyRings/sops/cryptoKeys/sops-key
        created_at: '2021-03-01T17:25:29Z'
        enc: <-HASH->
    azure_kv: []
    lastmodified: '2021-03-01T17:25:29Z'
    mac: ENC[AES256_GCM,data:<-HASH->,type:str]
    pgp: []
    encrypted_regex: ^(data|stringData)$
    version: 3.5.0

Alternatively you can encrypt and replace the file in-place.

$ sops -i -e secret.yaml

To decrypt the yaml file use sops -d or replace in-place using sops -i -d.

$ sops -d secret.yaml
apiVersion: v1
kind: Secret
metadata:
    name: mysecret
    namespace: default
type: Opaque
data:
    username: YWRtaW4=
    password: MWYyZDFlMmU2N2Rm

You can also edit an encrypted file with the default terminal editor by directly using the sops command without any options.

$ sops secret.yaml
File has not changed, exiting.

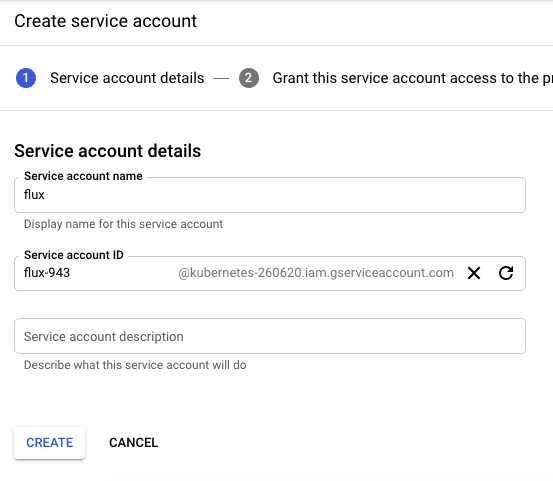
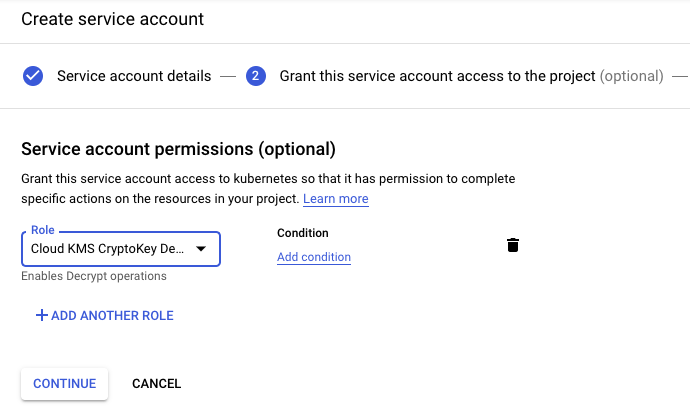
Let’s use the Flux CD Kustomize controller for this to decrypt Kubernetes secrets and apply to the specified namespace. First you need to create a GCP service account for Flux and grant the permission to decrypt.

Download the GCP json authentication file for the service account and create a new secret in the Flux namespace.

$ kubectl create secret generic gcp-auth -n gotk-system --from-file=./sops-gcp
$ kubectl get secrets -n gotk-system gcp-auth -o yaml
apiVersion: v1
data:
  sops-gcp: <-BASE64-ENCODED-GCP-AUTH-JSON->
kind: Secret
metadata:
  creationTimestamp: "2021-03-01T17:34:11Z"
  name: gcp-auth
  namespace: gotk-system
  resourceVersion: "1879000"
  selfLink: /api/v1/namespaces/gotk-system/secrets/gcp-auth
  uid: 10a14c1f-19a6-41a2-8610-694b12efefee
type: Opaque

You need to update the kustomize-controller deployment and add the volume mount for the sops GCP secret and the environment variable with the value where to find the Google application credential file. This is where my example is different to what is documented because I am not using integrated cloud authentication because my cluster is running locally.

...
    spec:
      containers:
...
      - env:
        - name: GOOGLE_APPLICATION_CREDENTIALS
          value: /tmp/.gcp/credentials/sops-gcp
        name: manager
        volumeMounts:
        - mountPath: /tmp/.gcp/credentials
          name: sops-gcp
          readOnly: true
      volumes:
      - name: sops-gcp
        secret:
          defaultMode: 420
          secretName: sops-gcp
...

In the Kustomize object you enable the sops decryption provider and the controller automatically decrypts and applies secrets in the next reconcile loop.

apiVersion: kustomize.toolkit.fluxcd.io/v1beta1
kind: Kustomization
metadata:
  name: cluster
  namespace: gotk-system
spec:
  decryption:
    provider: sops
  interval: 5m0s
  path: ./clusters/cluster-dev
  prune: true
  sourceRef:
    kind: GitRepository
    name: github-source

This takes a few minutes until the sync is completed and we can find out if the example secret got created correctly.

$ kubectl get secrets mysecret -n default -o yaml
apiVersion: v1
data:
  password: MWYyZDFlMmU2N2Rm
  username: YWRtaW4=
kind: Secret
metadata:
  name: mysecret
  namespace: default
  resourceVersion: "3439293"
  selfLink: /api/v1/namespaces/default/secrets/mysecret
  uid: 4a009675-3c89-448b-bb86-6211cec3d4ea
type: Opaque

This is how to use SOPS and Flux CD v2 to decrypt and apply Kubernetes secrets using GitOps.

Cisco ASAv network simulation using Vagrant

After creating IOSv and IOS XE Vagrant images, now doing the same for Cisco ASAv. Like in my last post same basic idea to create an simulated on-demand  network environment for continuous integration testing.

You need to buy the Cisco ASAv to get access to the KVM image on the Cisco website!

The Cisco ASAv is pretty easy because you can get QCOW2 images directly on the Cisco website, there are a few changes you need to do before you can use this together with Vagrant.

Boot the ASAv QCOW2 image on KVM and add the configuration below:

conf t
interface Management0/0
 nameif management
 security-level 0
 ip address dhcp
 no shutdown
 exit

hostname asa
domain-name lab.local
username vagrant password vagrant privilege 15
aaa authentication ssh console LOCAL
aaa authorization exec LOCAL auto-enable
ssh version 2
ssh timeout 60
ssh key-exchange group dh-group14-sha1
ssh 0 0 management

username vagrant attributes
  service-type admin
  ssh authentication publickey AAAAB3NzaC1yc2EAAAABIwAAAQEA6NF8iallvQVp22WDkTkyrtvp9eWW6A8YVr+kz4TjGYe7gHzIw+niNltGEFHzD8+v1I2YJ6oXevct1YeS0o9HZyN1Q9qgCgzUFtdOKLv6IedplqoPkcmF0aYet2PkEDo3MlTBckFXPITAMzF8dJSIFo9D8HfdOV0IAdx4O7PtixWKn5y2hMNG0zQPyUecp4pzC6kivAIhyfHilFR61RGL+GPXQ2MWZWFYbAGjyiYJnAmCP3NOTd0jMZEnDkbUvxhMmBYSdETk1rRgm+R4LOzFUGaHqHDLKLX+FIPKcF96hrucXzcWyLbIbEgE98OHlnVYCzRdK8jlqm8tehUc9c9WhQ==

Now the image is ready to use with Vagrant. Create an instance folder under the user vagrant directory and copy the QCOW2 image. As well create an metadata.json file:

mkdir -p ~/.vagrant.d/boxes/asav/0/libvirt/
cp ASAv.qcow2 ~/.vagrant.d/boxes/asav/0/libvirt/box.img
printf '{"provider":"libvirt","format":"qcow2","virtual_size":2}' > metadata.json

Create a Vagrantfile with the needed configuration and boot up the VMs. You have to start the VMs one by one.

berndonline@lab:~/asa-lab-vagrant$ vagrant status
Current machine states:

asa-1                     not created (libvirt)
asa-2                     not created (libvirt)

This environment represents multiple VMs. The VMs are all listed
above with their current state. For more information about a specific
VM, run `vagrant status NAME`.
berndonline@lab:~/asa-lab-vagrant$ vagrant up asa-1
Bringing machine 'asa-1' up with 'libvirt' provider...
==> asa-1: Creating image (snapshot of base box volume).
==> asa-1: Creating domain with the following settings...
==> asa-1:  -- Name:              asa-lab-vagrant_asa-1
==> asa-1:  -- Domain type:       kvm
==> asa-1:  -- Cpus:              1
==> asa-1:  -- Feature:           acpi
==> asa-1:  -- Feature:           apic
==> asa-1:  -- Feature:           pae
==> asa-1:  -- Memory:            2048M
==> asa-1:  -- Management MAC:
==> asa-1:  -- Loader:
==> asa-1:  -- Base box:          asav
==> asa-1:  -- Storage pool:      default
==> asa-1:  -- Image:             /var/lib/libvirt/images/asa-lab-vagrant_asa-1.img (8G)
==> asa-1:  -- Volume Cache:      default
==> asa-1:  -- Kernel:
==> asa-1:  -- Initrd:
==> asa-1:  -- Graphics Type:     vnc
==> asa-1:  -- Graphics Port:     5900
==> asa-1:  -- Graphics IP:       127.0.0.1
==> asa-1:  -- Graphics Password: Not defined
==> asa-1:  -- Video Type:        cirrus
==> asa-1:  -- Video VRAM:        9216
==> asa-1:  -- Sound Type:
==> asa-1:  -- Keymap:            en-us
==> asa-1:  -- TPM Path:
==> asa-1:  -- INPUT:             type=mouse, bus=ps2
==> asa-1: Creating shared folders metadata...
==> asa-1: Starting domain.
==> asa-1: Waiting for domain to get an IP address...
==> asa-1: Waiting for SSH to become available...
==> asa-1: Configuring and enabling network interfaces...
    asa-1: SSH address: 10.255.1.238:22
    asa-1: SSH username: vagrant
    asa-1: SSH auth method: private key
    asa-1: Warning: Connection refused. Retrying...
==> asa-1: Running provisioner: ansible...
    asa-1: Running ansible-playbook...

PLAY [all] *********************************************************************

PLAY RECAP *********************************************************************

berndonline@lab:~/asa-lab-vagrant$ vagrant up asa-2
Bringing machine 'asa-2' up with 'libvirt' provider...
==> asa-2: Creating image (snapshot of base box volume).
==> asa-2: Creating domain with the following settings...
==> asa-2:  -- Name:              asa-lab-vagrant_asa-2
==> asa-2:  -- Domain type:       kvm
==> asa-2:  -- Cpus:              1
==> asa-2:  -- Feature:           acpi
==> asa-2:  -- Feature:           apic
==> asa-2:  -- Feature:           pae
==> asa-2:  -- Memory:            2048M
==> asa-2:  -- Management MAC:
==> asa-2:  -- Loader:
==> asa-2:  -- Base box:          asav
==> asa-2:  -- Storage pool:      default
==> asa-2:  -- Image:             /var/lib/libvirt/images/asa-lab-vagrant_asa-2.img (8G)
==> asa-2:  -- Volume Cache:      default
==> asa-2:  -- Kernel:
==> asa-2:  -- Initrd:
==> asa-2:  -- Graphics Type:     vnc
==> asa-2:  -- Graphics Port:     5900
==> asa-2:  -- Graphics IP:       127.0.0.1
==> asa-2:  -- Graphics Password: Not defined
==> asa-2:  -- Video Type:        cirrus
==> asa-2:  -- Video VRAM:        9216
==> asa-2:  -- Sound Type:
==> asa-2:  -- Keymap:            en-us
==> asa-2:  -- TPM Path:
==> asa-2:  -- INPUT:             type=mouse, bus=ps2
==> asa-2: Creating shared folders metadata...
==> asa-2: Starting domain.
==> asa-2: Waiting for domain to get an IP address...
==> asa-2: Waiting for SSH to become available...
==> asa-2: Configuring and enabling network interfaces...
    asa-2: SSH address: 10.255.1.131:22
    asa-2: SSH username: vagrant
    asa-2: SSH auth method: private key
==> asa-2: Running provisioner: ansible...
    asa-2: Running ansible-playbook...

PLAY [all] *********************************************************************

PLAY RECAP *********************************************************************

berndonline@lab:~/asa-lab-vagrant$ vagrant status
Current machine states:

asa-1                     running (libvirt)
asa-2                     running (libvirt)

berndonline@lab:~/asa-lab-vagrant$

After the VMs are successfully booted you can connect with vagrant ssh:

berndonline@lab:~/asa-lab-vagrant$ vagrant ssh asa-1
Type help or '?' for a list of available commands.
asa# show version

Cisco Adaptive Security Appliance Software Version 9.6(2)
Device Manager Version 7.6(2)

Compiled on Tue 23-Aug-16 18:38 PDT by builders
System image file is "boot:/asa962-smp-k8.bin"
Config file at boot was "startup-config"

asa up 10 mins 31 secs

Hardware:   ASAv, 2048 MB RAM, CPU Xeon E5 series 3600 MHz,
Model Id:   ASAv10
Internal ATA Compact Flash, 8192MB
Slot 1: ATA Compact Flash, 8192MB
BIOS Flash Firmware Hub @ 0x0, 0KB

....

Configuration has not been modified since last system restart.
asa# exit

Logoff

Connection to 10.255.1.238 closed by remote host.
Connection to 10.255.1.238 closed.
berndonline@lab:~/asa-lab-vagrant$ vagrant destroy
==> asa-2: Removing domain...
==> asa-2: Running triggers after destroy...
Removing known host entries
==> asa-1: Removing domain...
==> asa-1: Running triggers after destroy...
Removing known host entries
berndonline@lab:~/asa-lab-vagrant$

Here I have a virtual ASAv environment which I can spin-up and down as needed for automation testing.

The example Vagrantfile you can find in my Github repository:

https://github.com/berndonline/asa-lab-vagrant/blob/master/Vagrantfile

Read my new post about an Ansible Playbook for Cisco ASAv Firewall Topology

Data centre network redesign

Over the last month I was busy working on an data centre redesign for my company which I finished this weekend in one of the three data centre’s.

The old network design was very outdated and bad choice of network equipment; Cisco Catalyst 6500 core switch for a small data centre environment with 8 racks is total overkill, two firewall clusters Juniper ISG2000 and Cisco ASA 5550 which were badly integrated and the configuration was a mess.

For the new network I followed a more converged idea to use a small and compact network to be as flexible as possible but also downsize the overall footprint and remove complexity. We adopted parts of DevOps “I like to call it NetOps” and used Ansible to automate the configuration deployment, the whole network stack is deployed within 90 seconds.

Used equipment:

  1. Top two switches were Dell S3048-ON running Cumulus Networks OS and used for internet- and leased-lines
  2. Under the two Dell WAN switches are two Cisco ASR 1001-X router for internet and wide area network (OSPF) routing.
  3. Under the Cisco router, two Dell S4048-ON core switches running Cumulus Network OS and connected existing HP Blade Center’s and HP DL servers. The new Tintri storage for the VMware vSphere clusters was also connected directly to the core switches.
  4. Under the Dell core switches are two Cisco ASA 5545-X in multi-context mode running Production, Corporate and S2S VPN firewalls.
  5. On the bottom of the network stack were existing serial console server and Cisco Catalyst switch for management network.

Now I will start with the deployment of VMware NSX SDN (Software defined Network) in this data centre. Ones VMware NSX is finished and handed over to the Systems Engineers I will do the same exercise for the 2nd data centre in the UK.

About Cumulus Linux and VMware NSX SDN I will publish some more information and my experience in the coming month.

Strange ARP issue between ASA and Cisco router

Recently I had a strange ARP problem between an Cisco ASA firewall and an Cisco router (provider router) on an internet line in one of our remote offices. Periodically the office lost the network connectivity.

From the first look the ARP table seemed fine:

# sh arp | i OUTSIDE
OUTSIDE 212.0.107.169 000f.e28a.1f7a 348

The ARP resolution was not working properly, the firewall was waiting for responses or even lost the ARP entry from the router. From the debugging output you can see that the firewall was in pending state and waiting for the router to respond:

# clear arp OUTSIDE 212.0.107.169
arp-req: generating request for 212.0.107.169 at interface OUTSIDE
arp-send: arp request built from 212.0.107.170 0a00.0a00.0010 for 212.0.107.169 at 3637391690
arp-req: generating request for 212.0.107.169 at interface OUTSIDE
arp-req: request for 212.0.107.169 still pending
arp-req: generating request for 212.0.107.169 at interface OUTSIDE
arp-req: request for 212.0.107.169 still pending
arp-req: generating request for 212.0.107.169 at interface OUTSIDE
arp-req: request for 212.0.107.169 still pending
arp-in: response at OUTSIDE from 212.0.107.169 000f.e28a.1f7a for 212.0.107.170 0a00.0a00.0010
arp-set: added arp OUTSIDE 212.0.107.169 000f.e28a.1f7a and updating NPs at 3637391710
arp-in: resp from 212.0.107.169 for 212.0.107.170 on OUTSIDE at 3637391710
arp-send: sending all saved block to OUTSIDE 212.0.107.169 at 3637391710

The same happen to normal ARP updates and the reason why we lost periodically the connectivity because the router didnt respond at all.

Our provider quickly figured out that there was a problem with the device and replaced the router.

ARP table output:

# sh arp | i OUTSIDE
OUTSIDE 212.0.107.169 000f.e28a.1f7a 303

Here the normal ARP behaviour ones the router was replaced,  the router responded directly to ARP requests:

# clear arp OUTSIDE 212.0.107.169
arp-req: generating request for 212.0.107.169 at interface OUTSIDE
arp-send: arp request built from 212.0.107.170 0a00.0a00.0010 for 212.0.107.169 at 3717553710
arp-in: response at OUTSIDE from 212.0.107.169 000f.e28a.1f7a for 212.0.107.170 0a00.0a00.0010
arp-set: added arp OUTSIDE 212.0.107.169 000f.e28a.1f7a and updating NPs at 3717553710
arp-in: resp from 212.0.107.169 for 212.0.107.170 on OUTSIDE at 3717553710

Normal ARP updates:

arp-in: request at OUTSIDE from 212.0.107.169 000f.e28a.1f7a for 212.0.107.171 0000.0000.0000
arp-set: added arp OUTSIDE 212.0.107.169 000f.e28a.1f7a and updating NPs at 3717983740


Ansible Playbook for Cisco Lab

From my recent posts, you can see that I use Ansible a lot for automating the device configuration deployment. Here my firewall lab (Cisco routers and Cisco ASA firewall) which I use to test different things in GNS3:

Before you can start deploying configs via Ansible you need to manually configure your management interfaces and device remote access. I run VMware Fusion Pro and use my VMNET2 network as management network because I have additional VMs for Ansible and Monitoring.

Here the config to prep your Cisco routers that you can afterwards deploy the rest of the config via Ansible:

conf t
ip vrf vrf-mgmt
	rd 1:1
	exit

interface Ethernet1/0
 description management
 ip vrf forwarding vrf-mgmt
 ip address 192.168.100.201 255.255.255.0
 no shutdown
 exit

ip domain-name localdomain

aaa new-model
aaa authentication login default local
aaa authorization exec default local 

username ansible privilege 15 secret 5 $1$xAJX$D99QcH02Splr1L3ktrvh41

crypto key generate rsa general-keys modulus 2048 

ip ssh version 2
ip ssh authentication-retries 5

line vty 0 4
 transport input ssh
 exit

exit
write mem

The same you need to do for your Cisco ASA firewall:

conf t
enable password 2KFQnbNIdI.2KYOU encrypted

interface Management0/0
 nameif management
 security-level 0
 ip address 192.168.100.204 255.255.255.0
 
aaa authentication ssh console LOCAL

ssh 0.0.0.0 0.0.0.0 management

username ansible password xsxRJKdxDzf9Ctr8 encrypted privilege 15
exit
write mem

Now you are ready to deploy the basic lab configuration to all the devices but before we start we need hosts and vars files and the main Ansible Playbook (yaml) file.

In the host’s file I define all the interface variables, there are different ways of doing it but this one is the easiest.

./hosts

[router]
inside
dmz
outside
[firewall]
firewall

In the group_vars file is the global variables.

./group_vars/all.yml

---
username: "ansible"
password: "cisco"
secret: "cisco"
default_gw_inside: "10.1.255.1"
default_gw_dmz: "10.1.255.33"
default_gw_firewall: "217.110.110.254"

Here the Ansible Playbook with the basic device configuration:

./interfaces.yml

- name: Deploy Cisco lab configuration part 1
  connection: local
  hosts: router
  gather_facts: false
  vars:
    cli:
      username: "{{ username }}"
      password: "{{ password }}"
      host: "{{ device_ip }}"
  tasks:
    - name: deploy inside router configuration
      when: ansible_host not in "outside"
      ios_config:
        provider: "{{ cli }}"
        before:
          - "default interface {{ item.interface }}"
        lines:
          - "ip address {{ item.address }}"
        after:
          - no shutdown
        parents: "interface {{ item.interface }}"
        match: strict
      with_items:
        - { interface : Ethernet0/0, address : "{{ eth_00_ip }} {{ eth_00_mask }}" }
        - { interface : Ethernet0/1, address : "{{ eth_01_ip }} {{ eth_01_mask }}" }
    - name: deploy outside router configuration
      when: ansible_host not in "inside,dmz"
      ios_config:
        provider: "{{ cli }}"
        before:
          - "default interface {{ item.interface }}"
        lines:
          - "ip address {{ item.address }}"
        after:
          - no shutdown
        parents: "interface {{ item.interface }}"
        match: strict
      with_items:
        - { interface : Ethernet0/0, address : "{{ eth_00_ip }} {{ eth_00_mask }}" }
        - { interface : Ethernet0/1, address : "{{ eth_01_ip }}" }

- name: Deploy Cisco lab configuration part 2
  connection: local
  hosts: firewall
  gather_facts: false
  vars:
      cli:
       username: "{{ username }}"
       password: "{{ password }}"
       auth_pass: "{{ secret }}"
       authorize: yes
       host: "{{ device_ip }}"
  tasks:
    - name: deploy firewall configuration
      when: ansible_host not in "inside,dmz,outside"
      asa_config:
        provider: "{{ cli }}"
        lines:
          - "nameif {{ item.nameif }}"
          - "ip address {{ item.address }}"
        after:
          - no shutdown
        parents: "interface {{ item.interface }}"
        match: line
      with_items:
        - { interface : GigabitEthernet0/0, nameif : "{{ eth_00_nameif }}", address : "{{ eth_00_ip }} {{ eth_00_mask }}" }
        - { interface : GigabitEthernet0/1, nameif : "{{ eth_01_nameif }}", address : "{{ eth_01_ip }} {{ eth_01_mask }}" }
        - { interface : GigabitEthernet0/2, nameif : "{{ eth_02_nameif }}", address : "{{ eth_02_ip }} {{ eth_02_mask }}" }

In the playbook, I needed to separate the outside router because one interface is configured to dhcp otherwise I could have used only one task for all three routers.

The 2nd part is for the Cisco ASA firewall configuration because it uses a different Ansible module and variables.

Now let us deploy the config and see the output from Ansible:

[berndonline@ansible firewall]$ ansible-playbook interfaces.yml -i hosts

PLAY [Deploy firewall lab configuration part 1] ********************************

TASK [deploy inside router configuration] **************************************
skipping: [outside] => (item={u'interface': u'Ethernet0/1', u'address': u'dhcp '})
skipping: [outside] => (item={u'interface': u'Ethernet0/0', u'address': u'217.110.110.254 255.255.255.0'})
changed: [dmz] => (item={u'interface': u'Ethernet0/0', u'address': u'10.1.255.34 255.255.255.240'})
changed: [inside] => (item={u'interface': u'Ethernet0/0', u'address': u'10.1.255.2 255.255.255.240'})
changed: [dmz] => (item={u'interface': u'Ethernet0/1', u'address': u'10.1.1.254 255.255.255.0'})
changed: [inside] => (item={u'interface': u'Ethernet0/1', u'address': u'10.1.0.254 255.255.255.0'})

TASK [deploy outside router configuration] *************************************
skipping: [inside] => (item={u'interface': u'Ethernet0/1', u'address': u'10.1.0.254'})
skipping: [inside] => (item={u'interface': u'Ethernet0/0', u'address': u'10.1.255.2 255.255.255.240'})
skipping: [dmz] => (item={u'interface': u'Ethernet0/1', u'address': u'10.1.1.254'})
skipping: [dmz] => (item={u'interface': u'Ethernet0/0', u'address': u'10.1.255.34 255.255.255.240'})
changed: [outside] => (item={u'interface': u'Ethernet0/0', u'address': u'217.110.110.254 255.255.255.0'})
changed: [outside] => (item={u'interface': u'Ethernet0/1', u'address': u'dhcp'})

PLAY [Deploy firewall lab configuration part 2] ********************************

TASK [deploy firewall configuration] *******************************************
changed: [firewall] => (item={u'interface': u'GigabitEthernet0/0', u'nameif': u'inside', u'address': u'10.1.255.1 255.255.255.240'})
changed: [firewall] => (item={u'interface': u'GigabitEthernet0/1', u'nameif': u'dmz', u'address': u'10.1.255.33 255.255.255.240'})
changed: [firewall] => (item={u'interface': u'GigabitEthernet0/2', u'nameif': u'outside', u'address': u'217.110.110.1 255.255.255.0'})

PLAY RECAP *********************************************************************
dmz                        : ok=1    changed=1    unreachable=0    failed=0
firewall                   : ok=1    changed=1    unreachable=0    failed=0
inside                     : ok=1    changed=1    unreachable=0    failed=0
outside                    : ok=1    changed=1    unreachable=0    failed=0

[berndonline@ansible firewall]$

Quick check if Ansible deployed the interface configuration:

inside#sh ip int brief
Interface                  IP-Address      OK? Method Status                Protocol
Ethernet0/0                10.1.255.2      YES manual up                    up
Ethernet0/1                10.1.0.254      YES manual up                    up
Ethernet1/0                192.168.100.201 YES NVRAM  up                    up
inside#

dmz#sh ip int brief
Interface                  IP-Address      OK? Method Status                Protocol
Ethernet0/0                10.1.255.34     YES manual up                    up
Ethernet0/1                10.1.1.254      YES manual up                    up
Ethernet1/0                192.168.100.202 YES NVRAM  up                    up
dmz#

outside#sh ip int brief
Interface                  IP-Address      OK? Method Status                Protocol
Ethernet0/0                217.110.110.254 YES manual up                    up
Ethernet0/1                172.16.191.23   YES DHCP   up                    up
Ethernet1/0                192.168.100.203 YES NVRAM  up                    up
outside#

firewall# sho ip address
Current IP Addresses:
Interface                Name                   IP address      Subnet mask     Method
GigabitEthernet0/0       inside                 10.1.255.1      255.255.255.240 manual
GigabitEthernet0/1       dmz                    10.1.255.33     255.255.255.240 manual
GigabitEthernet0/2       outside                217.110.110.1   255.255.255.0   manual
Management0/0            management             192.168.100.204 255.255.255.0   CONFIG
firewall#

As you can see Ansible deployed the interface configuration correctly. If I run Ansible again nothing will be deployed because the configuration is already present:

[berndonline@ansible firewall]$ ansible-playbook interfaces.yml -i hosts

PLAY [Deploy firewall lab configuration part 1] ********************************

TASK [deploy inside router configuration] **************************************
skipping: [outside] => (item={u'interface': u'Ethernet0/1', u'address': u'dhcp '})
skipping: [outside] => (item={u'interface': u'Ethernet0/0', u'address': u'217.110.110.254 255.255.255.0'})
ok: [dmz] => (item={u'interface': u'Ethernet0/0', u'address': u'10.1.255.34 255.255.255.240'})
ok: [dmz] => (item={u'interface': u'Ethernet0/1', u'address': u'10.1.1.254 255.255.255.0'})
ok: [inside] => (item={u'interface': u'Ethernet0/0', u'address': u'10.1.255.2 255.255.255.240'})
ok: [inside] => (item={u'interface': u'Ethernet0/1', u'address': u'10.1.0.254 255.255.255.0'})

TASK [deploy outside router configuration] *************************************
skipping: [inside] => (item={u'interface': u'Ethernet0/1', u'address': u'10.1.0.254'})
skipping: [inside] => (item={u'interface': u'Ethernet0/0', u'address': u'10.1.255.2 255.255.255.240'})
skipping: [dmz] => (item={u'interface': u'Ethernet0/1', u'address': u'10.1.1.254'})
skipping: [dmz] => (item={u'interface': u'Ethernet0/0', u'address': u'10.1.255.34 255.255.255.240'})
ok: [outside] => (item={u'interface': u'Ethernet0/0', u'address': u'217.110.110.254 255.255.255.0'})
ok: [outside] => (item={u'interface': u'Ethernet0/1', u'address': u'dhcp'})

PLAY [Deploy firewall lab configuration part 2] ********************************

TASK [deploy firewall configuration] *******************************************
ok: [firewall] => (item={u'interface': u'GigabitEthernet0/0', u'nameif': u'inside', u'address': u'10.1.255.1 255.255.255.240'})
ok: [firewall] => (item={u'interface': u'GigabitEthernet0/1', u'nameif': u'dmz', u'address': u'10.1.255.33 255.255.255.240'})
ok: [firewall] => (item={u'interface': u'GigabitEthernet0/2', u'nameif': u'outside', u'address': u'217.110.110.1 255.255.255.0'})

PLAY RECAP *********************************************************************
dmz                        : ok=1    changed=0    unreachable=0    failed=0
firewall                   : ok=1    changed=0    unreachable=0    failed=0
inside                     : ok=1    changed=0    unreachable=0    failed=0
outside                    : ok=1    changed=0    unreachable=0    failed=0

[berndonline@ansible firewall]$

In my GNS3 labs, I normally not save the device configuration except the management IPs because with Ansible I can deploy everything again within seconds and use different Playbooks depending what I want to test. It gets even cooler if you use Semaphore (see my blog post: Ansible Semaphore) because you just click ones on the Playbook you want to deploy.

Comment below if you have questions or problems.

Read my new posts about Ansible Playbook for Cisco ASAv Firewall Topology or Ansible Playbook for Cisco BGP Routing Topology.