Continuous Integration and Delivery for Networking with Cisco devices

This post is about continuous integration and continuous delivery (CICD) for Cisco devices and how to use network simulation to test automation before deploying this to production environments. That was one of the main reasons for me to use Vagrant for simulating the network because the virtual environment can be created on-demand and thrown away after the scripts run successful. Please read before my post about Cisco network simulation using Vagrant: Cisco IOSv and XE network simulation using Vagrant and Cisco ASAv network simulation using Vagrant.

Same like in my first post about Continuous Integration and Delivery for Networking with Cumulus Linux, I am using Gitlab.com and their Gitlab-runner for the continuous integration and delivery (CICD) pipeline.

  • You need to register your Gitlab-runner with the Gitlab repository:

  • The next step is to create your .gitlab-ci.yml which defines your CI-pipeline.
---
stages:
    - validate ansible
    - staging iosv
    - staging iosxe
validate:
    stage: validate ansible
    script:
        - bash ./linter.sh
staging_iosv:
    before_script:
        - git clone https://github.com/berndonline/cisco-lab-vagrant.git
        - cd cisco-lab-vagrant/
        - cp Vagrantfile-IOSv Vagrantfile
    stage: staging iosv
    script:
        - bash ../staging.sh
staging_iosxe:
    before_script:
        - git clone https://github.com/berndonline/cisco-lab-vagrant.git
        - cd cisco-lab-vagrant/
        - cp Vagrantfile-IOSXE Vagrantfile
    stage: staging iosxe
    script:
        - bash ../staging.sh

I clone the cisco vagrant lab which I use to spin-up a virtual staging environment and run the Ansible playbook against the virtual lab. The stages IOSv and IOSXE are just examples in my case depending what Cisco IOS versions you want to test.

The production stage would be similar to staging only that you run the Ansible playbook against your physical environment.

  • Basically any commit or merge in the Gitlab repo triggers the pipeline which is defined in the gitlab-ci.

  • The first stage is only to validate that the YAML files have the correct syntax.

  • Here the details of a job and when everything goes well the job succeeded.

This is an easy way to test your Ansible playbooks against a virtual Cisco environment before deploying this to a production system.

Here again my two repositories I use:

https://github.com/berndonline/cisco-lab-vagrant

https://github.com/berndonline/cisco-lab-provision

Read my new posts about Ansible Playbook for Cisco ASAv Firewall Topology or Ansible Playbook for Cisco BGP Routing Topology.

Ansible Playbook for Cisco Lab

From my recent posts, you can see that I use Ansible a lot for automating the device configuration deployment. Here my firewall lab (Cisco routers and Cisco ASA firewall) which I use to test different things in GNS3:

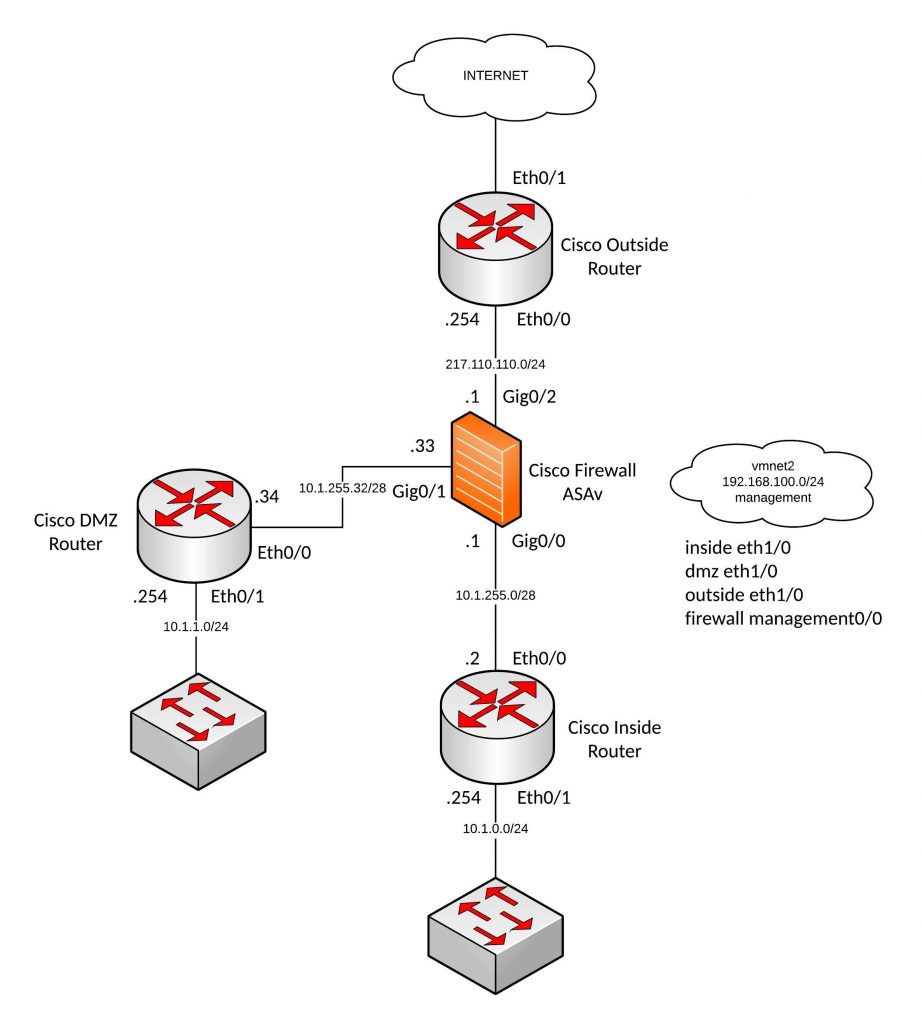
Before you can start deploying configs via Ansible you need to manually configure your management interfaces and device remote access. I run VMware Fusion Pro and use my VMNET2 network as management network because I have additional VMs for Ansible and Monitoring.

Here the config to prep your Cisco routers that you can afterwards deploy the rest of the config via Ansible:

conf t
ip vrf vrf-mgmt
	rd 1:1
	exit

interface Ethernet1/0
 description management
 ip vrf forwarding vrf-mgmt
 ip address 192.168.100.201 255.255.255.0
 no shutdown
 exit

ip domain-name localdomain

aaa new-model
aaa authentication login default local
aaa authorization exec default local 

username ansible privilege 15 secret 5 $1$xAJX$D99QcH02Splr1L3ktrvh41

crypto key generate rsa general-keys modulus 2048 

ip ssh version 2
ip ssh authentication-retries 5

line vty 0 4
 transport input ssh
 exit

exit
write mem

The same you need to do for your Cisco ASA firewall:

conf t
enable password 2KFQnbNIdI.2KYOU encrypted

interface Management0/0
 nameif management
 security-level 0
 ip address 192.168.100.204 255.255.255.0
 
aaa authentication ssh console LOCAL

ssh 0.0.0.0 0.0.0.0 management

username ansible password xsxRJKdxDzf9Ctr8 encrypted privilege 15
exit
write mem

Now you are ready to deploy the basic lab configuration to all the devices but before we start we need hosts and vars files and the main Ansible Playbook (yaml) file.

In the host’s file I define all the interface variables, there are different ways of doing it but this one is the easiest.

./hosts

[router]
inside
dmz
outside
[firewall]
firewall

In the group_vars file is the global variables.

./group_vars/all.yml

---
username: "ansible"
password: "cisco"
secret: "cisco"
default_gw_inside: "10.1.255.1"
default_gw_dmz: "10.1.255.33"
default_gw_firewall: "217.110.110.254"

Here the Ansible Playbook with the basic device configuration:

./interfaces.yml

- name: Deploy Cisco lab configuration part 1
  connection: local
  hosts: router
  gather_facts: false
  vars:
    cli:
      username: "{{ username }}"
      password: "{{ password }}"
      host: "{{ device_ip }}"
  tasks:
    - name: deploy inside router configuration
      when: ansible_host not in "outside"
      ios_config:
        provider: "{{ cli }}"
        before:
          - "default interface {{ item.interface }}"
        lines:
          - "ip address {{ item.address }}"
        after:
          - no shutdown
        parents: "interface {{ item.interface }}"
        match: strict
      with_items:
        - { interface : Ethernet0/0, address : "{{ eth_00_ip }} {{ eth_00_mask }}" }
        - { interface : Ethernet0/1, address : "{{ eth_01_ip }} {{ eth_01_mask }}" }
    - name: deploy outside router configuration
      when: ansible_host not in "inside,dmz"
      ios_config:
        provider: "{{ cli }}"
        before:
          - "default interface {{ item.interface }}"
        lines:
          - "ip address {{ item.address }}"
        after:
          - no shutdown
        parents: "interface {{ item.interface }}"
        match: strict
      with_items:
        - { interface : Ethernet0/0, address : "{{ eth_00_ip }} {{ eth_00_mask }}" }
        - { interface : Ethernet0/1, address : "{{ eth_01_ip }}" }

- name: Deploy Cisco lab configuration part 2
  connection: local
  hosts: firewall
  gather_facts: false
  vars:
      cli:
       username: "{{ username }}"
       password: "{{ password }}"
       auth_pass: "{{ secret }}"
       authorize: yes
       host: "{{ device_ip }}"
  tasks:
    - name: deploy firewall configuration
      when: ansible_host not in "inside,dmz,outside"
      asa_config:
        provider: "{{ cli }}"
        lines:
          - "nameif {{ item.nameif }}"
          - "ip address {{ item.address }}"
        after:
          - no shutdown
        parents: "interface {{ item.interface }}"
        match: line
      with_items:
        - { interface : GigabitEthernet0/0, nameif : "{{ eth_00_nameif }}", address : "{{ eth_00_ip }} {{ eth_00_mask }}" }
        - { interface : GigabitEthernet0/1, nameif : "{{ eth_01_nameif }}", address : "{{ eth_01_ip }} {{ eth_01_mask }}" }
        - { interface : GigabitEthernet0/2, nameif : "{{ eth_02_nameif }}", address : "{{ eth_02_ip }} {{ eth_02_mask }}" }

In the playbook, I needed to separate the outside router because one interface is configured to dhcp otherwise I could have used only one task for all three routers.

The 2nd part is for the Cisco ASA firewall configuration because it uses a different Ansible module and variables.

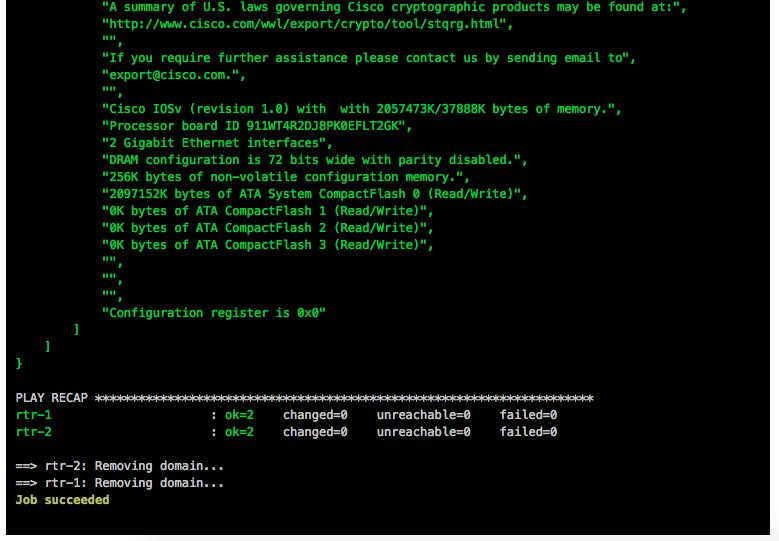
Now let us deploy the config and see the output from Ansible:

[berndonline@ansible firewall]$ ansible-playbook interfaces.yml -i hosts

PLAY [Deploy firewall lab configuration part 1] ********************************

TASK [deploy inside router configuration] **************************************
skipping: [outside] => (item={u'interface': u'Ethernet0/1', u'address': u'dhcp '})
skipping: [outside] => (item={u'interface': u'Ethernet0/0', u'address': u'217.110.110.254 255.255.255.0'})
changed: [dmz] => (item={u'interface': u'Ethernet0/0', u'address': u'10.1.255.34 255.255.255.240'})
changed: [inside] => (item={u'interface': u'Ethernet0/0', u'address': u'10.1.255.2 255.255.255.240'})
changed: [dmz] => (item={u'interface': u'Ethernet0/1', u'address': u'10.1.1.254 255.255.255.0'})
changed: [inside] => (item={u'interface': u'Ethernet0/1', u'address': u'10.1.0.254 255.255.255.0'})

TASK [deploy outside router configuration] *************************************
skipping: [inside] => (item={u'interface': u'Ethernet0/1', u'address': u'10.1.0.254'})
skipping: [inside] => (item={u'interface': u'Ethernet0/0', u'address': u'10.1.255.2 255.255.255.240'})
skipping: [dmz] => (item={u'interface': u'Ethernet0/1', u'address': u'10.1.1.254'})
skipping: [dmz] => (item={u'interface': u'Ethernet0/0', u'address': u'10.1.255.34 255.255.255.240'})
changed: [outside] => (item={u'interface': u'Ethernet0/0', u'address': u'217.110.110.254 255.255.255.0'})
changed: [outside] => (item={u'interface': u'Ethernet0/1', u'address': u'dhcp'})

PLAY [Deploy firewall lab configuration part 2] ********************************

TASK [deploy firewall configuration] *******************************************
changed: [firewall] => (item={u'interface': u'GigabitEthernet0/0', u'nameif': u'inside', u'address': u'10.1.255.1 255.255.255.240'})
changed: [firewall] => (item={u'interface': u'GigabitEthernet0/1', u'nameif': u'dmz', u'address': u'10.1.255.33 255.255.255.240'})
changed: [firewall] => (item={u'interface': u'GigabitEthernet0/2', u'nameif': u'outside', u'address': u'217.110.110.1 255.255.255.0'})

PLAY RECAP *********************************************************************
dmz                        : ok=1    changed=1    unreachable=0    failed=0
firewall                   : ok=1    changed=1    unreachable=0    failed=0
inside                     : ok=1    changed=1    unreachable=0    failed=0
outside                    : ok=1    changed=1    unreachable=0    failed=0

[berndonline@ansible firewall]$

Quick check if Ansible deployed the interface configuration:

inside#sh ip int brief
Interface                  IP-Address      OK? Method Status                Protocol
Ethernet0/0                10.1.255.2      YES manual up                    up
Ethernet0/1                10.1.0.254      YES manual up                    up
Ethernet1/0                192.168.100.201 YES NVRAM  up                    up
inside#

dmz#sh ip int brief
Interface                  IP-Address      OK? Method Status                Protocol
Ethernet0/0                10.1.255.34     YES manual up                    up
Ethernet0/1                10.1.1.254      YES manual up                    up
Ethernet1/0                192.168.100.202 YES NVRAM  up                    up
dmz#

outside#sh ip int brief
Interface                  IP-Address      OK? Method Status                Protocol
Ethernet0/0                217.110.110.254 YES manual up                    up
Ethernet0/1                172.16.191.23   YES DHCP   up                    up
Ethernet1/0                192.168.100.203 YES NVRAM  up                    up
outside#

firewall# sho ip address
Current IP Addresses:
Interface                Name                   IP address      Subnet mask     Method
GigabitEthernet0/0       inside                 10.1.255.1      255.255.255.240 manual
GigabitEthernet0/1       dmz                    10.1.255.33     255.255.255.240 manual
GigabitEthernet0/2       outside                217.110.110.1   255.255.255.0   manual
Management0/0            management             192.168.100.204 255.255.255.0   CONFIG
firewall#

As you can see Ansible deployed the interface configuration correctly. If I run Ansible again nothing will be deployed because the configuration is already present:

[berndonline@ansible firewall]$ ansible-playbook interfaces.yml -i hosts

PLAY [Deploy firewall lab configuration part 1] ********************************

TASK [deploy inside router configuration] **************************************
skipping: [outside] => (item={u'interface': u'Ethernet0/1', u'address': u'dhcp '})
skipping: [outside] => (item={u'interface': u'Ethernet0/0', u'address': u'217.110.110.254 255.255.255.0'})
ok: [dmz] => (item={u'interface': u'Ethernet0/0', u'address': u'10.1.255.34 255.255.255.240'})
ok: [dmz] => (item={u'interface': u'Ethernet0/1', u'address': u'10.1.1.254 255.255.255.0'})
ok: [inside] => (item={u'interface': u'Ethernet0/0', u'address': u'10.1.255.2 255.255.255.240'})
ok: [inside] => (item={u'interface': u'Ethernet0/1', u'address': u'10.1.0.254 255.255.255.0'})

TASK [deploy outside router configuration] *************************************
skipping: [inside] => (item={u'interface': u'Ethernet0/1', u'address': u'10.1.0.254'})
skipping: [inside] => (item={u'interface': u'Ethernet0/0', u'address': u'10.1.255.2 255.255.255.240'})
skipping: [dmz] => (item={u'interface': u'Ethernet0/1', u'address': u'10.1.1.254'})
skipping: [dmz] => (item={u'interface': u'Ethernet0/0', u'address': u'10.1.255.34 255.255.255.240'})
ok: [outside] => (item={u'interface': u'Ethernet0/0', u'address': u'217.110.110.254 255.255.255.0'})
ok: [outside] => (item={u'interface': u'Ethernet0/1', u'address': u'dhcp'})

PLAY [Deploy firewall lab configuration part 2] ********************************

TASK [deploy firewall configuration] *******************************************
ok: [firewall] => (item={u'interface': u'GigabitEthernet0/0', u'nameif': u'inside', u'address': u'10.1.255.1 255.255.255.240'})
ok: [firewall] => (item={u'interface': u'GigabitEthernet0/1', u'nameif': u'dmz', u'address': u'10.1.255.33 255.255.255.240'})
ok: [firewall] => (item={u'interface': u'GigabitEthernet0/2', u'nameif': u'outside', u'address': u'217.110.110.1 255.255.255.0'})

PLAY RECAP *********************************************************************
dmz                        : ok=1    changed=0    unreachable=0    failed=0
firewall                   : ok=1    changed=0    unreachable=0    failed=0
inside                     : ok=1    changed=0    unreachable=0    failed=0
outside                    : ok=1    changed=0    unreachable=0    failed=0

[berndonline@ansible firewall]$

In my GNS3 labs, I normally not save the device configuration except the management IPs because with Ansible I can deploy everything again within seconds and use different Playbooks depending what I want to test. It gets even cooler if you use Semaphore (see my blog post: Ansible Semaphore) because you just click ones on the Playbook you want to deploy.

Comment below if you have questions or problems.

Read my new posts about Ansible Playbook for Cisco ASAv Firewall Topology or Ansible Playbook for Cisco BGP Routing Topology.

Setup Juniper ISG NSRP cluster

This post describes how to rebuild a Juniper NSRP Cluster if the first Juniper firewall is already configured for NSRP.
Please make sure you have the following prerequisite on both Firewalls.

Minimum software and hardware requirements for configuring Active / Passive NSRP:

  • Firewall’s with identical ScreenOS versions and license keys
  • Firewall’s with identical hardware
  • At least one interface on each firewall to be configured in the HA zone, which will be used for carrying control channel information

Configuration steps on the unconfigured Firewall.

Configure the Interface(s) for HA

If possible it makes sense to use the same Interface as used on the other device.

set interface ethernet0/4 zone HA

Configure the NSRP cluster id:

set nsrp cluster id 1

Both firewalls in the cluster must have the same Cluster ID number.

IMPORTANT: Other NSRP firewall pairs on the same segment must have a different set of cluster ids. Once the cluster id is set to a value, all the security interfaces will become part of the VSD-group 0, by default.

Configure cluster name for NSRP:

To define a single name for all cluster members, type the following CLI command:

set nsrp cluster name <name_str>
set nsrp vsd-group id <number> priority <number>

IMPORTANT: Make sure that the desired STANDBY firewall has a HIGHER priority configured than the preferred master. The firewall with the lower priority will be the active master in the cluster!

Physical connection:

Connect only the HA link cable to the interface that is configured for the HA zone.

Check the nsrp cluster status:

You can check the nsrp cluster status via the configuration GUI or via CLI.

To check the NSRP cluster status via GUI connect to the actual master and navigate to Reports > System Log > Event and search for NSRP related entries.

To check the NSRP cluster status via CLI please connect to the actual standby via console. You can check the status with the following command:

get nsrp cluster

Synchronize the configurations:

To synchronize the configuration from the active to the standby unit, please connect to the standby unit via console and execute the following command:

exec nsrp sync global-config save

The following will be reported shortly after you enter the above command:

load peer system config to save
firewall-B(B)-> Save global configuration successfully.
firewall-B(B)-> Save local configuration successfully.
firewall-B(B)-> Done.
firewall-B(B)-> Please reset your box to let cluster configuration to take effect!

Reset the Firewall:

IMPORTANT:  If you are prompted to save the configuration after you enter the reset command, answer n (No).  Then, proceed with the reboot by answering y (Yes).

firewall-B(B)-> reset
firewall-B(B)-> Configuration modified.  Save? [y]/n n
firewall-B(B)-> System reset.  Are you sure? y/[n] y

Check if the configurations are in sync:

Please execute the following command via CLI (console connection) on the backup firewall to check if the configurations are in sync:

exec nsrp sync global-config check-sum

Physical connection:

Please connect all other interfaces in the correct order to the standby unit.

Initial manual failover:

exec nsrp vsd-group 0 mode ineligible

Command reference:

NSRP

get nsrp cluster Show cluster info
get nsrp monitor Show list of monitored interfaces
get nsrp vsd id 0 Show VSD id 0
get counters ha Show HA interface hardware counters
exec nsrp sync global-config check-sum Allows you to see if the cluster configs are syncronised
exec nsrp sync global save Sync’s the nodes.A reboot is required to complete the update.
exec nsrp vsd-group 0 mode Fails over the cluster. Run this command on the Master node.

Current Settings / Values

get envar get environment variable
get config get device configuration
get system get system information
get arp get arp cache
get route get routing table

Cisco ASA Identity Firewall

Testing at the moment identity firewalling with a Cisco ASA for a new office network infrastructure.

From the configuration everything is straight forward and easy to set-up:

1. Configure AAA LDAP Server

aaa-server addomain.net protocol ldap
aaa-server addomain.net (INSIDE) host 10.1.0.1
    ldap-base-dn DC=addomain,DC=net
    ldap-group-base-dn DC=addomin,DC=net
    ldap-scope subtree
    server-type microsoft
    server-port 389 
    ldap-login-dn *username*
    ldap-login-password *password*
    exit

If you use ldap over SSL you need to enable it and change the server port!

2. Configure Windows Cisco AD Agent

Install the Cisco AD Agent on one of your Windows Servers, not the Domain Controller if you also want to use NPS!

adacfg client create –name ASA5515 –ip 10.1.0.250/32 –secret secretpresharedkey 
adacfg dc create -name DC01 -host DC01.addomain.net -domain addomain.net -user Administrator -password *password*

2.1 Check Windows AD Agent Configuration

C:\IBF\CLI\adactrl.exe show running
C:\IBF\CLI\adacfg.exe client list
C:\IBF\CLI\adacfg.exe dc list

3 Configure AG Agent on the ASA

aaa-server adagent protocol radius
    ad-agent-mode

aaa-server adagent (INSIDE) host 10.1.0.2
    key secretpresharedkey
    user-identity ad-agent aaa-server adagent

4. Configure Identity option on the ASA

user-identity domain ADDOMAIN aaa-server addomain.net
user-identity default-domain ADDOMAIN

5. Example Object and Access List Configuration

object-group user USERNAME
    user ADDOMAIN\user1
    exit

object-group user GROUPNAME
    user-group ADDOMAIN\IT-ADMINs
    exit

access-list INSIDE-IN extended permit ip user ADDOMAIN\user1 any host 10.1.1.1
access-list INSIDE-IN extended permit ip user-group ADDOMAIN\\ADMINs any host 10.1.1.1
access-list INSIDE-IN extended permit ip object-group-user GROUPNAME any host 20.1.1.1

More information about how to configure identity firewalling you find here: Configuring the Identity Firewall

Optimizing Cisco ASA Firewall Configuration

From my experience with Cisco ASAs over the last years it can make a big difference on the performance if the ASA is not correctly configured. You have to keep some things in mind when you install and set-up your firewalls. Of course for low traffic networks it will not make a big difference but for data centre infrastructures it can make a huge difference on the load of your CPU.

In the end from the network perspective everything can influence the performance: throughput (bit/s, packets/s and packet size), sessions (new and max connections), inspection and encryption (VPN). I recommend to have a look at the CiscoLive 365 presentation from 2012 – Maximizing Firewall Performance, very interesting presentation about the ASA hardware platform’s and what influence the performance.

At first some general information about the ASA platform’s before you start configuring

ASA5510 to 5550

  • On-board interfaces are better for higher packet rate

ASA5580

  • Traffic distribution over both I/O bridges
  • Keep flows on same I/O bridge and place interface pairs on the same card (inside and outside)

ASA55xx-X

  • Possible to use jumbo frames but only make sense in end-to-end configuration

All ASA platform’s

  • Use port-channel for 1Gbit interfaces to split frames over multiple FIFO queues and RX rings (10Gbit interface have four RX rings)
  • Avoid inter-context traffic because it uses the loopback buffer

SNMP and Logging settings

Disable SNMP traps if not needed and use polling only

snmp-server host INSIDE 10.255.0.10 poll community public version 2c

Only use one syslog server and proper trap level to reduce CPU overhead also adjust the ASDM logging

logging enable

logging host INSIDE 10.255.0.10
logging trap critical
logging history errors
logging queue 2048 

logging asdm warning 
logging asdm-buffer-size 512 

asdm history enable

Filter logging messages to reduce CPU overhead and prevent misconfigured debug logging to overload the CPU of the firewall

:: Build TCP Connection
no logging message 302013

:: Teardown TCP Connection
no logging message 302014

:: Deny udp reverse path check
no logging message 106021

:: Bad TCP hdr length
no logging message 500003

:: Denied ICMP type=0, no matching session
no logging message 313004

:: No matching connection for ICMP error message
no logging message 313005

:: Inbound TCP connection denied outside Firewall Access
no logging message 106001

:: Inbount UDP connection denied outside Firewall Access
no logging message 106006
no logging message 106007

Disable Threat Detection statistics

threat-detection basic-threat
no threat-detection statistics

Enable threat detection statistics only temporary because it can have a big impact on the performance of your ASA but keep basic threat detection always enabled!

ICMP interface settings

Not really related to optimizing the performance but ICMP should be correctly configured

icmp unreachable rate-limit 1 burst-size 1

icmp permit any echo OUTSIDE
icmp permit any echo-reply OUTSIDE
icmp permit any unreachable OUTSIDE

icmp permit any echo INSIDE
icmp permit any echo-reply INSIDE
icmp permit any unreachable INSIDE

Transport Protocol settings

Adjust default TCP MMS (Maximum Segment Size) 1380 to higher value (Please be careful sometimes it makes sense to leave it at 1380).

sysopt connection tcpmss 1460
sysopt connection tcpmss minimum 0

ASA silently drop packets without sending TCP reset.

no service resetinbound
no service resetoutside

Timeout value settings

Change timeout values for XLATE table, TCP/UDP sessions and Firewall Engine settings

timeout xlate 1:05:00
timeout udp 00:01:00
timeout conn 01:00:00
timeout half-closed 00:10:00
timeout h323 00:00:01
timeout sunrpc 00:01:00
timeout sip 00:05:00
timeout sip_media 00:01:00
timeout h225 00:00:01
timeout mgcp 00:00:01
timeout uauth 00:00:01 absolute

Antispoofing Options

ip verify reverse-path interface OUTSIDE
ip verify reverse-path interface INSIDE

Modular Policy Framework (MPF)

Modular Policy Framework provides a consistent and flexible way to configure security appliance features. For example, you can use Modular Policy Framework to create a timeout configuration that is specific to a particular TCP application, as opposed to one that applies to all TCP applications.
ACL and Class-Map for unrestricted IP traffic between backend networks

access-list UNRESTRICTED-IP-TRAFFIC extended permit ip object NET_10.1.100.0 object NET_10.2.100.0
access-list UNRESTRICTED-IP-TRAFFIC extended permit ip object NET_10.1.200.0 object NET_10.2.200.0
access-list UNRESTRICTED-IP-TRAFFIC extended permit ip object NET_10.1.300.0 object NET_10.2.300.0

class-map unrestricted-ip-traffic
match access-list UNRESTRICTED-IP-TRAFFIC
exit

ACL and Class-Map for any IP traffic

access-list ALL-IP-TRAFFIC extended permit ip any any

class-map all-ip-traffic
match access-list ALL-IP-TRAFFIC
exit

Inspection Policy for DNS traffic

policy-map type inspect dns custom_dns_map
 parameters
  message-length maximum 1280
  dns-guard
  protocol-enforcement
  no nat-rewrite
  no id-randomization
  no tsig enforced
  no id-mismatch
  exit
 exit

Policy Map

Turn off not needed inspection to reduce processing overhead within the CPU. In the policy map you define the TCP connection quotas for the before configured class-map’s ACLs.

policy-map global_policy

  class inspection_default
   inspect icmp
   inspect icmp error
   inspect ftp
   inspect dns custom_dns_map

   no inspect rtsp
   no inspect pptp
   no inspect sip
   no inspect ctiqbe
   no inspect esmtp
   no inspect gtp
   no inspect h323
   no inspect h323 ras
   no inspect h323 h225
   no inspect http
   no inspect ils
   no inspect mgcp
   no inspect netbios
   no inspect rsh
   no inspect skinny
   no inspect snmp
   no inspect sqlnet
   no inspect sunrpc
   no inspect tftp
   no inspect xdmcp
   exit

  class unrestricted-ip-traffic
   set connection advanced-options tcp-state-bypass
   set connection per-client-max 0
   set connection conn-max 0
   set connection timeout embryonic 0:00:10
   set connection timeout half-closed 0:10:00
   set connection timeout tcp 1:00:00
   exit

  class all-ip-traffic
   set connection random-sequence-number enable
   set connection per-client-max 500
   set connection conn-max 0
   set connection embryonic-conn-max 100
   set connection per-client-embryonic-max 50
   set connection timeout embryonic 0:00:10
   set connection timeout half-closed 0:10:00
   set connection timeout tcp 1:00:00
   exit
exit

Additional information

There are also some more points to think about what can influense the performance of the ASA firewall.

  • Several smaller ACLs are better than a large one (ACL size mostly impacts conn setup rate)
  • Static NAT entries are best for higher performance
  • Optimize dynamic routing because it has an impact on the CPU
  • Careful with inline packet capturing
  • Keep HTTP conn replication disabled for best performance results
  • Share the load with active virtual contexts on each firewall, see here my post: Cisco ASA Virtual Context Mode