Kubernetes GitOps at Scale with Cluster API and Flux CD

What does GitOps mean and how you run this at scale with Kubernetes? GitOps is basically a framework that takes traditional DevOps practices which where used for application development and apply them to platform automation.

This is nothing new and some maybe have done similar type of automation in the past but this wasn’t called GitOps back then. Kubernetes is great because of it’s declarative configuration management which makes it very easy to configure. This can become a challenge when you suddenly have to run 5, 10, 20 or 40 of these clusters across various cloud providers and multiple environments. We need a cluster management system feeding configuration from a code repository to run all our Kubernetes “cattle” workload clusters.

What I am trying to achieve with this design; that you can easily horizontally scale not only your workload clusters but also your cluster management system which is versioned across multiple cloud providers like you see in the diagram above.

There is of course a technical problem to all of this, finding the right tools to solve the problem and which work well together. In my example I will use the Cluster API for provisioning and managing the lifecycle of these Kubernetes workload clusters. Then we need Flux CD for the configuration management both the cluster management which runs the Cluster API components but also the configuration for the workload clusters. The Cluster API you can also replace with OpenShift Hive to run instead OKD or RedHat OpenShift clusters.

Another problem we need to think about is version control and the branching model for the platform configuration. The structure of the configuration is important but also how you implement changes or the versioning of your configuration through releases. I highly recommend reading about Trunk Based Development which is a modern branching model and specifically solves the versioning problem for us.

Git repository and folder structure

We need a git repository for storing the platform configuration both for the management- and workload-clusters, and the tenant namespace configuration (this also can be stored in a separate repositories). Let’s go through the folder structure of the repository and I will explain this in more detail. Checkout my example repository for more detail: github.com/berndonline/k8s-gitops-at-scale.

  • The features folder on the top-level will store configuration for specific features we want to enable and apply to our clusters (both management and worker). Under each <feature name> you find two subfolders for namespace(d)- and cluster-wide (non-namespaced) configuration. Features are part of platform configuration which will be promoted between environments. You will see namespaced and non-namespaced subfolders throughout the folder structure which is basically to group your configuration files.
    ├── features
    │   ├── access-control
    │   │   └── non-namespaced
    │   ├── helloworld-operator
    │   │   ├── namespaced
    │   │   └── non-namespaced
    │   └── ingress-nginx
    │       ├── namespaced
    │       └── non-namespaced
    
  • The providers folder will store the configuration based on cloud provider <name> and the <version> of your cluster management. The version below the cloud provider folder is needed to be able to spin up new management clusters in the future. You can be creative with the folder structure and have management cluster per environment and/or instead of the version if required. The mgmt folder will store the configuration for the management cluster which includes manifests for Flux CD controllers, the Cluster API to spin-up workload clusters which are separated by cluster name and anything else you want to configure on your management cluster. The clusters folder will store configuration for all workload clusters separated based on <environment> and common (applies across multiple clusters in the same environment) and by <cluster name> (applies to a dedicated cluster).
    ├── providers
    │   └── aws
    │       └── v1
    │           ├── clusters
    │           │   ├── non-prod
    │           │   │   ├── common
    │           │   │   │   ├── namespaced
    │           │   │   │   │   └── non-prod-common
    │           │   │   │   └── non-namespaced
    │           │   │   │       └── non-prod-common
    │           │   │   └── non-prod-eu-west-1
    │           │   │       ├── namespaced
    │           │   │       │   └── non-prod-eu-west-1
    │           │   │       └── non-namespaced
    │           │   │           └── non-prod-eu-west-1
    │           │   └── prod
    │           │       ├── common
    │           │       │   ├── namespaced
    │           │       │   │   └── prod-common
    │           │       │   └── non-namespaced
    │           │       │       └── prod-common
    │           │       └── prod-eu-west-1
    │           │           ├── namespaced
    │           │           │   └── prod-eu-west-1
    │           │           └── non-namespaced
    │           │               └── prod-eu-west-1
    │           └── mgmt
    │               ├── namespaced
    │               │   ├── flux-system
    │               │   ├── non-prod-eu-west-1
    │               │   └── prod-eu-west-1
    │               └── non-namespaced
    │                   ├── non-prod-eu-west-1
    │                   └── prod-eu-west-1
    
  • The tenants folder will store the namespace configuration of the onboarded teams and is applied to our workload clusters. Similar to the providers folder tenants has subfolders based on the cloud provider <name> and below subfolders for common (applies across environments) and <environments> (applied to a dedicated environment) configuration. There you find the tenant namespace <name> and all the needed manifests to create and configure the namespace/s.
    └── tenants
        └── aws
            ├── common
            │   └── dummy
            ├── non-prod
            │   └── dummy
            └── prod
                └── dummy
    

Why do we need a common folder for tenants? The common folder will contain namespace configuration which will be promoted between the environments from non-prod to prod using a release but more about release and promotion you find more down below.

Configuration changes

Applying changes to your platform configuration has to follow the Trunk Based Development model of doing small incremental changes through feature branches.

Let’s look into an example change the our dummy tenant onboarding pull-request. You see that I checked-out a branch called “tenant-dummy” to apply my changes, then push and publish the branch in the repository to raised the pull-request.

Important is that your commit messages and pull-request name are following a strict naming convention.

I would also strongly recommend to squash your commit messages into the name of your pull-request. This will keep your git history clean.

This naming convention makes it easier later for auto-generating your release notes when you publish your release. Having the clean well formatted git history combined with your release notes nicely cross references your changes for to a particular release tag.

More about creating a release a bit later in this article.

GitOps configuration

The configuration from the platform repository gets pulled on the management cluster using different gitrepository resources following the main branch or a version tag.

$ kubectl get gitrepositories.source.toolkit.fluxcd.io -A
NAMESPACE     NAME      URL                                                    AGE   READY   STATUS
flux-system   main      ssh://[email protected]/berndonline/k8s-gitops-at-scale   2d    True    stored artifact for revision 'main/ee3e71efb06628775fa19e9664b9194848c6450e'
flux-system   release   ssh://[email protected]/berndonline/k8s-gitops-at-scale   2d    True    stored artifact for revision 'v0.0.2/a5a5edd1194b629f6b41977483dca49aaad957ff'

The kustomization resources will then render and apply the configuration locally to the management cluster (diagram left-side) or remote clusters to our non-prod and prod workload clusters (diagram right-side) using the kubeconfig of the cluster created by the Cluster API stored during the bootstrap.

There are multiple kustomization resources to apply configuration based off the folder structure which I explained above. See the output below and checkout the repository for more details.

$ kubectl get kustomizations.kustomize.toolkit.fluxcd.io -A
NAMESPACE            NAME                          AGE   READY   STATUS
flux-system          feature-access-control        13h   True    Applied revision: v0.0.2/a5a5edd1194b629f6b41977483dca49aaad957ff
flux-system          mgmt                          2d    True    Applied revision: main/ee3e71efb06628775fa19e9664b9194848c6450e
non-prod-eu-west-1   common                        21m   True    Applied revision: main/ee3e71efb06628775fa19e9664b9194848c6450e
non-prod-eu-west-1   feature-access-control        21m   True    Applied revision: main/ee3e71efb06628775fa19e9664b9194848c6450e
non-prod-eu-west-1   feature-helloworld-operator   21m   True    Applied revision: main/ee3e71efb06628775fa19e9664b9194848c6450e
non-prod-eu-west-1   feature-ingress-nginx         21m   True    Applied revision: main/ee3e71efb06628775fa19e9664b9194848c6450e
non-prod-eu-west-1   non-prod-eu-west-1            21m   True    Applied revision: main/ee3e71efb06628775fa19e9664b9194848c6450e
non-prod-eu-west-1   tenants-common                21m   True    Applied revision: main/ee3e71efb06628775fa19e9664b9194848c6450e
non-prod-eu-west-1   tenants-non-prod              21m   True    Applied revision: main/ee3e71efb06628775fa19e9664b9194848c6450e
prod-eu-west-1       common                        15m   True    Applied revision: v0.0.2/a5a5edd1194b629f6b41977483dca49aaad957ff
prod-eu-west-1       feature-access-control        15m   True    Applied revision: v0.0.2/a5a5edd1194b629f6b41977483dca49aaad957ff
prod-eu-west-1       feature-helloworld-operator   15m   True    Applied revision: v0.0.2/a5a5edd1194b629f6b41977483dca49aaad957ff
prod-eu-west-1       feature-ingress-nginx         15m   True    Applied revision: v0.0.2/a5a5edd1194b629f6b41977483dca49aaad957ff
prod-eu-west-1       prod-eu-west-1                15m   True    Applied revision: v0.0.2/a5a5edd1194b629f6b41977483dca49aaad957ff
prod-eu-west-1       tenants-common                15m   True    Applied revision: v0.0.2/a5a5edd1194b629f6b41977483dca49aaad957ff
prod-eu-west-1       tenants-prod                  15m   True    Applied revision: v0.0.2/a5a5edd1194b629f6b41977483dca49aaad957ff

Release and promotion

The GitOps framework doesn’t explain about how to do promotion to higher environments and this is where the Trunk Based Development model comes in helpful together with the gitrepository resource to be able to pull a tagged version instead of a branch.

This allows us applying configuration first to lower environments to non-prod following the main branch, means pull-requests which are merged will be applied instantly. Configuration for higher environments to production requires to create a version tag and publish a release in the repository.

Why using a tag and not a release branch? A tag in your repository is a point in time snapshot of your configuration and can’t be easily modified which is required for creating the release. A branch on the other hand can be modified using pull-requests and you end up with lots of release branches which is less ideal.

To create a new version tag in the git repository I use the following commands:

$ git tag v0.0.3
$ git push origin --tags
Total 0 (delta 0), reused 0 (delta 0)
To github.com:berndonline/k8s-gitops-at-scale.git
* [new tag] v0.0.3 -> v0.0.3

This doesn’t do much after we pushed the new tag because the gitrepository release is set to v0.0.2 but I can see the new tag is available in the repository.

In the repository I can go to releases and click on “Draft a new release” and choose the new tag v0.0.3 I pushed previously.

The release notes you see below can be auto-generate from the pull-requests you merged between v0.0.2 and v0.0.3 by clicking “Generate release notes”. To finish this off save and publish the release.


The release is publish and release notes are visible to everyone which is great for product teams on your platform because they will get visibility about upcoming changes including their own modifications to namespace configuration.

Until now all the changes are applied to our lower non-prod environment following the main branch and for doing the promotion we need to raise a pull-request and update the gitrepository release the new version v0.0.3.

If you follow ITIL change procedures then this is the point where you would normally raise a change for merging your pull-request because this triggers the rollout of your configuration to production.

When the pull-request is merged the release gitrepository is updated by the kustomization resources through the main branch.

$ kubectl get gitrepositories.source.toolkit.fluxcd.io -A
NAMESPACE     NAME      URL                                           AGE   READY   STATUS
flux-system   main      ssh://[email protected]/berndonline/k8s-gitops   2d    True    stored artifact for revision 'main/83133756708d2526cca565880d069445f9619b70'
flux-system   release   ssh://[email protected]/berndonline/k8s-gitops   2d    True    stored artifact for revision 'v0.0.3/ee3e71efb06628885fa19e9664b9198a8c6450e8'

Shortly after the kustomization resources referencing the release will reconcile and automatically push down the new rendered configuration to the production clusters.

$ kubectl get kustomizations.kustomize.toolkit.fluxcd.io -A
NAMESPACE            NAME                          AGE   READY   STATUS
flux-system          feature-access-control        13h   True    Applied revision: v0.0.3/ee3e71efb06628885fa19e9664b9198a8c6450e8
flux-system          mgmt                          2d    True    Applied revision: main/83133756708d2526cca565880d069445f9619b70
non-prod-eu-west-1   common                        31m   True    Applied revision: main/83133756708d2526cca565880d069445f9619b70
non-prod-eu-west-1   feature-access-control        31m   True    Applied revision: main/83133756708d2526cca565880d069445f9619b70
non-prod-eu-west-1   feature-helloworld-operator   31m   True    Applied revision: main/83133756708d2526cca565880d069445f9619b70
non-prod-eu-west-1   feature-ingress-nginx         31m   True    Applied revision: main/83133756708d2526cca565880d069445f9619b70
non-prod-eu-west-1   non-prod-eu-west-1            31m   True    Applied revision: main/83133756708d2526cca565880d069445f9619b70
non-prod-eu-west-1   tenants-common                31m   True    Applied revision: main/83133756708d2526cca565880d069445f9619b70
non-prod-eu-west-1   tenants-non-prod              31m   True    Applied revision: main/83133756708d2526cca565880d069445f9619b70
prod-eu-west-1       common                        26m   True    Applied revision: v0.0.3/ee3e71efb06628885fa19e9664b9198a8c6450e8
prod-eu-west-1       feature-access-control        26m   True    Applied revision: v0.0.3/ee3e71efb06628885fa19e9664b9198a8c6450e8
prod-eu-west-1       feature-helloworld-operator   26m   True    Applied revision: v0.0.3/ee3e71efb06628885fa19e9664b9198a8c6450e8
prod-eu-west-1       feature-ingress-nginx         26m   True    Applied revision: v0.0.3/ee3e71efb06628885fa19e9664b9198a8c6450e8
prod-eu-west-1       prod-eu-west-1                26m   True    Applied revision: v0.0.3/ee3e71efb06628885fa19e9664b9198a8c6450e8
prod-eu-west-1       tenants-common                26m   True    Applied revision: v0.0.3/ee3e71efb06628885fa19e9664b9198a8c6450e8
prod-eu-west-1       tenants-prod                  26m   True    Applied revision: v0.0.3/ee3e71efb06628885fa19e9664b9198a8c6450e8

Why using Kustomize for managing the configuration and not Helm? I know the difficulties of managing these raw YAML manifests. Kustomize gets you going quick where with Helm there is a higher initial effort writing your Charts. In my next article I will focus specifically on Helm.

I showed a very simplistic example having a single cloud provider (aws) and a single management cluster but as you have seen you can easily add Azure or Google cloud providers in your configuration and scale horizontally. I think this is what makes Kubernetes and controllers like Flux CD great together that you don’t need to have complex pipelines or workflows to rollout and promote your changes completely pipeline-less.


Getting started with Kubernetes Operators in Go

In the past few weeks I started to learn Go and beginners like me can make quick progress once you understand the structure and some basics about the programming language. I felt that from all the learning and reading I’ve done on Go and Kubernetes operators, I had enough knowledge to start writing my own Kubernetes operator in Go.

At the beginning of last year, RedHat released the operator-sdk which helps to create the scaffolding for writing your own operators in Ansible, Helm or natively in Go. There has been quite a few changes along the way around the operator-sdk and it is maturing a lot over the course of the past year.

The instructions on how to install Go can be found on the Go website and we need the latest version of the operator-sdk:

$ wget https://github.com/operator-framework/operator-sdk/releases/download/v1.2.0/operator-sdk-v1.2.0-x86_64-linux-gnu
$ mv operator-sdk-v1.2.0-x86_64-linux-gnu operator-sdk
$ sudo mv operator-sdk /usr/local/bin/

Create a new folder and start to initialise the project. You see that I have already set the option --domain so all API groups will be <-group->.helloworld.io. The --repo option allows me to create the project folder outside of my $GOPATH environment. Infos about the folder structure you can find in the Kubebuilder documentation:

$ mkdir k8s-helloworld-operator
$ cd k8s-helloworld-operator
$ operator-sdk init --domain=helloworld.io --repo=github.com/berndonline/k8s-helloworld-operator

The last thing we need before we start writing the operator is to create a new API and Controller and this will scaffold the operator API at api/v1alpha1/operator_types.go and the controller at controllers/operator_controller.go.

$ operator-sdk create api --group app --version v1alpha1 --kind Operator
Create Resource [y/n]
y
Create Controller [y/n]
y
Writing scaffold for you to edit...
api/v1alpha1/operator_types.go
controllers/operator_controller.go
...
  • Define your API

Define your API for the operator custom resource by editing the Go type definitions at api/v1alpha1/operator_types.go

// OperatorSpec defines the desired state of Operator
type OperatorSpec struct {
	// INSERT ADDITIONAL SPEC FIELDS - desired state of cluster
	// Important: Run "make" to regenerate code after modifying this file

	// Foo is an example field of Operator. Edit Operator_types.go to remove/update
	Size     int32  `json:"size"`
	Image    string `json:"image"`
	Response string `json:"response"`
}
// OperatorStatus defines the observed state of Operator
type OperatorStatus struct {
	// INSERT ADDITIONAL STATUS FIELD - define observed state of cluster
	// Important: Run "make" to regenerate code after modifying this file
	Nodes []string `json:"nodes"`
}

// Operator is the Schema for the operators API
// +kubebuilder:subresource:status
type Operator struct {
	metav1.TypeMeta   `json:",inline"`
	metav1.ObjectMeta `json:"metadata,omitempty"`

	Spec   OperatorSpec   `json:"spec,omitempty"`
	Status OperatorStatus `json:"status,omitempty"`
}

After modifying the _types.go file you always need to run the following command to update the generated code for that resource type:

$ make generate 
/home/ubuntu/.go/bin/controller-gen object:headerFile="hack/boilerplate.go.txt" paths="./..."
  • Generate Custom Resource Definition (CRD) manifests

In the previous step we defined the API with spec and status fields of the CRD manifests, which can be generated and updated with the following command:

$ make manifests
/home/ubuntu/.go/bin/controller-gen "crd:trivialVersions=true" rbac:roleName=manager-role webhook paths="./..." output:crd:artifacts:config=config/crd/bases

This makefile will invoke the controller-gen to generate the CRD manifests at config/crd/bases/app.helloworld.io_operators.yaml and below you see my custom resource example for the operator:

apiVersion: app.helloworld.io/v1alpha1
kind: Operator
metadata:
  name: operator-sample
spec:
  size: 1
  response: "Hello, World!"
  image: "ghcr.io/berndonline/k8s/go-helloworld:latest"
  • Controller

In the beginning when I created the API, the operator-sdk automatically created the controller file for me at controllers/operator_controller.go which we now start to modify and add the Go code. I will not go into every detail because the different resources you will create will all look very similar and repeat like you will see in example code. I will mainly focus on the Deployment for my Helloworld container image which I want to deploy using the operator.

Let’s start looking at the deploymentForOperator function which defines and returns the Kubernetes Deployment object. You see there that I invoke an imported Go packages like &appsv1.Deployment and the import is defined at the top of the controller file. You can find details about this in the Go Doc reference: godoc.org/k8s.io/api/apps/v1

// deploymentForOperator returns a operator Deployment object
func (r *OperatorReconciler) deploymentForOperator(m *appv1alpha1.Operator) *appsv1.Deployment {
	ls := labelsForOperator(m.Name)
	replicas := m.Spec.Size

	dep := &appsv1.Deployment{
		ObjectMeta: metav1.ObjectMeta{
			Name:      m.Name,
			Namespace: m.Namespace,
		},
		Spec: appsv1.DeploymentSpec{
			Replicas: &replicas,
			Selector: &metav1.LabelSelector{
				MatchLabels: ls,
			},
			Template: corev1.PodTemplateSpec{
				ObjectMeta: metav1.ObjectMeta{
					Labels: ls,
				},
				Spec: corev1.PodSpec{
					Containers: []corev1.Container{{
						Image:           m.Spec.Image,
						ImagePullPolicy: "Always",
						Name:            "helloworld",
						Ports: []corev1.ContainerPort{{
							ContainerPort: 8080,
							Name:          "operator",
						}},
						Env: []corev1.EnvVar{{
							Name:  "RESPONSE",
							Value: m.Spec.Response,
						}},
						EnvFrom: []corev1.EnvFromSource{{
							ConfigMapRef: &corev1.ConfigMapEnvSource{
								LocalObjectReference: corev1.LocalObjectReference{
									Name: m.Name,
								},
							},
						}},
						VolumeMounts: []corev1.VolumeMount{{
							Name:      m.Name,
							ReadOnly:  true,
							MountPath: "/helloworld/",
						}},
					}},
					Volumes: []corev1.Volume{{
						Name: m.Name,
						VolumeSource: corev1.VolumeSource{
							ConfigMap: &corev1.ConfigMapVolumeSource{
								LocalObjectReference: corev1.LocalObjectReference{
									Name: m.Name,
								},
							},
						},
					}},
				},
			},
		},
	}

	// Set Operator instance as the owner and controller
	ctrl.SetControllerReference(m, dep, r.Scheme)
	return dep
}

We have defined the deploymentForOperator function and now we can look into the Reconcile function and add the step to check if the deployment already exists and, if not, to create the new deployment:

// Check if the deployment already exists, if not create a new one
found := &appsv1.Deployment{}
err = r.Get(ctx, types.NamespacedName{Name: operator.Name, Namespace: operator.Namespace}, found)
if err != nil && errors.IsNotFound(err) {
	// Define a new deployment
	dep := r.deploymentForOperator(operator)
	log.Info("Creating a new Deployment", "Deployment.Namespace", dep.Namespace, "Deployment.Name", dep.Name)
	err = r.Create(ctx, dep)
	if err != nil {
		log.Error(err, "Failed to create new Deployment", "Deployment.Namespace", dep.Namespace, "Deployment.Name", dep.Name)
		return ctrl.Result{}, err
	}
	// Deployment created successfully - return and requeue
	return ctrl.Result{Requeue: true}, nil
} else if err != nil {
	log.Error(err, "Failed to get Deployment")
	return ctrl.Result{}, err
}

Unfortunately this isn’t enough because this will only check if the deployment exists or not and create a new deployment, but it will not update the deployment if the custom resource is changed.

We need to add two more steps to check if the created Deployment Spec.Template matches the Spec.Template from the  deploymentForOperator function and the Deployment Spec.Replicas the defined size from the custom resource. I will make use of the defined variable found := &appsv1.Deployment{} from the previous step when I checked if the deployment exists.

// Check if the deployment Spec.Template, matches the found Spec.Template
deploy := r.deploymentForOperator(operator)
if !equality.Semantic.DeepDerivative(deploy.Spec.Template, found.Spec.Template) {
	found = deploy
	log.Info("Updating Deployment", "Deployment.Namespace", found.Namespace, "Deployment.Name", found.Name)
	err := r.Update(ctx, found)
	if err != nil {
		log.Error(err, "Failed to update Deployment", "Deployment.Namespace", found.Namespace, "Deployment.Name", found.Name)
		return ctrl.Result{}, err
	}
	return ctrl.Result{Requeue: true}, nil
}

// Ensure the deployment size is the same as the spec
size := operator.Spec.Size
if *found.Spec.Replicas != size {
	found.Spec.Replicas = &size
	err = r.Update(ctx, found)
	if err != nil {
		log.Error(err, "Failed to update Deployment", "Deployment.Namespace", found.Namespace, "Deployment.Name", found.Name)
		return ctrl.Result{}, err
	}
	// Spec updated - return and requeue
	return ctrl.Result{Requeue: true}, nil
}

The SetupWithManager() function in controllers/operator_controller.go specifies how the controller is built to watch a custom resource and other resources that are owned and managed by that controller.

func (r *OperatorReconciler) SetupWithManager(mgr ctrl.Manager) error {
	return ctrl.NewControllerManagedBy(mgr).
		For(&appv1alpha1.Operator{}).
		Owns(&appsv1.Deployment{}).
		Owns(&corev1.ConfigMap{}).
		Owns(&corev1.Service{}).
		Owns(&networkingv1beta1.Ingress{}).
		Complete(r)
}

Basically that’s all I need to write for the controller to deploy my Helloworld container image using an Kubernetes operator. In my code example you will find that I also create a Kubernetes Service, Ingress and ConfigMap but you see that this mostly repeats what I have done with the Deployment object.

  • RBAC permissions

Before we can start running the operator, we need to define the RBAC permissions the controller needs to interact with the resources it manages otherwise your controller will not work. These are specified via [RBAC markers] like these:

// +kubebuilder:rbac:groups=app.helloworld.io,resources=operators,verbs=get;list;watch;create;update;patch;delete
// +kubebuilder:rbac:groups=app.helloworld.io,resources=operators/status,verbs=get;update;patch
// +kubebuilder:rbac:groups=app.helloworld.io,resources=operators/finalizers,verbs=update
// +kubebuilder:rbac:groups=apps,resources=deployments,verbs=get;list;watch;create;update;patch;delete
// +kubebuilder:rbac:groups=core,resources=services,verbs=get;list;watch;create;update;patch;delete
// +kubebuilder:rbac:groups=core,resources=configmaps,verbs=get;list;watch;create;update;patch;delete
// +kubebuilder:rbac:groups=networking.k8s.io,resources=ingresses,verbs=get;list;watch;create;update;patch;delete
// +kubebuilder:rbac:groups=core,resources=pods,verbs=get;list;watch

The ClusterRole manifest at config/rbac/role.yaml is generated from the above markers via controller-gen with the following command:

$ make manifests 
/home/ubuntu/.go/bin/controller-gen "crd:trivialVersions=true" rbac:roleName=manager-role webhook paths="./..." output:crd:artifacts:config=config/crd/bases
  • Running the Operator

We need a Kubernetes cluster and admin privileges to run the operator. I will use Kind which will run a lightweight Kubernetes cluster in your local Docker engine, which is all I need to run and test my Helloworld operator:

$ ./scripts/create-kind-cluster.sh 
Creating cluster "kind" ...
 ✓ Ensuring node image (kindest/node:v1.19.1) 🖼 
 ✓ Preparing nodes 📦  
 ✓ Writing configuration 📜 
 ✓ Starting control-plane 🕹️ 
 ✓ Installing CNI 🔌 
 ✓ Installing StorageClass 💾 
Set kubectl context to "kind-kind"
You can now use your cluster with:

kubectl cluster-info --context kind-kind

Have a question, bug, or feature request? Let us know! https://kind.sigs.k8s.io/#community 🙂

Before running the operator the custom resource Definition must be registered with the Kubernetes apiserver:

$ make install
/home/ubuntu/.go/bin/controller-gen "crd:trivialVersions=true" rbac:roleName=manager-role webhook paths="./..." output:crd:artifacts:config=config/crd/bases
/usr/bin/kustomize build config/crd | kubectl apply -f -
Warning: apiextensions.k8s.io/v1beta1 CustomResourceDefinition is deprecated in v1.16+, unavailable in v1.22+; use apiextensions.k8s.io/v1 CustomResourceDefinition
customresourcedefinition.apiextensions.k8s.io/operators.app.helloworld.io created

We can now run the operator locally on my workstation:

$ make run
/home/ubuntu/.go/bin/controller-gen object:headerFile="hack/boilerplate.go.txt" paths="./..."
go fmt ./...
go vet ./...
/home/ubuntu/.go/bin/controller-gen "crd:trivialVersions=true" rbac:roleName=manager-role webhook paths="./..." output:crd:artifacts:config=config/crd/bases
go run ./main.go
2020-11-22T18:12:49.023Z	INFO	controller-runtime.metrics	metrics server is starting to listen	{"addr": ":8080"}
2020-11-22T18:12:49.024Z	INFO	setup	starting manager
2020-11-22T18:12:49.025Z	INFO	controller-runtime.manager	starting metrics server	{"path": "/metrics"}
2020-11-22T18:12:49.025Z	INFO	controller	Starting EventSource	{"reconcilerGroup": "app.helloworld.io", "reconcilerKind": "Operator", "controller": "operator", "source": "kind source: /, Kind="}
2020-11-22T18:12:49.126Z	INFO	controller	Starting EventSource	{"reconcilerGroup": "app.helloworld.io", "reconcilerKind": "Operator", "controller": "operator", "source": "kind source: /, Kind="}
2020-11-22T18:12:49.226Z	INFO	controller	Starting EventSource	{"reconcilerGroup": "app.helloworld.io", "reconcilerKind": "Operator", "controller": "operator", "source": "kind source: /, Kind="}
2020-11-22T18:12:49.327Z	INFO	controller	Starting EventSource	{"reconcilerGroup": "app.helloworld.io", "reconcilerKind": "Operator", "controller": "operator", "source": "kind source: /, Kind="}
2020-11-22T18:12:49.428Z	INFO	controller	Starting EventSource	{"reconcilerGroup": "app.helloworld.io", "reconcilerKind": "Operator", "controller": "operator", "source": "kind source: /, Kind="}
2020-11-22T18:12:49.528Z	INFO	controller	Starting Controller	{"reconcilerGroup": "app.helloworld.io", "reconcilerKind": "Operator", "controller": "operator"}
2020-11-22T18:12:49.528Z	INFO	controller	Starting workers	{"reconcilerGroup": "app.helloworld.io", "reconcilerKind": "Operator", "controller": "operator", "worker count": 1}

Let’s open a new terminal and apply the custom resource example:

$ kubectl apply -f config/samples/app_v1alpha1_operator.yaml 
operator.app.helloworld.io/operator-sample created

Going back to the terminal where the operator is running, you see the log messages that it invoke the different functions to deploy the defined resource objects:

2020-11-22T18:15:30.412Z	INFO	controllers.Operator	Creating a new Deployment	{"operator": "default/operator-sample", "Deployment.Namespace": "default", "Deployment.Name": "operator-sample"}
2020-11-22T18:15:30.446Z	INFO	controllers.Operator	Creating a new ConfigMap	{"operator": "default/operator-sample", "ConfigMap.Namespace": "default", "ConfigMap.Name": "operator-sample"}
2020-11-22T18:15:30.453Z	INFO	controllers.Operator	Creating a new Service	{"operator": "default/operator-sample", "Service.Namespace": "default", "Service.Name": "operator-sample"}
2020-11-22T18:15:30.470Z	INFO	controllers.Operator	Creating a new Ingress	{"operator": "default/operator-sample", "Ingress.Namespace": "default", "Ingress.Name": "operator-sample"}
2020-11-22T18:15:30.927Z	DEBUG	controller	Successfully Reconciled	{"reconcilerGroup": "app.helloworld.io", "reconcilerKind": "Operator", "controller": "operator", "name": "operator-sample", "namespace": "default"}
2020-11-22T18:15:33.776Z	DEBUG	controller	Successfully Reconciled	{"reconcilerGroup": "app.helloworld.io", "reconcilerKind": "Operator", "controller": "operator", "name": "operator-sample", "namespace": "default"}
2020-11-22T18:15:35.181Z	DEBUG	controller	Successfully Reconciled	{"reconcilerGroup": "app.helloworld.io", "reconcilerKind": "Operator", "controller": "operator", "name": "operator-sample", "namespace": "default"}

In the default namespace where I applied the custom resource you will see the deployed resources by the operator:

$ kubectl get operators.app.helloworld.io 
NAME              AGE
operator-sample   6m11s
$ kubectl get all
NAME                                   READY   STATUS    RESTARTS   AGE
pod/operator-sample-767897c4b9-8zwsd   1/1     Running   0          2m59s

NAME                      TYPE        CLUSTER-IP      EXTERNAL-IP   PORT(S)    AGE
service/kubernetes        ClusterIP   10.96.0.1               443/TCP    29m
service/operator-sample   ClusterIP   10.96.199.188           8080/TCP   2m59s

NAME                              READY   UP-TO-DATE   AVAILABLE   AGE
deployment.apps/operator-sample   1/1     1            1           2m59s

NAME                                         DESIRED   CURRENT   READY   AGE
replicaset.apps/operator-sample-767897c4b9   1         1         1       2m59s

There is not much else to do other than to build the operator image and push to an image registry so that I can run the operator on a Kubernetes cluster.

$ make docker-build IMG=ghcr.io/berndonline/k8s/helloworld-operator:latest
$ make docker-push IMG=ghcr.io/berndonline/k8s/helloworld-operator:latest
$ kustomize build config/default | kubectl apply -f -

I hope this article is useful for getting you started on writing your own Kubernetes operator in Go.

How to manage Kubernetes clusters the GitOps way with Flux CD

Kubernetes is becoming more and more popular, and so is managing clusters at scale. This article is about how to manage Kubernetes clusters the GitOps way using the Flux CD operator.

Flux can monitor container image and code repositories that you specify and trigger deployments to automatically change the configuration state of your Kubernetes cluster. The cluster configuration is centrally managed and stored in declarative form in Git, and there is no need for an administrator to manually apply manifests, the Flux operator synchronise to apply or delete the cluster configuration.

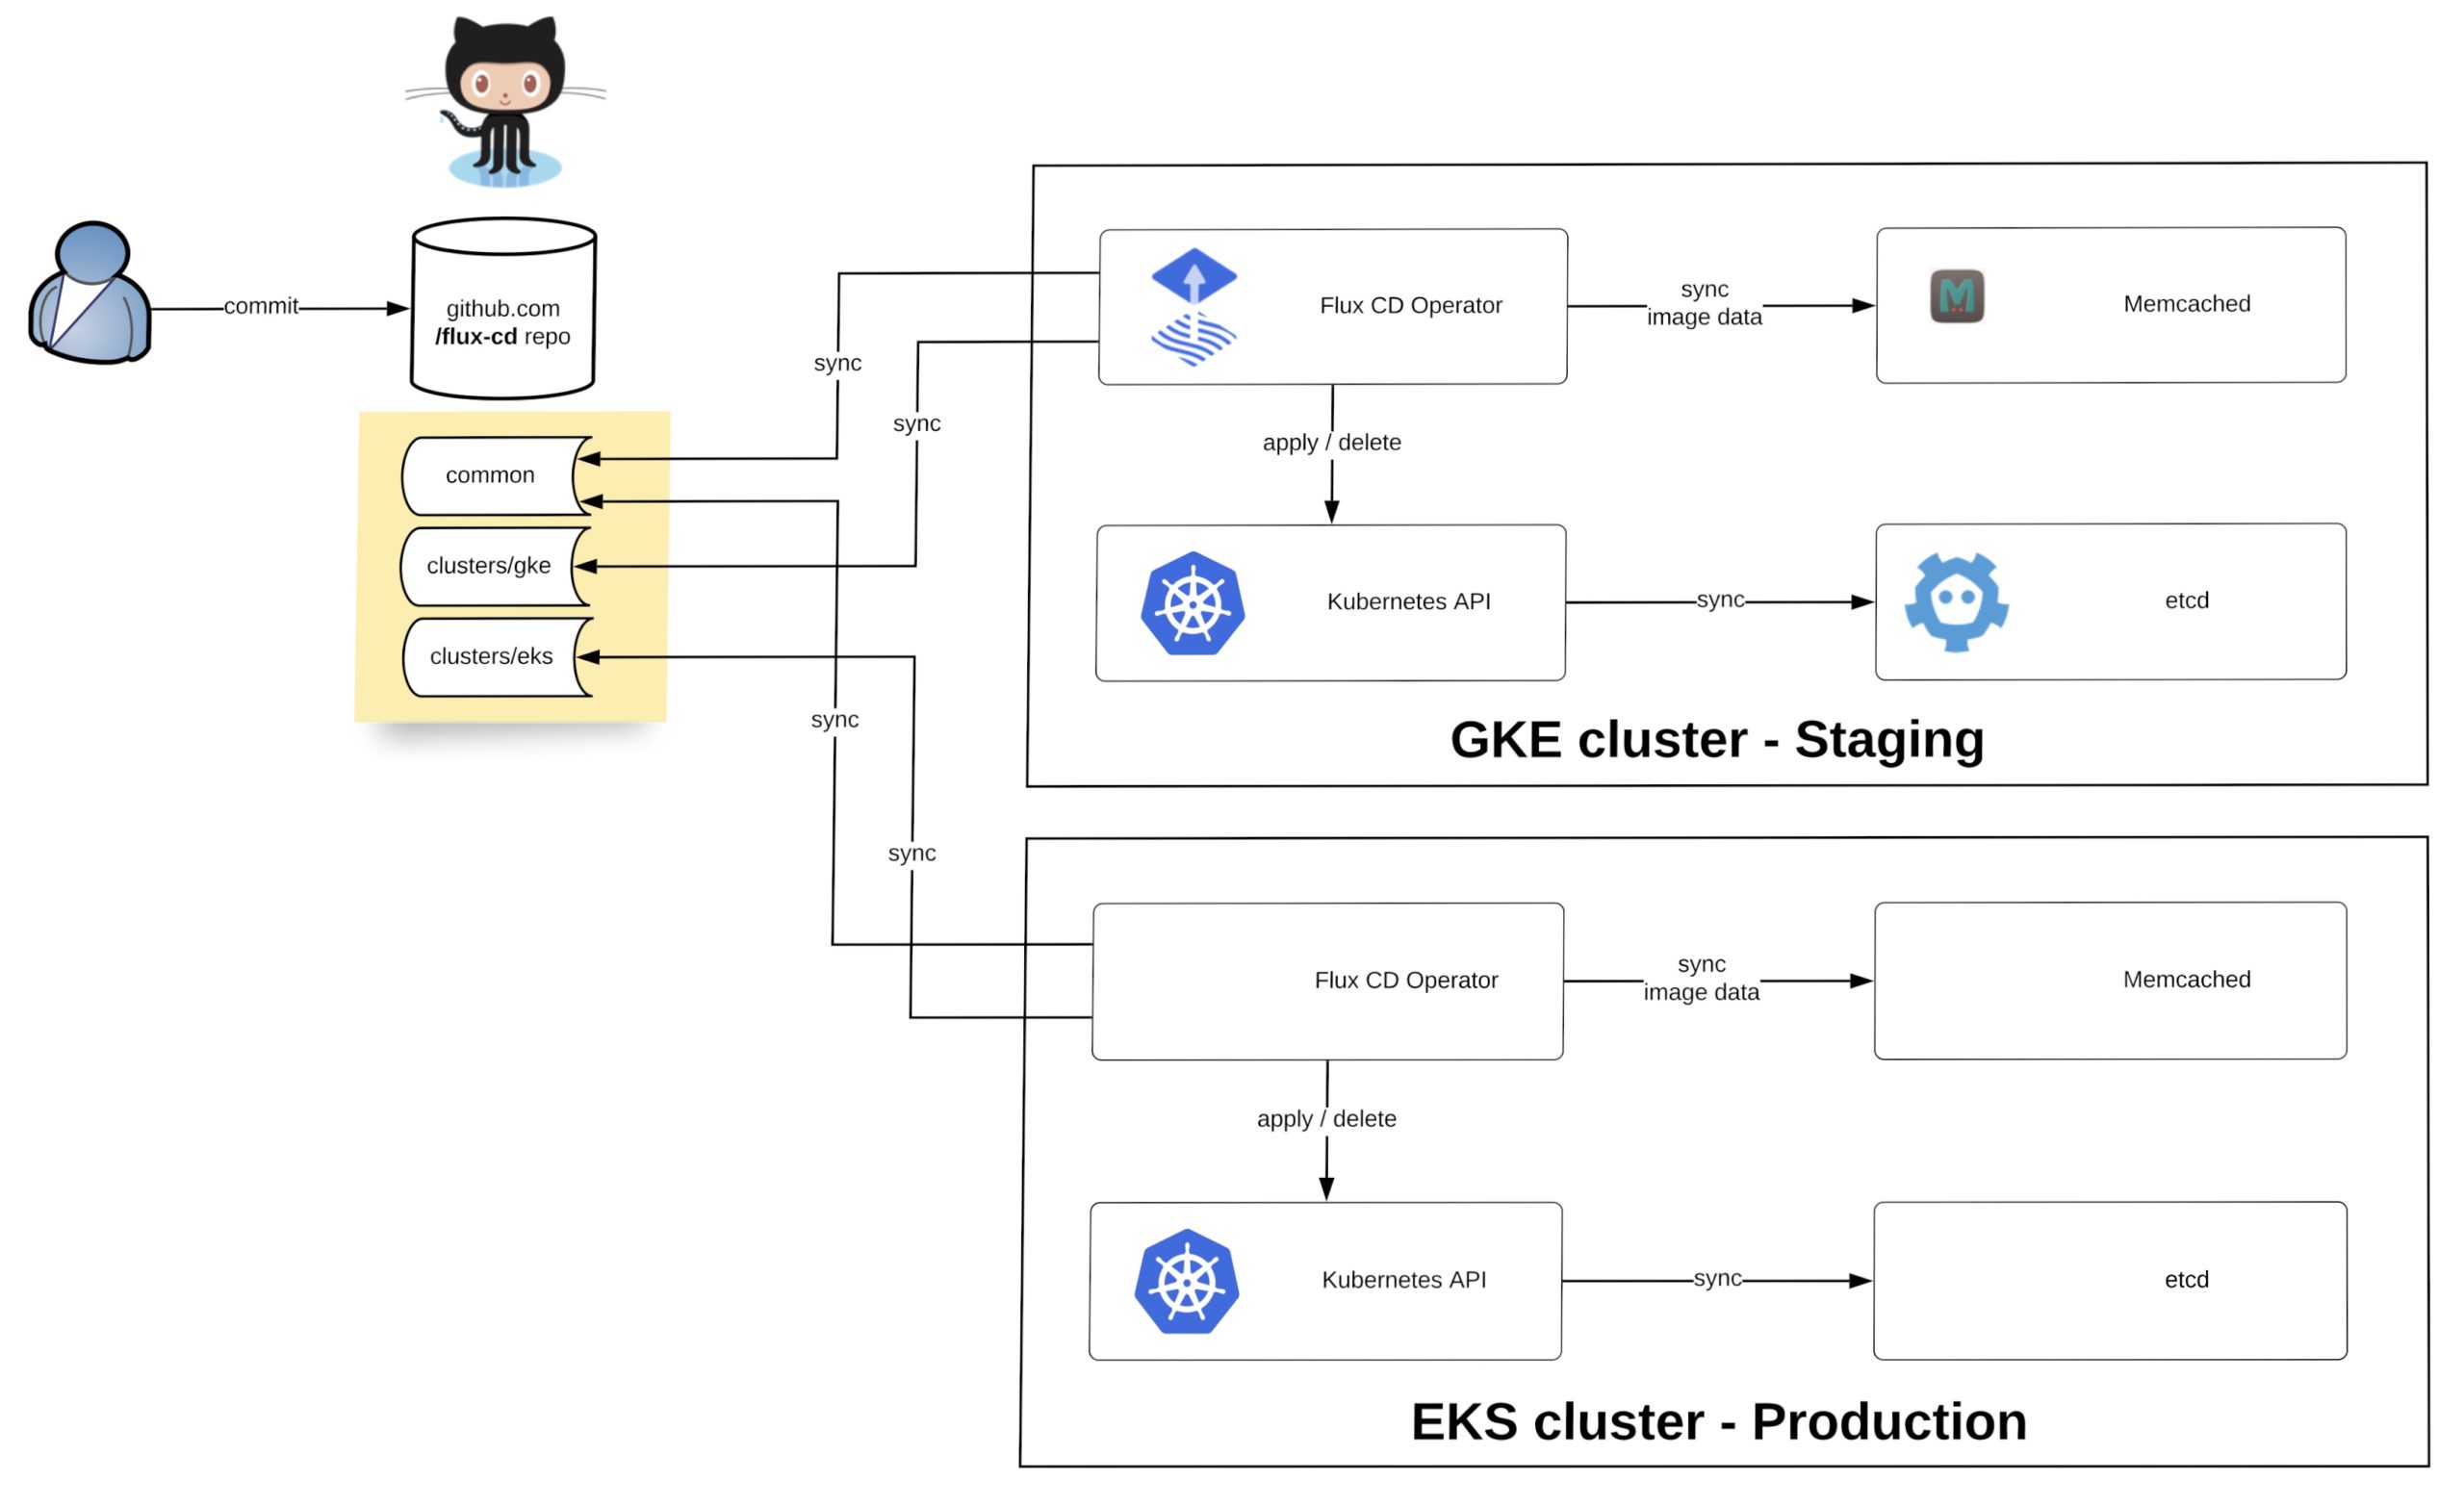
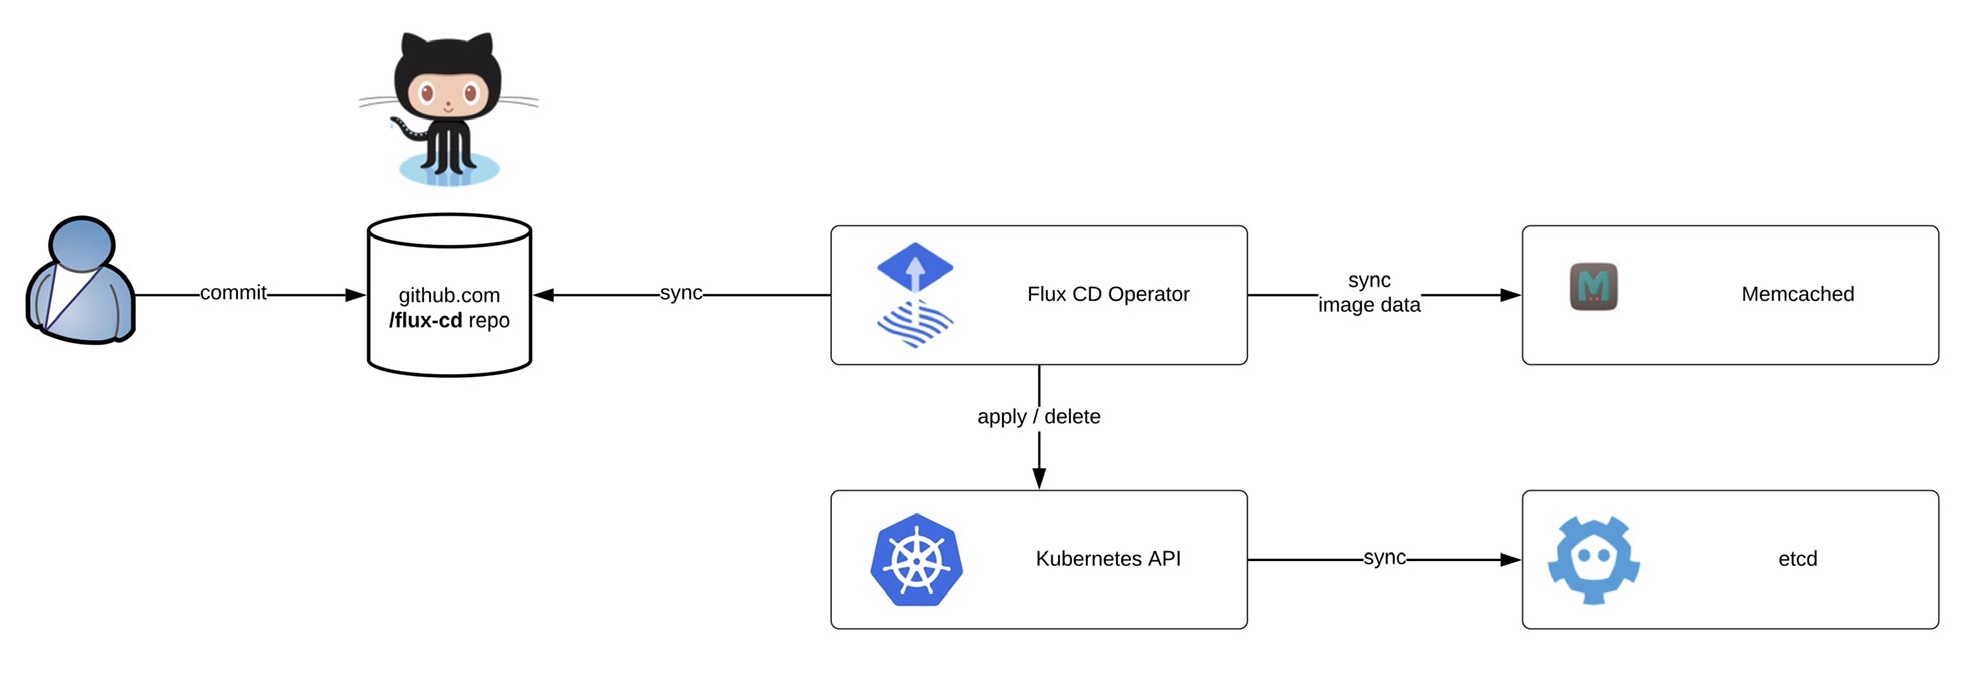
Before we start deploying the operator we need to install the fluxctl command-line utility and create the namespace:

sudo wget -O /usr/local/bin/fluxctl https://github.com/fluxcd/flux/releases/download/1.18.0/fluxctl_linux_amd64
sudo chmod 755 /usr/local/bin/fluxctl
kubectl create ns flux

Deploying the Flux operator is straight forward and requires a few options like git repository and git path. The path is important for my example because it tells the operator in which folder to look for manifests:

$ fluxctl install [email protected] [email protected]:berndonline/flux-cd.git --git-path=clusters/gke,common/stage --manifest-generation=true --git-branch=master --namespace=flux --registry-disable-scanning | kubectl apply -f -
deployment.apps/memcached created
service/memcached created
serviceaccount/flux created
clusterrole.rbac.authorization.k8s.io/flux created
clusterrolebinding.rbac.authorization.k8s.io/flux created
deployment.apps/flux created
secret/flux-git-deploy created

After you have applied the configuration, wait until the Flux pods are up and running:

$ kubectl get pods -n flux
NAME                       READY   STATUS    RESTARTS   AGE
flux-85cd9cd746-hnb4f      1/1     Running   0          74m
memcached-5dcd7579-d6vwh   1/1     Running   0          20h

The last step is to get the Flux operator deploy keys and copy the output to add to your Git repository:

fluxctl identity --k8s-fwd-ns flux

Now you are ready to synchronise the Flux operator with the repository. By default Flux automatically synchronises every 5 minutes to apply configuration changes:

$ fluxctl sync --k8s-fwd-ns flux
Synchronizing with [email protected]:berndonline/flux-cd.git
Revision of master to apply is 726944d
Waiting for 726944d to be applied ...
Done.

You are able to list workloads which are managed by the Flux operator:

$ fluxctl list-workloads --k8s-fwd-ns=flux -a
WORKLOAD                             CONTAINER         IMAGE                            RELEASE  POLICY
default:deployment/hello-kubernetes  hello-kubernetes  paulbouwer/hello-kubernetes:1.5  ready    automated

How do we manage the configuration for multiple Kubernetes clusters?

I want to show you a simple example using Kustomize to manage multiple clusters across two environments (staging and production) with Flux. Basically you have a single repository and multiple clusters synchronising the configuration depending how you configure the –git-path variable of the Flux operator. The option –manifest-generation enables Kustomize for the operator and it is required to add a .flux.yaml to run Kustomize build on the cluster directories and to apply the generated manifests.

Let’s look at the repository file and folder structure. We have the base folder containing the common deployment configuration, the common folder with the environment separation for stage and prod overlays and the clusters folder which contains more cluster specific configuration:

├── .flux.yaml 
├── base
│   └── common
│       ├── deployment.yaml
│       ├── kustomization.yaml
│       ├── namespace.yaml
│       └── service.yaml
├── clusters
│   ├── eks
|   |   ├── eks-app1
│   │   |   ├── deployment.yaml
|   |   |   ├── kustomization.yaml
│   │   |   └── service.yaml
|   |   └── kustomization.yaml
│   ├── gke
|   |   ├── gke-app1
│   │   |   ├── deployment.yaml
|   |   |   ├── kustomization.yaml
│   │   |   └── service.yaml
|   |   ├── gke-app2
│   │   |   ├── deployment.yaml
|   |   |   ├── kustomization.yaml
│   │   |   └── service.yaml
|   |   └── kustomization.yaml
└── common
    ├── prod
    |   ├── prod.yaml
    |   └── kustomization.yaml
    └── stage
        ├──  team1
        |    ├── deployment.yaml
        |    ├── kustomization.yaml
        |    ├── namespace.yaml
        |    └── service.yaml
        ├── stage.yaml
        └── kustomization.yaml

If you are new to Kustomize I would recommend reading the article Kustomize – The right way to do templating in Kubernetes.

The last thing we need to do is to deploy the Flux operator to the two Kubernetes clusters. The only difference between both is the git-path variable which points the operator to the cluster and common directories were Kustomize applies the overlays based what is specified in kustomize.yaml. More details about the configuration you find in my example repository: https://github.com/berndonline/flux-cd

Flux config for Google GKE staging cluster:

fluxctl install [email protected] [email protected]:berndonline/flux-cd.git --git-path=clusters/gke,common/stage --manifest-generation=true --git-branch=master --namespace=flux | kubectl apply -f -

Flux config for Amazon EKS production cluster:

fluxctl install [email protected] [email protected]:berndonline/flux-cd.git --git-path=clusters/eks,common/prod --manifest-generation=true --git-branch=master --namespace=flux | kubectl apply -f -

After a few minutes the configuration is applied to the two clusters and you can validate the configuration.

Google GKE stage workloads:

$ fluxctl list-workloads --k8s-fwd-ns=flux -a
WORKLOAD                   CONTAINER         IMAGE                            RELEASE  POLICY
common:deployment/common   hello-kubernetes  paulbouwer/hello-kubernetes:1.5  ready    automated
default:deployment/gke1    hello-kubernetes  paulbouwer/hello-kubernetes:1.5  ready    
default:deployment/gke2    hello-kubernetes  paulbouwer/hello-kubernetes:1.5  ready    
team1:deployment/team1     hello-kubernetes  paulbouwer/hello-kubernetes:1.5  ready
$ kubectl get svc --all-namespaces | grep LoadBalancer
common        common                 LoadBalancer   10.91.14.186   35.240.53.46     80:31537/TCP    16d
default       gke1                   LoadBalancer   10.91.7.169    35.195.241.46    80:30218/TCP    16d
default       gke2                   LoadBalancer   10.91.10.239   35.195.144.68    80:32589/TCP    16d
team1         team1                  LoadBalancer   10.91.1.178    104.199.107.56   80:31049/TCP    16d

GKE common stage application:

Amazon EKS prod workloads:

$ fluxctl list-workloads --k8s-fwd-ns=flux -a
WORKLOAD                          CONTAINER         IMAGE                                                                RELEASE  POLICY
common:deployment/common          hello-kubernetes  paulbouwer/hello-kubernetes:1.5                                      ready    automated
default:deployment/eks1           hello-kubernetes  paulbouwer/hello-kubernetes:1.5                                      ready
$ kubectl get svc --all-namespaces | grep LoadBalancer
common        common       LoadBalancer   10.100.254.171   a4caafcbf2b2911ea87370a71555111a-958093179.eu-west-1.elb.amazonaws.com    80:32318/TCP    3m8s
default       eks1         LoadBalancer   10.100.170.10    a4caeada52b2911ea87370a71555111a-1261318311.eu-west-1.elb.amazonaws.com   80:32618/TCP    3m8s

EKS common prod application:

I hope this article is useful to get started with GitOps and the Flux operator. In the future, I would like to see Flux being able to watch git tags which will make it easier to promote changes and manage clusters with version tags.

For more technical information have a look at the Flux CD documentation.

Create and run Ansible Operator on OpenShift

Since RedHat announced the new OpenShift version 4.0 they said it will be a very different experience to install and operate the platform, mostly because of Operators managing the components of the cluster. A few month back RedHat officially released the Operator-SDK and the Operator Hub to create your own operators and to share them.

I did some testing around the Ansible Operator which I wanted to share in this article but before we dig into creating our own operator we need to first install operator-sdk:

# Make sure you are able to use docker commands
sudo groupadd docker
sudo usermod -aG docker centos
ls -l /var/run/docker.sock
sudo chown root:docker /var/run/docker.sock

# Download Go
wget https://dl.google.com/go/go1.10.3.linux-amd64.tar.gz
sudo tar -C /usr/local -xzf go1.10.3.linux-amd64.tar.gz

# Modify bash_profile
vi ~/.bash_profile
export PATH=$PATH:/usr/local/go/bin:$HOME/go
export GOPATH=$HOME/go

# Load bash_profile
source ~/.bash_profile

# Install Go dep
mkdir -p /home/centos/go/bin
curl https://raw.githubusercontent.com/golang/dep/master/install.sh | sh
sudo cp /home/centos/go/bin/dep /usr/local/go/bin/

# Download and install operator framework
mkdir -p $GOPATH/src/github.com/operator-framework
cd $GOPATH/src/github.com/operator-framework
git clone https://github.com/operator-framework/operator-sdk
cd operator-sdk
git checkout master
make dep
make install
sudo cp /home/centos/go/bin/operator-sdk /usr/local/bin/

Let’s start creating our Ansible Operator using the operator-sdk command line which create a blank operator template which we will modify. You can create three different types of operators: Go, Helm or Ansible – check out the operator-sdk repository:

operator-sdk new helloworld-operator --api-version=hello.world.com/v1alpha1 --kind=Helloworld --type=ansible --cluster-scoped
cd ./helloworld-operator/

I am using the Ansible k8s module to create a Hello OpenShift deployment configuration in tasks/main.yml.

---
# tasks file for helloworld

- name: create deployment config
  k8s:
    definition:
      apiVersion: apps.openshift.io/v1
      kind: DeploymentConfig
      metadata:
        name: '{{ meta.name }}'
        labels:
          app: '{{ meta.name }}'
        namespace: '{{ meta.namespace }}'
...

Please have a look at my Github repository openshift-helloworld-operator for more details.

After we have modified the Ansible Role we can start and build operator which will create container we can afterwards push to a container registry like Docker Hub:

$ operator-sdk build berndonline/openshift-helloworld-operator:v0.1
INFO[0000] Building Docker image berndonline/openshift-helloworld-operator:v0.1
Sending build context to Docker daemon   192 kB
Step 1/3 : FROM quay.io/operator-framework/ansible-operator:v0.5.0
Trying to pull repository quay.io/operator-framework/ansible-operator ...
v0.5.0: Pulling from quay.io/operator-framework/ansible-operator
a02a4930cb5d: Already exists
1bdeea372afe: Pull complete
3b057581d180: Pull complete
12618e5abaa7: Pull complete
6f75beb67357: Pull complete
b241f86d9d40: Pull complete
e990bcb94ae6: Pull complete
3cd07ac53955: Pull complete
3fdda52e2c22: Pull complete
0fd51cfb1114: Pull complete
feaebb94b4da: Pull complete
4ff9620dce03: Pull complete
a428b645a85e: Pull complete
5daaf234bbf2: Pull complete
8cbdd2e4d624: Pull complete
fa8517b650e0: Pull complete
a2a83ad7ba5a: Pull complete
d61b9e9050fe: Pull complete
Digest: sha256:9919407a30b24d459e1e4188d05936b52270cafcd53afc7d73c89be02262f8c5
Status: Downloaded newer image for quay.io/operator-framework/ansible-operator:v0.5.0
 ---> 1e857f3522b5
Step 2/3 : COPY roles/ ${HOME}/roles/
 ---> 6e073916723a
Removing intermediate container cb3f89ba1ed6
Step 3/3 : COPY watches.yaml ${HOME}/watches.yaml
 ---> 8f0ee7ba26cb
Removing intermediate container 56ece5b800b2
Successfully built 8f0ee7ba26cb
INFO[0018] Operator build complete.

$ docker push berndonline/openshift-helloworld-operator:v0.1
The push refers to a repository [docker.io/berndonline/openshift-helloworld-operator]
2233d56d407b: Pushed
d60aa100721d: Pushed
a3a57fad5e76: Pushed
ab38e57f8581: Pushed
79b113b67633: Pushed
9cf5b154cadd: Pushed
b191ffbd3c8d: Pushed
5e21ced2d28b: Pushed
cdadb746680d: Pushed
d105c72f21c1: Pushed
1a899839ab25: Pushed
be81e9b31e54: Pushed
63d9d56008cb: Pushed
56a62cb9d96c: Pushed
3f9dc45a1d02: Pushed
dac20332f7b5: Pushed
24f8e5ff1817: Pushed
1bdae1c8263a: Pushed
bc08b53be3d4: Pushed
071d8bd76517: Mounted from openshift/origin-node
v0.1: digest: sha256:50fb222ec47c0d0a7006ff73aba868dfb3369df8b0b16185b606c10b2e30b111 size: 4495

After we have pushed the container to the registry we can continue on OpenShift and create the operator project together with the custom resource definition:

oc new-project helloworld-operator
oc create -f deploy/crds/hello_v1alpha1_helloworld_crd.yaml

Before we apply the resources let’s review and edit operator image configuration to point to our newly create operator container image:

$ cat deploy/operator.yaml
apiVersion: apps/v1
kind: Deployment
metadata:
  name: helloworld-operator
spec:
  replicas: 1
  selector:
    matchLabels:
      name: helloworld-operator
  template:
    metadata:
      labels:
        name: helloworld-operator
    spec:
      serviceAccountName: helloworld-operator
      containers:
        - name: helloworld-operator
          # Replace this with the built image name
          image: berndonline/openshift-helloworld-operator:v0.1
          imagePullPolicy: Always
          env:
            - name: WATCH_NAMESPACE
              value: ""
            - name: POD_NAME
              valueFrom:
                fieldRef:
                  fieldPath: metadata.name
            - name: OPERATOR_NAME
              value: "helloworld-operator"

$ cat deploy/role_binding.yaml
kind: ClusterRoleBinding
apiVersion: rbac.authorization.k8s.io/v1
metadata:
  name: helloworld-operator
subjects:
- kind: ServiceAccount
  name: helloworld-operator
  # Replace this with the namespace the operator is deployed in.
  namespace: helloworld-operator
roleRef:
  kind: ClusterRole
  name: helloworld-operator
  apiGroup: rbac.authorization.k8s.io

$ cat deploy/role_user.yaml
apiVersion: rbac.authorization.k8s.io/v1
kind: ClusterRole
metadata:
  creationTimestamp: null
  name: helloworld-operator-execute
rules:
- apiGroups:
  - hello.world.com
  resources:
  - '*'
  verbs:
  - '*'

Afterwards we can deploy the required resources:

oc create -f deploy/operator.yaml \
          -f deploy/role_binding.yaml \
          -f deploy/role.yaml \
          -f deploy/service_account.yaml

Create a cluster-role for the custom resource definition and add bind user to a cluster-role to be able to create a custom resource:

oc create -f deploy/role_user.yaml 
oc adm policy add-cluster-role-to-user helloworld-operator-execute berndonline

If you forget to do this you will see the following error message:

Now we can login as your openshift user and create the custom resource in the namespace myproject:

$ oc create -n myproject -f deploy/crds/hello_v1alpha1_helloworld_cr.yaml
helloworld.hello.world.com/hello-openshift created
$ oc describe Helloworld/hello-openshift -n myproject
Name:         hello-openshift
Namespace:    myproject
Labels:       
Annotations:  
API Version:  hello.world.com/v1alpha1
Kind:         Helloworld
Metadata:
  Creation Timestamp:  2019-03-16T15:33:25Z
  Generation:          1
  Resource Version:    19692
  Self Link:           /apis/hello.world.com/v1alpha1/namespaces/myproject/helloworlds/hello-openshift
  UID:                 d6ce75d7-4800-11e9-b6a8-0a238ec78c2a
Spec:
  Size:  1
Status:
  Conditions:
    Last Transition Time:  2019-03-16T15:33:25Z
    Message:               Running reconciliation
    Reason:                Running
    Status:                True
    Type:                  Running
Events:                    

You can also create the custom resource via the web console:

You will get a security warning which you need to confirm to apply the custom resource:

After a few minutes the operator will create the deploymentconfig and will deploy the hello-openshift pod:

$ oc get dc
NAME              REVISION   DESIRED   CURRENT   TRIGGERED BY
hello-openshift   1          1         1         config,image(hello-openshift:latest)

$ oc get pods
NAME                      READY     STATUS    RESTARTS   AGE
hello-openshift-1-pjhm4   1/1       Running   0          2m

We can modify custom resource and change the spec size to three:

$ oc edit Helloworld/hello-openshift
...
spec:
  size: 3
...

$ oc describe Helloworld/hello-openshift
Name:         hello-openshift
Namespace:    myproject
Labels:       
Annotations:  
API Version:  hello.world.com/v1alpha1
Kind:         Helloworld
Metadata:
  Creation Timestamp:  2019-03-16T15:33:25Z
  Generation:          2
  Resource Version:    24902
  Self Link:           /apis/hello.world.com/v1alpha1/namespaces/myproject/helloworlds/hello-openshift
  UID:                 d6ce75d7-4800-11e9-b6a8-0a238ec78c2a
Spec:
  Size:  3
Status:
  Conditions:
    Last Transition Time:  2019-03-16T15:33:25Z
    Message:               Running reconciliation
    Reason:                Running
    Status:                True
    Type:                  Running
Events:                    
~ centos(ocp: myproject) $

The operator will change the deployment config and change the desired state to three pods:

$ oc get dc
NAME              REVISION   DESIRED   CURRENT   TRIGGERED BY
hello-openshift   1          3         3         config,image(hello-openshift:latest)

$ oc get pods
NAME                      READY     STATUS    RESTARTS   AGE
hello-openshift-1-pjhm4   1/1       Running   0          32m
hello-openshift-1-qhqgx   1/1       Running   0          3m
hello-openshift-1-qlb2q   1/1       Running   0          3m

To clean-up and remove the deployment config you need to delete the custom resource

oc delete Helloworld/hello-openshift -n myproject
oc adm policy remove-cluster-role-from-user helloworld-operator-execute berndonline

I hope this is a good and simple example to show how powerful operators are on OpenShift / Kubernetes.

Part three: Ansible URI module and PUT or POST

This will be the last part of my short series on the Ansible URI module and this time I will explain and show examples about when to use PUT or POST when interacting with REST APIs. I make use of the JSON_QUERY filter which I have explained in my previous article.

What is the difference between POST and PUT?

  • PUT – The PUT method is idempotent and needs the universal unique identifier (uuid) to update an API object. Example PUT /api/service/{{ object-uuid }}. The HTTP return code is 200.

  • POST – Is not idempotent and used to create an API object and an unique identifier is not needed for this. In this case the uuid is server-side generated.  Example POST /api/service/. The HTTP return code is 201.

I am again using the example from AVI Network Software Load Balancers and their REST API.

---
password: 123
api_version: 17.2.13
openshift:
  name: openshift-cloud-provider
openshift_cloud_json: "{{ lookup('template','openshift_cloud_json.j2') }}"

(Optional) Set ansible_host variable to IP address. I have had issues in the past using the DNS name and the task below overrides the variable with the IP address of the host:

- block:
  - name: Resolve hostname
    shell: dig +short "{{ ansible_host }}"
    changed_when: false
    register: dig_output
  
  - name: Set ansible_host to IP address
    set_fact:
      ansible_host: "{{ dig_output.stdout }}"
  when: ( inventory_hostname == groups ["controller"][0] )

Let’s start creating an object using POST and afterwards updating the existing object using PUT. The problem with POST is, that it is not idempotent so we need to first check if the object exists before creating it. We need to do this because creating the same object twice could be an issue:

- block: 
  - name: Avi | OpenShift | Check cloud config
    uri:
      url: "https://{{ ansible_host }}/api/cloud/?name={{ openshift.name }}" 
      method: GET 
      user: "{{ username }}" 
      password: "{{ password }}" 
      return_content: yes 
      body_format: json 
      force_basic_auth: yes 
      validate_certs: false 
      status_code: 200 
      timeout: 180 
      headers:
        X-Avi-Version: "{{ api_version }}" 
    register: check

  - name: Avi | OpenShift | Create cloud config
    uri:
      url: "https://{{ ansible_host }}/api/cloud/" 
      method: POST 
      user: "{{ username }}" 
      password: "{{ password }}" 
      return_content: yes 
      body: "{{ openshift_cloud_json }}" 
      body_format: json 
      force_basic_auth: yes 
      validate certs: false 
      status_code: 201 
      timeout: 180 
      headers:
        X-Avi-Version: "{{ api_version }}"
    when: check.json.count == 0 
  when: ( inventory_hostname == groups ["controller"][0] ) and update_config is undefined

Let’s continue with the example and using PUT to update the configuration of an existing object. To do this you need to define a extra variable update_config=true for the tasks below to be executed:

- block: 
  - name: Avi | OpenShift | Check cloud config
    uri:
      url: "https://{{ ansible_host }}/api/cloud/" 
      method: GET 
      user: "{{ username }}" 
      password: "{{ password }}" 
      return_content: yes 
      body_format: json 
      force_basic_auth: yes 
      validate_certs: false 
      status_code: 200 
      timeout: 180 
      headers:
        X-Avi-Version: "{{ api_version }}" 
    register: check

  - name: Avi | Set_fact for OpenShift name 
    set_fact:
      openshift_cloud_name: "[?name=='{{ openshift.name }}').uuid"
      
  - name: Avi | Set_fact for OpenShift uuid
    set_fact:
      openshift_cloud_uuid: "{{ check.json.results | json_query(penshift_cloud_name) }}" 
      
  - name: Avi | OpenShift | Update cloud config
    uri:
      url: "https://{{ ansible_host }}/api/cloud/{{ openshift_cloud_uuid [0] }}" 
      method: PUT 
      user: "{{ username }}" 
      password: "{{ password }}" 
      return_content: yes 
      body: "{{ openshift_cloud_json }}" 
      body_format: json 
      force_basic_auth: yes 
      validate_certs: false 
      status_code: 200 
      timeout: 180 
      headers:
        X-Avi-Version: "{{ api_version }}" 
    when: ( inventory_hostname == groups ("controller"][0] ) and update_config is defined

Here you find the links to the other articles about Ansible URI module:

Please share your feedback and leave a comment.