F5 Load Balancer

My company decided to buy two F5 Big IP Local Traffic Manager 8950 for our web cluster systems with a maximum balanced capacity of 20 gigabit. We also got the F5 Local Traffic Manager as Virtual Edition for our test enviroment and to integrate it into the test network.

In the beginning the F5 looked very complicated but after some time now playing around with it and setting up things, it got easier and easier. I only need to have a deeper look at the iRules because this feature allows you can to really do everything with the F5 load balancer.

So for now I can’t really write more about it but I will soon  post some updates.

Next week I have the integration of the F5 Big-IP into the production network of my company and will start setting up the first new linux web cluster but only with a layer 4 balancing.

Update:

Here a nice picture of the new F5 BigIP boxes in the data center from my company:
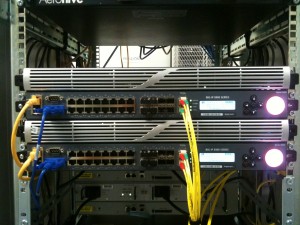
For the new web cluster for my company we set-up layer 4 balanced web server pools and layer 7 balanced pools.

The layer 7 balancing was necessary because there where different server pools with applications that needed to run under the same domain and where routed on the expected http/https request. I will post the iRule for everybody soon.

Here two interesting ressources to get information:

Ask F5

F5 Devcentral


Bug in Cisco Catalyst 2960S

I found a new bug in the IOS 12.2(55) on our c2960s where we had a high cpu usage and lot of traceback syslog messages.

Here is the info from the Cisco TAC about the problem:

Symptom:
C2960S switch getting the following message:

%SUPERVISOR-4-UNEXPECTED: rfd_idx = 56B hwptr 64D75AC queue 8 
-Traceback= 12ECA7C 12EF254 12EF5DC 1382180 137C680 137C628 13821F0 1383128 137C730 184AA64 184AA3C 1848974

Conditions:
WS-C2960S running IOS earlier than 12.2(58)SE

Workaround:
Temporary workaround is reload, fix is in 12.2(58)SE
Action Plan
1. As a temporary workaround we can reload the switch.
2. For permanent solution please upgrade the switch to 12.2(58)SE.

Cisco FlexLink Configuration Examples

Here you can find some configuration examples for the Cisco Flexlink.

This example shows how to configure an interface with a backup interface and to verify the configuration:

Switch# configure terminal
Switch(conf)# interface fastethernet1/1
Switch(conf-if)# switchport backup interface fastethernet1/2
Switch(conf-if)# end
Switch# show interface switchport backup

Switch Backup Interface Pairs:

Active Interface        Backup Interface        State
------------------------------------------------------------------------
FastEthernet1/1         FastEthernet1/2         Active Up/Backup Standby
FastEthernet1/3         FastEthernet1/4         Active Up/Backup Standby
Port-channel1           GigabitEthernet1/1      Active Up/Backup Standby

This example shows how to configure preemption mode as bandwidth for a  backup interface pair and to verify the configuration:

Switch# configure terminal
Switch(conf)# interface gigabitethernet1/0/1
Switch(conf-if)# switchport backup interface gigabitethernet1/2
Switch(conf-if)# switchport backup interface gigabitethernet1/2 preemption mode forced
Switch(conf-if)# switchport backup interface gigabitethernet1/2 preemption delay 50
Switch(conf-if)# end
Switch# show interface switchport backup detail

Active Interface     Backup Interface     State
------------------------------------------------------------------------
GigabitEthernet1/21     GigabitEthernet1/2     Active Down/Backup Down

Interface Pair : Gi1/21, Gi1/2
Preemption Mode : forced
Preemption Delay : 50 seconds
Bandwidth : 10000 Kbit (Gi1/1), 10000 Kbit (Gi1/2)
Mac Address Move Update Vlan : auto

To configure VLAN load balancing on Flex Links,  follow these steps:
In this example, VLANs 1 to 50, 60, and 100 to 120 are configured on the  switch:

Switch(config)# interface fastethernet 1/6
Switch(config-if)# switchport backup interface fastethernet 1/0/8 prefer vlan 60,100-120

When both interfaces are up, Fast Ethernet port1/0/8 forwards traffic for VLANs 60 and 100 to 120 and Fast Ethernet port 1/0/6 forwards traffic for VLANs 1 to 50

Switch# show interfaces switchport backup

Switch Backup Interface Pairs:

Active Interface     Backup Interface     State
------------------------------------------------------------------------
FastEthernet1/6     FastEthernet1/8     Active Up/Backup Standby

Vlans Preferred on Active Interface: 1-50
Vlans Preferred on Backup Interface: 60, 100-120

ASA Config: Site-to-Site VPN with NAT

Christmas just went by and I had some time to write down an howto with NAT in an Site-to-Site VPN tunnel. In this scenario you have clients in site A who need to access servers in site B. Normally it is not possible to access the servers in site B when you’re using the same IP address space. You can only get this work if you’re using NAT in site A to hide the internal addresses. The only thing what you need to do is to find an address space for the NAT translation and you need to be sure that you’re not using the address space in site B where you want to access the server.

Its just an very easy example how to do that you can also do an configuration where you site A and B access each other so you need todo NAT on both sides and create an transfer network. If you have questions there just ask i will maybe also create an howto for that,

Site A

Internal IP address space: 192.168.0.0/16

Client IP addresses: 192.168.100.0/24

NAT IP address: 172.25.0.1/32

Site B

Internal IP address space: 196.168.0.0/16

Server IP addresses: 192.168.200.0/24

Configuration Site A:

———————————————————————————————

object-group network Site-B-Access
network-object 192.168.100.0 255.255.255.0
exit

object-group network VPN-Site-B
network-object 192.168.200.0 255.255.255.0
exit

access-list nat_outbound-site-b extended permit ip object-group Site-B-Access object-group VPN-Site-B

nat (inside) 2 access-list nat_outbound-site-b

global (outside) 2 172.25.0.1 netmask 255.255.255.255

object-group network VPN-NAT-Site-B
network-object 172.25.0.1 255.255.255.255
exit

access-list acl_inside extended permit icmp any object-group VPN-Site-B
access-list acl_inside extended deny ip any object-group VPN-Site-B

access-list acl_VPN-Site-B extended permit ip object-group VPN-NAT-Site-B object-group VPN-Site-B

tunnel-group 1.1.1.1 type ipsec-l2l
tunnel-group 1.1.1.1 ipsec-attributes
pre-shared-key secretpassword
isakmp keepalive threshold 10 retry 2
exit

crypto map VPN 1 match address acl_VPN-Site-B
crypto map VPN 1 set peer 1.1.1.1
crypto map VPN 1 set pfs group2
crypto map VPN 1 set transform-set ESP-3DES-SHA
crypto map VPN 1 set connection-type bidirectional
crypto map VPN 1 set security-association lifetime seconds 3600 kilobytes 4608000
no crypto map VPN 1 set reverse-route
no crypto map VPN 1 set  nat-t-disable
crypto map VPN 1 set phase1-mode main
crypto map VPN 1 set inheritance rule
crypto map VPN 1 interface outside

Site B:

---------------------------------------------------------------------------------------------

coming soon

so have a look in some days i will complete the post until then

Just tested new Cisco ASA 8.3 (Update)

It was a big suprise that Cisco changed so many things in the new IOS version for the ASA. Remember it is only an minor release update i would expect these changes for an major update but anyway they did a good work.

The new group objects what they implementent is very nice. It make the work much easier and you have a better overview about the NAT configuration like before because they move it to the actual network object.

Here an example how nat works in the network object:

object network web-01-external
host 24.0.0.1
exit

object network web-01-frontside
description Web Server Node 1
host 10.1.0.1
nat (inside,outside) static web-01-external
exit