Kubernetes GitOps at Scale with Cluster API and Flux CD

What does GitOps mean and how you run this at scale with Kubernetes? GitOps is basically a framework that takes traditional DevOps practices which where used for application development and apply them to platform automation.

This is nothing new and some maybe have done similar type of automation in the past but this wasn’t called GitOps back then. Kubernetes is great because of it’s declarative configuration management which makes it very easy to configure. This can become a challenge when you suddenly have to run 5, 10, 20 or 40 of these clusters across various cloud providers and multiple environments. We need a cluster management system feeding configuration from a code repository to run all our Kubernetes “cattle” workload clusters.

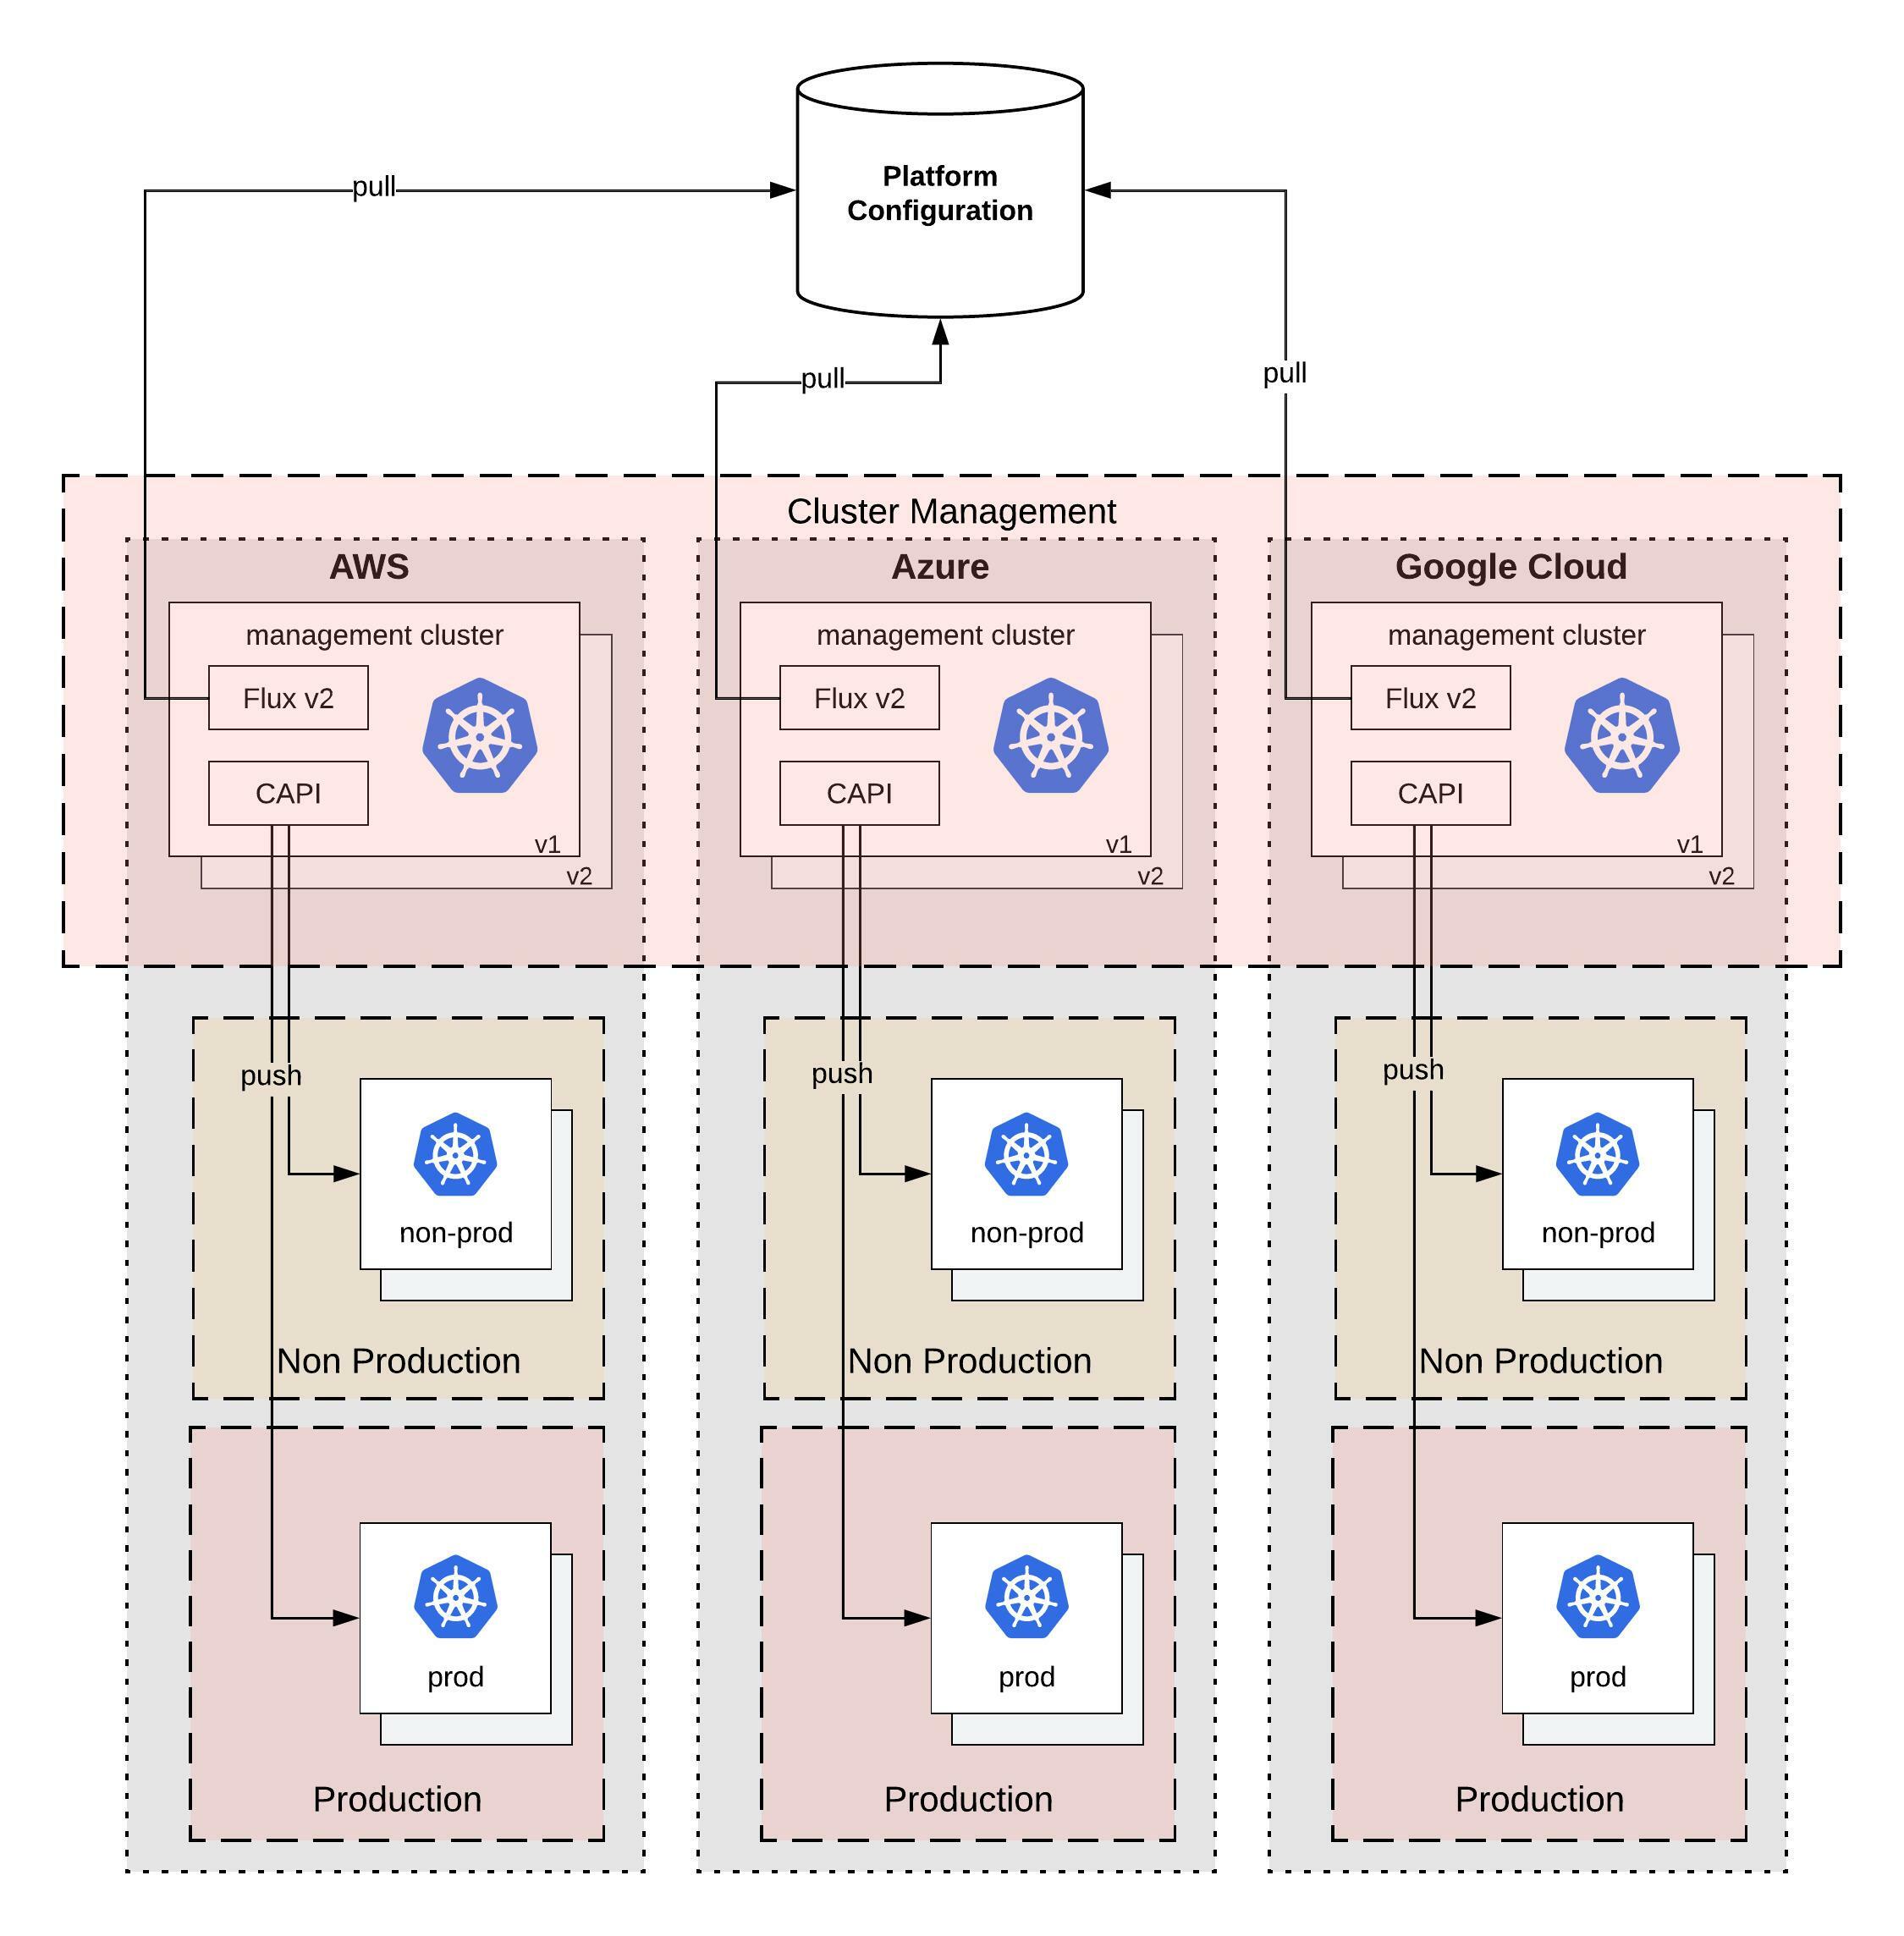
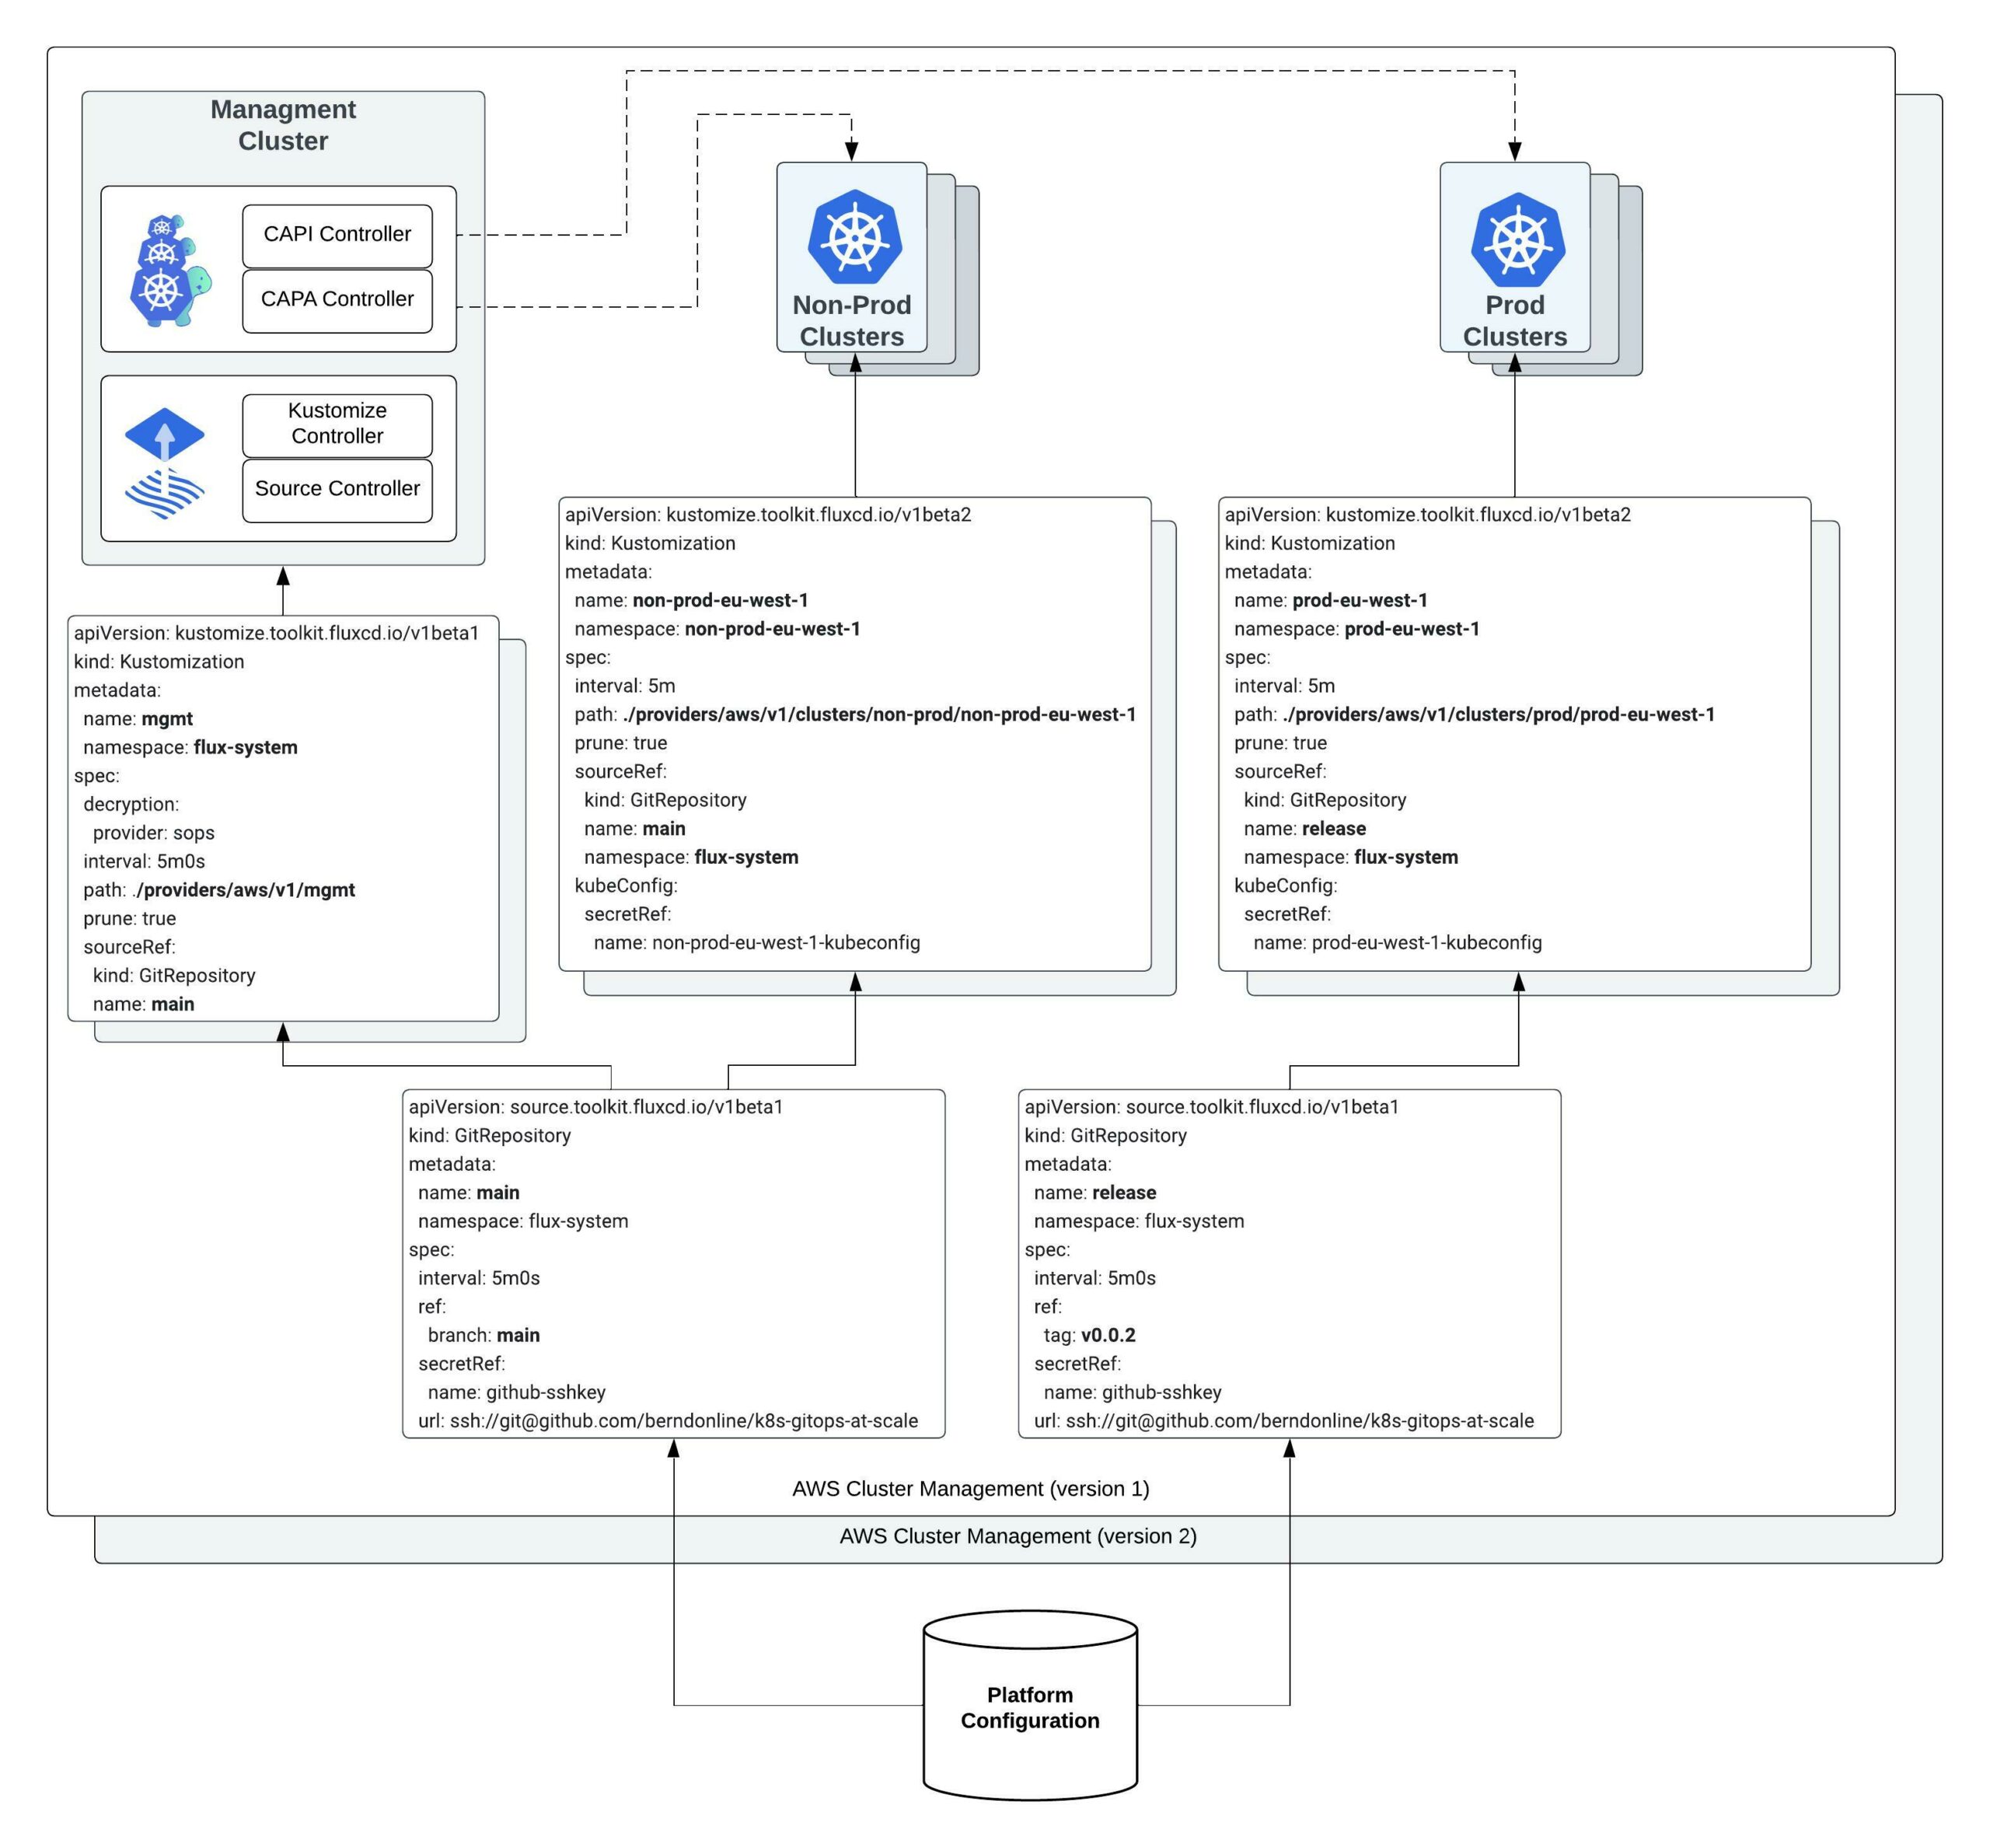
What I am trying to achieve with this design; that you can easily horizontally scale not only your workload clusters but also your cluster management system which is versioned across multiple cloud providers like you see in the diagram above.

There is of course a technical problem to all of this, finding the right tools to solve the problem and which work well together. In my example I will use the Cluster API for provisioning and managing the lifecycle of these Kubernetes workload clusters. Then we need Flux CD for the configuration management both the cluster management which runs the Cluster API components but also the configuration for the workload clusters. The Cluster API you can also replace with OpenShift Hive to run instead OKD or RedHat OpenShift clusters.

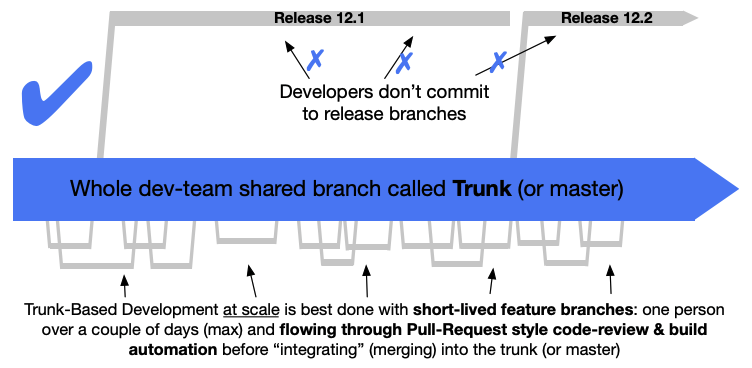
Another problem we need to think about is version control and the branching model for the platform configuration. The structure of the configuration is important but also how you implement changes or the versioning of your configuration through releases. I highly recommend reading about Trunk Based Development which is a modern branching model and specifically solves the versioning problem for us.

Git repository and folder structure

We need a git repository for storing the platform configuration both for the management- and workload-clusters, and the tenant namespace configuration (this also can be stored in a separate repositories). Let’s go through the folder structure of the repository and I will explain this in more detail. Checkout my example repository for more detail: github.com/berndonline/k8s-gitops-at-scale.
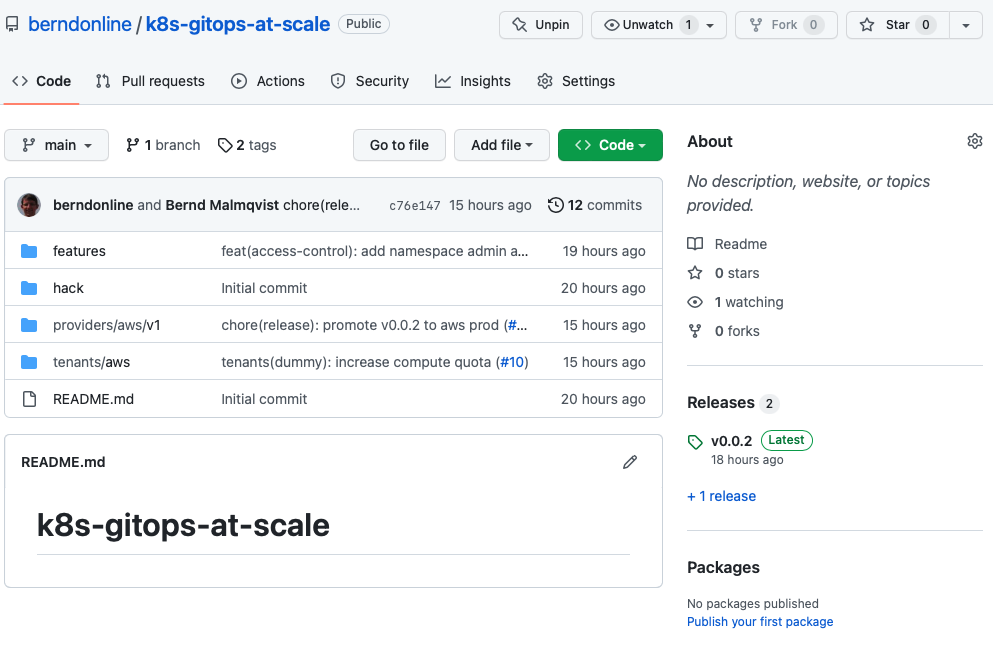
  • The features folder on the top-level will store configuration for specific features we want to enable and apply to our clusters (both management and worker). Under each <feature name> you find two subfolders for namespace(d)- and cluster-wide (non-namespaced) configuration. Features are part of platform configuration which will be promoted between environments. You will see namespaced and non-namespaced subfolders throughout the folder structure which is basically to group your configuration files.
    ├── features
    │   ├── access-control
    │   │   └── non-namespaced
    │   ├── helloworld-operator
    │   │   ├── namespaced
    │   │   └── non-namespaced
    │   └── ingress-nginx
    │       ├── namespaced
    │       └── non-namespaced
    
  • The providers folder will store the configuration based on cloud provider <name> and the <version> of your cluster management. The version below the cloud provider folder is needed to be able to spin up new management clusters in the future. You can be creative with the folder structure and have management cluster per environment and/or instead of the version if required. The mgmt folder will store the configuration for the management cluster which includes manifests for Flux CD controllers, the Cluster API to spin-up workload clusters which are separated by cluster name and anything else you want to configure on your management cluster. The clusters folder will store configuration for all workload clusters separated based on <environment> and common (applies across multiple clusters in the same environment) and by <cluster name> (applies to a dedicated cluster).
    ├── providers
    │   └── aws
    │       └── v1
    │           ├── clusters
    │           │   ├── non-prod
    │           │   │   ├── common
    │           │   │   │   ├── namespaced
    │           │   │   │   │   └── non-prod-common
    │           │   │   │   └── non-namespaced
    │           │   │   │       └── non-prod-common
    │           │   │   └── non-prod-eu-west-1
    │           │   │       ├── namespaced
    │           │   │       │   └── non-prod-eu-west-1
    │           │   │       └── non-namespaced
    │           │   │           └── non-prod-eu-west-1
    │           │   └── prod
    │           │       ├── common
    │           │       │   ├── namespaced
    │           │       │   │   └── prod-common
    │           │       │   └── non-namespaced
    │           │       │       └── prod-common
    │           │       └── prod-eu-west-1
    │           │           ├── namespaced
    │           │           │   └── prod-eu-west-1
    │           │           └── non-namespaced
    │           │               └── prod-eu-west-1
    │           └── mgmt
    │               ├── namespaced
    │               │   ├── flux-system
    │               │   ├── non-prod-eu-west-1
    │               │   └── prod-eu-west-1
    │               └── non-namespaced
    │                   ├── non-prod-eu-west-1
    │                   └── prod-eu-west-1
    
  • The tenants folder will store the namespace configuration of the onboarded teams and is applied to our workload clusters. Similar to the providers folder tenants has subfolders based on the cloud provider <name> and below subfolders for common (applies across environments) and <environments> (applied to a dedicated environment) configuration. There you find the tenant namespace <name> and all the needed manifests to create and configure the namespace/s.
    └── tenants
        └── aws
            ├── common
            │   └── dummy
            ├── non-prod
            │   └── dummy
            └── prod
                └── dummy
    

Why do we need a common folder for tenants? The common folder will contain namespace configuration which will be promoted between the environments from non-prod to prod using a release but more about release and promotion you find more down below.

Configuration changes

Applying changes to your platform configuration has to follow the Trunk Based Development model of doing small incremental changes through feature branches.

Let’s look into an example change the our dummy tenant onboarding pull-request. You see that I checked-out a branch called “tenant-dummy” to apply my changes, then push and publish the branch in the repository to raised the pull-request.
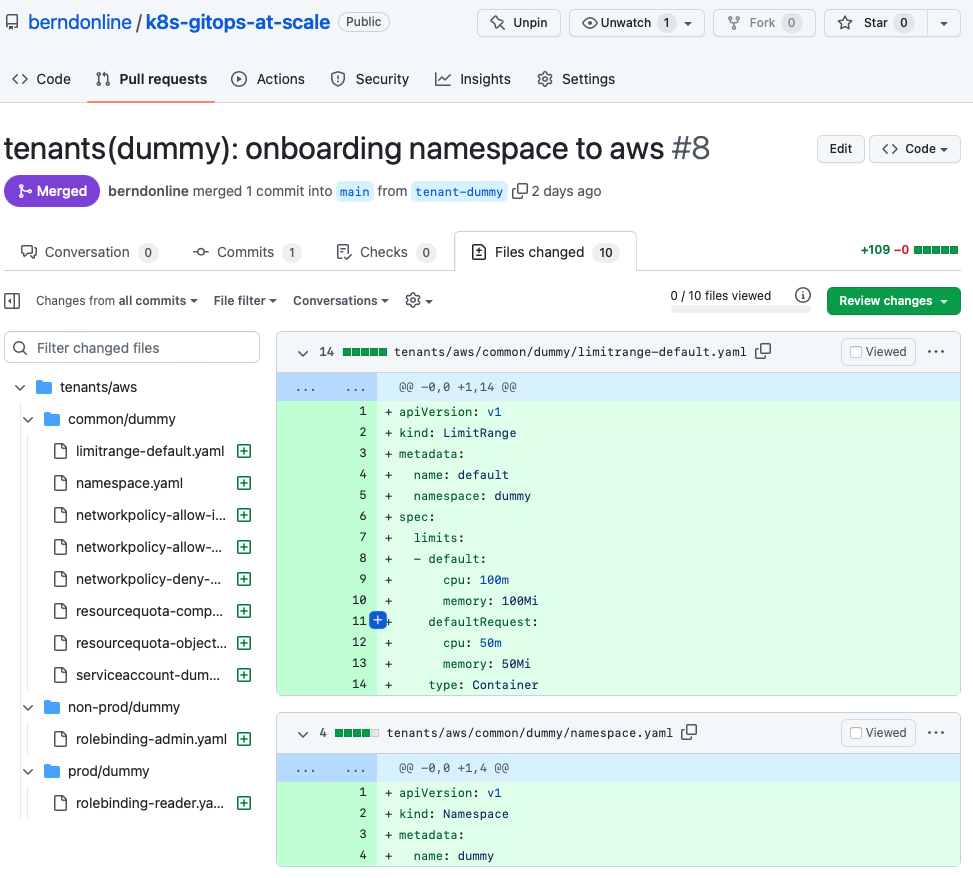
Important is that your commit messages and pull-request name are following a strict naming convention.
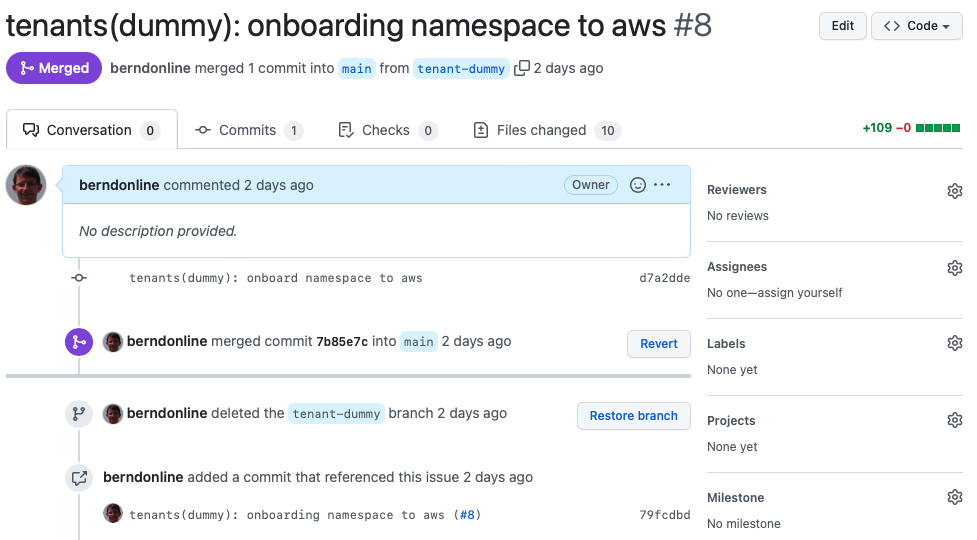
I would also strongly recommend to squash your commit messages into the name of your pull-request. This will keep your git history clean.
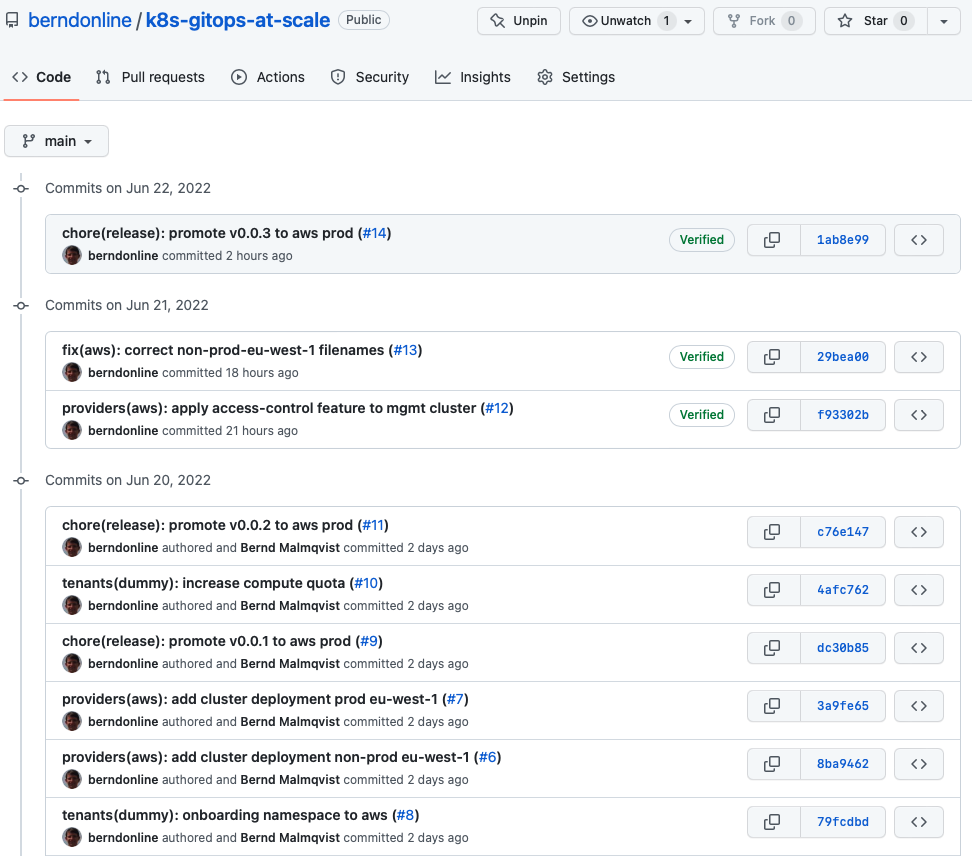
This naming convention makes it easier later for auto-generating your release notes when you publish your release. Having the clean well formatted git history combined with your release notes nicely cross references your changes for to a particular release tag.
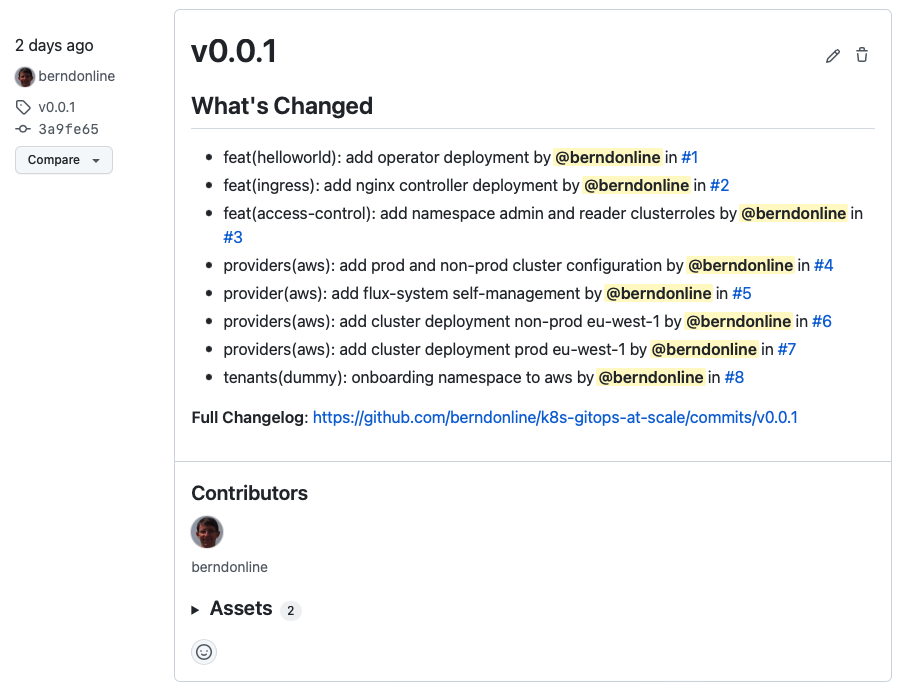
More about creating a release a bit later in this article.

GitOps configuration

The configuration from the platform repository gets pulled on the management cluster using different gitrepository resources following the main branch or a version tag.

$ kubectl get gitrepositories.source.toolkit.fluxcd.io -A
NAMESPACE     NAME      URL                                                    AGE   READY   STATUS
flux-system   main      ssh://[email protected]/berndonline/k8s-gitops-at-scale   2d    True    stored artifact for revision 'main/ee3e71efb06628775fa19e9664b9194848c6450e'
flux-system   release   ssh://[email protected]/berndonline/k8s-gitops-at-scale   2d    True    stored artifact for revision 'v0.0.2/a5a5edd1194b629f6b41977483dca49aaad957ff'

The kustomization resources will then render and apply the configuration locally to the management cluster (diagram left-side) or remote clusters to our non-prod and prod workload clusters (diagram right-side) using the kubeconfig of the cluster created by the Cluster API stored during the bootstrap.

There are multiple kustomization resources to apply configuration based off the folder structure which I explained above. See the output below and checkout the repository for more details.

$ kubectl get kustomizations.kustomize.toolkit.fluxcd.io -A
NAMESPACE            NAME                          AGE   READY   STATUS
flux-system          feature-access-control        13h   True    Applied revision: v0.0.2/a5a5edd1194b629f6b41977483dca49aaad957ff
flux-system          mgmt                          2d    True    Applied revision: main/ee3e71efb06628775fa19e9664b9194848c6450e
non-prod-eu-west-1   common                        21m   True    Applied revision: main/ee3e71efb06628775fa19e9664b9194848c6450e
non-prod-eu-west-1   feature-access-control        21m   True    Applied revision: main/ee3e71efb06628775fa19e9664b9194848c6450e
non-prod-eu-west-1   feature-helloworld-operator   21m   True    Applied revision: main/ee3e71efb06628775fa19e9664b9194848c6450e
non-prod-eu-west-1   feature-ingress-nginx         21m   True    Applied revision: main/ee3e71efb06628775fa19e9664b9194848c6450e
non-prod-eu-west-1   non-prod-eu-west-1            21m   True    Applied revision: main/ee3e71efb06628775fa19e9664b9194848c6450e
non-prod-eu-west-1   tenants-common                21m   True    Applied revision: main/ee3e71efb06628775fa19e9664b9194848c6450e
non-prod-eu-west-1   tenants-non-prod              21m   True    Applied revision: main/ee3e71efb06628775fa19e9664b9194848c6450e
prod-eu-west-1       common                        15m   True    Applied revision: v0.0.2/a5a5edd1194b629f6b41977483dca49aaad957ff
prod-eu-west-1       feature-access-control        15m   True    Applied revision: v0.0.2/a5a5edd1194b629f6b41977483dca49aaad957ff
prod-eu-west-1       feature-helloworld-operator   15m   True    Applied revision: v0.0.2/a5a5edd1194b629f6b41977483dca49aaad957ff
prod-eu-west-1       feature-ingress-nginx         15m   True    Applied revision: v0.0.2/a5a5edd1194b629f6b41977483dca49aaad957ff
prod-eu-west-1       prod-eu-west-1                15m   True    Applied revision: v0.0.2/a5a5edd1194b629f6b41977483dca49aaad957ff
prod-eu-west-1       tenants-common                15m   True    Applied revision: v0.0.2/a5a5edd1194b629f6b41977483dca49aaad957ff
prod-eu-west-1       tenants-prod                  15m   True    Applied revision: v0.0.2/a5a5edd1194b629f6b41977483dca49aaad957ff

Release and promotion

The GitOps framework doesn’t explain about how to do promotion to higher environments and this is where the Trunk Based Development model comes in helpful together with the gitrepository resource to be able to pull a tagged version instead of a branch.

This allows us applying configuration first to lower environments to non-prod following the main branch, means pull-requests which are merged will be applied instantly. Configuration for higher environments to production requires to create a version tag and publish a release in the repository.

Why using a tag and not a release branch? A tag in your repository is a point in time snapshot of your configuration and can’t be easily modified which is required for creating the release. A branch on the other hand can be modified using pull-requests and you end up with lots of release branches which is less ideal.

To create a new version tag in the git repository I use the following commands:

$ git tag v0.0.3
$ git push origin --tags
Total 0 (delta 0), reused 0 (delta 0)
To github.com:berndonline/k8s-gitops-at-scale.git
* [new tag] v0.0.3 -> v0.0.3

This doesn’t do much after we pushed the new tag because the gitrepository release is set to v0.0.2 but I can see the new tag is available in the repository.
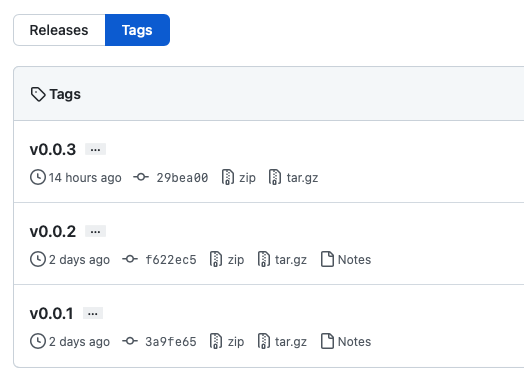
In the repository I can go to releases and click on “Draft a new release” and choose the new tag v0.0.3 I pushed previously.
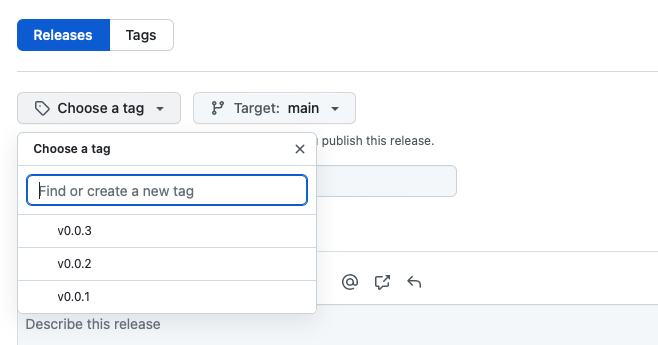
The release notes you see below can be auto-generate from the pull-requests you merged between v0.0.2 and v0.0.3 by clicking “Generate release notes”. To finish this off save and publish the release.
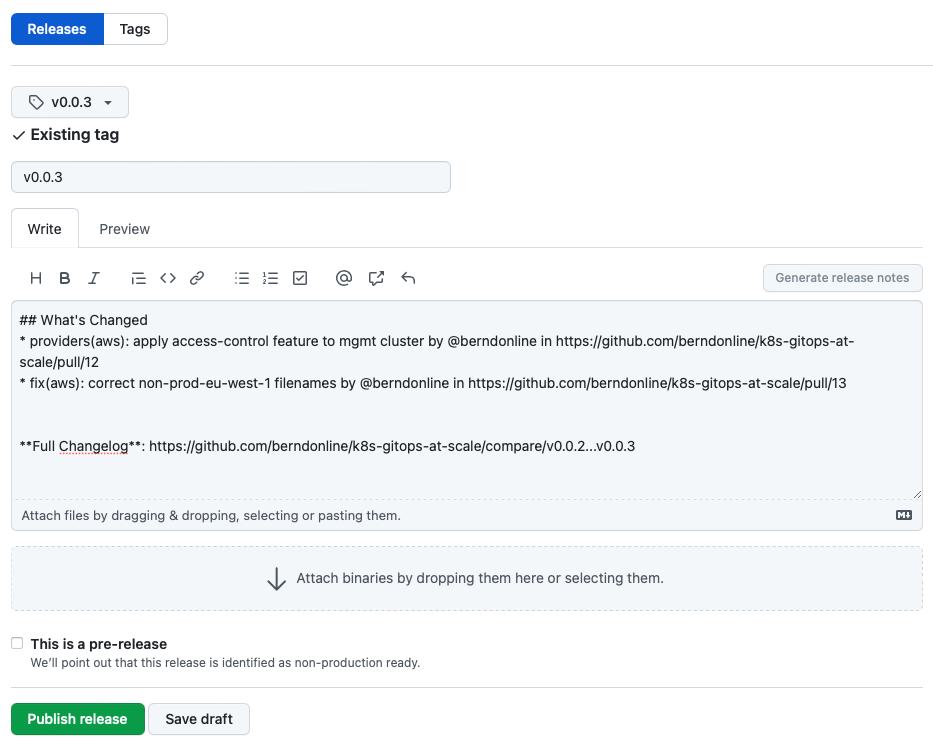

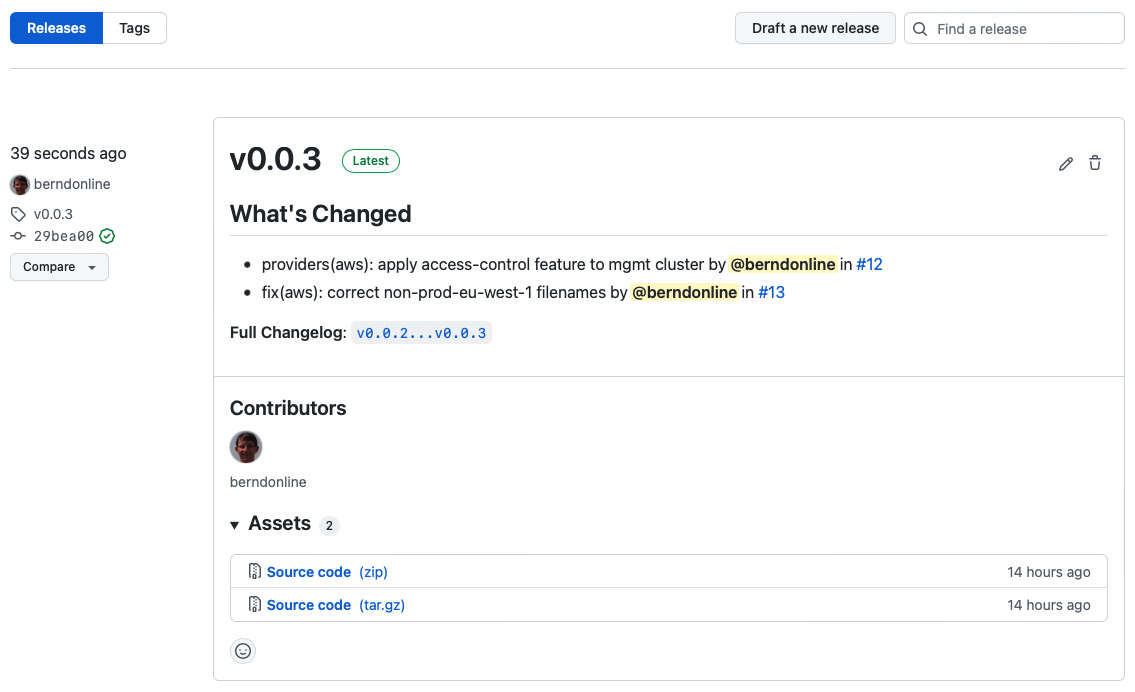
The release is publish and release notes are visible to everyone which is great for product teams on your platform because they will get visibility about upcoming changes including their own modifications to namespace configuration.
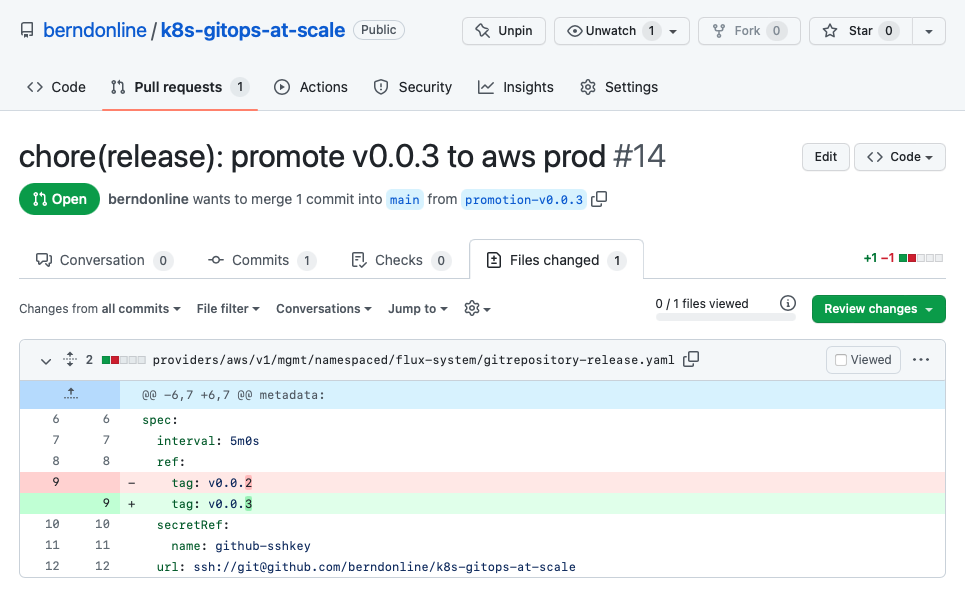
Until now all the changes are applied to our lower non-prod environment following the main branch and for doing the promotion we need to raise a pull-request and update the gitrepository release the new version v0.0.3.

If you follow ITIL change procedures then this is the point where you would normally raise a change for merging your pull-request because this triggers the rollout of your configuration to production.
When the pull-request is merged the release gitrepository is updated by the kustomization resources through the main branch.

$ kubectl get gitrepositories.source.toolkit.fluxcd.io -A
NAMESPACE     NAME      URL                                           AGE   READY   STATUS
flux-system   main      ssh://[email protected]/berndonline/k8s-gitops   2d    True    stored artifact for revision 'main/83133756708d2526cca565880d069445f9619b70'
flux-system   release   ssh://[email protected]/berndonline/k8s-gitops   2d    True    stored artifact for revision 'v0.0.3/ee3e71efb06628885fa19e9664b9198a8c6450e8'

Shortly after the kustomization resources referencing the release will reconcile and automatically push down the new rendered configuration to the production clusters.

$ kubectl get kustomizations.kustomize.toolkit.fluxcd.io -A
NAMESPACE            NAME                          AGE   READY   STATUS
flux-system          feature-access-control        13h   True    Applied revision: v0.0.3/ee3e71efb06628885fa19e9664b9198a8c6450e8
flux-system          mgmt                          2d    True    Applied revision: main/83133756708d2526cca565880d069445f9619b70
non-prod-eu-west-1   common                        31m   True    Applied revision: main/83133756708d2526cca565880d069445f9619b70
non-prod-eu-west-1   feature-access-control        31m   True    Applied revision: main/83133756708d2526cca565880d069445f9619b70
non-prod-eu-west-1   feature-helloworld-operator   31m   True    Applied revision: main/83133756708d2526cca565880d069445f9619b70
non-prod-eu-west-1   feature-ingress-nginx         31m   True    Applied revision: main/83133756708d2526cca565880d069445f9619b70
non-prod-eu-west-1   non-prod-eu-west-1            31m   True    Applied revision: main/83133756708d2526cca565880d069445f9619b70
non-prod-eu-west-1   tenants-common                31m   True    Applied revision: main/83133756708d2526cca565880d069445f9619b70
non-prod-eu-west-1   tenants-non-prod              31m   True    Applied revision: main/83133756708d2526cca565880d069445f9619b70
prod-eu-west-1       common                        26m   True    Applied revision: v0.0.3/ee3e71efb06628885fa19e9664b9198a8c6450e8
prod-eu-west-1       feature-access-control        26m   True    Applied revision: v0.0.3/ee3e71efb06628885fa19e9664b9198a8c6450e8
prod-eu-west-1       feature-helloworld-operator   26m   True    Applied revision: v0.0.3/ee3e71efb06628885fa19e9664b9198a8c6450e8
prod-eu-west-1       feature-ingress-nginx         26m   True    Applied revision: v0.0.3/ee3e71efb06628885fa19e9664b9198a8c6450e8
prod-eu-west-1       prod-eu-west-1                26m   True    Applied revision: v0.0.3/ee3e71efb06628885fa19e9664b9198a8c6450e8
prod-eu-west-1       tenants-common                26m   True    Applied revision: v0.0.3/ee3e71efb06628885fa19e9664b9198a8c6450e8
prod-eu-west-1       tenants-prod                  26m   True    Applied revision: v0.0.3/ee3e71efb06628885fa19e9664b9198a8c6450e8

Why using Kustomize for managing the configuration and not Helm? I know the difficulties of managing these raw YAML manifests. Kustomize gets you going quick where with Helm there is a higher initial effort writing your Charts. In my next article I will focus specifically on Helm.

I showed a very simplistic example having a single cloud provider (aws) and a single management cluster but as you have seen you can easily add Azure or Google cloud providers in your configuration and scale horizontally. I think this is what makes Kubernetes and controllers like Flux CD great together that you don’t need to have complex pipelines or workflows to rollout and promote your changes completely pipeline-less.
 

Getting started with OpenShift Hive

If you don’t know OpenShift Hive I recommend having a look at the video of my talk at RedHat OpenShift Commons about OpenShift Hive where I also talk about how you can provision and manage the lifecycle of OpenShift 4 clusters using the Kubernetes API and the OpenShift Hive operator.

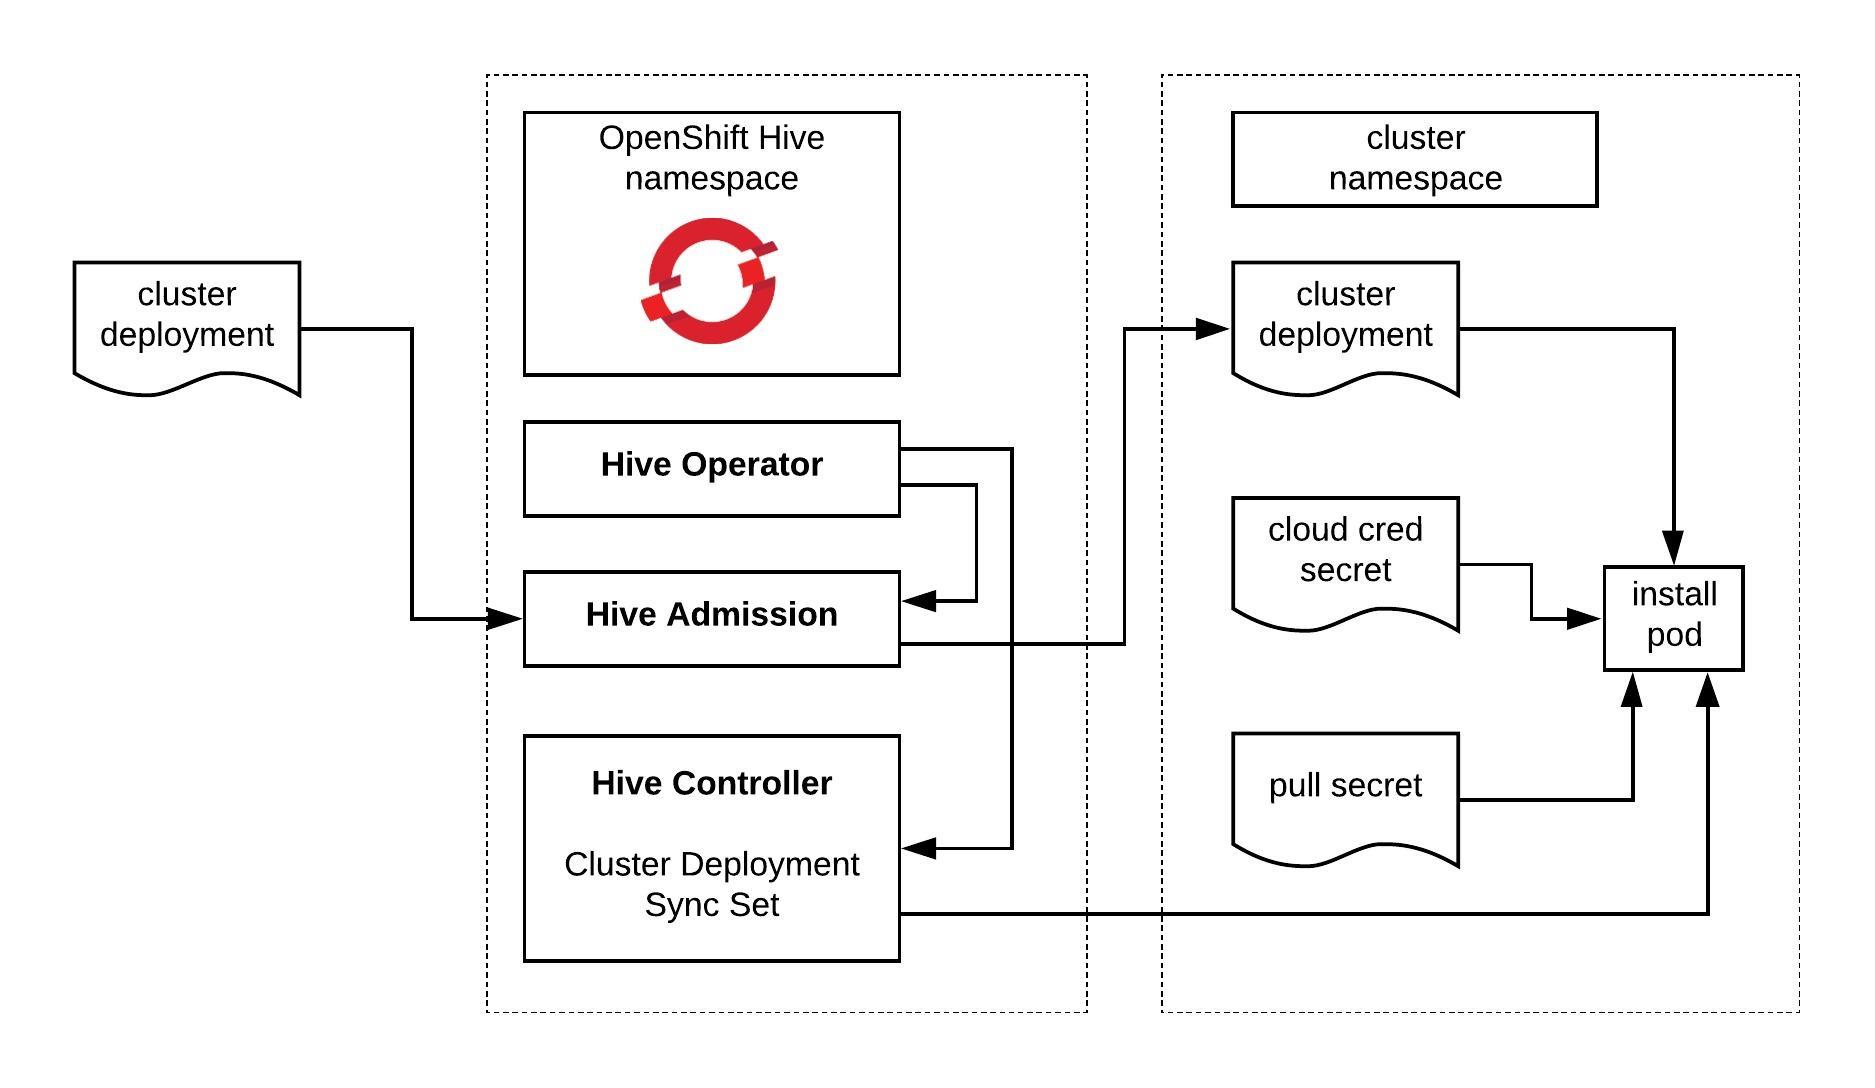
The Hive operator has three main components the admission controller,  the Hive controller and the Hive operator itself. For more information about the Hive architecture visit the Hive docs:

You can use an OpenShift or native Kubernetes cluster to run the operator, in my case I use a EKS cluster. Let’s go through the prerequisites which are required to generate the manifests and the hiveutil:

$ curl -s "https://raw.githubusercontent.com/\
> kubernetes-sigs/kustomize/master/hack/install_kustomize.sh"  | bash
$ sudo mv ./kustomize /usr/bin/
$ wget https://dl.google.com/go/go1.13.3.linux-amd64.tar.gz
$ tar -xvf go1.13.3.linux-amd64.tar.gz
$ sudo mv go /usr/local

To setup the Go environment copy the content below and add to your .profile:

export GOPATH="${HOME}/.go"
export PATH="$PATH:/usr/local/go/bin"
export PATH="$PATH:${GOPATH}/bin:${GOROOT}/bin"

Continue with installing the Go dependencies and clone the OpenShift Hive Github repository:

$ mkdir -p ~/.go/src/github.com/openshift/
$ go get github.com/golang/mock/mockgen
$ go get github.com/golang/mock/gomock
$ go get github.com/cloudflare/cfssl/cmd/cfssl
$ go get github.com/cloudflare/cfssl/cmd/cfssljson
$ cd ~/.go/src/github.com/openshift/
$ git clone https://github.com/openshift/hive.git
$ cd hive/
$ git checkout remotes/origin/master

Before we run make deploy I would recommend modifying the Makefile that we only generate the Hive manifests without deploying them to Kubernetes:

$ sed -i -e 's#oc apply -f config/crds# #' -e 's#kustomize build overlays/deploy | oc apply -f -#kustomize build overlays/deploy > hive.yaml#' Makefile
$ make deploy
# The apis-path is explicitly specified so that CRDs are not created for v1alpha1
go run tools/vendor/sigs.k8s.io/controller-tools/cmd/controller-gen/main.go crd --apis-path=pkg/apis/hive/v1
CRD files generated, files can be found under path /home/ubuntu/.go/src/github.com/openshift/hive/config/crds.
go generate ./pkg/... ./cmd/...
hack/update-bindata.sh
# Deploy the operator manifests:
mkdir -p overlays/deploy
cp overlays/template/kustomization.yaml overlays/deploy
cd overlays/deploy && kustomize edit set image registry.svc.ci.openshift.org/openshift/hive-v4.0:hive=registry.svc.ci.openshift.org/openshift/hivev1:hive
kustomize build overlays/deploy > hive.yaml
rm -rf overlays/deploy

Quick look at the content of the hive.yaml manifest:

$ cat hive.yaml
apiVersion: v1
kind: Namespace
metadata:
  name: hive
---
apiVersion: v1
kind: ServiceAccount
metadata:
  name: hive-operator
  namespace: hive

...

---
apiVersion: apps/v1
kind: Deployment
metadata:
  labels:
    control-plane: hive-operator
    controller-tools.k8s.io: "1.0"
  name: hive-operator
  namespace: hive
spec:
  replicas: 1
  revisionHistoryLimit: 4
  selector:
    matchLabels:
      control-plane: hive-operator
      controller-tools.k8s.io: "1.0"
  template:
    metadata:
      labels:
        control-plane: hive-operator
        controller-tools.k8s.io: "1.0"
    spec:
      containers:
      - command:
        - /opt/services/hive-operator
        - --log-level
        - info
        env:
        - name: CLI_CACHE_DIR
          value: /var/cache/kubectl
        image: registry.svc.ci.openshift.org/openshift/hive-v4.0:hive
        imagePullPolicy: Always
        livenessProbe:
          failureThreshold: 1
          httpGet:
            path: /debug/health
            port: 8080
          initialDelaySeconds: 10
          periodSeconds: 10
        name: hive-operator
        resources:
          requests:
            cpu: 100m
            memory: 256Mi
        volumeMounts:
        - mountPath: /var/cache/kubectl
          name: kubectl-cache
      serviceAccountName: hive-operator
      terminationGracePeriodSeconds: 10
      volumes:
      - emptyDir: {}
        name: kubectl-cache

Now we can apply the Hive custom resource definition (crds):

$ kubectl apply -f ./config/crds/
customresourcedefinition.apiextensions.k8s.io/checkpoints.hive.openshift.io created
customresourcedefinition.apiextensions.k8s.io/clusterdeployments.hive.openshift.io created
customresourcedefinition.apiextensions.k8s.io/clusterdeprovisions.hive.openshift.io created
customresourcedefinition.apiextensions.k8s.io/clusterimagesets.hive.openshift.io created
customresourcedefinition.apiextensions.k8s.io/clusterprovisions.hive.openshift.io created
customresourcedefinition.apiextensions.k8s.io/clusterstates.hive.openshift.io created
customresourcedefinition.apiextensions.k8s.io/dnszones.hive.openshift.io created
customresourcedefinition.apiextensions.k8s.io/hiveconfigs.hive.openshift.io created
customresourcedefinition.apiextensions.k8s.io/machinepools.hive.openshift.io created
customresourcedefinition.apiextensions.k8s.io/selectorsyncidentityproviders.hive.openshift.io created
customresourcedefinition.apiextensions.k8s.io/selectorsyncsets.hive.openshift.io created
customresourcedefinition.apiextensions.k8s.io/syncidentityproviders.hive.openshift.io created
customresourcedefinition.apiextensions.k8s.io/syncsets.hive.openshift.io created
customresourcedefinition.apiextensions.k8s.io/syncsetinstances.hive.openshift.io created

And continue to apply the hive.yaml manifest for deploying the OpenShift Hive operator and its components:

$ kubectl apply -f hive.yaml
namespace/hive created
serviceaccount/hive-operator created
clusterrole.rbac.authorization.k8s.io/hive-frontend created
clusterrole.rbac.authorization.k8s.io/hive-operator-role created
clusterrole.rbac.authorization.k8s.io/manager-role created
clusterrole.rbac.authorization.k8s.io/system:openshift:hive:hiveadmission created
rolebinding.rbac.authorization.k8s.io/extension-server-authentication-reader-hiveadmission created
clusterrolebinding.rbac.authorization.k8s.io/auth-delegator-hiveadmission created
clusterrolebinding.rbac.authorization.k8s.io/hive-frontend created
clusterrolebinding.rbac.authorization.k8s.io/hive-operator-rolebinding created
clusterrolebinding.rbac.authorization.k8s.io/hiveadmission-hive-hiveadmission created
clusterrolebinding.rbac.authorization.k8s.io/hiveapi-cluster-admin created
clusterrolebinding.rbac.authorization.k8s.io/manager-rolebinding created
deployment.apps/hive-operator created

For the Hive admission controller you need to generate a SSL certifcate:

$ ./hack/hiveadmission-dev-cert.sh
~/Dropbox/hive/hiveadmission-certs ~/Dropbox/hive
2020/02/03 22:17:30 [INFO] generate received request
2020/02/03 22:17:30 [INFO] received CSR
2020/02/03 22:17:30 [INFO] generating key: ecdsa-256
2020/02/03 22:17:30 [INFO] encoded CSR
certificatesigningrequest.certificates.k8s.io/hiveadmission.hive configured
certificatesigningrequest.certificates.k8s.io/hiveadmission.hive approved
-----BEGIN CERTIFICATE-----
MIICaDCCAVCgAwIBAgIQHvvDPncIWHRcnDzzoWGjQDANBgkqhkiG9w0BAQsFADAv
MS0wKwYDVQQDEyRiOTk2MzhhNS04OWQyLTRhZTAtYjI4Ny1iMWIwOGNmOGYyYjAw
HhcNMjAwMjAzMjIxNTA3WhcNMjUwMjAxMjIxNTA3WjAhMR8wHQYDVQQDExZoaXZl
YWRtaXNzaW9uLmhpdmUuc3ZjMFkwEwYHKoZIzj0CAQYIKoZIzj0DAQcDQgAEea4N
UPbvzM3VdtOkdJ7lBytekRTvwGMqs9HgG14CtqCVCOFq8f+BeqqyrRbJsX83iBfn
gMc54moElb5kIQNjraNZMFcwDAYDVR0TAQH/BAIwADBHBgNVHREEQDA+ghZoaXZl
YWRtaXNzaW9uLmhpdmUuc3ZjgiRoaXZlYWRtaXNzaW9uLmhpdmUuc3ZjLmNsdXN0
ZXIubG9jYWwwDQYJKoZIhvcNAQELBQADggEBADhgT3tNnFs6hBIZFfWmoESe6nnZ
fy9GmlmF9qEBo8FZSk/LYvV0peOdgNZCHqsT2zaJjxULqzQ4zfSb/koYpxeS4+Bf
xwgHzIB/ylzf54wVkILWUFK3GnYepG5dzTXS7VHc4uiNJe0Hwc5JI4HBj7XdL3C7
cbPm7T2cBJi2jscoCWELWo/0hDxkcqZR7rdeltQQ+Uhz87LhTTqlknAMFzL7tM/+
pJePZMQgH97vANsbk97bCFzRZ4eABYSiN0iAB8GQM5M+vK33ZGSVQDJPKQQYH6th
Kzi9wrWEeyEtaWozD5poo9s/dxaLxFAdPDICkPB2yr5QZB+NuDgA+8IYffo=
-----END CERTIFICATE-----
secret/hiveadmission-serving-cert created
~/Dropbox/hive

Afterwards we can check if all the pods are running, this might take a few seconds:

$ kubectl get pods -n hive
NAME                                READY   STATUS    RESTARTS   AGE
hive-controllers-7c6ccc84b9-q7k7m   1/1     Running   0          31s
hive-operator-f9f4447fd-jbmkh       1/1     Running   0          55s
hiveadmission-6766c5bc6f-9667g      1/1     Running   0          27s
hiveadmission-6766c5bc6f-gvvlq      1/1     Running   0          27s

The Hive operator is successfully installed on your Kubernetes cluster but we are not finished yet. To create the required Cluster Deployment manifests we need to generate the hiveutil binary:

$ make hiveutil
go generate ./pkg/... ./cmd/...
hack/update-bindata.sh
go build -o bin/hiveutil github.com/openshift/hive/contrib/cmd/hiveutil

To generate Hive Cluster Deployment manifests just run the following hiveutil command below, I output the definition with -o into yaml:

$ bin/hiveutil create-cluster --base-domain=mydomain.example.com --cloud=aws mycluster -o yaml
apiVersion: v1
items:
- apiVersion: hive.openshift.io/v1
  kind: ClusterImageSet
  metadata:
    creationTimestamp: null
    name: mycluster-imageset
  spec:
    releaseImage: quay.io/openshift-release-dev/ocp-release:4.3.2-x86_64
  status: {}
- apiVersion: v1
  kind: Secret
  metadata:
    creationTimestamp: null
    name: mycluster-aws-creds
  stringData:
    aws_access_key_id: <-YOUR-AWS-ACCESS-KEY->
    aws_secret_access_key: <-YOUR-AWS-SECRET-KEY->
  type: Opaque
- apiVersion: v1
  data:
    install-config.yaml: <-BASE64-ENCODED-OPENSHIFT4-INSTALL-CONFIG->
  kind: Secret
  metadata:
    creationTimestamp: null
    name: mycluster-install-config
  type: Opaque
- apiVersion: hive.openshift.io/v1
  kind: ClusterDeployment
  metadata:
    creationTimestamp: null
    name: mycluster
  spec:
    baseDomain: mydomain.example.com
    clusterName: mycluster
    controlPlaneConfig:
      servingCertificates: {}
    installed: false
    platform:
      aws:
        credentialsSecretRef:
          name: mycluster-aws-creds
        region: us-east-1
    provisioning:
      imageSetRef:
        name: mycluster-imageset
      installConfigSecretRef:
        name: mycluster-install-config
  status:
    clusterVersionStatus:
      availableUpdates: null
      desired:
        force: false
        image: ""
        version: ""
      observedGeneration: 0
      versionHash: ""
- apiVersion: hive.openshift.io/v1
  kind: MachinePool
  metadata:
    creationTimestamp: null
    name: mycluster-worker
  spec:
    clusterDeploymentRef:
      name: mycluster
    name: worker
    platform:
      aws:
        rootVolume:
          iops: 100
          size: 22
          type: gp2
        type: m4.xlarge
    replicas: 3
  status:
    replicas: 0
kind: List
metadata: {}

I hope this post is useful in getting you started with OpenShift Hive. In my next article I will go through the details of the OpenShift 4 cluster deployment with Hive.

Read my new article about OpenShift / OKD 4.x Cluster Deployment using OpenShift Hive

OpenShift Hive – API driven OpenShift cluster provisioning and management operator

RedHat invited me and my colleague Matt to speak at RedHat OpenShift Commons in London about the API driven OpenShift cluster provisioning and management operator called OpenShift Hive. We have been using OpenShift Hive for the past few months to provision and manage the OpenShift 4 estate across multiple environments. Below the video recording of our talk at OpenShift Commons London:

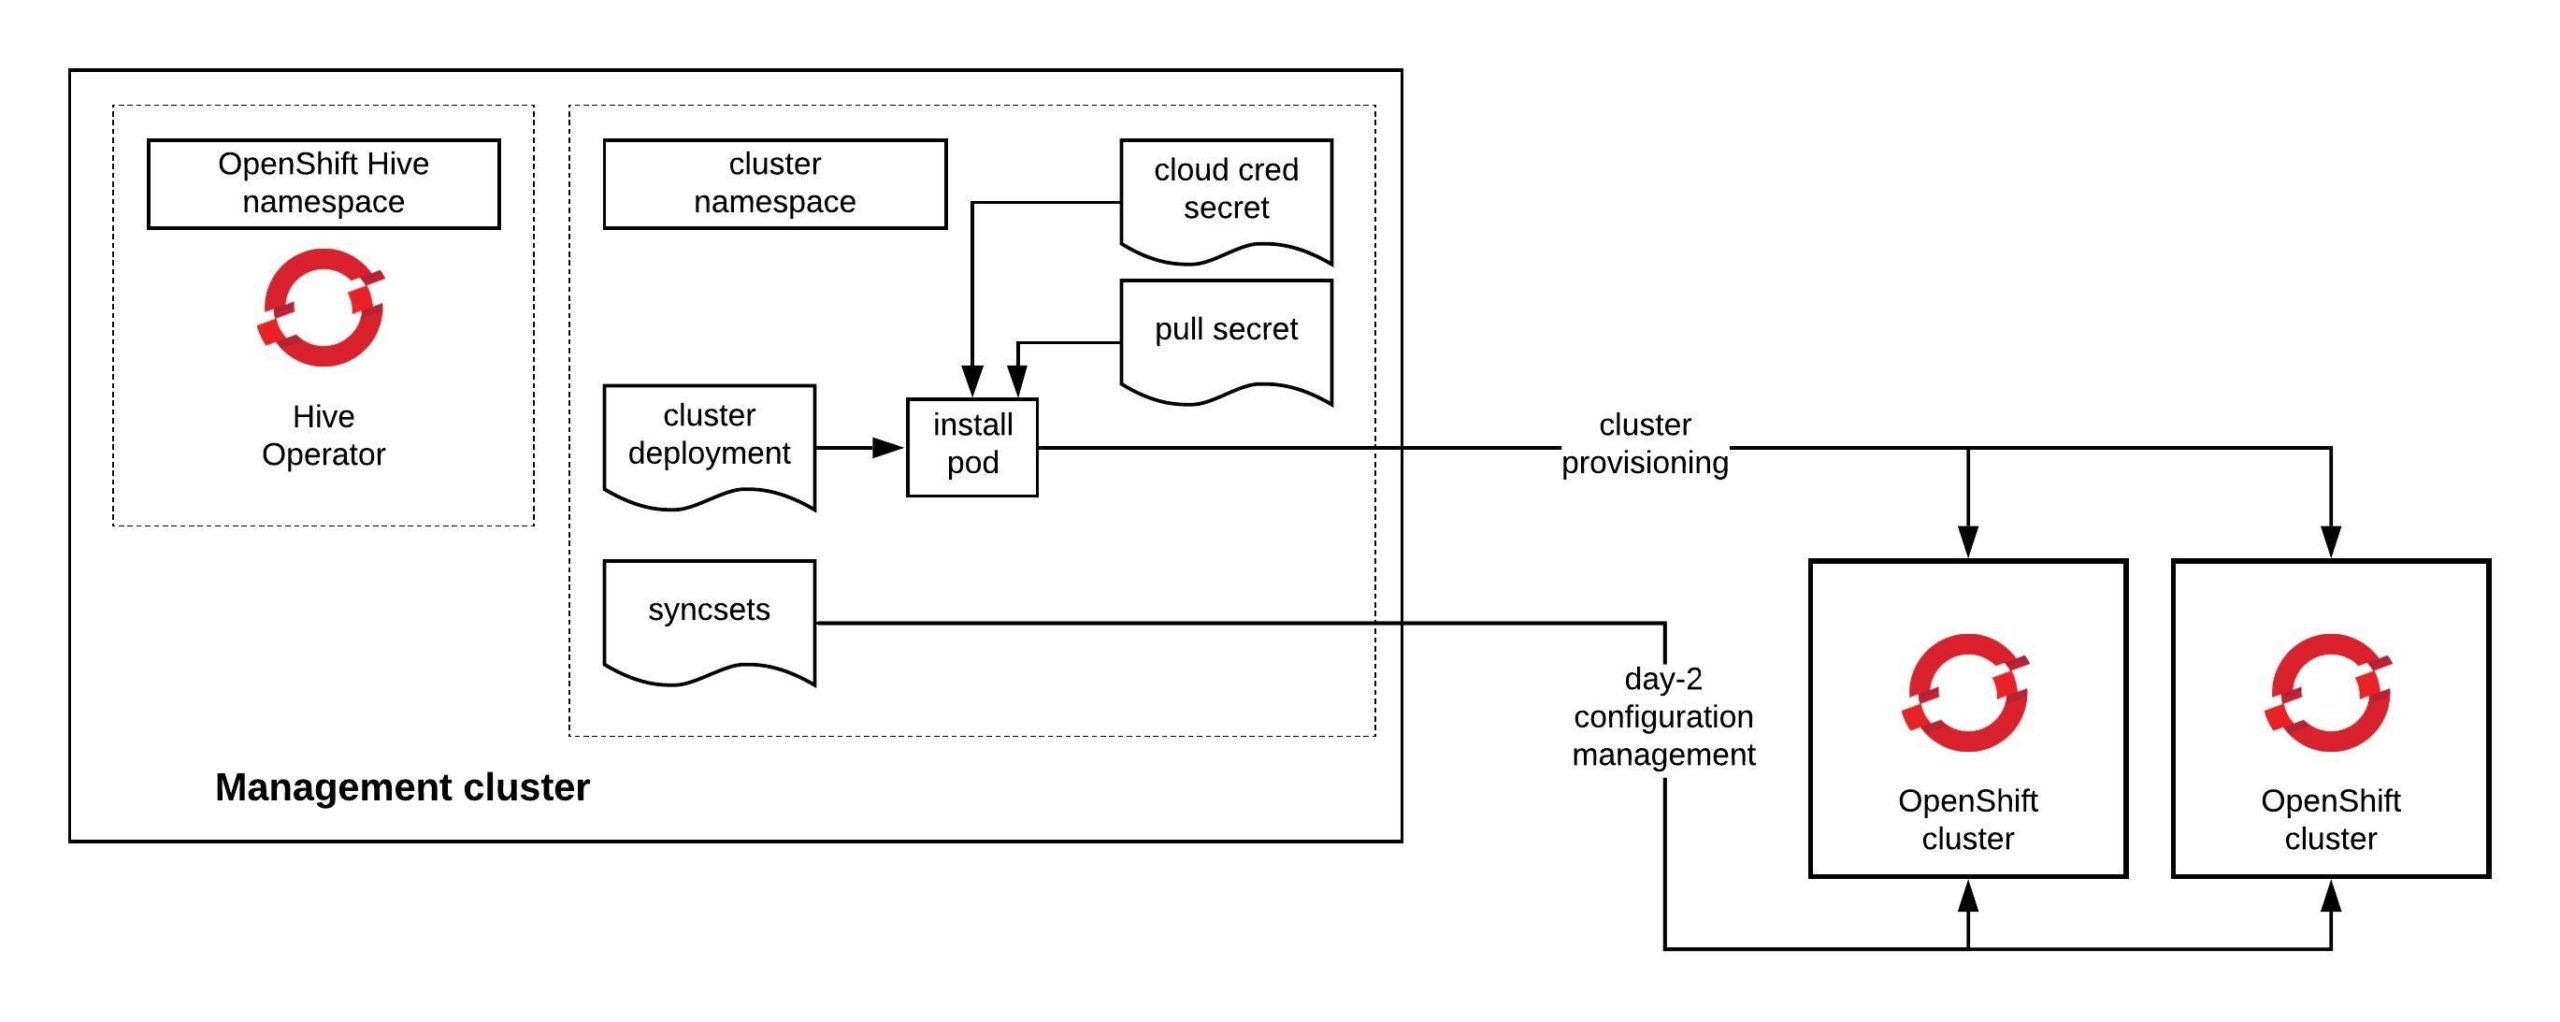
The Hive operator requires to run on a separate Kubernetes cluster to centrally provision and manage the OpenShift 4 clusters. With Hive you can manage hundreds of cluster deployments and configuration with a single operator. There is nothing required on the OpenShift 4 clusters itself, Hive only requires access to the cluster API:

The ClusterDeployment custom resource is the definition for the cluster specs, similar to the openshift-installer install-config where you define cluster specifications, cloud credential and image pull secrets. Below is an example of the ClusterDeployment manifest:

---
apiVersion: hive.openshift.io/v1
kind: ClusterDeployment
metadata:
  name: mycluster
  namespace: mynamespace
spec:
  baseDomain: hive.example.com
  clusterName: mycluster
  platform:
    aws:
      credentialsSecretRef:
        name: mycluster-aws-creds
      region: eu-west-1
  provisioning:
    imageSetRef:
      name: openshift-v4.3.0
    installConfigSecretRef:
      name: mycluster-install-config
    sshPrivateKeySecretRef:
      name: mycluster-ssh-key
  pullSecretRef:
    name: mycluster-pull-secret

The SyncSet custom resource is defining the configuration and is able to regularly reconcile the manifests to keep all clusters synchronised. With SyncSets you can apply resources and patches as you see in the example below:

---
apiVersion: hive.openshift.io/v1
kind: SyncSet
metadata:
  name: mygroup
spec:
  clusterDeploymentRefs:
  - name: ClusterName
  resourceApplyMode: Upsert
  resources:
  - apiVersion: user.openshift.io/v1
    kind: Group
    metadata:
      name: mygroup
    users:
    - myuser
  patches:
  - kind: ConfigMap
    apiVersion: v1
    name: foo
    namespace: default
    patch: |-
      { "data": { "foo": "new-bar" } }
    patchType: merge
  secretReferences:
  - source:
      name: ad-bind-password
      namespace: default
    target:
      name: ad-bind-password
      namespace: openshift-config

Depending of the amount of resource and patches you want to apply, a SyncSet can get pretty large and is not very easy to manage. My colleague Matt wrote a SyncSet Generator, please check this Github repository.

In one of my next articles I will go into more detail on how to deploy OpenShift Hive and I’ll provide more examples of how to use ClusterDeployment and SyncSets. In the meantime please check out the OpenShift Hive repository for more details, additionally here are links to the Hive documentation on using Hive and Syncsets.

Read my new article about installing OpenShift Hive.

Running Istio Service Mesh on Amazon EKS

I have not spend too much time with Istio in the last weeks but after my previous article about running Istio Service Mesh on OpenShift I wanted to do the same and deploy Istio Service Mesh on an Amazon EKS cluster. This time I did the recommended way of using a helm template to deploy Istio which is more flexible then the Ansible operator for the OpenShift deployment.

Once you have created your EKS cluster you can start, there are not many prerequisite for EKS so you can basically create the istio namespace and create a secret for Kiali, and start to deploy the helm template:

kubectl create namespace istio-system

USERNAME=$(echo -n 'admin' | base64)
PASSPHRASE=$(echo -n 'supersecretpassword!!' | base64)
NAMESPACE=istio-system

cat <<EOF | kubectl apply -n istio-system -f -
apiVersion: v1
kind: Secret
metadata:
  name: kiali
  namespace: $NAMESPACE
  labels:
    app: kiali
type: Opaque
data:
  username: $USERNAME
  passphrase: $PASSPHRASE
EOF

You then create the Custom Resource Definitions (CRDs) for Istio:

helm template istio-1.1.4/install/kubernetes/helm/istio-init --name istio-init --namespace istio-system | kubectl apply -f -  

# Check the created Istio CRDs 
kubectl get crds -n istio-system | grep 'istio.io\|certmanager.k8s.io' | wc -l

At this point you can deploy the main Istio Helm template. See the installation options for more detail about customizing the installation:

helm template istio-1.1.4/install/kubernetes/helm/istio --name istio --namespace istio-system  --set grafana.enabled=true --set tracing.enabled=true --set kiali.enabled=true --set kiali.dashboard.secretName=kiali --set kiali.dashboard.usernameKey=username --set kiali.dashboard.passphraseKey=passphrase | kubectl apply -f -
 
# Validate and see that all components start
kubectl get pods -n istio-system -w  

The Kiali service has the type clusterIP which we need to change to type LoadBalancer:

kubectl patch svc kiali -n istio-system --patch '{"spec": {"type": "LoadBalancer" }}'

# Get the create AWS ELB for the Kiali service
$ kubectl get svc kiali -n istio-system --no-headers | awk '{ print $4 }'
abbf8224773f111e99e8a066e034c3d4-78576474.eu-west-1.elb.amazonaws.com

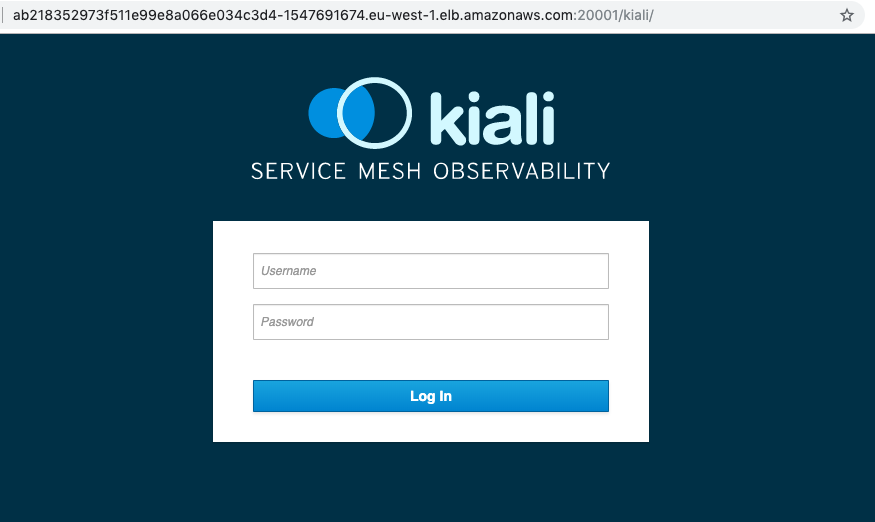
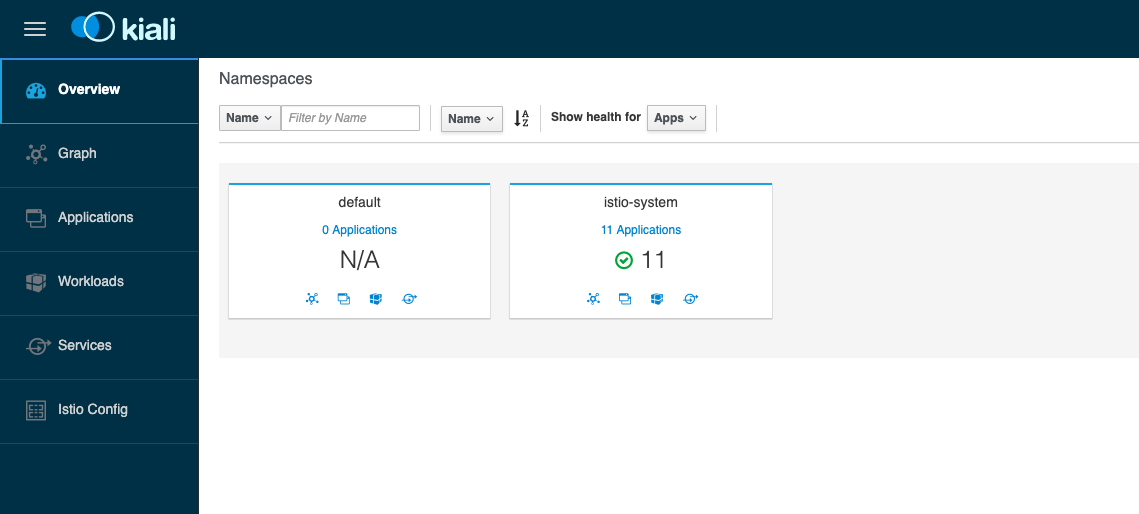
Now we are able to access the Kiali dashboard and login with the credentials I have specified earlier in the Kiali secret.

We didn’t deploy anything else yet so the default namespace is empty:

I recommend having a look at the Istio-Sidecar injection. If your istio-sidecar containers are not getting deployed you might forgot to allow TCP port 443 from your control-plane to worker nodes. Have a look at the Github issue about this: Admission control webhooks (e.g. sidecar injector) don’t work on EKS.

We can continue and deploy the Google Hipster Shop example.

# Label default namespace to inject Envoy sidecar
kubectl label namespace default istio-injection=enabled

# Check istio sidecar injector label
kubectl get namespace -L istio-injection

# Deploy Google hipster shop manifests
kubectl create -f https://raw.githubusercontent.com/berndonline/aws-eks-terraform/master/example/istio-hipster-shop.yml
kubectl create -f https://raw.githubusercontent.com/berndonline/aws-eks-terraform/master/example/istio-manifest.yml

# Wait a few minutes before deploying the load generator
kubectl create -f https://raw.githubusercontent.com/berndonline/aws-eks-terraform/master/example/istio-loadgenerator.yml

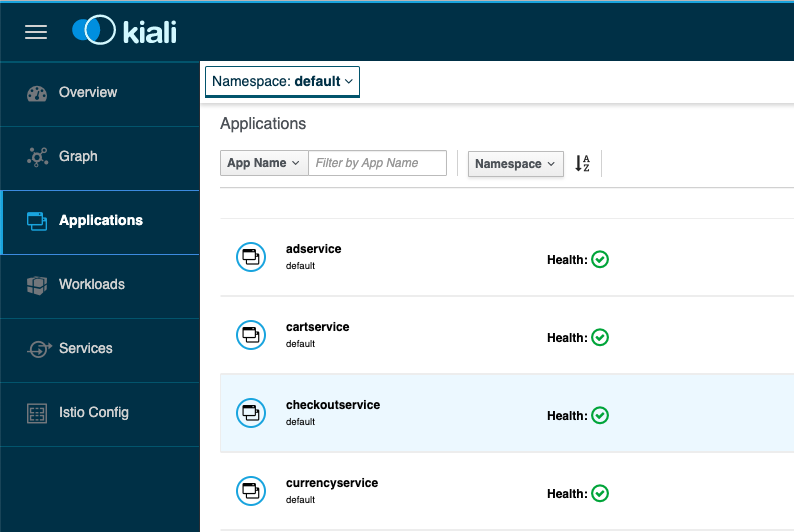
We can check again the Kiali dashboard once the application is deployed and healthy. If there are issues with the Envoy sidecar you will see a warning “Missing Sidecar”:

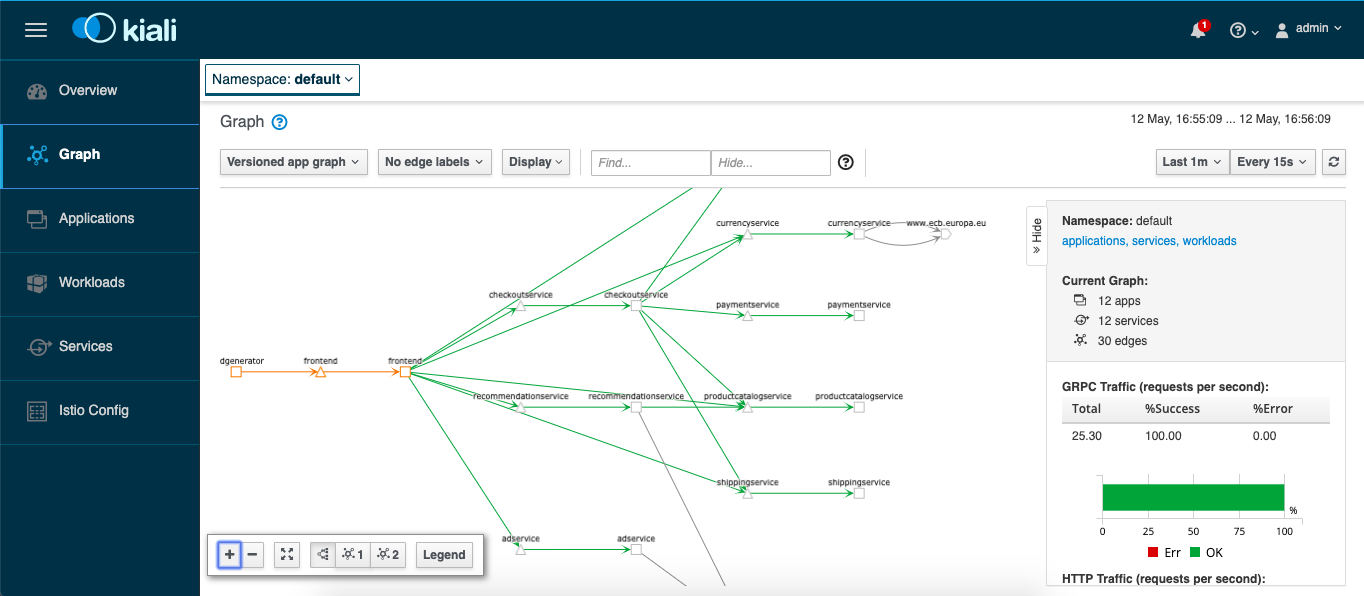
We are also able to see the graph which shows detailed traffic flows within the microservice application.

Let’s get the hostname for the istio-ingressgateway service and connect via the web browser:

$ kubectl get svc istio-ingressgateway -n istio-system --no-headers | awk '{ print $4 }'
a16f7090c74ca11e9a1fb02cd763ca9e-362893117.eu-west-1.elb.amazonaws.com

Before you destroy your EKS cluster you should remove all installed components because Kubernetes service type LoadBalancer created AWS ELBs which will not get deleted and stay behind when you delete the EKS cluster:

kubectl label namespace default istio-injection-
kubectl delete -f https://raw.githubusercontent.com/berndonline/aws-eks-terraform/master/example/istio-loadgenerator.yml
kubectl delete -f https://raw.githubusercontent.com/berndonline/aws-eks-terraform/master/example/istio-hipster-shop.yml
kubectl delete -f https://raw.githubusercontent.com/berndonline/aws-eks-terraform/master/example/istio-manifest.yml

Finally to remove Istio from EKS you run the same Helm template command but do kubectl delete:

helm template istio-1.1.4/install/kubernetes/helm/istio --name istio --namespace istio-system  --set grafana.enabled=true --set tracing.enabled=true --set kiali.enabled=true --set kiali.dashboard.secretName=kiali --set kiali.dashboard.usernameKey=username --set kiali.dashboard.passphraseKey=passphrase | kubectl delete -f -

Very simple to get started with Istio Service Mesh on EKS and if I find some time I will give the Istio Multicluster a try and see how this works to span Istio service mesh across multiple Kubernetes clusters.

Create Amazon EKS cluster using Terraform

I have found AWS EKS introduction on the HashiCorp learning portal and thought I’d give it a try and test the Amazon Elastic Kubernetes Services. Using cloud native container services like EKS is getting more popular and makes it easier for everyone running a Kubernetes cluster and start deploying container straight away without the overhead of maintaining and patching the control-plane and leave this to AWS.

Creating the EKS cluster is pretty easy by just running terraform apply. The only prerequisite is to have kubectl and AWS IAM authenticator installed. You find the terraform files on my repository https://github.com/berndonline/aws-eks-terraform

# Initializing and create EKS cluster
terraform init
terraform apply  

# Generate kubeconfig and configmap for adding worker nodes
terraform output kubeconfig > ./kubeconfig
terraform output config_map_aws_auth > ./config_map_aws_auth.yaml

# Apply configmap for worker nodes to join the cluster
export KUBECONFIG=./kubeconfig
kubectl apply -f ./config_map_aws_auth.yaml
kubectl get nodes --watch

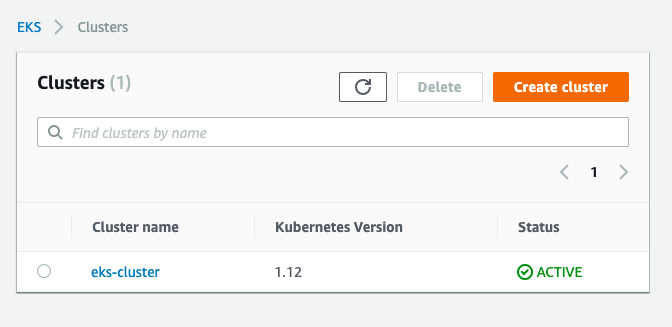
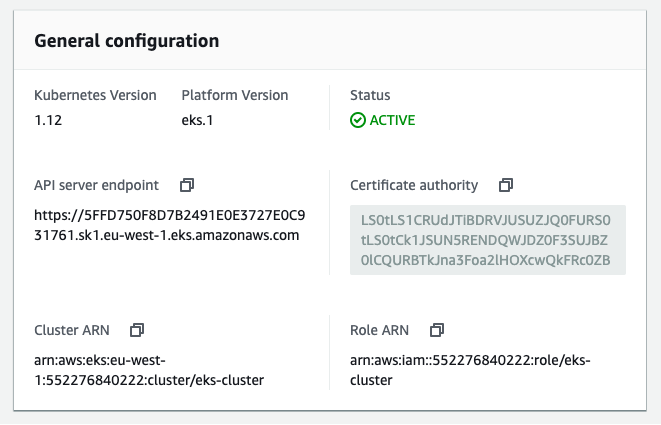
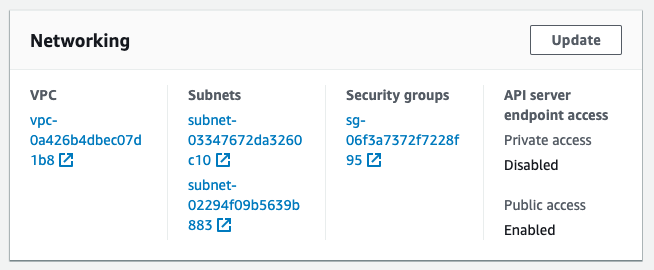
Let’s have a look at the AWS EKS console:

In the cluster details you see general information:

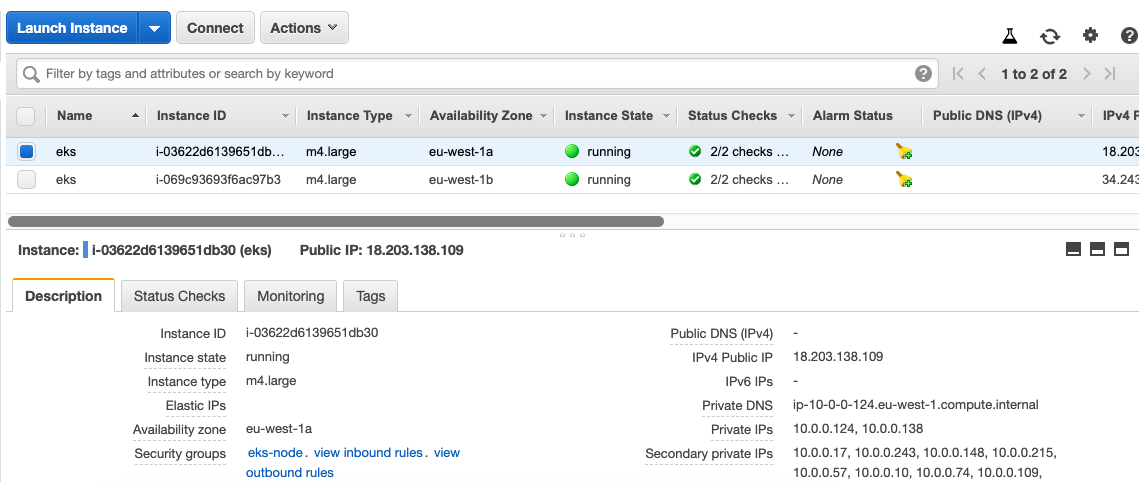
On the EC2 side you see two worker nodes as defined:

Now we can deploy an example application:

$ kubectl create -f example/hello-kubernetes.yml
service/hello-kubernetes created
deployment.apps/hello-kubernetes created
ingress.extensions/hello-ingress created

Checking that the pods are running and the correct resources are created:

$ kubectl get all
NAME                                   READY   STATUS    RESTARTS   AGE
pod/hello-kubernetes-b75555c67-4fhfn   1/1     Running   0          1m
pod/hello-kubernetes-b75555c67-pzmlw   1/1     Running   0          1m

NAME                       TYPE           CLUSTER-IP       EXTERNAL-IP                                                              PORT(S)        AGE
service/hello-kubernetes   LoadBalancer   172.20.108.223   ac1dc1ab84e5c11e9ab7e0211179d9b9-394134490.eu-west-1.elb.amazonaws.com   80:32043/TCP   1m
service/kubernetes         ClusterIP      172.20.0.1                                                                                443/TCP        26m

NAME                               DESIRED   CURRENT   UP-TO-DATE   AVAILABLE   AGE
deployment.apps/hello-kubernetes   2         2         2            2           1m

NAME                                         DESIRED   CURRENT   READY   AGE
replicaset.apps/hello-kubernetes-b75555c67   2         2         2       1m

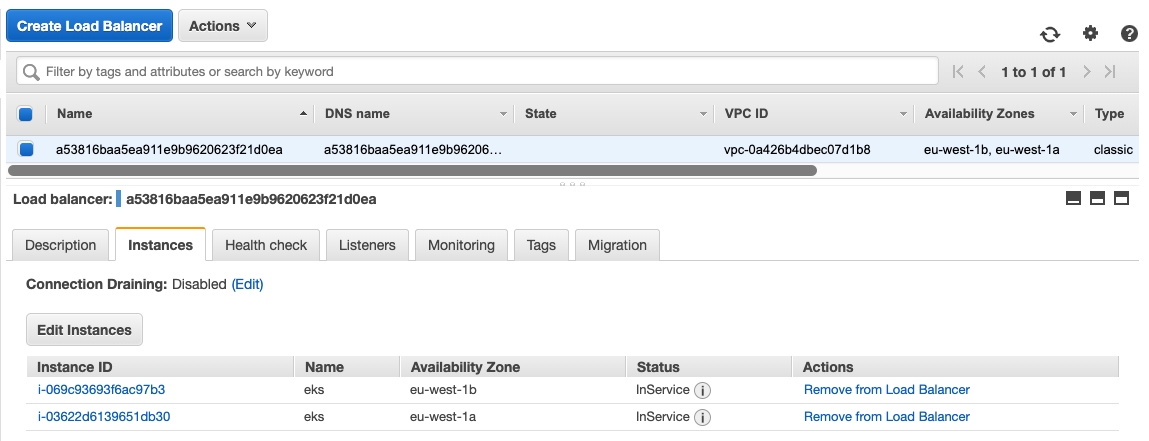
With the ingress service the EKS cluster is automatically creating an ELB load balancer and forward traffic to the two worker nodes:

Example application:

I have used a very simple Jenkins pipeline to create the AWS EKS cluster:

pipeline {
    agent any
    environment {
        AWS_ACCESS_KEY_ID = credentials('AWS_ACCESS_KEY_ID')
        AWS_SECRET_ACCESS_KEY = credentials('AWS_SECRET_ACCESS_KEY')
    }
    stages {
        stage('prepare workspace') {
            steps {
                sh 'rm -rf *'
                git branch: 'master', url: 'https://github.com/berndonline/aws-eks-terraform.git'
                sh 'terraform init'
            }
        }
        stage('terraform apply') {
            steps {
                sh 'terraform apply -auto-approve'
                sh 'terraform output kubeconfig > ./kubeconfig'
                sh 'terraform output config_map_aws_auth > ./config_map_aws_auth.yaml'
                sh 'export KUBECONFIG=./kubeconfig'
            }
        }
        stage('add worker nodes') {
            steps {
                sh 'kubectl apply -f ./config_map_aws_auth.yaml --kubeconfig=./kubeconfig'
                sh 'sleep 60'
            }
        }
        stage('deploy example application') {
            steps {    
                sh 'kubectl apply -f ./example/hello-kubernetes.yml --kubeconfig=./kubeconfig'
                sh 'kubectl get all --kubeconfig=./kubeconfig'
            }
        }
        stage('Run terraform destroy') {
            steps {
                input 'Run terraform destroy?'
            }
        }
        stage('terraform destroy') {
            steps {
                sh 'kubectl delete -f ./example/hello-kubernetes.yml --kubeconfig=./kubeconfig'
                sh 'sleep 60'
                sh 'terraform destroy -force'
            }
        }
    }
}

I really like how easy and quick it is to create an AWS EKS cluster in less than 15 mins.