Kubernetes GitOps at Scale with Cluster API and Flux CD

What does GitOps mean and how you run this at scale with Kubernetes? GitOps is basically a framework that takes traditional DevOps practices which where used for application development and apply them to platform automation.

This is nothing new and some maybe have done similar type of automation in the past but this wasn’t called GitOps back then. Kubernetes is great because of it’s declarative configuration management which makes it very easy to configure. This can become a challenge when you suddenly have to run 5, 10, 20 or 40 of these clusters across various cloud providers and multiple environments. We need a cluster management system feeding configuration from a code repository to run all our Kubernetes “cattle” workload clusters.

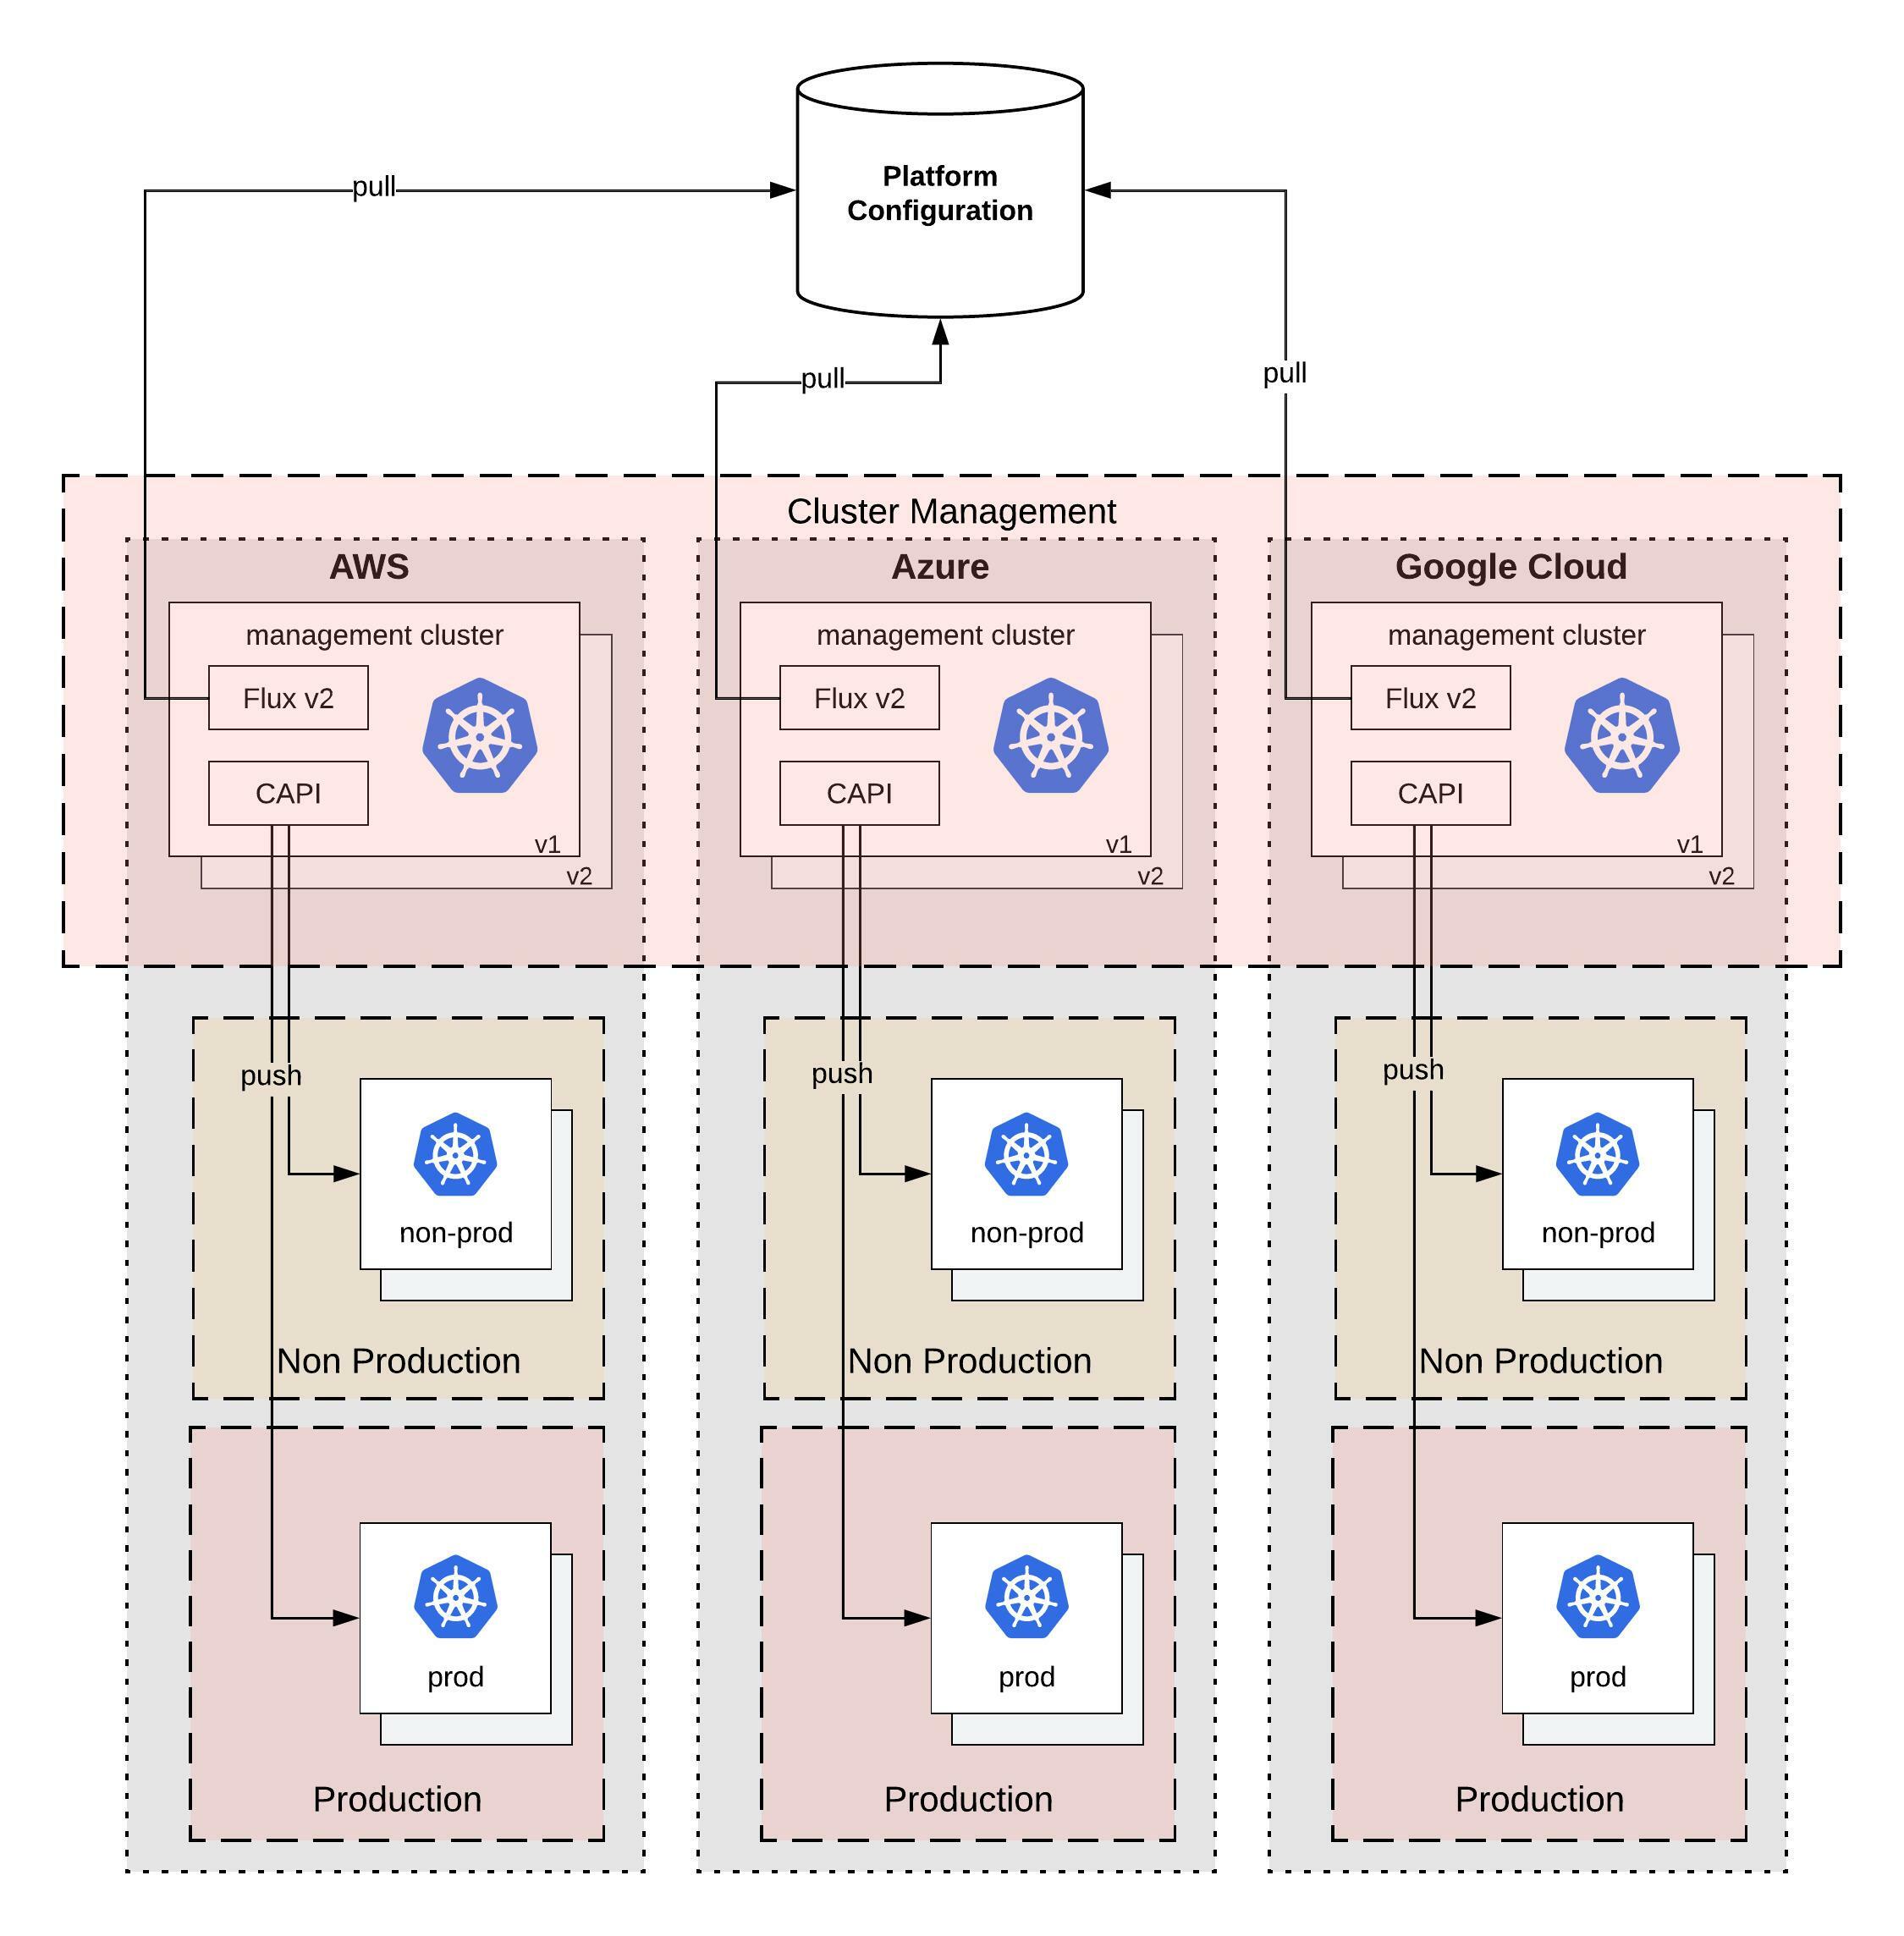
What I am trying to achieve with this design; that you can easily horizontally scale not only your workload clusters but also your cluster management system which is versioned across multiple cloud providers like you see in the diagram above.

There is of course a technical problem to all of this, finding the right tools to solve the problem and which work well together. In my example I will use the Cluster API for provisioning and managing the lifecycle of these Kubernetes workload clusters. Then we need Flux CD for the configuration management both the cluster management which runs the Cluster API components but also the configuration for the workload clusters. The Cluster API you can also replace with OpenShift Hive to run instead OKD or RedHat OpenShift clusters.

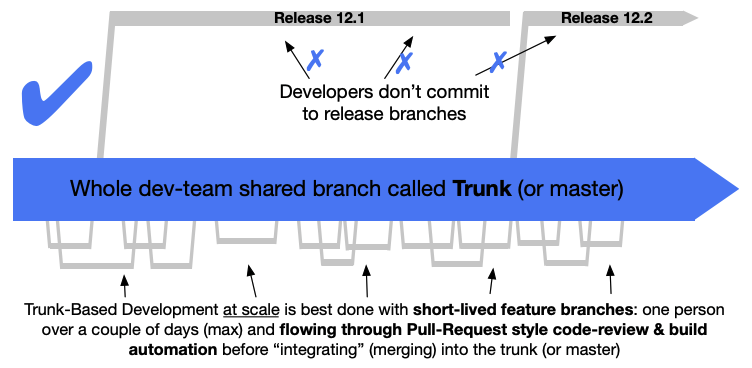
Another problem we need to think about is version control and the branching model for the platform configuration. The structure of the configuration is important but also how you implement changes or the versioning of your configuration through releases. I highly recommend reading about Trunk Based Development which is a modern branching model and specifically solves the versioning problem for us.

Git repository and folder structure

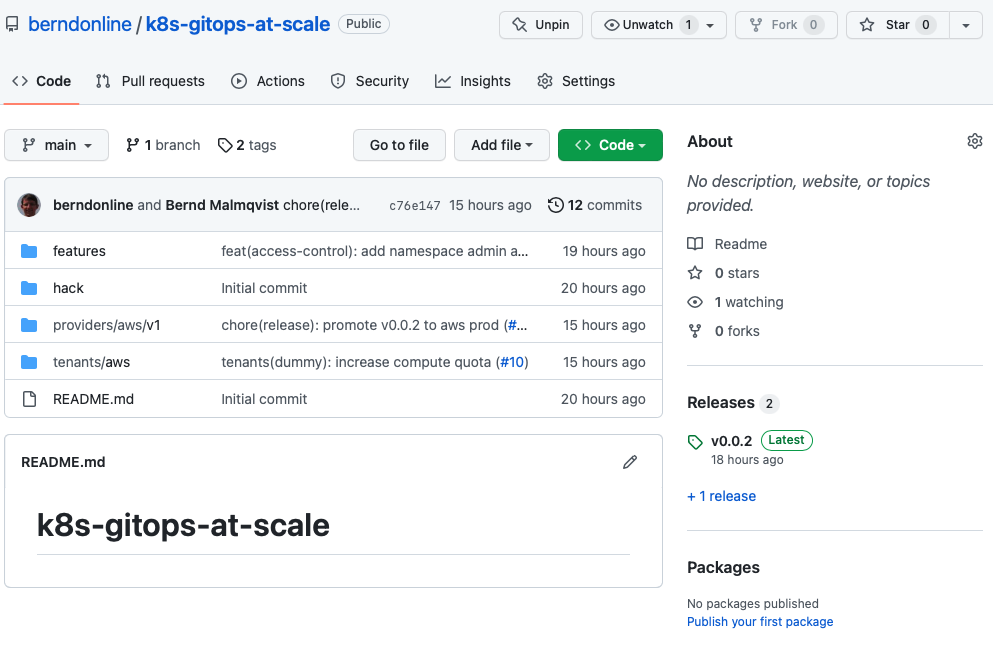
We need a git repository for storing the platform configuration both for the management- and workload-clusters, and the tenant namespace configuration (this also can be stored in a separate repositories). Let’s go through the folder structure of the repository and I will explain this in more detail. Checkout my example repository for more detail: github.com/berndonline/k8s-gitops-at-scale.

  • The features folder on the top-level will store configuration for specific features we want to enable and apply to our clusters (both management and worker). Under each <feature name> you find two subfolders for namespace(d)- and cluster-wide (non-namespaced) configuration. Features are part of platform configuration which will be promoted between environments. You will see namespaced and non-namespaced subfolders throughout the folder structure which is basically to group your configuration files.
    ├── features
    │   ├── access-control
    │   │   └── non-namespaced
    │   ├── helloworld-operator
    │   │   ├── namespaced
    │   │   └── non-namespaced
    │   └── ingress-nginx
    │       ├── namespaced
    │       └── non-namespaced
    
  • The providers folder will store the configuration based on cloud provider <name> and the <version> of your cluster management. The version below the cloud provider folder is needed to be able to spin up new management clusters in the future. You can be creative with the folder structure and have management cluster per environment and/or instead of the version if required. The mgmt folder will store the configuration for the management cluster which includes manifests for Flux CD controllers, the Cluster API to spin-up workload clusters which are separated by cluster name and anything else you want to configure on your management cluster. The clusters folder will store configuration for all workload clusters separated based on <environment> and common (applies across multiple clusters in the same environment) and by <cluster name> (applies to a dedicated cluster).
    ├── providers
    │   └── aws
    │       └── v1
    │           ├── clusters
    │           │   ├── non-prod
    │           │   │   ├── common
    │           │   │   │   ├── namespaced
    │           │   │   │   │   └── non-prod-common
    │           │   │   │   └── non-namespaced
    │           │   │   │       └── non-prod-common
    │           │   │   └── non-prod-eu-west-1
    │           │   │       ├── namespaced
    │           │   │       │   └── non-prod-eu-west-1
    │           │   │       └── non-namespaced
    │           │   │           └── non-prod-eu-west-1
    │           │   └── prod
    │           │       ├── common
    │           │       │   ├── namespaced
    │           │       │   │   └── prod-common
    │           │       │   └── non-namespaced
    │           │       │       └── prod-common
    │           │       └── prod-eu-west-1
    │           │           ├── namespaced
    │           │           │   └── prod-eu-west-1
    │           │           └── non-namespaced
    │           │               └── prod-eu-west-1
    │           └── mgmt
    │               ├── namespaced
    │               │   ├── flux-system
    │               │   ├── non-prod-eu-west-1
    │               │   └── prod-eu-west-1
    │               └── non-namespaced
    │                   ├── non-prod-eu-west-1
    │                   └── prod-eu-west-1
    
  • The tenants folder will store the namespace configuration of the onboarded teams and is applied to our workload clusters. Similar to the providers folder tenants has subfolders based on the cloud provider <name> and below subfolders for common (applies across environments) and <environments> (applied to a dedicated environment) configuration. There you find the tenant namespace <name> and all the needed manifests to create and configure the namespace/s.
    └── tenants
        └── aws
            ├── common
            │   └── dummy
            ├── non-prod
            │   └── dummy
            └── prod
                └── dummy
    

Why do we need a common folder for tenants? The common folder will contain namespace configuration which will be promoted between the environments from non-prod to prod using a release but more about release and promotion you find more down below.

Configuration changes

Applying changes to your platform configuration has to follow the Trunk Based Development model of doing small incremental changes through feature branches.

Let’s look into an example change the our dummy tenant onboarding pull-request. You see that I checked-out a branch called “tenant-dummy” to apply my changes, then push and publish the branch in the repository to raised the pull-request.

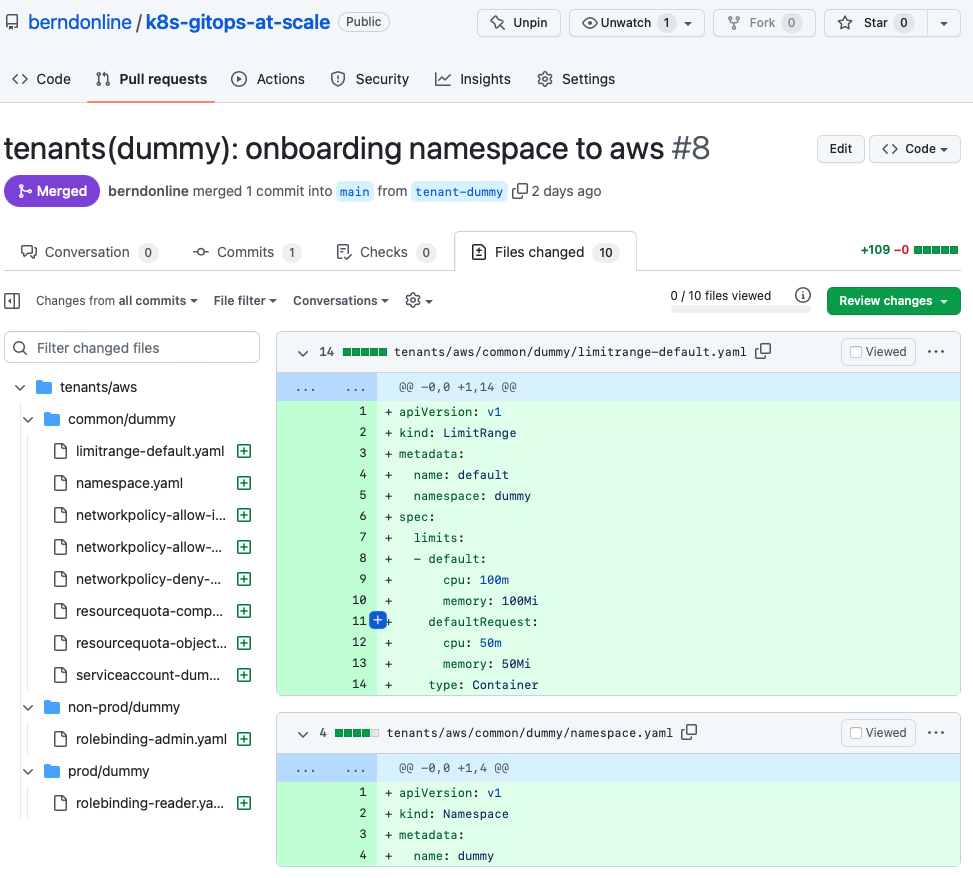
Important is that your commit messages and pull-request name are following a strict naming convention.

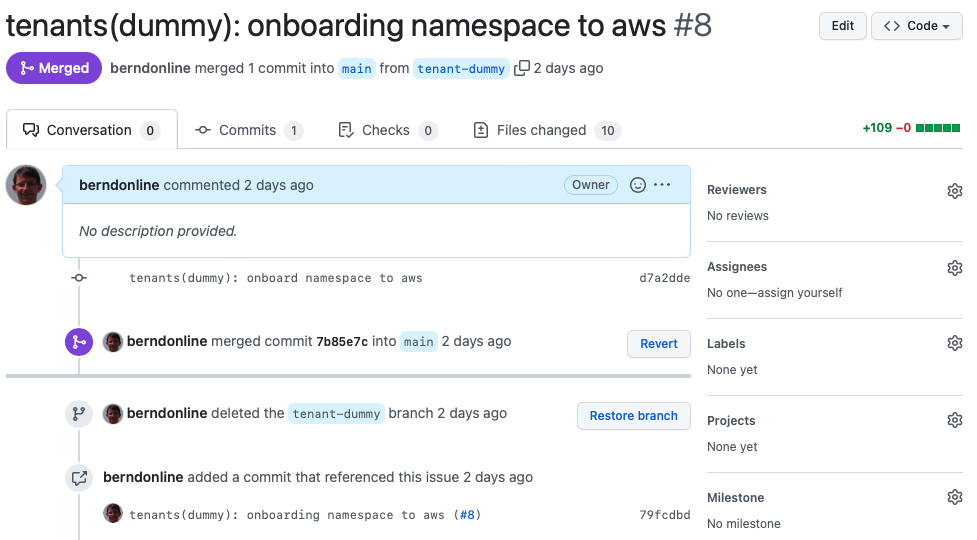
I would also strongly recommend to squash your commit messages into the name of your pull-request. This will keep your git history clean.

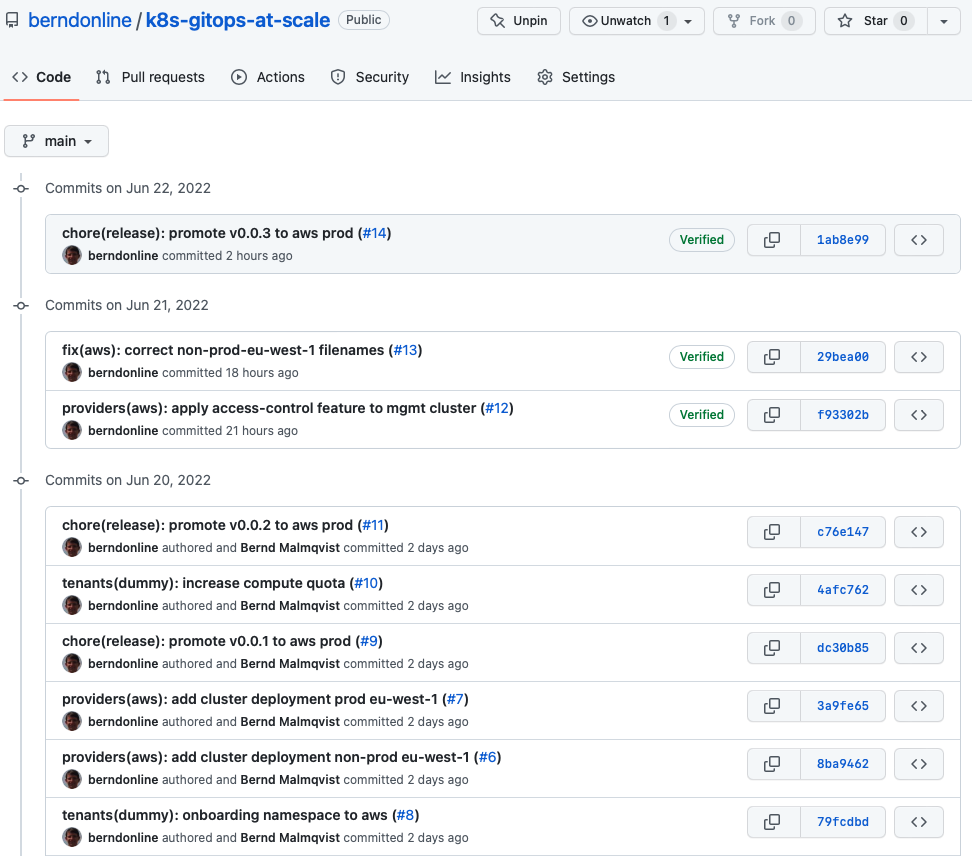
This naming convention makes it easier later for auto-generating your release notes when you publish your release. Having the clean well formatted git history combined with your release notes nicely cross references your changes for to a particular release tag.

More about creating a release a bit later in this article.

GitOps configuration

The configuration from the platform repository gets pulled on the management cluster using different gitrepository resources following the main branch or a version tag.

$ kubectl get gitrepositories.source.toolkit.fluxcd.io -A
NAMESPACE     NAME      URL                                                    AGE   READY   STATUS
flux-system   main      ssh://[email protected]/berndonline/k8s-gitops-at-scale   2d    True    stored artifact for revision 'main/ee3e71efb06628775fa19e9664b9194848c6450e'
flux-system   release   ssh://[email protected]/berndonline/k8s-gitops-at-scale   2d    True    stored artifact for revision 'v0.0.2/a5a5edd1194b629f6b41977483dca49aaad957ff'

The kustomization resources will then render and apply the configuration locally to the management cluster (diagram left-side) or remote clusters to our non-prod and prod workload clusters (diagram right-side) using the kubeconfig of the cluster created by the Cluster API stored during the bootstrap.

There are multiple kustomization resources to apply configuration based off the folder structure which I explained above. See the output below and checkout the repository for more details.

$ kubectl get kustomizations.kustomize.toolkit.fluxcd.io -A
NAMESPACE            NAME                          AGE   READY   STATUS
flux-system          feature-access-control        13h   True    Applied revision: v0.0.2/a5a5edd1194b629f6b41977483dca49aaad957ff
flux-system          mgmt                          2d    True    Applied revision: main/ee3e71efb06628775fa19e9664b9194848c6450e
non-prod-eu-west-1   common                        21m   True    Applied revision: main/ee3e71efb06628775fa19e9664b9194848c6450e
non-prod-eu-west-1   feature-access-control        21m   True    Applied revision: main/ee3e71efb06628775fa19e9664b9194848c6450e
non-prod-eu-west-1   feature-helloworld-operator   21m   True    Applied revision: main/ee3e71efb06628775fa19e9664b9194848c6450e
non-prod-eu-west-1   feature-ingress-nginx         21m   True    Applied revision: main/ee3e71efb06628775fa19e9664b9194848c6450e
non-prod-eu-west-1   non-prod-eu-west-1            21m   True    Applied revision: main/ee3e71efb06628775fa19e9664b9194848c6450e
non-prod-eu-west-1   tenants-common                21m   True    Applied revision: main/ee3e71efb06628775fa19e9664b9194848c6450e
non-prod-eu-west-1   tenants-non-prod              21m   True    Applied revision: main/ee3e71efb06628775fa19e9664b9194848c6450e
prod-eu-west-1       common                        15m   True    Applied revision: v0.0.2/a5a5edd1194b629f6b41977483dca49aaad957ff
prod-eu-west-1       feature-access-control        15m   True    Applied revision: v0.0.2/a5a5edd1194b629f6b41977483dca49aaad957ff
prod-eu-west-1       feature-helloworld-operator   15m   True    Applied revision: v0.0.2/a5a5edd1194b629f6b41977483dca49aaad957ff
prod-eu-west-1       feature-ingress-nginx         15m   True    Applied revision: v0.0.2/a5a5edd1194b629f6b41977483dca49aaad957ff
prod-eu-west-1       prod-eu-west-1                15m   True    Applied revision: v0.0.2/a5a5edd1194b629f6b41977483dca49aaad957ff
prod-eu-west-1       tenants-common                15m   True    Applied revision: v0.0.2/a5a5edd1194b629f6b41977483dca49aaad957ff
prod-eu-west-1       tenants-prod                  15m   True    Applied revision: v0.0.2/a5a5edd1194b629f6b41977483dca49aaad957ff

Release and promotion

The GitOps framework doesn’t explain about how to do promotion to higher environments and this is where the Trunk Based Development model comes in helpful together with the gitrepository resource to be able to pull a tagged version instead of a branch.

This allows us applying configuration first to lower environments to non-prod following the main branch, means pull-requests which are merged will be applied instantly. Configuration for higher environments to production requires to create a version tag and publish a release in the repository.

Why using a tag and not a release branch? A tag in your repository is a point in time snapshot of your configuration and can’t be easily modified which is required for creating the release. A branch on the other hand can be modified using pull-requests and you end up with lots of release branches which is less ideal.

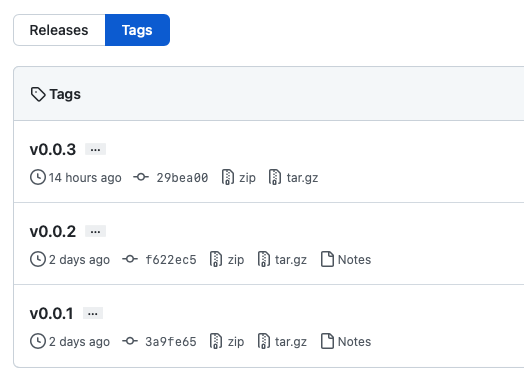
To create a new version tag in the git repository I use the following commands:

$ git tag v0.0.3
$ git push origin --tags
Total 0 (delta 0), reused 0 (delta 0)
To github.com:berndonline/k8s-gitops-at-scale.git
* [new tag] v0.0.3 -> v0.0.3

This doesn’t do much after we pushed the new tag because the gitrepository release is set to v0.0.2 but I can see the new tag is available in the repository.

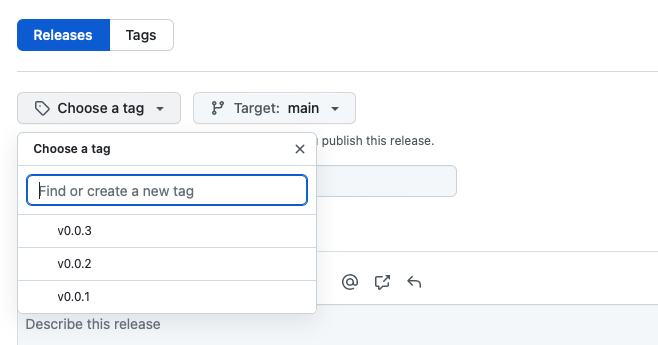
In the repository I can go to releases and click on “Draft a new release” and choose the new tag v0.0.3 I pushed previously.

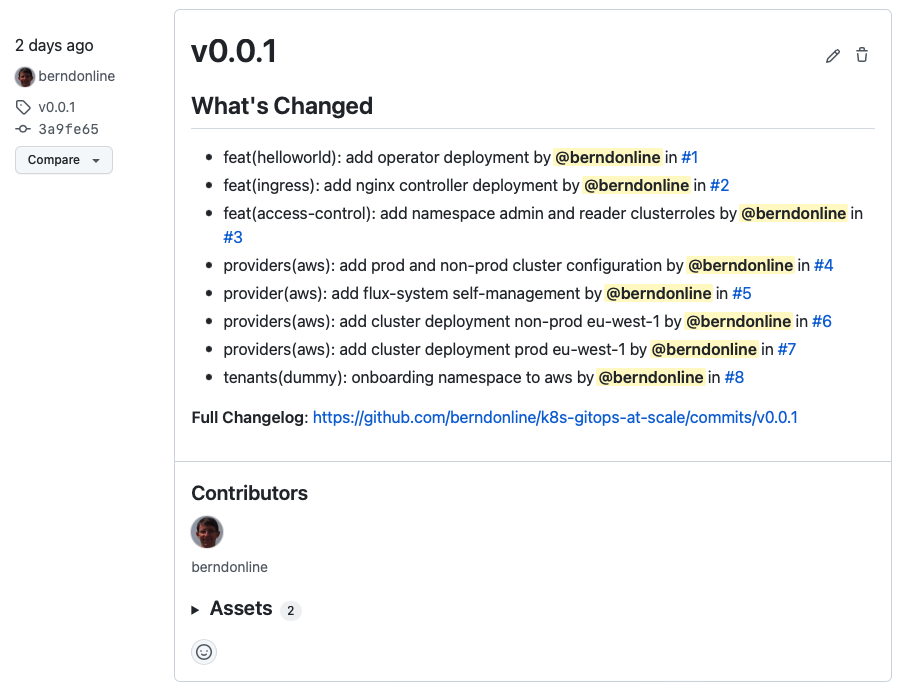
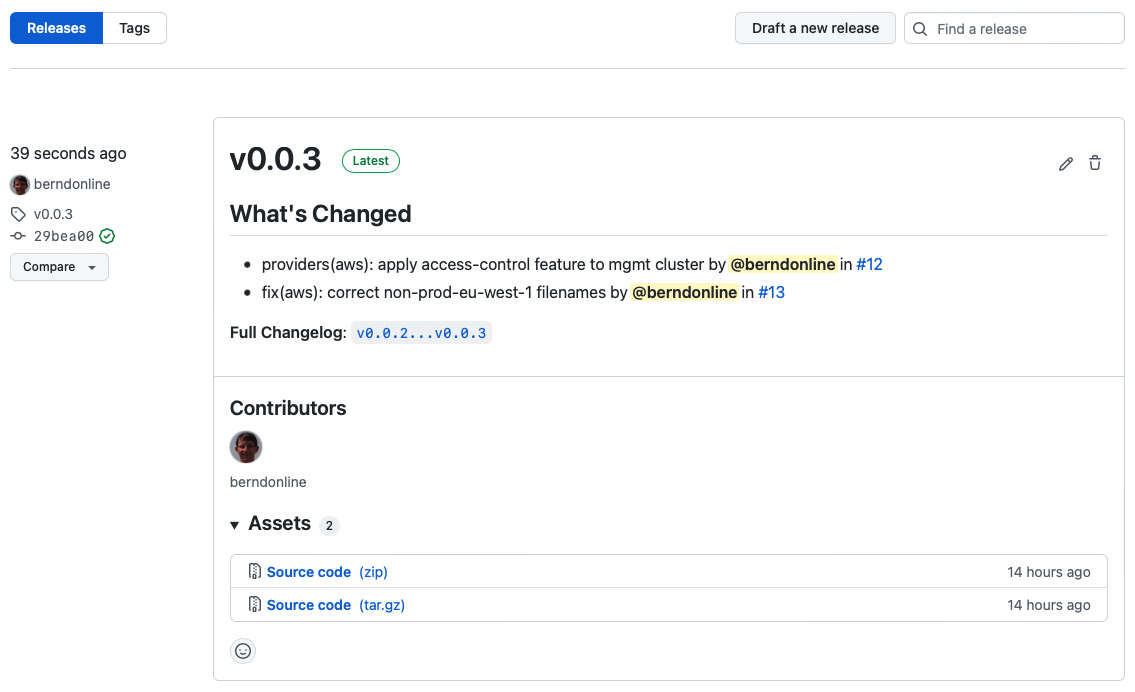
The release notes you see below can be auto-generate from the pull-requests you merged between v0.0.2 and v0.0.3 by clicking “Generate release notes”. To finish this off save and publish the release.


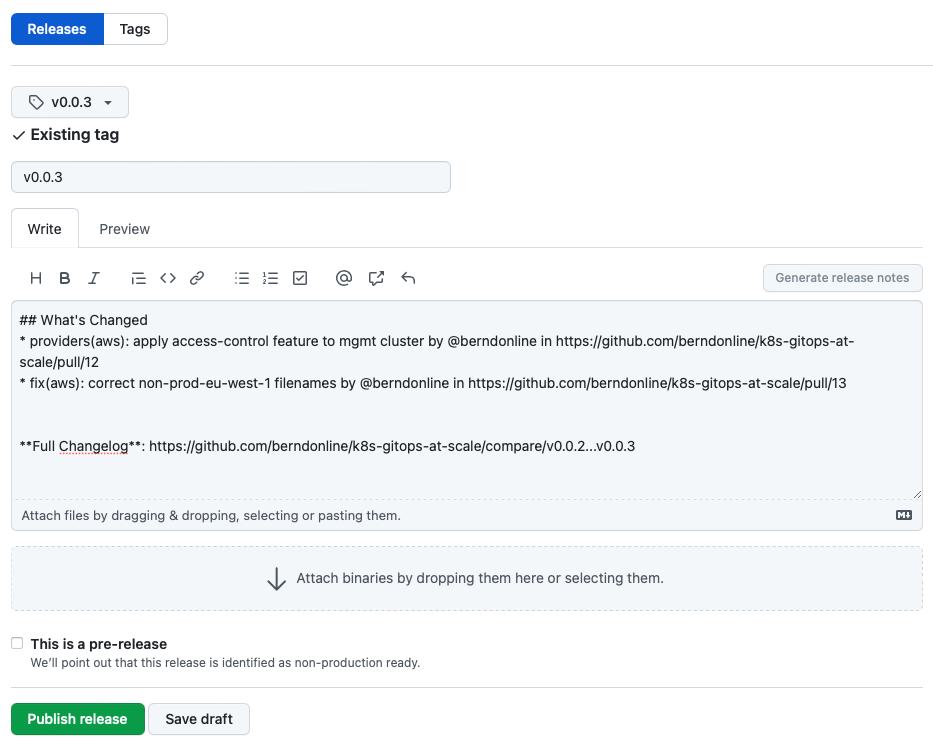
The release is publish and release notes are visible to everyone which is great for product teams on your platform because they will get visibility about upcoming changes including their own modifications to namespace configuration.

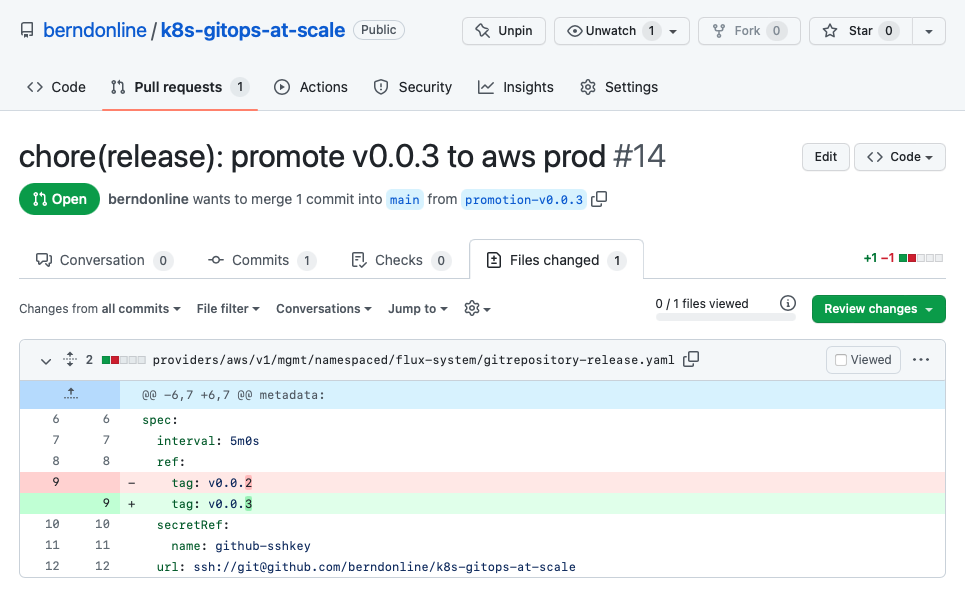
Until now all the changes are applied to our lower non-prod environment following the main branch and for doing the promotion we need to raise a pull-request and update the gitrepository release the new version v0.0.3.

If you follow ITIL change procedures then this is the point where you would normally raise a change for merging your pull-request because this triggers the rollout of your configuration to production.

When the pull-request is merged the release gitrepository is updated by the kustomization resources through the main branch.

$ kubectl get gitrepositories.source.toolkit.fluxcd.io -A
NAMESPACE     NAME      URL                                           AGE   READY   STATUS
flux-system   main      ssh://[email protected]/berndonline/k8s-gitops   2d    True    stored artifact for revision 'main/83133756708d2526cca565880d069445f9619b70'
flux-system   release   ssh://[email protected]/berndonline/k8s-gitops   2d    True    stored artifact for revision 'v0.0.3/ee3e71efb06628885fa19e9664b9198a8c6450e8'

Shortly after the kustomization resources referencing the release will reconcile and automatically push down the new rendered configuration to the production clusters.

$ kubectl get kustomizations.kustomize.toolkit.fluxcd.io -A
NAMESPACE            NAME                          AGE   READY   STATUS
flux-system          feature-access-control        13h   True    Applied revision: v0.0.3/ee3e71efb06628885fa19e9664b9198a8c6450e8
flux-system          mgmt                          2d    True    Applied revision: main/83133756708d2526cca565880d069445f9619b70
non-prod-eu-west-1   common                        31m   True    Applied revision: main/83133756708d2526cca565880d069445f9619b70
non-prod-eu-west-1   feature-access-control        31m   True    Applied revision: main/83133756708d2526cca565880d069445f9619b70
non-prod-eu-west-1   feature-helloworld-operator   31m   True    Applied revision: main/83133756708d2526cca565880d069445f9619b70
non-prod-eu-west-1   feature-ingress-nginx         31m   True    Applied revision: main/83133756708d2526cca565880d069445f9619b70
non-prod-eu-west-1   non-prod-eu-west-1            31m   True    Applied revision: main/83133756708d2526cca565880d069445f9619b70
non-prod-eu-west-1   tenants-common                31m   True    Applied revision: main/83133756708d2526cca565880d069445f9619b70
non-prod-eu-west-1   tenants-non-prod              31m   True    Applied revision: main/83133756708d2526cca565880d069445f9619b70
prod-eu-west-1       common                        26m   True    Applied revision: v0.0.3/ee3e71efb06628885fa19e9664b9198a8c6450e8
prod-eu-west-1       feature-access-control        26m   True    Applied revision: v0.0.3/ee3e71efb06628885fa19e9664b9198a8c6450e8
prod-eu-west-1       feature-helloworld-operator   26m   True    Applied revision: v0.0.3/ee3e71efb06628885fa19e9664b9198a8c6450e8
prod-eu-west-1       feature-ingress-nginx         26m   True    Applied revision: v0.0.3/ee3e71efb06628885fa19e9664b9198a8c6450e8
prod-eu-west-1       prod-eu-west-1                26m   True    Applied revision: v0.0.3/ee3e71efb06628885fa19e9664b9198a8c6450e8
prod-eu-west-1       tenants-common                26m   True    Applied revision: v0.0.3/ee3e71efb06628885fa19e9664b9198a8c6450e8
prod-eu-west-1       tenants-prod                  26m   True    Applied revision: v0.0.3/ee3e71efb06628885fa19e9664b9198a8c6450e8

Why using Kustomize for managing the configuration and not Helm? I know the difficulties of managing these raw YAML manifests. Kustomize gets you going quick where with Helm there is a higher initial effort writing your Charts. In my next article I will focus specifically on Helm.

I showed a very simplistic example having a single cloud provider (aws) and a single management cluster but as you have seen you can easily add Azure or Google cloud providers in your configuration and scale horizontally. I think this is what makes Kubernetes and controllers like Flux CD great together that you don’t need to have complex pipelines or workflows to rollout and promote your changes completely pipeline-less.


Install OpenShift/OKD 4.9.x Single Node Cluster (SNO) using OpenShift Hive/ACM

I haven’t written much since the summer 2021 and I thought I start the New Year with a little update regarding OpenShift/OKD 4.9 Single Node cluster (SNO) installation. The single node type is not new because I have been using these All-in-One or Single Node clusters since OpenShift 3.x and it worked great until OpenShift 4.7. When RedHat released OpenShift 4.8 the single node installation stopped working because of issue with the control-plane because it expected three nodes for high availability and this installation method was possible till then but not officially supported by RedHat.

When the OpenShift 4.9 release was announced the single node installation method called SNO became a supported way for deploying OpenShift Edge clusters on  bare-metal or virtual machine using the RedHat Cloud Assisted Installer.

This opened the possibility again to install OpenShift/OKD 4.9 as a single node (SNO) on any cloud provider like AWS, GCP or Azure through the openshift-install command line utility or through OpenShift Hive / Advanced Cluster Management operator.

The install-config.yaml for a single node cluster is pretty much the same like for a normal cluster only that you change the worker node replicas to zero and control-plane (master) nodes to one. Make sure your instance size has minimum 8x vCPUs and 32 GB of memory.

---
apiVersion: v1
baseDomain: k8s.domain.com
compute:
- name: worker
  platform:
    aws:
      rootVolume:
        iops: 100
        size: 22
        type: gp2
      type: m5.2xlarge
  replicas: 0
controlPlane:
  name: master
  platform:
    aws:
      rootVolume:
        iops: 100
        size: 22
        type: gp2
      type: m5.2xlarge
  replicas: 1
metadata:
  creationTimestamp: null
  name: okd-eu-west-1
networking:
  clusterNetwork:
  - cidr: 10.128.0.0/14
    hostPrefix: 23
  machineCIDR: 10.0.0.0/16
  networkType: OpenShiftSDN
  serviceNetwork:
  - 172.30.0.0/16
platform:
  aws:
    region: eu-west-1
pullSecret: ""
sshKey: ""

I am using OpenShift Hive for installing the OKD 4.9 single node cluster which requires Kubernetes to run the Hive operator.

Create a install-config secret:

$ kubectl create secret generic install-config -n okd --from-file=install-config.yaml=./okd-sno-install-config.yaml 

In the ClusterDeployment you specify AWS credentials, reference the install-config and the release image for OKD 4.9. Here you can find the latest OKD release image tags: https://quay.io/repository/openshift/okd

---
apiVersion: hive.openshift.io/v1
kind: ClusterDeployment
metadata:
  creationTimestamp: null
  name: okd-eu-west-1
  namespace: okd
spec:
  baseDomain: k8s.domain.com
  clusterName: okd-eu-west-1
  controlPlaneConfig:
    servingCertificates: {}
  installed: false
  platform:
    aws:
      credentialsSecretRef:
        name: aws-creds
      region: eu-west-1
  provisioning:
    releaseImage: quay.io/openshift/okd:4.9.0-0.okd-2022-01-14-230113
    installConfigSecretRef:
      name: install-config
  pullSecretRef:
    name: pull-secret

Apply the cluster deployment and wait for Hive to install the OpenShift/OKD cluster.

$ kubectl apply -f ./okd-clusterdeployment.yaml 

The provision pod will output the messages from the openshift-install binary and the cluster will be finish the installation in around 35mins.

$ kubectl logs okd-eu-west-1-0-8vhnf-provision-qrjrg -c hive -f
time="2022-01-15T15:51:32Z" level=debug msg="Couldn't find install logs provider environment variable. Skipping."
time="2022-01-15T15:51:32Z" level=debug msg="checking for SSH private key" installID=m2zcxsds
time="2022-01-15T15:51:32Z" level=info msg="unable to initialize host ssh key" error="cannot configure SSH agent as SSH_PRIV_KEY_PATH is unset or empty" installID=m2zcxsds
time="2022-01-15T15:51:32Z" level=info msg="waiting for files to be available: [/output/openshift-install /output/oc]" installID=m2zcxsds
time="2022-01-15T15:51:32Z" level=info msg="found file" installID=m2zcxsds path=/output/openshift-install
time="2022-01-15T15:51:32Z" level=info msg="found file" installID=m2zcxsds path=/output/oc
time="2022-01-15T15:51:32Z" level=info msg="all files found, ready to proceed" installID=m2zcxsds
time="2022-01-15T15:51:35Z" level=info msg="copied /output/openshift-install to /home/hive/openshift-install" installID=m2zcxsds
time="2022-01-15T15:51:36Z" level=info msg="copied /output/oc to /home/hive/oc" installID=m2zcxsds
time="2022-01-15T15:51:36Z" level=info msg="copying install-config.yaml" installID=m2zcxsds
time="2022-01-15T15:51:36Z" level=info msg="copied /installconfig/install-config.yaml to /output/install-config.yaml" installID=m2zcxsds
time="2022-01-15T15:51:36Z" level=info msg="waiting for files to be available: [/output/.openshift_install.log]" installID=m2zcxsds
time="2022-01-15T15:51:36Z" level=info msg="cleaning up from past install attempts" installID=m2zcxsds
time="2022-01-15T15:51:36Z" level=warning msg="skipping cleanup as no infra ID set" installID=m2zcxsds
time="2022-01-15T15:51:36Z" level=debug msg="object does not exist" installID=m2zcxsds object=okd/okd-eu-west-1-0-8vhnf-admin-kubeconfig
time="2022-01-15T15:51:36Z" level=debug msg="object does not exist" installID=m2zcxsds object=okd/okd-eu-west-1-0-8vhnf-admin-password
time="2022-01-15T15:51:36Z" level=info msg="generating assets" installID=m2zcxsds
time="2022-01-15T15:51:36Z" level=info msg="running openshift-install create manifests" installID=m2zcxsds
time="2022-01-15T15:51:36Z" level=info msg="running openshift-install binary" args="[create manifests]" installID=m2zcxsds
time="2022-01-15T15:51:37Z" level=info msg="found file" installID=m2zcxsds path=/output/.openshift_install.log
time="2022-01-15T15:51:37Z" level=info msg="all files found, ready to proceed" installID=m2zcxsds
time="2022-01-15T15:51:36Z" level=debug msg="OpenShift Installer unreleased-master-5011-geb132dae953888e736c382f1176c799c0e1aa49e-dirty"
time="2022-01-15T15:51:36Z" level=debug msg="Built from commit eb132dae953888e736c382f1176c799c0e1aa49e"
time="2022-01-15T15:51:36Z" level=debug msg="Fetching Master Machines..."
time="2022-01-15T15:51:36Z" level=debug msg="Loading Master Machines..."
time="2022-01-15T15:51:36Z" level=debug msg="  Loading Cluster ID..."
time="2022-01-15T15:51:36Z" level=debug msg="    Loading Install Config..."
time="2022-01-15T15:51:36Z" level=debug msg="      Loading SSH Key..."
time="2022-01-15T15:51:36Z" level=debug msg="      Loading Base Domain..."

....

time="2022-01-15T16:14:17Z" level=debug msg="Still waiting for the cluster to initialize: Working towards 4.9.0-0.okd-2022-01-14-230113"
time="2022-01-15T16:14:31Z" level=debug msg="Still waiting for the cluster to initialize: Working towards 4.9.0-0.okd-2022-01-14-230113: 529 of 744 done (71% complete)"
time="2022-01-15T16:14:32Z" level=debug msg="Still waiting for the cluster to initialize: Working towards 4.9.0-0.okd-2022-01-14-230113: 585 of 744 done (78% complete)"
time="2022-01-15T16:14:47Z" level=debug msg="Still waiting for the cluster to initialize: Working towards 4.9.0-0.okd-2022-01-14-230113: 702 of 744 done (94% complete)"
time="2022-01-15T16:15:02Z" level=debug msg="Still waiting for the cluster to initialize: Working towards 4.9.0-0.okd-2022-01-14-230113: 703 of 744 done (94% complete)"
time="2022-01-15T16:15:32Z" level=debug msg="Still waiting for the cluster to initialize: Working towards 4.9.0-0.okd-2022-01-14-230113: 708 of 744 done (95% complete)"
time="2022-01-15T16:15:47Z" level=debug msg="Still waiting for the cluster to initialize: Working towards 4.9.0-0.okd-2022-01-14-230113: 720 of 744 done (96% complete)"
time="2022-01-15T16:16:02Z" level=debug msg="Still waiting for the cluster to initialize: Working towards 4.9.0-0.okd-2022-01-14-230113: 722 of 744 done (97% complete)"
time="2022-01-15T16:17:17Z" level=debug msg="Still waiting for the cluster to initialize: Some cluster operators are still updating: authentication, console, monitoring"
time="2022-01-15T16:18:02Z" level=debug msg="Cluster is initialized"
time="2022-01-15T16:18:02Z" level=info msg="Waiting up to 10m0s for the openshift-console route to be created..."
time="2022-01-15T16:18:02Z" level=debug msg="Route found in openshift-console namespace: console"
time="2022-01-15T16:18:02Z" level=debug msg="OpenShift console route is admitted"
time="2022-01-15T16:18:02Z" level=info msg="Install complete!"
time="2022-01-15T16:18:02Z" level=info msg="To access the cluster as the system:admin user when using 'oc', run 'export KUBECONFIG=/output/auth/kubeconfig'"
time="2022-01-15T16:18:02Z" level=info msg="Access the OpenShift web-console here: https://console-openshift-console.apps.okd-eu-west-1.k8s.domain.com"
time="2022-01-15T16:18:02Z" level=debug msg="Time elapsed per stage:"
time="2022-01-15T16:18:02Z" level=debug msg="           cluster: 6m35s"
time="2022-01-15T16:18:02Z" level=debug msg="         bootstrap: 34s"
time="2022-01-15T16:18:02Z" level=debug msg="Bootstrap Complete: 12m46s"
time="2022-01-15T16:18:02Z" level=debug msg="               API: 4m2s"
time="2022-01-15T16:18:02Z" level=debug msg=" Bootstrap Destroy: 1m15s"
time="2022-01-15T16:18:02Z" level=debug msg=" Cluster Operators: 4m59s"
time="2022-01-15T16:18:02Z" level=info msg="Time elapsed: 26m13s"
time="2022-01-15T16:18:03Z" level=info msg="command completed successfully" installID=m2zcxsds
time="2022-01-15T16:18:03Z" level=info msg="saving installer output" installID=m2zcxsds
time="2022-01-15T16:18:03Z" level=info msg="install completed successfully" installID=m2zcxsds

Check the cluster deployment and get the kubeadmin password from the secret the Hive operator created during the installation and login to the web console:

$ kubectl get clusterdeployments
NAME            PLATFORM   REGION      CLUSTERTYPE   INSTALLED   INFRAID               VERSION   POWERSTATE   AGE
okd-eu-west-1   aws        eu-west-1                 true        okd-eu-west-1-l4g4n   4.9.0     Running      39m
$ kubectl get secrets okd-eu-west-1-0-8vhnf-admin-password -o jsonpath={.data.password} | base64 -d
EP5Fs-TZrKj-Vtst6-5GWZ9

The cluster details show that the control plane runs as single master node:

Your cluster has a single combined master/worker node:

These single node type clusters can be used in combination with OpenShift Hive ClusterPools to have an amount of pre-installed OpenShift/OKD clusters available for automated tests or as temporary development environment.

apiVersion: hive.openshift.io/v1
kind: ClusterPool
metadata:
  name: okd-eu-west-1-pool
  namespace: okd
spec:
  baseDomain: k8s.domain.com
  imageSetRef:
    name: 4.9.0-0.okd-2022-01-14
  installConfigSecretTemplateRef:
    name: install-config
  platform:
    aws:
      credentialsSecretRef:
        name: aws-creds
      region: eu-west-1
  pullSecretRef:
    name: pull-secret
  size: 3

The clusters are hibernating (shutdown) in the pool and will be powered on when you apply the ClusterClaim to allocate a cluster with a lifetime set to 8 hours. After 8 hours the cluster gets automatically deleted by the Hive operator.

apiVersion: hive.openshift.io/v1
kind: ClusterClaim
metadata:
  name: test-1
  namespace: okd
spec:
  clusterPoolName: okd-eu-west-1-pool
  lifetime: 8h

This sums up how to deploy a OpenShift/OKD 4.9 as single node cluster. I hope this article is helpful and leave a comment if you have questions.

Kubernetes in Docker (KinD) – Cluster Bootstrap Script for Continuous Integration

I have been using Kubernetes in Docker (KinD) for over a year and it’s ideal when you require an ephemeral Kubernetes cluster for local development or testing. My focus with the bootstrap script was to create a Kubernetes cluster where I can easily customise the configuration, choose the required CNI plugin, the Ingress controller or enable Service Mesh if needed, which is especially important in continuous integration pipelines. I will show you two simple examples below of how I use KinD for testing.

I created the ./kind.sh shell script which does what I need to create a cluster in a couple of minutes and apply the configuration.

    • Customise cluster configuration like Kubernetes version, the number of worker nodes, change the service- and pod IP address subnet and a couple of other cluster level configuration.
    • You can choose from different CNI plugins like KinD-CNI (default), Calico and Cilium, or optionally enable the Multus-CNI on top of the CNI plugin.
    • Install the popular known Nginx or Contour Kubernetes ingress controllers. Contour is interesting because it is an Envoy based Ingress controller and can be used for the Kubernetes Gateway API.
    • Enable Istio Service Mesh which is also available as a Gateway API option or install MetalLB, a Kubernetes service type load balancer plugin.
    • Install Operator Lifecycle Manager (OLM) to install Kubernetes community operators from OperatorHub.io.
$ ./kind.sh --help
usage: kind.sh [--name ]
               [--num-workers ]
               [--config-file ]
               [--kubernetes-version ]
               [--cluster-apiaddress ]
               [--cluster-apiport ]
               [--cluster-loglevel ]
               [--cluster-podsubnet ]
               [--cluster-svcsubnet ]
               [--disable-default-cni]
               [--install-calico-cni]
               [--install-cilium-cni]
               [--install-multus-cni]
               [--install-istio]
               [--install-metallb]
               [--install-nginx-ingress]
               [--install-contour-ingress]
               [--install-istio-gateway-api]
               [--install-contour-gateway-api]
               [--install-olm]
               [--help]

--name                          Name of the KIND cluster
                                DEFAULT: kind
--num-workers                   Number of worker nodes.
                                DEFAULT: 0 worker nodes.
--config-file                   Name of the KIND J2 configuration file.
                                DEFAULT: ./kind.yaml.j2
--kubernetes-version            Flag to specify the Kubernetes version.
                                DEFAULT: Kubernetes v1.21.1
--cluster-apiaddress            Kubernetes API IP address for kind (master).
                                DEFAULT: 0.0.0.0.
--cluster-apiport               Kubernetes API port for kind (master).
                                DEFAULT: 6443.
--cluster-loglevel              Log level for kind (master).
                                DEFAULT: 4.
--cluster-podsubnet             Pod subnet IP address range.
                                DEFAULT: 10.128.0.0/14.
--cluster-svcsubnet             Service subnet IP address range.
                                DEFAULT: 172.30.0.0/16.
--disable-default-cni           Flag to disable Kind default CNI - required to install custom cni plugin.
                                DEFAULT: Default CNI used.
--install-calico-cni            Flag to install Calico CNI Components.
                                DEFAULT: Don't install calico cni components.
--install-cilium-cni            Flag to install Cilium CNI Components.
                                DEFAULT: Don't install cilium cni components.
--install-multus-cni            Flag to install Multus CNI Components.
                                DEFAULT: Don't install multus cni components.
--install-istio                 Flag to install Istio Service Mesh Components.
                                DEFAULT: Don't install istio components.
--install-metallb               Flag to install Metal LB Components.
                                DEFAULT: Don't install loadbalancer components.
--install-nginx-ingress         Flag to install Ingress Components - can't be used in combination with istio.
                                DEFAULT: Don't install ingress components.
--install-contour-ingress       Flag to install Ingress Components - can't be used in combination with istio.
                                DEFAULT: Don't install ingress components.
--install-istio-gateway-api     Flag to install Istio Service Mesh Gateway API Components.
                                DEFAULT: Don't install istio components.
--install-contour-gateway-api   Flag to install Ingress Components - can't be used in combination with istio.
                                DEFAULT: Don't install ingress components.
--install-olm                   Flag to install Operator Lifecyle Manager
                                DEFAULT: Don't install olm components.
                                Visit https://operatorhub.io to install available operators
--delete                        Delete Kind cluster.

Based on the options you choose, the script renders the needed KinD config YAML file and creates the clusters locally in a couple of minutes. To install Istio Service Mesh on KinD you also need the Istio profile which you can find together with the bootstrap script in my GitHub Gists.

Let’s look into how I use KinD and the bootstrap script in Jenkins for continuous integration (CI). I have a pipeline which executes the bootstrap script to create the cluster on my Jenkins agent.

For now I kept the configuration very simple and only need the Nginx Ingress controller in this example:

stages {
    stage('Prepare workspace') {
        steps {
            git credentialsId: 'github-ssh', url: '[email protected]:ab7fb36162f39dbed08f7bd90072a3d2.git'
        }
    }

    stage('Create Kind cluster') {
        steps {
            sh '''#!/bin/bash
            bash ./kind.sh --kubernetes-version v1.21.1 \
                           --install-nginx-ingress
            '''
        }
    }
    stage('Clean-up workspace') {
        steps {
            sh 'rm -rf *'
        }
    }
}

Log output of the script parameters:

I have written a Go Helloworld application and the Jenkins pipeline which runs the Go unit-tests and builds the container image. It also triggers the build job for the create-kind-cluster pipeline to spin-up the Kubernetes cluster.

...
stage ('Create Kind cluster') {
    steps {
        build job: 'create-kind-cluster'
    }
}
...

It then continues to deploy the newly build Helloworld container image and executes a simple end-to-end ingress test.

I also use this same example for my Go Helloworld Kubernetes operator build pipeline. It builds the Go operator and again triggers the build job to create the KinD cluster. It then continues to deploy the Helloworld operator and applies the Custom Resources, and finishes with a simple end-to-end ingress test.

I hope this is an interesting and useful article. Visit my GitHub Gists to download the KinD bootstrap script.

Kubernetes Cluster API – Machine Health Check and AWS Spot instances

In my first article about the Kubernetes Cluster API and provisioning of AWS workload clusters I mentioned briefly configuring Machine Health Check for the data-place/worker nodes. The Cluster API also supports Machine Health Check for control-plane/master nodes and can automatically remediate any node issues by replacing and provision new instances. The configuration is the same, only the label selector is different for the node type.

Let’s take a look again at the Machine Health Check for data-plane/worker nodes, the selector label is set to nodepool: nodepool-0 to match the label which is configured in the MachineDeployment.

---
apiVersion: cluster.x-k8s.io/v1alpha3
kind: MachineHealthCheck
metadata:
  name: cluster-1-node-unhealthy-5m
  namespace: k8s
spec:
  clusterName: cluster-1
  maxUnhealthy: 40%
  nodeStartupTimeout: 10m
  selector:
    matchLabels:
      nodepool: nodepool-0
  unhealthyConditions:
  - type: Ready
    status: Unknown
    timeout: 300s
  - type: Ready
    status: "False"
    timeout: 300s

To configure Machine Health Check for your control-plane/master add the label cluster.x-k8s.io/control-plane: “” as selector.

---
apiVersion: cluster.x-k8s.io/v1alpha3
kind: MachineHealthCheck
metadata:
  name: cluster-1-master-unhealthy-5m
spec:
  clusterName: cluster-1
  maxUnhealthy: 30%
  selector:
    matchLabels:
      cluster.x-k8s.io/control-plane: ""
  unhealthyConditions:
    - type: Ready
      status: Unknown
      timeout: 300s
    - type: Ready
      status: "False"
      timeout: 300s

When both are applied you see the two node groups and the status of available nodes and expected/desired state.

$ kubectl get machinehealthcheck
NAME                                       MAXUNHEALTHY   EXPECTEDMACHINES   CURRENTHEALTHY
cluster-1-node-unhealthy-5m                40%            3                  3
cluster-1-master-unhealthy-5m              30%            3                  3

If you terminate one control- and data-plane node, the Machine Health Check identifies these after a couple of minutes and starts the remediation by provisioning new instances to replace the faulty ones. This takes around 5 to 10 min and your cluster is back into the desired state. The management cluster automatically repaired the workload cluster without manual intervention.

$ kubectl get machinehealthcheck
NAME                            MAXUNHEALTHY   EXPECTEDMACHINES   CURRENTHEALTHY
cluster-1-node-unhealthy-5m     40%            3                  2
cluster-1-master-unhealthy-5m   30%            3                  2

More information about Machine Health Check you can find in the Cluster API documentation.

However, a few ago, I didn’t test running the data-plane/worker nodes on AWS EC2 spot instances which is also supported option in the AWSMachineTemplate. Spot instances for control-plane nodes are not supported and don’t make sense because you need the master nodes available at all time.

Using spot instances can reduce the cost of running your workload cluster and you can see a cost saving of up to 60% – 70% compared to the on-demand price. Although AWS can reclaim these instance by terminating your spot instance at any point in time, they are reliable enough in combination with the Cluster API Machine Health Check that you could run production on spot instances with huge cost savings.

To use spot instances simply add the spotMarketOptions to the AWS Machine Template of the data-plane nodes and the Cluster API will automatically issue spot instance requests for these. If you don’t specify the maxPrice and leave this value blank, this will automatically put the on-demand price as max value for the requested instance type. It makes sense to leave this empty because you cannot be outbid if the marketplace of spot instance suddenly changes because of increasing compute demand.

---
apiVersion: infrastructure.cluster.x-k8s.io/v1alpha3
kind: AWSMachineTemplate
metadata:
  name: cluster-1-data-plane-0
  namespace: k8s
spec:
  template:
    spec:
      iamInstanceProfile: nodes.cluster-api-provider-aws.sigs.k8s.io
      instanceType: t3.small
      sshKeyName: default
      spotMarketOptions:
        maxPrice: ""

In the AWS console you see the spot instance requests.

This is great in combination with the Machine Health Check that I explained earlier: if AWS suddenly does reclaim one or multiple of your spot instances, the Machine Health Check will automatically starts to remediate for these missing nodes by requesting new spot instance.

OpenShift Hive v1.1.x – Latest updates & new features

Over a year has gone by since my first article about Getting started with OpenShift Hive and my talk at the RedHat OpenShift Gathering when the first stable OpenShift Hive v1 version got released. In between a lot has happened and OpenShift Hive v1.1.1 was released a few weeks ago. So I wanted to look into the new functionalities of OpenShift Hive.

  • Operator Lifecycle Manager (OLM) installation

Hive is now available through the Operator Hub community catalog and can be installed on both OpenShift or native Kubernetes cluster through the OLM. The install is straightforward by adding the operator-group and subscription manifests:

---
apiVersion: operators.coreos.com/v1alpha2
kind: OperatorGroup
metadata:
  name: operatorgroup
  namespace: hive
---
apiVersion: operators.coreos.com/v1alpha1
kind: Subscription
metadata:
  name: hive
  namespace: hive
spec:
  channel: alpha
  name: hive-operator
  source: operatorhubio-catalog
  sourceNamespace: olm

Alternatively the Hive subscription can be configured with a manual install plan. In this case the OLM will not automatically upgrade the Hive operator when a new version is released – I highly recommend this for production deployments!

---
apiVersion: operators.coreos.com/v1alpha1
kind: Subscription
metadata:
  name: hive
  namespace: hive
spec:
  channel: alpha
  name: hive-operator
  installPlanApproval: Manual
  source: operatorhubio-catalog
  sourceNamespace: olm

After a few seconds you see an install plan being added.

$ k get installplan
NAME            CSV                    APPROVAL   APPROVED
install-9drmh   hive-operator.v1.1.0   Manual     false

Edit the install plan and set approved value to true – the OLM will start and install or upgrade the Hive operator automatically.

...
spec:
  approval: Manual
  approved: true
  clusterServiceVersionNames:
  - hive-operator.v1.1.0
  generation: 1
...

After the Hive operator is installed you need to apply the Hiveconfig object for the operator to install all of the needed Hive components. On non-OpenShift installs (native Kubernetes) you still need to generate Hiveadmission certificates for the admission controller pods to start otherwise they are missing the hiveadmission-serving-cert secret.

  • Hiveconfig – Velero backup and delete protection

There are a few small but also very useful changes in the Hiveconfig object. You can now enable the deleteProtection option which prevents administrators from accidental deletions of ClusterDeployments or SyncSets. Another great addition is that you can enable automatic configuration of Velero to backup your cluster namespaces, meaning you’re not required to configure backups separately.

---
apiVersion: hive.openshift.io/v1
kind: HiveConfig
metadata:
  name: hive
spec:
  logLevel: info
  targetNamespace: hive
  deleteProtection: enabled
  backup:
    velero:
      enabled: true
      namespace: velero

Backups are configured in the Velero namespace as specified in the Hiveconfig.

$ k get backups -n velero
NAME                              AGE
backup-okd-2021-03-26t11-57-32z   3h12m
backup-okd-2021-03-26t12-00-32z   3h9m
backup-okd-2021-03-26t12-35-44z   154m
backup-okd-2021-03-26t12-38-44z   151m
...

With the deletion protection enabled in the hiveconfig, the controller automatically adds the annotation hive.openshift.io/protected-delete: “true” to all resources and prevents these from accidental deletions:

$ k delete cd okd --wait=0
The ClusterDeployment "okd" is invalid: metadata.annotations.hive.openshift.io/protected-delete: Invalid value: "true": cannot delete while annotation is present
  • ClusterSync and Scaling Hive controller

To check applied resources through SyncSets and SelectorSyncSets, where Hive has previously used Syncsetnstance but these no longer exists. This now has move to ClusterSync to collect status information about applied resources:

$ k get clustersync okd -o yaml
apiVersion: hiveinternal.openshift.io/v1alpha1
kind: ClusterSync
metadata:
  name: okd
  namespace: okd
spec: {}
status:
  conditions:
  - lastProbeTime: "2021-03-26T16:13:57Z"
    lastTransitionTime: "2021-03-26T16:13:57Z"
    message: All SyncSets and SelectorSyncSets have been applied to the cluster
    reason: Success
    status: "False"
    type: Failed
  firstSuccessTime: "2021-03-26T16:13:57Z"
...

It is also possible to horizontally scale the Hive controller to change the synchronisation frequency for running larger OpenShift deployments.

---
apiVersion: hive.openshift.io/v1
kind: HiveConfig
metadata:
  name: hive
spec:
  logLevel: info
  targetNamespace: hive
  deleteProtection: enabled
  backup:
    velero:
      enabled: true
      namespace: velero
  controllersConfig:
    controllers:
    - config:
        concurrentReconciles: 10
        replicas: 3
      name: clustersync

Please checkout the scaling test script which I found in the Github repo, you can simulate fake clusters by adding the annotation “hive.openshift.io/fake-cluster=true” to your ClusterDeployment.

  • Hibernating clusters

RedHat introduced that you can hibernate (shutdown) clusters in OpenShift 4.5 when they are not needed and switch them easily back on when you need them. This is now possible with OpenShift Hive: you can hibernate and change the power state of a cluster deployment.

$ kubectl patch cd okd --type='merge' -p $'spec:\n powerState: Hibernating'

Checking the cluster deployment and power state change to stopping.

$ kubectl get cd
NAME   PLATFORM   REGION      CLUSTERTYPE   INSTALLED   INFRAID     VERSION   POWERSTATE   AGE
okd    aws        eu-west-1                 true        okd-jpqgb   4.7.0     Stopping     44m

After a couple of minutes the power state of the cluster nodes will change to hibernating.

$ kubectl get cd
NAME   PLATFORM   REGION      CLUSTERTYPE   INSTALLED   INFRAID     VERSION   POWERSTATE    AGE
okd    aws        eu-west-1                 true        okd-jpqgb   4.7.0     Hibernating   47m

In the AWS console you see the cluster instances as stopped.

When turning the cluster back online, change the power state in the cluster deployment to running.

$ kubectl patch cd okd --type='merge' -p $'spec:\n powerState: Running'

Again the power state changes to resuming.

$ kubectl get cd
NAME   PLATFORM   REGION      CLUSTERTYPE   INSTALLED   INFRAID     VERSION   POWERSTATE   AGE
okd    aws        eu-west-1                 true        okd-jpqgb   4.7.0     Resuming     49m

A few minutes later the cluster changes to running and is ready to use again.

$ k get cd
NAME   PLATFORM   REGION      CLUSTERTYPE   INSTALLED   INFRAID     VERSION   POWERSTATE   AGE
okd    aws        eu-west-1                 true        okd-jpqgb   4.7.0     Running      61m
  • Cluster pools

Cluster pools is something which came together with the hibernating feature which allows you to pre-provision OpenShift clusters without actually allocating them and after the provisioning they will hibernate until you claim a cluster. Again a nice feature and ideal use-case for ephemeral type development or integration test environments which allows you to have clusters ready to go to claim when needed and dispose them afterwards.

Create a ClusterPool custom resource which is similar to a cluster deployment.

apiVersion: hive.openshift.io/v1
kind: ClusterPool
metadata:
  name: okd-eu-west-1
  namespace: hive
spec:
  baseDomain: okd.domain.com
  imageSetRef:
    name: okd-4.7-imageset
  installConfigSecretTemplateRef: 
    name: install-config
  skipMachinePools: true
  platform:
    aws:
      credentialsSecretRef:
        name: aws-creds
      region: eu-west-1
  pullSecretRef:
    name: pull-secret
  size: 3

To claim a cluster from a pool, apply the ClusterClaim resource.

apiVersion: hive.openshift.io/v1
kind: ClusterClaim
metadata:
  name: okd-claim
  namespace: hive
spec:
  clusterPoolName: okd-eu-west-1
  lifetime: 8h

I haven’t tested this yet but will definitely start using this in the coming weeks. Have a look at the Hive documentation on using ClusterPool and ClusterClaim.

  • Cluster relocation

For me, having used OpenShift Hive for over one and half years to run OpenShift 4 cluster, this is a very useful functionality because at some point you might need to rebuild or move your management services to a new Hive cluster. The ClusterRelocator object gives you the option to do this.

$ kubectl create secret generic new-hive-cluster-kubeconfig -n hive --from-file=kubeconfig=./new-hive-cluster.kubeconfig

Create the ClusterRelocator object and specify the kubeconfig of the remote Hive cluster, and also add a clusterDeploymentSelector:

apiVersion: hive.openshift.io/v1
kind: ClusterRelocate
metadata:
  name: migrate
spec:
  kubeconfigSecretRef:
    namespace: hive
    name: new-hive-cluster-kubeconfig
  clusterDeploymentSelector:
    matchLabels:
      migrate: cluster

To move cluster deployments, add the label migrate=cluster to your OpenShift clusters you want to move.

$ kubectl label clusterdeployment okd migrate=cluster

The cluster deployment will move to the new Hive cluster and will be removed from the source Hive cluster without the de-provision. It’s important to keep in mind that you need to copy any other resources you need, such as secrets, syncsets, selectorsyncsets and syncidentiyproviders, before moving the clusters. Take a look at the Hive documentation for the exact steps.

  • Useful annotation

Pause SyncSets by adding the annotation “hive.openshift.io/syncset-pause=true” to the clusterdeployment which stops the reconcile of defined resources and great for troubleshooting.

In a cluster deployment you can set the option to preserve cluster on delete which allows the user to disconnect a cluster from Hive without de-provisioning it.

$ kubectl patch cd okd --type='merge' -p $'spec:\n preserveOnDelete: true'

This sums up the new features and functionalities you can use with the latest OpenShift Hive version.