Continuous Integration and Delivery for Networking with Cisco devices

This post is about continuous integration and continuous delivery (CICD) for Cisco devices and how to use network simulation to test automation before deploying this to production environments. That was one of the main reasons for me to use Vagrant for simulating the network because the virtual environment can be created on-demand and thrown away after the scripts run successful. Please read before my post about Cisco network simulation using Vagrant: Cisco IOSv and XE network simulation using Vagrant and Cisco ASAv network simulation using Vagrant.

Same like in my first post about Continuous Integration and Delivery for Networking with Cumulus Linux, I am using Gitlab.com and their Gitlab-runner for the continuous integration and delivery (CICD) pipeline.

  • You need to register your Gitlab-runner with the Gitlab repository:

  • The next step is to create your .gitlab-ci.yml which defines your CI-pipeline.
---
stages:
    - validate ansible
    - staging iosv
    - staging iosxe
validate:
    stage: validate ansible
    script:
        - bash ./linter.sh
staging_iosv:
    before_script:
        - git clone https://github.com/berndonline/cisco-lab-vagrant.git
        - cd cisco-lab-vagrant/
        - cp Vagrantfile-IOSv Vagrantfile
    stage: staging iosv
    script:
        - bash ../staging.sh
staging_iosxe:
    before_script:
        - git clone https://github.com/berndonline/cisco-lab-vagrant.git
        - cd cisco-lab-vagrant/
        - cp Vagrantfile-IOSXE Vagrantfile
    stage: staging iosxe
    script:
        - bash ../staging.sh

I clone the cisco vagrant lab which I use to spin-up a virtual staging environment and run the Ansible playbook against the virtual lab. The stages IOSv and IOSXE are just examples in my case depending what Cisco IOS versions you want to test.

The production stage would be similar to staging only that you run the Ansible playbook against your physical environment.

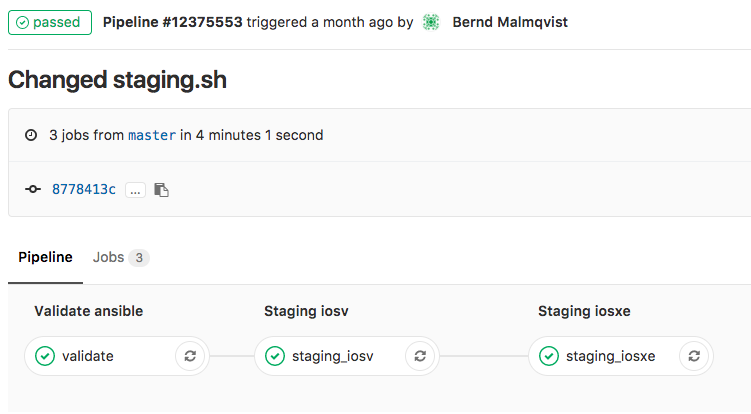
  • Basically any commit or merge in the Gitlab repo triggers the pipeline which is defined in the gitlab-ci.

  • The first stage is only to validate that the YAML files have the correct syntax.

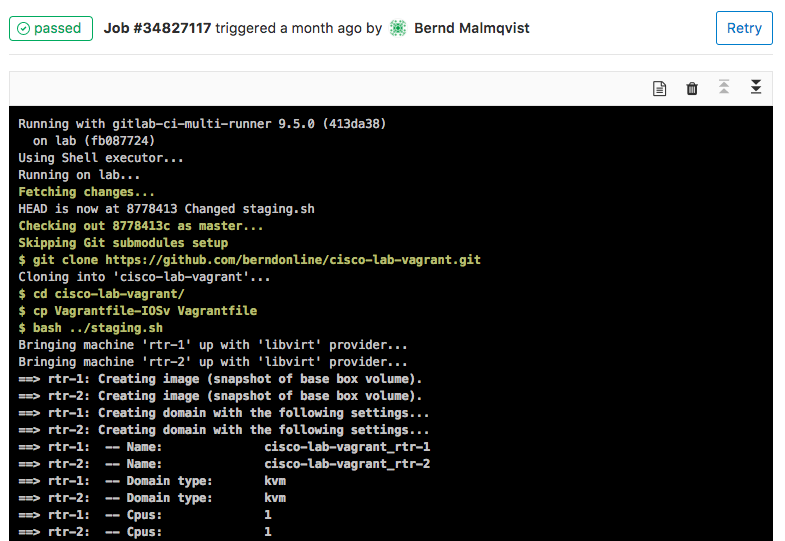
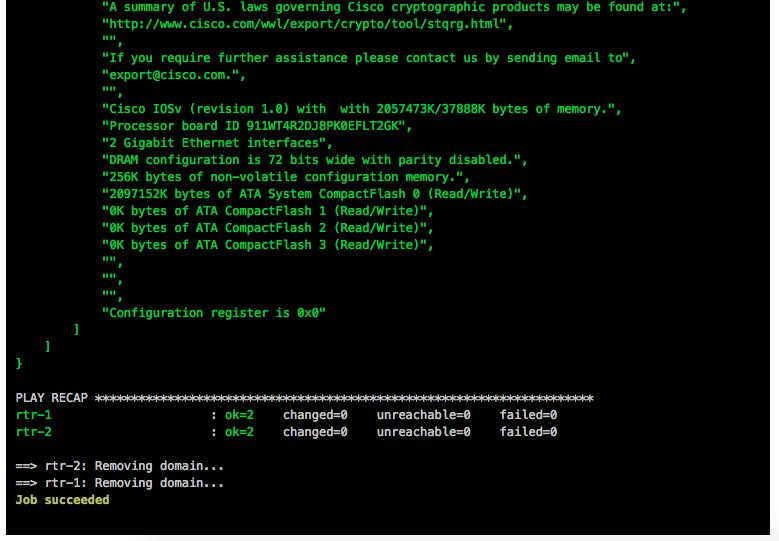
  • Here the details of a job and when everything goes well the job succeeded.

This is an easy way to test your Ansible playbooks against a virtual Cisco environment before deploying this to a production system.

Here again my two repositories I use:

https://github.com/berndonline/cisco-lab-vagrant

https://github.com/berndonline/cisco-lab-provision

Read my new posts about Ansible Playbook for Cisco ASAv Firewall Topology or Ansible Playbook for Cisco BGP Routing Topology.

Cisco IOSv and XE network simulation using Vagrant

Here some interesting things I did with on-demand network simulation of Cisco IOSv and IOS XE using Vagrant. Yes, Cisco has is own product for network simulation called Cisco VIRL (Cisco Virtual Internet Routing Lab) but this is not as flexible and on-demand like using Vagrant and KVM. One of the reason was to do some continuous integration testing, same what I did with Cumulus Linux: Continuous Integration and Delivery for Networking with Cumulus Linux

You need to have an active Cisco VIRL subscription to download the VMDK images or buy the Cisco CSR1000V to get access to the ISO on the Cisco website!

IOS XE was the easiest because I found a Github repository to convert an existing CSR1000V ISO to vbox image to use with Vagrant. The only thing I needed to do was to converting the vbox image to KVM using vagrant mutate.

berndonline@lab:~/cisco-lab-vagrant$ vagrant status
Current machine states:

rtr-1                     not created (libvirt)
rtr-2                     not created (libvirt)

berndonline@lab:~/cisco-lab-vagrant$ vagrant up
Bringing machine 'rtr-1' up with 'libvirt' provider...
Bringing machine 'rtr-2' up with 'libvirt' provider...
==> rtr-1: Creating image (snapshot of base box volume).
==> rtr-2: Creating image (snapshot of base box volume).
==> rtr-1: Creating domain with the following settings...
==> rtr-1:  -- Name:              cisco-lab-vagrant_rtr-1
==> rtr-2: Creating domain with the following settings...
==> rtr-1:  -- Domain type:       kvm
==> rtr-2:  -- Name:              cisco-lab-vagrant_rtr-2
==> rtr-1:  -- Cpus:              1
==> rtr-2:  -- Domain type:       kvm
==> rtr-1:  -- Feature:           acpi
==> rtr-2:  -- Cpus:              1
==> rtr-2:  -- Feature:           acpi
==> rtr-2:  -- Feature:           apic
==> rtr-1:  -- Feature:           apic
==> rtr-2:  -- Feature:           pae
==> rtr-1:  -- Feature:           pae
==> rtr-2:  -- Memory:            2048M
==> rtr-2:  -- Management MAC:
==> rtr-2:  -- Loader:
==> rtr-1:  -- Memory:            2048M
==> rtr-2:  -- Base box:          iosxe

....

==> rtr-1: Waiting for SSH to become available...
==> rtr-2: Waiting for SSH to become available...
==> rtr-1: Configuring and enabling network interfaces...
==> rtr-2: Configuring and enabling network interfaces...
    rtr-1: SSH address: 10.255.1.84:22
    rtr-1: SSH username: vagrant
    rtr-1: SSH auth method: private key
    rtr-2: SSH address: 10.255.1.208:22
    rtr-2: SSH username: vagrant
    rtr-2: SSH auth method: private key
==> rtr-1: Running provisioner: ansible...
    rtr-1: Running ansible-playbook...

PLAY [all] *********************************************************************

TASK [run show version on remote devices] **************************************
==> rtr-2: Running provisioner: ansible...
    rtr-2: Running ansible-playbook...

PLAY [all] *********************************************************************

TASK [run show version on remote devices] **************************************
ok: [rtr-1]

PLAY RECAP *********************************************************************
rtr-1                      : ok=1    changed=0    unreachable=0    failed=0

ok: [rtr-2]

PLAY RECAP *********************************************************************
rtr-2                      : ok=1    changed=0    unreachable=0    failed=0
berndonline@lab:~/cisco-lab-vagrant$ vagrant status
Current machine states:

rtr-1                     running (libvirt)
rtr-2                     running (libvirt)

berndonline@lab:~/cisco-lab-vagrant$

Afterwards you can connect with vagrant ssh to your virtual IOS XE VM:

berndonline@lab:~/cisco-lab-vagrant$ vagrant ssh rtr-1

csr1kv#show version
Cisco IOS XE Software, Version 03.16.00.S - Extended Support Release
Cisco IOS Software, CSR1000V Software (X86_64_LINUX_IOSD-UNIVERSALK9-M), Version 15.5(3)S, RELEASE SOFTWARE (fc6)
Technical Support: http://www.cisco.com/techsupport
Copyright (c) 1986-2015 by Cisco Systems, Inc.
Compiled Sun 26-Jul-15 20:16 by mcpre

Cisco IOS-XE software, Copyright (c) 2005-2015 by cisco Systems, Inc.
All rights reserved.  Certain components of Cisco IOS-XE software are
licensed under the GNU General Public License ("GPL") Version 2.0.  The
software code licensed under GPL Version 2.0 is free software that comes
with ABSOLUTELY NO WARRANTY.  You can redistribute and/or modify such
GPL code under the terms of GPL Version 2.0.  For more details, see the
documentation or "License Notice" file accompanying the IOS-XE software,
or the applicable URL provided on the flyer accompanying the IOS-XE
software.

ROM: IOS-XE ROMMON

csr1kv uptime is 9 minutes
Uptime for this control processor is 10 minutes
System returned to ROM by reload
System image file is "bootflash:packages.conf"
Last reload reason: 

....

berndonline@lab:~/cisco-lab-vagrant$ vagrant destroy
==> rtr-2: Removing domain...
==> rtr-1: Removing domain...
berndonline@lab:~/cisco-lab-vagrant$

Running IOSv on KVM wasn’t that easy because you only get VMDK (Virtual Machine Disk) which you need to convert to a QCOW2 image. The next step is to boot the QCOW2 image and add some additional configuration changes before you can use this with Vagrant. Give the VM at least 2048 MB and min. 1 vCPU.

Ones the VM is booted, connect and add the following configuration below. You need to create an vagrant user and add the ssh key from Vagrant, additionally create an EEM applet to generate the rsa key during boot otherwise Vagrant cannot connect to the VM. Afterwards save the running-config and turn off the VM:

conf t
ip vrf vrf-mgmt
	rd 1:1
	exit

interface Gig0/0
 description management
 ip vrf forwarding vrf-mgmt
 ip address dhcp
 no shutdown
 exit

ip domain-name lab.local

aaa new-model
aaa authentication login default local
aaa authorization exec default local 

username vagrant privilege 15 secret vagrant

crypto key generate rsa general-keys modulus 2048 

ip ssh version 2
ip ssh authentication-retries 5

ip ssh pubkey-chain
   username vagrant
    key-hash ssh-rsa DD3BB82E850406E9ABFFA80AC0046ED6
    exit
   exit

line vty 0 4
 exec-timeout 0 0
 transport input ssh
 exit

shell processing full

event manager session cli username vagrant
event manager applet EEM_SSH_Keygen authorization bypass

event syslog pattern SYS-5-RESTART
action 0.0 info type routername
action 0.1 set status none
action 1.0 cli command enable
action 2.0 cli command "show ip ssh | include ^SSH"
action 2.1 regexp "([ED][^ ]+)" \$_cli_result result status
action 2.2 syslog priority informational msg "SSH is currently \$status"
action 3.0 if \$status eq Disabled
action 3.1 cli command "configure terminal"
action 3.2 cli command "crypto key generate rsa usage-keys label SSHKEYS modulus 2048"
action 3.3 cli command "end"
action 3.4 cli command "copy run start"
action 3.5 syslog priority informational msg "SSH keys generated by EEM"
action 4.0 end
end

exit
write mem

Now the QCOW2 image is ready to use with Vagrant. Create an instance folder under the user vagrant directory and copy the QCOW2 image. As well create an metadata.json file:

mkdir -p ~/.vagrant.d/boxes/iosv/0/libvirt/
cp IOSv.qcow2 ~/.vagrant.d/boxes/iosv/0/libvirt/box.img
printf '{"provider":"libvirt","format":"qcow2","virtual_size":2}' > metadata.json

The IOSv image is ready to use with Vagrant, just create an Vagrantfile with the needed configuration and boot up the VMs.

berndonline@lab:~/cisco-lab-vagrant$ vagrant status
Current machine states:

rtr-1                     not created (libvirt)
rtr-2                     not created (libvirt)

berndonline@lab:~/cisco-lab-vagrant$ vagrant up
Bringing machine 'rtr-1' up with 'libvirt' provider...
Bringing machine 'rtr-2' up with 'libvirt' provider...
==> rtr-2: Creating image (snapshot of base box volume).
==> rtr-1: Creating image (snapshot of base box volume).
==> rtr-2: Creating domain with the following settings...
==> rtr-1: Creating domain with the following settings...
==> rtr-2:  -- Name:              cisco-lab-vagrant_rtr-2
==> rtr-2:  -- Domain type:       kvm
==> rtr-1:  -- Name:              cisco-lab-vagrant_rtr-1
==> rtr-2:  -- Cpus:              1
==> rtr-1:  -- Domain type:       kvm
==> rtr-2:  -- Feature:           acpi
==> rtr-1:  -- Cpus:              1
==> rtr-2:  -- Feature:           apic
==> rtr-1:  -- Feature:           acpi
==> rtr-2:  -- Feature:           pae
==> rtr-1:  -- Feature:           apic
==> rtr-2:  -- Memory:            2048M
==> rtr-1:  -- Feature:           pae
==> rtr-2:  -- Management MAC:
==> rtr-1:  -- Memory:            2048M
==> rtr-2:  -- Loader:
==> rtr-1:  -- Management MAC:
==> rtr-2:  -- Base box:          iosv
==> rtr-1:  -- Loader:
==> rtr-1:  -- Base box:          iosv

....

==> rtr-2: Waiting for SSH to become available...
==> rtr-1: Waiting for SSH to become available...
==> rtr-2: Configuring and enabling network interfaces...
==> rtr-1: Configuring and enabling network interfaces...
    rtr-2: SSH address: 10.255.1.234:22
    rtr-2: SSH username: vagrant
    rtr-2: SSH auth method: private key
    rtr-1: SSH address: 10.255.1.237:22
    rtr-1: SSH username: vagrant
    rtr-1: SSH auth method: private key
==> rtr-2: Running provisioner: ansible...
    rtr-2: Running ansible-playbook...

PLAY [all] *********************************************************************

TASK [run show version on remote devices] **************************************
Thursday 26 October 2017  18:21:22 +0200 (0:00:00.015)       0:00:00.015 ******
==> rtr-1: Running provisioner: ansible...
    rtr-1: Running ansible-playbook...

PLAY [all] *********************************************************************

TASK [run show version on remote devices] **************************************
Thursday 26 October 2017  18:21:23 +0200 (0:00:00.014)       0:00:00.014 ******
ok: [rtr-2]

PLAY RECAP *********************************************************************
rtr-2                      : ok=1    changed=0    unreachable=0    failed=0

Thursday 26 October 2017  18:21:24 +0200 (0:00:01.373)       0:00:01.388 ******
===============================================================================
run show version on remote devices -------------------------------------- 1.37s
ok: [rtr-1]

PLAY RECAP *********************************************************************
rtr-1                      : ok=1    changed=0    unreachable=0    failed=0

Thursday 26 October 2017  18:21:24 +0200 (0:00:01.380)       0:00:01.395 ******
===============================================================================
run show version on remote devices -------------------------------------- 1.38s
berndonline@lab:~/cisco-lab-vagrant$

After the VMs are successfully booted you can connect again with vagrant ssh:

berndonline@lab:~/cisco-lab-vagrant$ vagrant ssh rtr-1
**************************************************************************
* IOSv is strictly limited to use for evaluation, demonstration and IOS  *
* education. IOSv is provided as-is and is not supported by Cisco's      *
* Technical Advisory Center. Any use or disclosure, in whole or in part, *
* of the IOSv Software or Documentation to any third party for any       *
* purposes is expressly prohibited except as otherwise authorized by     *
* Cisco in writing.                                                      *
**************************************************************************
router#show version
Cisco IOS Software, IOSv Software (VIOS-ADVENTERPRISEK9-M), Version 15.6(2)T, RELEASE SOFTWARE (fc2)
Technical Support: http://www.cisco.com/techsupport
Copyright (c) 1986-2016 by Cisco Systems, Inc.
Compiled Tue 22-Mar-16 16:19 by prod_rel_team

ROM: Bootstrap program is IOSv

router uptime is 1 minute
System returned to ROM by reload
System image file is "flash0:/vios-adventerprisek9-m"
Last reload reason: Unknown reason

....

berndonline@lab:~/cisco-lab-vagrant$ vagrant destroy
==> rtr-2: Removing domain...
==> rtr-1: Removing domain...
berndonline@lab:~/cisco-lab-vagrant$

Basically thats it, your on-demand IOSv and IOS XE lab using Vagrant, ready for some automation and continuous integration testing.

The example Vagrantfiles you can find in my Github repository:

https://github.com/berndonline/cisco-lab-vagrant/blob/master/Vagrantfile-IOSXE

https://github.com/berndonline/cisco-lab-vagrant/blob/master/Vagrantfile-IOSv

Cisco ASA and IOS-XE embedded packet capturing

This is a short post about a step-by-step procedure to configure packet capturing on Cisco ASA or IOS XE using the CLI.

Cisco ASA embedded packet capturing:

access-list acl_capin extended permit ip host 217.100.100.254 host 10.0.255.254
access-list acl_capin extended permit ip host 10.0.255.254 host 217.100.100.254
capture capin interface inside access-list acl_capin

or

capture capin interface inside match ip host 10.0.255.254 host 217.100.100.254
[possible in asa 8.x and later]

Show captured packets:

asa-1(config)#  show capture capin

10 packets captured

   1: 15:11:12.760092       10.0.255.254 > 217.100.100.254: icmp: echo request
   2: 15:11:12.761755       217.100.100.254 > 10.0.255.254: icmp: echo reply
   3: 15:11:12.764196       10.0.255.254 > 217.100.100.254: icmp: echo request
   4: 15:11:12.765615       217.100.100.254 > 10.0.255.254: icmp: echo reply
   5: 15:11:12.768072       10.0.255.254 > 217.100.100.254: icmp: echo request
   6: 15:11:12.769354       217.100.100.254 > 10.0.255.254: icmp: echo reply
   7: 15:11:12.771612       10.0.255.254 > 217.100.100.254: icmp: echo request
   8: 15:11:12.773077       217.100.100.254 > 10.0.255.254: icmp: echo reply
   9: 15:11:12.775548       10.0.255.254 > 217.100.100.254: icmp: echo request
  10: 15:11:12.777150       217.100.100.254 > 10.0.255.254: icmp: echo reply
10 packets shown

asa-1(config)#

asa-1(config)#  show capture capinside detail

20 packets captured

   1: 15:11:12.760092 a000.0000.0001 a000.0000.0021 0x0800 Length: 114
      10.0.255.254 > 217.100.100.254: icmp: echo request (ttl 255, id 5)
   2: 15:11:12.761755 a000.0000.0021 a000.0000.0001 0x0800 Length: 114
      217.100.100.254 > 10.0.255.254: icmp: echo reply (ttl 255, id 5)
   3: 15:11:12.764196 a000.0000.0001 a000.0000.0021 0x0800 Length: 114
      10.0.255.254 > 217.100.100.254: icmp: echo request (ttl 255, id 6)
   4: 15:11:12.765615 a000.0000.0021 a000.0000.0001 0x0800 Length: 114
      217.100.100.254 > 10.0.255.254: icmp: echo reply (ttl 255, id 6)
   5: 15:11:12.768072 a000.0000.0001 a000.0000.0021 0x0800 Length: 114
      10.0.255.254 > 217.100.100.254: icmp: echo request (ttl 255, id 7)
   6: 15:11:12.769354 a000.0000.0021 a000.0000.0001 0x0800 Length: 114
      217.100.100.254 > 10.0.255.254: icmp: echo reply (ttl 255, id 7)
   7: 15:11:12.771612 a000.0000.0001 a000.0000.0021 0x0800 Length: 114
      10.0.255.254 > 217.100.100.254: icmp: echo request (ttl 255, id 8)
   8: 15:11:12.773077 a000.0000.0021 a000.0000.0001 0x0800 Length: 114
      217.100.100.254 > 10.0.255.254: icmp: echo reply (ttl 255, id 8)
   9: 15:11:12.775548 a000.0000.0001 a000.0000.0021 0x0800 Length: 114
      10.0.255.254 > 217.100.100.254: icmp: echo request (ttl 255, id 9)
  10: 15:11:12.777150 a000.0000.0021 a000.0000.0001 0x0800 Length: 114
      217.100.100.254 > 10.0.255.254: icmp: echo reply (ttl 255, id 9)
20 packets shown

asa-1(config)#
Browser capture:
https://10.255.1.203/admin/capture/capin

Download pcap:
https://10.255.1.203/capture/capin/pcap

Disable capture and remove access-list:

no capture capin
no capture capout
clear configure access-list acl_capin
clear configure access-list acl_capout

Cisco ASR embedded packet capturing:

ip access-list extended acl_cap
 permit ip any any
 permit icmp any any
 exit
 
monitor capture mycap access-list acl_cap 
monitor capture mycap limit duration 1000
monitor capture mycap interface GigabitEthernet3 both
monitor capture mycap buffer circular size 10
monitor capture mycap start
monitor capture mycap export tftp://10.255.1.87/mycap.pcap

Show captured packets:

rtr-2#show monitor capture mycap buffer dump
0
  0000:  A0000000 0004A000 00000001 08004500   ..............E.
  0010:  00640041 0000FF01 A9530A00 FF010A00   .d.A.....S......
  0020:  FF020800 0B62000D 00000000 0000001E   .....b..........
  0030:  72BDABCD ABCDABCD ABCDABCD ABCDABCD   r...............
  0040:  ABCDABCD ABCDABCD ABCDABCD ABCDABCD   ................
  0050:  ABCDABCD ABCDABCD ABCDABCD ABCDABCD   ................
  0060:  ABCDABCD ABCDABCD ABCDABCD ABCDABCD   ................
  0070:  ABCD                                  ..

1
  0000:  A0000000 0001A000 00000004 08004500   ..............E.
  0010:  00640041 0000FF01 A9530A00 FF020A00   .d.A.....S......
  0020:  FF010000 1362000D 00000000 0000001E   .....b..........
  0030:  72BDABCD ABCDABCD ABCDABCD ABCDABCD   r...............
  0040:  ABCDABCD ABCDABCD ABCDABCD ABCDABCD   ................
  0050:  ABCDABCD ABCDABCD ABCDABCD ABCDABCD   ................
  0060:  ABCDABCD ABCDABCD ABCDABCD ABCDABCD   ................
  0070:  ABCD                                  ..
...

rtr-2#show monitor capture mycap buffer
 buffer size (KB) : 10240
 buffer used (KB) : 128
 packets in buf   : 14
 packets dropped  : 0
 packets per sec  : 1
...

Disable capture and remove access-list:

monitor capture mycap stop
no monitor capture mycap
no ip access-list extended acl_cap

Cisco IOS automation with Ansible

Bin a long time since I wrote my last post, I am pretty busy with work redesigning the data centres for my employer. Implementing as well an SDN Software-defined Network from VMware NSX but more about this later.

Ansible released some weeks ago new core modules which allows you to push directly configuration to Cisco IOS devices. More information you find here: https://docs.ansible.com/ansible/list_of_network_modules.html

I created a small automation lab in GNS3 to test the deployment of configs via Ansible to the two Cisco routers you see below. I am running VMware Fusion and used the vmnet2 (192.168.100.0/24) network for management because I run there my CentOS VM from where I deploy the configuration.

Don’t forget you need to pre-configure your Cisco router that you can connect via SSH to deploy the configuration.

Here the folder and file script structure of my Ansible example, under roles you have the different tasks I would like to execute common and logging but as well dependencies writecfg which saves the running-config to startup-config:

site.yml
hosts
group_vars/all.yml
roles/common/meta/main.yml
roles/common/task/main.yml
roles/common/templates/common.j2
roles/logging/meta/main.yml
roles/logging/tasks/main.yml
roles/logging/templates/common.j2
roles/writecfg/handlers/main.yml

The site.yml is the main script which I execute with Ansible which includes different roles for common and logging configuration:

- name: Cisco baseline configuration
  connection: local
  hosts: ios 
  gather_facts: false

  roles:
    - role: common
      tags: common
    - role: logging
      tags: logging

In the hosts file, I define the hostname and IP addresses of my IOS devices

[ios]
rtr01 device_ip=192.168.100.130
rtr02 device_ip=192.168.100.132

The file group_vars/all.yml defines variables which I used when the script is executed:

---
username: "ansible"
password: "cisco"
secret: "cisco"
logserver: 192.168.100.131

Under the roles/../meta/main.yml I set a dependency on the writecfg handler to save the configuration later when I change anything on the device.

Under the roles/../tasks/main.yml I define the module which I want to execute and the template I would like to deploy

Under the roles/../templates/.. you find the Jinja2 template files which include the commands.

Under roles/writecfg/handler/main.yml is the dependencies I have with the two roles common and logging to save the configuration if something is changed on the router.

To execute the cisco-baseline Ansible script just execute the following command and see the result:

[user@desktop cisco-baseline]$ ansible-playbook site.yml -i hosts

PLAY [Ensure basic configuration of switches] **********************************

TASK [common : ensure common configuration exists] *****************************
ok: [rtr02]
ok: [rtr01]

TASK [logging : ensure logging configuration exists] ***************************
changed: [rtr02]
changed: [rtr01]

RUNNING HANDLER [writecfg : write config] **************************************
ok: [rtr01]
ok: [rtr02]

PLAY RECAP *********************************************************************
rtr01                      : ok=3    changed=1    unreachable=0    failed=0
rtr02                      : ok=3    changed=1    unreachable=0    failed=0

[user@desktop cisco-baseline]$

Read my new posts about Ansible Playbook for Cisco ASAv Firewall Topology or Ansible Playbook for Cisco BGP Routing Topology.

Redirect Cisco show commands

Short overview of how to redirect Cisco show commands… quite useful sometimes 😉

show <command> | redirect URL

The syntax to redirect the command output to the file location specified in the URL. The pipe (|) is required. Prefixes can be local file locations, like flash: or disk0:. Alternatively, you can specify network locations using the following:

ftp://username:password@location/directory/filename
tftp://location/directory/filename

Rcp: prefix is not supported.

Example: Redirect show tech-support

show tech-support | redirect tftp://10.1.1.100/show-tech_c2960s-01.txt