Kubernetes GitOps at Scale with Cluster API and Flux CD

What does GitOps mean and how you run this at scale with Kubernetes? GitOps is basically a framework that takes traditional DevOps practices which where used for application development and apply them to platform automation.

This is nothing new and some maybe have done similar type of automation in the past but this wasn’t called GitOps back then. Kubernetes is great because of it’s declarative configuration management which makes it very easy to configure. This can become a challenge when you suddenly have to run 5, 10, 20 or 40 of these clusters across various cloud providers and multiple environments. We need a cluster management system feeding configuration from a code repository to run all our Kubernetes “cattle” workload clusters.

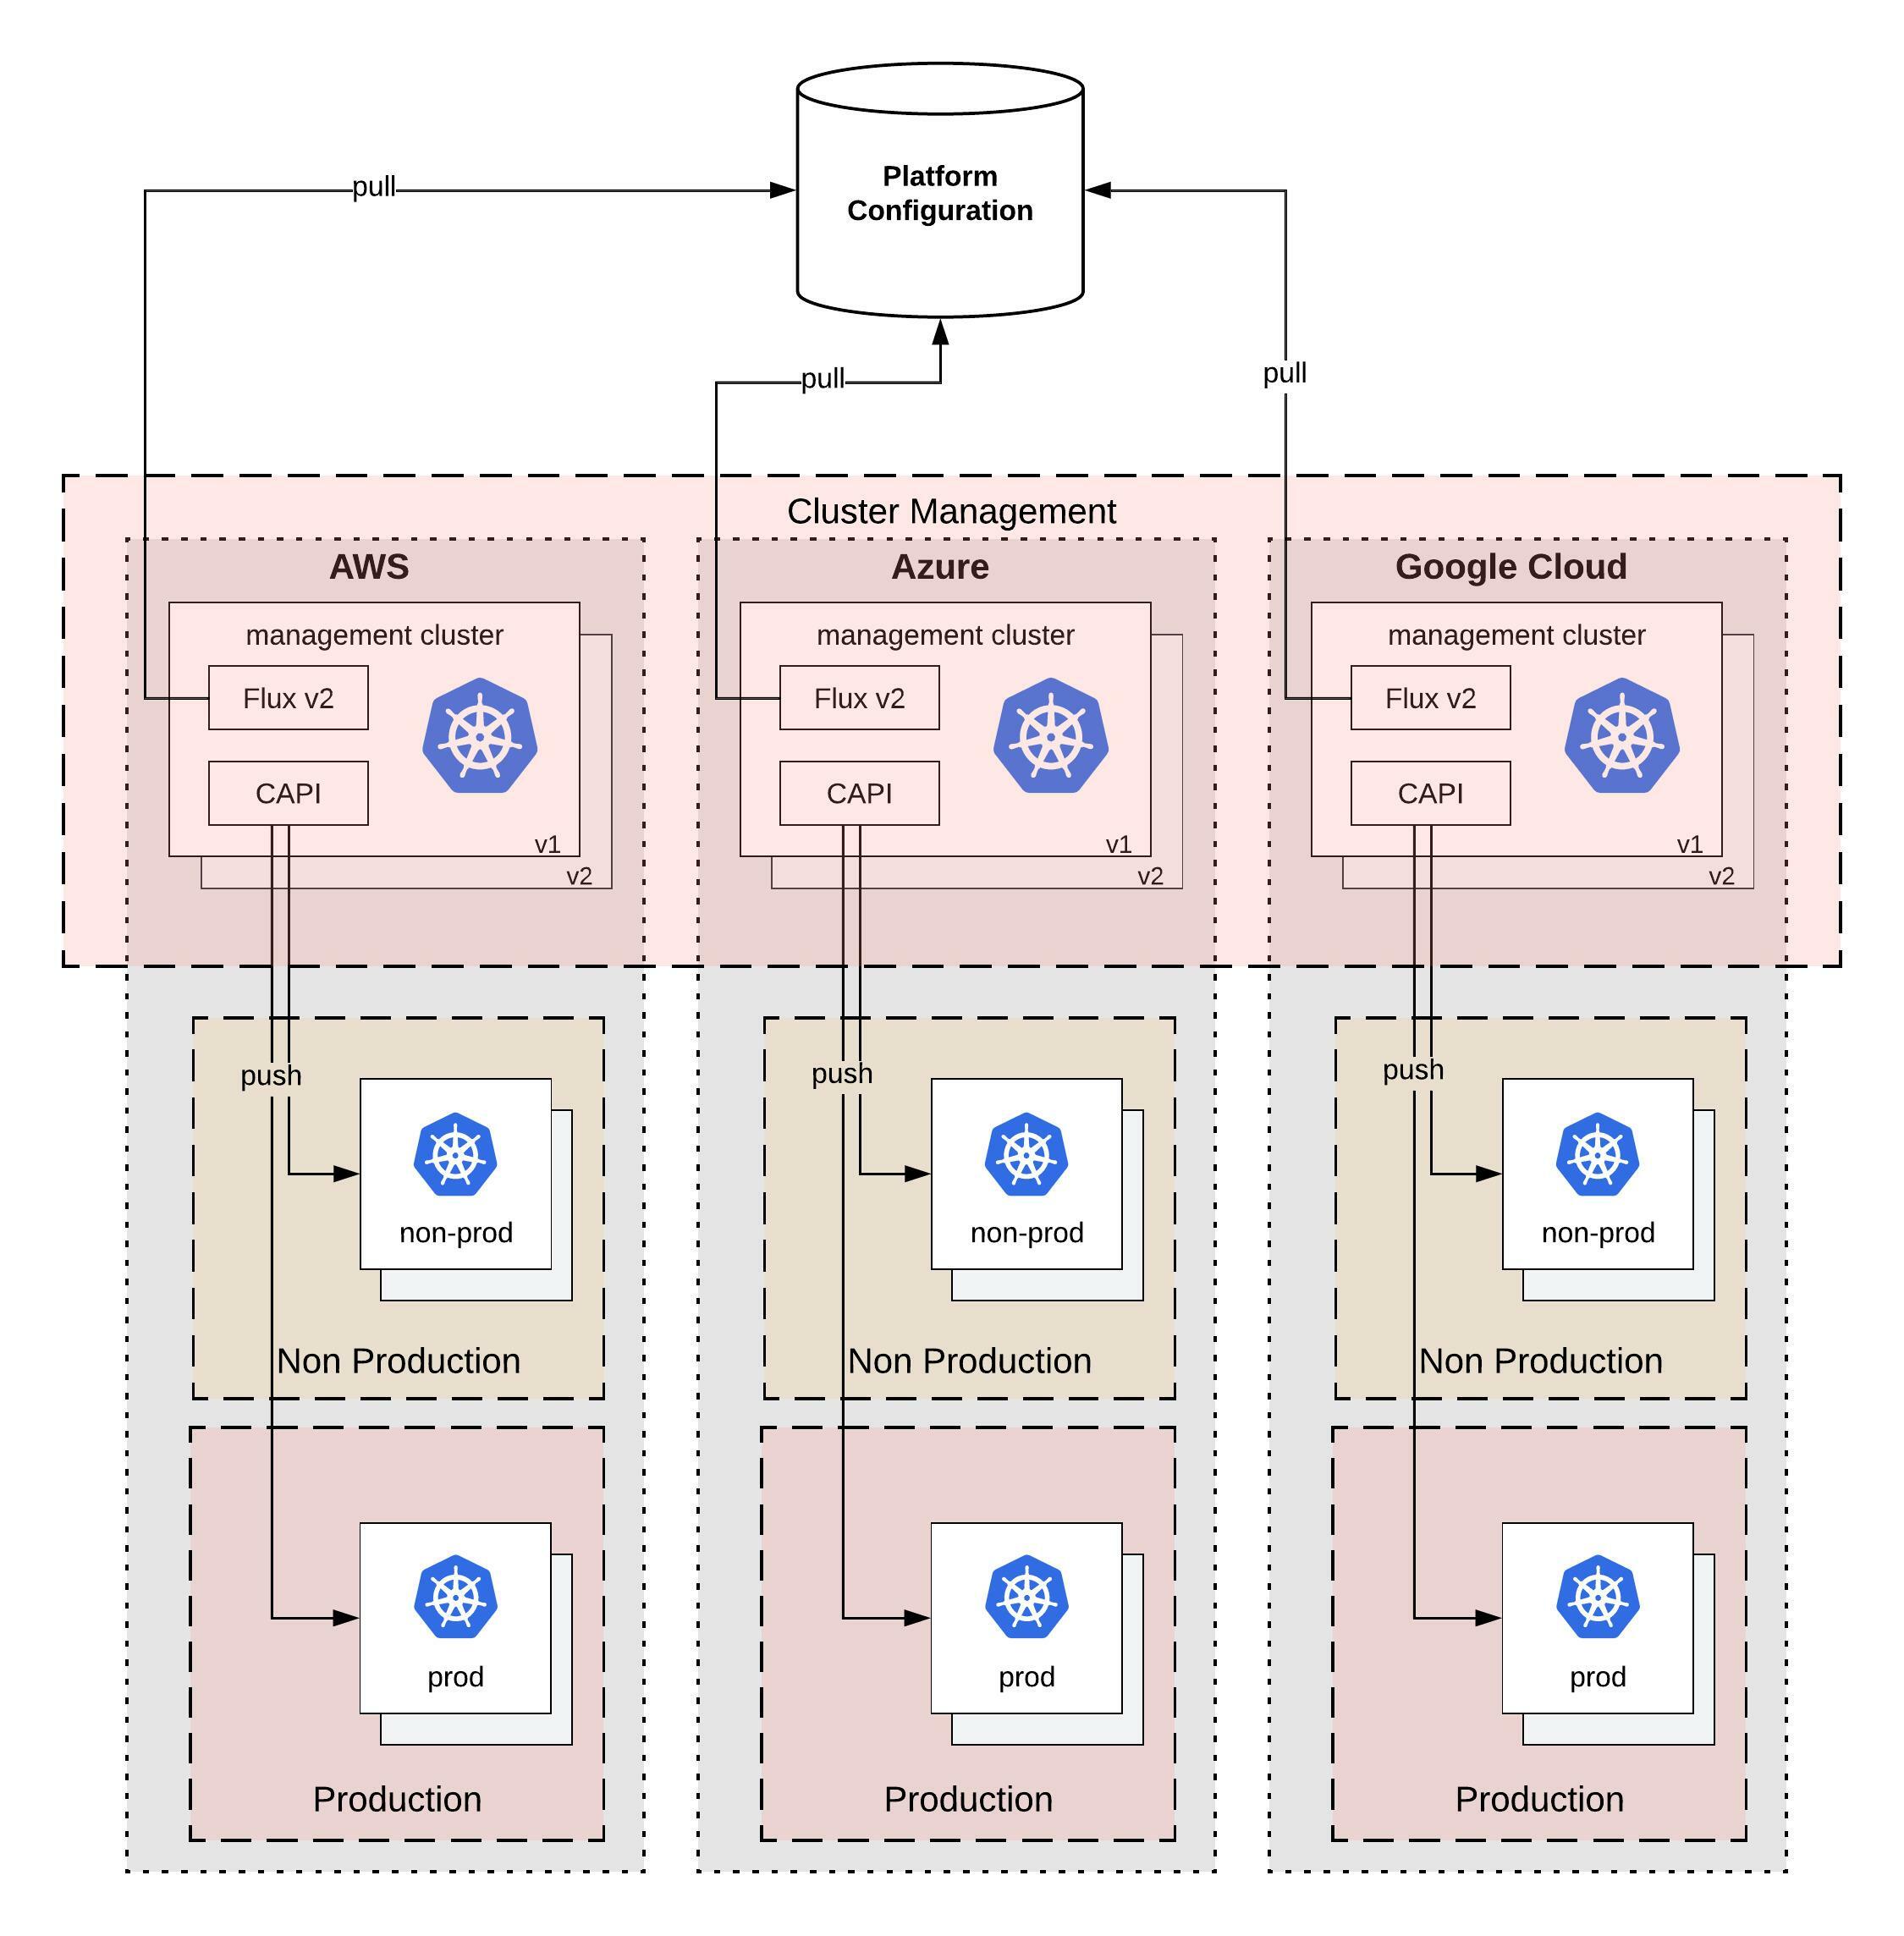
What I am trying to achieve with this design; that you can easily horizontally scale not only your workload clusters but also your cluster management system which is versioned across multiple cloud providers like you see in the diagram above.

There is of course a technical problem to all of this, finding the right tools to solve the problem and which work well together. In my example I will use the Cluster API for provisioning and managing the lifecycle of these Kubernetes workload clusters. Then we need Flux CD for the configuration management both the cluster management which runs the Cluster API components but also the configuration for the workload clusters. The Cluster API you can also replace with OpenShift Hive to run instead OKD or RedHat OpenShift clusters.

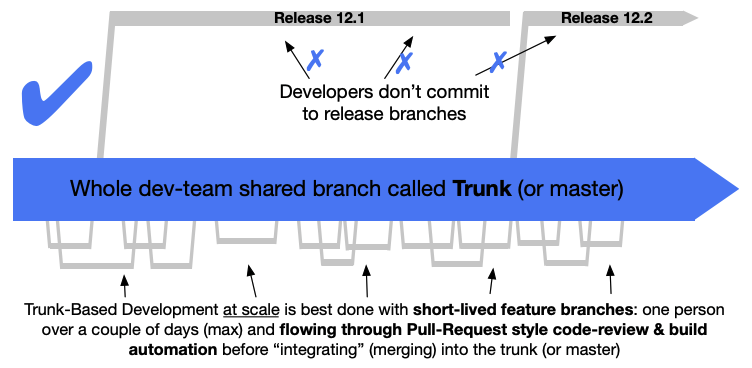
Another problem we need to think about is version control and the branching model for the platform configuration. The structure of the configuration is important but also how you implement changes or the versioning of your configuration through releases. I highly recommend reading about Trunk Based Development which is a modern branching model and specifically solves the versioning problem for us.

Git repository and folder structure

We need a git repository for storing the platform configuration both for the management- and workload-clusters, and the tenant namespace configuration (this also can be stored in a separate repositories). Let’s go through the folder structure of the repository and I will explain this in more detail. Checkout my example repository for more detail: github.com/berndonline/k8s-gitops-at-scale.
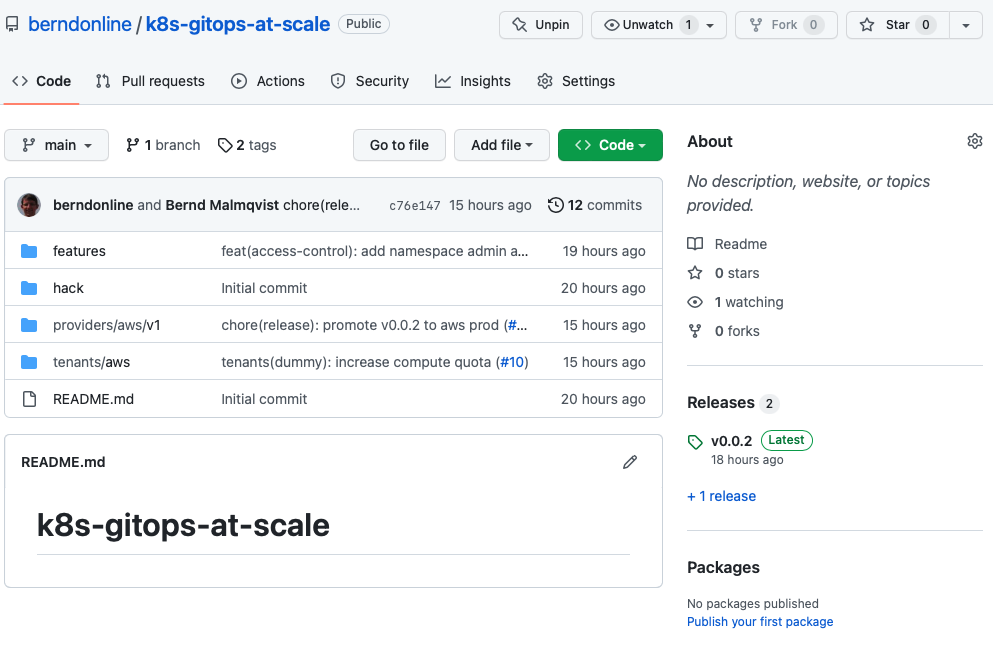
  • The features folder on the top-level will store configuration for specific features we want to enable and apply to our clusters (both management and worker). Under each <feature name> you find two subfolders for namespace(d)- and cluster-wide (non-namespaced) configuration. Features are part of platform configuration which will be promoted between environments. You will see namespaced and non-namespaced subfolders throughout the folder structure which is basically to group your configuration files.
    ├── features
    │   ├── access-control
    │   │   └── non-namespaced
    │   ├── helloworld-operator
    │   │   ├── namespaced
    │   │   └── non-namespaced
    │   └── ingress-nginx
    │       ├── namespaced
    │       └── non-namespaced
    
  • The providers folder will store the configuration based on cloud provider <name> and the <version> of your cluster management. The version below the cloud provider folder is needed to be able to spin up new management clusters in the future. You can be creative with the folder structure and have management cluster per environment and/or instead of the version if required. The mgmt folder will store the configuration for the management cluster which includes manifests for Flux CD controllers, the Cluster API to spin-up workload clusters which are separated by cluster name and anything else you want to configure on your management cluster. The clusters folder will store configuration for all workload clusters separated based on <environment> and common (applies across multiple clusters in the same environment) and by <cluster name> (applies to a dedicated cluster).
    ├── providers
    │   └── aws
    │       └── v1
    │           ├── clusters
    │           │   ├── non-prod
    │           │   │   ├── common
    │           │   │   │   ├── namespaced
    │           │   │   │   │   └── non-prod-common
    │           │   │   │   └── non-namespaced
    │           │   │   │       └── non-prod-common
    │           │   │   └── non-prod-eu-west-1
    │           │   │       ├── namespaced
    │           │   │       │   └── non-prod-eu-west-1
    │           │   │       └── non-namespaced
    │           │   │           └── non-prod-eu-west-1
    │           │   └── prod
    │           │       ├── common
    │           │       │   ├── namespaced
    │           │       │   │   └── prod-common
    │           │       │   └── non-namespaced
    │           │       │       └── prod-common
    │           │       └── prod-eu-west-1
    │           │           ├── namespaced
    │           │           │   └── prod-eu-west-1
    │           │           └── non-namespaced
    │           │               └── prod-eu-west-1
    │           └── mgmt
    │               ├── namespaced
    │               │   ├── flux-system
    │               │   ├── non-prod-eu-west-1
    │               │   └── prod-eu-west-1
    │               └── non-namespaced
    │                   ├── non-prod-eu-west-1
    │                   └── prod-eu-west-1
    
  • The tenants folder will store the namespace configuration of the onboarded teams and is applied to our workload clusters. Similar to the providers folder tenants has subfolders based on the cloud provider <name> and below subfolders for common (applies across environments) and <environments> (applied to a dedicated environment) configuration. There you find the tenant namespace <name> and all the needed manifests to create and configure the namespace/s.
    └── tenants
        └── aws
            ├── common
            │   └── dummy
            ├── non-prod
            │   └── dummy
            └── prod
                └── dummy
    

Why do we need a common folder for tenants? The common folder will contain namespace configuration which will be promoted between the environments from non-prod to prod using a release but more about release and promotion you find more down below.

Configuration changes

Applying changes to your platform configuration has to follow the Trunk Based Development model of doing small incremental changes through feature branches.

Let’s look into an example change the our dummy tenant onboarding pull-request. You see that I checked-out a branch called “tenant-dummy” to apply my changes, then push and publish the branch in the repository to raised the pull-request.
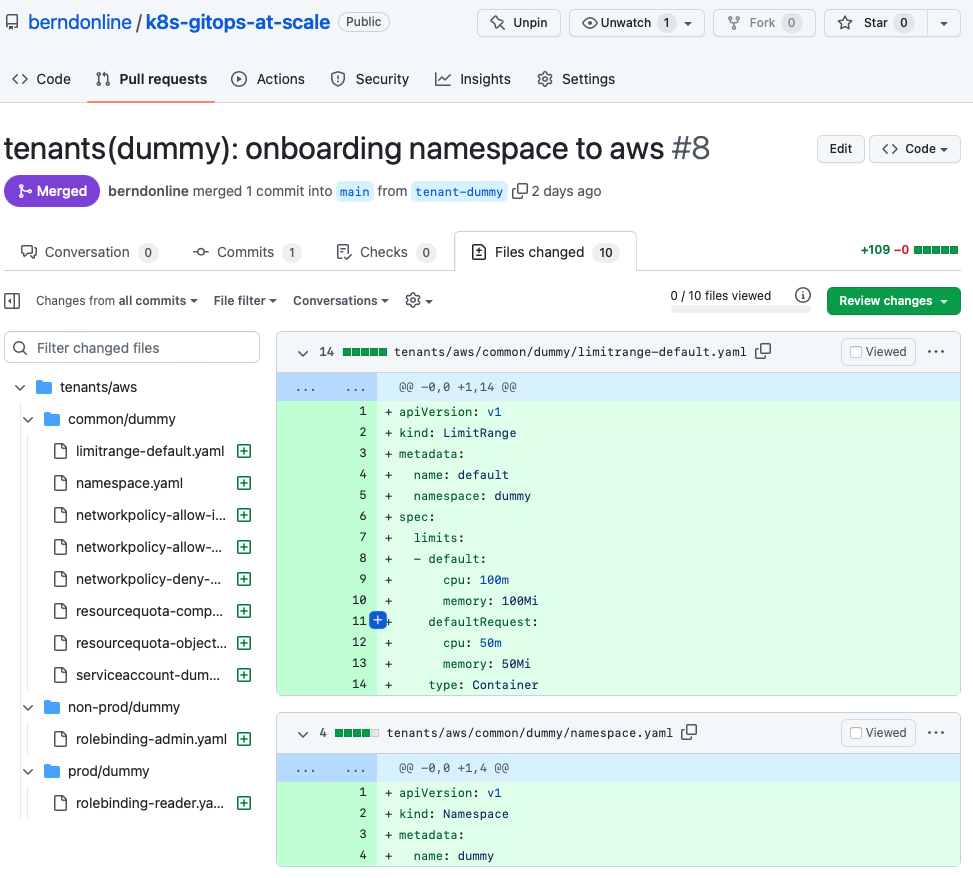
Important is that your commit messages and pull-request name are following a strict naming convention.
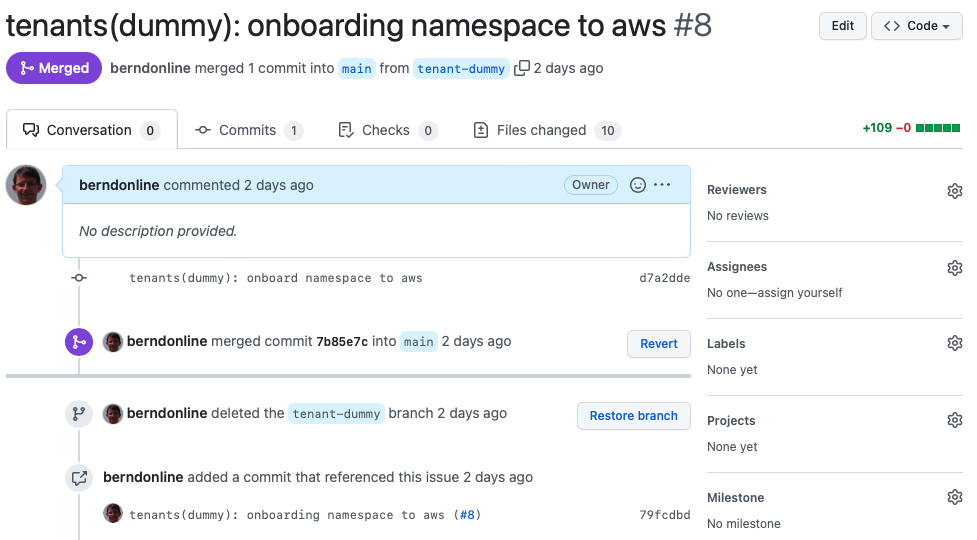
I would also strongly recommend to squash your commit messages into the name of your pull-request. This will keep your git history clean.
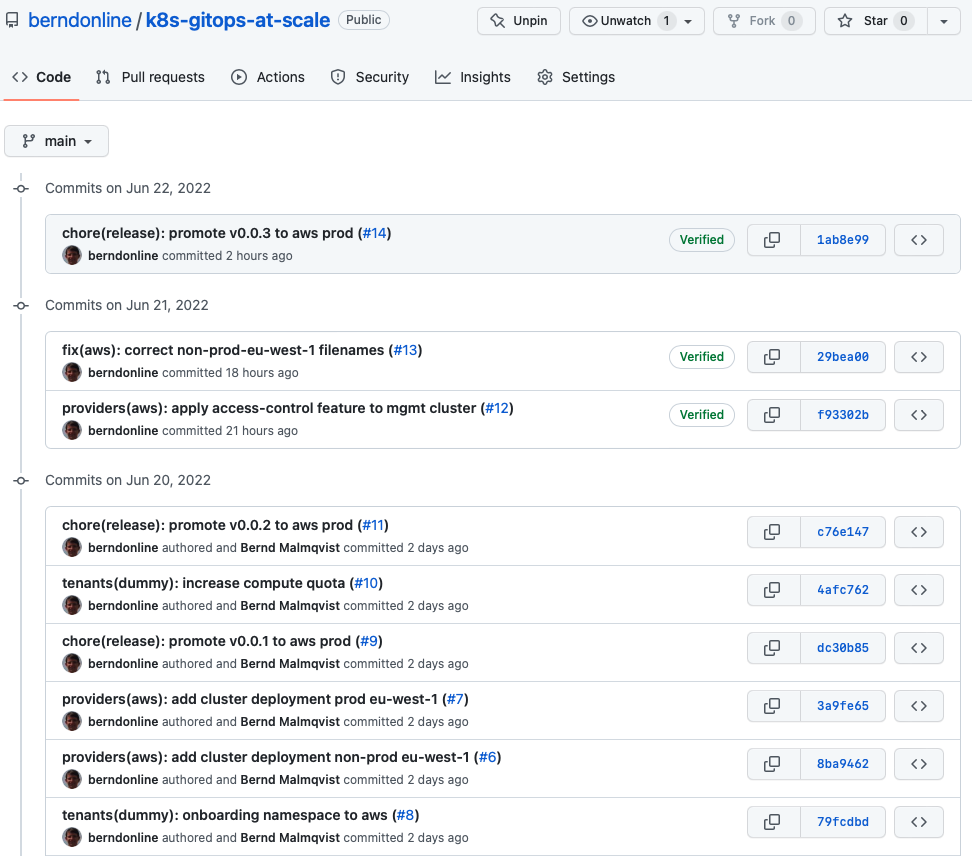
This naming convention makes it easier later for auto-generating your release notes when you publish your release. Having the clean well formatted git history combined with your release notes nicely cross references your changes for to a particular release tag.
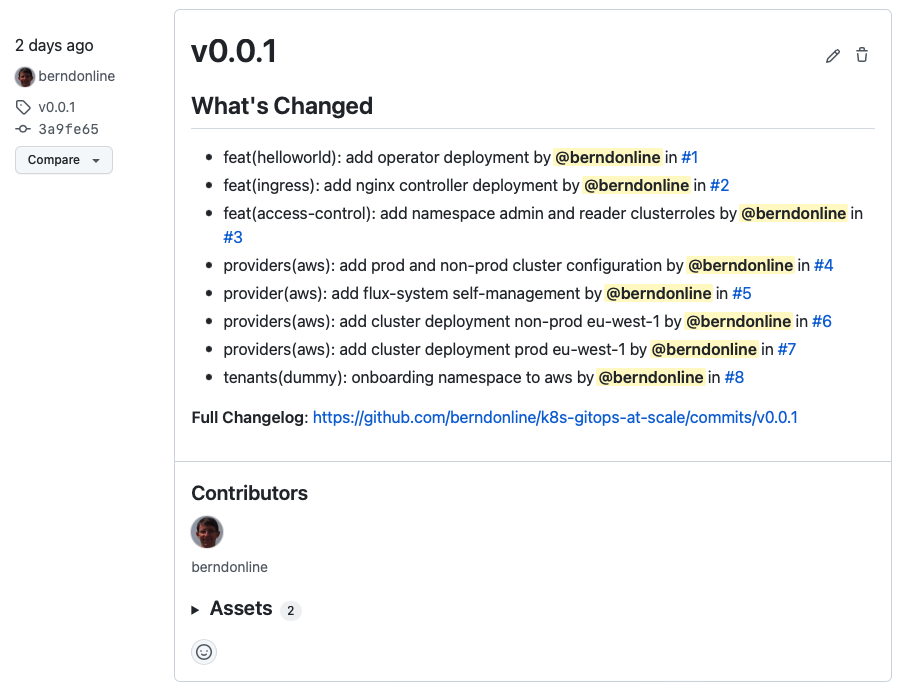
More about creating a release a bit later in this article.

GitOps configuration

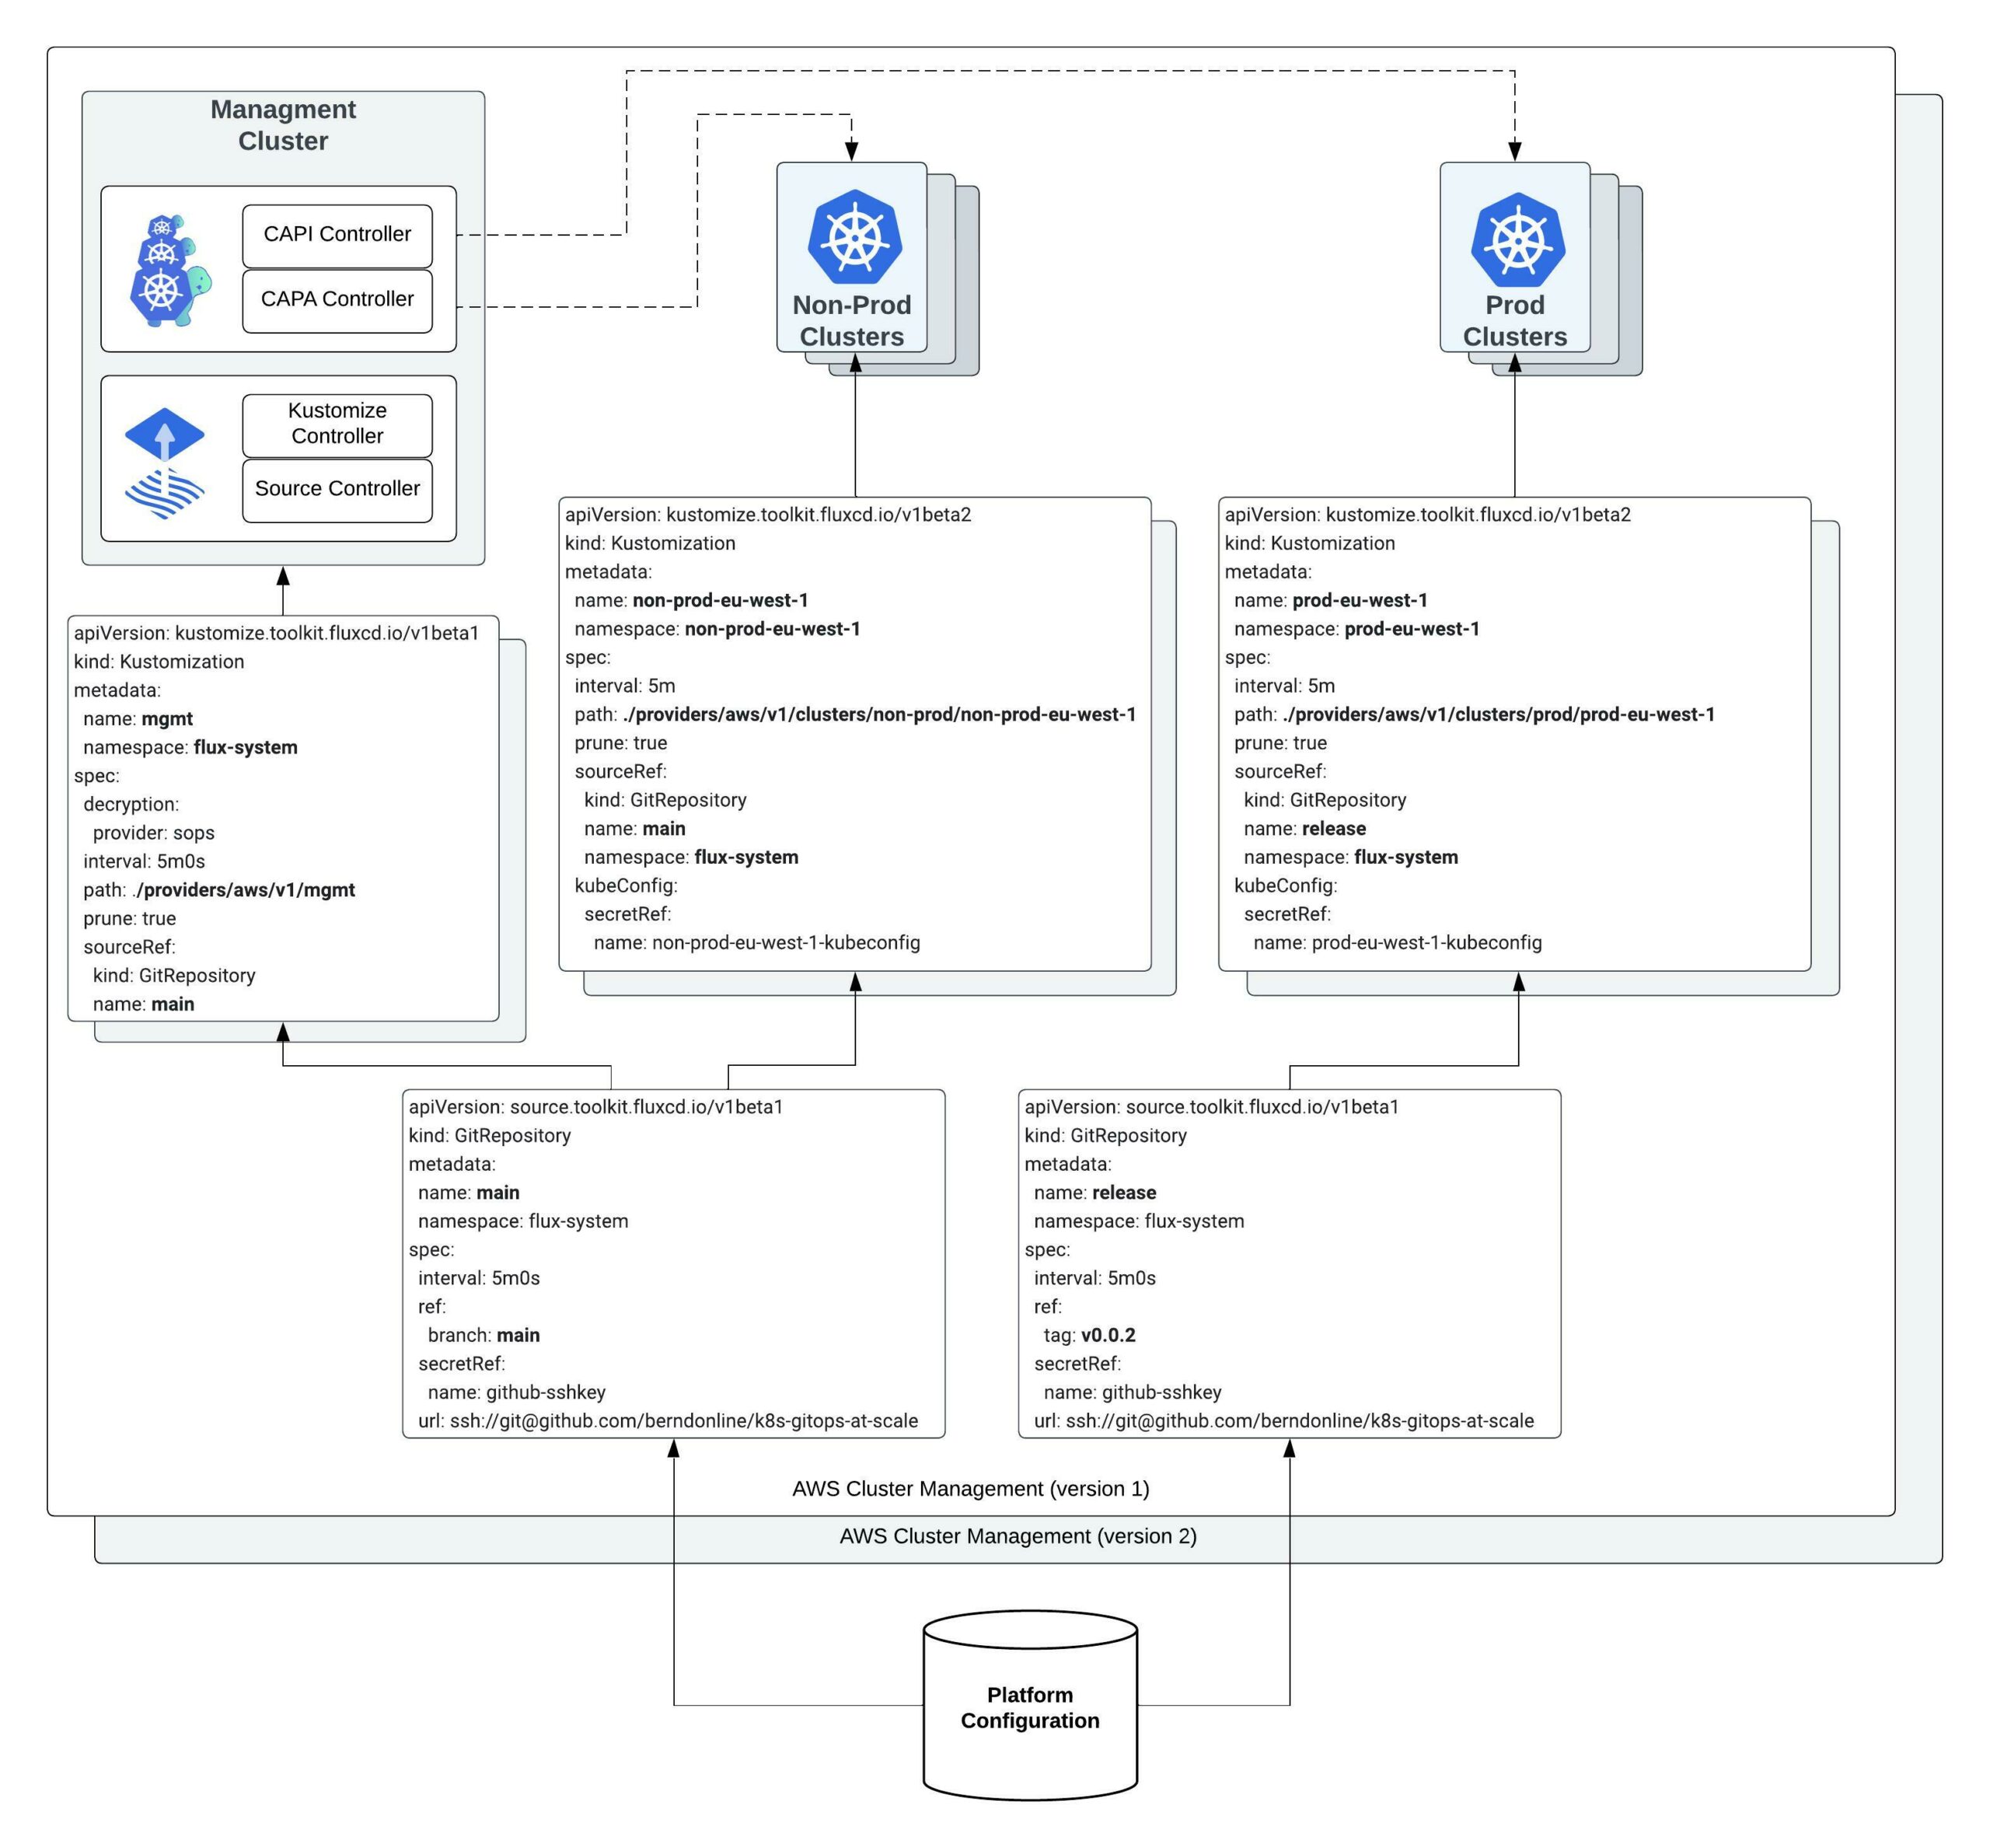
The configuration from the platform repository gets pulled on the management cluster using different gitrepository resources following the main branch or a version tag.

$ kubectl get gitrepositories.source.toolkit.fluxcd.io -A
NAMESPACE     NAME      URL                                                    AGE   READY   STATUS
flux-system   main      ssh://[email protected]/berndonline/k8s-gitops-at-scale   2d    True    stored artifact for revision 'main/ee3e71efb06628775fa19e9664b9194848c6450e'
flux-system   release   ssh://[email protected]/berndonline/k8s-gitops-at-scale   2d    True    stored artifact for revision 'v0.0.2/a5a5edd1194b629f6b41977483dca49aaad957ff'

The kustomization resources will then render and apply the configuration locally to the management cluster (diagram left-side) or remote clusters to our non-prod and prod workload clusters (diagram right-side) using the kubeconfig of the cluster created by the Cluster API stored during the bootstrap.

There are multiple kustomization resources to apply configuration based off the folder structure which I explained above. See the output below and checkout the repository for more details.

$ kubectl get kustomizations.kustomize.toolkit.fluxcd.io -A
NAMESPACE            NAME                          AGE   READY   STATUS
flux-system          feature-access-control        13h   True    Applied revision: v0.0.2/a5a5edd1194b629f6b41977483dca49aaad957ff
flux-system          mgmt                          2d    True    Applied revision: main/ee3e71efb06628775fa19e9664b9194848c6450e
non-prod-eu-west-1   common                        21m   True    Applied revision: main/ee3e71efb06628775fa19e9664b9194848c6450e
non-prod-eu-west-1   feature-access-control        21m   True    Applied revision: main/ee3e71efb06628775fa19e9664b9194848c6450e
non-prod-eu-west-1   feature-helloworld-operator   21m   True    Applied revision: main/ee3e71efb06628775fa19e9664b9194848c6450e
non-prod-eu-west-1   feature-ingress-nginx         21m   True    Applied revision: main/ee3e71efb06628775fa19e9664b9194848c6450e
non-prod-eu-west-1   non-prod-eu-west-1            21m   True    Applied revision: main/ee3e71efb06628775fa19e9664b9194848c6450e
non-prod-eu-west-1   tenants-common                21m   True    Applied revision: main/ee3e71efb06628775fa19e9664b9194848c6450e
non-prod-eu-west-1   tenants-non-prod              21m   True    Applied revision: main/ee3e71efb06628775fa19e9664b9194848c6450e
prod-eu-west-1       common                        15m   True    Applied revision: v0.0.2/a5a5edd1194b629f6b41977483dca49aaad957ff
prod-eu-west-1       feature-access-control        15m   True    Applied revision: v0.0.2/a5a5edd1194b629f6b41977483dca49aaad957ff
prod-eu-west-1       feature-helloworld-operator   15m   True    Applied revision: v0.0.2/a5a5edd1194b629f6b41977483dca49aaad957ff
prod-eu-west-1       feature-ingress-nginx         15m   True    Applied revision: v0.0.2/a5a5edd1194b629f6b41977483dca49aaad957ff
prod-eu-west-1       prod-eu-west-1                15m   True    Applied revision: v0.0.2/a5a5edd1194b629f6b41977483dca49aaad957ff
prod-eu-west-1       tenants-common                15m   True    Applied revision: v0.0.2/a5a5edd1194b629f6b41977483dca49aaad957ff
prod-eu-west-1       tenants-prod                  15m   True    Applied revision: v0.0.2/a5a5edd1194b629f6b41977483dca49aaad957ff

Release and promotion

The GitOps framework doesn’t explain about how to do promotion to higher environments and this is where the Trunk Based Development model comes in helpful together with the gitrepository resource to be able to pull a tagged version instead of a branch.

This allows us applying configuration first to lower environments to non-prod following the main branch, means pull-requests which are merged will be applied instantly. Configuration for higher environments to production requires to create a version tag and publish a release in the repository.

Why using a tag and not a release branch? A tag in your repository is a point in time snapshot of your configuration and can’t be easily modified which is required for creating the release. A branch on the other hand can be modified using pull-requests and you end up with lots of release branches which is less ideal.

To create a new version tag in the git repository I use the following commands:

$ git tag v0.0.3
$ git push origin --tags
Total 0 (delta 0), reused 0 (delta 0)
To github.com:berndonline/k8s-gitops-at-scale.git
* [new tag] v0.0.3 -> v0.0.3

This doesn’t do much after we pushed the new tag because the gitrepository release is set to v0.0.2 but I can see the new tag is available in the repository.
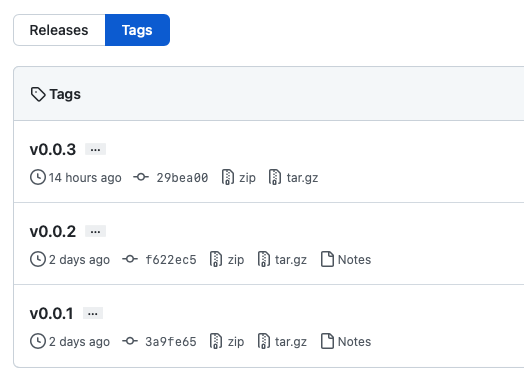
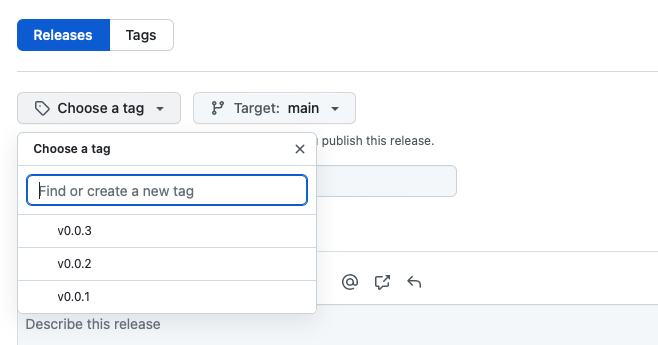
In the repository I can go to releases and click on “Draft a new release” and choose the new tag v0.0.3 I pushed previously.
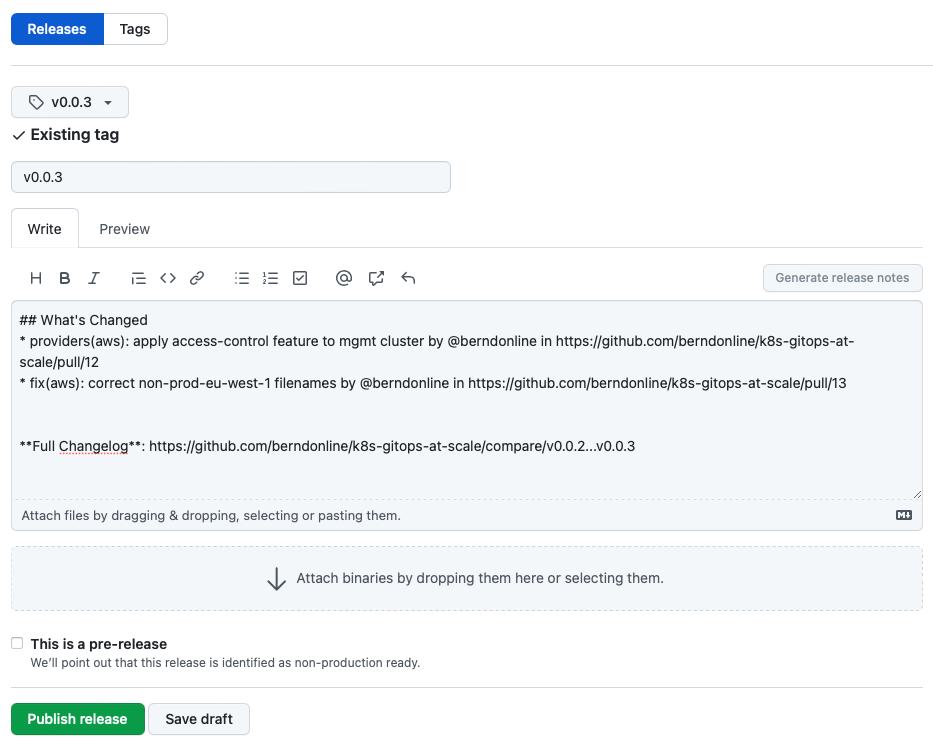
The release notes you see below can be auto-generate from the pull-requests you merged between v0.0.2 and v0.0.3 by clicking “Generate release notes”. To finish this off save and publish the release.

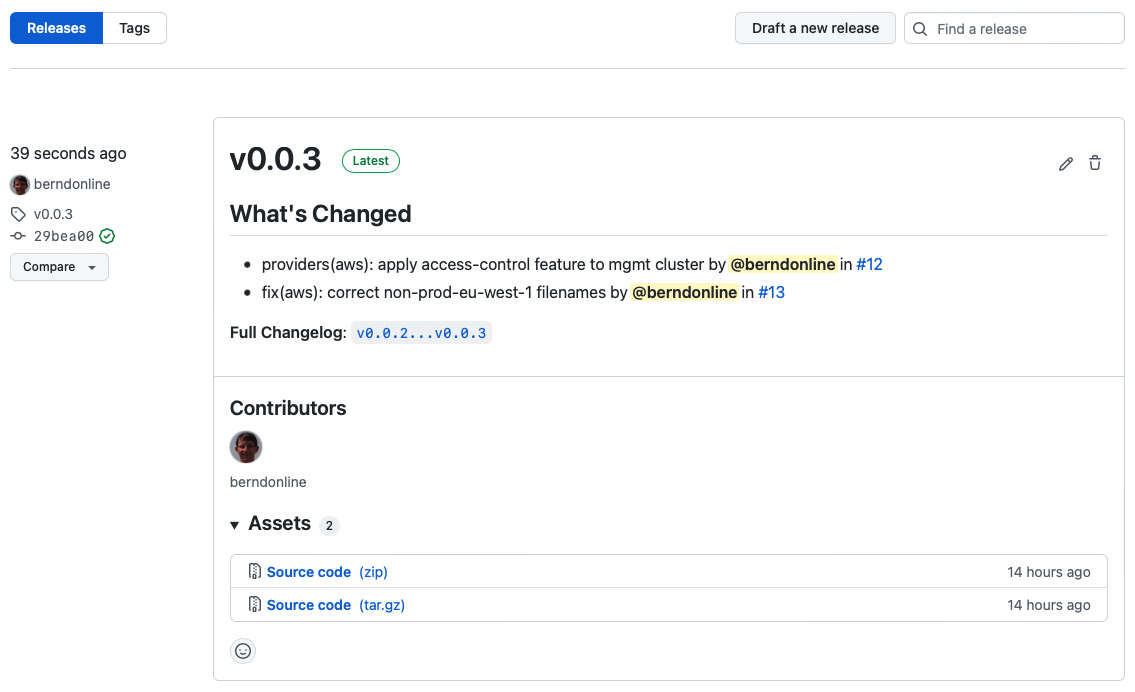
The release is publish and release notes are visible to everyone which is great for product teams on your platform because they will get visibility about upcoming changes including their own modifications to namespace configuration.
Until now all the changes are applied to our lower non-prod environment following the main branch and for doing the promotion we need to raise a pull-request and update the gitrepository release the new version v0.0.3.

If you follow ITIL change procedures then this is the point where you would normally raise a change for merging your pull-request because this triggers the rollout of your configuration to production.
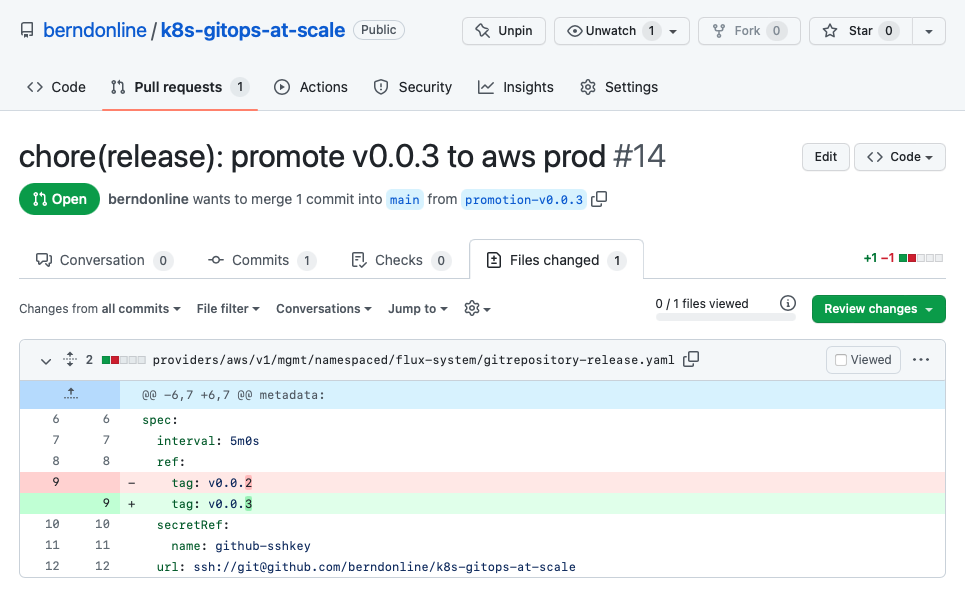
When the pull-request is merged the release gitrepository is updated by the kustomization resources through the main branch.

$ kubectl get gitrepositories.source.toolkit.fluxcd.io -A
NAMESPACE     NAME      URL                                           AGE   READY   STATUS
flux-system   main      ssh://[email protected]/berndonline/k8s-gitops   2d    True    stored artifact for revision 'main/83133756708d2526cca565880d069445f9619b70'
flux-system   release   ssh://[email protected]/berndonline/k8s-gitops   2d    True    stored artifact for revision 'v0.0.3/ee3e71efb06628885fa19e9664b9198a8c6450e8'

Shortly after the kustomization resources referencing the release will reconcile and automatically push down the new rendered configuration to the production clusters.

$ kubectl get kustomizations.kustomize.toolkit.fluxcd.io -A
NAMESPACE            NAME                          AGE   READY   STATUS
flux-system          feature-access-control        13h   True    Applied revision: v0.0.3/ee3e71efb06628885fa19e9664b9198a8c6450e8
flux-system          mgmt                          2d    True    Applied revision: main/83133756708d2526cca565880d069445f9619b70
non-prod-eu-west-1   common                        31m   True    Applied revision: main/83133756708d2526cca565880d069445f9619b70
non-prod-eu-west-1   feature-access-control        31m   True    Applied revision: main/83133756708d2526cca565880d069445f9619b70
non-prod-eu-west-1   feature-helloworld-operator   31m   True    Applied revision: main/83133756708d2526cca565880d069445f9619b70
non-prod-eu-west-1   feature-ingress-nginx         31m   True    Applied revision: main/83133756708d2526cca565880d069445f9619b70
non-prod-eu-west-1   non-prod-eu-west-1            31m   True    Applied revision: main/83133756708d2526cca565880d069445f9619b70
non-prod-eu-west-1   tenants-common                31m   True    Applied revision: main/83133756708d2526cca565880d069445f9619b70
non-prod-eu-west-1   tenants-non-prod              31m   True    Applied revision: main/83133756708d2526cca565880d069445f9619b70
prod-eu-west-1       common                        26m   True    Applied revision: v0.0.3/ee3e71efb06628885fa19e9664b9198a8c6450e8
prod-eu-west-1       feature-access-control        26m   True    Applied revision: v0.0.3/ee3e71efb06628885fa19e9664b9198a8c6450e8
prod-eu-west-1       feature-helloworld-operator   26m   True    Applied revision: v0.0.3/ee3e71efb06628885fa19e9664b9198a8c6450e8
prod-eu-west-1       feature-ingress-nginx         26m   True    Applied revision: v0.0.3/ee3e71efb06628885fa19e9664b9198a8c6450e8
prod-eu-west-1       prod-eu-west-1                26m   True    Applied revision: v0.0.3/ee3e71efb06628885fa19e9664b9198a8c6450e8
prod-eu-west-1       tenants-common                26m   True    Applied revision: v0.0.3/ee3e71efb06628885fa19e9664b9198a8c6450e8
prod-eu-west-1       tenants-prod                  26m   True    Applied revision: v0.0.3/ee3e71efb06628885fa19e9664b9198a8c6450e8

Why using Kustomize for managing the configuration and not Helm? I know the difficulties of managing these raw YAML manifests. Kustomize gets you going quick where with Helm there is a higher initial effort writing your Charts. In my next article I will focus specifically on Helm.

I showed a very simplistic example having a single cloud provider (aws) and a single management cluster but as you have seen you can easily add Azure or Google cloud providers in your configuration and scale horizontally. I think this is what makes Kubernetes and controllers like Flux CD great together that you don’t need to have complex pipelines or workflows to rollout and promote your changes completely pipeline-less.
 

OpenShift Hive – Deploy Single Node (All-in-One) OKD Cluster on AWS

The concept of a single-node or All-in-One OpenShift / Kubernetes cluster isn’t something new, years ago when I was working with OpenShift 3 and before that with native Kubernetes, we were using single-node clusters as ephemeral development environment, integrations testing for pull-request or platform releases. It was only annoying because this required complex Jenkins pipelines, provision the node first, then install prerequisites and run the openshift-ansible installer playbook. Not always reliable and not a great experience but it done the job.

This is possible as well with the new OpenShift/OKD 4 version and with the help from OpenShift Hive. The experience is more reliable and quicker than previously and I don’t need to worry about de-provisioning, I will let Hive delete the cluster after a few hours automatically.

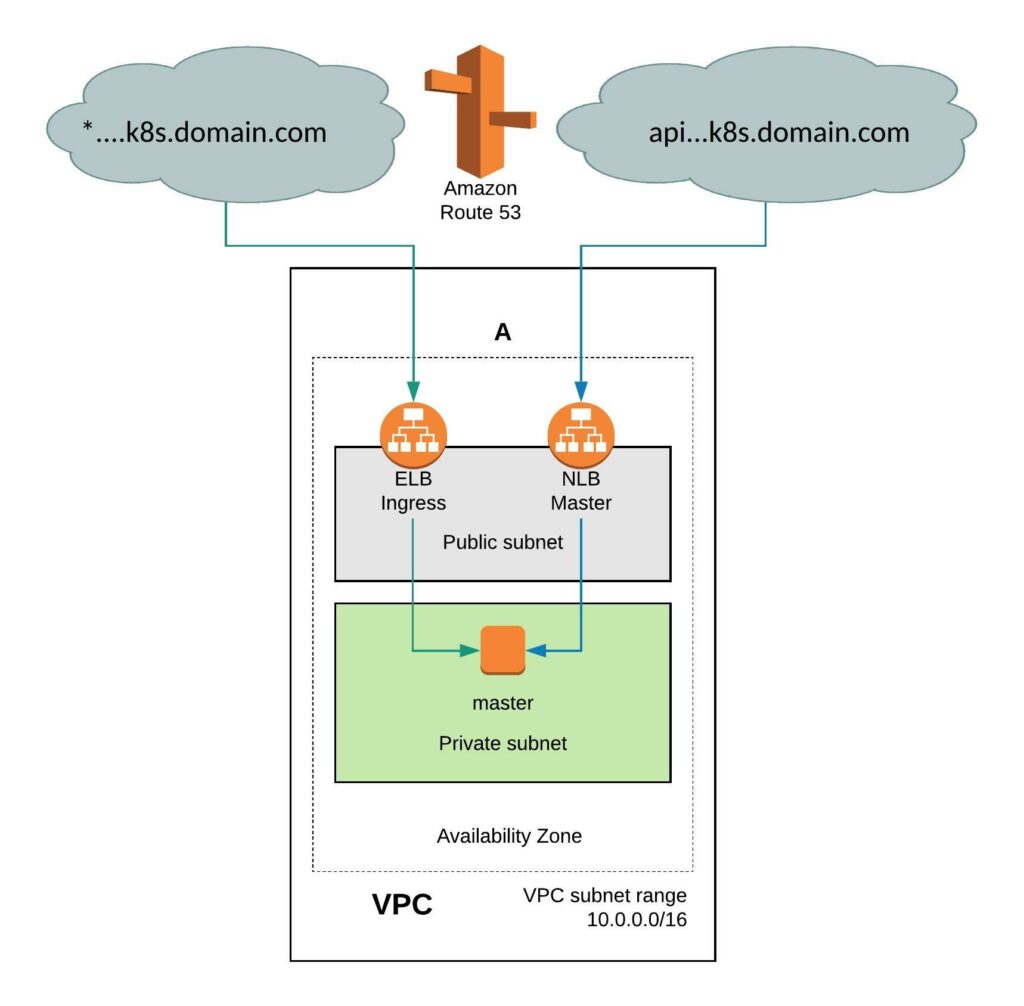
It requires a few simple modifications in the install-config. You need to add the Availability Zone you want where the instance will be created. When doing this the VPC will only have two subnets, one public and one private subnet in eu-west-1. You can also install the single-node cluster into an existing VPC you just have to specify subnet ids. Change the compute worker node replicas zero and control-plane replicas to one. Make sure to have an instance size with enough CPU and memory for all OpenShift components because they need to fit onto the single node. The rest of the install-config is pretty much standard.
---
apiVersion: v1
baseDomain: k8s.domain.com
compute:
- name: worker
  platform:
    aws:
      zones:
      - eu-west-1a
      rootVolume:
        iops: 100
        size: 22
        type: gp2
      type: r4.xlarge
  replicas: 0
controlPlane:
  name: master
  platform:
    aws:
      zones:
      - eu-west-1a
      rootVolume:
        iops: 100
        size: 22
        type: gp2
      type: r5.2xlarge
  replicas: 1
metadata:
  creationTimestamp: null
  name: okd-aio
networking:
  clusterNetwork:
  - cidr: 10.128.0.0/14
    hostPrefix: 23
  machineCIDR: 10.0.0.0/16
  networkType: OpenShiftSDN
  serviceNetwork:
  - 172.30.0.0/16
platform:
  aws:
    region: eu-west-1
pullSecret: ""
sshKey: ""

Create a new install-config secret for the cluster.

kubectl create secret generic install-config-aio -n okd --from-file=install-config.yaml=./install-config-aio.yaml

We will be using OpenShift Hive for the cluster deployment because the provision is more simplified and Hive can also apply any configuration using SyncSets or SelectorSyncSets which is needed. Add the annotation hive.openshift.io/delete-after: “2h” and Hive will automatically delete the cluster after 4 hours.

---
apiVersion: hive.openshift.io/v1
kind: ClusterDeployment
metadata:
  creationTimestamp: null
  annotations:
    hive.openshift.io/delete-after: "2h"
  name: okd-aio 
  namespace: okd
spec:
  baseDomain: k8s.domain.com
  clusterName: okd-aio
  controlPlaneConfig:
    servingCertificates: {}
  installed: false
  platform:
    aws:
      credentialsSecretRef:
        name: aws-creds
      region: eu-west-1
  provisioning:
    releaseImage: quay.io/openshift/okd:4.5.0-0.okd-2020-07-14-153706-ga
    installConfigSecretRef:
      name: install-config-aio
  pullSecretRef:
    name: pull-secret
  sshKey:
    name: ssh-key
status:
  clusterVersionStatus:
    availableUpdates: null
    desired:
      force: false
      image: ""
      version: ""
    observedGeneration: 0
    versionHash: ""

Apply the cluster deployment to your clusters namespace.

kubectl apply -f  ./clusterdeployment-aio.yaml

This is slightly faster than provision 6 nodes cluster and will take around 30mins until your ephemeral test cluster is ready to use.

Host and Container Monitoring with SysDig

After my previous articles about troubleshooting and to validate OpenShift using Ansible, I wanted to continue and show how SysDig is helping you to identify potentials issues on your nodes or container platform before they occur.

The open source version is a simple but very powerful tool to inspect your linux host via the command line but it has no capabilities to centrally monitor or store capture information. The enterprise version provides these capabilities like a web console and centrally stores metrics, it is also able to trigger remote captures without the need to connect to the host.

Sysdig Open Source

Let’s install sysdig open source, here the official SysDig installation guide.

# Host install
curl -s https://s3.amazonaws.com/download.draios.com/stable/install-sysdig | sudo bash

# Alternatively the container based install
yum -y install kernel-devel-$(uname -r)
docker pull sysdig/sysdig
docker run -i -t --name sysdig --privileged -v /var/run/docker.sock:/host/var/run/docker.sock -v /dev:/host/dev -v /proc:/host/proc:ro -v /boot:/host/boot:ro -v /lib/modules:/host/lib/modules:ro -v /usr:/host/usr:ro sysdig/sysdig

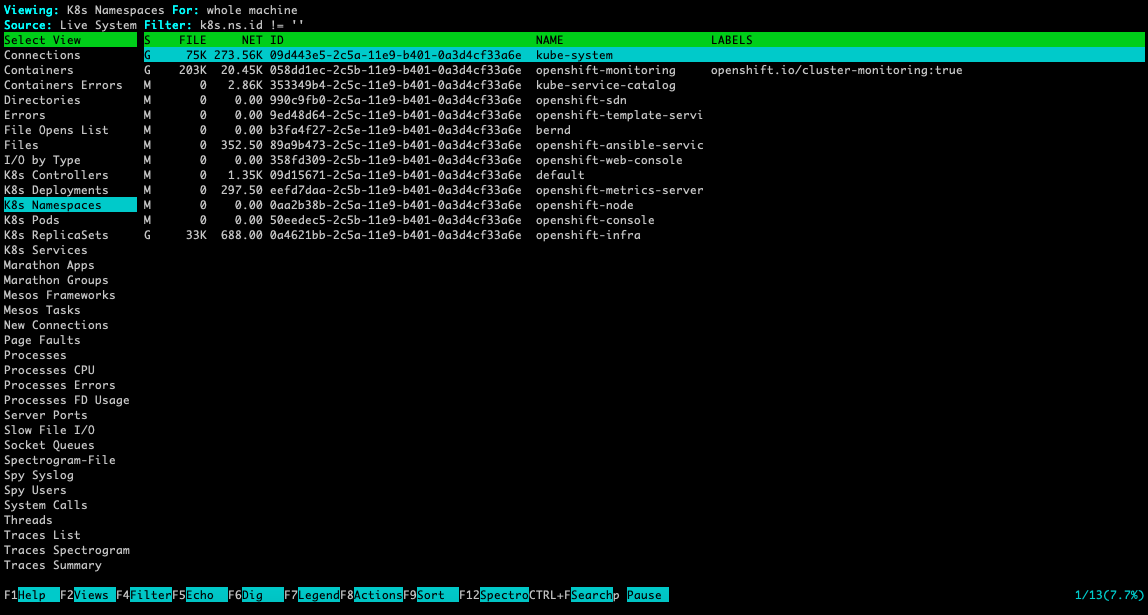
The csysdig command is nice and user friendly menu driven interface to see real-time system call information of your host. To collect information from Kubernetes or OpenShift please use the option [-kK] like seen in the example below:

csysdig -k https://localhost:8443 -K /etc/origin/master/admin.crt:/etc/origin/master/admin.key

For more information about how to use csysdig please have a look at the manual or watch the short Youtube video.

The main sysdig command is showing output directly in the terminal session and you are able to apply filters (chisels) to more granularly see the system calls. Like with csysdig, the option [-kK] enabled Kubernetes integration:

sysdig -k https://localhost:8443 -K /etc/origin/master/admin.crt:/etc/origin/master/admin.key

Here some useful commands to inspect Kubernetes or OpenShift events:

# Monitor Kubernetes namespace ip communication:
sudo sysdig -A -s8192 "fd.type in (ipv4, ipv6) and (k8s.ns.name=<-NAMESPACE-NAME->)" -k https://localhost:8443 -K /etc/origin/master/admin.crt:/e/origin/master/admin.key

# Monitor namespace and pod name, the 2nd command filters to only show GET requests:
sudo sysdig -A -s8192 "fd.type in (ipv4, ipv6) and (k8s.ns.name=<-NAMESPACE-NAME-> and k8s.pod.name=<-POD-NAME->)" -k https://localhost:8443 -K /etc/origin/master/admin.crt:/etc/origin/master/admin.key
sudo sysdig -A -s8192 "fd.type in (ipv4, ipv6) and (k8s.ns.name=<-NAMESPACE-NAME-> and k8s.pod.name=<-POD-NAME->) and evt.buffer contai GET" -k https://localhost:8443 -K /etc/origin/master/admin.crt:/etc/origin/master/admin.key 

# Monitor ns and pod names and apply chisel echo_fds:
sudo sysdig -A -s8192 "fd.type in (ipv4, ipv6) and (k8s.ns.name=<-NAMESPACE-NAME-> and k8s.pod.name=<-POD-NAME->)" -c echo_fds -k https://localhost:8443 -K /etc/origin/master/admin.crt:/etc/origin/master/admin.key

SysDig example

This capture is an http request between an busybox pod (name: busybox-2-hjhq8 ip: 10.128.0.81) via service (name: hello-app-http ip: 172.30.43.111) to the hello-openshift pod (name: hello-app-http-1-8v57x ip: 10.128.0.77) in the namespace myproject. I use a simple “wget -S –spider http://hello-app-http/” to simulate the request:

# Command to capture ip communication in myproject namespace including dnsmasq and wget processes:
sudo sysdig -s2000 -A -pk "fd.type in (ipv4, ipv6) and (k8s.ns.name=myproject or proc.name=dnsmasq) or proc.name=wget" -k https://localhost:8443 -K /etc/origin/master/admin.crt:/etc/origin/master/admin.key

# Output:
70739 19:36:51.401062017 1 busybox-2-hjhq8 (4d84d98d46f1) wget (84856:26) < socket fd=3(<4>)
70741 19:36:51.401062878 1 busybox-2-hjhq8 (4d84d98d46f1) wget (84856:26) > connect fd=3(<4>)
70748 19:36:51.401072194 1 busybox-2-hjhq8 (4d84d98d46f1) wget (84856:26) < connect res=0 tuple=10.128.0.81:44993->172.26.11.254:53
70749 19:36:51.401074599 1 busybox-2-hjhq8 (4d84d98d46f1) wget (84856:26) > sendto fd=3(<4u>10.128.0.81:44993->172.26.11.254:53) size=60 tuple=NULL
71083 19:36:51.401575859 0  (host) dnsmasq (20933:20933) > recvmsg fd=6(<4u>172.26.11.254:53)
71087 19:36:51.401582008 0  (host) dnsmasq (20933:20933) < recvmsg res=60 size=60 data= hello-app-httpmyprojectsvcclusterlocal tuple=10.128.0.81:44993->172.26.11.254:53
71088 19:36:51.401584101 0  (host) dnsmasq (20933:20933) > ioctl fd=6(<4u>10.128.0.81:44993->172.26.11.254:53) request=8910 argument=7FFE208E30C0
71089 19:36:51.401586692 0  (host) dnsmasq (20933:20933) < ioctl res=0
71108 19:36:51.401623408 0  (host) dnsmasq (20933:20933) < socket fd=58(<4>)
71109 19:36:51.401624563 0  (host) dnsmasq (20933:20933) > fcntl fd=58(<4>) cmd=4(F_GETFL)
71110 19:36:51.401625584 0  (host) dnsmasq (20933:20933) < fcntl res=2(/dev/null)
71111 19:36:51.401626259 0  (host) dnsmasq (20933:20933) > fcntl fd=58(<4>) cmd=5(F_SETFL)
71112 19:36:51.401626825 0  (host) dnsmasq (20933:20933) < fcntl res=0(/dev/null)
71113 19:36:51.401627787 0  (host) dnsmasq (20933:20933) > bind fd=58(<4>)
71129 19:36:51.401680355 0  (host) dnsmasq (20933:20933) < bind res=0 addr=0.0.0.0:22969
71130 19:36:51.401681698 0  (host) dnsmasq (20933:20933) > sendto fd=58(<4u>0.0.0.0:22969) size=60 tuple=0.0.0.0:22969->127.0.0.1:53
71131 19:36:51.401715726 0  (host) dnsmasq (20933:20933) < sendto res=60 data=
hello-app-httpmyprojectsvcclusterlocal
71469 19:36:51.402632442 1  (host) dnsmasq (20933:20933) > recvfrom fd=58(<4u>127.0.0.1:53->127.0.0.1:22969) size=5131
71474 19:36:51.402636604 1  (host) dnsmasq (20933:20933) < recvfrom res=114 data=
hello-app-httpmyprojectsvcclusterlocal)<*nsdns)
hostmaster)\`tp :< tuple=127.0.0.1:53->0.0.0.0:22969
71479 19:36:51.402643363 1  (host) dnsmasq (20933:20933) > sendmsg fd=6(<4u>10.128.0.81:44993->172.26.11.254:53) size=114 tuple=172.26.11.254:53->10.128.0.81:44993
71492 19:36:51.402666311 1  (host) dnsmasq (20933:20933) < sendmsg res=114 data=
hello-app-httpmyprojectsvcclusterlocal)<*nsdns)
hostmaster)\`tp :<
71493 19:36:51.402668199 1  (host) dnsmasq (20933:20933) > close fd=58(<4u>127.0.0.1:53->127.0.0.1:22969)
71494 19:36:51.402669009 1  (host) dnsmasq (20933:20933) < close res=0
80786 19:36:51.430143868 1 busybox-2-hjhq8 (4d84d98d46f1) wget (84856:26) < sendto res=60 data= hello-app-httpmyprojectsvcclusterlocal 80793 19:36:51.430153453 1 busybox-2-hjhq8 (4d84d98d46f1) wget (84856:26) > recvfrom fd=3(<4u>10.128.0.81:44993->172.26.11.254:53) size=512
80794 19:36:51.430158626 1 busybox-2-hjhq8 (4d84d98d46f1) wget (84856:26) < recvfrom res=114 data=
hello-app-httpmyprojectsvcclusterlocal)<*nsdns)
hostmaster)\`tp :< tuple=NULL 80795 19:36:51.430160257 1 busybox-2-hjhq8 (4d84d98d46f1) wget (84856:26) > close fd=3(<4u>10.128.0.81:44993->172.26.11.254:53)
80796 19:36:51.430161712 1 busybox-2-hjhq8 (4d84d98d46f1) wget (84856:26) < close res=0
80835 19:36:51.430260103 1 busybox-2-hjhq8 (4d84d98d46f1) wget (84856:26) < socket fd=3(<4>)
80838 19:36:51.430261013 1 busybox-2-hjhq8 (4d84d98d46f1) wget (84856:26) > connect fd=3(<4>)
80840 19:36:51.430269080 1 busybox-2-hjhq8 (4d84d98d46f1) wget (84856:26) < connect res=0 tuple=10.128.0.81:41405->172.26.11.254:53
80841 19:36:51.430271011 1 busybox-2-hjhq8 (4d84d98d46f1) wget (84856:26) > sendto fd=3(<4u>10.128.0.81:41405->172.26.11.254:53) size=60 tuple=NULL
80874 19:36:51.430433333 1  (host) dnsmasq (20933:20933) > recvmsg fd=6(<4u>10.128.0.81:44993->172.26.11.254:53)
80879 19:36:51.430439631 1  (host) dnsmasq (20933:20933) < recvmsg res=60 size=60 data= hello-app-httpmyprojectsvcclusterlocal tuple=10.128.0.81:41405->172.26.11.254:53
80881 19:36:51.430454839 1  (host) dnsmasq (20933:20933) > ioctl fd=6(<4u>10.128.0.81:41405->172.26.11.254:53) request=8910 argument=7FFE208E30C0
80885 19:36:51.430457716 1  (host) dnsmasq (20933:20933) < ioctl res=0
80895 19:36:51.430493317 1  (host) dnsmasq (20933:20933) < socket fd=58(<4>)
80896 19:36:51.430494522 1  (host) dnsmasq (20933:20933) > fcntl fd=58(<4>) cmd=4(F_GETFL)
80897 19:36:51.430495527 1  (host) dnsmasq (20933:20933) < fcntl res=2(/dev/null)
80898 19:36:51.430496189 1  (host) dnsmasq (20933:20933) > fcntl fd=58(<4>) cmd=5(F_SETFL)
80899 19:36:51.430496769 1  (host) dnsmasq (20933:20933) < fcntl res=0(/dev/null)
80900 19:36:51.430497538 1  (host) dnsmasq (20933:20933) > bind fd=58(<4>)
80913 19:36:51.430551876 1  (host) dnsmasq (20933:20933) < bind res=0 addr=0.0.0.0:64640
80914 19:36:51.430553226 1  (host) dnsmasq (20933:20933) > sendto fd=58(<4u>0.0.0.0:64640) size=60 tuple=0.0.0.0:64640->127.0.0.1:53
80922 19:36:51.430581962 1  (host) dnsmasq (20933:20933) < sendto res=60 data=
:=hello-app-httpmyprojectsvcclusterlocal
81032 19:36:51.430806106 1  (host) dnsmasq (20933:20933) > recvfrom fd=58(<4u>127.0.0.1:53->127.0.0.1:64640) size=5131
81035 19:36:51.430809074 1  (host) dnsmasq (20933:20933) < recvfrom res=76 data= :=hello-app-httpmyprojectsvcclusterlocal+o tuple=127.0.0.1:53->0.0.0.0:64640
81040 19:36:51.430818116 1  (host) dnsmasq (20933:20933) > sendmsg fd=6(<4u>10.128.0.81:41405->172.26.11.254:53) size=76 tuple=172.26.11.254:53->10.128.0.81:41405
81051 19:36:51.430840305 1  (host) dnsmasq (20933:20933) < sendmsg res=76 data=
hello-app-httpmyprojectsvcclusterlocal+o
81052 19:36:51.430842129 1  (host) dnsmasq (20933:20933) > close fd=58(<4u>127.0.0.1:53->127.0.0.1:64640)
81053 19:36:51.430842956 1  (host) dnsmasq (20933:20933) < close res=0
84676 19:36:51.436248790 1 busybox-2-hjhq8 (4d84d98d46f1) wget (84856:26) < sendto res=60 data= hello-app-httpmyprojectsvcclusterlocal 84683 19:36:51.436254334 1 busybox-2-hjhq8 (4d84d98d46f1) wget (84856:26) > recvfrom fd=3(<4u>10.128.0.81:41405->172.26.11.254:53) size=512
84684 19:36:51.436256892 1 busybox-2-hjhq8 (4d84d98d46f1) wget (84856:26) < recvfrom res=76 data= hello-app-httpmyprojectsvcclusterlocal+o tuple=NULL 84685 19:36:51.436264998 1 busybox-2-hjhq8 (4d84d98d46f1) wget (84856:26) > close fd=3(<4u>10.128.0.81:41405->172.26.11.254:53)
84686 19:36:51.436265743 1 busybox-2-hjhq8 (4d84d98d46f1) wget (84856:26) < close res=0
85420 19:36:51.437492301 1 busybox-2-hjhq8 (4d84d98d46f1) wget (84856:26) < socket fd=3(<4>)
85421 19:36:51.437493337 1 busybox-2-hjhq8 (4d84d98d46f1) wget (84856:26) > connect fd=3(<4>)
86222 19:36:51.438494771 1 busybox-2-hjhq8 (4d84d98d46f1) wget (84856:26) < connect res=0 tuple=10.128.0.81:39656->172.30.43.111:80
86226 19:36:51.438497506 1 busybox-2-hjhq8 (4d84d98d46f1) wget (84856:26) > fcntl fd=3(<4t>10.128.0.81:39656->172.30.43.111:80) cmd=4(F_GETFL)
86228 19:36:51.438498484 1 busybox-2-hjhq8 (4d84d98d46f1) wget (84856:26) < fcntl res=2(/dev/pts/1)
86229 19:36:51.438499943 1 busybox-2-hjhq8 (4d84d98d46f1) wget (84856:26) > ioctl fd=3(<4t>10.128.0.81:39656->172.30.43.111:80) request=5401 argument=7FFDBF5E434C
86233 19:36:51.438501658 1 busybox-2-hjhq8 (4d84d98d46f1) wget (84856:26) < ioctl res=-25(ENOTTY) 86242 19:36:51.438509833 1 busybox-2-hjhq8 (4d84d98d46f1) wget (84856:26) > write fd=3(<4t>10.128.0.81:39656->172.30.43.111:80) size=105
86285 19:36:51.438557309 1 busybox-2-hjhq8 (4d84d98d46f1) wget (84856:26) < write res=105 data= GET / HTTP/1.1 Host: hello-app-http.myproject.svc.cluster.local User-Agent: Wget Connection: close 86291 19:36:51.438561615 1 busybox-2-hjhq8 (4d84d98d46f1) wget (84856:26) > read fd=3(<4t>10.128.0.81:39656->172.30.43.111:80) size=4096
107714 19:36:51.478518400 0 hello-app-http-1-8v57x (5145dc0ea61e) hello-openshift (11185:7) < accept fd=6(<4t>10.128.0.81:39656->10.128.0.77:8080) tuple=10.128.0.81:39656->10.128.0.77:8080 queuepct=0 queuelen=0 queuemax=128
107772 19:36:51.478636516 0 hello-app-http-1-8v57x (5145dc0ea61e) hello-openshift (11185:7) > read fd=6(<4t>10.128.0.81:39656->10.128.0.77:8080) size=4096
107773 19:36:51.478640241 0 hello-app-http-1-8v57x (5145dc0ea61e) hello-openshift (11185:7) < read res=105 data= GET / HTTP/1.1 Host: hello-app-http.myproject.svc.cluster.local User-Agent: Wget Connection: close 107857 19:36:51.478817861 0 hello-app-http-1-8v57x (5145dc0ea61e) hello-openshift (11185:7) > write fd=6(<4t>10.128.0.81:39656->10.128.0.77:8080) size=153
107869 19:36:51.478870349 0 hello-app-http-1-8v57x (5145dc0ea61e) hello-openshift (11185:7) < write res=153 data= HTTP/1.1 200 OK Date: Sun, 10 Feb 2019 19:36:51 GMT Content-Length: 17 Content-Type: text/plain; charset=utf-8 Connection: close Hello OpenShift! 107886 19:36:51.478892928 0 hello-app-http-1-8v57x (5145dc0ea61e) hello-openshift (11185:7) > close fd=6(<4t>10.128.0.81:39656->10.128.0.77:8080)
107887 19:36:51.478893676 0 hello-app-http-1-8v57x (5145dc0ea61e) hello-openshift (11185:7) < close res=0
107899 19:36:51.478998208 0 busybox-2-hjhq8 (4d84d98d46f1) wget (84856:26) < read res=153 data= HTTP/1.1 200 OK Date: Sun, 10 Feb 2019 19:36:51 GMT Content-Length: 17 Content-Type: text/plain; charset=utf-8 Connection: close Hello OpenShift! 108908 19:36:51.480114626 0 busybox-2-hjhq8 (4d84d98d46f1) wget (84856:26) > close fd=3(<4t>10.128.0.81:39656->172.30.43.111:80)
108910 19:36:51.480115482 0 busybox-2-hjhq8 (4d84d98d46f1) wget (84856:26) < close res=0
112966 19:36:51.488041049 0 hello-app-http-1-8v57x (5145dc0ea61e) hello-openshift (11183:6) < accept fd=6(<4t>10.128.0.1:55052->10.128.0.77:8080) tuple=10.128.0.1:55052->10.128.0.77:8080 queuepct=0 queuelen=0 queuemax=128
113001 19:36:51.488096304 0 hello-app-http-1-8v57x (5145dc0ea61e) hello-openshift (11183:6) > read fd=6(<4t>10.128.0.1:55052->10.128.0.77:8080) size=4096
113002 19:36:51.488098693 0 hello-app-http-1-8v57x (5145dc0ea61e) hello-openshift (11183:6) < read res=0 data= 113005 19:36:51.488105730 0 hello-app-http-1-8v57x (5145dc0ea61e) hello-openshift (11183:6) > close fd=6(<4t>10.128.0.1:55052->10.128.0.77:8080)
113006 19:36:51.488106302 0 hello-app-http-1-8v57x (5145dc0ea61e) hello-openshift (11183:6) < close res=0

Below a list of some more useful sysdig cli examples:

# Sysdig Chisels and Filters:
sudo sysdig -cl

# To find out more information about a particular chisel:
sudo sysdig -i lscontainers

# To view a list of available field classes, fields and their description:
sudo sysdig -l

# Create and write sysdig trace files, 2nd option sets byte limit for trace file:
sudo sysdig -w mytrace.scap
sudo sysdig -s 8192 -w trace.scap 

# Read sysdig trace files, 2nd option read and filter based on proc.name:
sudo sysdig -r trace.scap
sudo sysdig -r trace.scap proc.name=dnsmasq

# Monitor linux processes:
sudo sysdig -c ps

# Monitor linux processes by CPU utilisation:
sudo sysdig -c topprocs_cpu

# Monitor network connections:
sudo sysdig -c netstat
sudo sysdig -c topconns
sudo sysdig -c topprocs_net

# Monitor system file i/o:
sudo sysdig -c echo_fds
sudo sysdig -c topprocs_file

# Troubleshoot system performance:
sudo sysdig -c bottlenecks

# Monitor process execution time
sudo sysdig -c proc_exec_time 

# Monitor network i/o performance
sudo sysdig -c netlower 1

# Watch log entries
sudo sysdig -c spy_logs

# Monitor http requests:
sudo sysdig -c httplog    
sudo sysdig -c httptop [Print Top HTTP Requests] 

SysDig Monitor Enterprise

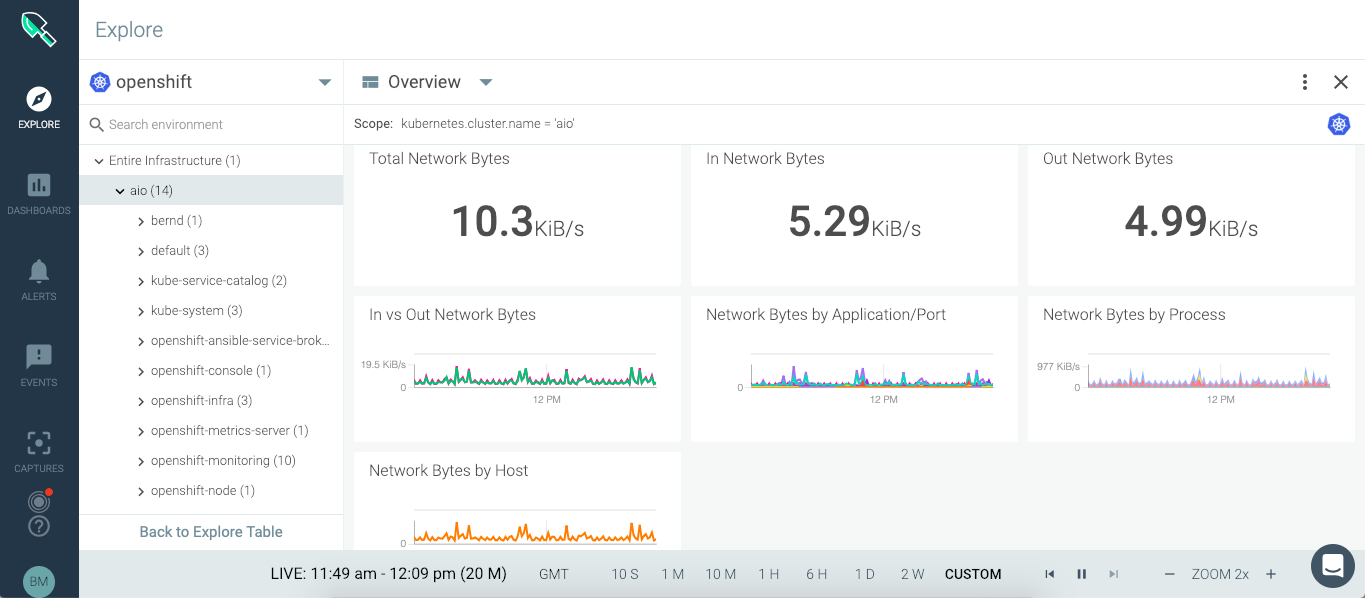
The paid enterprise version provides a web console to centrally access metrics and events from your fleet of monitored nodes.

You can run SysDig enterprise directly on OpenShift as DaemonSet and deploy the agent to all nodes in the cluster. For more detailed information about Kubernetes or OpenShift installation, read the official documentation.

oc adm new-project sysdig-agent --node-selector='app=sysdig-agent'
oc project sysdig-agent
oc label node --all "app=sysdig-agent"
oc create serviceaccount sysdig-agent
oc adm policy add-scc-to-user privileged -n sysdig-agent -z sysdig-agent
oc adm policy add-cluster-role-to-user cluster-reader -n sysdig-agent -z sysdig-agent

wget https://raw.githubusercontent.com/draios/sysdig-cloud-scripts/master/agent_deploy/kubernetes/sysdig-agent-daemonset-v2.yaml
wget https://raw.githubusercontent.com/draios/sysdig-cloud-scripts/master/agent_deploy/kubernetes/sysdig-agent-configmap.yaml
oc create secret generic sysdig-agent --from-literal=access-key=<-YOUR-ACCESS-KEY->

# Edit sysdig-agent-daemonset-v2.yaml to uncomment the line: serviceAccount: sysdig-agent and edit sysdig-agent-configmap.yaml to uncomment the line: new_k8s: true
# This allows kube-state-metrics to be automatically detected, monitored, and displayed in Sysdig Monitor. 
# Edit sysdig-agent-configmap.yaml to uncomment the line: k8s_cluster_name: and add your cluster name.

oc create -f sysdig-agent-daemonset-v2.yaml
oc create -f sysdig-agent-configmap.yaml

SysDig is a great tool to monitor and even further provides you the possibility to troubleshoot in depth your linux hosts and container platforms.

NetBox Open Source DCIM and IPAM tool

I wanted to share some information about an open source tool I have found some time ago which helps you to keep track of your infrastructure assets and configuration items. The name is NetBox which is an DCIM (Datacenter infrastructure management) and IPAM (IP address management) tool. NetBox was started by the network engineering team from DigitalOcean, specifically to address the needs of network and infrastructure engineers.

We all know that documentation is something no one wants to do, and no one has time for. What makes NetBox interesting is that not only does it focus on infrastructure documentation with a clean web console, it also comes with a API to push changes via the API , or use NetBox as dynamic inventory for Ansible.

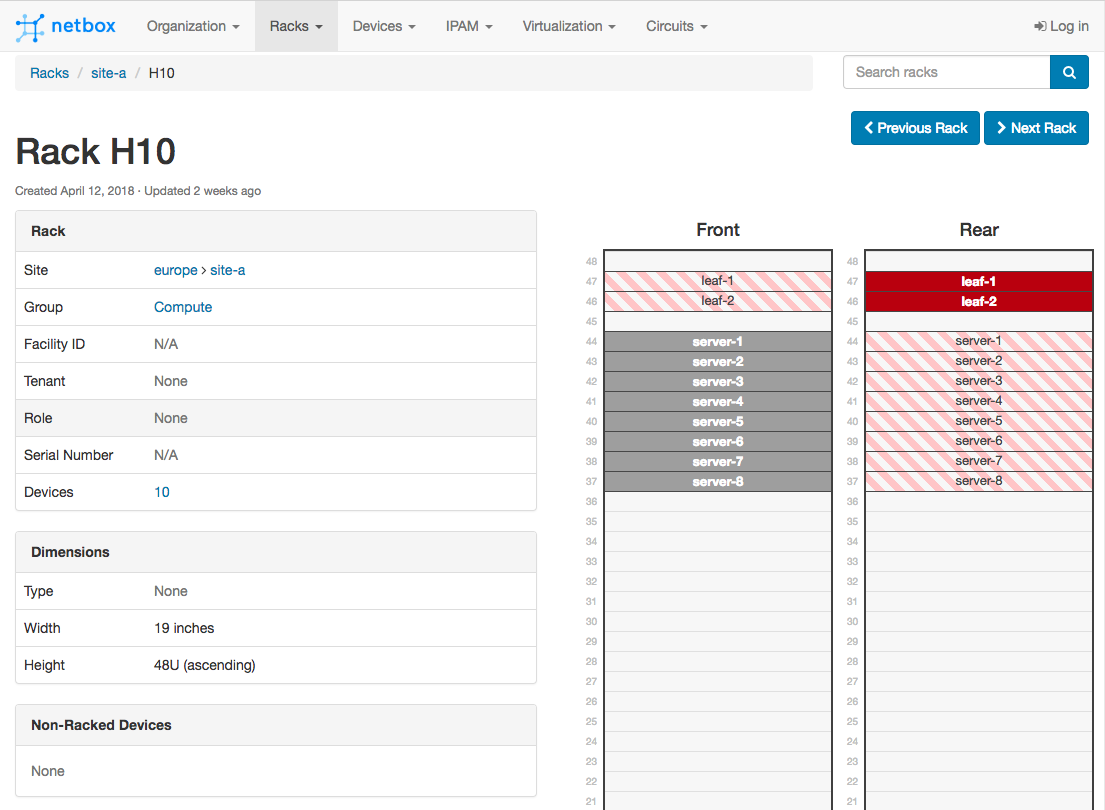
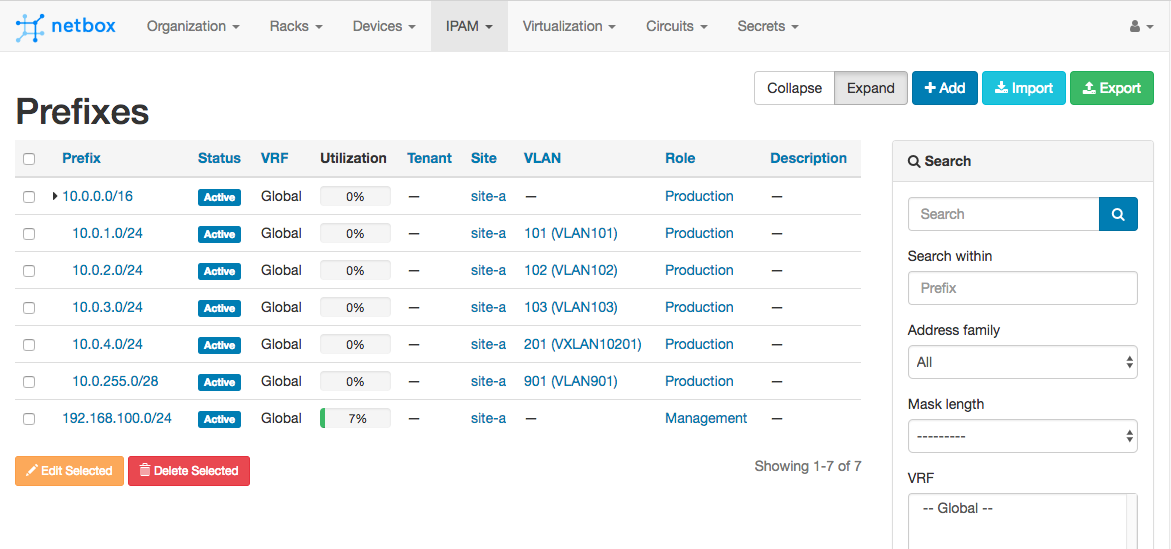
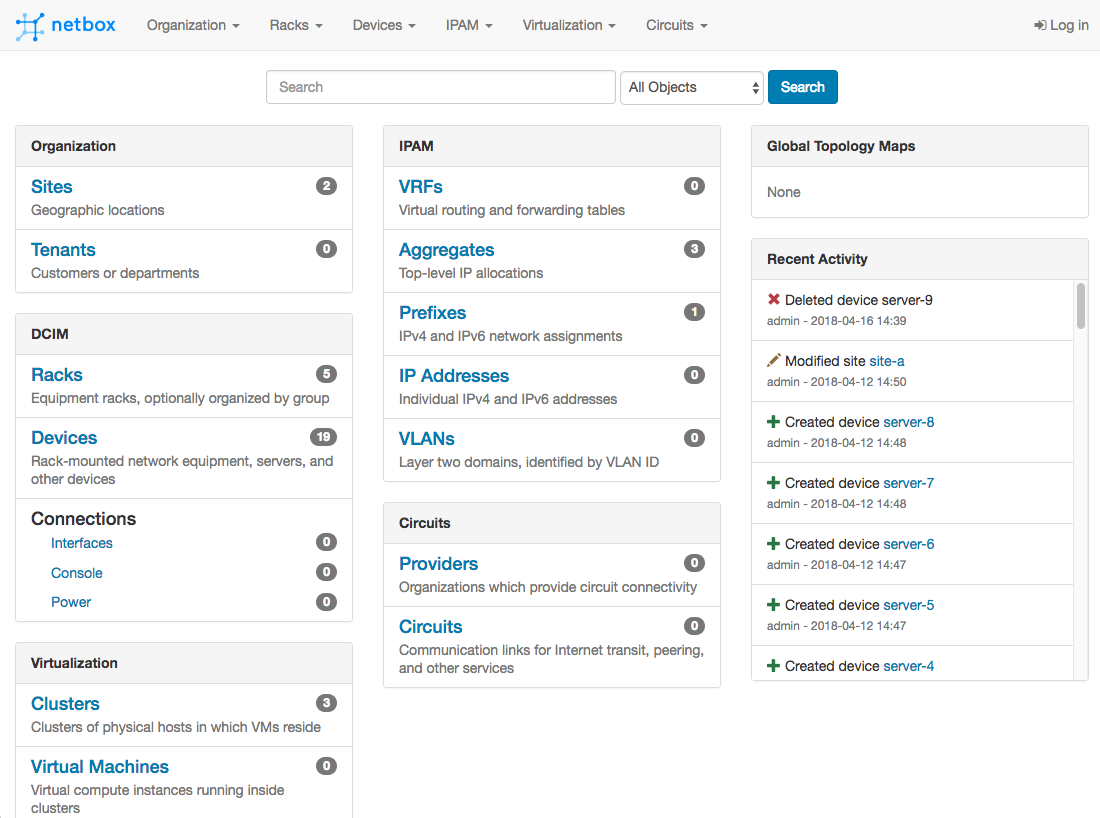
Here a few screenshots showing the look and feel from NetBox:

The rack overview:

The IPAM module:

Here is an example how to add a device via the REST API, very useful if you use ZTP (zero touch provisioning) and add your switches or servers automatically to NetBox or in your automation scripts when you deploy configurations:

vagrant@netbox:~$ curl -X POST -H "Authorization: Token fde02a67ca0c248bf5695bbf5cd56975add33655" -H "Content-Type: application/json" -H "Accept: application/json; indent=4" http://localhost:80/api/dcim/devices/ --data '{ "nae": "server-9", "display_name": "server-9", "device_type": 5, "device_role": 8 , "site": 1 }'
{
    "id": 21,
    "name": "server-9",
    "device_type": 5,
    "device_role": 8,
    "tenant": null,
    "platform": null,
    "serial": "",
    "asset_tag": null,
    "site": 1,
    "rack": null,
    "position": null,
    "face": null,
    "status": 1,
    "primary_ip4": null,
    "primary_ip6": null,
    "cluster": null,
    "virtual_chassis": null,
    "vc_position": null,
    "vc_priority": null,
    "comments": "",
    "created": "2018-04-16",
    "last_updated": "2018-04-16T14:40:47.787862Z"
}
vagrant@netbox:~$

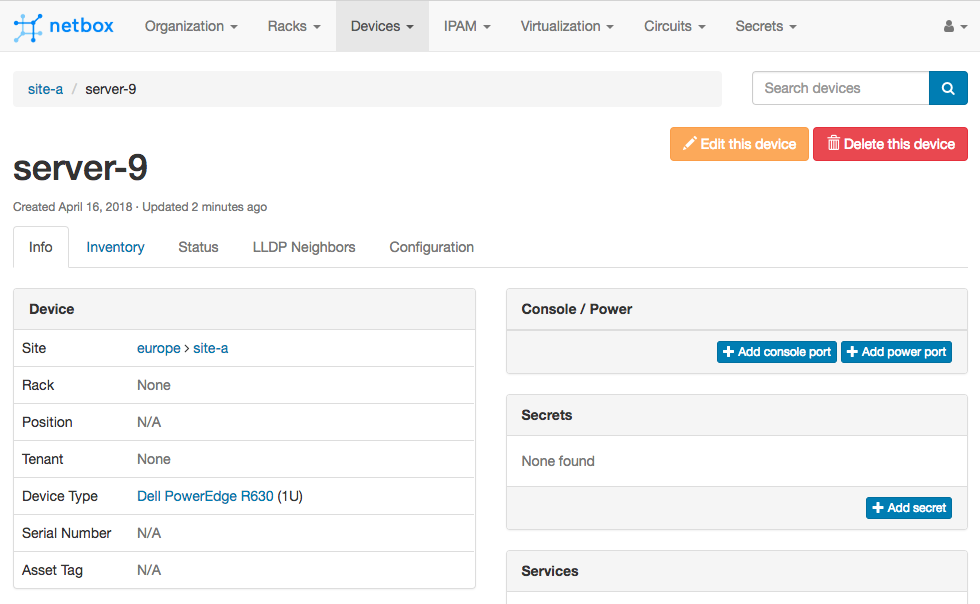
In the web console you see the device I have just added via the REST API:

On the main NetBox Github repository page you find links for a Ansible Role or Vagrant environment.

You can use NetBox as Ansible dynamic inventory and pull out hosts information dynamically when running playbooks. Check out the Github repository I have found.

sudo apt-get install python-setuptools ansible -y
git clone https://github.com/AAbouZaid/netbox-as-ansible-inventory.git
cd ./netbox-as-ansible-inventory/
pip install -r ./requirements.txt
sudo python setup.py install

Usage with Ansible playbook

ansible-playbook -i netbox.py ./site.yml

Please share your feedback and leave a comment.

Open Source Routing GRE over IPSec with StrongSwan and Cisco IOS-XE

In my previous post about the Ansible Playbook for VyOS and BGP Routing, I wrote that I was looking for some Open Source alternatives for software routers to use in AWS Transit VPCs.

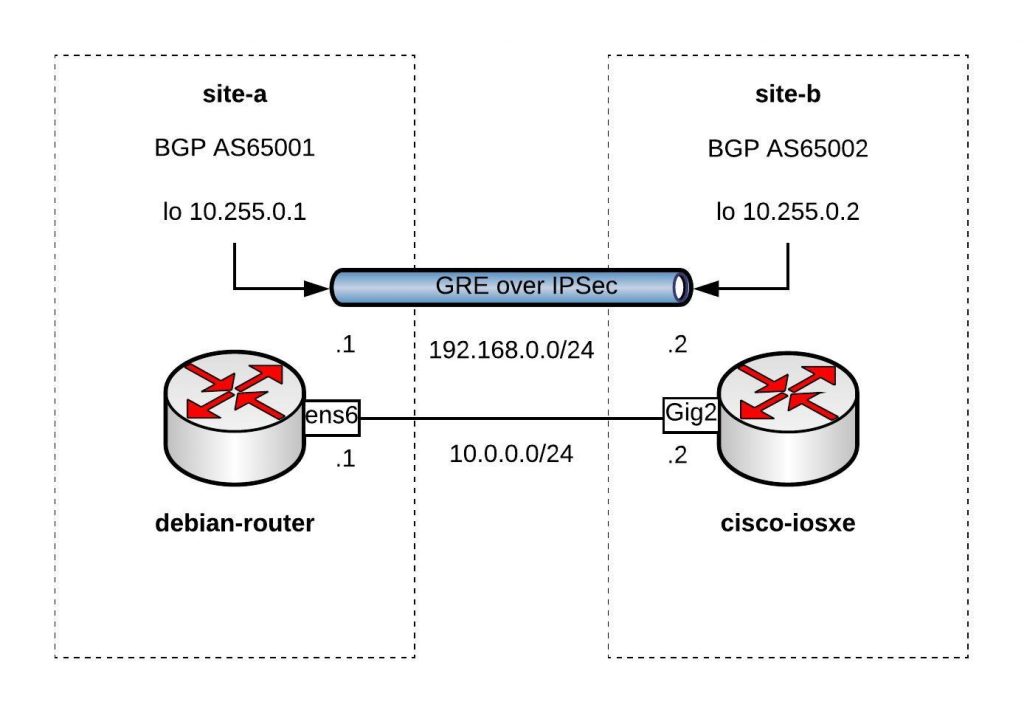
Here is the example using a Debian Linux,  FRR (Free Range Routing) and StrongSwan connecting over a GRE over IPSec tunnel to a Cisco IOS-XE (CSRv) router:

You can find the Vagrantfile in my Github repo https://github.com/berndonline/debian-router-vagrant. During the boot Ansible runs and pre-configures both nodes but continue reading about the detailed configuration:

sudo apt-get update
sudo apt-get upgrade -y

Enable IP routing by adding the following line to /etc/sysctl.conf:

sudo vi /etc/sysctl.conf
net.ipv4.ip_forward = 1
sudo sysctl -p /etc/sysctl.conf

Download the latest FRR release for Debian 9 x86_64 from https://github.com/FRRouting/frr/releases

Install FRR and don’t worry about any dependency errors from the first command, the second command will install the missing dependencies. Next, enable the needed FRR daemons and start the service:

wget https://github.com/FRRouting/frr/releases/download/frr-3.0.3/frr_3.0.3-1_debian9.1_amd64.deb
wget https://github.com/FRRouting/frr/releases/download/frr-3.0.3/frr-pythontools_3.0.3-1_debian9.1_all.deb
wget https://github.com/FRRouting/frr/releases/download/frr-3.0.3/frr-doc_3.0.3-1_debian9.1_all.deb
sudo dpkg -i frr_3.0.3-1_debian9.1_amd64.deb frr-pythontools_3.0.3-1_debian9.1_all.deb frr-doc_3.0.3-1_debian9.1_all.deb
sudo apt-get install -f -y

sudo bash -c 'cat << EOF > /etc/frr/daemons
zebra=yes
bgpd=yes
ospfd=no
ospf6d=no
ripd=no
ripngd=no
isisd=no
pimd=no
ldpd=no
nhrpd=no
EOF'

sudo bash -c 'cat << EOF > /etc/frr/frr.conf
!
frr version 3.0.3
frr defaults traditional
no ipv6 forwarding
!
router bgp 65001
 neighbor 192.168.0.2 remote-as 65002
 !
 address-family ipv4 unicast
  network 10.255.0.1/32
 exit-address-family
 vnc defaults
  response-lifetime 3600
  exit-vnc
!
line vty
!
EOF'

sudo systemctl enable frr
sudo systemctl start frr

Install StrongSwan and change a few settings before you can enable and start the service:

sudo apt-get install -y strongswan-swanctl charon-systemd

sudo bash -c 'cat << EOF > /etc/strongswan.d/charon/connmark.conf
connmark {
 
    # Disable connmark plugin
    # Needed for tunnels - see https://wiki.strongswan.org/projects/strongswan/wiki/RouteBasedVPN
    load = no
 
}
EOF'
sudo bash -c 'cat << EOF > /etc/strongswan.d/charon.conf
charon {
 
    # Cisco IKEv2 wants to use reauth - need to set make_before_break otherwise
    # strongSwan will have a very brief outage during IKEv2 reauth
    make_before_break = yes
 
    # Needed for tunnels - see https://wiki.strongswan.org/projects/strongswan/wiki/RouteBasedVPN
    install_routes = no
 
}
EOF'

sudo systemctl enable strongswan-swanctl
sudo systemctl start strongswan-swanctl

Setting TCP MSS to path MTU with iptables:

sudo DEBIAN_FRONTEND=noninteractive apt-get install -y -q iptables-persistent

sudo bash -c 'cat << EOF > /etc/iptables/rules.v4
*filter
:INPUT ACCEPT [0:0]
:FORWARD ACCEPT [0:0]
:OUTPUT ACCEPT [0:0]
COMMIT
*mangle
:PREROUTING ACCEPT [0:0]
:INPUT ACCEPT [0:0]
:FORWARD ACCEPT [0:0]
:OUTPUT ACCEPT [0:0]
:POSTROUTING ACCEPT [0:0]
-A FORWARD -p tcp --tcp-flags SYN,RST SYN -j TCPMSS --clamp-mss-to-pmtu
COMMIT
EOF'

Let us continue with the Debian router interface configuration, here you also find the GRE tunnel settings:

sudo bash -c 'cat << EOF > /etc/network/interfaces
source-directory /etc/network/interfaces.d
auto lo
iface lo inet loopback

auto lo:1
iface lo:1 inet static
      address 10.255.0.1
      netmask 255.255.255.255

auto ens5
iface ens5 inet dhcp

auto ens6
iface ens6 inet static
      address 10.0.0.1
      netmask 255.255.255.0

auto gre1
iface gre1 inet tunnel
      address 192.168.0.1
      netmask 255.255.255.0
      mode gre
      endpoint 10.0.0.2
EOF'

sudo systemctl restart networking

In StrongSwan you configure the IPSec settings:

sudo bash -c 'cat << EOF > /etc/swanctl/swanctl.conf
connections {
    my-vpn {
        remote_addrs = 10.0.0.2
        version = 1
        proposals = aes256-sha1-modp1536
        reauth_time = 1440m
        local-1 {
            auth = psk
            id = debian-router.domain.com
        }
        remote-1 {
            # id field here is inferred from the remote address
            auth = psk
        }
        children {
            my-vpn-1 {
                local_ts = 10.0.0.1/32[gre]
                remote_ts = 10.0.0.2/32[gre]
                mode = transport
                esp_proposals = aes128-sha1-modp1536
                rekey_time = 60m
                start_action = trap
                dpd_action = restart
            }
        }
    }

}
secrets {
    ike-my-vpn-1 {
        id-1 = cisco-iosxe.domain.com
        id-2 = 10.0.0.2
        secret = "secret"
    }
}
EOF'

sudo systemctl restart strongswan-swanctl

We finished the Debian host configuration and continue with the Cisco  router configuration to connect the Debian router to the tunnel 0 interface on the Cisco router:

conf t
hostname cisco-iosxe

crypto keyring my-keyring  
  pre-shared-key address 10.0.0.1 key secret
  exit

crypto isakmp policy 20
 encr aes 256
 authentication pre-share
 group 5
crypto isakmp identity hostname
crypto isakmp profile my-isakmp-profile
   keyring my-keyring
   match identity host debian-router.domain.com
   exit
crypto ipsec transform-set my-transform-set esp-aes esp-sha-hmac
 mode transport
 exit
crypto ipsec profile my-ipsec-profile
 set transform-set my-transform-set
 set pfs group5
 set isakmp-profile my-isakmp-profile
 exit

interface Loopback1
 ip address 10.255.0.2 255.255.255.255
 exit

interface Tunnel0
 ip address 192.168.0.2 255.255.255.0
 tunnel source GigabitEthernet2
 tunnel destination 10.0.0.1
 tunnel protection ipsec profile my-ipsec-profile
 no shut
 exit

interface GigabitEthernet2
 ip address 10.0.0.2 255.255.255.0
 no shut
 exit

router bgp 65002
 bgp log-neighbor-changes
 neighbor 192.168.0.1 remote-as 65001
 address-family ipv4
  network 10.255.0.2 mask 255.255.255.255
  neighbor 192.168.0.1 activate
 exit-address-family
 exit

exit
wr mem

Clone my Github repo https://github.com/berndonline/debian-router-vagrant and boot the environment with “./vagrant_up.sh”. After the two VMs are booted wait a few seconds and run the validation playbook to check the connectivity between the nodes:

berndonline@lab:~/debian-router-vagrant$ ansible-playbook ./validate_connectivity.yml

PLAY [debian-router] ***********************************************************************************************************************************************

TASK [check connectivity from debian router] ***********************************************************************************************************************
changed: [debian-router]

PLAY [cisco-iosxe] *************************************************************************************************************************************************

TASK [check connectivity from cisco iosxe] *************************************************************************************************************************
ok: [cisco-iosxe]

PLAY RECAP *********************************************************************************************************************************************************
cisco-iosxe                : ok=1    changed=0    unreachable=0    failed=0
debian-router              : ok=1    changed=1    unreachable=0    failed=0

berndonline@lab:~/debian-router-vagrant$

I will continue improving the config, and do some more testing with AWS VPN gateways (VGW).

Please share your feedback.

Leave a comment