OpenShift Networking and Network Policies

This article is about OpenShift networking in general but I also want to look at the Kubernetes CNI feature NetworkPolicy in a bit more detail. The latest OpenShift version 3.11 comes with three SDN deployment models:

  • ovs-subnet – This creates a single large vxlan between all the namespace and everyone is able to talk to each other.
  • ovs-multitenant – As the name already says this separates the namespaces into separate vxlan’s and only resources within the namespace are able to talk to each other. You have the possibility to join or making namespaces global.
  • ovs-networkpolicy – The newest SDN deployment method for OpenShift to enabling micro-segmentation to control the communication between pods and namespaces.
  • ovs-ovn – Next generation SDN for OpenShift but not yet officially released for OpenShift. For more information visit the OpenvSwitch Github repository ovn-kubernetes.

Here an overview of the common ovs-multitenant software defined network:

On an OpenShift node the tun0 interfaces owns the default gateway and is forwarding traffic to external endpoints outside the OpenShift platform or routing internal traffic to the openvswitch overlay. Both openvswitch and iptables are central components which are very important for the networking  on the platform.

Read the official OpenShift documentation managing networking or configuring the SDN for more information.

NetworkPolicy in Action

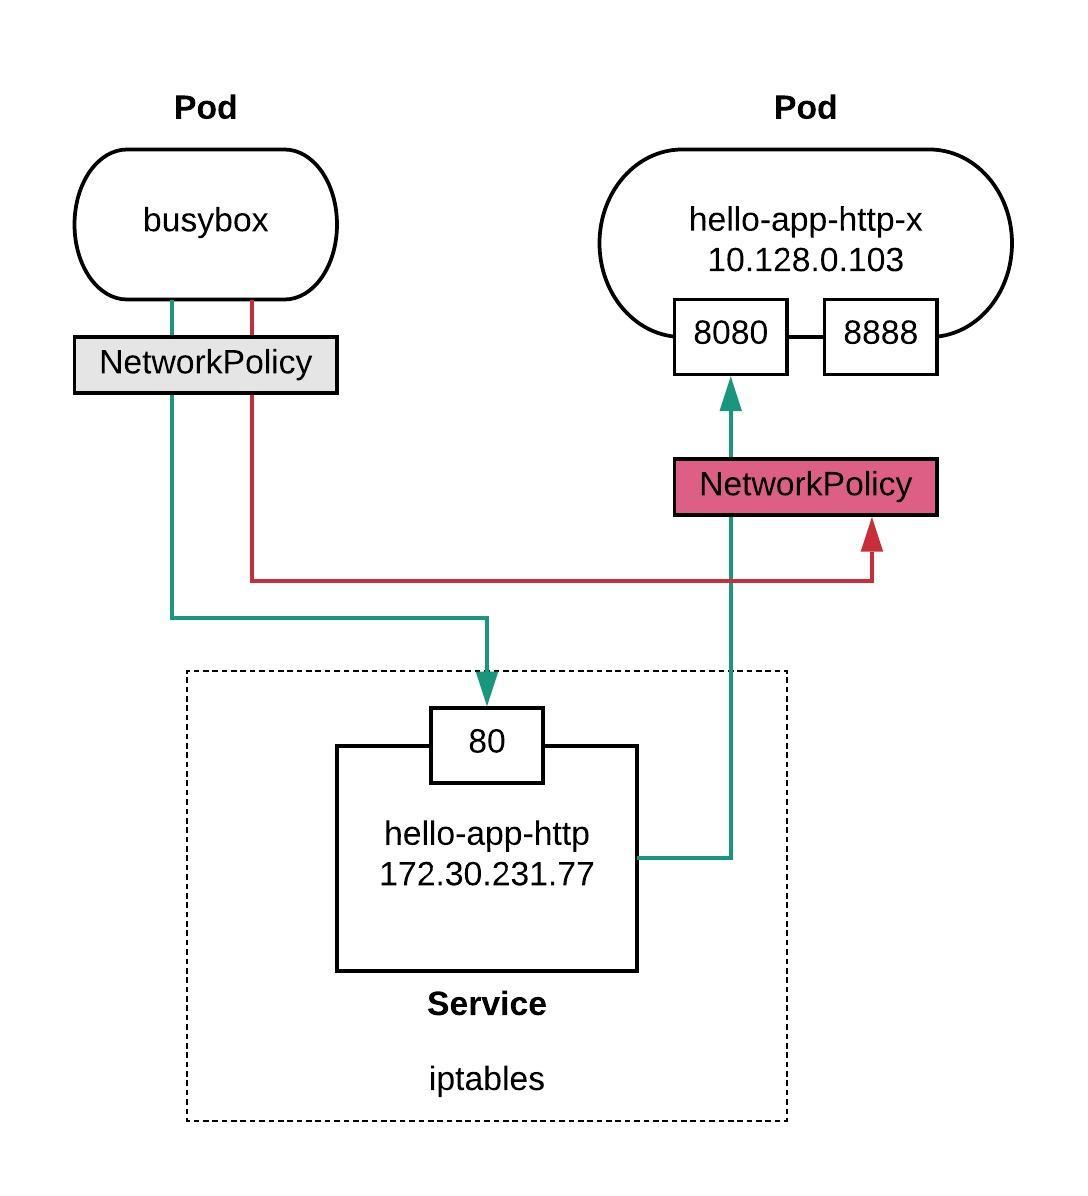
Let me first explain the example I use to test NetworkPolicy. We will have one hello-openshift pod behind service, and a busybox pod for testing the internal communication. I will create a default ingress deny policy and specifically allow tcp port 8080 to my hello-openshift pod. I am not planning to restrict the busybox pod with an egress policy, so all egress traffic is allowed.

Here you find the example yaml files to replicate the layout: busybox.yml and hello-openshift.yml

Short recap about Kubernetes service definition, they are just simple iptables entries and for this reason you cannot restrict them with NetworkPolicy.

[root@master1 ~]# iptables-save | grep 172.30.231.77
-A KUBE-SERVICES ! -s 10.128.0.0/14 -d 172.30.231.77/32 -p tcp -m comment --comment "myproject/hello-app-http:web cluster IP" -m tcp --dport 80 -j KUBE-MARK-MASQ
-A KUBE-SERVICES -d 172.30.231.77/32 -p tcp -m comment --comment "myproject/hello-app-http:web cluster IP" -m tcp --dport 80 -j KUBE-SVC-LFWXBQW674LJXLPD
[root@master1 ~]#

When you install OpenShift with ovs-networkpolicy, the default policy allows all traffic within a namespace. Let’s do a first test without a custom NetworkPolicy rule to see if I am able to connect to my hello-app-http service.

[root@master1 ~]# oc exec busybox-1-wn592 -- wget -S --spider http://hello-app-http
Connecting to hello-app-http (172.30.231.77:80)
  HTTP/1.1 200 OK
  Date: Tue, 19 Feb 2019 13:59:04 GMT
  Content-Length: 17
  Content-Type: text/plain; charset=utf-8
  Connection: close

[root@master1 ~]#

Now we add a default ingress deny policy to the namespace:

kind: NetworkPolicy
apiVersion: networking.k8s.io/v1
metadata:
  name: deny-all-ingress
spec:
  podSelector:
  ingress: []

After applying the default deny policy you are not able to connect to the hello-app-http service. The connection is timing out because no flows entries are defined yet in the OpenFlow table:

[root@master1 ~]# oc exec busybox-1-wn592 -- wget -S --spider http://hello-app-http
Connecting to hello-app-http (172.30.231.77:80)
wget: can't connect to remote host (172.30.231.77): Connection timed out
command terminated with exit code 1
[root@master1 ~]#

Let’s add a new policy and allow tcp port 8080 and specifying a podSelector to match all pods with the label “role: web”.

kind: NetworkPolicy
apiVersion: networking.k8s.io/v1
metadata:
  name: allow-tcp8080
spec:
  podSelector:
    matchLabels:
      role: web
  ingress:
  - ports:
    - protocol: TCP
      port: 8080

This alone doesn’t do anything, you still need to patch the deployment config and add the label “role: web” to your deployment config metadata information.

oc patch dc/hello-app-http --patch '{"spec":{"template":{"metadata":{"labels":{"role":"web"}}}}}'

To rollback the previous changes simply use the ‘oc rollback dc/hello-app-http’ command.

Now let’s check the openvswitch flow table and you will see that a new flow got added with the destination of my hello-openshift pod 10.128.0.103 on port 8080.

Afterwards we try again to connect to my hello-app-http service and you see that we get a succesful connect:

[root@master1 ~]# oc exec ovs-q4p8m -n openshift-sdn -- ovs-ofctl -O OpenFlow13 dump-flows br0 | grep '10.128.0.103.*8080'
 cookie=0x0, duration=221.251s, table=80, n_packets=15, n_bytes=1245, priority=150,tcp,reg1=0x2dfc74,nw_dst=10.128.0.103,tp_dst=8080 actions=output:NXM_NX_REG2[]
[root@master1 ~]#
[root@master1 ~]# oc exec busybox-1-wn592 -- wget -S --spider http://hello-app-http
Connecting to hello-app-http (172.30.231.77:80)
  HTTP/1.1 200 OK
  Date: Tue, 19 Feb 2019 14:21:57 GMT
  Content-Length: 17
  Content-Type: text/plain; charset=utf-8
  Connection: close

[root@master1 ~]#

The hello openshift container publishes two tcp ports 8080 and 8888, so finally let’s try to connect to the pod IP address on port 8888, and we will find out that I am not able to connect, the reason is that I only allowed 8080 in the policy.

[root@master1 ~]# oc exec busybox-1-wn592 -- wget -S --spider http://10.128.0.103:8888
Connecting to 10.128.0.103:8888 (10.128.0.103:8888)
wget: can't connect to remote host (10.128.0.103): Connection timed out
command terminated with exit code 1
[root@master1 ~]#

There are great posts on the RedHat OpenShift blog which you should checkout networkpolicies-and-microsegmentation and openshift-and-network-security-zones-coexistence-approaches. Otherwise I can recommend having a look at Ahmet Alp Balkan Github repository about Kubernetes network policy recipes, where you can find some good examples.

Using HashiCorp Terraform to deploy Amazon AWS VPC

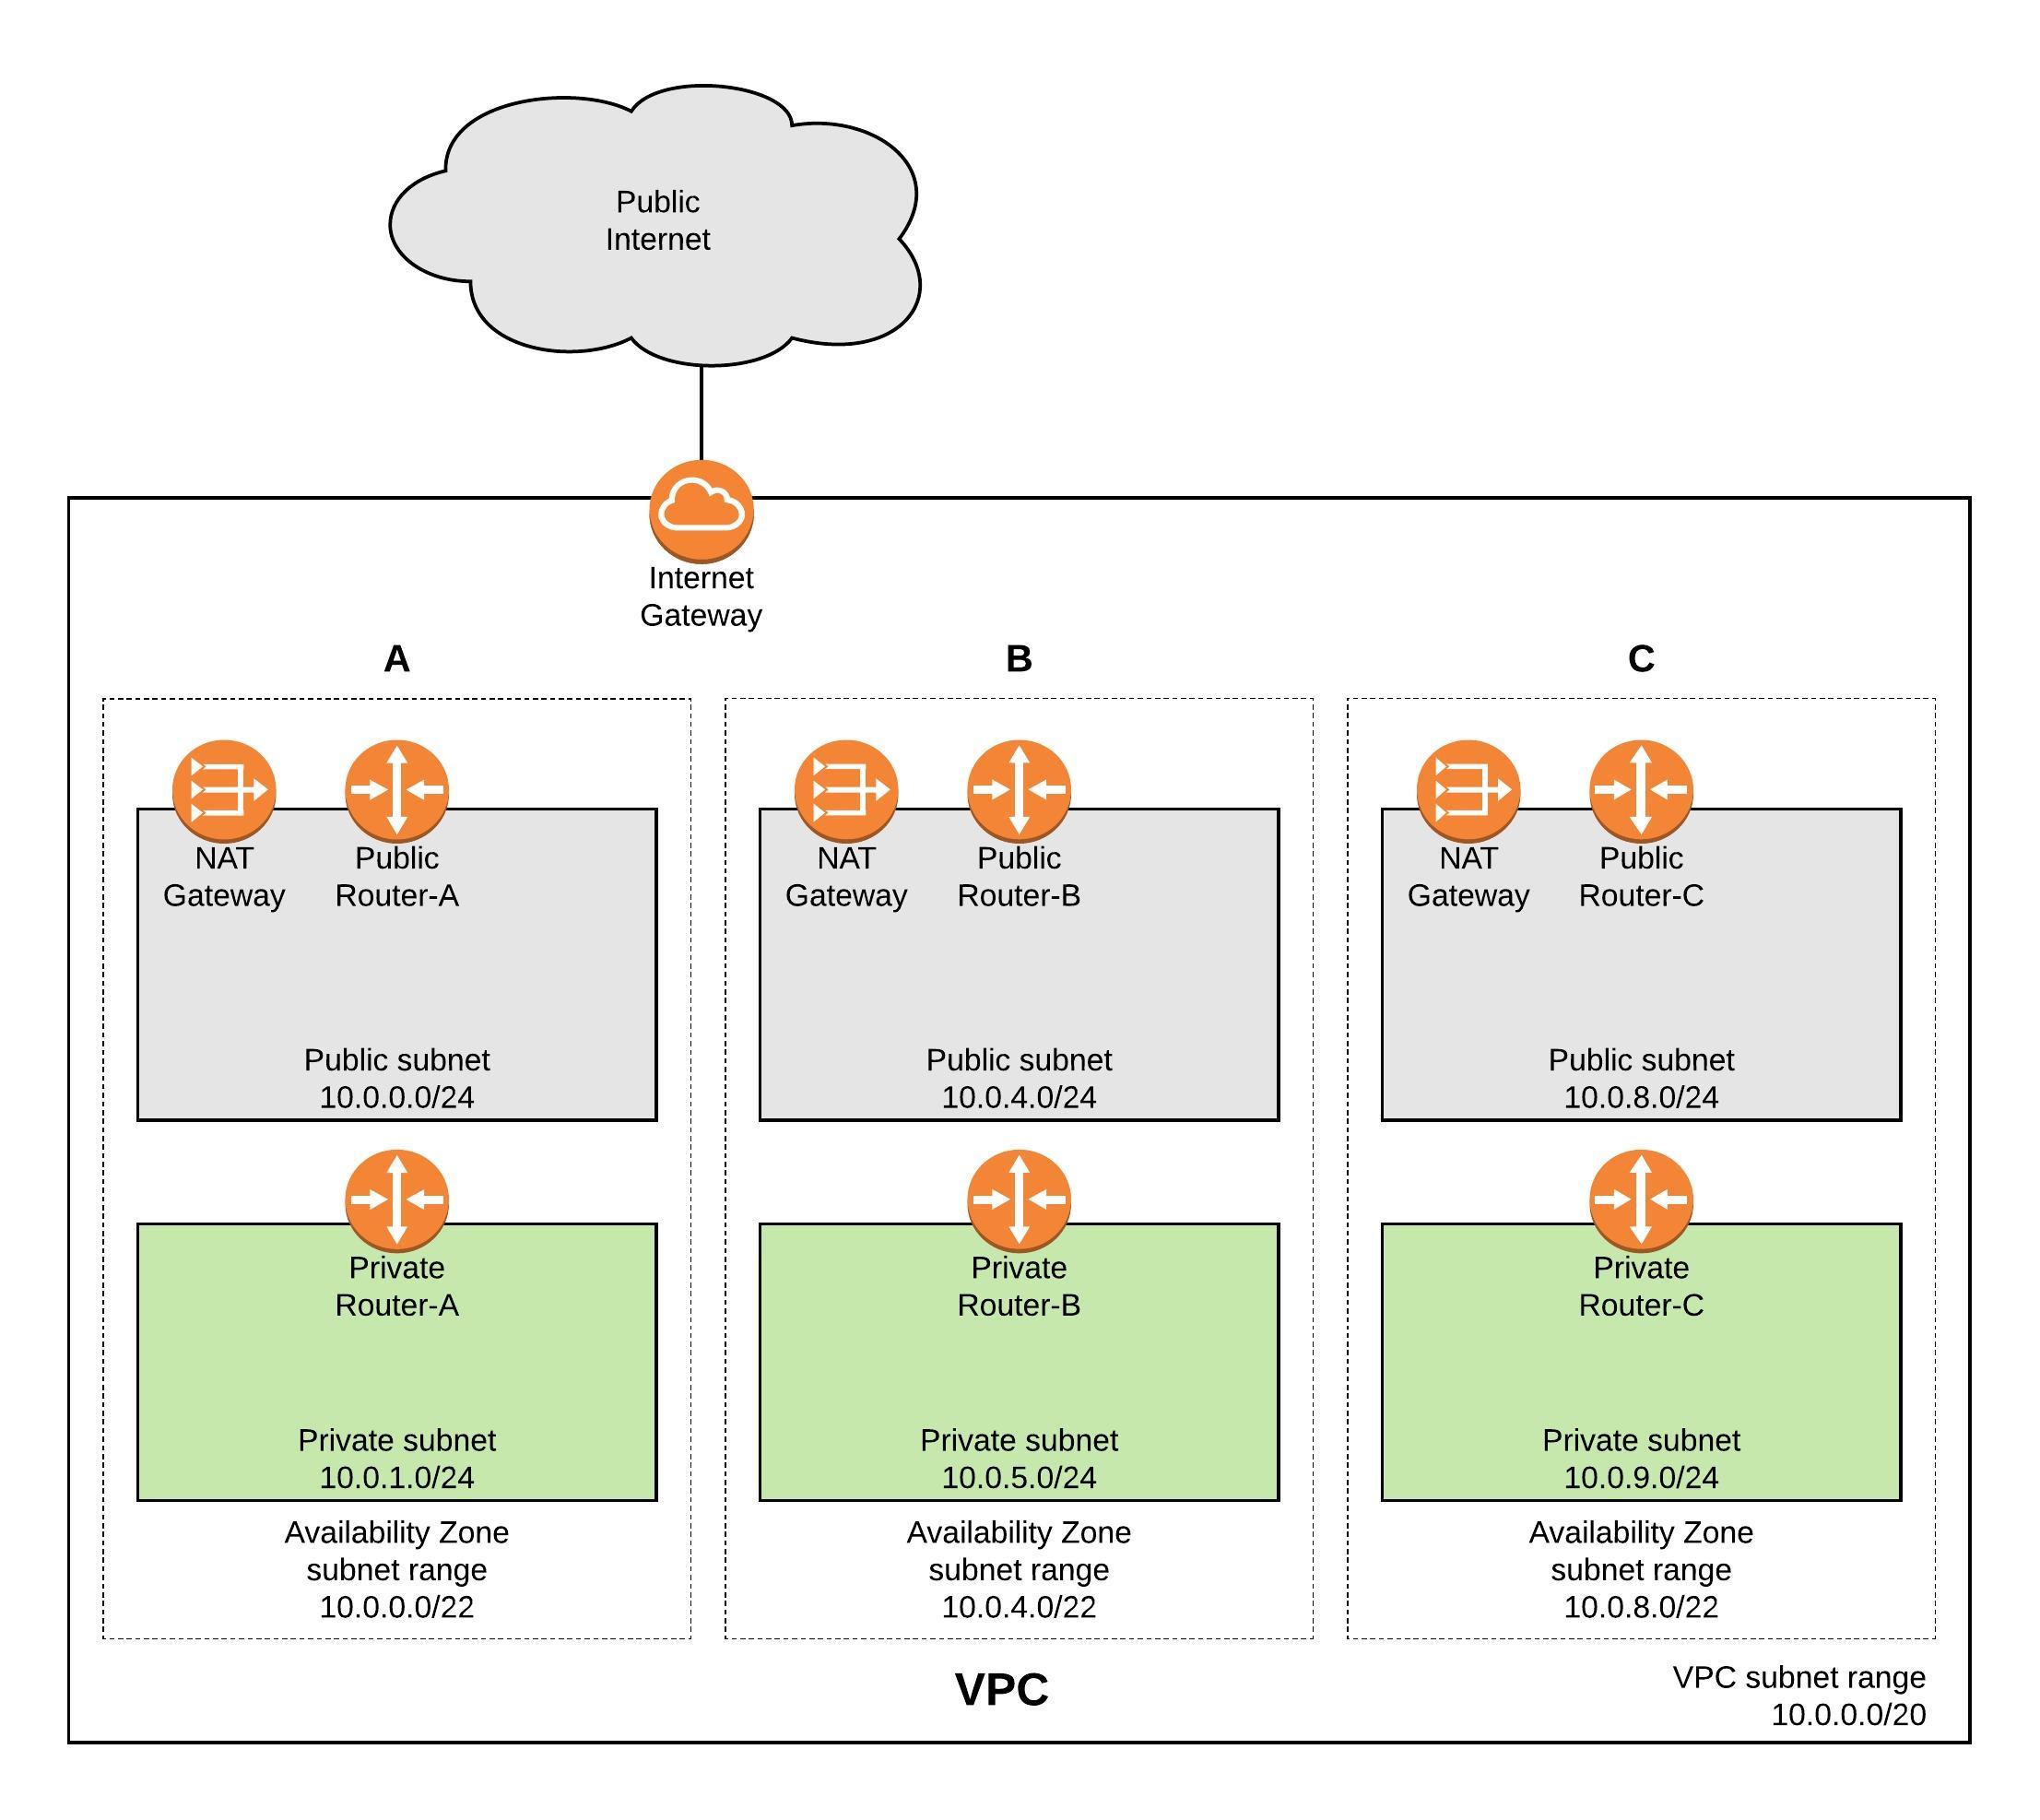
Before I start deploying the AWS VPC with HashCorp’s Terraform I want to explain the design of the Virtual Private Cloud. The main focus here is primarily for redundancy to ensure that if one Availability Zone (AZ) becomes unavailable that it is not interrupting the traffic and causing outages in your network, the NAT Gateway for example run per AZ so you need to make sure that these services are spread over multiple AZs.

AWS VPC network overview:
Before you start using Terraform you need to install the binary and it is also very useful to install the AWS command line interface. Please don’t forget to register the AWS CLI and add access and secure key.

pip install awscli --upgrade --user
wget https://releases.hashicorp.com/terraform/0.11.7/terraform_0.11.7_linux_amd64.zip
unzip terraform_0.11.7_linux_amd64.zip
sudo mv terraform /usr/local/bin/

Terraform is a great product and creates infrastructure as code, and is independent from any cloud provider so there is no need to use AWS CloudFormation like in my example. My repository for the Terraform files can be found here: https://github.com/berndonline/aws-terraform

Let’s start with the variables file, which defines the needed settings for deploying the VPC. Basically you only need to change the variables to deploy the VPC to another AWS region:

...
variable "aws_region" {
  description = "AWS region to launch servers."
  default     = "eu-west-1"
}
...
variable "vpc_cidr" {
    default = "10.0.0.0/20"
  description = "the vpc cdir range"
}
variable "public_subnet_a" {
  default = "10.0.0.0/24"
  description = "Public subnet AZ A"
}
variable "public_subnet_b" {
  default = "10.0.4.0/24"
  description = "Public subnet AZ A"
}
variable "public_subnet_c" {
  default = "10.0.8.0/24"
  description = "Public subnet AZ A"
}
...

The vpc.tf file is the Terraform template which deploys the private and public subnets, the internet gateway, multiple NAT gateways and the different routing tables and adds the needed routes towards the internet:

# Create a VPC to launch our instances into
resource "aws_vpc" "default" {
    cidr_block = "${var.vpc_cidr}"
    enable_dns_support = true
    enable_dns_hostnames = true
    tags {
      Name = "VPC"
    }
}

resource "aws_subnet" "PublicSubnetA" {
  vpc_id = "${aws_vpc.default.id}"
  cidr_block = "${var.public_subnet_a}"
  tags {
        Name = "Public Subnet A"
  }
 availability_zone = "${data.aws_availability_zones.available.names[0]}"
}
...

In the main.tf you define which provider to use:

# Specify the provider and access details
provider "aws" {
  region = "${var.aws_region}"
}

# Declare the data source
data "aws_availability_zones" "available" {}

Now let’s start deploying the environment, first you need to initialise Terraform “terraform init“:

berndonline@lab:~/aws-terraform$ terraform init

Initializing provider plugins...
- Checking for available provider plugins on https://releases.hashicorp.com...
- Downloading plugin for provider "aws" (1.25.0)...

The following providers do not have any version constraints in configuration,
so the latest version was installed.

To prevent automatic upgrades to new major versions that may contain breaking
changes, it is recommended to add version = "..." constraints to the
corresponding provider blocks in configuration, with the constraint strings
suggested below.

* provider.aws: version = "~> 1.25"

Terraform has been successfully initialized!

You may now begin working with Terraform. Try running "terraform plan" to see
any changes that are required for your infrastructure. All Terraform commands
should now work.

If you ever set or change modules or backend configuration for Terraform,
rerun this command to reinitialize your working directory. If you forget, other
commands will detect it and remind you to do so if necessary.
berndonline@lab:~/aws-terraform$

Next, let’s do a dry run “terraform plan” to see all changes Terraform would apply:

berndonline@lab:~/aws-terraform$ terraform plan
Refreshing Terraform state in-memory prior to plan...
The refreshed state will be used to calculate this plan, but will not be
persisted to local or remote state storage.

data.aws_availability_zones.available: Refreshing state...

------------------------------------------------------------------------

An execution plan has been generated and is shown below.
Resource actions are indicated with the following symbols:
  + create

Terraform will perform the following actions:

  + aws_eip.natgw_a
      id:                                          
      allocation_id:                               
      association_id:                              
      domain:                                      
      instance:                                    
      network_interface:                           
      private_ip:                                  
      public_ip:                                   
      vpc:                                         "true"

...

  + aws_vpc.default
      id:                                          
      assign_generated_ipv6_cidr_block:            "false"
      cidr_block:                                  "10.0.0.0/20"
      default_network_acl_id:                      
      default_route_table_id:                      
      default_security_group_id:                   
      dhcp_options_id:                             
      enable_classiclink:                          
      enable_classiclink_dns_support:              
      enable_dns_hostnames:                        "true"
      enable_dns_support:                          "true"
      instance_tenancy:                            "default"
      ipv6_association_id:                         
      ipv6_cidr_block:                             
      main_route_table_id:                         
      tags.%:                                      "1"
      tags.Name:                                   "VPC"


Plan: 27 to add, 0 to change, 0 to destroy.

------------------------------------------------------------------------

Note: You didn't specify an "-out" parameter to save this plan, so Terraform
can't guarantee that exactly these actions will be performed if
"terraform apply" is subsequently run.

berndonline@lab:~/aws-terraform$

Because nothing is deployed, Terraform would apply 27 changes, so let’s do this by running “terraform apply“. Terraform will check the state and will ask you to confirm and then apply the changes:

berndonline@lab:~/aws-terraform$ terraform apply
data.aws_availability_zones.available: Refreshing state...

An execution plan has been generated and is shown below.
Resource actions are indicated with the following symbols:
  + create

Terraform will perform the following actions:

  + aws_eip.natgw_a
      id:                                          
      allocation_id:                               
      association_id:                              
      domain:                                      
      instance:                                    
      network_interface:                           
      private_ip:                                  
      public_ip:                                   
      vpc:                                         "true"

...

  + aws_vpc.default
      id:                                          
      assign_generated_ipv6_cidr_block:            "false"
      cidr_block:                                  "10.0.0.0/20"
      default_network_acl_id:                      
      default_route_table_id:                      
      default_security_group_id:                   
      dhcp_options_id:                             
      enable_classiclink:                          
      enable_classiclink_dns_support:              
      enable_dns_hostnames:                        "true"
      enable_dns_support:                          "true"
      instance_tenancy:                            "default"
      ipv6_association_id:                         
      ipv6_cidr_block:                             
      main_route_table_id:                         
      tags.%:                                      "1"
      tags.Name:                                   "VPC"


Plan: 27 to add, 0 to change, 0 to destroy.

Do you want to perform these actions?
  Terraform will perform the actions described above.
  Only 'yes' will be accepted to approve.

  Enter a value: yes

aws_eip.natgw_c: Creating...
  allocation_id:     "" => ""
  association_id:    "" => ""
  domain:            "" => ""
  instance:          "" => ""
  network_interface: "" => ""
  private_ip:        "" => ""
  public_ip:         "" => ""
  vpc:               "" => "true"
aws_eip.natgw_a: Creating...
  allocation_id:     "" => ""
  association_id:    "" => ""
  domain:            "" => ""
  instance:          "" => ""
  network_interface: "" => ""
  private_ip:        "" => ""
  public_ip:         "" => ""
  vpc:               "" => "true"

...

aws_route_table_association.PrivateSubnetB: Creation complete after 0s (ID: rtbassoc-174ba16c)
aws_nat_gateway.public_nat_c: Still creating... (1m40s elapsed)
aws_nat_gateway.public_nat_c: Still creating... (1m50s elapsed)
aws_nat_gateway.public_nat_c: Creation complete after 1m56s (ID: nat-093319a1fa62c3eda)
aws_route_table.private_route_c: Creating...
  propagating_vgws.#:                         "" => ""
  route.#:                                    "" => "1"
  route.4170986711.cidr_block:                "" => "0.0.0.0/0"
  route.4170986711.egress_only_gateway_id:    "" => ""
  route.4170986711.gateway_id:                "" => ""
  route.4170986711.instance_id:               "" => ""
  route.4170986711.ipv6_cidr_block:           "" => ""
  route.4170986711.nat_gateway_id:            "" => "nat-093319a1fa62c3eda"
  route.4170986711.network_interface_id:      "" => ""
  route.4170986711.vpc_peering_connection_id: "" => ""
  tags.%:                                     "" => "1"
  tags.Name:                                  "" => "Private Route C"
  vpc_id:                                     "" => "vpc-fdffb19b"
aws_route_table.private_route_c: Creation complete after 1s (ID: rtb-d64632af)
aws_route_table_association.PrivateSubnetC: Creating...
  route_table_id: "" => "rtb-d64632af"
  subnet_id:      "" => "subnet-17da194d"
aws_route_table_association.PrivateSubnetC: Creation complete after 1s (ID: rtbassoc-35749e4e)

Apply complete! Resources: 27 added, 0 changed, 0 destroyed.
berndonline@lab:~/aws-terraform$

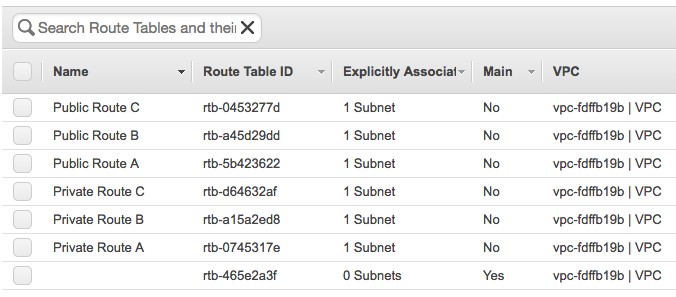
Terraform successfully applied all the changes so let’s have a quick look in the AWS web console:

You can change the environment and run “terraform apply” again and Terraform would deploy the changes you have made. In my example below I didn’t, so Terraform would do nothing because it tracks the state that is deployed and that I have defined in the vpc.tf:

berndonline@lab:~/aws-terraform$ terraform apply
aws_eip.natgw_c: Refreshing state... (ID: eipalloc-7fa0eb42)
aws_vpc.default: Refreshing state... (ID: vpc-fdffb19b)
aws_eip.natgw_a: Refreshing state... (ID: eipalloc-3ca7ec01)
aws_eip.natgw_b: Refreshing state... (ID: eipalloc-e6bbf0db)
data.aws_availability_zones.available: Refreshing state...
aws_subnet.PublicSubnetC: Refreshing state... (ID: subnet-d6e4278c)
aws_subnet.PrivateSubnetC: Refreshing state... (ID: subnet-17da194d)
aws_subnet.PrivateSubnetA: Refreshing state... (ID: subnet-6ea62708)
aws_subnet.PublicSubnetA: Refreshing state... (ID: subnet-1ab0317c)
aws_network_acl.all: Refreshing state... (ID: acl-c75f9ebe)
aws_internet_gateway.gw: Refreshing state... (ID: igw-27652940)
aws_subnet.PrivateSubnetB: Refreshing state... (ID: subnet-ab59c8e3)
aws_subnet.PublicSubnetB: Refreshing state... (ID: subnet-4a51c002)
aws_route_table.public_route_b: Refreshing state... (ID: rtb-a45d29dd)
aws_route_table.public_route_a: Refreshing state... (ID: rtb-5b423622)
aws_route_table.public_route_c: Refreshing state... (ID: rtb-0453277d)
aws_nat_gateway.public_nat_b: Refreshing state... (ID: nat-0376fc652d362a3b1)
aws_nat_gateway.public_nat_a: Refreshing state... (ID: nat-073ed904d4cf2d30e)
aws_route_table_association.PublicSubnetA: Refreshing state... (ID: rtbassoc-b14ba1ca)
aws_route_table_association.PublicSubnetB: Refreshing state... (ID: rtbassoc-277d975c)
aws_route_table.private_route_a: Refreshing state... (ID: rtb-0745317e)
aws_route_table.private_route_b: Refreshing state... (ID: rtb-a15a2ed8)
aws_route_table_association.PrivateSubnetB: Refreshing state... (ID: rtbassoc-174ba16c)
aws_route_table_association.PrivateSubnetA: Refreshing state... (ID: rtbassoc-60759f1b)
aws_nat_gateway.public_nat_c: Refreshing state... (ID: nat-093319a1fa62c3eda)
aws_route_table_association.PublicSubnetC: Refreshing state... (ID: rtbassoc-307e944b)
aws_route_table.private_route_c: Refreshing state... (ID: rtb-d64632af)
aws_route_table_association.PrivateSubnetC: Refreshing state... (ID: rtbassoc-35749e4e)

Apply complete! Resources: 0 added, 0 changed, 0 destroyed.
berndonline@lab:~/aws-terraform$

To remove the environment use run “terraform destroy“:

berndonline@lab:~/aws-terraform$ terraform destroy
aws_eip.natgw_c: Refreshing state... (ID: eipalloc-7fa0eb42)
data.aws_availability_zones.available: Refreshing state...
aws_eip.natgw_a: Refreshing state... (ID: eipalloc-3ca7ec01)
aws_vpc.default: Refreshing state... (ID: vpc-fdffb19b)
aws_eip.natgw_b: Refreshing state... (ID: eipalloc-e6bbf0db)

...

An execution plan has been generated and is shown below.
Resource actions are indicated with the following symbols:
  - destroy

Terraform will perform the following actions:

  - aws_eip.natgw_a

  - aws_eip.natgw_b

  - aws_eip.natgw_c

...

Plan: 0 to add, 0 to change, 27 to destroy.

Do you really want to destroy?
  Terraform will destroy all your managed infrastructure, as shown above.
  There is no undo. Only 'yes' will be accepted to confirm.

  Enter a value: yes

aws_network_acl.all: Destroying... (ID: acl-c75f9ebe)
aws_route_table_association.PrivateSubnetA: Destroying... (ID: rtbassoc-60759f1b)
aws_route_table_association.PublicSubnetC: Destroying... (ID: rtbassoc-307e944b)
aws_route_table_association.PublicSubnetA: Destroying... (ID: rtbassoc-b14ba1ca)
aws_route_table_association.PublicSubnetB: Destroying... (ID: rtbassoc-277d975c)
aws_route_table_association.PrivateSubnetC: Destroying... (ID: rtbassoc-35749e4e)
aws_route_table_association.PrivateSubnetB: Destroying... (ID: rtbassoc-174ba16c)
aws_route_table_association.PrivateSubnetB: Destruction complete after 0s

...

aws_internet_gateway.gw: Destroying... (ID: igw-27652940)
aws_eip.natgw_c: Destroying... (ID: eipalloc-7fa0eb42)
aws_subnet.PrivateSubnetC: Destroying... (ID: subnet-17da194d)
aws_subnet.PrivateSubnetC: Destruction complete after 1s
aws_eip.natgw_c: Destruction complete after 1s
aws_internet_gateway.gw: Still destroying... (ID: igw-27652940, 10s elapsed)
aws_internet_gateway.gw: Destruction complete after 11s
aws_vpc.default: Destroying... (ID: vpc-fdffb19b)
aws_vpc.default: Destruction complete after 0s

Destroy complete! Resources: 27 destroyed.
berndonline@lab:~/aws-terraform$

I hope this article was informative and explains how to deploy a VPC with Terraform. In the coming weeks I will add additional functions like deploying EC2 Instances and Load Balancing.

Please share your feedback and leave a comment.

Ansible Playbook to deploy AVI Controller and Service Engines

After my first blog post about Software defined Load Balancing with AVI Networks, here is how to automatically deploy AVI controller and services engines via Ansible.

Here are the links to my repositories; AVI Vagrant environment: https://github.com/berndonline/avi-lab-vagrant and AVI Ansible Playbook: https://github.com/berndonline/avi-lab-provision

Make sure that your vagrant environment is running,

berndonline@lab:~/avi-lab-vagrant$ vagrant status
Current machine states:

avi-controller-1          running (libvirt)
avi-controller-2          running (libvirt)
avi-controller-3          running (libvirt)
avi-se-1                  running (libvirt)
avi-se-2                  running (libvirt)

This environment represents multiple VMs. The VMs are all listed
above with their current state. For more information about a specific
VM, run `vagrant status NAME`.

I needed to modify the ansible.cfg to integrate a filter plugin:

[defaults]
inventory = ./.vagrant/provisioners/ansible/inventory/vagrant_ansible_inventory
host_key_checking=False

library = /home/berndonline/avi-lab-provision/lib
filter_plugins = /home/berndonline/avi-lab-provision/lib/filter_plugins

The controller installation is actually very simple and I got it from the official AVI ansible role they created, I added a second role to check ones the controller nodes are successfully booted:

---
- hosts: avi-controller
  user: '{{ ansible_ssh_user }}'
  gather_facts: "true"
  roles:
    - {role: ansible-role-avicontroller, become: true}
    - {role: avi-post-controller, become: false}

There’s one important thing to know before we run the playbook. When you have an AVI subscription you get custom container images with a predefined default password which makes it easier for you to do the cluster setup fully automated. You find the default password variable in group_vars/all.yml there you set as well if the password should be changed.

Let’s execute the ansible playbook, it takes a bit time for the three nodes to boot up:

berndonline@lab:~/avi-lab-vagrant$ ansible-playbook ../avi-lab-provision/playbooks/avi-controller-install.yml

PLAY [avi-controller] *********************************************************************************************************************************************

TASK [Gathering Facts] ********************************************************************************************************************************************
ok: [avi-controller-3]
ok: [avi-controller-2]
ok: [avi-controller-1]

TASK [ansible-role-avicontroller : Avi Controller | Deployment] ***************************************************************************************************
included: /home/berndonline/avi-lab-provision/roles/ansible-role-avicontroller/tasks/docker/main.yml for avi-controller-1, avi-controller-2, avi-controller-3

TASK [ansible-role-avicontroller : Avi Controller | Services | systemd | Check if Avi Controller installed] *******************************************************
included: /home/berndonline/avi-lab-provision/roles/ansible-role-avicontroller/tasks/docker/services/systemd/check.yml for avi-controller-1, avi-controller-2, avi-controller-3

TASK [ansible-role-avicontroller : Avi Controller | Check if Avi Controller installed] ****************************************************************************
ok: [avi-controller-3]
ok: [avi-controller-2]
ok: [avi-controller-1]

TASK [ansible-role-avicontroller : Avi Controller | Services | init.d | Check if Avi Controller installed] ********************************************************
skipping: [avi-controller-1]
skipping: [avi-controller-2]
skipping: [avi-controller-3]

TASK [ansible-role-avicontroller : Avi Controller | Check minimum requirements] ***********************************************************************************
included: /home/berndonline/avi-lab-provision/roles/ansible-role-avicontroller/tasks/docker/requirements.yml for avi-controller-1, avi-controller-2, avi-controller-3

TASK [ansible-role-avicontroller : Avi Controller | Requirements | Check for docker] ******************************************************************************
ok: [avi-controller-2]
ok: [avi-controller-3]
ok: [avi-controller-1]

...

TASK [avi-post-controller : wait for cluster nodes up] ************************************************************************************************************
FAILED - RETRYING: wait for cluster nodes up (30 retries left).

...

FAILED - RETRYING: wait for cluster nodes up (7 retries left).
FAILED - RETRYING: wait for cluster nodes up (8 retries left).
FAILED - RETRYING: wait for cluster nodes up (7 retries left).
ok: [avi-controller-2]
ok: [avi-controller-3]
ok: [avi-controller-1]

PLAY RECAP ********************************************************************************************************************************************************
avi-controller-1           : ok=36   changed=6    unreachable=0    failed=0
avi-controller-2           : ok=35   changed=5    unreachable=0    failed=0
avi-controller-3           : ok=35   changed=5    unreachable=0    failed=0

berndonline@lab:~/avi-lab-vagrant$

We are not finished yet and need to set basic settings like NTP and DNS, and need to configure the AVI three node controller cluster with another playbook:

---
- hosts: localhost
  connection: local
  roles:
    - {role: avi-cluster-setup, become: false}
    - {role: avi-change-password, become: false, when: avi_change_password == true}

The first role uses the REST API to do the configuration changes and requires the AVI ansible sdk role and for these reason it is very useful using the custom subscription images because you know the default password otherwise you need to modify the main setup.json file.

Let’s run the AVI cluster setup playbook:

berndonline@lab:~/avi-lab-vagrant$ ansible-playbook ../avi-lab-provision/playbooks/avi-cluster-setup.yml

PLAY [localhost] **************************************************************************************************************************************************

TASK [Gathering Facts] ********************************************************************************************************************************************
ok: [localhost]

TASK [ansible-role-avisdk : Checking if avisdk python library is present] *****************************************************************************************
ok: [localhost] => {
    "msg": "Please make sure avisdk is installed via pip. 'pip install avisdk --upgrade'"
}

TASK [avi-cluster-setup : set AVI dns and ntp facts] **************************************************************************************************************
ok: [localhost]

TASK [avi-cluster-setup : set AVI cluster facts] ******************************************************************************************************************
ok: [localhost]

TASK [avi-cluster-setup : configure ntp and dns controller nodes] *************************************************************************************************
changed: [localhost]

TASK [avi-cluster-setup : configure AVI cluster] ******************************************************************************************************************
changed: [localhost]

TASK [avi-cluster-setup : wait for cluster become active] *********************************************************************************************************
FAILED - RETRYING: wait for cluster become active (30 retries left).
FAILED - RETRYING: wait for cluster become active (29 retries left).
FAILED - RETRYING: wait for cluster become active (28 retries left).

...

FAILED - RETRYING: wait for cluster become active (14 retries left).
FAILED - RETRYING: wait for cluster become active (13 retries left).
FAILED - RETRYING: wait for cluster become active (12 retries left).
ok: [localhost]

TASK [avi-change-password : change default admin password on cluster build when subscription] *********************************************************************
skipping: [localhost]

PLAY RECAP ********************************************************************************************************************************************************
localhost                  : ok=7    changed=2    unreachable=0    failed=0

berndonline@lab:~/avi-lab-vagrant$

We can check in the web console to see if the cluster is booted and correctly setup:

Last but not least we need the ansible playbook for the AVI service engines installation which relies on the official AVI ansible se role:

---
- hosts: avi-se
  user: '{{ ansible_ssh_user }}'
  gather_facts: "true"
  roles:
    - {role: ansible-role-avise, become: true}

Let’s run the playbook for the service engines installation:

berndonline@lab:~/avi-lab-vagrant$ ansible-playbook ../avi-lab-provision/playbooks/avi-se-install.yml

PLAY [avi-se] *****************************************************************************************************************************************************

TASK [Gathering Facts] ********************************************************************************************************************************************
ok: [avi-se-2]
ok: [avi-se-1]

TASK [ansible-role-avisdk : Checking if avisdk python library is present] *****************************************************************************************
ok: [avi-se-1] => {
    "msg": "Please make sure avisdk is installed via pip. 'pip install avisdk --upgrade'"
}
ok: [avi-se-2] => {
    "msg": "Please make sure avisdk is installed via pip. 'pip install avisdk --upgrade'"
}

TASK [ansible-role-avise : Avi SE | Set facts] ********************************************************************************************************************
skipping: [avi-se-1]
skipping: [avi-se-2]

TASK [ansible-role-avise : Avi SE | Deployment] *******************************************************************************************************************
included: /home/berndonline/avi-lab-provision/roles/ansible-role-avise/tasks/docker/main.yml for avi-se-1, avi-se-2

TASK [ansible-role-avise : Avi SE | Check minimum requirements] ***************************************************************************************************
included: /home/berndonline/avi-lab-provision/roles/ansible-role-avise/tasks/docker/requirements.yml for avi-se-1, avi-se-2

TASK [ansible-role-avise : Avi SE | Requirements | Check for docker] **********************************************************************************************
ok: [avi-se-2]
ok: [avi-se-1]

TASK [ansible-role-avise : Avi SE | Requirements | Set facts] *****************************************************************************************************
ok: [avi-se-1]
ok: [avi-se-2]

TASK [ansible-role-avise : Avi SE | Requirements | Validate Parameters] *******************************************************************************************
ok: [avi-se-1] => {
    "changed": false,
    "msg": "All assertions passed"
}
ok: [avi-se-2] => {
    "changed": false,
    "msg": "All assertions passed"
}

...

TASK [ansible-role-avise : Avi SE | Services | systemd | Start the service since it's not running] ****************************************************************
changed: [avi-se-1]
changed: [avi-se-2]

RUNNING HANDLER [ansible-role-avise : Avi SE | Services | systemd | Daemon reload] ********************************************************************************
ok: [avi-se-2]
ok: [avi-se-1]

RUNNING HANDLER [ansible-role-avise : Avi SE | Services | Restart the avise service] ******************************************************************************
changed: [avi-se-2]
changed: [avi-se-1]

PLAY RECAP ********************************************************************************************************************************************************
avi-se-1                   : ok=47   changed=7    unreachable=0    failed=0
avi-se-2                   : ok=47   changed=7    unreachable=0    failed=0

berndonline@lab:~/avi-lab-vagrant$

After a few minutes you see the AVI service engines automatically register on the controller cluster and you are ready start configuring the detailed load balancing configuration:

Please share your feedback and leave a comment.
Software defined Load Balancing with AVI Networks

Throughout my career I have used various load balancing platforms, from commercial products like F5 or Citrix NetScaler to open source software like HA proxy. All of them do their job of balancing traffic between servers but the biggest problem is the scalability: yes you can deploy more load balancers but the config is static bound to the appliance.

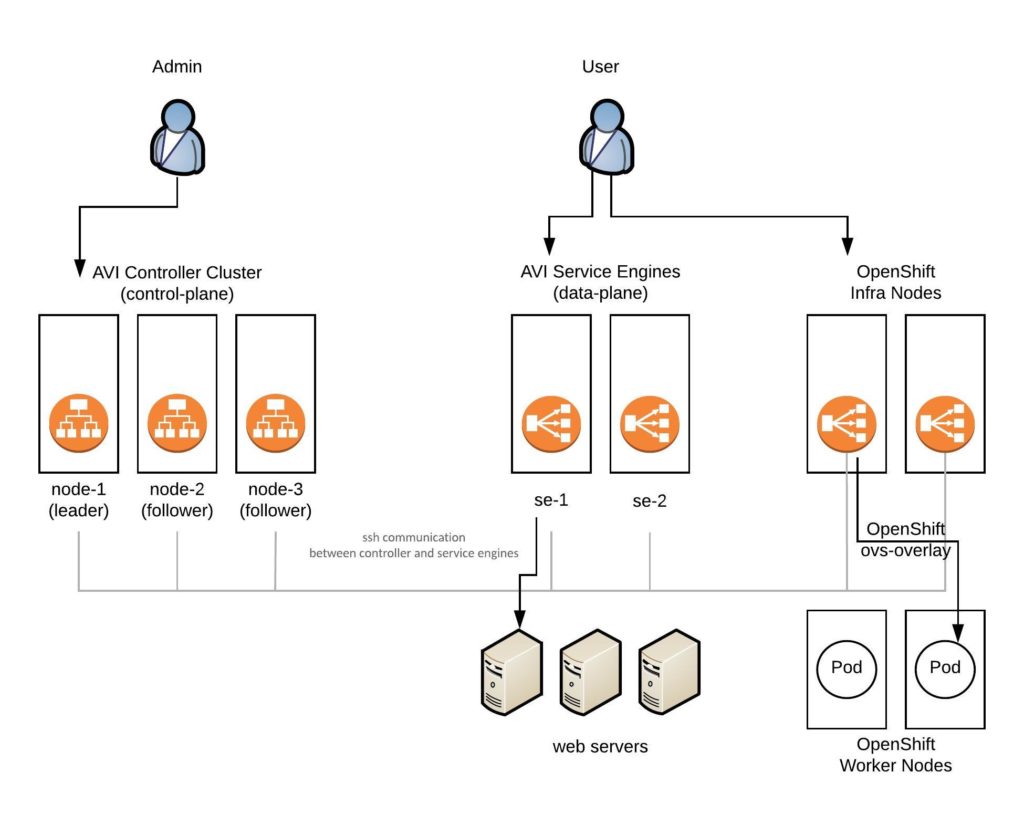
AVI Networks has a very interesting concept of moving away from the traditional idea of load balancing and solving this problem by decoupling the control-plane from the data-plane which makes the load balancing Service Engines basically just forward traffic and can be more easily scaled-out when needed. Another nice advantage is that these Service Engines are container based and can run on basically every type of infrastructure from Bare Metal, on VMs to modern containerized platforms like Kubernetes or OpenShift:

All the AVI components are running as container image on any type of infrastructure or platform architecture which makes the deployment very easy to run on-premise or cloud systems.

The Service Engines on Hypervisor or Base-metal servers need network cards which support Intel’s DPDK for better packet forwarding. Have a look at the AVI linux server deployment guide: https://avinetworks.com/docs/latest/installing-avi-vantage-for-a-linux-server-cloud/

Here now, is a basic step-by-step guide on how to install the AVI Vantage Controller and additional Service Engines. Have a look at the AVI Knowledge-Base where the install is explained in detail:  https://avinetworks.com/docs/latest/installing-avi-vantage-for-a-linux-server-cloud/

Here is the link to my Vagrant environment: https://github.com/berndonline/avi-lab-vagrant

Let’s start with the manual AVI Controller installation:

[vagrant@localhost ~]$ sudo ./avi_baremetal_setup.py
AviVantage Version Tag: 17.2.11-9014
Found disk with largest capacity at [/]

Welcome to Avi Initialization Script

Pre-requisites: This script assumes the below utilities are installed:
                  docker (yum -y install docker/apt-get install docker.io)
Supported Vers: OEL - 6.5,6.7,6.9,7.0,7.1,7.2,7.3,7.4 Centos/RHEL - 7.0,7.1,7.2,7.3,7.4, Ubuntu - 14.04,16.04

Do you want to run Avi Controller on this Host [y/n] y
Do you want to run Avi SE on this Host [y/n] n
Enter The Number Of Cores For Avi Controller. Range [4, 4] 4
Please Enter Memory (in GB) for Avi Controller. Range [12, 7]
Please enter directory path for Avi Controller Config (Default [/opt/avi/controller/data/])
Please enter disk size (in GB) for Avi Controller Config (Default [30G]) 10
Do you have separate partition for Avi Controller Metrics ? If yes, please enter directory path, else leave it blank
Do you have separate partition for Avi Controller Client Logs ? If yes, please enter directory path, else leave it blank
Please enter Controller IP (Default [10.255.1.232])
Enter the Controller SSH port. (Default [5098])
Enter the Controller system-internal portal port. (Default [8443])
AviVantage Version Tag: 17.2.11-9014
Run SE           : No
Run Controller   : Yes
Controller Cores : 4
Memory(GB)       : 7
Disk(GB)         : 10
Controller IP    : 10.255.1.232
Disabling Avi Services...
Loading Avi CONTROLLER Image. Please Wait..
Installation Successful. Starting Services..
[vagrant@localhost ~]$
[vagrant@localhost ~]$ sudo systemctl start avicontroller

Or as a single command without interactive mode:

[vagrant@localhost ~]$ sudo ./avi_baremetal_setup.py -c -cd 10 -cc 4 -cm 7 -i 10.255.1.232
AviVantage Version Tag: 17.2.11-9014
Found disk with largest capacity at [/]
AviVantage Version Tag: 17.2.11-9014
Run SE           : No
Run Controller   : Yes
Controller Cores : 4
Memory(GB)       : 7
Disk(GB)         : 10
Controller IP    : 10.255.1.232
Disabling Avi Services...
Loading Avi CONTROLLER Image. Please Wait..
Installation Successful. Starting Services..
[vagrant@localhost ~]$
[vagrant@localhost ~]$ sudo systemctl start avicontroller

The installer basically installed a container image on the server which runs the AVI Controller:

[vagrant@localhost ~]$ sudo docker ps
CONTAINER ID        IMAGE                                                 COMMAND                  CREATED              STATUS              PORTS                                                                                                                                    NAMES
c689435f74fd        avinetworks/controller:17.2.11-9014                   "/opt/avi/scripts/do…"   About a minute ago   Up About a minute   0.0.0.0:80->80/tcp, 0.0.0.0:443->443/tcp, 0.0.0.0:5054->5054/tcp, 0.0.0.0:5098->5098/tcp, 0.0.0.0:8443->8443/tcp, 0.0.0.0:161->161/udp   avicontroller
[vagrant@localhost ~]$

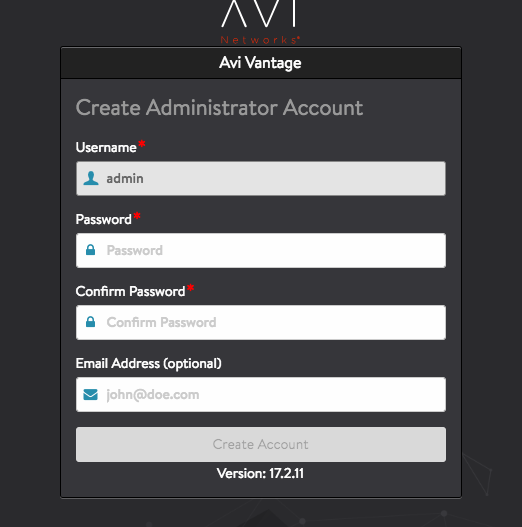
Next you can connect via the web console to change the password and finalise the configuration to configure DNS, NTP and SMTP:

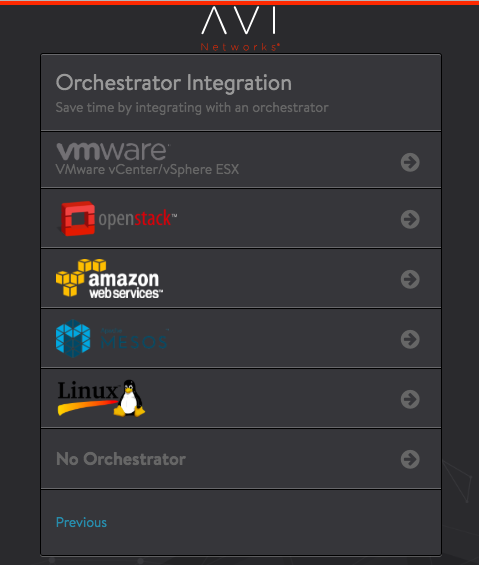
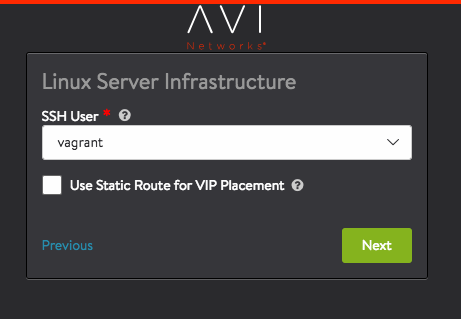
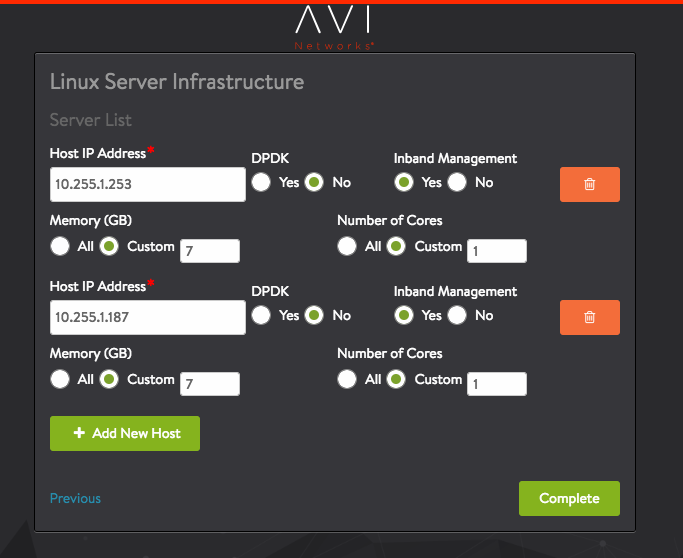
When you get to the menu Orchestrator integration you can put in the details for the controller to install additional service engines:

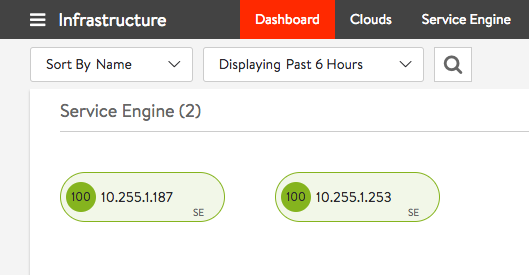
In the meantime the AVI Controller installs the specified Service Engines in the background, which automatically appear once this is completed under the infrastructure menu:

Like with the AVI Controller, the Service Engines run as container image:

[vagrant@localhost ~]$ sudo docker ps
CONTAINER ID        IMAGE                                         COMMAND                  CREATED             STATUS              PORTS               NAMES
2c6b207ed376        avinetworks/se:17.2.11-9014                   "/opt/avi/scripts/do…"   51 seconds ago      Up 50 seconds                           avise
[vagrant@localhost ~]$

The next article will be about automatically deploying the AVI Controller and Service Engines via Ansible, and looking into how to integrate AVI with OpenShift.

Please share your feedback and leave a comment.

Internet Edge and WAN Routing with Cumulus Linux

With this article I wanted to focus on something different than the usual spine and leaf topology and talk about datacenter edge routing.

I was using Cisco routers for many years for Internet Edge and WAN connectivity. The problem with using a vendor like Cisco is the price tag you have to pay and there still might a reason for it to spend the money. But nowadays you get leased-lines handed over as normal Ethernet connection and using a dedicated routers maybe not always necessary if you are not getting too crazy with BGP routing or quality of service.

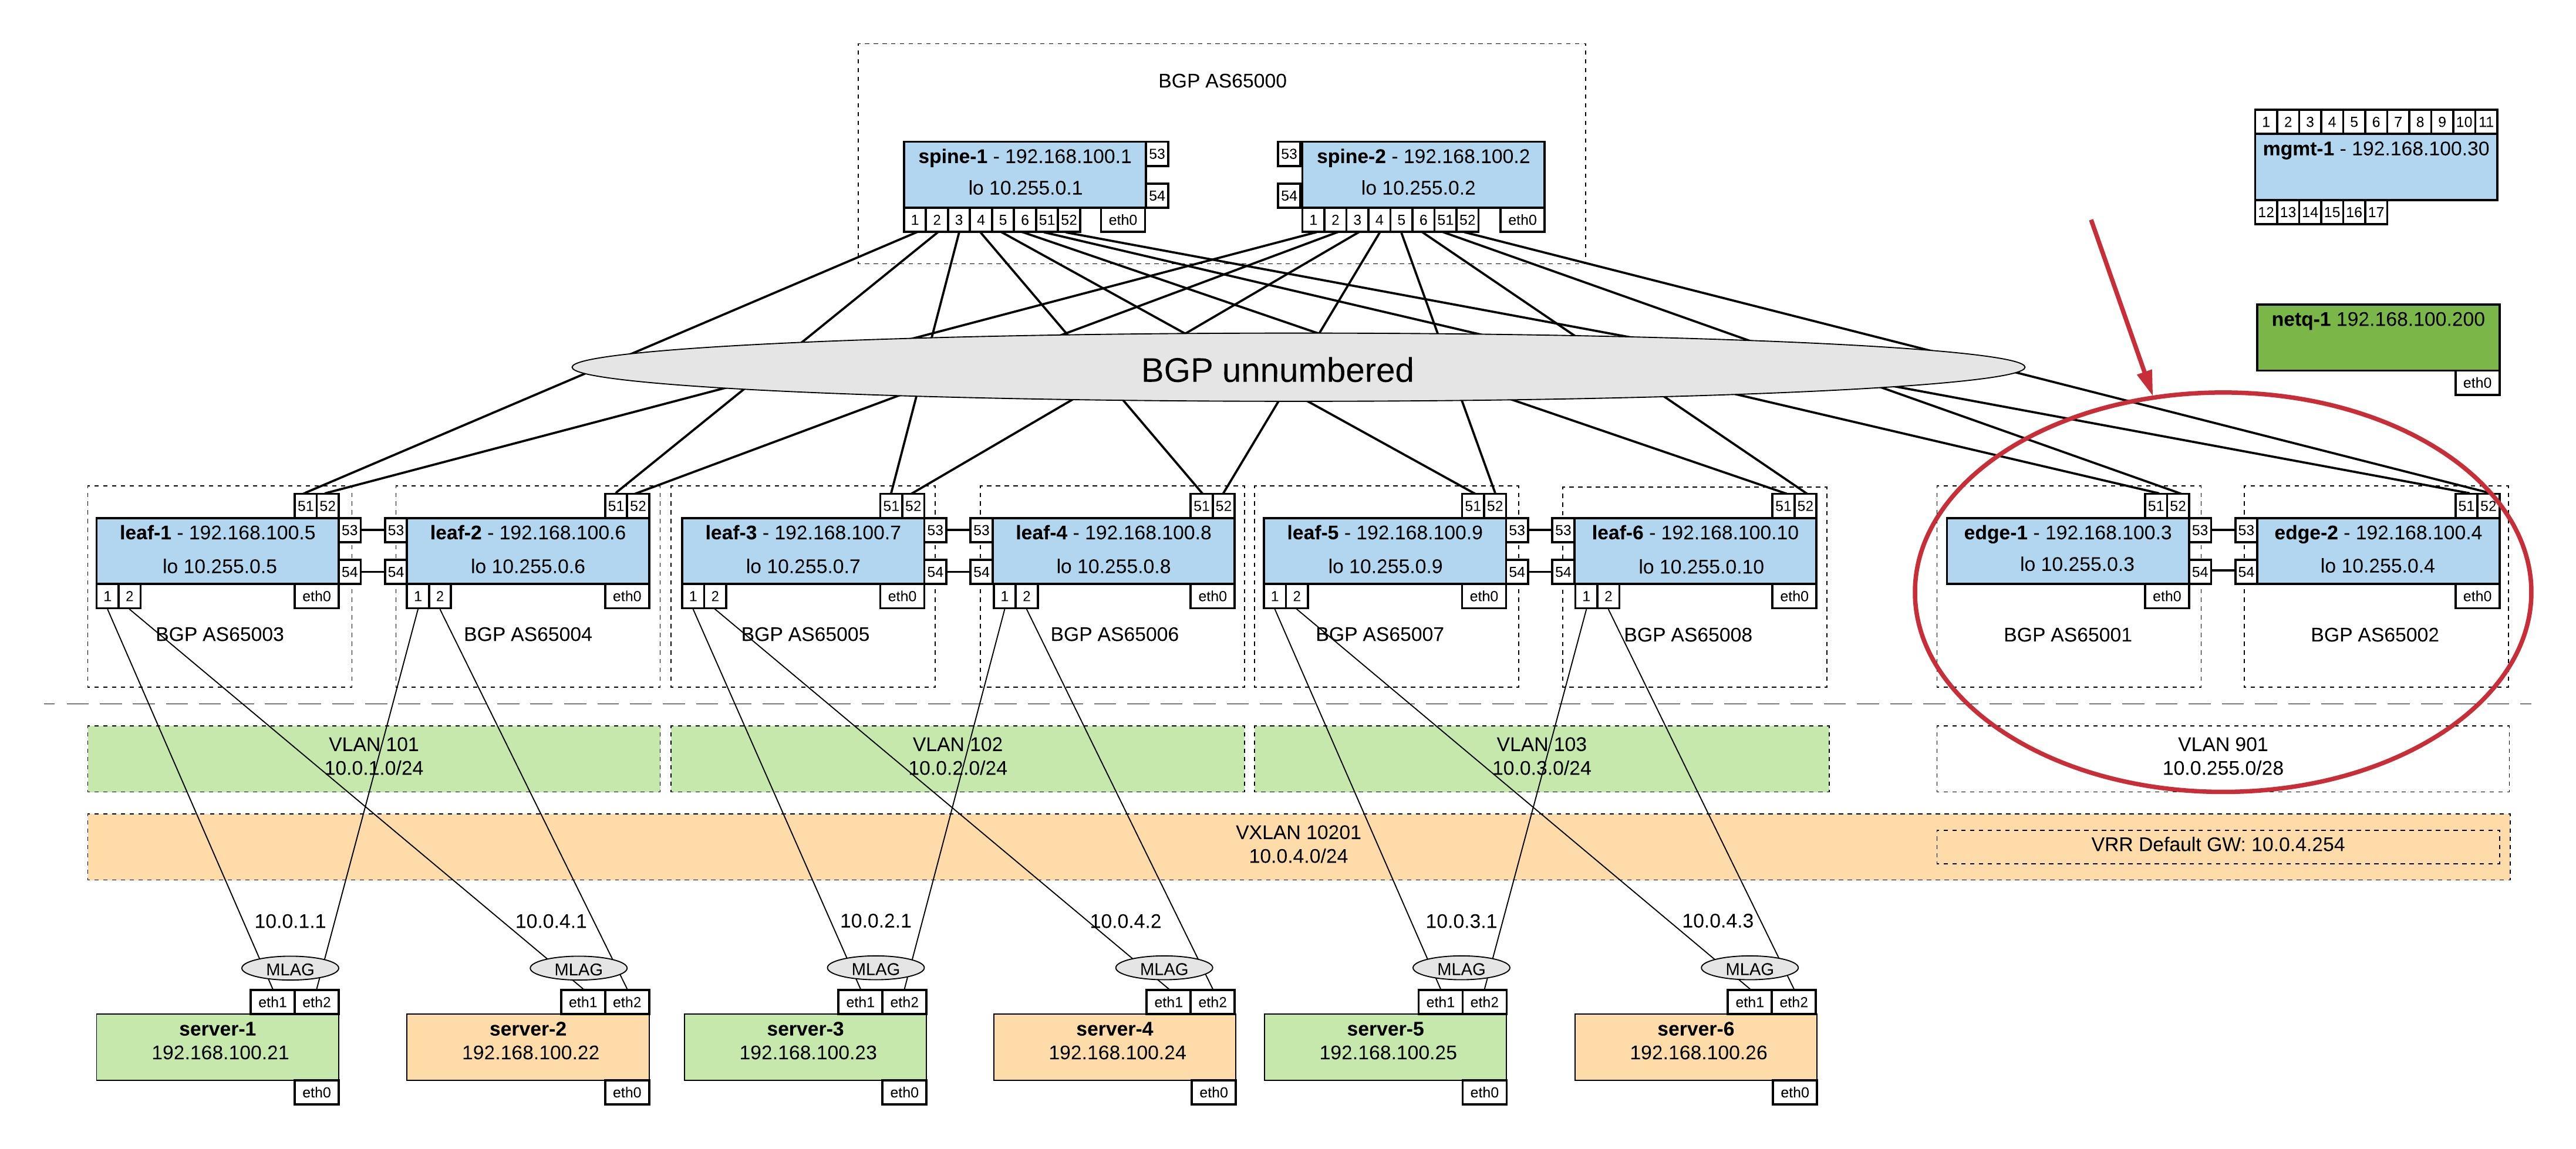
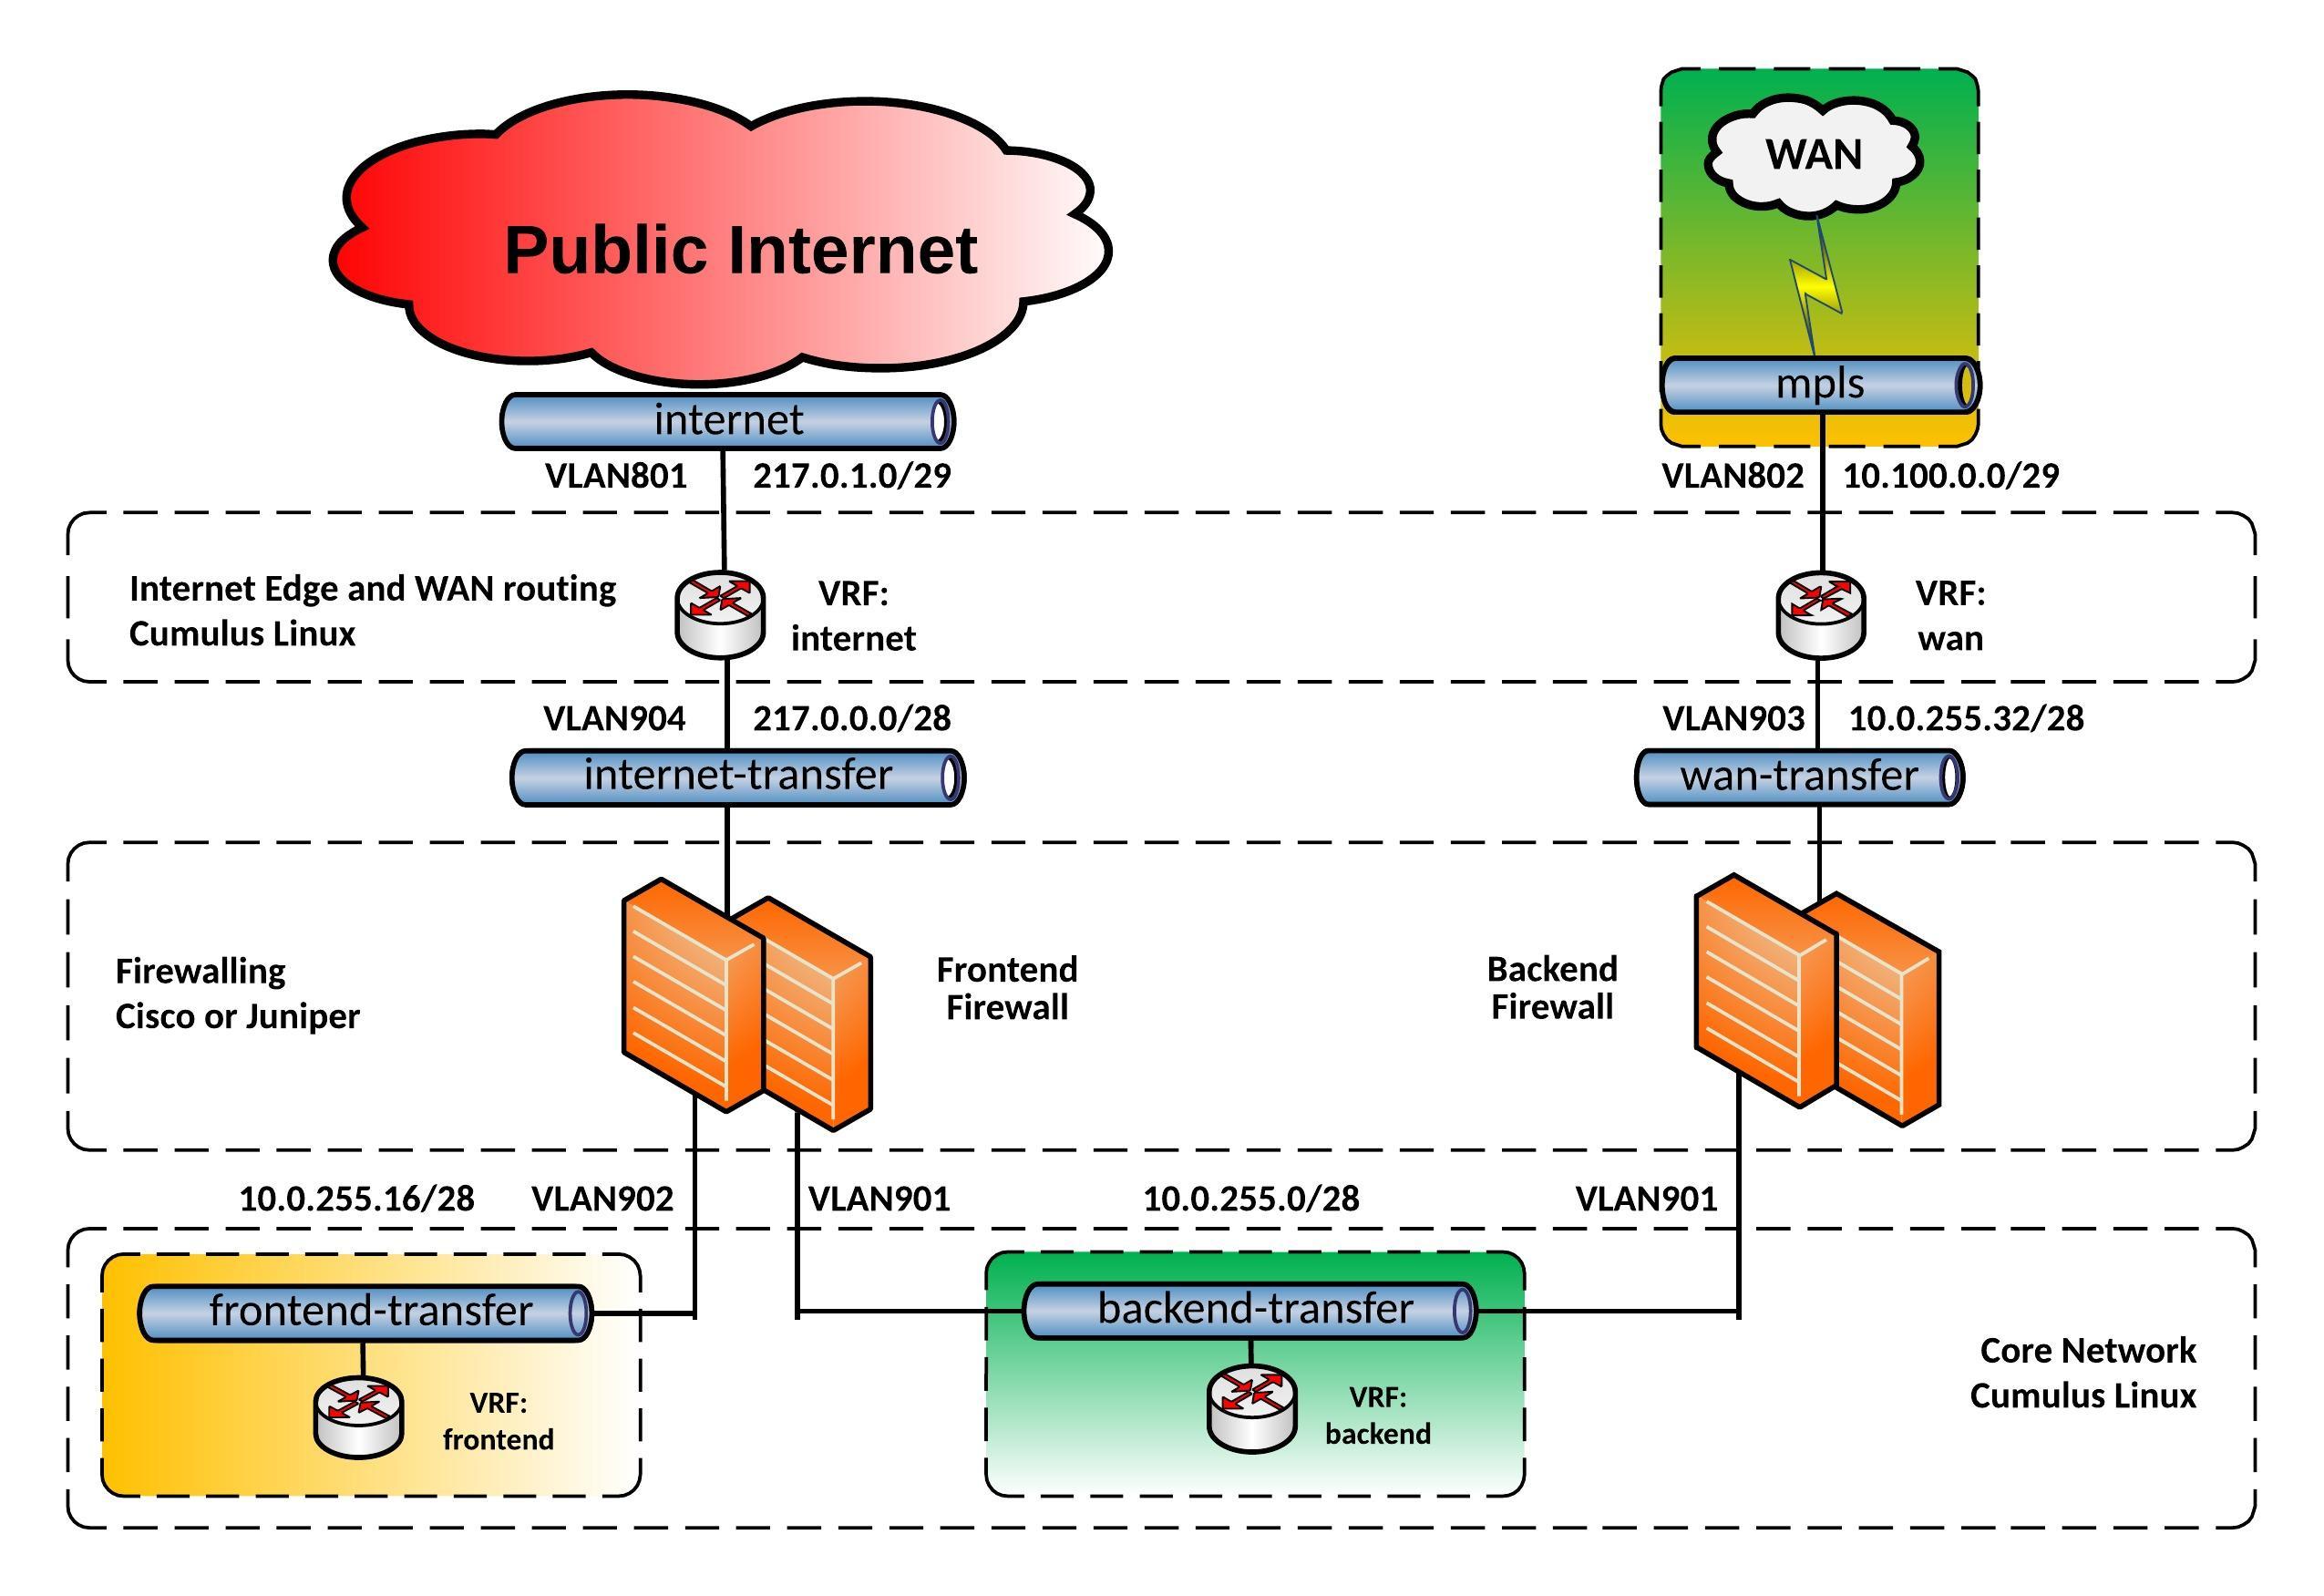
I was experimenting over the last weeks if I could use a Cumulus Linux switch as an Internet Edge and Wide Area Network router with running different VRFs for internet and WAN connectivity. I came up with the following edge network layout you see below:

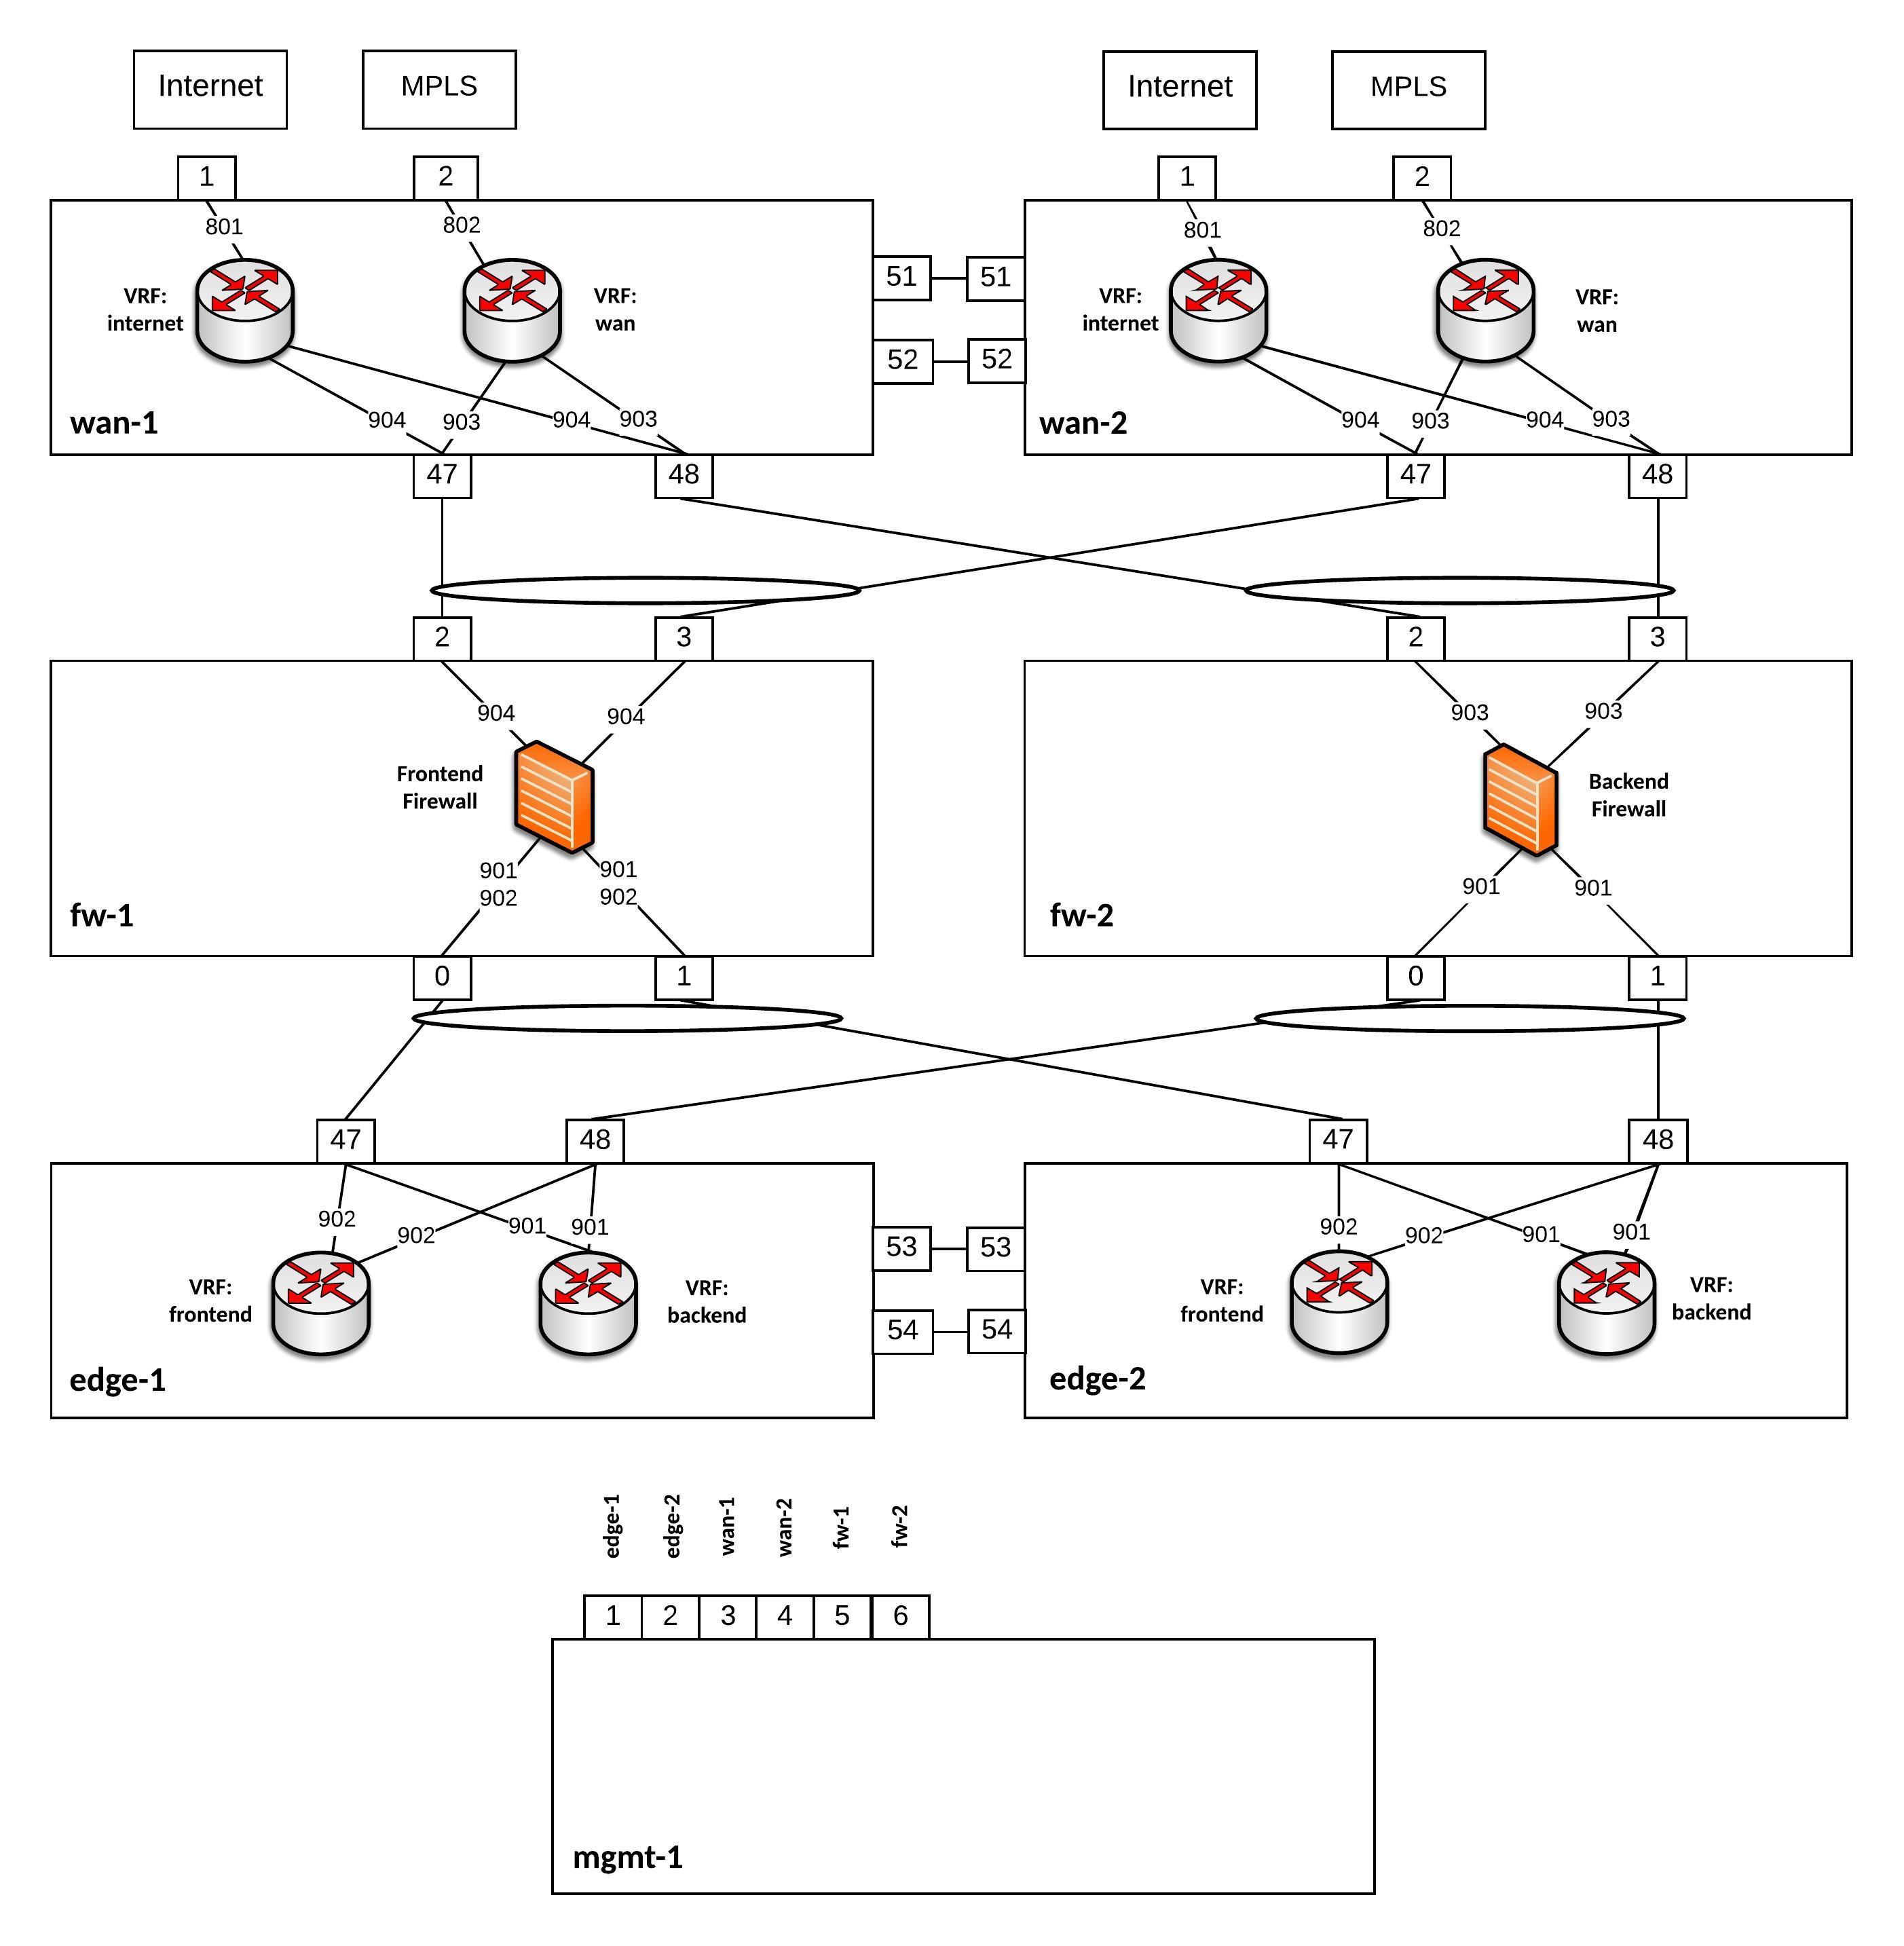
For this network, I build an Vagrant topology with Cumulus VX to simulate the edge routing and being able to test the connectivity. Below you see a more detailed view of the Vagrant topology:

Everything is running on Cumulus VX even the firewalls because I just wanted to simulate the traffic flow and see if the network communication is functioning. Also having separate WAN switches might be useful because 1Gbit/s switches are cheaper then 40Gbit/s switches and you need additional SFP for 1Gbit/s connections, another point is to separate your layer 2 WAN connectivity from your internal datacenter network.

Here the assigned IP addresses for this lab:

wan-1 VLAN801 PIP: 217.0.1.2/29 VIP: 217.0.1.1/29
wan-2 VLAN801 PIP: 217.0.1.3/29 VIP: 217.0.1.1/29
wan-1 VLAN802 PIP: 10.100.0.1/29 
wan-2 VLAN802 PIP: 10.100.0.2/29
wan-1 VLAN904 PIP: 217.0.0.2/28 VIP: 217.0.0.1/28
wan-2 VLAN904 PIP: 217.0.0.3/28 VIP: 217.0.0.1/28
fw-1 VLAN904 PIP: 217.0.0.14/28
wan-1 VLAN903 PIP: 10.0.255.34/28 VIP: 10.0.255.33/28
wan-2 VLAN903 PIP: 10.0.255.35/28 VIP: 10.0.255.33/28
fw-2 VLAN903 PIP: 10.0.255.46/28
edge-1 VLAN901 PIP: 10.0.255.2/28 VIP: 10.0.255.1/28
edge-2 VLAN901 PIP: 10.0.255.3/28 VIP: 10.0.255.1/28
fw-1 VLAN901 PIP: 10.0.255.14/28
fw-2 VLAN901 PIP: 10.0.255.12/28
edge-1 VLAN902 PIP: 10.0.255.18/28 VIP: 10.0.255.17/28
edge-2 VLAN902 PIP: 10.0.255.19/28 VIP: 10.0.255.17/28
fw-1 VLAN902 PIP: 10.0.255.30/28

You can find the Github repository for the Vagrant topology here: https://github.com/berndonline/cumulus-edge-vagrant

berndonline@lab:~/cumulus-edge-vagrant$ vagrant status
Current machine states:

fw-2                      running (libvirt)
fw-1                      running (libvirt)
mgmt-1                    running (libvirt)
edge-2                    running (libvirt)
edge-1                    running (libvirt)
wan-1                     running (libvirt)
wan-2                     running (libvirt)

This environment represents multiple VMs. The VMs are all listed
above with their current state. For more information about a specific
VM, run `vagrant status NAME`.
berndonline@lab:~/cumulus-edge-vagrant$

I wrote as well an Ansible Playbook to deploy the initial configuration which you can find here: https://github.com/berndonline/cumulus-edge-provision

Let’s execute the playbook:

berndonline@lab:~/cumulus-edge-vagrant$ ansible-playbook ../cumulus-edge-provision/site.yml

PLAY [edge] ********************************************************************************************************************************************************

TASK [switchgroups : create switch groups based on clag_pairs] *****************************************************************************************************
skipping: [edge-2] => (item=(u'wan', [u'wan-1', u'wan-2']))
skipping: [edge-1] => (item=(u'wan', [u'wan-1', u'wan-2']))
ok: [edge-2] => (item=(u'edge', [u'edge-1', u'edge-2']))
ok: [wan-1] => (item=(u'wan', [u'wan-1', u'wan-2']))
skipping: [wan-1] => (item=(u'edge', [u'edge-1', u'edge-2']))
ok: [edge-1] => (item=(u'edge', [u'edge-1', u'edge-2']))
ok: [wan-2] => (item=(u'wan', [u'wan-1', u'wan-2']))
skipping: [wan-2] => (item=(u'edge', [u'edge-1', u'edge-2']))

TASK [switchgroups : include switch group variables] ***************************************************************************************************************
skipping: [edge-2] => (item=(u'wan', [u'wan-1', u'wan-2']))
skipping: [edge-1] => (item=(u'wan', [u'wan-1', u'wan-2']))
ok: [wan-1] => (item=(u'wan', [u'wan-1', u'wan-2']))
skipping: [wan-1] => (item=(u'edge', [u'edge-1', u'edge-2']))
ok: [wan-2] => (item=(u'wan', [u'wan-1', u'wan-2']))
skipping: [wan-2] => (item=(u'edge', [u'edge-1', u'edge-2']))
ok: [edge-2] => (item=(u'edge', [u'edge-1', u'edge-2']))
ok: [edge-1] => (item=(u'edge', [u'edge-1', u'edge-2']))

...

RUNNING HANDLER [interfaces : reload networking] *******************************************************************************************************************
changed: [edge-2] => (item=ifreload -a)
changed: [edge-1] => (item=ifreload -a)
changed: [wan-1] => (item=ifreload -a)
changed: [wan-2] => (item=ifreload -a)
changed: [edge-2] => (item=sleep 10)
changed: [edge-1] => (item=sleep 10)
changed: [wan-2] => (item=sleep 10)
changed: [wan-1] => (item=sleep 10)

RUNNING HANDLER [routing : reload frr] *****************************************************************************************************************************
changed: [edge-2]
changed: [wan-1]
changed: [wan-2]
changed: [edge-1]

RUNNING HANDLER [ptm : restart ptmd] *******************************************************************************************************************************
changed: [edge-2]
changed: [edge-1]
changed: [wan-2]
changed: [wan-1]

RUNNING HANDLER [ntp : restart ntp] ********************************************************************************************************************************
changed: [wan-1]
changed: [edge-1]
changed: [wan-2]
changed: [edge-2]

RUNNING HANDLER [ifplugd : restart ifplugd] ************************************************************************************************************************
changed: [edge-1]
changed: [wan-1]
changed: [edge-2]
changed: [wan-2]

PLAY RECAP *********************************************************************************************************************************************************
edge-1                     : ok=21   changed=17   unreachable=0    failed=0
edge-2                     : ok=21   changed=17   unreachable=0    failed=0
wan-1                      : ok=21   changed=17   unreachable=0    failed=0
wan-2                      : ok=21   changed=17   unreachable=0    failed=0

berndonline@lab:~/cumulus-edge-vagrant$

At last but not least I wrote a simple Ansible Playbook for connectivity testing using ping what you can find here: https://github.com/berndonline/cumulus-edge-provision/blob/master/icmp_check.yml

berndonline@lab:~/cumulus-edge-vagrant$ ansible-playbook ../cumulus-edge-provision/check_icmp.yml

PLAY [exit edge] *********************************************************************************************************************************************************************************************************************

TASK [connectivity check from frontend firewall] *************************************************************************************************************************************************************************************
skipping: [fw-2] => (item=10.0.255.33)
skipping: [fw-2] => (item=10.0.255.17)
skipping: [fw-2] => (item=10.0.255.1)
skipping: [fw-2] => (item=217.0.0.1)
skipping: [edge-2] => (item=10.0.255.33)
skipping: [edge-2] => (item=10.0.255.17)
skipping: [edge-2] => (item=10.0.255.1)
skipping: [edge-1] => (item=10.0.255.33)
skipping: [edge-2] => (item=217.0.0.1)
skipping: [edge-1] => (item=10.0.255.17)
skipping: [edge-1] => (item=10.0.255.1)
skipping: [wan-1] => (item=10.0.255.33)
skipping: [edge-1] => (item=217.0.0.1)
skipping: [wan-1] => (item=10.0.255.17)
skipping: [wan-1] => (item=10.0.255.1)
skipping: [wan-1] => (item=217.0.0.1)
skipping: [wan-2] => (item=10.0.255.33)
skipping: [wan-2] => (item=10.0.255.17)
skipping: [wan-2] => (item=10.0.255.1)
skipping: [wan-2] => (item=217.0.0.1)
changed: [fw-1] => (item=10.0.255.33)
changed: [fw-1] => (item=10.0.255.17)
changed: [fw-1] => (item=10.0.255.1)
changed: [fw-1] => (item=217.0.0.1)
...
PLAY RECAP ***************************************************************************************************************************************************************************************************************************
edge-1                     : ok=2    changed=2    unreachable=0    failed=0
edge-2                     : ok=2    changed=2    unreachable=0    failed=0
fw-1                       : ok=1    changed=1    unreachable=0    failed=0
fw-2                       : ok=1    changed=1    unreachable=0    failed=0
wan-1                      : ok=2    changed=2    unreachable=0    failed=0
wan-2                      : ok=2    changed=2    unreachable=0    failed=0

berndonline@lab:~/cumulus-edge-vagrant$

The icmp check shows that in general the edge routing is working but I need to do some further testing with this if this can be used in a production environment.

If using switch hardware is not the right fit you can still install and use Free Range Routing (FRR) from Cumulus Networks on other Linux distributions and pick server hardware for your own custom edge router. I would only recommend checking Linux kernel support for VRF when choosing another Linux OS. Also have a look at my article about Open Source Routing GRE over IPSec with StrongSwan and Cisco IOS-XE where I build a Debian software router.

Please share your feedback and leave a comment.