Ansible Playbook for VyOS and BGP Routing

I am currently looking into different possibilities for Open Source alternatives to commercial routers from Cisco or Juniper to use in Amazon AWS Transit VPCs. One option is to completely build the software router by myself with a Debian Linux, FRR (Free Range Routing) and StrongSwan, read my post about the self-build software router: Open Source Routing GRE over IPSec with StrongSwan and Cisco IOS-XE

A few years back I was working with Juniper JunOS routers and I thought I’d give VyOS a try because the command line which is very similar.

I replicated the same Vagrant topology for my Ansible Playbook for Cisco BGP Routing Topology but used VyOS instead of Cisco.

Network overview:

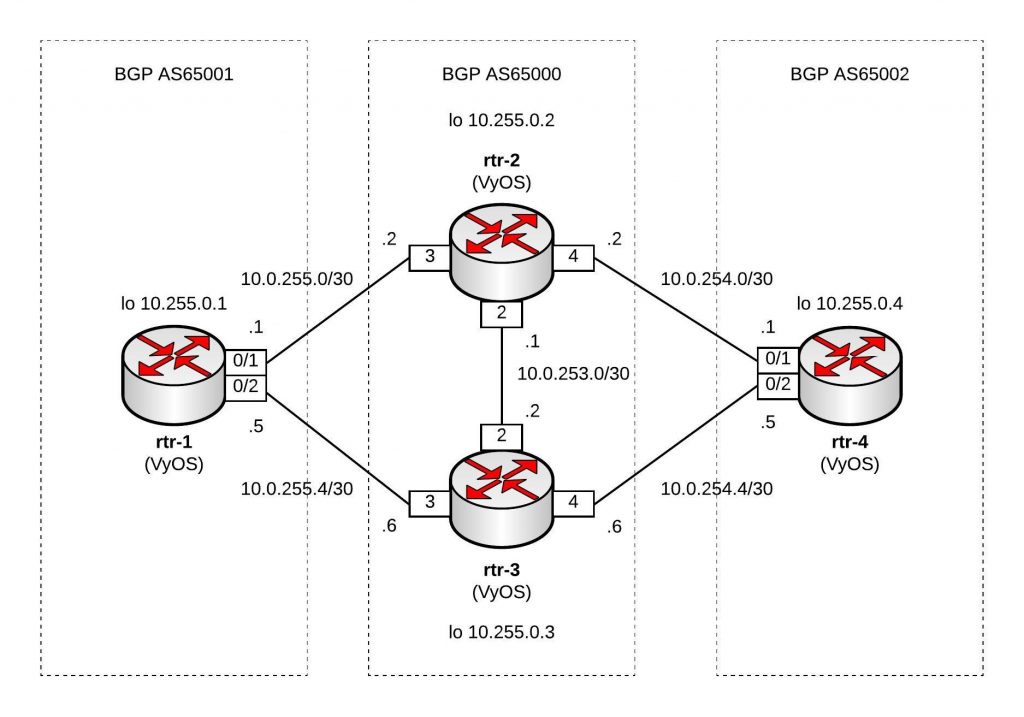
Here are the repositories for the Vagrant topology https://github.com/berndonline/vyos-lab-vagrant and the Ansible Playbook https://github.com/berndonline/vyos-lab-provision.

The Ansible Playbook site.yml is very simple, using the Ansible vyos_system for changing the hostname and the module vyos_config for interface and routing configuration:

---

- hosts: all

  connection: local
  user: '{{ ansible_ssh_user }}'
  gather_facts: 'no'

  roles:
    - hostname
    - interfaces
    - routing

Here is an example from host_vars rtr-1.yml:

---

hostname: rtr-1
domain_name: lab.local

loopback:
  dum0:
    alias: dummy loopback0
    address: 10.255.0.1
    mask: /32

interfaces:
  eth1:
    alias: connection rtr-2
    address: 10.0.255.1
    mask: /30

  eth2:
    alias: connection rtr-3
    address: 10.0.255.5
    mask: /30

bgp:
  asn: 65001
  neighbor:
    - {address: 10.0.255.2, remote_as: 65000}
    - {address: 10.0.255.6, remote_as: 65000}
  networks:
    - {network: 10.0.255.0, mask: /30}
    - {network: 10.0.255.4, mask: /30}
    - {network: 10.255.0.1, mask: /32}
  maxpath: 2

The template interfaces.j2 for the interface configuration:

{% if loopback is defined %}
{% for port, value in loopback.items() %}
set interfaces dummy {{ port }} address '{{ value.address }}{{ value.mask }}'
set interfaces dummy {{ port }} description '{{ value.alias }}'
{% endfor %}
{% endif %}

{% if interfaces is defined %}
{% for port, value in interfaces.items() %}
set interfaces ethernet {{ port }} address '{{ value.address }}{{ value.mask }}'
set interfaces ethernet {{ port }} description '{{ value.alias }}'
{% endfor %}
{% endif %}

This is the template routing.j2 for the routing configuration:

{% if bgp is defined %}
{% if bgp.maxpath is defined %}
set protocols bgp {{ bgp.asn }} maximum-paths ebgp '{{ bgp.maxpath }}'
{% endif %}
{% for item in bgp.neighbor %}
set protocols bgp {{ bgp.asn }} neighbor {{ item.address }} ebgp-multihop '2'
set protocols bgp {{ bgp.asn }} neighbor {{ item.address }} remote-as '{{ item.remote_as }}'
{% endfor %}
{% for item in bgp.networks %}
set protocols bgp {{ bgp.asn }} network '{{ item.network }}{{ item.mask }}'
{% endfor %}
set protocols bgp {{ bgp.asn }} parameters router-id '{{ loopback.dum0.address }}'
{% endif %}

The output of the running Ansible Playbook:

PLAY [all] *********************************************************************

TASK [hostname : write hostname and domain-name] *******************************
changed: [rtr-3]
changed: [rtr-2]
changed: [rtr-4]
changed: [rtr-1]

TASK [interfaces : write interfaces config] ************************************
changed: [rtr-4]
changed: [rtr-1]
changed: [rtr-3]
changed: [rtr-2]

TASK [routing : write routing config] ******************************************
changed: [rtr-2]
changed: [rtr-4]
changed: [rtr-3]
changed: [rtr-1]

PLAY RECAP *********************************************************************
rtr-1                      : ok=3    changed=3    unreachable=0    failed=0   
rtr-2                      : ok=3    changed=3    unreachable=0    failed=0   
rtr-3                      : ok=3    changed=3    unreachable=0    failed=0   
rtr-4                      : ok=3    changed=3    unreachable=0    failed=0   

Like in all my other Ansible Playbooks I use some kind of validation, a simple ping check vyos_check_icmp.yml to see if the configuration is correctly deployed:

---

- hosts: all

  connection: local
  user: '{{ ansible_ssh_user }}'
  gather_facts: 'no'

  tasks:
    - name: validate connection from rtr-1
      vyos_command:
        commands: 'ping {{ item }} count 4'
      when: "'rtr-1' in inventory_hostname"
      with_items:
        - '10.0.255.2'
        - '10.0.255.6'

    - name: validate connection from rtr-2
      vyos_command:
        commands: 'ping {{ item }} count 4'
      when: "'rtr-2' in inventory_hostname"
      with_items:
        - '10.0.255.1'
        - '10.0.254.1'
        - '10.0.253.2'
...

The output of the icmp validation Playbook:

PLAY [all] *********************************************************************

TASK [validate connection from rtr-1] ******************************************
skipping: [rtr-3] => (item=10.0.255.2) 
skipping: [rtr-3] => (item=10.0.255.6) 
skipping: [rtr-2] => (item=10.0.255.2) 
skipping: [rtr-2] => (item=10.0.255.6) 
skipping: [rtr-4] => (item=10.0.255.2) 
skipping: [rtr-4] => (item=10.0.255.6) 
ok: [rtr-1] => (item=10.0.255.2)
ok: [rtr-1] => (item=10.0.255.6)

TASK [validate connection from rtr-2] ******************************************
skipping: [rtr-3] => (item=10.0.255.1) 
skipping: [rtr-3] => (item=10.0.254.1) 
skipping: [rtr-1] => (item=10.0.255.1) 
skipping: [rtr-3] => (item=10.0.253.2) 
skipping: [rtr-1] => (item=10.0.254.1) 
skipping: [rtr-1] => (item=10.0.253.2) 
skipping: [rtr-4] => (item=10.0.255.1) 
skipping: [rtr-4] => (item=10.0.254.1) 
skipping: [rtr-4] => (item=10.0.253.2) 
ok: [rtr-2] => (item=10.0.255.1)
ok: [rtr-2] => (item=10.0.254.1)
ok: [rtr-2] => (item=10.0.253.2)

TASK [validate connection from rtr-3] ******************************************
skipping: [rtr-1] => (item=10.0.255.5) 
skipping: [rtr-1] => (item=10.0.254.5) 
skipping: [rtr-2] => (item=10.0.255.5) 
skipping: [rtr-1] => (item=10.0.253.1) 
skipping: [rtr-2] => (item=10.0.254.5) 
skipping: [rtr-2] => (item=10.0.253.1) 
skipping: [rtr-4] => (item=10.0.255.5) 
skipping: [rtr-4] => (item=10.0.254.5) 
skipping: [rtr-4] => (item=10.0.253.1) 
ok: [rtr-3] => (item=10.0.255.5)
ok: [rtr-3] => (item=10.0.254.5)
ok: [rtr-3] => (item=10.0.253.1)

TASK [validate connection from rtr-4] ******************************************
skipping: [rtr-3] => (item=10.0.254.2) 
skipping: [rtr-3] => (item=10.0.254.6) 
skipping: [rtr-1] => (item=10.0.254.2) 
skipping: [rtr-1] => (item=10.0.254.6) 
skipping: [rtr-2] => (item=10.0.254.2) 
skipping: [rtr-2] => (item=10.0.254.6) 
ok: [rtr-4] => (item=10.0.254.2)
ok: [rtr-4] => (item=10.0.254.6)

TASK [validate bgp connection from rtr-1] **************************************
skipping: [rtr-3] => (item=10.255.0.4) 
skipping: [rtr-2] => (item=10.255.0.4) 
skipping: [rtr-4] => (item=10.255.0.4) 
ok: [rtr-1] => (item=10.255.0.4)

TASK [validate bgp connection from rtr-4] **************************************
skipping: [rtr-3] => (item=10.255.0.1) 
skipping: [rtr-1] => (item=10.255.0.1) 
skipping: [rtr-2] => (item=10.255.0.1) 
ok: [rtr-4] => (item=10.255.0.1)

PLAY RECAP *********************************************************************
rtr-1                      : ok=2    changed=0    unreachable=0    failed=0   
rtr-2                      : ok=1    changed=0    unreachable=0    failed=0   
rtr-3                      : ok=1    changed=0    unreachable=0    failed=0   
rtr-4                      : ok=2    changed=0    unreachable=0    failed=0   

As you see, the configuration is successfully deployed and BGP connectivity between the nodes.

Leave a comment

BGP EVPN and VXLAN with Cumulus Linux

I did some updates on my Cumulus Linux Vagrant topology and added new functions to my post about an Ansible Playbook for the Cumulus Linux BGP IP-Fabric.

To the Vagrant topology, I added 6x servers and per clag-pair, each server is connected to a VLAN and the second server is connected to a VXLAN.

Here are the links to the repositories where you find the Ansible Playbook https://github.com/berndonline/cumulus-lab-provision and the Vagrantfile https://github.com/berndonline/cumulus-lab-vagrant

In the Ansible Playbook, I added BGP EVPN and one VXLAN which spreads over all Leaf and Edge switches. VXLAN routing is happening on the Edge switches into the rest of the virtual data centre network.

Here is an example of the additional variables I added to edge-1 for BGP EVPN and VXLAN:

group_vars/edge.yml:

clagd_vxlan_anycast_ip: 10.255.100.1

The VXLAN anycast IP is needed in BGP for EVPN and the same IP is shared between edge-1 and edge-2. The same is for the other leaf switches, per clag pair they share the same anycast IP address.

host_vars/edge-1.yml:

---

loopback: 10.255.0.3/32

bgp_fabric:
  asn: 65001
  router_id: 10.255.0.3
  neighbor:
    - swp51
    - swp52
  networks:
    - 10.0.4.0/24
    - 10.255.0.3/32
    - 10.255.100.1/32
    - 10.0.255.0/28
  evpn: true
  advertise_vni: true

peerlink:
  bond_slaves: swp53 swp54
  mtu: 9216
  vlan: 4094
  address: 169.254.1.1/30
  clagd_peer_ip: 169.254.1.2
  clagd_backup_ip: 192.168.100.4
  clagd_sys_mac: 44:38:39:FF:40:94
  clagd_priority: 4096

bridge:
  ports: peerlink vxlan10201
  vids: 901 201

vlans:
  901:
    alias: edge-transit-901
    vipv4: 10.0.255.14/28
    vmac: 00:00:5e:00:09:01
    pipv4: 10.0.255.12/28
  201:
    alias: prod-server-10201
    vipv4: 10.0.4.254/24
    vmac: 00:00:00:00:02:01
    pipv4: 10.0.4.252/24
    vlan_id: 201
    vlan_raw_device: bridge

vxlans:
  10201:
    alias: prod-server-10201
    vxlan_local_tunnelip: 10.255.0.3
    bridge_access: 201
    bridge_learning: 'off'
    bridge_arp_nd_suppress: 'on'

On the Edge switches, because of VXLAN routing, you find a mapping between VXLAN 10201 to VLAN 201 which has VRR running.

I needed to do some modifications to the interfaces template interfaces_config.j2:

{% if loopback is defined %}
auto lo
iface lo inet loopback
    address {{ loopback }}
{% if clagd_vxlan_anycast_ip is defined %}
    clagd-vxlan-anycast-ip {{ clagd_vxlan_anycast_ip }}
{% endif %}
{% endif %}
...
{% if bridge is defined %}
{% for vxlan_id, value in vxlans.items() %}
auto vxlan{{ vxlan_id }}
iface vxlan{{ vxlan_id }}
    alias {{ value.alias }}
    vxlan-id {{ vxlan_id }}
    vxlan-local-tunnelip {{ value.vxlan_local_tunnelip }}
    bridge-access {{ value.bridge_access }}
    bridge-learning {{ value.bridge_learning }}
    bridge-arp-nd-suppress {{ value.bridge_arp_nd_suppress }}
    mstpctl-bpduguard yes
    mstpctl-portbpdufilter yes

{% endfor %}
{% endif %}

There were also some modifications needed to the FRR template frr.j2 to add EVPN to the BGP configuration:

...
{% if bgp_fabric.evpn is defined %}
 address-family ipv6 unicast
  neighbor fabric activate
 exit-address-family
 !
 address-family l2vpn evpn
  neighbor fabric activate
{% if bgp_fabric.advertise_vni is defined %}
  advertise-all-vni
{% endif %}
 exit-address-family
{% endif %}
{% endif %}
...

For more detailed information about EVPN and VXLAN routing on Cumulus Linux, I recommend reading the documentation Ethernet Virtual Private Network – EVPN and VXLAN Routing.

Have fun testing the new features in my Ansible Playbook and please share your feedback.

Leave a comment

Ansible Playbook for Arista vEOS BGP IP-Fabric

Over the Christmas holidays, I was working just for fun on an Arista vEOS Vagrant topology and Ansible Playbook. I reused my Ansible Playbook from my previous post about an Ansible Playbook for Cumulus Linux BGP IP-Fabric and Cumulus NetQ Validation.

Arista only has a Virtualbox vEOS image and there is an ISO image to boot the virtual appliance which I don’t understand why they have done this, rather I prefer the way Cumulus provide their VX images for testing to use with Virtualbox or KVM.

I found an interesting blog post on how to run vEOS images with KVM (Libvirt). I tried it and I could run vEOS in KVM but unfortunately, it wasn’t  stable enough to run more complex virtual network topologies so I had to switch back to Virtualbox. I will give it a try again in a few month because I prefer KVM over Virtualbox.

Anyway, you’ll find more information about how to use vEOS with Virtualbox and Vagrant.

My Virtualbox Vagrantfile can be found in my Github repository: https://github.com/berndonline/arista-lab-vagrant

Network overview:

Ansible Playbook:

As I have mentioned before I tried to be close as possible to my Cumulus Linux Ansible Playbook and tried to keep the variables and roles the same. They are differences of course in the Jinja2 templates and tasks but the overall structure is similar.

Here you’ll find the repository with the Ansible Playbook: https://github.com/berndonline/arista-lab-provision

Because Arista didn’t prepare the images very well and only created a vagrant user without adding the ssh key for authentication I needed to use a CLI provider with a username and password. But this is only a minor issue otherwise it works the same. See the site.yml below:

---

- hosts: network

  connection: local
  gather_facts: 'False'

  vars:
    cli:
      username: vagrant
      password: vagrant

  roles:
    - leafgroups
    - hostname
    - interfaces
    - routing
    - ntp

In the roles, I have used the Arista EOS Ansible modules eos_config and eos_system.

Boot up the Vagrant environment and then run the Playbook afterwards:

PLAY [network] *****************************************************************

TASK [leafgroups : create leaf groups based on clag_pairs] *********************
ok: [leaf-1] => (item=(u'leafgroup1', [u'leaf-1', u'leaf-2']))
skipping: [leaf-1] => (item=(u'leafgroup2', [u'leaf-3', u'leaf-4'])) 
skipping: [leaf-3] => (item=(u'leafgroup1', [u'leaf-1', u'leaf-2'])) 
ok: [leaf-3] => (item=(u'leafgroup2', [u'leaf-3', u'leaf-4']))
skipping: [leaf-4] => (item=(u'leafgroup1', [u'leaf-1', u'leaf-2'])) 
ok: [leaf-2] => (item=(u'leafgroup1', [u'leaf-1', u'leaf-2']))
skipping: [leaf-2] => (item=(u'leafgroup2', [u'leaf-3', u'leaf-4'])) 
ok: [leaf-4] => (item=(u'leafgroup2', [u'leaf-3', u'leaf-4']))
skipping: [spine-1] => (item=(u'leafgroup1', [u'leaf-1', u'leaf-2'])) 
skipping: [spine-1] => (item=(u'leafgroup2', [u'leaf-3', u'leaf-4'])) 
skipping: [spine-2] => (item=(u'leafgroup1', [u'leaf-1', u'leaf-2'])) 
skipping: [spine-2] => (item=(u'leafgroup2', [u'leaf-3', u'leaf-4'])) 

TASK [leafgroups : include leaf group variables] *******************************
ok: [leaf-1] => (item=(u'leafgroup1', [u'leaf-1', u'leaf-2']))
skipping: [leaf-3] => (item=(u'leafgroup1', [u'leaf-1', u'leaf-2'])) 
skipping: [leaf-1] => (item=(u'leafgroup2', [u'leaf-3', u'leaf-4'])) 
skipping: [leaf-4] => (item=(u'leafgroup1', [u'leaf-1', u'leaf-2'])) 
skipping: [spine-1] => (item=(u'leafgroup1', [u'leaf-1', u'leaf-2'])) 
skipping: [spine-1] => (item=(u'leafgroup2', [u'leaf-3', u'leaf-4'])) 
ok: [leaf-3] => (item=(u'leafgroup2', [u'leaf-3', u'leaf-4']))
ok: [leaf-2] => (item=(u'leafgroup1', [u'leaf-1', u'leaf-2']))
skipping: [leaf-2] => (item=(u'leafgroup2', [u'leaf-3', u'leaf-4'])) 
ok: [leaf-4] => (item=(u'leafgroup2', [u'leaf-3', u'leaf-4']))
skipping: [spine-2] => (item=(u'leafgroup1', [u'leaf-1', u'leaf-2'])) 
skipping: [spine-2] => (item=(u'leafgroup2', [u'leaf-3', u'leaf-4'])) 

TASK [hostname : write hostname and domain name] *******************************
changed: [leaf-4]
changed: [spine-1]
changed: [leaf-1]
changed: [leaf-3]
changed: [leaf-2]
changed: [spine-2]

TASK [interfaces : write interface configuration] ******************************
changed: [spine-1]
changed: [leaf-2]
changed: [leaf-4]
changed: [leaf-3]
changed: [leaf-1]
changed: [spine-2]

TASK [routing : write routing configuration] ***********************************
changed: [leaf-1]
changed: [leaf-4]
changed: [spine-1]
changed: [leaf-2]
changed: [leaf-3]
changed: [spine-2]

TASK [ntp : write ntp configuration] *******************************************
changed: [leaf-2] => (item=216.239.35.8)
changed: [leaf-1] => (item=216.239.35.8)
changed: [leaf-3] => (item=216.239.35.8)
changed: [spine-1] => (item=216.239.35.8)
changed: [leaf-4] => (item=216.239.35.8)
changed: [spine-2] => (item=216.239.35.8)

PLAY RECAP *********************************************************************
leaf-1                     : ok=6    changed=4    unreachable=0    failed=0   
leaf-2                     : ok=6    changed=4    unreachable=0    failed=0   
leaf-3                     : ok=6    changed=4    unreachable=0    failed=0   
leaf-4                     : ok=6    changed=4    unreachable=0    failed=0   
spine-1                    : ok=4    changed=4    unreachable=0    failed=0   
spine-2                    : ok=4    changed=4    unreachable=0    failed=0   

I didn’t use the leafgroups role for variables in my Playbook but I left it just in case.

Because Arista has nothing similar to Cumulus NetQ to validate the configuration I create a simple arista_check_icmp.yml playbook and use ping from the leaf switches to test if the configuration is successfully deployed.

PLAY [leaf] ********************************************************************

TASK [validate connection from leaf-1] *****************************************
skipping: [leaf-3] => (item=10.255.0.4) 
skipping: [leaf-3] => (item=10.255.0.5) 
skipping: [leaf-3] => (item=10.255.0.6) 
skipping: [leaf-2] => (item=10.255.0.4) 
skipping: [leaf-2] => (item=10.255.0.5) 
skipping: [leaf-2] => (item=10.255.0.6) 
skipping: [leaf-3] => (item=10.0.102.252) 
skipping: [leaf-4] => (item=10.255.0.4) 
skipping: [leaf-3] => (item=10.0.102.253) 
skipping: [leaf-3] => (item=10.0.102.254) 
skipping: [leaf-4] => (item=10.255.0.5) 
skipping: [leaf-2] => (item=10.0.102.252) 
skipping: [leaf-4] => (item=10.255.0.6) 
skipping: [leaf-2] => (item=10.0.102.253) 
skipping: [leaf-2] => (item=10.0.102.254) 
skipping: [leaf-4] => (item=10.0.102.252) 
skipping: [leaf-4] => (item=10.0.102.253) 
skipping: [leaf-4] => (item=10.0.102.254) 
ok: [leaf-1] => (item=10.255.0.4)
ok: [leaf-1] => (item=10.255.0.5)
ok: [leaf-1] => (item=10.255.0.6)
ok: [leaf-1] => (item=10.0.102.252)
ok: [leaf-1] => (item=10.0.102.253)
ok: [leaf-1] => (item=10.0.102.254)

TASK [validate connection from leaf-2] *****************************************
skipping: [leaf-1] => (item=10.255.0.3) 
skipping: [leaf-3] => (item=10.255.0.3) 
skipping: [leaf-1] => (item=10.255.0.5) 
skipping: [leaf-3] => (item=10.255.0.5) 
skipping: [leaf-1] => (item=10.255.0.6) 
skipping: [leaf-3] => (item=10.255.0.6) 
skipping: [leaf-1] => (item=10.0.102.252) 
skipping: [leaf-1] => (item=10.0.102.253) 
skipping: [leaf-4] => (item=10.255.0.3) 
skipping: [leaf-3] => (item=10.0.102.252) 
skipping: [leaf-1] => (item=10.0.102.254) 
skipping: [leaf-3] => (item=10.0.102.253) 
skipping: [leaf-3] => (item=10.0.102.254) 
skipping: [leaf-4] => (item=10.255.0.5) 
skipping: [leaf-4] => (item=10.255.0.6) 
skipping: [leaf-4] => (item=10.0.102.252) 
skipping: [leaf-4] => (item=10.0.102.253) 
skipping: [leaf-4] => (item=10.0.102.254) 
ok: [leaf-2] => (item=10.255.0.3)
ok: [leaf-2] => (item=10.255.0.5)
ok: [leaf-2] => (item=10.255.0.6)
ok: [leaf-2] => (item=10.0.102.252)
ok: [leaf-2] => (item=10.0.102.253)
ok: [leaf-2] => (item=10.0.102.254)

TASK [validate connection from leaf-3] *****************************************
skipping: [leaf-1] => (item=10.255.0.3) 
skipping: [leaf-1] => (item=10.255.0.4) 
skipping: [leaf-2] => (item=10.255.0.3) 
skipping: [leaf-1] => (item=10.255.0.6) 
skipping: [leaf-1] => (item=10.0.101.252) 
skipping: [leaf-2] => (item=10.255.0.4) 
skipping: [leaf-2] => (item=10.255.0.6) 
skipping: [leaf-1] => (item=10.0.101.253) 
skipping: [leaf-4] => (item=10.255.0.3) 
skipping: [leaf-2] => (item=10.0.101.252) 
skipping: [leaf-4] => (item=10.255.0.4) 
skipping: [leaf-1] => (item=10.0.101.254) 
skipping: [leaf-4] => (item=10.255.0.6) 
skipping: [leaf-2] => (item=10.0.101.253) 
skipping: [leaf-4] => (item=10.0.101.252) 
skipping: [leaf-2] => (item=10.0.101.254) 
skipping: [leaf-4] => (item=10.0.101.253) 
skipping: [leaf-4] => (item=10.0.101.254) 
ok: [leaf-3] => (item=10.255.0.3)
ok: [leaf-3] => (item=10.255.0.4)
ok: [leaf-3] => (item=10.255.0.6)
ok: [leaf-3] => (item=10.0.101.252)
ok: [leaf-3] => (item=10.0.101.253)
ok: [leaf-3] => (item=10.0.101.254)

TASK [validate connection from leaf-4] *****************************************
skipping: [leaf-1] => (item=10.255.0.3) 
skipping: [leaf-3] => (item=10.255.0.3) 
skipping: [leaf-1] => (item=10.255.0.4) 
skipping: [leaf-3] => (item=10.255.0.4) 
skipping: [leaf-1] => (item=10.255.0.5) 
skipping: [leaf-2] => (item=10.255.0.3) 
skipping: [leaf-3] => (item=10.255.0.5) 
skipping: [leaf-3] => (item=10.0.101.252) 
skipping: [leaf-2] => (item=10.255.0.4) 
skipping: [leaf-1] => (item=10.0.101.252) 
skipping: [leaf-2] => (item=10.255.0.5) 
skipping: [leaf-2] => (item=10.0.101.252) 
skipping: [leaf-3] => (item=10.0.101.253) 
skipping: [leaf-1] => (item=10.0.101.253) 
skipping: [leaf-1] => (item=10.0.101.254) 
skipping: [leaf-3] => (item=10.0.101.254) 
skipping: [leaf-2] => (item=10.0.101.253) 
skipping: [leaf-2] => (item=10.0.101.254) 
ok: [leaf-4] => (item=10.255.0.3)
ok: [leaf-4] => (item=10.255.0.4)
ok: [leaf-4] => (item=10.255.0.5)
ok: [leaf-4] => (item=10.0.101.252)
ok: [leaf-4] => (item=10.0.101.253)
ok: [leaf-4] => (item=10.0.101.254)

PLAY RECAP *********************************************************************
leaf-1                     : ok=1    changed=0    unreachable=0    failed=0   
leaf-2                     : ok=1    changed=0    unreachable=0    failed=0   
leaf-3                     : ok=1    changed=0    unreachable=0    failed=0   
leaf-4                     : ok=1    changed=0    unreachable=0    failed=0   

I don’t usually work with Arista devices and this was a try to use a different switch vendor but still keep using the type of Ansible Playbook.

Please tell me if you like it and share your feedback.

Leave a comment

Cumulus Linux network simulation using Vagrant

I was using GNS3 for quite some time but it was not very flexible if you quickly wanted to test something and even more complicated if you used a different computer or shared your projects.

I spend some time with Vagrant to build a virtual Cumulus Linux lab environment which can run basically on every computer. Simulating network environments is the future when you want to test and validate your automation scripts.

My lab diagram:

I created different topology.dot files and used the Cumulus topology converter on Github to create my lab with Virtualbox or Libvirt (KVM). I did some modification to the initialise scripts for the switches and the management server. Everything you find in my Github repo https://github.com/berndonline/cumulus-lab-vagrant.

The topology file basically defines your network and the converter creates the Vagrantfile.

In the management topology file you have all servers (incl. management) like in the network diagram above. The Cumulus switches you can only access via the management server.

Very similar to the topology-mgmt.dot but in this one the management server is running Cumulus NetQ which you need to first import into your Vagrant. Here the link to the Cumulus NetQ demo on Github.

In this topology file you find a basic staging lab without servers where you can access the Cumulus switches directly via their Vagrant IP. I mainly use this to quickly test something like updating Cumulus switches or validating Ansible playbooks.

In this topology file you find a basic production lab where you can access the Cumulus switches directly via their Vagrant IP and have Cumulus NetQ as management server.

Basically to convert a topology into a Vagrantfile you just need to run the following command:

python topology_converter.py topology-staging.dot -p libvirt --ansible-hostfile

I use KVM in my example and want that Vagrant creates an Ansible inventory file and run playbooks directly agains the switches.

Check the status of the vagrant environment:

berndonline@lab:~/cumulus-lab-vagrant$ vagrant status
Current machine states:

spine-1                   not created (libvirt)
spine-2                   not created (libvirt)
leaf-1                    not created (libvirt)
leaf-3                    not created (libvirt)
leaf-2                    not created (libvirt)
leaf-4                    not created (libvirt)
mgmt-1                    not created (libvirt)
edge-2                    not created (libvirt)
edge-1                    not created (libvirt)

This environment represents multiple VMs. The VMs are all listed
above with their current state. For more information about a specific
VM, run `vagrant status NAME`.
berndonline@lab:~/cumulus-lab-vagrant$

To start the devices run:

vagrant up

If you use the topology files with management server you need to start first the management server and then the management switch before you boot the rest of the switches:

vagrant up mgmt-server
vagrant up mgmt-1
vagrant up

The switches will pull some part of their configuration from the management server.

Output if you start the environment:

berndonline@lab:~/cumulus-lab-vagrant$ vagrant up spine-1
Bringing machine 'spine-1' up with 'libvirt' provider...
==> spine-1: Creating image (snapshot of base box volume).
==> spine-1: Creating domain with the following settings...
==> spine-1:  -- Name:              cumulus-lab-vagrant_spine-1
==> spine-1:  -- Domain type:       kvm
==> spine-1:  -- Cpus:              1
==> spine-1:  -- Feature:           acpi
==> spine-1:  -- Feature:           apic
==> spine-1:  -- Feature:           pae
==> spine-1:  -- Memory:            512M
==> spine-1:  -- Management MAC:
==> spine-1:  -- Loader:
==> spine-1:  -- Base box:          CumulusCommunity/cumulus-vx
==> spine-1:  -- Storage pool:      default
==> spine-1:  -- Image:             /var/lib/libvirt/images/cumulus-lab-vagrant_spine-1.img (4G)
==> spine-1:  -- Volume Cache:      default
==> spine-1:  -- Kernel:
==> spine-1:  -- Initrd:
==> spine-1:  -- Graphics Type:     vnc
==> spine-1:  -- Graphics Port:     5900
==> spine-1:  -- Graphics IP:       127.0.0.1
==> spine-1:  -- Graphics Password: Not defined
==> spine-1:  -- Video Type:        cirrus
==> spine-1:  -- Video VRAM:        9216
==> spine-1:  -- Sound Type:
==> spine-1:  -- Keymap:            en-us
==> spine-1:  -- TPM Path:
==> spine-1:  -- INPUT:             type=mouse, bus=ps2
==> spine-1: Creating shared folders metadata...
==> spine-1: Starting domain.
==> spine-1: Waiting for domain to get an IP address...
==> spine-1: Waiting for SSH to become available...
    spine-1:
    spine-1: Vagrant insecure key detected. Vagrant will automatically replace
    spine-1: this with a newly generated keypair for better security.
    spine-1:
    spine-1: Inserting generated public key within guest...
    spine-1: Removing insecure key from the guest if it's present...
    spine-1: Key inserted! Disconnecting and reconnecting using new SSH key...
==> spine-1: Setting hostname...
==> spine-1: Configuring and enabling network interfaces...
....
==> spine-1: #################################
==> spine-1:   Running Switch Post Config (config_vagrant_switch.sh)
==> spine-1: #################################
==> spine-1:  ###Creating SSH keys for cumulus user ###
==> spine-1: #################################
==> spine-1:    Finished
==> spine-1: #################################
==> spine-1: Running provisioner: shell...
    spine-1: Running: inline script
==> spine-1: Running provisioner: shell...
    spine-1: Running: inline script
==> spine-1:   INFO: Adding UDEV Rule: a0:00:00:00:00:21 --> eth0
==> spine-1: Running provisioner: shell...
    spine-1: Running: inline script
==> spine-1:   INFO: Adding UDEV Rule: 44:38:39:00:00:30 --> swp1
==> spine-1: Running provisioner: shell...
    spine-1: Running: inline script
==> spine-1:   INFO: Adding UDEV Rule: 44:38:39:00:00:04 --> swp2
==> spine-1: Running provisioner: shell...
    spine-1: Running: inline script
==> spine-1:   INFO: Adding UDEV Rule: 44:38:39:00:00:26 --> swp3
==> spine-1: Running provisioner: shell...
    spine-1: Running: inline script
==> spine-1:   INFO: Adding UDEV Rule: 44:38:39:00:00:0a --> swp4
==> spine-1: Running provisioner: shell...
    spine-1: Running: inline script
==> spine-1:   INFO: Adding UDEV Rule: 44:38:39:00:00:22 --> swp51
==> spine-1: Running provisioner: shell...
    spine-1: Running: inline script
==> spine-1:   INFO: Adding UDEV Rule: 44:38:39:00:00:0d --> swp52
==> spine-1: Running provisioner: shell...
    spine-1: Running: inline script
==> spine-1:   INFO: Adding UDEV Rule: 44:38:39:00:00:10 --> swp53
==> spine-1: Running provisioner: shell...
    spine-1: Running: inline script
==> spine-1:   INFO: Adding UDEV Rule: 44:38:39:00:00:23 --> swp54
==> spine-1: Running provisioner: shell...
    spine-1: Running: inline script
==> spine-1:   INFO: Adding UDEV Rule: Vagrant interface = eth1
==> spine-1: #### UDEV Rules (/etc/udev/rules.d/70-persistent-net.rules) ####
==> spine-1: ACTION=="add", SUBSYSTEM=="net", ATTR{address}=="a0:00:00:00:00:21", NAME="eth0", SUBSYSTEMS=="pci"
==> spine-1: ACTION=="add", SUBSYSTEM=="net", ATTR{address}=="44:38:39:00:00:30", NAME="swp1", SUBSYSTEMS=="pci"
==> spine-1: ACTION=="add", SUBSYSTEM=="net", ATTR{address}=="44:38:39:00:00:04", NAME="swp2", SUBSYSTEMS=="pci"
==> spine-1: ACTION=="add", SUBSYSTEM=="net", ATTR{address}=="44:38:39:00:00:26", NAME="swp3", SUBSYSTEMS=="pci"
==> spine-1: ACTION=="add", SUBSYSTEM=="net", ATTR{address}=="44:38:39:00:00:0a", NAME="swp4", SUBSYSTEMS=="pci"
==> spine-1: ACTION=="add", SUBSYSTEM=="net", ATTR{address}=="44:38:39:00:00:22", NAME="swp51", SUBSYSTEMS=="pci"
==> spine-1: ACTION=="add", SUBSYSTEM=="net", ATTR{address}=="44:38:39:00:00:0d", NAME="swp52", SUBSYSTEMS=="pci"
==> spine-1: ACTION=="add", SUBSYSTEM=="net", ATTR{address}=="44:38:39:00:00:10", NAME="swp53", SUBSYSTEMS=="pci"
==> spine-1: ACTION=="add", SUBSYSTEM=="net", ATTR{address}=="44:38:39:00:00:23", NAME="swp54", SUBSYSTEMS=="pci"
==> spine-1: ACTION=="add", SUBSYSTEM=="net", ATTR{ifindex}=="2", NAME="eth1", SUBSYSTEMS=="pci"
==> spine-1: Running provisioner: shell...
    spine-1: Running: inline script
==> spine-1: ### RUNNING CUMULUS EXTRA CONFIG ###
==> spine-1:   INFO: Detected a 3.x Based Release
==> spine-1: ### Disabling default remap on Cumulus VX...
==> spine-1: ### Disabling ZTP service...
==> spine-1: Removed symlink /etc/systemd/system/multi-user.target.wants/ztp.service.
==> spine-1: ### Resetting ZTP to work next boot...
==> spine-1: Created symlink from /etc/systemd/system/multi-user.target.wants/ztp.service to /lib/systemd/system/ztp.service.
==> spine-1:   INFO: Detected Cumulus Linux v3.3.2 Release
==> spine-1: ### Fixing ONIE DHCP to avoid Vagrant Interface ###
==> spine-1:      Note: Installing from ONIE will undo these changes.
==> spine-1: ### Giving Vagrant User Ability to Run NCLU Commands ###
==> spine-1: ### DONE ###
==> spine-1: ### Rebooting Device to Apply Remap...

At the end you are able to connect to the Cumulus switch:

berndonline@lab:~/cumulus-lab-vagrant$ vagrant ssh spine-1

Welcome to Cumulus VX (TM)

Cumulus VX (TM) is a community supported virtual appliance designed for
experiencing, testing and prototyping Cumulus Networks' latest technology.
For any questions or technical support, visit our community site at:
http://community.cumulusnetworks.com

The registered trademark Linux (R) is used pursuant to a sublicense from LMI,
the exclusive licensee of Linus Torvalds, owner of the mark on a world-wide
basis.
vagrant@cumulus:~$

To destroy the Vagrant environment:

berndonline@lab:~/cumulus-lab-vagrant$ vagrant destroy spine-1
==> spine-2: Remove stale volume...
==> spine-2: Domain is not created. Please run `vagrant up` first.
==> spine-1: Removing domain...

My goal is to adopt some NetDevOps practice and use this in networking = NetOps, currently working on an Continuous Integration and Delivery (CI/CD) pipeline for Cumulus Linux network environments. The Vagrant lab was one of the prerequisites to simulate the changes before deploying this to production but more will follow in my next blog post.

Read my new post about an Ansible Playbook for Cumulus Linux BGP IP-Fabric and Cumulus NetQ Validation.

Data centre network redesign

Over the last month I was busy working on an data centre redesign for my company which I finished this weekend in one of the three data centre’s.

The old network design was very outdated and bad choice of network equipment; Cisco Catalyst 6500 core switch for a small data centre environment with 8 racks is total overkill, two firewall clusters Juniper ISG2000 and Cisco ASA 5550 which were badly integrated and the configuration was a mess.

For the new network I followed a more converged idea to use a small and compact network to be as flexible as possible but also downsize the overall footprint and remove complexity. We adopted parts of DevOps “I like to call it NetOps” and used Ansible to automate the configuration deployment, the whole network stack is deployed within 90 seconds.

Used equipment:

  1. Top two switches were Dell S3048-ON running Cumulus Networks OS and used for internet- and leased-lines
  2. Under the two Dell WAN switches are two Cisco ASR 1001-X router for internet and wide area network (OSPF) routing.
  3. Under the Cisco router, two Dell S4048-ON core switches running Cumulus Network OS and connected existing HP Blade Center’s and HP DL servers. The new Tintri storage for the VMware vSphere clusters was also connected directly to the core switches.
  4. Under the Dell core switches are two Cisco ASA 5545-X in multi-context mode running Production, Corporate and S2S VPN firewalls.
  5. On the bottom of the network stack were existing serial console server and Cisco Catalyst switch for management network.

Now I will start with the deployment of VMware NSX SDN (Software defined Network) in this data centre. Ones VMware NSX is finished and handed over to the Systems Engineers I will do the same exercise for the 2nd data centre in the UK.

About Cumulus Linux and VMware NSX SDN I will publish some more information and my experience in the coming month.