Kubernetes Cluster API – Provision workload clusters on AWS

The past few months I have been following the progress of the Kubernetes Cluster API which is part of the Kubernetes SIG (special interest group) Cluster-Lifecycle because they made good progress and wanted to try out the AWS provider version to deploy Kubeadm clusters. There are multiple infrastructure / cloud providers available which can be used, have a look at supported providers.

RedHat has based the Machine API Operator for the OpenShift 4 platform on the Kubernetes Cluster API and forked some of the cloud provider integrations but in OpenShift 4 this has a different use-case for the cluster to managed itself without the need of a central management cluster. I actually like RedHat’s concept and adaptation of the Cluster API and I hope we will see something similar in the upstream project.

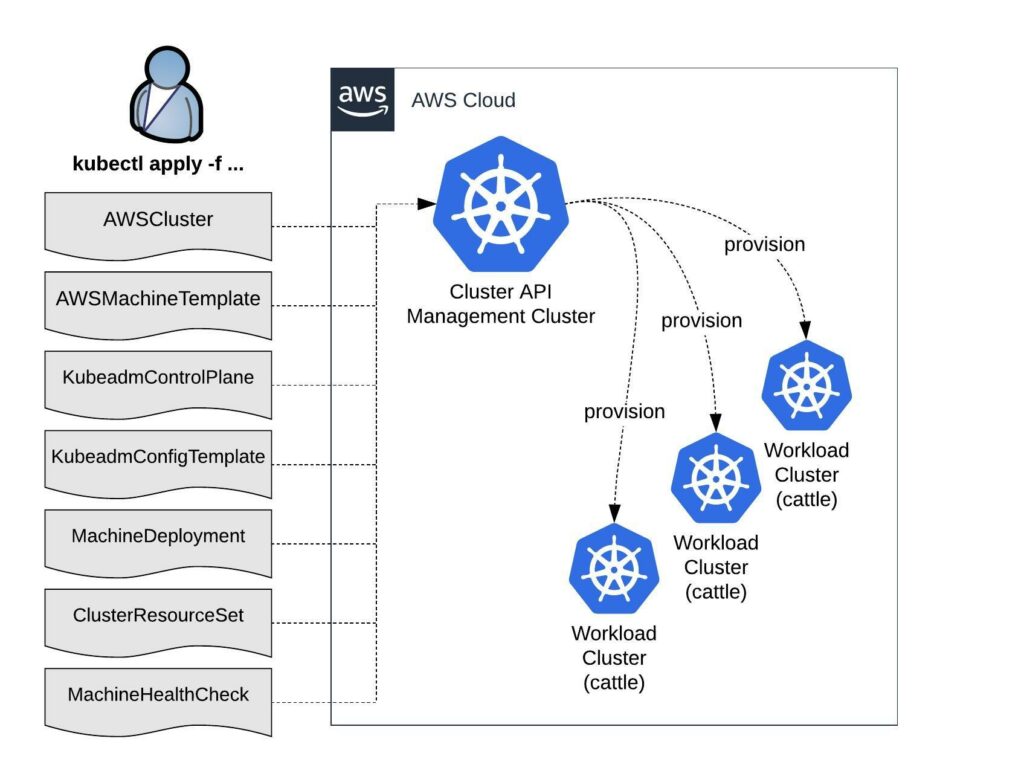
Bootstrapping workload clusters are pretty straight forward but before we can start with deploying the workload cluster we need a central Kubernetes management cluster for running the Cluster API components for your selected cloud provider. In The Cluster API Book for example they use a KinD (Kubernetes in Docker) cluster to provision the workload clusters.

To deploy the Cluster API components you need the clusterctl (Cluster API) and clusterawsadm (Cluster API AWS Provider) command-line utilities.

curl -L https://github.com/kubernetes-sigs/cluster-api/releases/download/v0.3.14/clusterctl-linux-amd64 -o clusterctl
chmod +x ./clusterctl
sudo mv ./clusterctl /usr/local/bin/clusterctl
curl -L https://github.com/kubernetes-sigs/cluster-api-provider-aws/releases/download/v0.6.4/clusterawsadm-linux-amd64 -o clusterawsadm
chmod +x ./clusterawsadm
sudo mv ./clusterawsadm /usr/local/bin/clusterawsadm

Let’s start to prepare to initialise the management cluster. You need a AWS IAM service account and in my example I enabled the experimental features-gates for MachinePool and ClusterResourceSets before running clusterawsadm to apply the required AWS IAM configuration.

$ export AWS_ACCESS_KEY_ID='<-YOUR-ACCESS-KEY->'
$ export AWS_SECRET_ACCESS_KEY='<-YOUR-SECRET-ACCESS-KEY->'
$ export EXP_MACHINE_POOL=true
$ export EXP_CLUSTER_RESOURCE_SET=true
$ clusterawsadm bootstrap iam create-cloudformation-stack
Attempting to create AWS CloudFormation stack cluster-api-provider-aws-sigs-k8s-io
I1206 22:23:19.620891  357601 service.go:59] AWS Cloudformation stack "cluster-api-provider-aws-sigs-k8s-io" already exists, updating

Following resources are in the stack: 

Resource                  |Type                                                                                |Status
AWS::IAM::InstanceProfile |control-plane.cluster-api-provider-aws.sigs.k8s.io                                  |CREATE_COMPLETE
AWS::IAM::InstanceProfile |controllers.cluster-api-provider-aws.sigs.k8s.io                                    |CREATE_COMPLETE
AWS::IAM::InstanceProfile |nodes.cluster-api-provider-aws.sigs.k8s.io                                          |CREATE_COMPLETE
AWS::IAM::ManagedPolicy   |arn:aws:iam::552276840222:policy/control-plane.cluster-api-provider-aws.sigs.k8s.io |CREATE_COMPLETE
AWS::IAM::ManagedPolicy   |arn:aws:iam::552276840222:policy/nodes.cluster-api-provider-aws.sigs.k8s.io         |CREATE_COMPLETE
AWS::IAM::ManagedPolicy   |arn:aws:iam::552276840222:policy/controllers.cluster-api-provider-aws.sigs.k8s.io   |CREATE_COMPLETE
AWS::IAM::Role            |control-plane.cluster-api-provider-aws.sigs.k8s.io                                  |CREATE_COMPLETE
AWS::IAM::Role            |controllers.cluster-api-provider-aws.sigs.k8s.io                                    |CREATE_COMPLETE
AWS::IAM::Role            |nodes.cluster-api-provider-aws.sigs.k8s.io                                          |CREATE_COMPLETE

This might take a few minutes before you can continue and run clusterctl to initialise the Cluster API components on your Kubernetes management cluster with the option –watching-namespace where you can apply the cluster deployment manifests.

$ export AWS_B64ENCODED_CREDENTIALS=$(clusterawsadm bootstrap credentials encode-as-profile)

WARNING: `encode-as-profile` should only be used for bootstrapping.

$ clusterctl init --infrastructure aws --watching-namespace k8s
Fetching providers
Installing cert-manager Version="v0.16.1"
Waiting for cert-manager to be available...
Installing Provider="cluster-api" Version="v0.3.14" TargetNamespace="capi-system"
Installing Provider="bootstrap-kubeadm" Version="v0.3.14" TargetNamespace="capi-kubeadm-bootstrap-system"
Installing Provider="control-plane-kubeadm" Version="v0.3.14" TargetNamespace="capi-kubeadm-control-plane-system"
Installing Provider="infrastructure-aws" Version="v0.6.3" TargetNamespace="capa-system"

Your management cluster has been initialized successfully!

You can now create your first workload cluster by running the following:

  clusterctl config cluster [name] --kubernetes-version [version] | kubectl apply -f -

Now we have finished deploying the needed Cluster API components and are ready to create your first Kubernetes workload cluster. I go through the different custom resources and configuration options for the cluster provisioning. This starts with the cloud infrastructure configuration as you see in the example below for the VPC setup. You don’t have to use all three Availability Zone and can start with a single AZ in a region.

---
apiVersion: infrastructure.cluster.x-k8s.io/v1alpha3
kind: AWSCluster
metadata:
  name: cluster-1
  namespace: k8s
spec:
  region: eu-west-1
  sshKeyName: default
  networkSpec:
    vpc:
      cidrBlock: "10.0.0.0/23"
    subnets:
    - availabilityZone: eu-west-1a
      cidrBlock: "10.0.0.0/27"
      isPublic: true
    - availabilityZone: eu-west-1b
      cidrBlock: "10.0.0.32/27"
      isPublic: true
    - availabilityZone: eu-west-1c
      cidrBlock: "10.0.0.64/27"
      isPublic: true
    - availabilityZone: eu-west-1a
      cidrBlock: "10.0.1.0/27"
    - availabilityZone: eu-west-1b
      cidrBlock: "10.0.1.32/27"
    - availabilityZone: eu-west-1c
      cidrBlock: "10.0.1.64/27"

Alternatively you can also provision the workload cluster into an existing VPC, in this case your cloud infrastructure configuration looks slightly different and you need to specify VPC and subnet IDs.

---
apiVersion: infrastructure.cluster.x-k8s.io/v1alpha3
kind: AWSCluster
metadata:
  name: cluster-1
  namespace: k8s
spec:
  region: eu-west-1
  sshKeyName: default
  networkSpec:
    vpc:
      id: vpc-0425c335226437144
    subnets:
    - id: subnet-0261219d564bb0dc5
    - id: subnet-0fdcccba78668e013
...

Next we define the Kubeadm control-plane configuration and start with the AWS Machine Template to define the instance type and custom node configuration. Then follows the Kubeadm control-plane config referencing the machine template and amounts of replicas and Kubernetes control-plane version:

---
apiVersion: infrastructure.cluster.x-k8s.io/v1alpha3
kind: AWSMachineTemplate
metadata:
  name: cluster-1
  namespace: k8s
spec:
  template:
    spec:
      iamInstanceProfile: control-plane.cluster-api-provider-aws.sigs.k8s.io
      instanceType: t3.small
      sshKeyName: default
---
apiVersion: controlplane.cluster.x-k8s.io/v1alpha3
kind: KubeadmControlPlane
metadata:
  name: cluster-1-control-plane
  namespace: k8s
spec:
  infrastructureTemplate:
    apiVersion: infrastructure.cluster.x-k8s.io/v1alpha3
    kind: AWSMachineTemplate
    name: cluster-1-control-plane
  kubeadmConfigSpec:
    clusterConfiguration:
      apiServer:
        extraArgs:
          cloud-provider: aws
      controllerManager:
        extraArgs:
          cloud-provider: aws
    initConfiguration:
      nodeRegistration:
        kubeletExtraArgs:
          cloud-provider: aws
        name: '{{ ds.meta_data.local_hostname }}'
    joinConfiguration:
      nodeRegistration:
        kubeletExtraArgs:
          cloud-provider: aws
        name: '{{ ds.meta_data.local_hostname }}'
  replicas: 1
  version: v1.20.4

We continue with the data-plane (worker) nodes which also starts with the AWS machine template, additionally we need a Kubeadm Config Template and then the Machine Deployment for the worker nodes with a number of replicas and used Kubernetes version.

---
apiVersion: infrastructure.cluster.x-k8s.io/v1alpha3
kind: AWSMachineTemplate
metadata:
  name: cluster-1-data-plane-0
  namespace: k8s
spec:
  template:
    spec:
      iamInstanceProfile: nodes.cluster-api-provider-aws.sigs.k8s.io
      instanceType: t3.small
      sshKeyName: default
---
apiVersion: bootstrap.cluster.x-k8s.io/v1alpha3
kind: KubeadmConfigTemplate
metadata:
  name: cluster-1-data-plane-0
  namespace: k8s
spec:
  template:
    spec:
      joinConfiguration:
        nodeRegistration:
          kubeletExtraArgs:
            cloud-provider: aws
          name: '{{ ds.meta_data.local_hostname }}'
---
apiVersion: cluster.x-k8s.io/v1alpha3
kind: MachineDeployment
metadata:
  name: cluster-1-data-plane-0
  namespace: k8s
spec:
  clusterName: cluster-1
  replicas: 1
  selector:
    matchLabels: null
  template:
    metadata:
      labels:
        "nodepool": "nodepool-0"
    spec:
      bootstrap:
        configRef:
          apiVersion: bootstrap.cluster.x-k8s.io/v1alpha3
          kind: KubeadmConfigTemplate
          name: cluster-1-data-plane-0
      clusterName: cluster-1
      infrastructureRef:
        apiVersion: infrastructure.cluster.x-k8s.io/v1alpha3
        kind: AWSMachineTemplate
        name: cluster-1-data-plane-0
      version: v1.20.4

A workload cluster can be very easily upgraded by changing the .spec.version in the MachineDeployment and KubeadmControlPlane configuration. You can’t jump over a Kubernetes versions and can only upgrade to the next available version example: v1.18.4 to v1.19.8 or v1.19.8 to v1.20.4. See the list of supported AMIs and Kubernetes versions for the AWS provider.

At the beginning we enabled the feature-gates when we were initialising the management cluster to allow us to use ClusterResourceSets. This is incredible useful because I can define a set of resources which gets applied during the provisioning of the cluster. This only get executed one time during the bootstrap and will be not reconciled afterwards. In the configuration you see the reference to two configmaps for adding the Calico CNI plugin and the Nginx Ingress controller.

---
apiVersion: addons.cluster.x-k8s.io/v1alpha3
kind: ClusterResourceSet
metadata:
  name: cluster-1-crs-0
  namespace: k8s
spec:
  clusterSelector:
    matchLabels:
      cluster.x-k8s.io/cluster-name: cluster-1
  resources:
  - kind: ConfigMap
    name: calico-cni
  - kind: ConfigMap
    name: nginx-ingress

Example of the two configmaps which contain the YAML manifests:

apiVersion: v1
kind: ConfigMap
metadata:
  creationTimestamp: null
  name: calico-cni
  namespace: k8s
data:
  calico.yaml: |+
    ---
    # Source: calico/templates/calico-config.yaml
    # This ConfigMap is used to configure a self-hosted Calico installation.
    kind: ConfigMap
    apiVersion: v1
    metadata:
      name: calico-config
      namespace: kube-system
...
---
apiVersion: v1
data:
  deploy.yaml: |+
    ---
    apiVersion: v1
    kind: Namespace
    metadata:
      name: ingress-nginx
      labels:
        app.kubernetes.io/name: ingress-nginx
        app.kubernetes.io/instance: ingress-nginx
...

Without ClusterResourceSet you would need to manually apply the CNI and ingress controller manifests which is not great because you need the CNI plugin for all nodes to go into Ready state.

$ kubectl --kubeconfig=./cluster-1.kubeconfig   apply -f https://docs.projectcalico.org/v3.15/manifests/calico.yaml
$ kubectl --kubeconfig=./cluster-1.kubeconfig apply -f https://raw.githubusercontent.com/kubernetes/ingress-nginx/controller-v0.41.2/deploy/static/provider/aws/deploy.yaml

Finally after we have created the configuration of the workload cluster we can apply cluster manifest with the option for setting custom clusterNetwork and specify with service and pod IP range.

---
apiVersion: cluster.x-k8s.io/v1alpha3
kind: Cluster
metadata:
  name: cluster-1
  namespace: k8s
  labels:
    cluster.x-k8s.io/cluster-name: cluster-1
spec:
  clusterNetwork:
    services:
      cidrBlocks:
      - 172.30.0.0/16
    pods:
      cidrBlocks:
      - 10.128.0.0/14
  controlPlaneRef:
    apiVersion: controlplane.cluster.x-k8s.io/v1alpha3
    kind: KubeadmControlPlane
    name: cluster-1-control-plane
  infrastructureRef:
    apiVersion: infrastructure.cluster.x-k8s.io/v1alpha3
    kind: AWSCluster
    name: cluster-1

The provisioning of the workload cluster will take around 10 to 15 mins and you can follow the progress by checking the status of different configurations we have applied previously.

You can scale both Kubeadm control-plane and MachineDeployment afterwards to change the size of your cluster. MachineDeployment can be scaled down to zero to save cost.

$ kubectl scale KubeadmControlPlane cluster-1-control-plane --replicas=1
$ kubectl scale MachineDeployment cluster-1-data-plane-0 --replicas=0

After the provisioning is completed you can get kubeconfig of the cluster from the secret which got created during the bootstrap:

$ kubectl --namespace=k8s get secret cluster-1-kubeconfig    -o jsonpath={.data.value} | base64 --decode    > cluster-1.kubeconfig

Example check the node state.

$ kubectl --kubeconfig=./cluster-1.kubeconfig get nodes

When your cluster is provisioned and nodes are in Ready state you can apply the MachineHealthCheck for the data-plane (worker) nodes. This automatically remediate unhealthy nodes and provisions new nodes to join them into the cluster.

---
apiVersion: cluster.x-k8s.io/v1alpha3
kind: MachineHealthCheck
metadata:
  name: cluster-1-node-unhealthy-5m
  namespace: k8s
spec:
  # clusterName is required to associate this MachineHealthCheck with a particular cluster
  clusterName: cluster-1
  # (Optional) maxUnhealthy prevents further remediation if the cluster is already partially unhealthy
  maxUnhealthy: 40%
  # (Optional) nodeStartupTimeout determines how long a MachineHealthCheck should wait for
  # a Node to join the cluster, before considering a Machine unhealthy
  nodeStartupTimeout: 10m
  # selector is used to determine which Machines should be health checked
  selector:
    matchLabels:
      nodepool: nodepool-0 
  # Conditions to check on Nodes for matched Machines, if any condition is matched for the duration of its timeout, the Machine is considered unhealthy
  unhealthyConditions:
  - type: Ready
    status: Unknown
    timeout: 300s
  - type: Ready
    status: "False"
    timeout: 300s

I hope this is a useful article for getting started with the Kubernetes Cluster API.

Getting started with Kubernetes Operators in Go

In the past few weeks I started to learn Go and beginners like me can make quick progress once you understand the structure and some basics about the programming language. I felt that from all the learning and reading I’ve done on Go and Kubernetes operators, I had enough knowledge to start writing my own Kubernetes operator in Go.

At the beginning of last year, RedHat released the operator-sdk which helps to create the scaffolding for writing your own operators in Ansible, Helm or natively in Go. There has been quite a few changes along the way around the operator-sdk and it is maturing a lot over the course of the past year.

The instructions on how to install Go can be found on the Go website and we need the latest version of the operator-sdk:

$ wget https://github.com/operator-framework/operator-sdk/releases/download/v1.2.0/operator-sdk-v1.2.0-x86_64-linux-gnu
$ mv operator-sdk-v1.2.0-x86_64-linux-gnu operator-sdk
$ sudo mv operator-sdk /usr/local/bin/

Create a new folder and start to initialise the project. You see that I have already set the option --domain so all API groups will be <-group->.helloworld.io. The --repo option allows me to create the project folder outside of my $GOPATH environment. Infos about the folder structure you can find in the Kubebuilder documentation:

$ mkdir k8s-helloworld-operator
$ cd k8s-helloworld-operator
$ operator-sdk init --domain=helloworld.io --repo=github.com/berndonline/k8s-helloworld-operator

The last thing we need before we start writing the operator is to create a new API and Controller and this will scaffold the operator API at api/v1alpha1/operator_types.go and the controller at controllers/operator_controller.go.

$ operator-sdk create api --group app --version v1alpha1 --kind Operator
Create Resource [y/n]
y
Create Controller [y/n]
y
Writing scaffold for you to edit...
api/v1alpha1/operator_types.go
controllers/operator_controller.go
...
  • Define your API

Define your API for the operator custom resource by editing the Go type definitions at api/v1alpha1/operator_types.go

// OperatorSpec defines the desired state of Operator
type OperatorSpec struct {
	// INSERT ADDITIONAL SPEC FIELDS - desired state of cluster
	// Important: Run "make" to regenerate code after modifying this file

	// Foo is an example field of Operator. Edit Operator_types.go to remove/update
	Size     int32  `json:"size"`
	Image    string `json:"image"`
	Response string `json:"response"`
}
// OperatorStatus defines the observed state of Operator
type OperatorStatus struct {
	// INSERT ADDITIONAL STATUS FIELD - define observed state of cluster
	// Important: Run "make" to regenerate code after modifying this file
	Nodes []string `json:"nodes"`
}

// Operator is the Schema for the operators API
// +kubebuilder:subresource:status
type Operator struct {
	metav1.TypeMeta   `json:",inline"`
	metav1.ObjectMeta `json:"metadata,omitempty"`

	Spec   OperatorSpec   `json:"spec,omitempty"`
	Status OperatorStatus `json:"status,omitempty"`
}

After modifying the _types.go file you always need to run the following command to update the generated code for that resource type:

$ make generate 
/home/ubuntu/.go/bin/controller-gen object:headerFile="hack/boilerplate.go.txt" paths="./..."
  • Generate Custom Resource Definition (CRD) manifests

In the previous step we defined the API with spec and status fields of the CRD manifests, which can be generated and updated with the following command:

$ make manifests
/home/ubuntu/.go/bin/controller-gen "crd:trivialVersions=true" rbac:roleName=manager-role webhook paths="./..." output:crd:artifacts:config=config/crd/bases

This makefile will invoke the controller-gen to generate the CRD manifests at config/crd/bases/app.helloworld.io_operators.yaml and below you see my custom resource example for the operator:

apiVersion: app.helloworld.io/v1alpha1
kind: Operator
metadata:
  name: operator-sample
spec:
  size: 1
  response: "Hello, World!"
  image: "ghcr.io/berndonline/k8s/go-helloworld:latest"
  • Controller

In the beginning when I created the API, the operator-sdk automatically created the controller file for me at controllers/operator_controller.go which we now start to modify and add the Go code. I will not go into every detail because the different resources you will create will all look very similar and repeat like you will see in example code. I will mainly focus on the Deployment for my Helloworld container image which I want to deploy using the operator.

Let’s start looking at the deploymentForOperator function which defines and returns the Kubernetes Deployment object. You see there that I invoke an imported Go packages like &appsv1.Deployment and the import is defined at the top of the controller file. You can find details about this in the Go Doc reference: godoc.org/k8s.io/api/apps/v1

// deploymentForOperator returns a operator Deployment object
func (r *OperatorReconciler) deploymentForOperator(m *appv1alpha1.Operator) *appsv1.Deployment {
	ls := labelsForOperator(m.Name)
	replicas := m.Spec.Size

	dep := &appsv1.Deployment{
		ObjectMeta: metav1.ObjectMeta{
			Name:      m.Name,
			Namespace: m.Namespace,
		},
		Spec: appsv1.DeploymentSpec{
			Replicas: &replicas,
			Selector: &metav1.LabelSelector{
				MatchLabels: ls,
			},
			Template: corev1.PodTemplateSpec{
				ObjectMeta: metav1.ObjectMeta{
					Labels: ls,
				},
				Spec: corev1.PodSpec{
					Containers: []corev1.Container{{
						Image:           m.Spec.Image,
						ImagePullPolicy: "Always",
						Name:            "helloworld",
						Ports: []corev1.ContainerPort{{
							ContainerPort: 8080,
							Name:          "operator",
						}},
						Env: []corev1.EnvVar{{
							Name:  "RESPONSE",
							Value: m.Spec.Response,
						}},
						EnvFrom: []corev1.EnvFromSource{{
							ConfigMapRef: &corev1.ConfigMapEnvSource{
								LocalObjectReference: corev1.LocalObjectReference{
									Name: m.Name,
								},
							},
						}},
						VolumeMounts: []corev1.VolumeMount{{
							Name:      m.Name,
							ReadOnly:  true,
							MountPath: "/helloworld/",
						}},
					}},
					Volumes: []corev1.Volume{{
						Name: m.Name,
						VolumeSource: corev1.VolumeSource{
							ConfigMap: &corev1.ConfigMapVolumeSource{
								LocalObjectReference: corev1.LocalObjectReference{
									Name: m.Name,
								},
							},
						},
					}},
				},
			},
		},
	}

	// Set Operator instance as the owner and controller
	ctrl.SetControllerReference(m, dep, r.Scheme)
	return dep
}

We have defined the deploymentForOperator function and now we can look into the Reconcile function and add the step to check if the deployment already exists and, if not, to create the new deployment:

// Check if the deployment already exists, if not create a new one
found := &appsv1.Deployment{}
err = r.Get(ctx, types.NamespacedName{Name: operator.Name, Namespace: operator.Namespace}, found)
if err != nil && errors.IsNotFound(err) {
	// Define a new deployment
	dep := r.deploymentForOperator(operator)
	log.Info("Creating a new Deployment", "Deployment.Namespace", dep.Namespace, "Deployment.Name", dep.Name)
	err = r.Create(ctx, dep)
	if err != nil {
		log.Error(err, "Failed to create new Deployment", "Deployment.Namespace", dep.Namespace, "Deployment.Name", dep.Name)
		return ctrl.Result{}, err
	}
	// Deployment created successfully - return and requeue
	return ctrl.Result{Requeue: true}, nil
} else if err != nil {
	log.Error(err, "Failed to get Deployment")
	return ctrl.Result{}, err
}

Unfortunately this isn’t enough because this will only check if the deployment exists or not and create a new deployment, but it will not update the deployment if the custom resource is changed.

We need to add two more steps to check if the created Deployment Spec.Template matches the Spec.Template from the  deploymentForOperator function and the Deployment Spec.Replicas the defined size from the custom resource. I will make use of the defined variable found := &appsv1.Deployment{} from the previous step when I checked if the deployment exists.

// Check if the deployment Spec.Template, matches the found Spec.Template
deploy := r.deploymentForOperator(operator)
if !equality.Semantic.DeepDerivative(deploy.Spec.Template, found.Spec.Template) {
	found = deploy
	log.Info("Updating Deployment", "Deployment.Namespace", found.Namespace, "Deployment.Name", found.Name)
	err := r.Update(ctx, found)
	if err != nil {
		log.Error(err, "Failed to update Deployment", "Deployment.Namespace", found.Namespace, "Deployment.Name", found.Name)
		return ctrl.Result{}, err
	}
	return ctrl.Result{Requeue: true}, nil
}

// Ensure the deployment size is the same as the spec
size := operator.Spec.Size
if *found.Spec.Replicas != size {
	found.Spec.Replicas = &size
	err = r.Update(ctx, found)
	if err != nil {
		log.Error(err, "Failed to update Deployment", "Deployment.Namespace", found.Namespace, "Deployment.Name", found.Name)
		return ctrl.Result{}, err
	}
	// Spec updated - return and requeue
	return ctrl.Result{Requeue: true}, nil
}

The SetupWithManager() function in controllers/operator_controller.go specifies how the controller is built to watch a custom resource and other resources that are owned and managed by that controller.

func (r *OperatorReconciler) SetupWithManager(mgr ctrl.Manager) error {
	return ctrl.NewControllerManagedBy(mgr).
		For(&appv1alpha1.Operator{}).
		Owns(&appsv1.Deployment{}).
		Owns(&corev1.ConfigMap{}).
		Owns(&corev1.Service{}).
		Owns(&networkingv1beta1.Ingress{}).
		Complete(r)
}

Basically that’s all I need to write for the controller to deploy my Helloworld container image using an Kubernetes operator. In my code example you will find that I also create a Kubernetes Service, Ingress and ConfigMap but you see that this mostly repeats what I have done with the Deployment object.

  • RBAC permissions

Before we can start running the operator, we need to define the RBAC permissions the controller needs to interact with the resources it manages otherwise your controller will not work. These are specified via [RBAC markers] like these:

// +kubebuilder:rbac:groups=app.helloworld.io,resources=operators,verbs=get;list;watch;create;update;patch;delete
// +kubebuilder:rbac:groups=app.helloworld.io,resources=operators/status,verbs=get;update;patch
// +kubebuilder:rbac:groups=app.helloworld.io,resources=operators/finalizers,verbs=update
// +kubebuilder:rbac:groups=apps,resources=deployments,verbs=get;list;watch;create;update;patch;delete
// +kubebuilder:rbac:groups=core,resources=services,verbs=get;list;watch;create;update;patch;delete
// +kubebuilder:rbac:groups=core,resources=configmaps,verbs=get;list;watch;create;update;patch;delete
// +kubebuilder:rbac:groups=networking.k8s.io,resources=ingresses,verbs=get;list;watch;create;update;patch;delete
// +kubebuilder:rbac:groups=core,resources=pods,verbs=get;list;watch

The ClusterRole manifest at config/rbac/role.yaml is generated from the above markers via controller-gen with the following command:

$ make manifests 
/home/ubuntu/.go/bin/controller-gen "crd:trivialVersions=true" rbac:roleName=manager-role webhook paths="./..." output:crd:artifacts:config=config/crd/bases
  • Running the Operator

We need a Kubernetes cluster and admin privileges to run the operator. I will use Kind which will run a lightweight Kubernetes cluster in your local Docker engine, which is all I need to run and test my Helloworld operator:

$ ./scripts/create-kind-cluster.sh 
Creating cluster "kind" ...
 ✓ Ensuring node image (kindest/node:v1.19.1) 🖼 
 ✓ Preparing nodes 📦  
 ✓ Writing configuration 📜 
 ✓ Starting control-plane 🕹️ 
 ✓ Installing CNI 🔌 
 ✓ Installing StorageClass 💾 
Set kubectl context to "kind-kind"
You can now use your cluster with:

kubectl cluster-info --context kind-kind

Have a question, bug, or feature request? Let us know! https://kind.sigs.k8s.io/#community 🙂

Before running the operator the custom resource Definition must be registered with the Kubernetes apiserver:

$ make install
/home/ubuntu/.go/bin/controller-gen "crd:trivialVersions=true" rbac:roleName=manager-role webhook paths="./..." output:crd:artifacts:config=config/crd/bases
/usr/bin/kustomize build config/crd | kubectl apply -f -
Warning: apiextensions.k8s.io/v1beta1 CustomResourceDefinition is deprecated in v1.16+, unavailable in v1.22+; use apiextensions.k8s.io/v1 CustomResourceDefinition
customresourcedefinition.apiextensions.k8s.io/operators.app.helloworld.io created

We can now run the operator locally on my workstation:

$ make run
/home/ubuntu/.go/bin/controller-gen object:headerFile="hack/boilerplate.go.txt" paths="./..."
go fmt ./...
go vet ./...
/home/ubuntu/.go/bin/controller-gen "crd:trivialVersions=true" rbac:roleName=manager-role webhook paths="./..." output:crd:artifacts:config=config/crd/bases
go run ./main.go
2020-11-22T18:12:49.023Z	INFO	controller-runtime.metrics	metrics server is starting to listen	{"addr": ":8080"}
2020-11-22T18:12:49.024Z	INFO	setup	starting manager
2020-11-22T18:12:49.025Z	INFO	controller-runtime.manager	starting metrics server	{"path": "/metrics"}
2020-11-22T18:12:49.025Z	INFO	controller	Starting EventSource	{"reconcilerGroup": "app.helloworld.io", "reconcilerKind": "Operator", "controller": "operator", "source": "kind source: /, Kind="}
2020-11-22T18:12:49.126Z	INFO	controller	Starting EventSource	{"reconcilerGroup": "app.helloworld.io", "reconcilerKind": "Operator", "controller": "operator", "source": "kind source: /, Kind="}
2020-11-22T18:12:49.226Z	INFO	controller	Starting EventSource	{"reconcilerGroup": "app.helloworld.io", "reconcilerKind": "Operator", "controller": "operator", "source": "kind source: /, Kind="}
2020-11-22T18:12:49.327Z	INFO	controller	Starting EventSource	{"reconcilerGroup": "app.helloworld.io", "reconcilerKind": "Operator", "controller": "operator", "source": "kind source: /, Kind="}
2020-11-22T18:12:49.428Z	INFO	controller	Starting EventSource	{"reconcilerGroup": "app.helloworld.io", "reconcilerKind": "Operator", "controller": "operator", "source": "kind source: /, Kind="}
2020-11-22T18:12:49.528Z	INFO	controller	Starting Controller	{"reconcilerGroup": "app.helloworld.io", "reconcilerKind": "Operator", "controller": "operator"}
2020-11-22T18:12:49.528Z	INFO	controller	Starting workers	{"reconcilerGroup": "app.helloworld.io", "reconcilerKind": "Operator", "controller": "operator", "worker count": 1}

Let’s open a new terminal and apply the custom resource example:

$ kubectl apply -f config/samples/app_v1alpha1_operator.yaml 
operator.app.helloworld.io/operator-sample created

Going back to the terminal where the operator is running, you see the log messages that it invoke the different functions to deploy the defined resource objects:

2020-11-22T18:15:30.412Z	INFO	controllers.Operator	Creating a new Deployment	{"operator": "default/operator-sample", "Deployment.Namespace": "default", "Deployment.Name": "operator-sample"}
2020-11-22T18:15:30.446Z	INFO	controllers.Operator	Creating a new ConfigMap	{"operator": "default/operator-sample", "ConfigMap.Namespace": "default", "ConfigMap.Name": "operator-sample"}
2020-11-22T18:15:30.453Z	INFO	controllers.Operator	Creating a new Service	{"operator": "default/operator-sample", "Service.Namespace": "default", "Service.Name": "operator-sample"}
2020-11-22T18:15:30.470Z	INFO	controllers.Operator	Creating a new Ingress	{"operator": "default/operator-sample", "Ingress.Namespace": "default", "Ingress.Name": "operator-sample"}
2020-11-22T18:15:30.927Z	DEBUG	controller	Successfully Reconciled	{"reconcilerGroup": "app.helloworld.io", "reconcilerKind": "Operator", "controller": "operator", "name": "operator-sample", "namespace": "default"}
2020-11-22T18:15:33.776Z	DEBUG	controller	Successfully Reconciled	{"reconcilerGroup": "app.helloworld.io", "reconcilerKind": "Operator", "controller": "operator", "name": "operator-sample", "namespace": "default"}
2020-11-22T18:15:35.181Z	DEBUG	controller	Successfully Reconciled	{"reconcilerGroup": "app.helloworld.io", "reconcilerKind": "Operator", "controller": "operator", "name": "operator-sample", "namespace": "default"}

In the default namespace where I applied the custom resource you will see the deployed resources by the operator:

$ kubectl get operators.app.helloworld.io 
NAME              AGE
operator-sample   6m11s
$ kubectl get all
NAME                                   READY   STATUS    RESTARTS   AGE
pod/operator-sample-767897c4b9-8zwsd   1/1     Running   0          2m59s

NAME                      TYPE        CLUSTER-IP      EXTERNAL-IP   PORT(S)    AGE
service/kubernetes        ClusterIP   10.96.0.1               443/TCP    29m
service/operator-sample   ClusterIP   10.96.199.188           8080/TCP   2m59s

NAME                              READY   UP-TO-DATE   AVAILABLE   AGE
deployment.apps/operator-sample   1/1     1            1           2m59s

NAME                                         DESIRED   CURRENT   READY   AGE
replicaset.apps/operator-sample-767897c4b9   1         1         1       2m59s

There is not much else to do other than to build the operator image and push to an image registry so that I can run the operator on a Kubernetes cluster.

$ make docker-build IMG=ghcr.io/berndonline/k8s/helloworld-operator:latest
$ make docker-push IMG=ghcr.io/berndonline/k8s/helloworld-operator:latest
$ kustomize build config/default | kubectl apply -f -

I hope this article is useful for getting you started on writing your own Kubernetes operator in Go.

OpenShift / OKD 4.x Cluster Deployment using OpenShift Hive

Before you continue to deploy an OpenShift or OKD cluster please check out my other posts about OpenShift Hive – API driven OpenShift cluster provisioning and management operator and Getting started with OpenShift Hive  because you need a running OpenShift Hive operator.

To install the OKD (OpenShift Origin Community Distribution) version we need a few things beforehand: a cluster namespace, AWS credentials, SSH keys, image pull secret, install-config, cluster image version and cluster deployment.

Let’s start to create the cluster namespace:

cat <<EOF | kubectl apply -f -
---
apiVersion: v1
kind: Namespace
metadata:
  name: okd

Create a secret with your ssh key:

$ kubectl create secret generic ssh-key -n okd --from-file=ssh-privatekey=/home/ubuntu/.ssh/id_rsa --from-file=ssh-publickey=/home/ubuntu/.ssh/id_rsa.pub

Create the AWS credential secret:

$ kubectl create secret generic aws-creds -n okd --from-literal=aws_secret_access_key=$AWS_SECRET_ACCESS_KEY --from-literal=aws_access_key_id=$AWS_ACCESS_KEY_ID

Create an image pull secret, this is not important for installing a OKD 4.x cluster but needs to be present otherwise Hive will not start the cluster deployment. If you have an RedHat Enterprise subscription for OpenShift then you need to add here your RedHat image pull secret:

$ kubectl create secret generic pull-secret -n okd --from-file=.dockerconfigjson=/home/ubuntu/.docker/config.json --type=kubernetes.io/dockerconfigjson 

Create a install-config.yaml for the cluster deployment and modify to your needs:

---
apiVersion: v1
baseDomain: kube.domain.com
compute:
- name: worker
  platform:
    aws:
      rootVolume:
        iops: 100
        size: 22
        type: gp2
      type: m4.xlarge
  replicas: 3
controlPlane:
  name: master
  platform:
    aws:
      rootVolume:
        iops: 100
        size: 22
        type: gp2
      type: m4.xlarge
replicas: 3
metadata:
  creationTimestamp: null
  name: okd
networking:
  clusterNetwork:
  - cidr: 10.128.0.0/14
    hostPrefix: 23
  machineCIDR: 10.0.0.0/16
  networkType: OpenShiftSDN
  serviceNetwork:
  - 172.30.0.0/16
platform:
  aws:
    region: eu-west-1
pullSecret: ""
sshKey: ""

Create the install-config secret for the cluster deployment:

$ kubectl create secret generic install-config -n okd --from-file=install-config.yaml=./install-config.yaml

Create the ClusterImageSet for OKD. In my example I am using the latest OKD 4.4.0 release. More information about the available OKD release versions you find here: https://origin-release.svc.ci.openshift.org/

cat <<EOF | kubectl apply -f -
---
apiVersion: hive.openshift.io/v1
kind: ClusterImageSet
metadata:
  name: okd-4-4-0-imageset
spec:
  releaseImage: registry.svc.ci.openshift.org/origin/release:4.4.0-0.okd-2020-02-18-212654
EOF 

Below is an example of a RedHat Enterprise OpenShift 4 ClusterImageSet:

---
apiVersion: hive.openshift.io/v1
kind: ClusterImageSet
metadata:
  name: openshift-4-3-0-imageset
spec:
  releaseImage: quay.io/openshift-release-dev/ocp-release:4.3.0-x86_64

For Hive to start with the cluster deployment, we need to modify the manifest below and add the references to the previous created secrets, install-config and cluster imageset version:

cat <<EOF | kubectl apply -f -
---
apiVersion: hive.openshift.io/v1
kind: ClusterDeployment
metadata:
  creationTimestamp: null
  name: okd
  namespace: okd
spec:
  baseDomain: kube.domain.com
  clusterName: okd
  controlPlaneConfig:
    servingCertificates: {}
  installed: false
  platform:
    aws:
      credentialsSecretRef:
        name: aws-creds
      region: eu-west-1
  provisioning:
    imageSetRef:
      name: okd-4-4-0-imageset
    installConfigSecretRef:
      name: install-config 
  pullSecretRef:
    name: pull-secret
  sshKey:
    name: ssh-key
status:
  clusterVersionStatus:
    availableUpdates: null
    desired:
      force: false
      image: ""
      version: ""
    observedGeneration: 0
    versionHash: ""
EOF

Once you submitted the ClusterDeployment manifest, the Hive operator will start to deploy the cluster straightaway:

$ kubectl get clusterdeployments.hive.openshift.io -n okd
NAME   CLUSTERNAME   CLUSTERTYPE   BASEDOMAIN          INSTALLED   INFRAID     AGE
okd    okd                         kube.domain.com     false       okd-jcdkd   107s

Hive will create the provision (install) pod for the cluster deployment and inject the installer configuration:

$ kubectl get pods -n okd
NAME                          READY   STATUS    RESTARTS   AGE
okd-0-tbm9t-provision-c5hpf   1/3     Running   0          57s

You can view the logs to check the progress of the cluster deployment. You will see the terraform output for creating the infrastructure resources and feedback from the installer about the installation progress. At the end you will see when the installation completed successfully:

$ kubectl logs okd-0-tbm9t-provision-c5hpf -n okd -c hive -f
...
time="2020-02-23T13:31:41Z" level=debug msg="module.dns.aws_route53_zone.int: Creating..."
time="2020-02-23T13:31:42Z" level=debug msg="aws_ami_copy.main: Still creating... [3m40s elapsed]"
time="2020-02-23T13:31:51Z" level=debug msg="module.dns.aws_route53_zone.int: Still creating... [10s elapsed]"
time="2020-02-23T13:31:52Z" level=debug msg="aws_ami_copy.main: Still creating... [3m50s elapsed]"
time="2020-02-23T13:32:01Z" level=debug msg="module.dns.aws_route53_zone.int: Still creating... [20s elapsed]"
time="2020-02-23T13:32:02Z" level=debug msg="aws_ami_copy.main: Still creating... [4m0s elapsed]"
time="2020-02-23T13:32:11Z" level=debug msg="module.dns.aws_route53_zone.int: Still creating... [30s elapsed]"
time="2020-02-23T13:32:12Z" level=debug msg="aws_ami_copy.main: Still creating... [4m10s elapsed]"
time="2020-02-23T13:32:21Z" level=debug msg="module.dns.aws_route53_zone.int: Still creating... [40s elapsed]"
time="2020-02-23T13:32:22Z" level=debug msg="aws_ami_copy.main: Still creating... [4m20s elapsed]"
time="2020-02-23T13:32:31Z" level=debug msg="module.dns.aws_route53_zone.int: Still creating... [50s elapsed]"
time="2020-02-23T13:32:32Z" level=debug msg="aws_ami_copy.main: Still creating... [4m30s elapsed]"
time="2020-02-23T13:32:41Z" level=debug msg="module.dns.aws_route53_zone.int: Still creating... [1m0s elapsed]"
time="2020-02-23T13:32:41Z" level=debug msg="module.dns.aws_route53_zone.int: Creation complete after 1m0s [id=Z10411051RAEUMMAUH39E]"
time="2020-02-23T13:32:41Z" level=debug msg="module.dns.aws_route53_record.etcd_a_nodes[0]: Creating..."
time="2020-02-23T13:32:41Z" level=debug msg="module.dns.aws_route53_record.api_internal: Creating..."
time="2020-02-23T13:32:41Z" level=debug msg="module.dns.aws_route53_record.api_external_internal_zone: Creating..."
time="2020-02-23T13:32:41Z" level=debug msg="module.dns.aws_route53_record.etcd_a_nodes[2]: Creating..."
time="2020-02-23T13:32:41Z" level=debug msg="module.dns.aws_route53_record.etcd_a_nodes[1]: Creating..."
time="2020-02-23T13:32:42Z" level=debug msg="aws_ami_copy.main: Still creating... [4m40s elapsed]"
time="2020-02-23T13:32:51Z" level=debug msg="module.dns.aws_route53_record.etcd_a_nodes[0]: Still creating... [10s elapsed]"
time="2020-02-23T13:32:51Z" level=debug msg="module.dns.aws_route53_record.api_internal: Still creating... [10s elapsed]"
time="2020-02-23T13:32:51Z" level=debug msg="module.dns.aws_route53_record.api_external_internal_zone: Still creating... [10s elapsed]"
time="2020-02-23T13:32:51Z" level=debug msg="module.dns.aws_route53_record.etcd_a_nodes[2]: Still creating... [10s elapsed]"
time="2020-02-23T13:32:51Z" level=debug msg="module.dns.aws_route53_record.etcd_a_nodes[1]: Still creating... [10s elapsed]"
time="2020-02-23T13:32:52Z" level=debug msg="aws_ami_copy.main: Still creating... [4m50s elapsed]"
...
time="2020-02-23T13:34:43Z" level=debug msg="Apply complete! Resources: 123 added, 0 changed, 0 destroyed."
time="2020-02-23T13:34:43Z" level=debug msg="OpenShift Installer unreleased-master-2446-gc108297de972e1a6a5fb502a7668079d16e501f9-dirty"
time="2020-02-23T13:34:43Z" level=debug msg="Built from commit c108297de972e1a6a5fb502a7668079d16e501f9"
time="2020-02-23T13:34:43Z" level=info msg="Waiting up to 20m0s for the Kubernetes API at https://api.okd.kube.domain.com:6443..."
time="2020-02-23T13:35:13Z" level=debug msg="Still waiting for the Kubernetes API: Get https://api.okd.kube.domain.com:6443/version?timeout=32s: dial tcp 52.17.210.160:6443: connect: connection refused"
time="2020-02-23T13:35:50Z" level=debug msg="Still waiting for the Kubernetes API: Get https://api.okd.kube.domain.com:6443/version?timeout=32s: dial tcp 52.211.227.216:6443: connect: connection refused"
time="2020-02-23T13:36:20Z" level=debug msg="Still waiting for the Kubernetes API: Get https://api.okd.kube.domain.com:6443/version?timeout=32s: dial tcp 52.17.210.160:6443: connect: connection refused"
time="2020-02-23T13:36:51Z" level=debug msg="Still waiting for the Kubernetes API: Get https://api.okd.kube.domain.com:6443/version?timeout=32s: dial tcp 52.211.227.216:6443: connect: connection refused"
time="2020-02-23T13:37:58Z" level=debug msg="Still waiting for the Kubernetes API: Get https://api.okd.kube.domain.com:6443/version?timeout=32s: dial tcp 52.211.227.216:6443: connect: connection refused"
time="2020-02-23T13:38:00Z" level=debug msg="Still waiting for the Kubernetes API: the server could not find the requested resource"
time="2020-02-23T13:38:30Z" level=debug msg="Still waiting for the Kubernetes API: the server could not find the requested resource"
time="2020-02-23T13:38:58Z" level=debug msg="Still waiting for the Kubernetes API: Get https://api.okd.kube.domain.com:6443/version?timeout=32s: dial tcp 52.211.227.216:6443: connect: connection refused"
time="2020-02-23T13:39:28Z" level=debug msg="Still waiting for the Kubernetes API: Get https://api.okd.kube.domain.com:6443/version?timeout=32s: dial tcp 63.35.50.149:6443: connect: connection refused"
time="2020-02-23T13:39:36Z" level=info msg="API v1.17.1 up"
time="2020-02-23T13:39:36Z" level=info msg="Waiting up to 40m0s for bootstrapping to complete..."
...
time="2020-02-23T13:55:14Z" level=debug msg="Still waiting for the cluster to initialize: Working towards 4.4.0-0.okd-2020-02-18-212654: 97% complete"
time="2020-02-23T13:55:24Z" level=debug msg="Still waiting for the cluster to initialize: Working towards 4.4.0-0.okd-2020-02-18-212654: 99% complete"
time="2020-02-23T13:57:39Z" level=debug msg="Still waiting for the cluster to initialize: Working towards 4.4.0-0.okd-2020-02-18-212654: 99% complete, waiting on authentication, console, monitoring"
time="2020-02-23T13:58:54Z" level=debug msg="Still waiting for the cluster to initialize: Working towards 4.4.0-0.okd-2020-02-18-212654: 99% complete"
time="2020-02-23T14:01:40Z" level=debug msg="Still waiting for the cluster to initialize: Working towards 4.4.0-0.okd-2020-02-18-212654: 100% complete, waiting on authentication"
time="2020-02-23T14:03:24Z" level=debug msg="Cluster is initialized"
time="2020-02-23T14:03:24Z" level=info msg="Waiting up to 10m0s for the openshift-console route to be created..."
time="2020-02-23T14:03:24Z" level=debug msg="Route found in openshift-console namespace: console"
time="2020-02-23T14:03:24Z" level=debug msg="Route found in openshift-console namespace: downloads"
time="2020-02-23T14:03:24Z" level=debug msg="OpenShift console route is created"
time="2020-02-23T14:03:24Z" level=info msg="Install complete!"
time="2020-02-23T14:03:24Z" level=info msg="To access the cluster as the system:admin user when using 'oc', run 'export KUBECONFIG=/output/auth/kubeconfig'"
time="2020-02-23T14:03:24Z" level=info msg="Access the OpenShift web-console here: https://console-openshift-console.apps.okd.kube.domain.com"
REDACTED LINE OF OUTPUT
time="2020-02-23T14:03:25Z" level=info msg="command completed successfully" installID=jcdkd
time="2020-02-23T14:03:25Z" level=info msg="saving installer output" installID=jcdkd
time="2020-02-23T14:03:25Z" level=debug msg="installer console log: level=info msg=\"Credentials loaded from default AWS environment variables\"\nlevel=info msg=\"Consuming Install Config from target directory\"\nlevel=warning msg=\"Found override for release image. Please be warned, this is not advised\"\nlevel=info msg=\"Consuming Master Machines from target directory\"\nlevel=info msg=\"Consuming Common Manifests from target directory\"\nlevel=info msg=\"Consuming OpenShift Install from target directory\"\nlevel=info msg=\"Consuming Worker Machines from target directory\"\nlevel=info msg=\"Consuming Openshift Manifests from target directory\"\nlevel=info msg=\"Consuming Master Ignition Config from target directory\"\nlevel=info msg=\"Consuming Worker Ignition Config from target directory\"\nlevel=info msg=\"Consuming Bootstrap Ignition Config from target directory\"\nlevel=info msg=\"Creating infrastructure resources...\"\nlevel=info msg=\"Waiting up to 20m0s for the Kubernetes API at https://api.okd.kube.domain.com:6443...\"\nlevel=info msg=\"API v1.17.1 up\"\nlevel=info msg=\"Waiting up to 40m0s for bootstrapping to complete...\"\nlevel=info msg=\"Destroying the bootstrap resources...\"\nlevel=error\nlevel=error msg=\"Warning: Resource targeting is in effect\"\nlevel=error\nlevel=error msg=\"You are creating a plan with the -target option, which means that the result\"\nlevel=error msg=\"of this plan may not represent all of the changes requested by the current\"\nlevel=error msg=configuration.\nlevel=error msg=\"\\t\\t\"\nlevel=error msg=\"The -target option is not for routine use, and is provided only for\"\nlevel=error msg=\"exceptional situations such as recovering from errors or mistakes, or when\"\nlevel=error msg=\"Terraform specifically suggests to use it as part of an error message.\"\nlevel=error\nlevel=error\nlevel=error msg=\"Warning: Applied changes may be incomplete\"\nlevel=error\nlevel=error msg=\"The plan was created with the -target option in effect, so some changes\"\nlevel=error msg=\"requested in the configuration may have been ignored and the output values may\"\nlevel=error msg=\"not be fully updated. Run the following command to verify that no other\"\nlevel=error msg=\"changes are pending:\"\nlevel=error msg=\"    terraform plan\"\nlevel=error msg=\"\\t\"\nlevel=error msg=\"Note that the -target option is not suitable for routine use, and is provided\"\nlevel=error msg=\"only for exceptional situations such as recovering from errors or mistakes, or\"\nlevel=error msg=\"when Terraform specifically suggests to use it as part of an error message.\"\nlevel=error\nlevel=info msg=\"Waiting up to 30m0s for the cluster at https://api.okd.kube.domain.com:6443 to initialize...\"\nlevel=info msg=\"Waiting up to 10m0s for the openshift-console route to be created...\"\nlevel=info msg=\"Install complete!\"\nlevel=info msg=\"To access the cluster as the system:admin user when using 'oc', run 'export KUBECONFIG=/output/auth/kubeconfig'\"\nlevel=info msg=\"Access the OpenShift web-console here: https://console-openshift-console.apps.okd.kube.domain.com\"\nREDACTED LINE OF OUTPUT\n" installID=vxghr9br
time="2020-02-23T14:03:25Z" level=info msg="install completed successfully" installID=jcdkd

After the installation of the cluster deployment has finished, the Installed value is set to True:

$ kubectl get clusterdeployments.hive.openshift.io  -n okd
NAME   CLUSTERNAME   CLUSTERTYPE   BASEDOMAIN          INSTALLED   INFRAID      AGE
okd    okd                         kube.domain.com     true        okd-jcdkd    54m

At this point you can start using the platform by getting the login credentials from the cluster credential secret Hive created during the installation:

$ kubectl get secrets -n okd okd-0-tbm9t-admin-password -o jsonpath='{.data.username}' | base64 -d
kubeadmin
$ kubectl get secrets -n okd okd-0-tbm9t-admin-password -o jsonpath='{.data.password}' | base64 -d
2T38d-aETpX-dj2YU-UBN4a

Log in via the command-line or the web console:

To delete the cluster simply delete the ClusterDeployment resources which initiates a cluster deprovision and will delete all related AWS resources. If the deprovision gets stuck, manually delete the uninstall finalizer allowing the cluster deployment to be deleted, but note that this may leave artifacts in your AWS account:

$ kubectl delete clusterdeployments.hive.openshift.io okd -n okd --wait=false
clusterdeployment.hive.openshift.io "okd" deleted

Please visit the OpenShift Hive documentation for more information about using Hive.

In the next article I will explain how you can use OpenShift Hive to create, update, delete, patch cluster resources using SyncSets.

Getting started with OpenShift Hive

If you don’t know OpenShift Hive I recommend having a look at the video of my talk at RedHat OpenShift Commons about OpenShift Hive where I also talk about how you can provision and manage the lifecycle of OpenShift 4 clusters using the Kubernetes API and the OpenShift Hive operator.

The Hive operator has three main components the admission controller,  the Hive controller and the Hive operator itself. For more information about the Hive architecture visit the Hive docs:

You can use an OpenShift or native Kubernetes cluster to run the operator, in my case I use a EKS cluster. Let’s go through the prerequisites which are required to generate the manifests and the hiveutil:

$ curl -s "https://raw.githubusercontent.com/\
> kubernetes-sigs/kustomize/master/hack/install_kustomize.sh"  | bash
$ sudo mv ./kustomize /usr/bin/
$ wget https://dl.google.com/go/go1.13.3.linux-amd64.tar.gz
$ tar -xvf go1.13.3.linux-amd64.tar.gz
$ sudo mv go /usr/local

To setup the Go environment copy the content below and add to your .profile:

export GOPATH="${HOME}/.go"
export PATH="$PATH:/usr/local/go/bin"
export PATH="$PATH:${GOPATH}/bin:${GOROOT}/bin"

Continue with installing the Go dependencies and clone the OpenShift Hive Github repository:

$ mkdir -p ~/.go/src/github.com/openshift/
$ go get github.com/golang/mock/mockgen
$ go get github.com/golang/mock/gomock
$ go get github.com/cloudflare/cfssl/cmd/cfssl
$ go get github.com/cloudflare/cfssl/cmd/cfssljson
$ cd ~/.go/src/github.com/openshift/
$ git clone https://github.com/openshift/hive.git
$ cd hive/
$ git checkout remotes/origin/master

Before we run make deploy I would recommend modifying the Makefile that we only generate the Hive manifests without deploying them to Kubernetes:

$ sed -i -e 's#oc apply -f config/crds# #' -e 's#kustomize build overlays/deploy | oc apply -f -#kustomize build overlays/deploy > hive.yaml#' Makefile
$ make deploy
# The apis-path is explicitly specified so that CRDs are not created for v1alpha1
go run tools/vendor/sigs.k8s.io/controller-tools/cmd/controller-gen/main.go crd --apis-path=pkg/apis/hive/v1
CRD files generated, files can be found under path /home/ubuntu/.go/src/github.com/openshift/hive/config/crds.
go generate ./pkg/... ./cmd/...
hack/update-bindata.sh
# Deploy the operator manifests:
mkdir -p overlays/deploy
cp overlays/template/kustomization.yaml overlays/deploy
cd overlays/deploy && kustomize edit set image registry.svc.ci.openshift.org/openshift/hive-v4.0:hive=registry.svc.ci.openshift.org/openshift/hivev1:hive
kustomize build overlays/deploy > hive.yaml
rm -rf overlays/deploy

Quick look at the content of the hive.yaml manifest:

$ cat hive.yaml
apiVersion: v1
kind: Namespace
metadata:
  name: hive
---
apiVersion: v1
kind: ServiceAccount
metadata:
  name: hive-operator
  namespace: hive

...

---
apiVersion: apps/v1
kind: Deployment
metadata:
  labels:
    control-plane: hive-operator
    controller-tools.k8s.io: "1.0"
  name: hive-operator
  namespace: hive
spec:
  replicas: 1
  revisionHistoryLimit: 4
  selector:
    matchLabels:
      control-plane: hive-operator
      controller-tools.k8s.io: "1.0"
  template:
    metadata:
      labels:
        control-plane: hive-operator
        controller-tools.k8s.io: "1.0"
    spec:
      containers:
      - command:
        - /opt/services/hive-operator
        - --log-level
        - info
        env:
        - name: CLI_CACHE_DIR
          value: /var/cache/kubectl
        image: registry.svc.ci.openshift.org/openshift/hive-v4.0:hive
        imagePullPolicy: Always
        livenessProbe:
          failureThreshold: 1
          httpGet:
            path: /debug/health
            port: 8080
          initialDelaySeconds: 10
          periodSeconds: 10
        name: hive-operator
        resources:
          requests:
            cpu: 100m
            memory: 256Mi
        volumeMounts:
        - mountPath: /var/cache/kubectl
          name: kubectl-cache
      serviceAccountName: hive-operator
      terminationGracePeriodSeconds: 10
      volumes:
      - emptyDir: {}
        name: kubectl-cache

Now we can apply the Hive custom resource definition (crds):

$ kubectl apply -f ./config/crds/
customresourcedefinition.apiextensions.k8s.io/checkpoints.hive.openshift.io created
customresourcedefinition.apiextensions.k8s.io/clusterdeployments.hive.openshift.io created
customresourcedefinition.apiextensions.k8s.io/clusterdeprovisions.hive.openshift.io created
customresourcedefinition.apiextensions.k8s.io/clusterimagesets.hive.openshift.io created
customresourcedefinition.apiextensions.k8s.io/clusterprovisions.hive.openshift.io created
customresourcedefinition.apiextensions.k8s.io/clusterstates.hive.openshift.io created
customresourcedefinition.apiextensions.k8s.io/dnszones.hive.openshift.io created
customresourcedefinition.apiextensions.k8s.io/hiveconfigs.hive.openshift.io created
customresourcedefinition.apiextensions.k8s.io/machinepools.hive.openshift.io created
customresourcedefinition.apiextensions.k8s.io/selectorsyncidentityproviders.hive.openshift.io created
customresourcedefinition.apiextensions.k8s.io/selectorsyncsets.hive.openshift.io created
customresourcedefinition.apiextensions.k8s.io/syncidentityproviders.hive.openshift.io created
customresourcedefinition.apiextensions.k8s.io/syncsets.hive.openshift.io created
customresourcedefinition.apiextensions.k8s.io/syncsetinstances.hive.openshift.io created

And continue to apply the hive.yaml manifest for deploying the OpenShift Hive operator and its components:

$ kubectl apply -f hive.yaml
namespace/hive created
serviceaccount/hive-operator created
clusterrole.rbac.authorization.k8s.io/hive-frontend created
clusterrole.rbac.authorization.k8s.io/hive-operator-role created
clusterrole.rbac.authorization.k8s.io/manager-role created
clusterrole.rbac.authorization.k8s.io/system:openshift:hive:hiveadmission created
rolebinding.rbac.authorization.k8s.io/extension-server-authentication-reader-hiveadmission created
clusterrolebinding.rbac.authorization.k8s.io/auth-delegator-hiveadmission created
clusterrolebinding.rbac.authorization.k8s.io/hive-frontend created
clusterrolebinding.rbac.authorization.k8s.io/hive-operator-rolebinding created
clusterrolebinding.rbac.authorization.k8s.io/hiveadmission-hive-hiveadmission created
clusterrolebinding.rbac.authorization.k8s.io/hiveapi-cluster-admin created
clusterrolebinding.rbac.authorization.k8s.io/manager-rolebinding created
deployment.apps/hive-operator created

For the Hive admission controller you need to generate a SSL certifcate:

$ ./hack/hiveadmission-dev-cert.sh
~/Dropbox/hive/hiveadmission-certs ~/Dropbox/hive
2020/02/03 22:17:30 [INFO] generate received request
2020/02/03 22:17:30 [INFO] received CSR
2020/02/03 22:17:30 [INFO] generating key: ecdsa-256
2020/02/03 22:17:30 [INFO] encoded CSR
certificatesigningrequest.certificates.k8s.io/hiveadmission.hive configured
certificatesigningrequest.certificates.k8s.io/hiveadmission.hive approved
-----BEGIN CERTIFICATE-----
MIICaDCCAVCgAwIBAgIQHvvDPncIWHRcnDzzoWGjQDANBgkqhkiG9w0BAQsFADAv
MS0wKwYDVQQDEyRiOTk2MzhhNS04OWQyLTRhZTAtYjI4Ny1iMWIwOGNmOGYyYjAw
HhcNMjAwMjAzMjIxNTA3WhcNMjUwMjAxMjIxNTA3WjAhMR8wHQYDVQQDExZoaXZl
YWRtaXNzaW9uLmhpdmUuc3ZjMFkwEwYHKoZIzj0CAQYIKoZIzj0DAQcDQgAEea4N
UPbvzM3VdtOkdJ7lBytekRTvwGMqs9HgG14CtqCVCOFq8f+BeqqyrRbJsX83iBfn
gMc54moElb5kIQNjraNZMFcwDAYDVR0TAQH/BAIwADBHBgNVHREEQDA+ghZoaXZl
YWRtaXNzaW9uLmhpdmUuc3ZjgiRoaXZlYWRtaXNzaW9uLmhpdmUuc3ZjLmNsdXN0
ZXIubG9jYWwwDQYJKoZIhvcNAQELBQADggEBADhgT3tNnFs6hBIZFfWmoESe6nnZ
fy9GmlmF9qEBo8FZSk/LYvV0peOdgNZCHqsT2zaJjxULqzQ4zfSb/koYpxeS4+Bf
xwgHzIB/ylzf54wVkILWUFK3GnYepG5dzTXS7VHc4uiNJe0Hwc5JI4HBj7XdL3C7
cbPm7T2cBJi2jscoCWELWo/0hDxkcqZR7rdeltQQ+Uhz87LhTTqlknAMFzL7tM/+
pJePZMQgH97vANsbk97bCFzRZ4eABYSiN0iAB8GQM5M+vK33ZGSVQDJPKQQYH6th
Kzi9wrWEeyEtaWozD5poo9s/dxaLxFAdPDICkPB2yr5QZB+NuDgA+8IYffo=
-----END CERTIFICATE-----
secret/hiveadmission-serving-cert created
~/Dropbox/hive

Afterwards we can check if all the pods are running, this might take a few seconds:

$ kubectl get pods -n hive
NAME                                READY   STATUS    RESTARTS   AGE
hive-controllers-7c6ccc84b9-q7k7m   1/1     Running   0          31s
hive-operator-f9f4447fd-jbmkh       1/1     Running   0          55s
hiveadmission-6766c5bc6f-9667g      1/1     Running   0          27s
hiveadmission-6766c5bc6f-gvvlq      1/1     Running   0          27s

The Hive operator is successfully installed on your Kubernetes cluster but we are not finished yet. To create the required Cluster Deployment manifests we need to generate the hiveutil binary:

$ make hiveutil
go generate ./pkg/... ./cmd/...
hack/update-bindata.sh
go build -o bin/hiveutil github.com/openshift/hive/contrib/cmd/hiveutil

To generate Hive Cluster Deployment manifests just run the following hiveutil command below, I output the definition with -o into yaml:

$ bin/hiveutil create-cluster --base-domain=mydomain.example.com --cloud=aws mycluster -o yaml
apiVersion: v1
items:
- apiVersion: hive.openshift.io/v1
  kind: ClusterImageSet
  metadata:
    creationTimestamp: null
    name: mycluster-imageset
  spec:
    releaseImage: quay.io/openshift-release-dev/ocp-release:4.3.2-x86_64
  status: {}
- apiVersion: v1
  kind: Secret
  metadata:
    creationTimestamp: null
    name: mycluster-aws-creds
  stringData:
    aws_access_key_id: <-YOUR-AWS-ACCESS-KEY->
    aws_secret_access_key: <-YOUR-AWS-SECRET-KEY->
  type: Opaque
- apiVersion: v1
  data:
    install-config.yaml: <-BASE64-ENCODED-OPENSHIFT4-INSTALL-CONFIG->
  kind: Secret
  metadata:
    creationTimestamp: null
    name: mycluster-install-config
  type: Opaque
- apiVersion: hive.openshift.io/v1
  kind: ClusterDeployment
  metadata:
    creationTimestamp: null
    name: mycluster
  spec:
    baseDomain: mydomain.example.com
    clusterName: mycluster
    controlPlaneConfig:
      servingCertificates: {}
    installed: false
    platform:
      aws:
        credentialsSecretRef:
          name: mycluster-aws-creds
        region: us-east-1
    provisioning:
      imageSetRef:
        name: mycluster-imageset
      installConfigSecretRef:
        name: mycluster-install-config
  status:
    clusterVersionStatus:
      availableUpdates: null
      desired:
        force: false
        image: ""
        version: ""
      observedGeneration: 0
      versionHash: ""
- apiVersion: hive.openshift.io/v1
  kind: MachinePool
  metadata:
    creationTimestamp: null
    name: mycluster-worker
  spec:
    clusterDeploymentRef:
      name: mycluster
    name: worker
    platform:
      aws:
        rootVolume:
          iops: 100
          size: 22
          type: gp2
        type: m4.xlarge
    replicas: 3
  status:
    replicas: 0
kind: List
metadata: {}

I hope this post is useful in getting you started with OpenShift Hive. In my next article I will go through the details of the OpenShift 4 cluster deployment with Hive.

Read my new article about OpenShift / OKD 4.x Cluster Deployment using OpenShift Hive

OpenShift Container Platform Troubleshooting Guide

On the first look OpenShift/Kubernetes seems like a very complex platform but once you start to get to know the different components and what they are doing, you will see it gets easier and easier. The purpose of this article to give you an every day guide based on my experience on how to successfully troubleshoot issues on OpenShift.

  • OpenShift service logging
# OpenShift 3.1 to OpenShift 3.9:
/etc/sysconfig/atomic-openshift-master-controllers
/etc/sysconfig/atomic-openshift-master-api
/etc/sysconfig/atomic-openshift-node

# OpenShift 3.10 and later versions:
/etc/origin/master/master.env # for API and Controllers
/etc/sysconfig/atomic-openshift-node

The log levels for the OpenShift services can be controlled via the –loglevel parameter in the service options.

0 – Errors and warnings only
2 – Normal information
4 – Debugging information
6 – API- debugging information (request / response)
8 – Body API debugging information

For example add or edit the line in /etc/sysconfig/atomic-openshift-node to OPTIONS=’–loglevel=4′ and afterward restart the service with systemctl restart atomic-openshift-node.

Viewing OpenShift service logs:

# OpenShift 3.1 to OpenShift 3.9:
journalctl -u atomic-openshift-master-api
journalctl -u atomic-openshift-master-controllers
journalctl -u atomic-openshift-node
journalctl -u etcd # or 'etcd_container' for containerized install

# OpenShift 3.10 and later versions:
/usr/local/bin/master-logs api api
/usr/local/bin/master-logs controllers controllers
/usr/local/bin/master-logs etcd etcd
journalctl -u atomic-openshift-node
  • Docker service logging

Change the docker daemon log level and add the parameter –log-level for the OPTIONS variable in dockers service file located in /etc/sysconfig/docker.

The available log levels are: ( debug, info, warn, error, fatal )

See the example below; to enable debug logging in /etc/sysconfig/docker to set log level equal to debug (After making the changes on the docker service you need to will restart with systemctl restart docker.):

OPTIONS='--insecure-registry=172.30.0.0/16 --selinux-enabled --log-level=debug'
  • OC command logging

The oc and oadm command also accept a loglevel option that can help get additional information. Value between 6 and 8 will provide extensive logging, API requests (loglevel 6), API headers (loglevel 7) and API responses received (loglevel 8):

oc whoami --loglevel=8
  • OpenShift SkyDNS

SkyDNS is the internal service discovery for OpenShift and DNS is important for OpenShift to function:

# Test full qualified cluster domain name
nslookup docker-registry.default.svc.cluster.local
# OR
dig +short docker-registry.default.svc.cluster.local

# Check if clusterip match the previous result
oc get svc/docker-registry -n default

# Test short name
nslookup docker-registry.default.svc
nslookup <endpoint-name>.<project-name>.svc

If short name doesn’t work look out if cluster.local is missing in dns search suffix. If resolution doesn’t work at all before enable debug logging, check if Dnsmasq service running and correctly configured. OpenShift uses a dispatcher script to maintain the DNS configuration of a node.

Add the options “–logspec ‘dns=10’” to the /etc/sysconfig/atomic-openshift-node service configuration on a node running skydns and restart the atomic-openshift-node service afterwards. There will then be skydns debug information in the journalctl logs.

OPTIONS="--loglevel=2 --logspec dns*=10"
  • OpenShift Master API and Web Console

In the following example, the internal-master.domain.com is used by the internal cluster, and the master.domain.com is used by external clients

# Run the following commands on any node host
curl https://internal-master.domain.com:443/version
curl -k https://master.domain.com:443/healthz

# The OpenShift API service runs on all master instances. To see the status of the service, view the master-api pods in the kube-system project:
oc get pod -n kube-system -l openshift.io/component=api
oc get pod -n kube-system -o wide
curl -k --insecure https://$HOSTNAME:8443/healthz
  • OpenShift Controller role

The OpenShift Container Platform controller service is available on all master nodes. The service runs in active/passive mode, which means it should only be running on one master.

# Verify the master host running the controller service
oc get -n kube-system cm openshift-master-controllers -o yaml
    • OpenShift Certificates

During the installation of OpenShift the playbooks generates a CA to sign every certificate in the cluster. One of the most common issues are expired node certificates. Below are a list of important certificate files:

# Is the OpenShift Certificate Authority, and it signs every other certificate unless specified otherwise.
/etc/origin/master/ca.crt

# Contains a bundle with the current and the old CA's (if exists) to trust them all. If there has been only one ca.crt, then this file is the same as ca.crt.
/etc/origin/master/ca-bundle.crt

# The internal API, also known as cluster internal address or the variable masterURL here all the internal components authenticates to access the API, such as nodes, routers and other services.
/etc/origin/master/master.server.crt

# Master controller certificate authenticates to kubernetes as a client using the admin.kubeconfig
/etc/origin/master/admin.crt

# Node certificates
/etc/origin/node/ca.crt                   # to be able to trust the API, a copy of masters CA bundle is placed in:
/etc/origin/node/server.crt               # to secure this communication
/etc/origin/node/system:node:{fqdn}.crt   # Nodes needs to authenticate to the Kubernetes API as a client. 

# Etcd certificates
/etc/etcd/ca.crt                          # is the etcd CA, it is used to sign every certificate.
/etc/etcd/server.crt                      # is used by the etcd to listen to clients.
/etc/etcd/peer.crt                        # is used by etcd to authenticate as a client.

# Master certificates to auth to etcd
/etc/origin/master/master.etcd-ca.crt     # is a copy of /etc/etcd/ca.crt. Used to trust the etcd cluster.
/etc/origin/master/master.etcd-client.crt # is used to authenticate as a client of the etcd cluster.

# Services ca certificate. All self-signed internal certificates are signed by this CA.
/etc/origin/master/service-signer.crt

Here’s an example to check the validity of the master server certificate:

cat /etc/origin/master/master.server.crt | openssl x509 -text | grep -i Validity -A2
# OR
openssl x509 -enddate -noout -in /etc/origin/master/master.server.crt

It’s worth checking the documentation about how to re-deploy certificates on OpenShift.

  • OpenShift etcd

On the etcd node (master) set source to etcd.conf file for most of the needed variables.

source /etc/etcd/etcd.conf
export ETCDCTL_API=3

# Set endpoint variable to include all etcd endpoints
ETCD_ALL_ENDPOINTS=` etcdctl  --cert=$ETCD_PEER_CERT_FILE --key=$ETCD_PEER_KEY_FILE --cacert=$ETCD_TRUSTED_CA_FILE --endpoints=$ETCD_LISTEN_CLIENT_URLS --write-out=fields   member list | awk '/ClientURL/{printf "%s%s",sep,$3; sep=","}'`

# Cluster status and health checks
etcdctl  --cert=$ETCD_PEER_CERT_FILE --key=$ETCD_PEER_KEY_FILE --cacert=$ETCD_TRUSTED_CA_FILE --endpoints=$ETCD_LISTEN_CLIENT_URLS --write-out=table  member list
etcdctl  --cert=$ETCD_PEER_CERT_FILE --key=$ETCD_PEER_KEY_FILE --cacert=$ETCD_TRUSTED_CA_FILE --endpoints=$ETCD_ALL_ENDPOINTS  --write-out=table endpoint status
etcdctl  --cert=$ETCD_PEER_CERT_FILE --key=$ETCD_PEER_KEY_FILE --cacert=$ETCD_TRUSTED_CA_FILE --endpoints=$ETCD_ALL_ENDPOINTS endpoint health

Check etcd database key entries:

etcdctl  --cert=$ETCD_PEER_CERT_FILE --key=$ETCD_PEER_KEY_FILE --cacert=$ETCD_TRUSTED_CA_FILE --endpoints="https://$(hostname):2379" get /openshift.io --prefix --keys-only
  • OpenShift Registry

To get detailed information about the pods running the internal registry run the following command:

oc get pods -n default | grep registry | awk '{ print $1 }' | xargs -i oc describe pod {}

For a basic health check that the internal registry is running and responding you need to “curl” the /healthz path. Normally this should return a 200 HTTP response:

Registry=$(oc get svc docker-registry -n default -o 'jsonpath={.spec.clusterIP}:{.spec.ports[0].port}')

curl -vk $Registry/healthz
# OR
curl -vk https://$Registry/healthz

If a persistent volume is attached to the registry make sure that the registry can write to the volume.

oc project default 
oc rsh `oc get pods -o name -l docker-registry`

$ touch /registry/test-file
$ ls -la /registry/ 
$ rm /registry/test-file
$ exit

If the registry is insecure make sure you have edited the /etc/sysconfig/docker file and add –insecure-registry 172.30.0.0/16 to the OPTIONS parameter on the nodes.

For more information about testing the internal registry please have a look at the documentation about Accessing the Registry.

  • OpenShift Router 

To increase the log level for OpenShift router pod, set loglevel=4 in the container args:

# Increase logging level
oc patch dc -n default router -p '[{"op": "add", "path": "/spec/template/spec/containers/0/args", "value":["--loglevel=4"]}]' --type=json 

# View logs
oc logs <router-pod-name> -n default

# Remove logging change 
oc patch dc -n default router -p '[{"op": "remove", "path": "/spec/template/spec/containers/0/args", "value":["--loglevel=4"]}]' --type=json

OpenShift router image version 3.3 and later, the logging for http requests can be forwarded to an external syslog server:

oc set env dc/router ROUTER_SYSLOG_ADDRESS=<syslog-server-ip> ROUTER_LOG_LEVEL=debug

If you are facing issues with ingress routes to your application run the below command to collect more information:

oc logs dc/router -n default
oc get dc/router -o yaml -n default
oc get route <route-name> -n <project-name> 
oc get endpoints --all-namespaces 
oc exec -it <router-pod-name> -- ls -la 
oc exec -it <router-pod-name> -- find /var/lib/haproxy -regex ".*\(.map\|config.*\|.json\)" -print -exec cat {} \; > haproxy_configs_and_maps

Check if your application domain is /paas.domain.com/ and dig for an ANSWER containing the load balancer VIP address:

dig \*.paas.domain.com

Confirm that certificates are being severed out correctly by running the following:

echo -n | openssl s_client -connect :443 -servername myapp.paas.domain.com 2>&1 | openssl x509 -noout -text
curl -kv https://myapp.paas.domain.com 
  • OpenShift SDN

Please checkout the official Troubleshooting OpenShift SDN documentation

To get OpenFlow table export, connect to the openvswitch container and run following command:

docker exec openvswitch ovs-ofctl -O OpenFlow13 dump-flows br0
  • OpenShift Namespace events

Useful to collect events from the namespace to identify pod creation issues before you did in the container logs:

oc get events [-n |--all-namespaces]

In the default namespace you find relevant events for monitoring or auditing a cluster, such as Node and resource events related to the OpenShift platform.

  • OpenShift Pod and Container Logs

Container/pod logs can be viewed using the OpenShift oc command line. Add option “-p” to print the logs for the previous instance of the container in a pod if it exists and add option “-f” to stream the logs:

oc logs <pod-name> [-f]

The logs are saved to the worker nodes disk where the container/pod is running and it is located at:
/var/lib/docker/containers/<container-id>/<container-id>-json.log.

For setting the log file limits for containers on a worker node the –log-opt can be configured with max-size and max-file so that a containers logs are rolled over:

# cat /etc/sysconfig/docker 
OPTIONS='--insecure-registry=172.30.0.0/16 --selinux-enabled --log-opt max-size=50m --log-opt max-file=5'

# Restart docker service for the changes to take effect.
systemctl restart docker 

To remove all logs from a given container run the following commands:

cat /dev/null > /var/lib/docker/containers/<container-id>/<container-id>-json.log
# OR
cat /dev/null >  $(docker inspect --format='{{.LogPath}}' <container-id> )

To generate a list of the largest files run the following commands:

# Log files
find /var/lib/docker/ -name "*.log" -exec ls -sh {} \; | sort -n -r | head -20

# All container files
du -aSh /var/lib/docker/ | sort -n -r | head -n 10

Finding out the veth# interface of a docker container and use tcpdump to capture traffic more easily. The iflink of the container is the same as the ifindex of the veth#. You can get the iflink of the container as follows:

docker exec -it <container-name>  bash -c 'cat /sys/class/net/eth0/iflink'

# Let's say that the results in 14, then grep for 14
grep -l 14 /sys/class/net/veth*/ifindex

# Which will give a unique result on the worker node
/sys/class/net/veth12c4982/ifindex

Here a simple bash script to get the container and veth id’s:

#!/bin/bash
for container in $(docker ps -q); do
    iflink=`docker exec -it $container bash -c 'cat /sys/class/net/eth0/iflink'`
    iflink=`echo $iflink|tr -d '\r'`
    veth=`grep -l $iflink /sys/class/net/veth*/ifindex`
    veth=`echo $veth|sed -e 's;^.*net/\(.*\)/ifindex$;\1;'`
    echo $container:$veth
done
  • OpenShift Builder Pod Logs

If you want to troubleshoot a particular build of “myapp” you can view logs with:

oc logs [bc/|dc/]<name> [-f]

To increase the logging level add a BUILD_LOGLEVEL environment variable to the BuildConfig strategy:

sourceStrategy:
...
  env:
    - name: "BUILD_LOGLEVEL"
      value: "5"

I hope you found this article useful and that it helped you troubleshoot OpenShift. Please let me know what you think and leave a comment.