In the recent month I have spend a lot of time around networking and automation but I want to shift more towards running modern container platforms like Kubernetes or OpenShift which both are using networking services and as I have shared in one of my previous article about AVI software load balancer, it all fits nicely into networking in my opinion.
But before we start, please have a look at my previous article about Deploying OpenShift Origin Cluster using Ansible to create a small OpenShift platform for testing.
Create a bash completion file for oc commands:
[root@origin-master ~]# oc completion bash > /etc/bash_completion.d/oc
[root@origin-master ~]# . /etc/bash_completion.d/oc
- Let’s start and login to OpenShift as a normal user account
[root@origin-master ~]# oc login https://console.lab.hostgate.net:8443/
The server is using a certificate that does not match its hostname: x509: certificate is valid for lab.hostgate.net, not console.lab.hostgate.net
You can bypass the certificate check, but any data you send to the server could be intercepted by others.
Use insecure connections? (y/n): y

Authentication required for https://console.lab.hostgate.net:8443 (openshift)
Username: demo
Password:
Login successful.

[root@origin-master ~]#
Instead of username and password use token which you can get from the web console:
oc login https://console.lab.hostgate.net:8443 --token=***hash token***
- Now create the project where we want to run our web application:
[root@origin-master ~]# oc new-project webapp
Now using project "webapp" on server "https://console.lab.hostgate.net:8443".

You can add applications to this project with the 'new-app' command. For example, try:

    oc new-app centos/ruby-22-centos7~https://github.com/openshift/ruby-ex.git

to build a new example application in Ruby.
[root@origin-master ~]#
Afterwards we need to create a build configuration, in my example we use an external Dockerfile without starting the build directly:
[root@origin-master ~]#  oc new-build --name webapp-build --binary
warning: Cannot find git. Ensure that it is installed and in your path. Git is required to work with git repositories.
    * A Docker build using binary input will be created
      * The resulting image will be pushed to image stream "webapp-build:latest"
      * A binary build was created, use 'start-build --from-dir' to trigger a new build

--> Creating resources with label build=webapp-build ...
    imagestream "webapp-build" created
    buildconfig "webapp-build" created
--> Success
[root@origin-master ~]#
Create Dockerfile:
[root@origin-master ~]# vi Dockerfile
Copy and paste the line below into the Dockerfile:
FROM openshift/hello-openshift
Let’s continue and start the build from the Dockerfile we specified previously
[root@origin-master ~]#  oc start-build webapp-build --from-file=Dockerfile --follow
Uploading file "Dockerfile" as binary input for the build ...
build "webapp-build-1" started
Receiving source from STDIN as file Dockerfile
Pulling image openshift/hello-openshift ...
Step 1/3 : FROM openshift/hello-openshift
 ---> 7af3297a3fb4
Step 2/3 : ENV "OPENSHIFT_BUILD_NAME" "webapp-build-1" "OPENSHIFT_BUILD_NAMESPACE" "webapp"
 ---> Running in 422f63f69364
 ---> 2cd93085ec93
Removing intermediate container 422f63f69364
Step 3/3 : LABEL "io.openshift.build.name" "webapp-build-1" "io.openshift.build.namespace" "webapp"
 ---> Running in 0c3e6cce6f0b
 ---> cf178dda8238
Removing intermediate container 0c3e6cce6f0b
Successfully built cf178dda8238
Pushing image docker-registry.default.svc:5000/webapp/webapp-build:latest ...
Push successful
[root@origin-master ~]#
Alternatively you can directly inject the Dockerfile options in a single command and the build would start immediately:
[root@origin-master ~]# oc new-build --name webapp-build -D $'FROM openshift/hello-openshift'
- Create the web application
[root@origin-master ~]# oc new-app webapp-build
warning: Cannot find git. Ensure that it is installed and in your path. Git is required to work with git repositories.
--> Found image cf178dd (4 minutes old) in image stream "webapp/webapp-build" under tag "latest" for "webapp-build"

    * This image will be deployed in deployment config "webapp-build"
    * Ports 8080/tcp, 8888/tcp will be load balanced by service "webapp-build"
      * Other containers can access this service through the hostname "webapp-build"

--> Creating resources ...
    deploymentconfig "webapp-build" created
    service "webapp-build" created
--> Success
    Application is not exposed. You can expose services to the outside world by executing one or more of the commands below:
     'oc expose svc/webapp-build'
    Run 'oc status' to view your app.
[root@origin-master ~]#
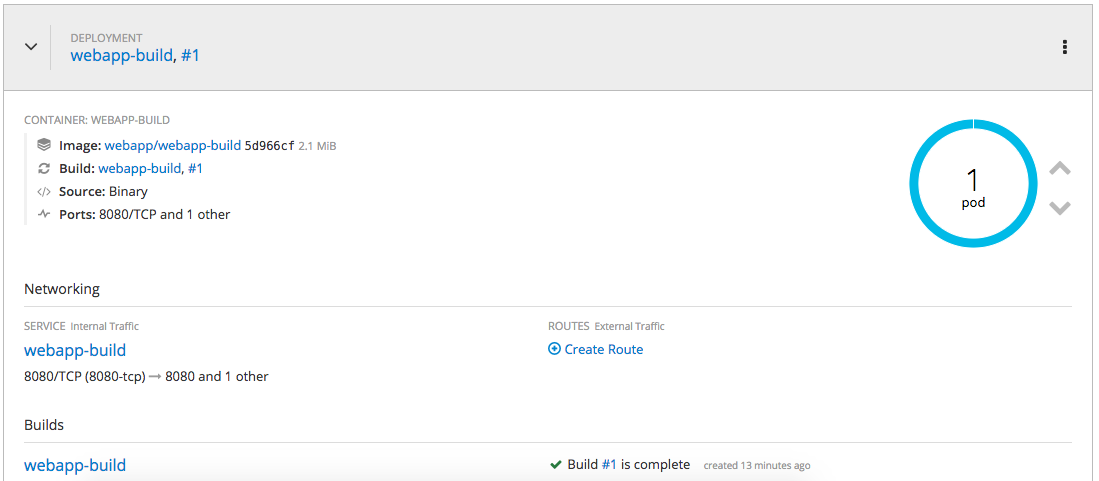
As you see below, we are currently running a single pod:
[root@origin-master ~]#  oc get pod -o wide
NAME                   READY     STATUS      RESTARTS   AGE       IP            NODE
webapp-build-1-build   0/1       Completed   0          8m        10.131.0.27   origin-node-1
webapp-build-1-znk98   1/1       Running     0          3m        10.131.0.29   origin-node-1
[root@origin-master ~]#
Let’s check out endpoints and services:
[root@origin-master ~]# oc get ep
NAME           ENDPOINTS                           AGE
webapp-build   10.131.0.29:8080,10.131.0.29:8888   1m
[root@origin-master ~]# oc get svc
NAME           CLUSTER-IP     EXTERNAL-IP   PORT(S)             AGE
webapp-build   172.30.64.97           8080/TCP,8888/TCP   1m
[root@origin-master ~]#
Running a single pod is not great for redundancy, let’s scale out:
[root@origin-master ~]# oc scale --replicas=5 dc/webapp-build
deploymentconfig "webapp-build" scaled
[root@origin-master ~]#  oc get pod -o wide
NAME                   READY     STATUS      RESTARTS   AGE       IP            NODE
webapp-build-1-4fb98   1/1       Running     0          15s       10.130.0.47   origin-node-2
webapp-build-1-build   0/1       Completed   0          9m        10.131.0.27   origin-node-1
webapp-build-1-dw6ww   1/1       Running     0          15s       10.131.0.30   origin-node-1
webapp-build-1-lswhg   1/1       Running     0          15s       10.131.0.31   origin-node-1
webapp-build-1-z4nk9   1/1       Running     0          15s       10.130.0.46   origin-node-2
webapp-build-1-znk98   1/1       Running     0          4m        10.131.0.29   origin-node-1
[root@origin-master ~]#
We can check our endpoints and services again, and see that we have more endpoints and still one service:
[root@origin-master ~]# oc get ep
NAME           ENDPOINTS                                                        AGE
webapp-build   10.130.0.46:8080,10.130.0.47:8080,10.131.0.29:8080 + 7 more...   4m
[root@origin-master ~]# oc get svc
NAME           CLUSTER-IP     EXTERNAL-IP   PORT(S)             AGE
webapp-build   172.30.64.97           8080/TCP,8888/TCP   4m
[root@origin-master ~]#
OpenShift uses an internal DNS service called SkyDNS to expose services for internal communication:
[root@origin-master ~]# dig webapp-build.webapp.svc.cluster.local

; <<>> DiG 9.9.4-RedHat-9.9.4-61.el7 <<>> webapp-build.webapp.svc.cluster.local
;; global options: +cmd
;; Got answer:
;; ->>HEADER<<- opcode: QUERY, status: NOERROR, id: 20933
;; flags: qr aa rd ra; QUERY: 1, ANSWER: 1, AUTHORITY: 0, ADDITIONAL: 0

;; QUESTION SECTION:
;webapp-build.webapp.svc.cluster.local. IN A

;; ANSWER SECTION:
webapp-build.webapp.svc.cluster.local. 30 IN A	172.30.64.97

;; Query time: 1 msec
;; SERVER: 10.255.1.214#53(10.255.1.214)
;; WHEN: Sat Jun 30 08:58:19 UTC 2018
;; MSG SIZE  rcvd: 71

[root@origin-master ~]#
- Let’s expose our web application so that it is accessible from the outside world:
[root@origin-master ~]# oc expose svc webapp-build
route "webapp-build" exposed
[root@origin-master ~]#
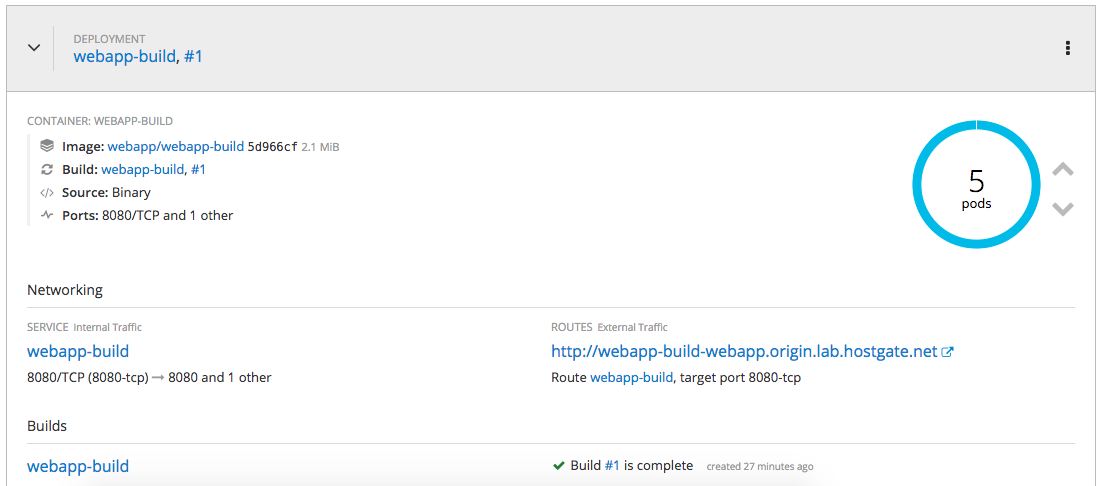
Connect with a browser to the URL you see under routes:

Modify the WebApp and inject variables via a config map into our application:
[root@origin-master ~]# oc create configmap webapp-map --from-literal=RESPONSE="My first OpenShift WebApp"
configmap "webapp-map" created
[root@origin-master ~]#
Afterwards we need to add the previously created config map to our environment
[root@origin-master ~]# oc env dc/webapp-build --from=configmap/webapp-map
deploymentconfig "webapp-build" updated
[root@origin-master ~]#
Now when we check our web application again you see that the new variables are injected into the pod and displayed:

I will share more about running OpenShift Container Platform and my experience in the coming month. I hope you find this article useful and please share your feedback and leave a comment.