How to manage Kubernetes clusters the GitOps way with Flux CD

Kubernetes is becoming more and more popular, and so is managing clusters at scale. This article is about how to manage Kubernetes clusters the GitOps way using the Flux CD operator.

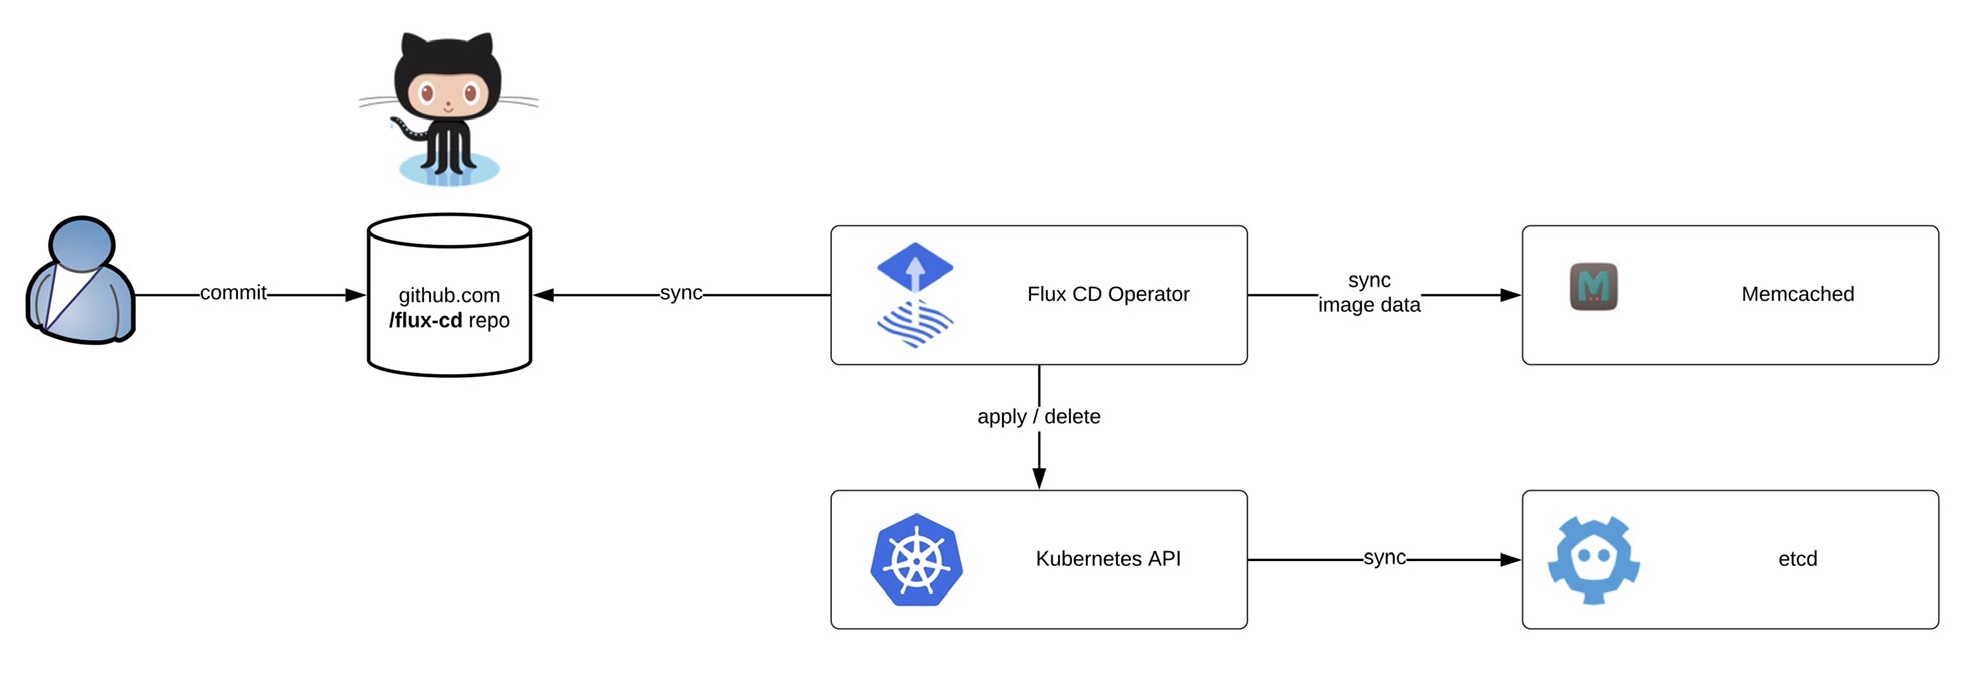
Flux can monitor container image and code repositories that you specify and trigger deployments to automatically change the configuration state of your Kubernetes cluster. The cluster configuration is centrally managed and stored in declarative form in Git, and there is no need for an administrator to manually apply manifests, the Flux operator synchronise to apply or delete the cluster configuration.

Before we start deploying the operator we need to install the fluxctl command-line utility and create the namespace:

sudo wget -O /usr/local/bin/fluxctl https://github.com/fluxcd/flux/releases/download/1.18.0/fluxctl_linux_amd64
sudo chmod 755 /usr/local/bin/fluxctl
kubectl create ns flux

Deploying the Flux operator is straight forward and requires a few options like git repository and git path. The path is important for my example because it tells the operator in which folder to look for manifests:

$ fluxctl install [email protected] [email protected]:berndonline/flux-cd.git --git-path=clusters/gke,common/stage --manifest-generation=true --git-branch=master --namespace=flux --registry-disable-scanning | kubectl apply -f -
deployment.apps/memcached created
service/memcached created
serviceaccount/flux created
clusterrole.rbac.authorization.k8s.io/flux created
clusterrolebinding.rbac.authorization.k8s.io/flux created
deployment.apps/flux created
secret/flux-git-deploy created

After you have applied the configuration, wait until the Flux pods are up and running:

$ kubectl get pods -n flux
NAME                       READY   STATUS    RESTARTS   AGE
flux-85cd9cd746-hnb4f      1/1     Running   0          74m
memcached-5dcd7579-d6vwh   1/1     Running   0          20h

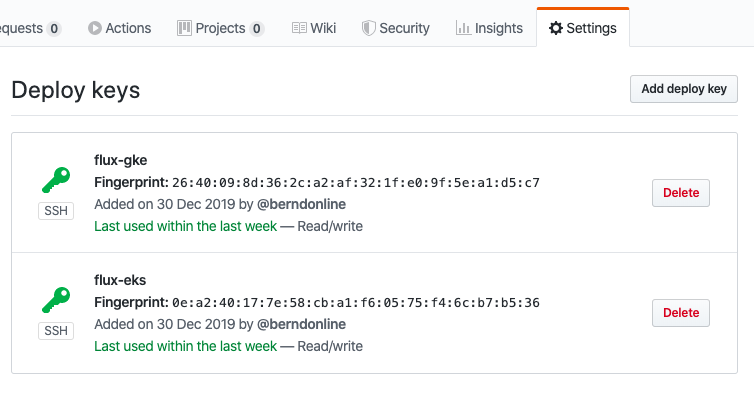
The last step is to get the Flux operator deploy keys and copy the output to add to your Git repository:

fluxctl identity --k8s-fwd-ns flux

Now you are ready to synchronise the Flux operator with the repository. By default Flux automatically synchronises every 5 minutes to apply configuration changes:

$ fluxctl sync --k8s-fwd-ns flux
Synchronizing with [email protected]:berndonline/flux-cd.git
Revision of master to apply is 726944d
Waiting for 726944d to be applied ...
Done.

You are able to list workloads which are managed by the Flux operator:

$ fluxctl list-workloads --k8s-fwd-ns=flux -a
WORKLOAD                             CONTAINER         IMAGE                            RELEASE  POLICY
default:deployment/hello-kubernetes  hello-kubernetes  paulbouwer/hello-kubernetes:1.5  ready    automated

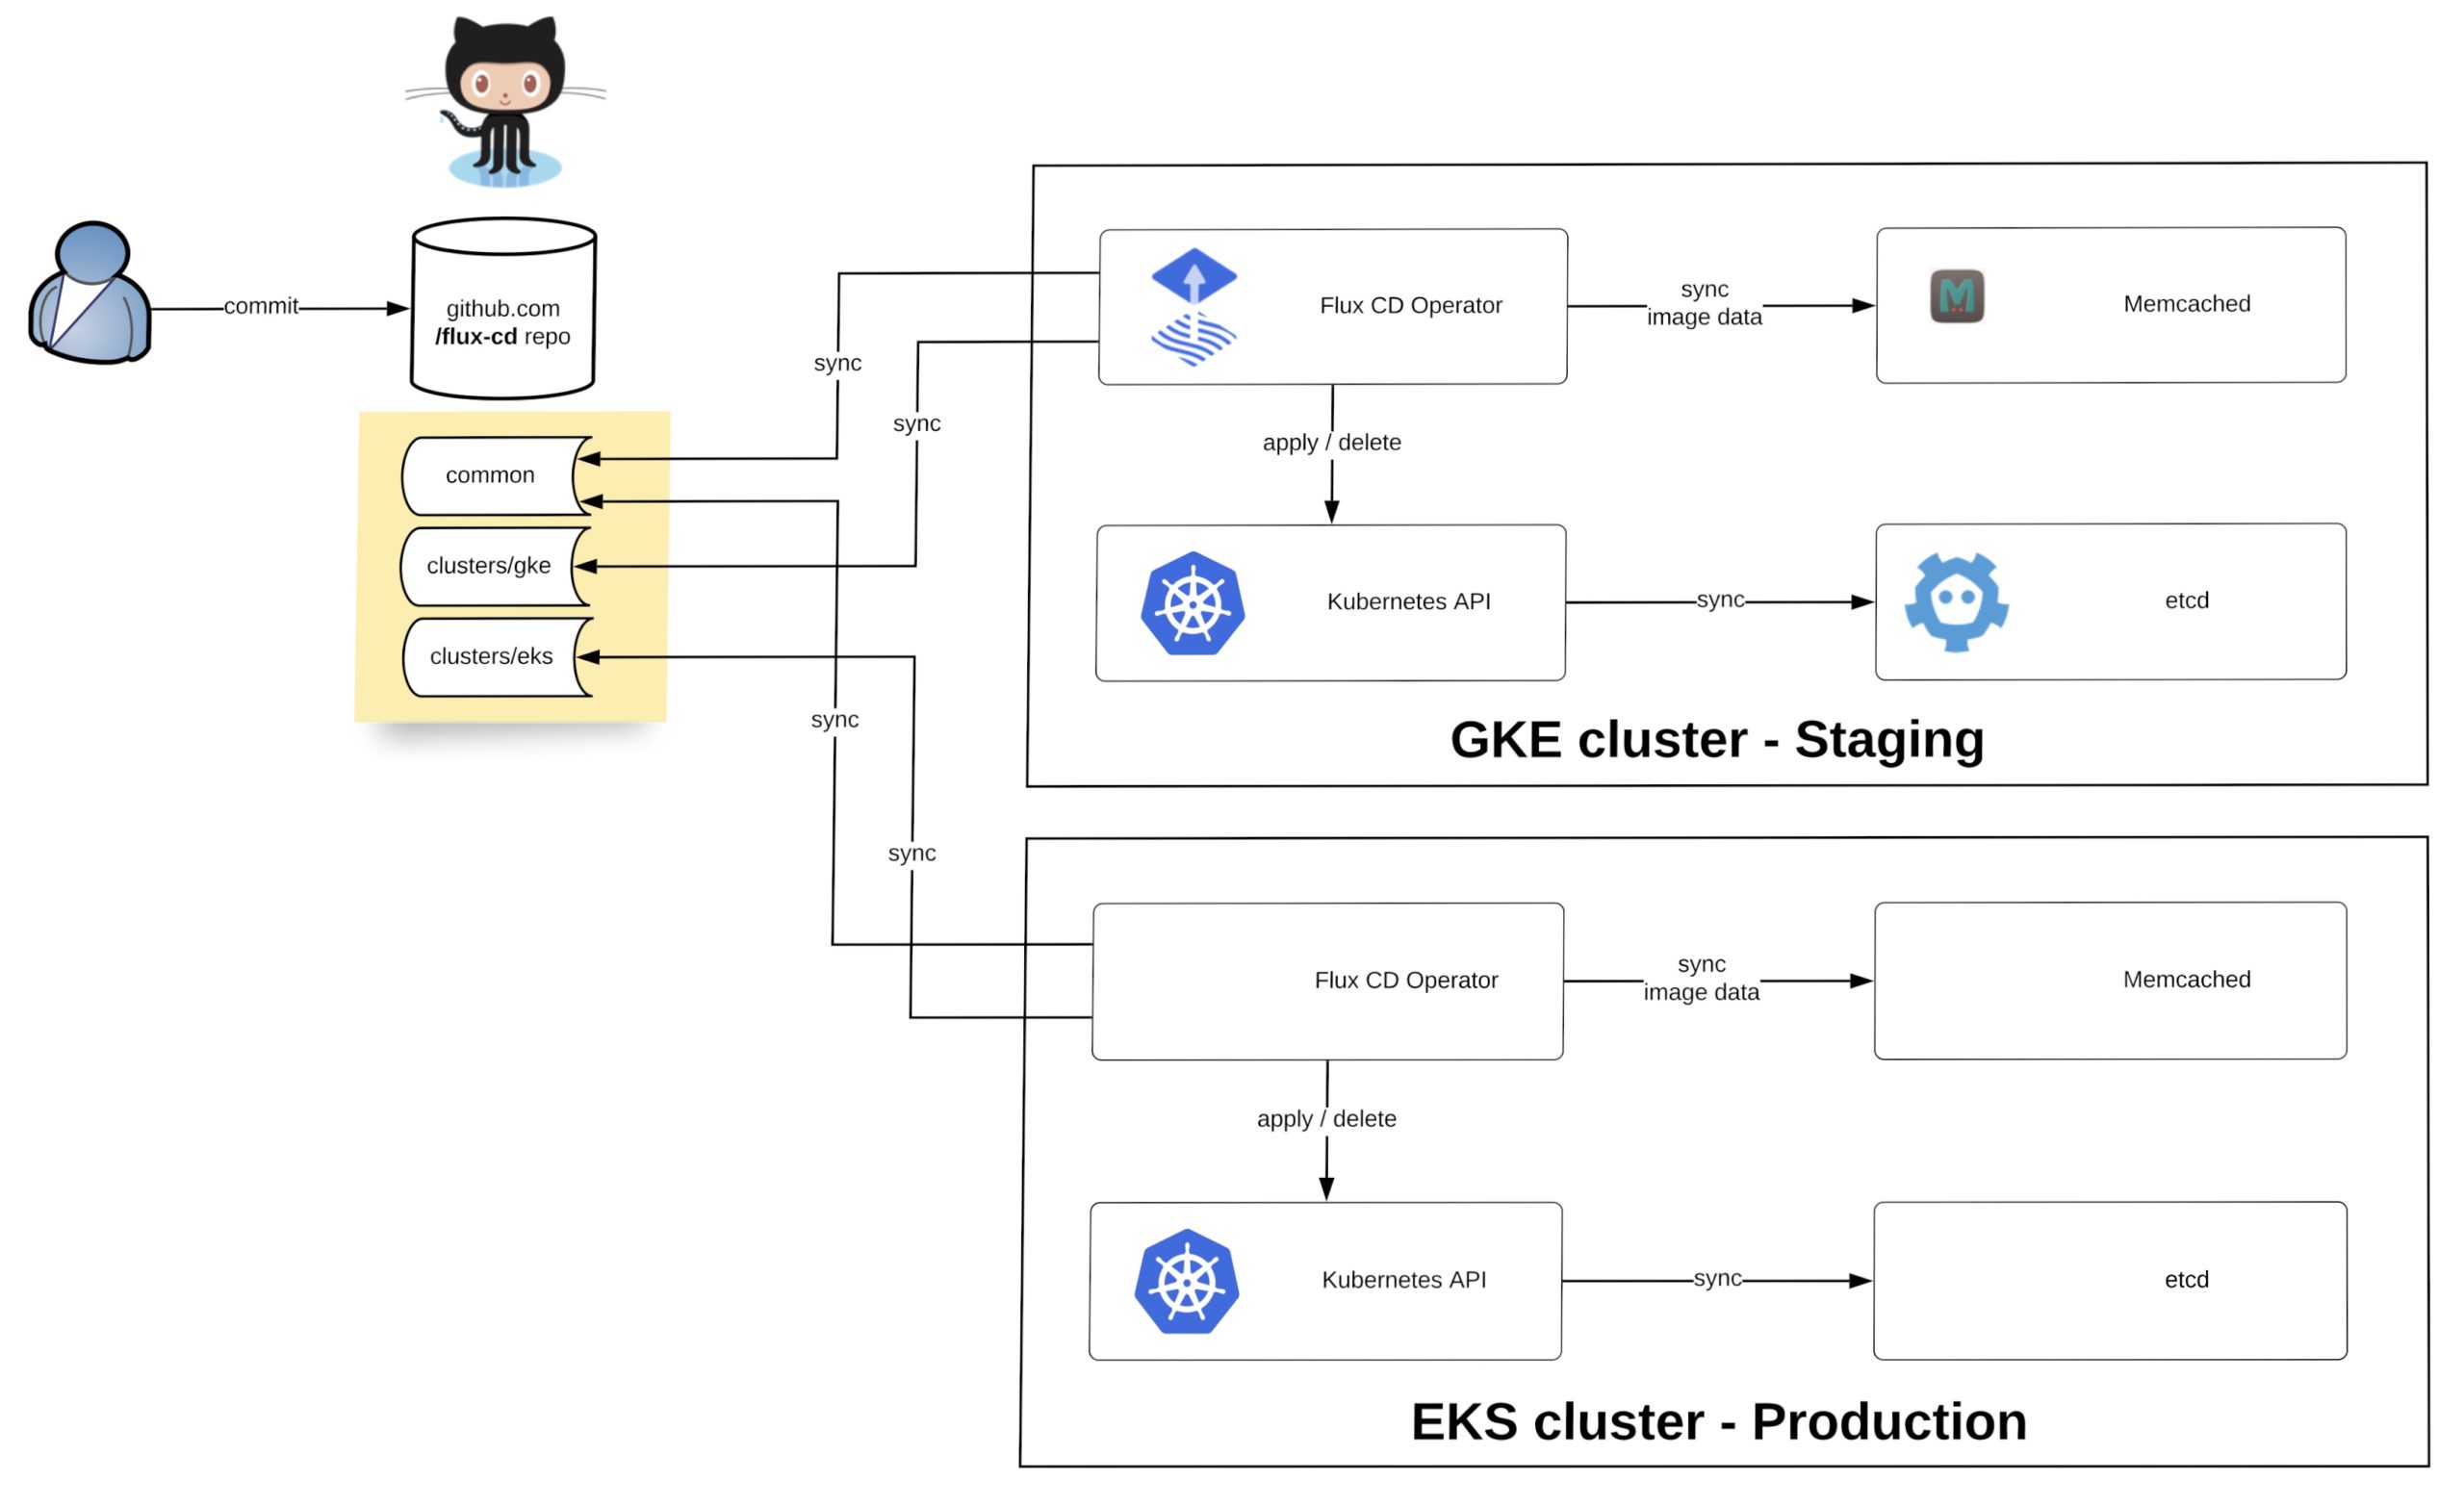
How do we manage the configuration for multiple Kubernetes clusters?

I want to show you a simple example using Kustomize to manage multiple clusters across two environments (staging and production) with Flux. Basically you have a single repository and multiple clusters synchronising the configuration depending how you configure the –git-path variable of the Flux operator. The option –manifest-generation enables Kustomize for the operator and it is required to add a .flux.yaml to run Kustomize build on the cluster directories and to apply the generated manifests.

Let’s look at the repository file and folder structure. We have the base folder containing the common deployment configuration, the common folder with the environment separation for stage and prod overlays and the clusters folder which contains more cluster specific configuration:

├── .flux.yaml 
├── base
│   └── common
│       ├── deployment.yaml
│       ├── kustomization.yaml
│       ├── namespace.yaml
│       └── service.yaml
├── clusters
│   ├── eks
|   |   ├── eks-app1
│   │   |   ├── deployment.yaml
|   |   |   ├── kustomization.yaml
│   │   |   └── service.yaml
|   |   └── kustomization.yaml
│   ├── gke
|   |   ├── gke-app1
│   │   |   ├── deployment.yaml
|   |   |   ├── kustomization.yaml
│   │   |   └── service.yaml
|   |   ├── gke-app2
│   │   |   ├── deployment.yaml
|   |   |   ├── kustomization.yaml
│   │   |   └── service.yaml
|   |   └── kustomization.yaml
└── common
    ├── prod
    |   ├── prod.yaml
    |   └── kustomization.yaml
    └── stage
        ├──  team1
        |    ├── deployment.yaml
        |    ├── kustomization.yaml
        |    ├── namespace.yaml
        |    └── service.yaml
        ├── stage.yaml
        └── kustomization.yaml

If you are new to Kustomize I would recommend reading the article Kustomize – The right way to do templating in Kubernetes.

The last thing we need to do is to deploy the Flux operator to the two Kubernetes clusters. The only difference between both is the git-path variable which points the operator to the cluster and common directories were Kustomize applies the overlays based what is specified in kustomize.yaml. More details about the configuration you find in my example repository: https://github.com/berndonline/flux-cd

Flux config for Google GKE staging cluster:

fluxctl install [email protected] [email protected]:berndonline/flux-cd.git --git-path=clusters/gke,common/stage --manifest-generation=true --git-branch=master --namespace=flux | kubectl apply -f -

Flux config for Amazon EKS production cluster:

fluxctl install [email protected] [email protected]:berndonline/flux-cd.git --git-path=clusters/eks,common/prod --manifest-generation=true --git-branch=master --namespace=flux | kubectl apply -f -

After a few minutes the configuration is applied to the two clusters and you can validate the configuration.

Google GKE stage workloads:

$ fluxctl list-workloads --k8s-fwd-ns=flux -a
WORKLOAD                   CONTAINER         IMAGE                            RELEASE  POLICY
common:deployment/common   hello-kubernetes  paulbouwer/hello-kubernetes:1.5  ready    automated
default:deployment/gke1    hello-kubernetes  paulbouwer/hello-kubernetes:1.5  ready    
default:deployment/gke2    hello-kubernetes  paulbouwer/hello-kubernetes:1.5  ready    
team1:deployment/team1     hello-kubernetes  paulbouwer/hello-kubernetes:1.5  ready
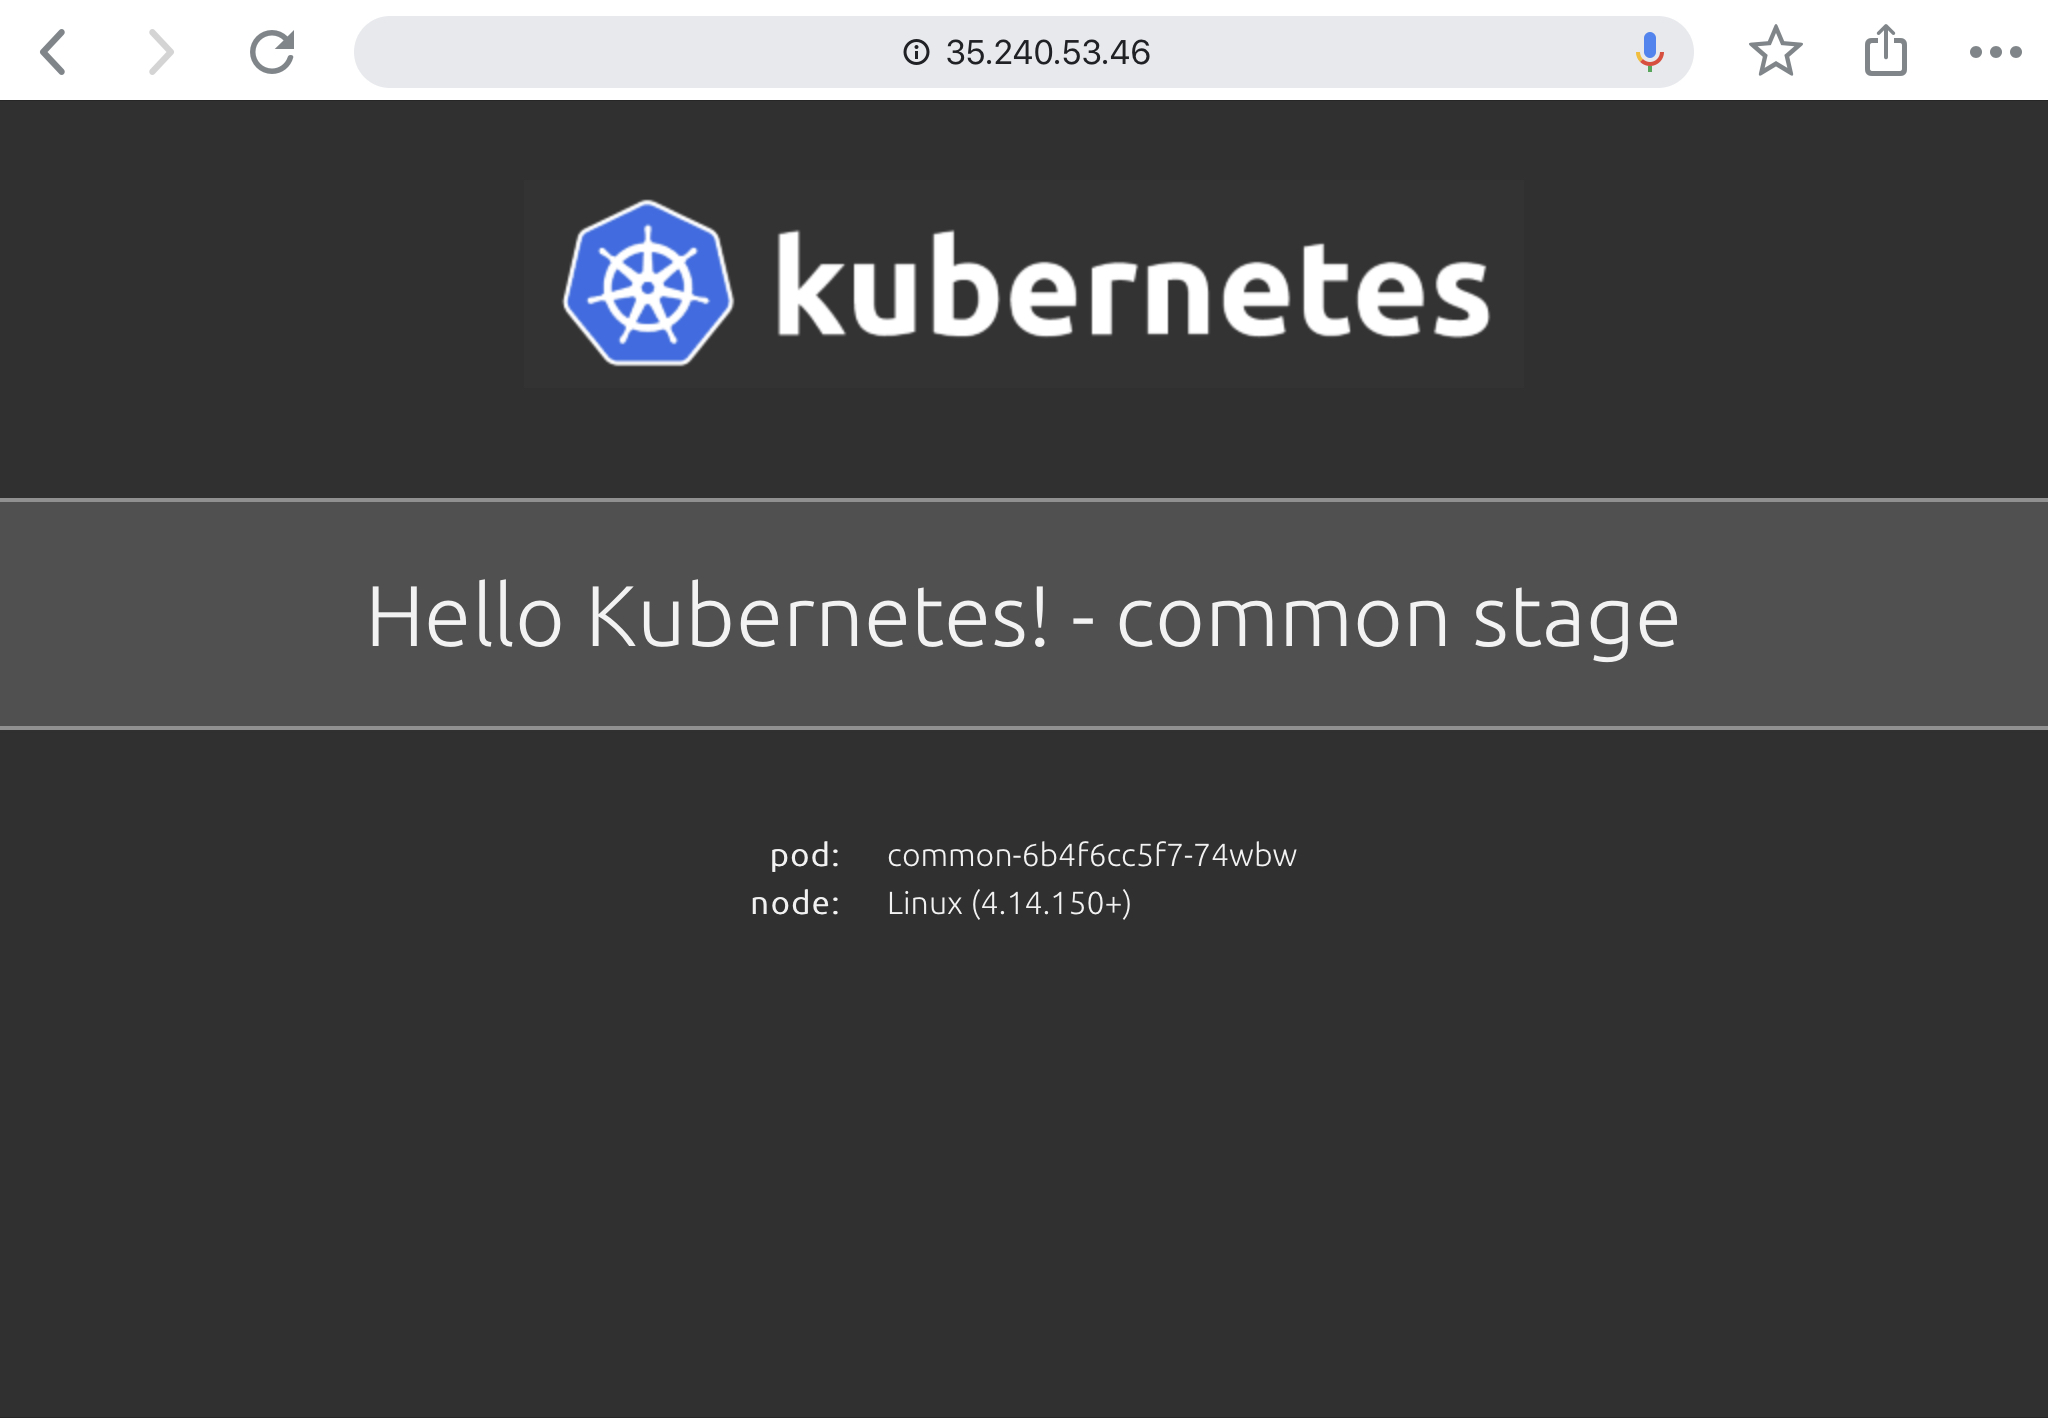
$ kubectl get svc --all-namespaces | grep LoadBalancer
common        common                 LoadBalancer   10.91.14.186   35.240.53.46     80:31537/TCP    16d
default       gke1                   LoadBalancer   10.91.7.169    35.195.241.46    80:30218/TCP    16d
default       gke2                   LoadBalancer   10.91.10.239   35.195.144.68    80:32589/TCP    16d
team1         team1                  LoadBalancer   10.91.1.178    104.199.107.56   80:31049/TCP    16d

GKE common stage application:

Amazon EKS prod workloads:

$ fluxctl list-workloads --k8s-fwd-ns=flux -a
WORKLOAD                          CONTAINER         IMAGE                                                                RELEASE  POLICY
common:deployment/common          hello-kubernetes  paulbouwer/hello-kubernetes:1.5                                      ready    automated
default:deployment/eks1           hello-kubernetes  paulbouwer/hello-kubernetes:1.5                                      ready
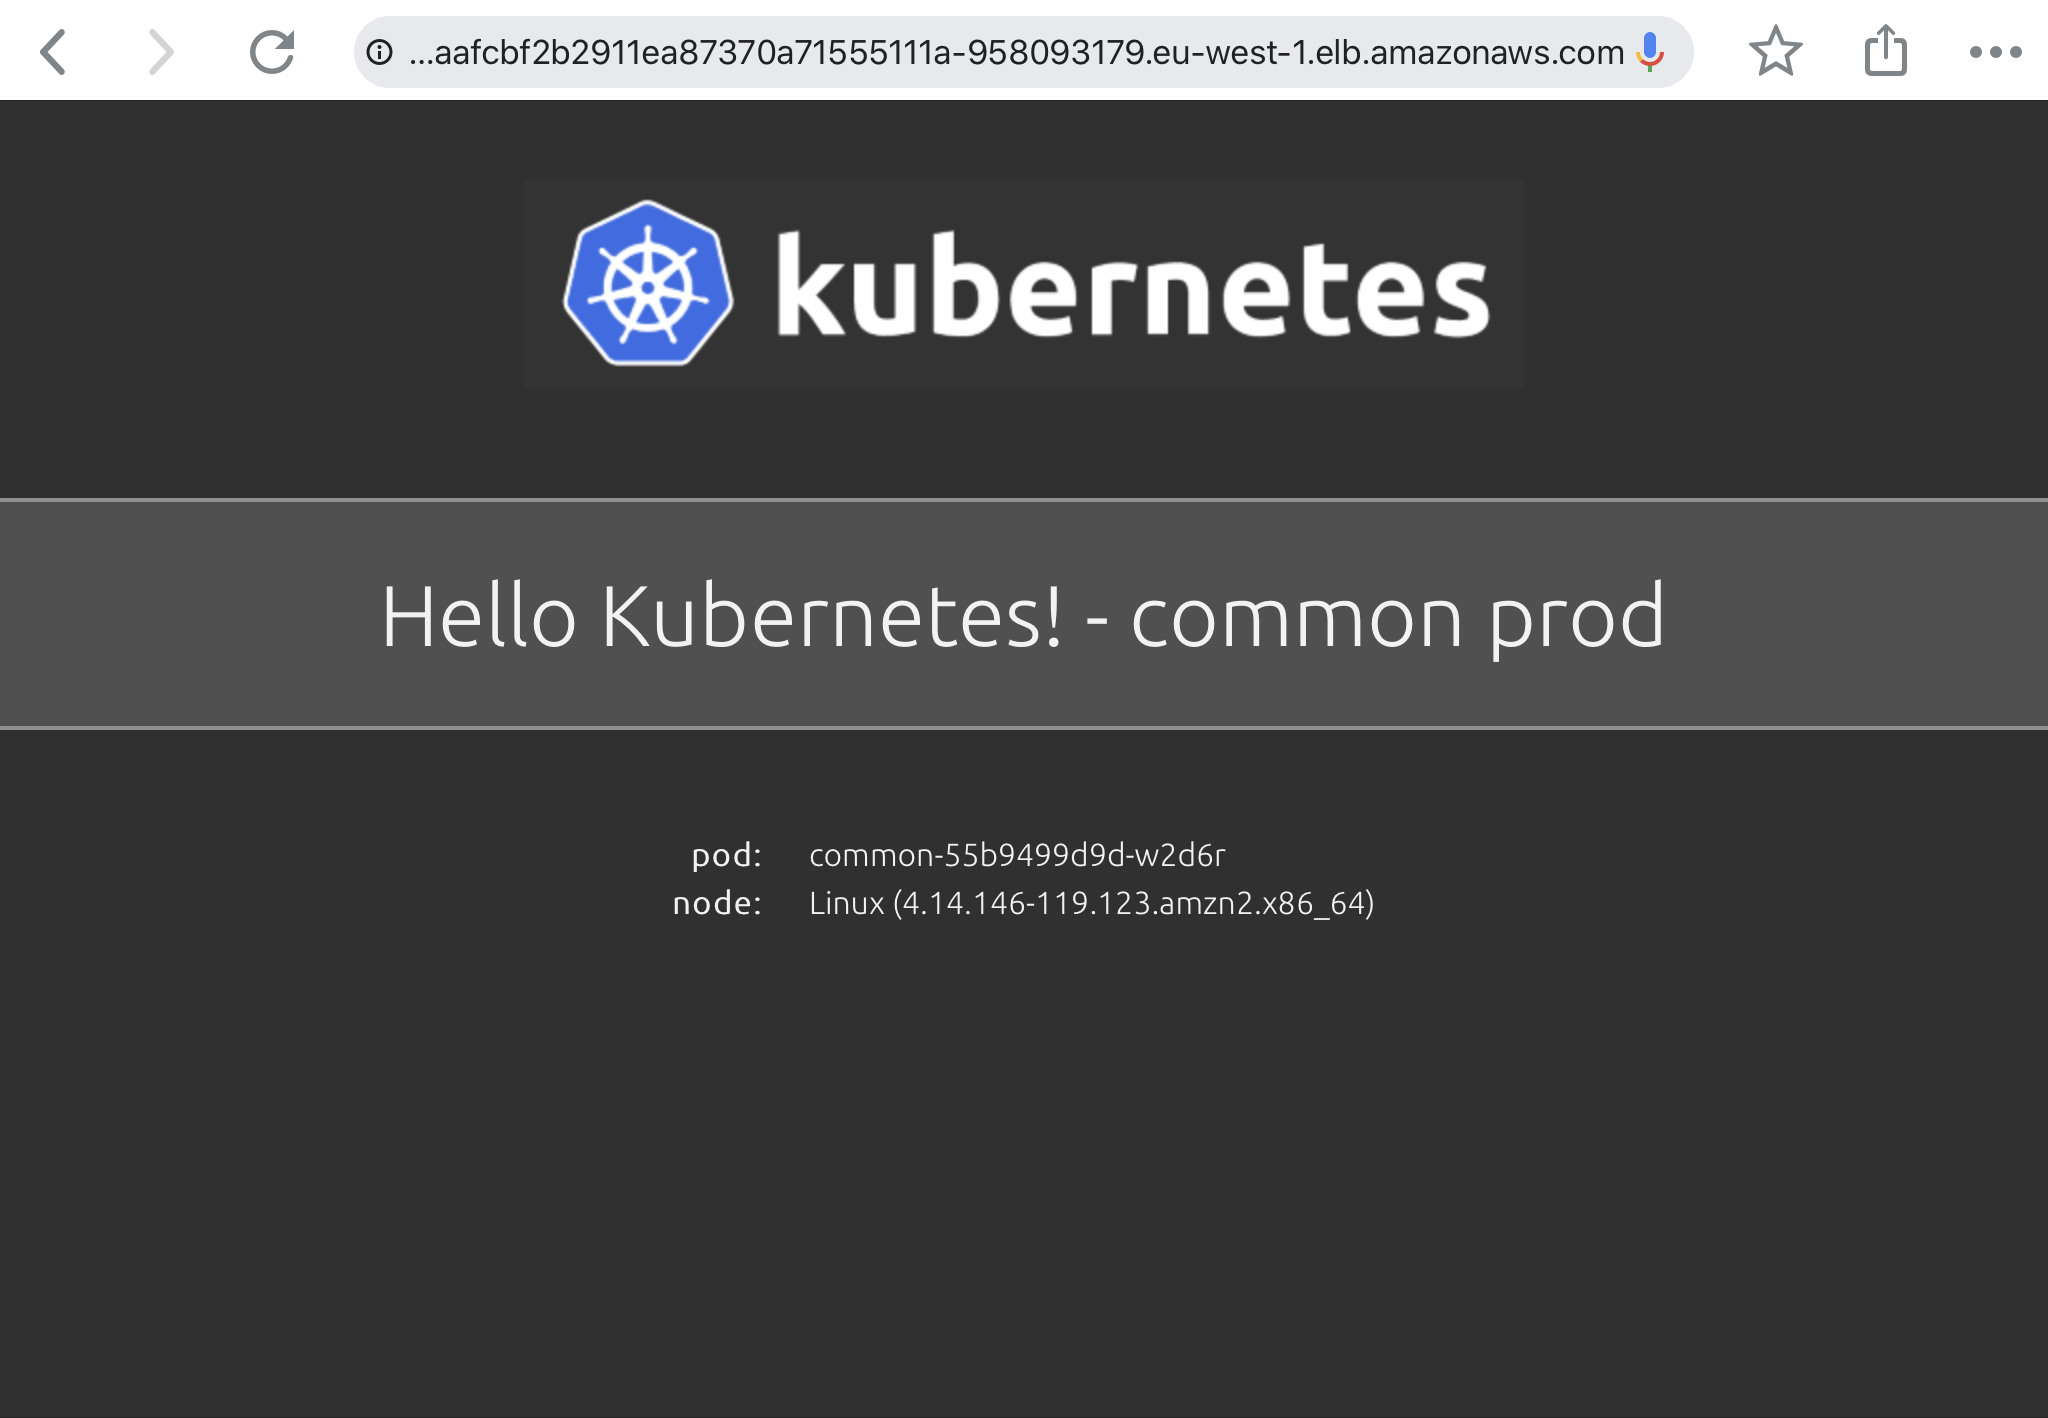
$ kubectl get svc --all-namespaces | grep LoadBalancer
common        common       LoadBalancer   10.100.254.171   a4caafcbf2b2911ea87370a71555111a-958093179.eu-west-1.elb.amazonaws.com    80:32318/TCP    3m8s
default       eks1         LoadBalancer   10.100.170.10    a4caeada52b2911ea87370a71555111a-1261318311.eu-west-1.elb.amazonaws.com   80:32618/TCP    3m8s

EKS common prod application:

I hope this article is useful to get started with GitOps and the Flux operator. In the future, I would like to see Flux being able to watch git tags which will make it easier to promote changes and manage clusters with version tags.

For more technical information have a look at the Flux CD documentation.

Getting started with GKE – Google Kubernetes Engine

I have not spend much time with Google Cloud Platform because I have used mostly AWS cloud services like EKS but I wanted to give Google’s GKE – Kubernetes Engine a try to compare both offerings. My first impression is great about how easy it is to create a cluster and to enable options for NetworkPolicy or Istio Service Mesh without the need to manually install these compare to AWS EKS.

The GKE integration into the cloud offering is perfect, there is no need for a Kubernetes dashboard or custom monitoring / logging solutions, all is nicely integrated into the Google cloud services and can be used straight away once you created the cluster.

I created a new project called Kubernetes for deploying the GKE cluster. The command you see below creates a GKE cluster with the defined settings and options, and I really like the simplicity of a single command to create and manage the cluster similar like eksctl does:

gcloud beta container --project "kubernetes-xxxxxx" clusters create "cluster-1" \
  --region "europe-west1" \
  --no-enable-basic-auth \
  --cluster-version "1.15.4-gke.22" \
  --machine-type "n1-standard-2" \
  --image-type "COS" \
  --disk-type "pd-standard" \
  --disk-size "100" \
  --metadata disable-legacy-endpoints=true \
  --scopes "https://www.googleapis.com/auth/devstorage.read_only","https://www.googleapis.com/auth/logging.write","https://www.googleapis.com/auth/monitoring","https://www.googleapis.com/auth/servicecontrol","https://www.googleapis.com/auth/service.management.readonly","https://www.googleapis.com/auth/trace.append" \
  --num-nodes "1" \
  --enable-stackdriver-kubernetes \
  --enable-ip-alias \
  --network "projects/kubernetes-xxxxxx/global/networks/default" \
  --subnetwork "projects/kubernetes-xxxxxx/regions/europe-west1/subnetworks/default" \
  --default-max-pods-per-node "110" \
  --enable-network-policy \
  --addons HorizontalPodAutoscaling,HttpLoadBalancing,Istio \
  --istio-config auth=MTLS_PERMISSIVE \
  --enable-autoupgrade \
  --enable-autorepair \
  --maintenance-window-start "2019-12-29T00:00:00Z" \
  --maintenance-window-end "2019-12-30T00:00:00Z" \
  --maintenance-window-recurrence "FREQ=WEEKLY;BYDAY=MO,TU,WE,TH,FR,SA,SU" \
  --enable-vertical-pod-autoscaling

With the gcloud command you can authenticate and generate a kubeconfig file for your cluster and start using kubectl directly to deploy your applications.

gcloud beta container clusters get-credentials cluster-1 --region europe-west1 --project kubernetes-xxxxxx

There is no need for a Kubernetes dashboard what I have mentioned because it is integrated into the Google Kubernetes Engine console. You are able to see cluster information and deployed workloads, and you are able to drill down to detailed information about running pods:

Google is offering the Kubernetes control-plane for free and which is a massive advantage for GKE because AWS on the other hand charges for the EKS control-plane around $144 per month.

You can keep your GKE control-plane running and scale down your instance pool to zero if no compute capacity is needed and scale up later if required:

# scale down node pool
gcloud container clusters resize cluster-1 --num-nodes=0 --region "europe-west1"

# scale up node pool 
gcloud container clusters resize cluster-1 --num-nodes=1 --region "europe-west1"

Let’s deploy the Google microservices demo application with Istio Service Mesh enabled:

# label default namespace to inject Envoy sidecar
kubectl label namespace default istio-injection=enabled

# check istio sidecar injector label
kubectl get namespace -L istio-injection

# deploy Google microservices demo manifests
kubectl create -f https://raw.githubusercontent.com/berndonline/microservices-demo/master/kubernetes-manifests/hipster-shop.yml
kubectl create -f https://raw.githubusercontent.com/berndonline/microservices-demo/master/istio-manifests/istio.yml

Get the public IP addresses for the frontend service and ingress gateway to connect with your browser:

# get frontend-external service IP address
kubectl get svc frontend-external --no-headers | awk '{ print $4 }'

# get istio ingress gateway service IP address
kubectl get svc istio-ingressgateway -n istio-system --no-headers | awk '{ print $4 }'

To delete the GKE cluster simply run the following gcloud command:

gcloud beta container --project "kubernetes-xxxxxx" clusters delete "cluster-1" --region "europe-west1"

Googles Kubernetes Engine is in my opinion the better offering compared to AWS EKS which seems a bit too basic.

Getting started with OpenShift Container Platform

In the recent month I have spend a lot of time around networking and automation but I want to shift more towards running modern container platforms like Kubernetes or OpenShift which both are using networking services and as I have shared in one of my previous article about AVI software load balancer, it all fits nicely into networking in my opinion.

But before we start, please have a look at my previous article about Deploying OpenShift Origin Cluster using Ansible to create a small OpenShift platform for testing.

Create a bash completion file for oc commands:

[root@origin-master ~]# oc completion bash > /etc/bash_completion.d/oc
[root@origin-master ~]# . /etc/bash_completion.d/oc
  • Let’s start and login to OpenShift as a normal user account
[root@origin-master ~]# oc login https://console.lab.hostgate.net:8443/
The server is using a certificate that does not match its hostname: x509: certificate is valid for lab.hostgate.net, not console.lab.hostgate.net
You can bypass the certificate check, but any data you send to the server could be intercepted by others.
Use insecure connections? (y/n): y

Authentication required for https://console.lab.hostgate.net:8443 (openshift)
Username: demo
Password:
Login successful.

[root@origin-master ~]#

Instead of username and password use token which you can get from the web console:

oc login https://console.lab.hostgate.net:8443 --token=***hash token***
  • Now create the project where we want to run our web application:
[root@origin-master ~]# oc new-project webapp
Now using project "webapp" on server "https://console.lab.hostgate.net:8443".

You can add applications to this project with the 'new-app' command. For example, try:

    oc new-app centos/ruby-22-centos7~https://github.com/openshift/ruby-ex.git

to build a new example application in Ruby.
[root@origin-master ~]#

Afterwards we need to create a build configuration, in my example we use an external Dockerfile without starting the build directly:

[root@origin-master ~]#  oc new-build --name webapp-build --binary
warning: Cannot find git. Ensure that it is installed and in your path. Git is required to work with git repositories.
    * A Docker build using binary input will be created
      * The resulting image will be pushed to image stream "webapp-build:latest"
      * A binary build was created, use 'start-build --from-dir' to trigger a new build

--> Creating resources with label build=webapp-build ...
    imagestream "webapp-build" created
    buildconfig "webapp-build" created
--> Success
[root@origin-master ~]#

Create Dockerfile:

[root@origin-master ~]# vi Dockerfile

Copy and paste the line below into the Dockerfile:

FROM openshift/hello-openshift

Let’s continue and start the build from the Dockerfile we specified previously

[root@origin-master ~]#  oc start-build webapp-build --from-file=Dockerfile --follow
Uploading file "Dockerfile" as binary input for the build ...
build "webapp-build-1" started
Receiving source from STDIN as file Dockerfile
Pulling image openshift/hello-openshift ...
Step 1/3 : FROM openshift/hello-openshift
 ---> 7af3297a3fb4
Step 2/3 : ENV "OPENSHIFT_BUILD_NAME" "webapp-build-1" "OPENSHIFT_BUILD_NAMESPACE" "webapp"
 ---> Running in 422f63f69364
 ---> 2cd93085ec93
Removing intermediate container 422f63f69364
Step 3/3 : LABEL "io.openshift.build.name" "webapp-build-1" "io.openshift.build.namespace" "webapp"
 ---> Running in 0c3e6cce6f0b
 ---> cf178dda8238
Removing intermediate container 0c3e6cce6f0b
Successfully built cf178dda8238
Pushing image docker-registry.default.svc:5000/webapp/webapp-build:latest ...
Push successful
[root@origin-master ~]#

Alternatively you can directly inject the Dockerfile options in a single command and the build would start immediately:

[root@origin-master ~]#  oc new-build --name webapp-build -D $'FROM openshift/hello-openshift'
  • Create the web application
[root@origin-master ~]# oc new-app webapp-build
warning: Cannot find git. Ensure that it is installed and in your path. Git is required to work with git repositories.
--> Found image cf178dd (4 minutes old) in image stream "webapp/webapp-build" under tag "latest" for "webapp-build"

    * This image will be deployed in deployment config "webapp-build"
    * Ports 8080/tcp, 8888/tcp will be load balanced by service "webapp-build"
      * Other containers can access this service through the hostname "webapp-build"

--> Creating resources ...
    deploymentconfig "webapp-build" created
    service "webapp-build" created
--> Success
    Application is not exposed. You can expose services to the outside world by executing one or more of the commands below:
     'oc expose svc/webapp-build'
    Run 'oc status' to view your app.
[root@origin-master ~]#

As you see below, we are currently running a single pod:

[root@origin-master ~]#  oc get pod -o wide
NAME                   READY     STATUS      RESTARTS   AGE       IP            NODE
webapp-build-1-build   0/1       Completed   0          8m        10.131.0.27   origin-node-1
webapp-build-1-znk98   1/1       Running     0          3m        10.131.0.29   origin-node-1
[root@origin-master ~]#

Let’s check out endpoints and services:

[root@origin-master ~]# oc get ep
NAME           ENDPOINTS                           AGE
webapp-build   10.131.0.29:8080,10.131.0.29:8888   1m
[root@origin-master ~]# oc get svc
NAME           CLUSTER-IP     EXTERNAL-IP   PORT(S)             AGE
webapp-build   172.30.64.97           8080/TCP,8888/TCP   1m
[root@origin-master ~]#

Running a single pod is not great for redundancy, let’s scale out:

[root@origin-master ~]# oc scale --replicas=5 dc/webapp-build
deploymentconfig "webapp-build" scaled
[root@origin-master ~]#  oc get pod -o wide
NAME                   READY     STATUS      RESTARTS   AGE       IP            NODE
webapp-build-1-4fb98   1/1       Running     0          15s       10.130.0.47   origin-node-2
webapp-build-1-build   0/1       Completed   0          9m        10.131.0.27   origin-node-1
webapp-build-1-dw6ww   1/1       Running     0          15s       10.131.0.30   origin-node-1
webapp-build-1-lswhg   1/1       Running     0          15s       10.131.0.31   origin-node-1
webapp-build-1-z4nk9   1/1       Running     0          15s       10.130.0.46   origin-node-2
webapp-build-1-znk98   1/1       Running     0          4m        10.131.0.29   origin-node-1
[root@origin-master ~]#

We can check our endpoints and services again, and see that we have more endpoints and still one service:

[root@origin-master ~]# oc get ep
NAME           ENDPOINTS                                                        AGE
webapp-build   10.130.0.46:8080,10.130.0.47:8080,10.131.0.29:8080 + 7 more...   4m
[root@origin-master ~]# oc get svc
NAME           CLUSTER-IP     EXTERNAL-IP   PORT(S)             AGE
webapp-build   172.30.64.97           8080/TCP,8888/TCP   4m
[root@origin-master ~]#

OpenShift uses an internal DNS service called SkyDNS to expose services for internal communication:

[root@origin-master ~]# dig webapp-build.webapp.svc.cluster.local

; <<>> DiG 9.9.4-RedHat-9.9.4-61.el7 <<>> webapp-build.webapp.svc.cluster.local
;; global options: +cmd
;; Got answer:
;; ->>HEADER<<- opcode: QUERY, status: NOERROR, id: 20933
;; flags: qr aa rd ra; QUERY: 1, ANSWER: 1, AUTHORITY: 0, ADDITIONAL: 0

;; QUESTION SECTION:
;webapp-build.webapp.svc.cluster.local. IN A

;; ANSWER SECTION:
webapp-build.webapp.svc.cluster.local. 30 IN A	172.30.64.97

;; Query time: 1 msec
;; SERVER: 10.255.1.214#53(10.255.1.214)
;; WHEN: Sat Jun 30 08:58:19 UTC 2018
;; MSG SIZE  rcvd: 71

[root@origin-master ~]#
  • Let’s expose our web application so that it is accessible from the outside world:
[root@origin-master ~]# oc expose svc webapp-build
route "webapp-build" exposed
[root@origin-master ~]#

Connect with a browser to the URL you see under routes:

Modify the WebApp and inject variables via a config map into our application:

[root@origin-master ~]# oc create configmap webapp-map --from-literal=RESPONSE="My first OpenShift WebApp"
configmap "webapp-map" created
[root@origin-master ~]#

Afterwards we need to add the previously created config map to our environment

[root@origin-master ~]# oc env dc/webapp-build --from=configmap/webapp-map
deploymentconfig "webapp-build" updated
[root@origin-master ~]#

Now when we check our web application again you see that the new variables are injected into the pod and displayed:

I will share more about running OpenShift Container Platform and my experience in the coming month. I hope you find this article useful and please share your feedback and leave a comment.