Running Istio Service Mesh on OpenShift

In the Kubernetes/OpenShift community everyone is talking about Istio service mesh, so I wanted to share my experience about the installation and running a sample microservice application with Istio on OpenShift 3.11 and 4.0. Service mesh on OpenShift is still at least a few month away from being available generally to run in production but this gives you the possibility to start testing and exploring Istio. I have found good documentation about installing Istio on OCP and OKD have a look for more information.

To install Istio on OpenShift 3.11 you need to apply the node and master prerequisites you see below; for OpenShift 4.0 and above you can skip these steps and go directly to the istio-operator installation:

sudo bash -c 'cat << EOF > /etc/origin/master/master-config.patch
admissionConfig:
  pluginConfig:
    MutatingAdmissionWebhook:
      configuration:
        apiVersion: apiserver.config.k8s.io/v1alpha1
        kubeConfigFile: /dev/null
        kind: WebhookAdmission
    ValidatingAdmissionWebhook:
      configuration:
        apiVersion: apiserver.config.k8s.io/v1alpha1
        kubeConfigFile: /dev/null
        kind: WebhookAdmission
EOF'
        
sudo cp -p /etc/origin/master/master-config.yaml /etc/origin/master/master-config.yaml.prepatch
sudo bash -c 'oc ex config patch /etc/origin/master/master-config.yaml.prepatch -p "$(cat /etc/origin/master/master-config.patch)" > /etc/origin/master/master-config.yaml'
sudo su -
master-restart api
master-restart controllers
exit       

sudo bash -c 'cat << EOF > /etc/sysctl.d/99-elasticsearch.conf 
vm.max_map_count = 262144
EOF'

sudo sysctl vm.max_map_count=262144

The Istio installation is straight forward by starting first to install the istio-operator:

oc new-project istio-operator
oc new-app -f https://raw.githubusercontent.com/Maistra/openshift-ansible/maistra-0.9/istio/istio_community_operator_template.yaml --param=OPENSHIFT_ISTIO_MASTER_PUBLIC_URL=<-master-public-hostname->

Verify the operator deployment:

oc logs -n istio-operator $(oc -n istio-operator get pods -l name=istio-operator --output=jsonpath={.items..metadata.name})

Once the operator is running we can start deploying Istio components by creating a custom resource:

cat << EOF >  ./istio-installation.yaml
apiVersion: "istio.openshift.com/v1alpha1"
kind: "Installation"
metadata:
  name: "istio-installation"
  namespace: istio-operator
EOF

oc create -n istio-operator -f ./istio-installation.yaml

Check and watch the Istio installation progress which might take a while to complete:

oc get pods -n istio-system -w

# The installation of the core components is finished when you see:
...
openshift-ansible-istio-installer-job-cnw72   0/1       Completed   0         4m

Afterwards, to finish off the Istio installation, we need to install the Kiali web console:

bash <(curl -L https://git.io/getLatestKialiOperator)
oc get route -n istio-system -l app=kiali

Verifying that all Istio components are running:

$ oc get pods -n istio-system
NAME                                          READY     STATUS      RESTARTS   AGE
elasticsearch-0                               1/1       Running     0          9m
grafana-74b5796d94-4ll5d                      1/1       Running     0          9m
istio-citadel-db879c7f8-kfxfk                 1/1       Running     0          11m
istio-egressgateway-6d78858d89-58lsd          1/1       Running     0          11m
istio-galley-6ff54d9586-8r7cl                 1/1       Running     0          11m
istio-ingressgateway-5dcf9fdf4b-4fjj5         1/1       Running     0          11m
istio-pilot-7ccf64f659-ghh7d                  2/2       Running     0          11m
istio-policy-6c86656499-v45zr                 2/2       Running     3          11m
istio-sidecar-injector-6f696b8495-8qqjt       1/1       Running     0          11m
istio-telemetry-686f78b66b-v7ljf              2/2       Running     3          11m
jaeger-agent-k4tpz                            1/1       Running     0          9m
jaeger-collector-64bc5678dd-wlknc             1/1       Running     0          9m
jaeger-query-776d4d754b-8z47d                 1/1       Running     0          9m
kiali-5fd946b855-7lw2h                        1/1       Running     0          2m
openshift-ansible-istio-installer-job-cnw72   0/1       Completed   0          13m
prometheus-75b849445c-l7rlr                   1/1       Running     0          11m

Let’s start to deploy the microservice application example by using the Google Hipster Shop, it contains multiple microservices which is great to test with Istio:

# Create new project
oc new-project hipster-shop

# Set permissions to allow Istio to deploy the Envoy-Proxy side-car container
oc adm policy add-scc-to-user anyuid -z default -n hipster-shop
oc adm policy add-scc-to-user privileged -z default -n hipster-shop

# Create Hipster Shop deployments and Istio services
oc create -f https://raw.githubusercontent.com/berndonline/openshift-ansible/master/examples/istio-hipster-shop.yml
oc create -f https://raw.githubusercontent.com/berndonline/openshift-ansible/master/examples/istio-manifest.yml

# Wait and check that all pods are running before creating the load generator
oc get pods -n hipster-shop -w

# Create load generator deployment
oc create -f https://raw.githubusercontent.com/berndonline/openshift-ansible/master/examples/istio-loadgenerator.yml

As you see below each pod has a sidecar container with the Istio Envoy proxy which handles pod traffic:

[centos@ip-172-26-1-167 ~]$ oc get pods
NAME                                     READY     STATUS    RESTARTS   AGE
adservice-7894dbfd8c-g4m9v               2/2       Running   0          49m
cartservice-758d66c648-79fj4             2/2       Running   4          49m
checkoutservice-7b9dc8b755-h2b2v         2/2       Running   0          49m
currencyservice-7b5c5f48fc-gtm9x         2/2       Running   0          49m
emailservice-79578566bb-jvwbw            2/2       Running   0          49m
frontend-6497c5f748-5fc4f                2/2       Running   0          49m
loadgenerator-764c5547fc-sw6mg           2/2       Running   0          40m
paymentservice-6b989d657c-klp4d          2/2       Running   0          49m
productcatalogservice-5bfbf4c77c-cw676   2/2       Running   0          49m
recommendationservice-c947d84b5-svbk8    2/2       Running   0          49m
redis-cart-79d84748cf-cvg86              2/2       Running   0          49m
shippingservice-6ccb7d8ff7-66v8m         2/2       Running   0          49m
[centos@ip-172-26-1-167 ~]$

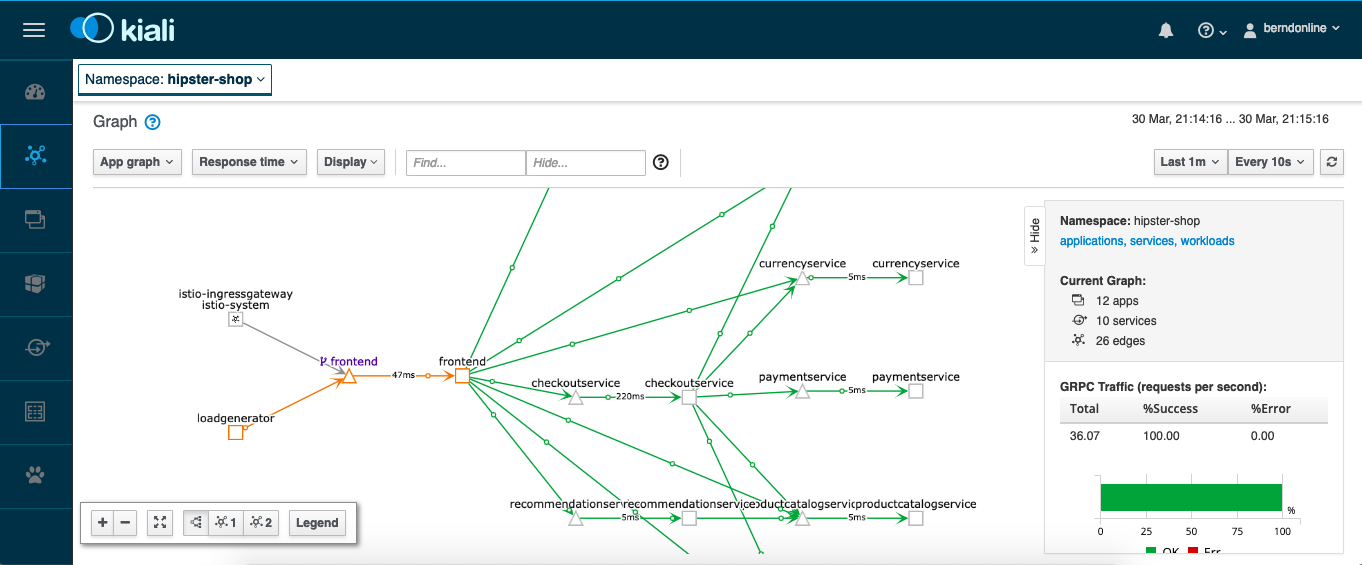
The Kiali web console answers the question about what microservices are part of the service mesh and how are they connected which gives you a great level of detail about the traffic flows:

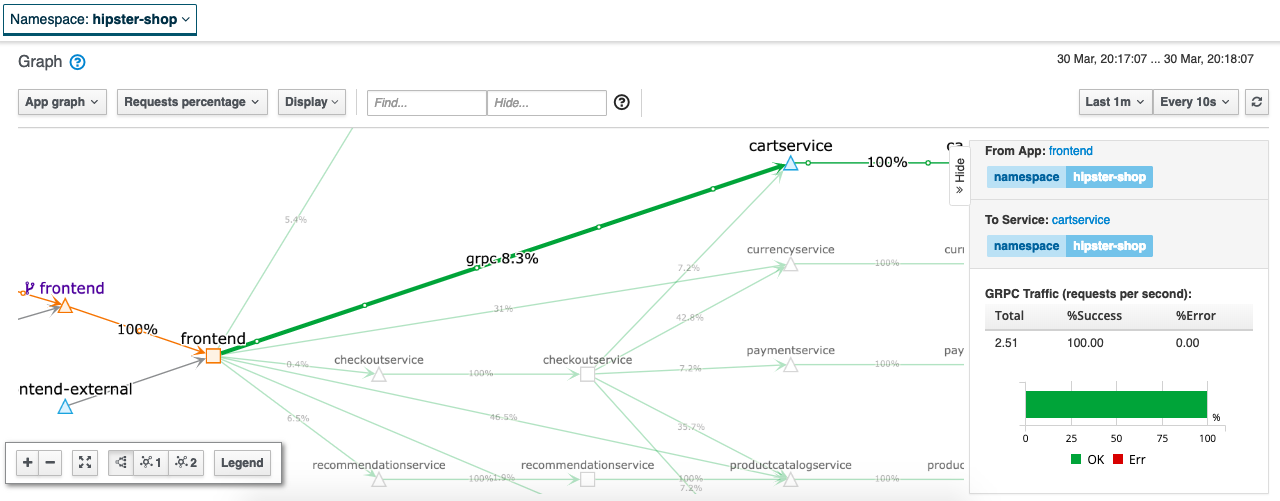
Detailed traffic flow view:

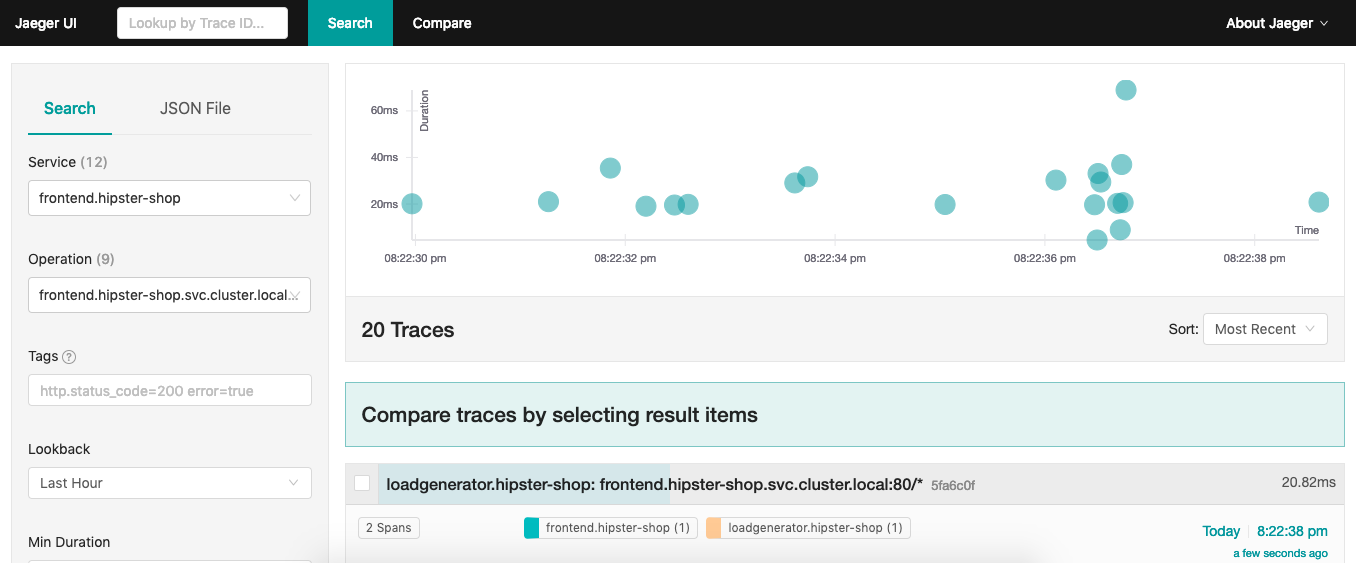
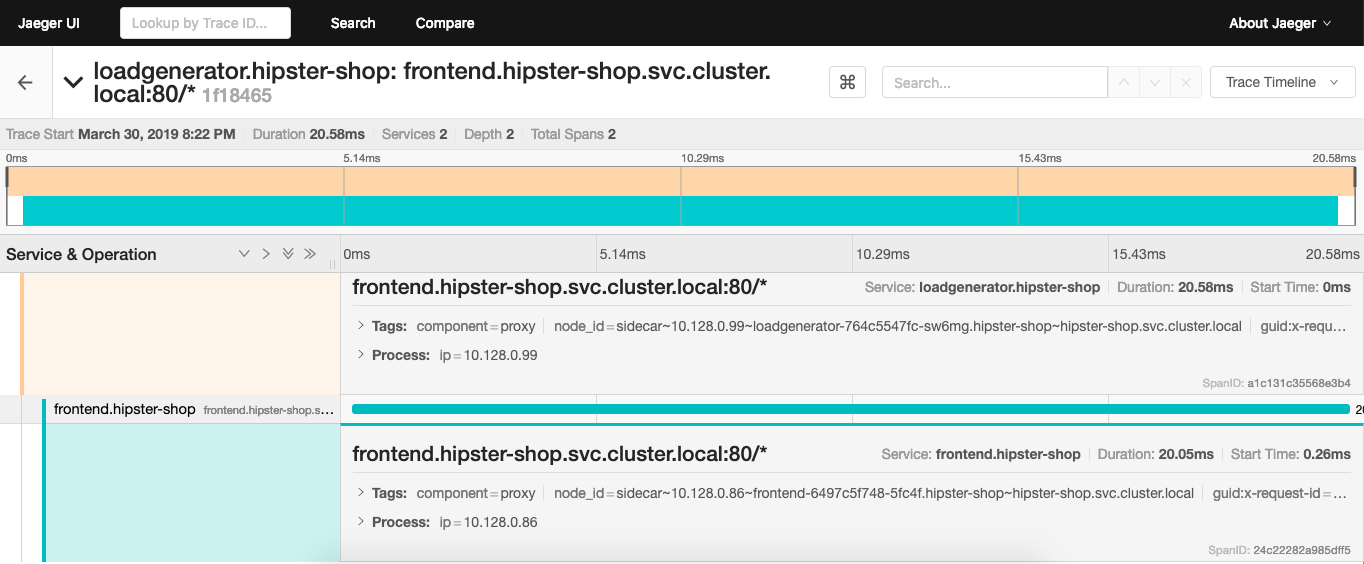
The Isito installation comes with Jaeger which is an open source tracing tool to monitor and troubleshoot transactions:

Enough about this, lets connect to our cool Hipster Shop and happy shopping:

Additionally there is another example, the Istio Bookinfo if you want to try something smaller and less complex:

oc new-project myproject

oc adm policy add-scc-to-user anyuid -z default -n myproject
oc adm policy add-scc-to-user privileged -z default -n myproject

oc apply -n myproject -f https://raw.githubusercontent.com/Maistra/bookinfo/master/bookinfo.yaml
oc apply -n myproject -f https://raw.githubusercontent.com/Maistra/bookinfo/master/bookinfo-gateway.yaml
export GATEWAY_URL=$(oc get route -n istio-system istio-ingressgateway -o jsonpath='{.spec.host}')
curl -o /dev/null -s -w "%{http_code}\n" http://$GATEWAY_URL/productpage

curl -o destination-rule-all.yaml https://raw.githubusercontent.com/istio/istio/release-1.0/samples/bookinfo/networking/destination-rule-all.yaml
oc apply -f destination-rule-all.yaml

curl -o destination-rule-all-mtls.yaml https://raw.githubusercontent.com/istio/istio/release-1.0/samples/bookinfo/networking/destination-rule-all-mtls.yaml
oc apply -f destination-rule-all-mtls.yaml

oc get destinationrules -o yaml

I hope this is a useful article for getting started with Istio service mesh on OpenShift.

Getting started with OpenShift Container Platform

In the recent month I have spend a lot of time around networking and automation but I want to shift more towards running modern container platforms like Kubernetes or OpenShift which both are using networking services and as I have shared in one of my previous article about AVI software load balancer, it all fits nicely into networking in my opinion.

But before we start, please have a look at my previous article about Deploying OpenShift Origin Cluster using Ansible to create a small OpenShift platform for testing.

Create a bash completion file for oc commands:

[root@origin-master ~]# oc completion bash > /etc/bash_completion.d/oc
[root@origin-master ~]# . /etc/bash_completion.d/oc
  • Let’s start and login to OpenShift as a normal user account
[root@origin-master ~]# oc login https://console.lab.hostgate.net:8443/
The server is using a certificate that does not match its hostname: x509: certificate is valid for lab.hostgate.net, not console.lab.hostgate.net
You can bypass the certificate check, but any data you send to the server could be intercepted by others.
Use insecure connections? (y/n): y

Authentication required for https://console.lab.hostgate.net:8443 (openshift)
Username: demo
Password:
Login successful.

[root@origin-master ~]#

Instead of username and password use token which you can get from the web console:

oc login https://console.lab.hostgate.net:8443 --token=***hash token***
  • Now create the project where we want to run our web application:
[root@origin-master ~]# oc new-project webapp
Now using project "webapp" on server "https://console.lab.hostgate.net:8443".

You can add applications to this project with the 'new-app' command. For example, try:

    oc new-app centos/ruby-22-centos7~https://github.com/openshift/ruby-ex.git

to build a new example application in Ruby.
[root@origin-master ~]#

Afterwards we need to create a build configuration, in my example we use an external Dockerfile without starting the build directly:

[root@origin-master ~]#  oc new-build --name webapp-build --binary
warning: Cannot find git. Ensure that it is installed and in your path. Git is required to work with git repositories.
    * A Docker build using binary input will be created
      * The resulting image will be pushed to image stream "webapp-build:latest"
      * A binary build was created, use 'start-build --from-dir' to trigger a new build

--> Creating resources with label build=webapp-build ...
    imagestream "webapp-build" created
    buildconfig "webapp-build" created
--> Success
[root@origin-master ~]#

Create Dockerfile:

[root@origin-master ~]# vi Dockerfile

Copy and paste the line below into the Dockerfile:

FROM openshift/hello-openshift

Let’s continue and start the build from the Dockerfile we specified previously

[root@origin-master ~]#  oc start-build webapp-build --from-file=Dockerfile --follow
Uploading file "Dockerfile" as binary input for the build ...
build "webapp-build-1" started
Receiving source from STDIN as file Dockerfile
Pulling image openshift/hello-openshift ...
Step 1/3 : FROM openshift/hello-openshift
 ---> 7af3297a3fb4
Step 2/3 : ENV "OPENSHIFT_BUILD_NAME" "webapp-build-1" "OPENSHIFT_BUILD_NAMESPACE" "webapp"
 ---> Running in 422f63f69364
 ---> 2cd93085ec93
Removing intermediate container 422f63f69364
Step 3/3 : LABEL "io.openshift.build.name" "webapp-build-1" "io.openshift.build.namespace" "webapp"
 ---> Running in 0c3e6cce6f0b
 ---> cf178dda8238
Removing intermediate container 0c3e6cce6f0b
Successfully built cf178dda8238
Pushing image docker-registry.default.svc:5000/webapp/webapp-build:latest ...
Push successful
[root@origin-master ~]#

Alternatively you can directly inject the Dockerfile options in a single command and the build would start immediately:

[root@origin-master ~]#  oc new-build --name webapp-build -D $'FROM openshift/hello-openshift'
  • Create the web application
[root@origin-master ~]# oc new-app webapp-build
warning: Cannot find git. Ensure that it is installed and in your path. Git is required to work with git repositories.
--> Found image cf178dd (4 minutes old) in image stream "webapp/webapp-build" under tag "latest" for "webapp-build"

    * This image will be deployed in deployment config "webapp-build"
    * Ports 8080/tcp, 8888/tcp will be load balanced by service "webapp-build"
      * Other containers can access this service through the hostname "webapp-build"

--> Creating resources ...
    deploymentconfig "webapp-build" created
    service "webapp-build" created
--> Success
    Application is not exposed. You can expose services to the outside world by executing one or more of the commands below:
     'oc expose svc/webapp-build'
    Run 'oc status' to view your app.
[root@origin-master ~]#

As you see below, we are currently running a single pod:

[root@origin-master ~]#  oc get pod -o wide
NAME                   READY     STATUS      RESTARTS   AGE       IP            NODE
webapp-build-1-build   0/1       Completed   0          8m        10.131.0.27   origin-node-1
webapp-build-1-znk98   1/1       Running     0          3m        10.131.0.29   origin-node-1
[root@origin-master ~]#

Let’s check out endpoints and services:

[root@origin-master ~]# oc get ep
NAME           ENDPOINTS                           AGE
webapp-build   10.131.0.29:8080,10.131.0.29:8888   1m
[root@origin-master ~]# oc get svc
NAME           CLUSTER-IP     EXTERNAL-IP   PORT(S)             AGE
webapp-build   172.30.64.97           8080/TCP,8888/TCP   1m
[root@origin-master ~]#

Running a single pod is not great for redundancy, let’s scale out:

[root@origin-master ~]# oc scale --replicas=5 dc/webapp-build
deploymentconfig "webapp-build" scaled
[root@origin-master ~]#  oc get pod -o wide
NAME                   READY     STATUS      RESTARTS   AGE       IP            NODE
webapp-build-1-4fb98   1/1       Running     0          15s       10.130.0.47   origin-node-2
webapp-build-1-build   0/1       Completed   0          9m        10.131.0.27   origin-node-1
webapp-build-1-dw6ww   1/1       Running     0          15s       10.131.0.30   origin-node-1
webapp-build-1-lswhg   1/1       Running     0          15s       10.131.0.31   origin-node-1
webapp-build-1-z4nk9   1/1       Running     0          15s       10.130.0.46   origin-node-2
webapp-build-1-znk98   1/1       Running     0          4m        10.131.0.29   origin-node-1
[root@origin-master ~]#

We can check our endpoints and services again, and see that we have more endpoints and still one service:

[root@origin-master ~]# oc get ep
NAME           ENDPOINTS                                                        AGE
webapp-build   10.130.0.46:8080,10.130.0.47:8080,10.131.0.29:8080 + 7 more...   4m
[root@origin-master ~]# oc get svc
NAME           CLUSTER-IP     EXTERNAL-IP   PORT(S)             AGE
webapp-build   172.30.64.97           8080/TCP,8888/TCP   4m
[root@origin-master ~]#

OpenShift uses an internal DNS service called SkyDNS to expose services for internal communication:

[root@origin-master ~]# dig webapp-build.webapp.svc.cluster.local

; <<>> DiG 9.9.4-RedHat-9.9.4-61.el7 <<>> webapp-build.webapp.svc.cluster.local
;; global options: +cmd
;; Got answer:
;; ->>HEADER<<- opcode: QUERY, status: NOERROR, id: 20933
;; flags: qr aa rd ra; QUERY: 1, ANSWER: 1, AUTHORITY: 0, ADDITIONAL: 0

;; QUESTION SECTION:
;webapp-build.webapp.svc.cluster.local. IN A

;; ANSWER SECTION:
webapp-build.webapp.svc.cluster.local. 30 IN A	172.30.64.97

;; Query time: 1 msec
;; SERVER: 10.255.1.214#53(10.255.1.214)
;; WHEN: Sat Jun 30 08:58:19 UTC 2018
;; MSG SIZE  rcvd: 71

[root@origin-master ~]#
  • Let’s expose our web application so that it is accessible from the outside world:
[root@origin-master ~]# oc expose svc webapp-build
route "webapp-build" exposed
[root@origin-master ~]#

Connect with a browser to the URL you see under routes:

Modify the WebApp and inject variables via a config map into our application:

[root@origin-master ~]# oc create configmap webapp-map --from-literal=RESPONSE="My first OpenShift WebApp"
configmap "webapp-map" created
[root@origin-master ~]#

Afterwards we need to add the previously created config map to our environment

[root@origin-master ~]# oc env dc/webapp-build --from=configmap/webapp-map
deploymentconfig "webapp-build" updated
[root@origin-master ~]#

Now when we check our web application again you see that the new variables are injected into the pod and displayed:

I will share more about running OpenShift Container Platform and my experience in the coming month. I hope you find this article useful and please share your feedback and leave a comment.