With this article I wanted to focus on something different than the usual spine and leaf topology and talk about datacenter edge routing.
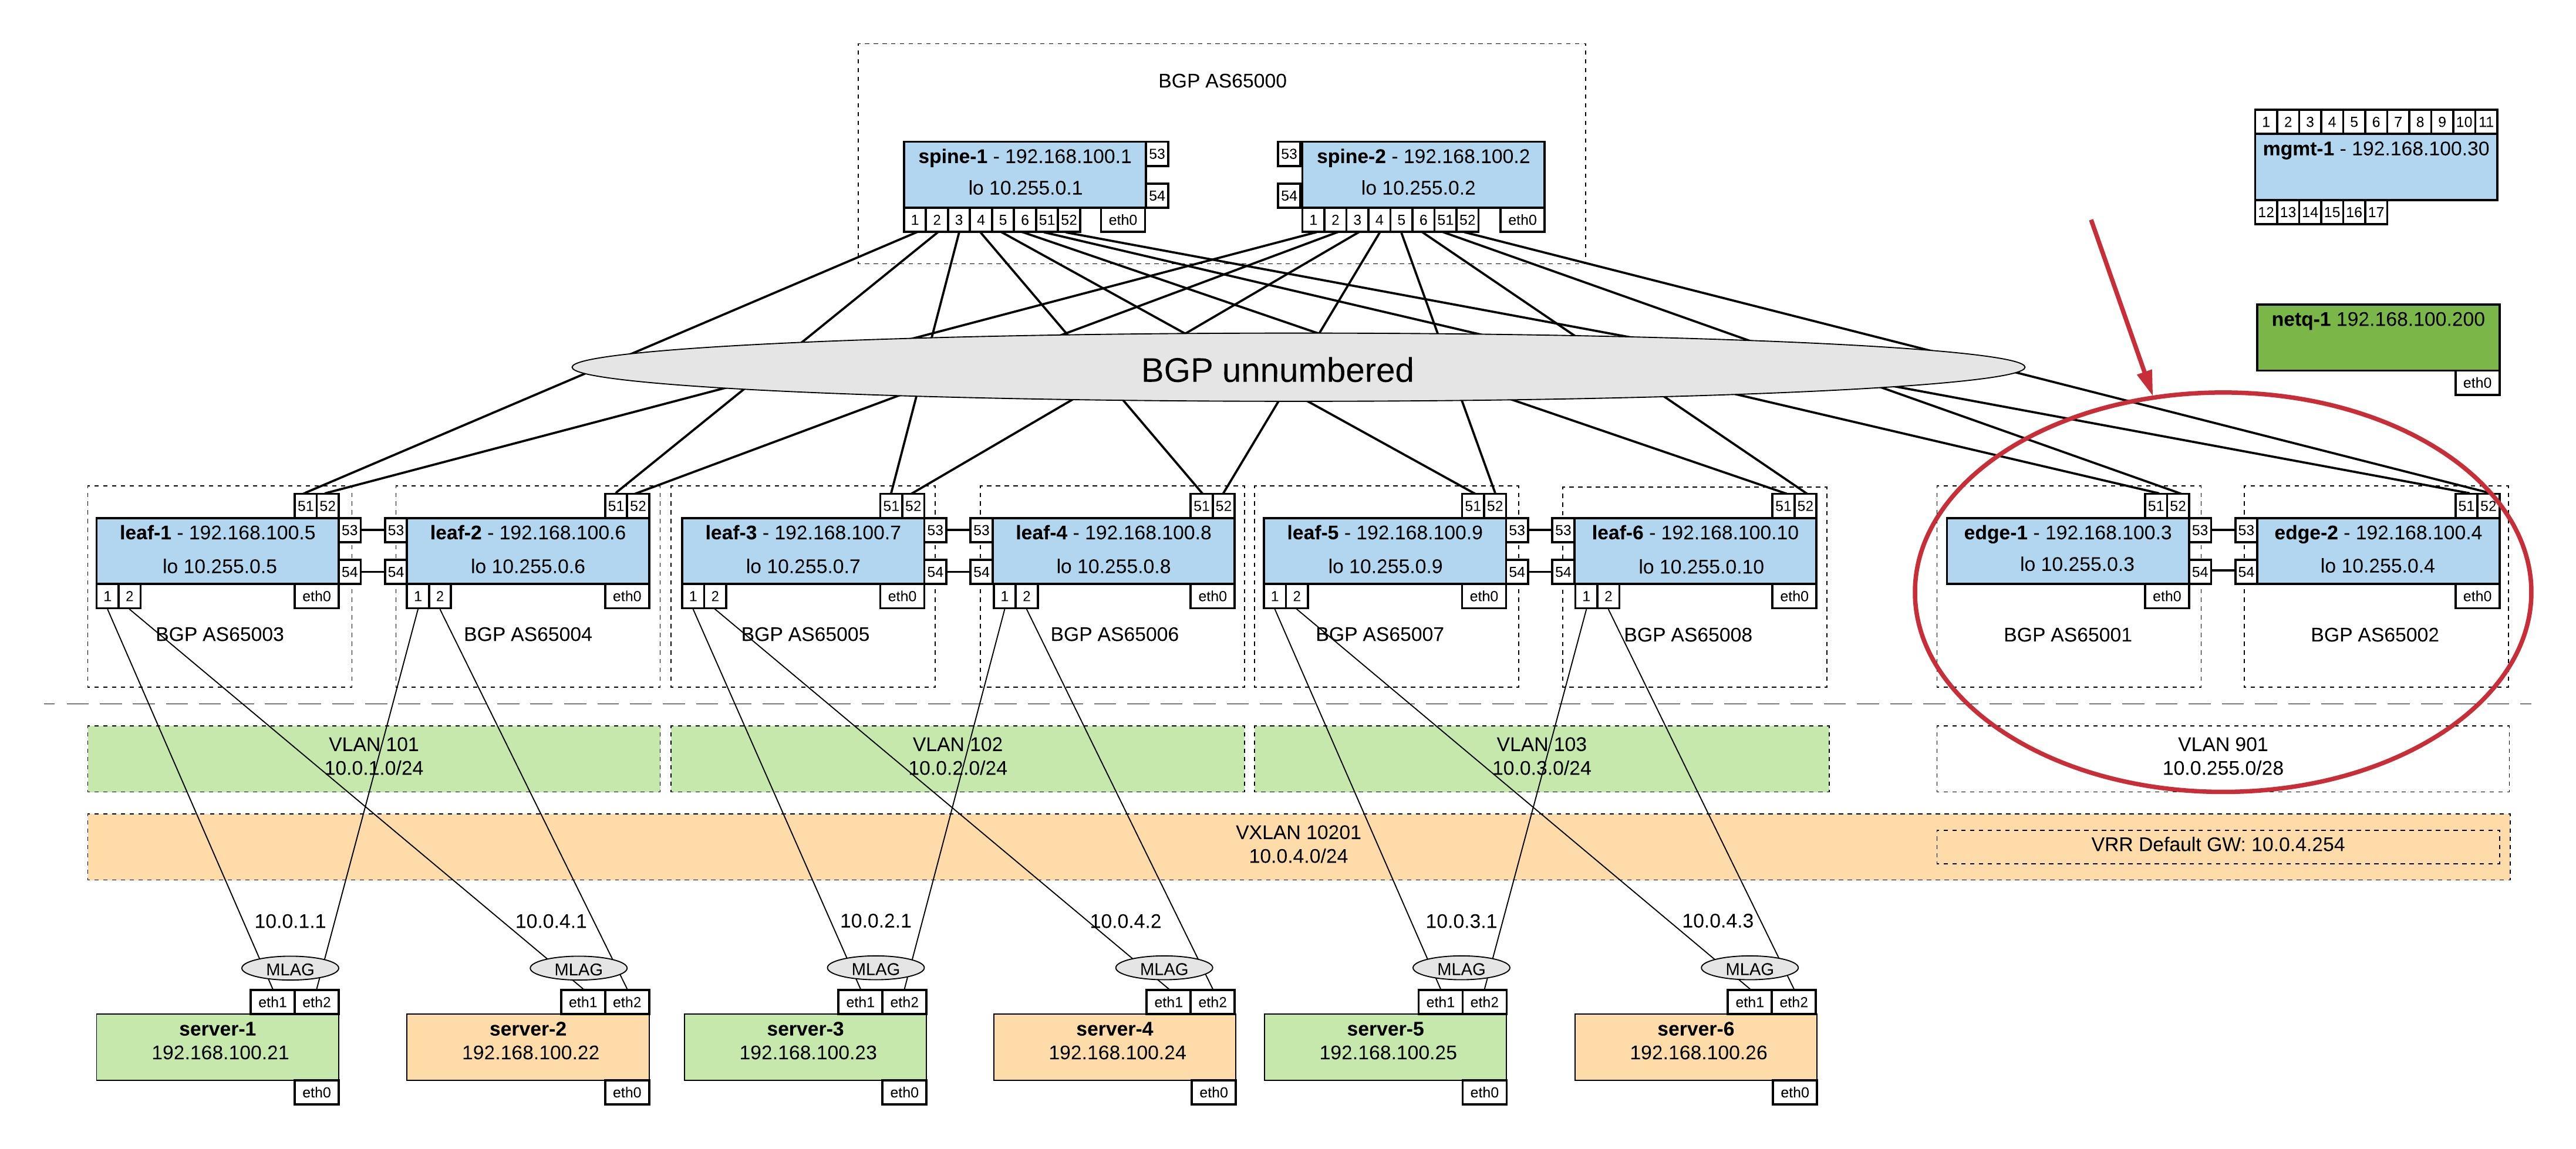
I was using Cisco routers for many years for Internet Edge and WAN connectivity. The problem with using a vendor like Cisco is the price tag you have to pay and there still might a reason for it to spend the money. But nowadays you get leased-lines handed over as normal Ethernet connection and using a dedicated routers maybe not always necessary if you are not getting too crazy with BGP routing or quality of service.
I was experimenting over the last weeks if I could use a Cumulus Linux switch as an Internet Edge and Wide Area Network router with running different VRFs for internet and WAN connectivity. I came up with the following edge network layout you see below:
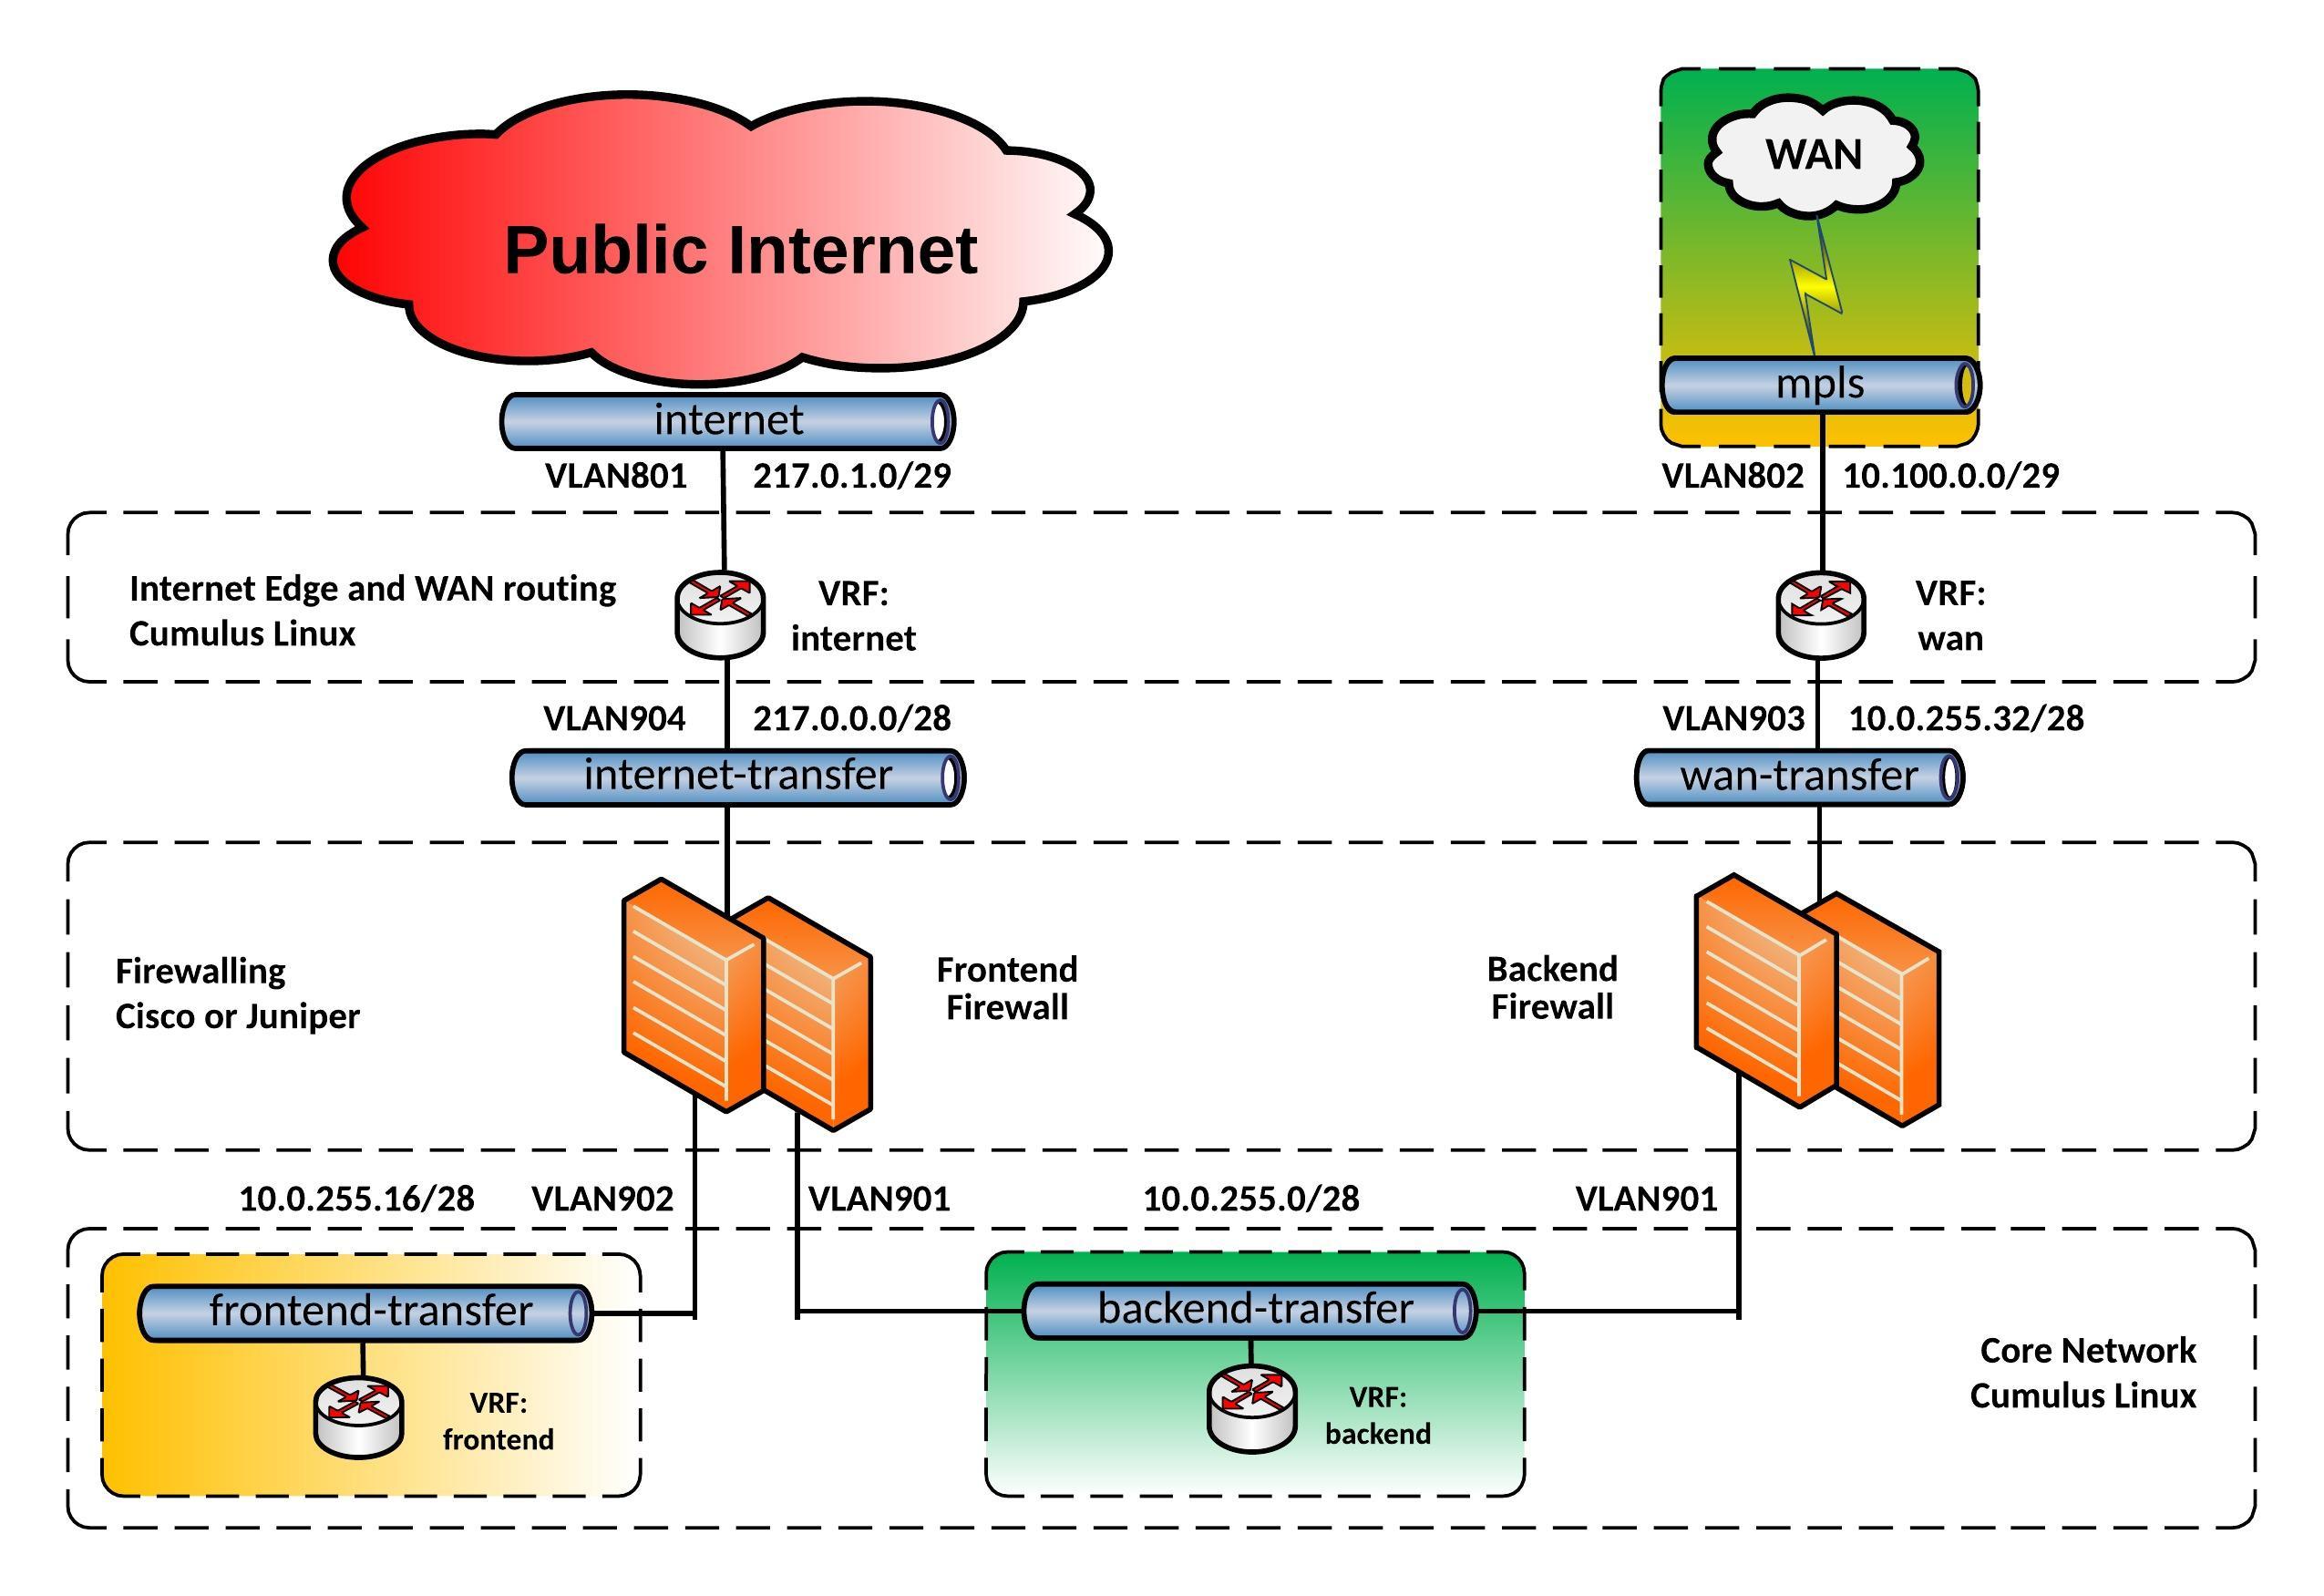
For this network, I build an Vagrant topology with Cumulus VX to simulate the edge routing and being able to test the connectivity. Below you see a more detailed view of the Vagrant topology:
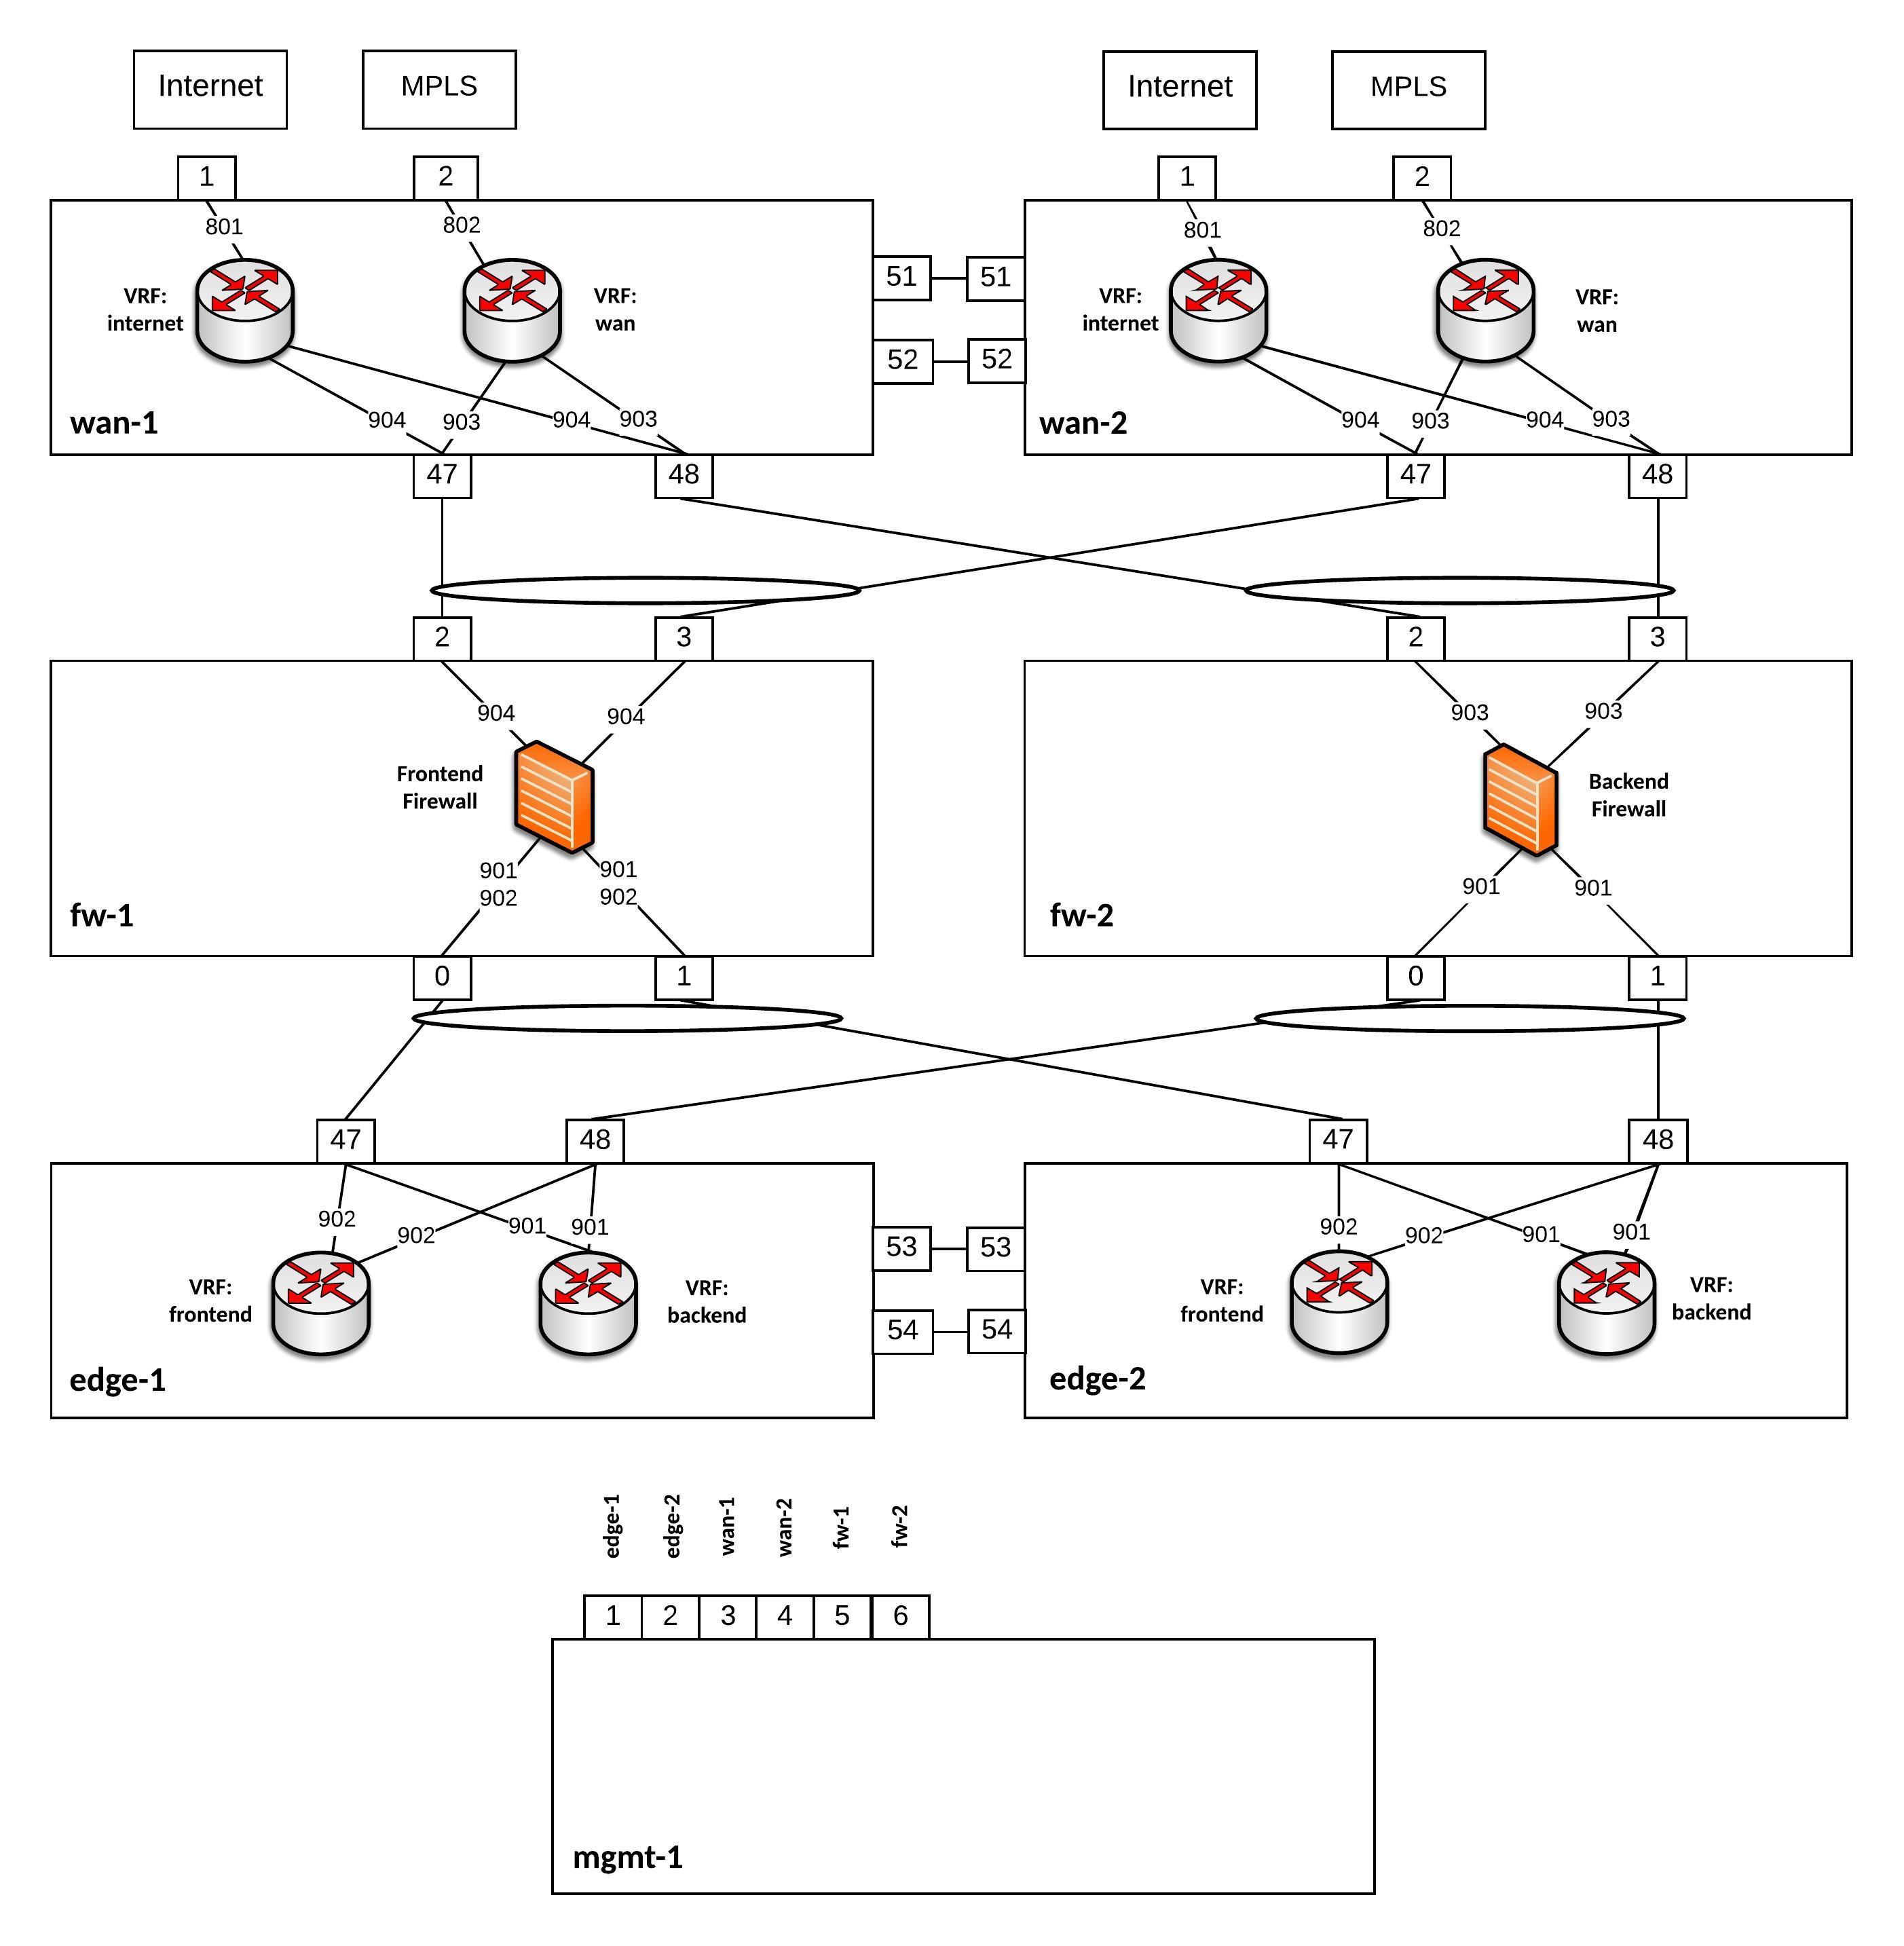
Everything is running on Cumulus VX even the firewalls because I just wanted to simulate the traffic flow and see if the network communication is functioning. Also having separate WAN switches might be useful because 1Gbit/s switches are cheaper then 40Gbit/s switches and you need additional SFP for 1Gbit/s connections, another point is to separate your layer 2 WAN connectivity from your internal datacenter network.
Here the assigned IP addresses for this lab:
wan-1 VLAN801 PIP: 217.0.1.2/29 VIP: 217.0.1.1/29
wan-2 VLAN801 PIP: 217.0.1.3/29 VIP: 217.0.1.1/29
wan-1 VLAN802 PIP: 10.100.0.1/29
wan-2 VLAN802 PIP: 10.100.0.2/29
wan-1 VLAN904 PIP: 217.0.0.2/28 VIP: 217.0.0.1/28
wan-2 VLAN904 PIP: 217.0.0.3/28 VIP: 217.0.0.1/28
fw-1 VLAN904 PIP: 217.0.0.14/28
wan-1 VLAN903 PIP: 10.0.255.34/28 VIP: 10.0.255.33/28
wan-2 VLAN903 PIP: 10.0.255.35/28 VIP: 10.0.255.33/28
fw-2 VLAN903 PIP: 10.0.255.46/28
edge-1 VLAN901 PIP: 10.0.255.2/28 VIP: 10.0.255.1/28
edge-2 VLAN901 PIP: 10.0.255.3/28 VIP: 10.0.255.1/28
fw-1 VLAN901 PIP: 10.0.255.14/28
fw-2 VLAN901 PIP: 10.0.255.12/28
edge-1 VLAN902 PIP: 10.0.255.18/28 VIP: 10.0.255.17/28
edge-2 VLAN902 PIP: 10.0.255.19/28 VIP: 10.0.255.17/28
fw-1 VLAN902 PIP: 10.0.255.30/28
You can find the Github repository for the Vagrant topology here: https://github.com/berndonline/cumulus-edge-vagrant
berndonline@lab:~/cumulus-edge-vagrant$ vagrant status
Current machine states:

fw-2                      running (libvirt)
fw-1                      running (libvirt)
mgmt-1                    running (libvirt)
edge-2                    running (libvirt)
edge-1                    running (libvirt)
wan-1                     running (libvirt)
wan-2                     running (libvirt)

This environment represents multiple VMs. The VMs are all listed
above with their current state. For more information about a specific
VM, run `vagrant status NAME`.
berndonline@lab:~/cumulus-edge-vagrant$
I wrote as well an Ansible Playbook to deploy the initial configuration which you can find here: https://github.com/berndonline/cumulus-edge-provision
Let’s execute the playbook:
berndonline@lab:~/cumulus-edge-vagrant$ ansible-playbook ../cumulus-edge-provision/site.yml

PLAY [edge] ********************************************************************************************************************************************************

TASK [switchgroups : create switch groups based on clag_pairs] *****************************************************************************************************
skipping: [edge-2] => (item=(u'wan', [u'wan-1', u'wan-2']))
skipping: [edge-1] => (item=(u'wan', [u'wan-1', u'wan-2']))
ok: [edge-2] => (item=(u'edge', [u'edge-1', u'edge-2']))
ok: [wan-1] => (item=(u'wan', [u'wan-1', u'wan-2']))
skipping: [wan-1] => (item=(u'edge', [u'edge-1', u'edge-2']))
ok: [edge-1] => (item=(u'edge', [u'edge-1', u'edge-2']))
ok: [wan-2] => (item=(u'wan', [u'wan-1', u'wan-2']))
skipping: [wan-2] => (item=(u'edge', [u'edge-1', u'edge-2']))

TASK [switchgroups : include switch group variables] ***************************************************************************************************************
skipping: [edge-2] => (item=(u'wan', [u'wan-1', u'wan-2']))
skipping: [edge-1] => (item=(u'wan', [u'wan-1', u'wan-2']))
ok: [wan-1] => (item=(u'wan', [u'wan-1', u'wan-2']))
skipping: [wan-1] => (item=(u'edge', [u'edge-1', u'edge-2']))
ok: [wan-2] => (item=(u'wan', [u'wan-1', u'wan-2']))
skipping: [wan-2] => (item=(u'edge', [u'edge-1', u'edge-2']))
ok: [edge-2] => (item=(u'edge', [u'edge-1', u'edge-2']))
ok: [edge-1] => (item=(u'edge', [u'edge-1', u'edge-2']))

...

RUNNING HANDLER [interfaces : reload networking] *******************************************************************************************************************
changed: [edge-2] => (item=ifreload -a)
changed: [edge-1] => (item=ifreload -a)
changed: [wan-1] => (item=ifreload -a)
changed: [wan-2] => (item=ifreload -a)
changed: [edge-2] => (item=sleep 10)
changed: [edge-1] => (item=sleep 10)
changed: [wan-2] => (item=sleep 10)
changed: [wan-1] => (item=sleep 10)

RUNNING HANDLER [routing : reload frr] *****************************************************************************************************************************
changed: [edge-2]
changed: [wan-1]
changed: [wan-2]
changed: [edge-1]

RUNNING HANDLER [ptm : restart ptmd] *******************************************************************************************************************************
changed: [edge-2]
changed: [edge-1]
changed: [wan-2]
changed: [wan-1]

RUNNING HANDLER [ntp : restart ntp] ********************************************************************************************************************************
changed: [wan-1]
changed: [edge-1]
changed: [wan-2]
changed: [edge-2]

RUNNING HANDLER [ifplugd : restart ifplugd] ************************************************************************************************************************
changed: [edge-1]
changed: [wan-1]
changed: [edge-2]
changed: [wan-2]

PLAY RECAP *********************************************************************************************************************************************************
edge-1                     : ok=21   changed=17   unreachable=0    failed=0
edge-2                     : ok=21   changed=17   unreachable=0    failed=0
wan-1                      : ok=21   changed=17   unreachable=0    failed=0
wan-2                      : ok=21   changed=17   unreachable=0    failed=0

berndonline@lab:~/cumulus-edge-vagrant$
At last but not least I wrote a simple Ansible Playbook for connectivity testing using ping what you can find here: https://github.com/berndonline/cumulus-edge-provision/blob/master/icmp_check.yml
berndonline@lab:~/cumulus-edge-vagrant$ ansible-playbook ../cumulus-edge-provision/check_icmp.yml

PLAY [exit edge] *********************************************************************************************************************************************************************************************************************

TASK [connectivity check from frontend firewall] *************************************************************************************************************************************************************************************
skipping: [fw-2] => (item=10.0.255.33)
skipping: [fw-2] => (item=10.0.255.17)
skipping: [fw-2] => (item=10.0.255.1)
skipping: [fw-2] => (item=217.0.0.1)
skipping: [edge-2] => (item=10.0.255.33)
skipping: [edge-2] => (item=10.0.255.17)
skipping: [edge-2] => (item=10.0.255.1)
skipping: [edge-1] => (item=10.0.255.33)
skipping: [edge-2] => (item=217.0.0.1)
skipping: [edge-1] => (item=10.0.255.17)
skipping: [edge-1] => (item=10.0.255.1)
skipping: [wan-1] => (item=10.0.255.33)
skipping: [edge-1] => (item=217.0.0.1)
skipping: [wan-1] => (item=10.0.255.17)
skipping: [wan-1] => (item=10.0.255.1)
skipping: [wan-1] => (item=217.0.0.1)
skipping: [wan-2] => (item=10.0.255.33)
skipping: [wan-2] => (item=10.0.255.17)
skipping: [wan-2] => (item=10.0.255.1)
skipping: [wan-2] => (item=217.0.0.1)
changed: [fw-1] => (item=10.0.255.33)
changed: [fw-1] => (item=10.0.255.17)
changed: [fw-1] => (item=10.0.255.1)
changed: [fw-1] => (item=217.0.0.1)
...
PLAY RECAP ***************************************************************************************************************************************************************************************************************************
edge-1                     : ok=2    changed=2    unreachable=0    failed=0
edge-2                     : ok=2    changed=2    unreachable=0    failed=0
fw-1                       : ok=1    changed=1    unreachable=0    failed=0
fw-2                       : ok=1    changed=1    unreachable=0    failed=0
wan-1                      : ok=2    changed=2    unreachable=0    failed=0
wan-2                      : ok=2    changed=2    unreachable=0    failed=0

berndonline@lab:~/cumulus-edge-vagrant$
The icmp check shows that in general the edge routing is working but I need to do some further testing with this if this can be used in a production environment.
If using switch hardware is not the right fit you can still install and use Free Range Routing (FRR) from Cumulus Networks on other Linux distributions and pick server hardware for your own custom edge router. I would only recommend checking Linux kernel support for VRF when choosing another Linux OS. Also have a look at my article about Open Source Routing GRE over IPSec with StrongSwan and Cisco IOS-XE where I build a Debian software router.
Please share your feedback and leave a comment.
