Host and Container Monitoring with SysDig

After my previous articles about troubleshooting and to validate OpenShift using Ansible, I wanted to continue and show how SysDig is helping you to identify potentials issues on your nodes or container platform before they occur.

The open source version is a simple but very powerful tool to inspect your linux host via the command line but it has no capabilities to centrally monitor or store capture information. The enterprise version provides these capabilities like a web console and centrally stores metrics, it is also able to trigger remote captures without the need to connect to the host.

Sysdig Open Source

Let’s install sysdig open source, here the official SysDig installation guide.

# Host install
curl -s https://s3.amazonaws.com/download.draios.com/stable/install-sysdig | sudo bash

# Alternatively the container based install
yum -y install kernel-devel-$(uname -r)
docker pull sysdig/sysdig
docker run -i -t --name sysdig --privileged -v /var/run/docker.sock:/host/var/run/docker.sock -v /dev:/host/dev -v /proc:/host/proc:ro -v /boot:/host/boot:ro -v /lib/modules:/host/lib/modules:ro -v /usr:/host/usr:ro sysdig/sysdig

The csysdig command is nice and user friendly menu driven interface to see real-time system call information of your host. To collect information from Kubernetes or OpenShift please use the option [-kK] like seen in the example below:

csysdig -k https://localhost:8443 -K /etc/origin/master/admin.crt:/etc/origin/master/admin.key
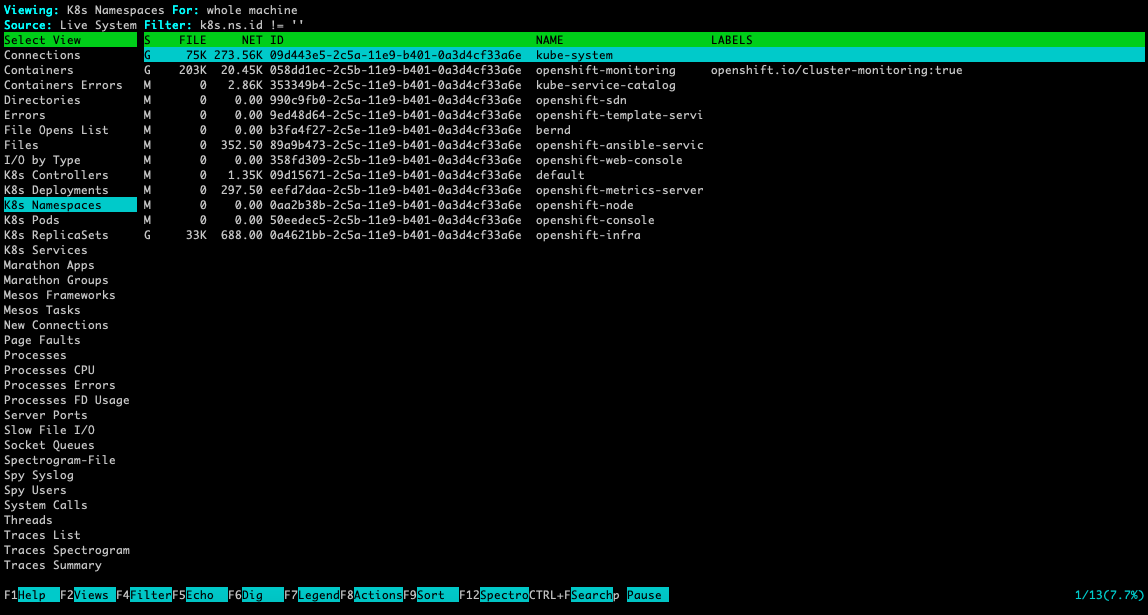
For more information about how to use csysdig please have a look at the manual or watch the short Youtube video.

The main sysdig command is showing output directly in the terminal session and you are able to apply filters (chisels) to more granularly see the system calls. Like with csysdig, the option [-kK] enabled Kubernetes integration:

sysdig -k https://localhost:8443 -K /etc/origin/master/admin.crt:/etc/origin/master/admin.key

Here some useful commands to inspect Kubernetes or OpenShift events:

# Monitor Kubernetes namespace ip communication:
sudo sysdig -A -s8192 "fd.type in (ipv4, ipv6) and (k8s.ns.name=<-NAMESPACE-NAME->)" -k https://localhost:8443 -K /etc/origin/master/admin.crt:/e/origin/master/admin.key

# Monitor namespace and pod name, the 2nd command filters to only show GET requests:
sudo sysdig -A -s8192 "fd.type in (ipv4, ipv6) and (k8s.ns.name=<-NAMESPACE-NAME-> and k8s.pod.name=<-POD-NAME->)" -k https://localhost:8443 -K /etc/origin/master/admin.crt:/etc/origin/master/admin.key
sudo sysdig -A -s8192 "fd.type in (ipv4, ipv6) and (k8s.ns.name=<-NAMESPACE-NAME-> and k8s.pod.name=<-POD-NAME->) and evt.buffer contai GET" -k https://localhost:8443 -K /etc/origin/master/admin.crt:/etc/origin/master/admin.key 

# Monitor ns and pod names and apply chisel echo_fds:
sudo sysdig -A -s8192 "fd.type in (ipv4, ipv6) and (k8s.ns.name=<-NAMESPACE-NAME-> and k8s.pod.name=<-POD-NAME->)" -c echo_fds -k https://localhost:8443 -K /etc/origin/master/admin.crt:/etc/origin/master/admin.key

SysDig example

This capture is an http request between an busybox pod (name: busybox-2-hjhq8 ip: 10.128.0.81) via service (name: hello-app-http ip: 172.30.43.111) to the hello-openshift pod (name: hello-app-http-1-8v57x ip: 10.128.0.77) in the namespace myproject. I use a simple “wget -S –spider http://hello-app-http/” to simulate the request:

# Command to capture ip communication in myproject namespace including dnsmasq and wget processes:
sudo sysdig -s2000 -A -pk "fd.type in (ipv4, ipv6) and (k8s.ns.name=myproject or proc.name=dnsmasq) or proc.name=wget" -k https://localhost:8443 -K /etc/origin/master/admin.crt:/etc/origin/master/admin.key

# Output:
70739 19:36:51.401062017 1 busybox-2-hjhq8 (4d84d98d46f1) wget (84856:26) < socket fd=3(<4>)
70741 19:36:51.401062878 1 busybox-2-hjhq8 (4d84d98d46f1) wget (84856:26) > connect fd=3(<4>)
70748 19:36:51.401072194 1 busybox-2-hjhq8 (4d84d98d46f1) wget (84856:26) < connect res=0 tuple=10.128.0.81:44993->172.26.11.254:53
70749 19:36:51.401074599 1 busybox-2-hjhq8 (4d84d98d46f1) wget (84856:26) > sendto fd=3(<4u>10.128.0.81:44993->172.26.11.254:53) size=60 tuple=NULL
71083 19:36:51.401575859 0  (host) dnsmasq (20933:20933) > recvmsg fd=6(<4u>172.26.11.254:53)
71087 19:36:51.401582008 0  (host) dnsmasq (20933:20933) < recvmsg res=60 size=60 data= hello-app-httpmyprojectsvcclusterlocal tuple=10.128.0.81:44993->172.26.11.254:53
71088 19:36:51.401584101 0  (host) dnsmasq (20933:20933) > ioctl fd=6(<4u>10.128.0.81:44993->172.26.11.254:53) request=8910 argument=7FFE208E30C0
71089 19:36:51.401586692 0  (host) dnsmasq (20933:20933) < ioctl res=0
71108 19:36:51.401623408 0  (host) dnsmasq (20933:20933) < socket fd=58(<4>)
71109 19:36:51.401624563 0  (host) dnsmasq (20933:20933) > fcntl fd=58(<4>) cmd=4(F_GETFL)
71110 19:36:51.401625584 0  (host) dnsmasq (20933:20933) < fcntl res=2(/dev/null)
71111 19:36:51.401626259 0  (host) dnsmasq (20933:20933) > fcntl fd=58(<4>) cmd=5(F_SETFL)
71112 19:36:51.401626825 0  (host) dnsmasq (20933:20933) < fcntl res=0(/dev/null)
71113 19:36:51.401627787 0  (host) dnsmasq (20933:20933) > bind fd=58(<4>)
71129 19:36:51.401680355 0  (host) dnsmasq (20933:20933) < bind res=0 addr=0.0.0.0:22969
71130 19:36:51.401681698 0  (host) dnsmasq (20933:20933) > sendto fd=58(<4u>0.0.0.0:22969) size=60 tuple=0.0.0.0:22969->127.0.0.1:53
71131 19:36:51.401715726 0  (host) dnsmasq (20933:20933) < sendto res=60 data=
hello-app-httpmyprojectsvcclusterlocal
71469 19:36:51.402632442 1  (host) dnsmasq (20933:20933) > recvfrom fd=58(<4u>127.0.0.1:53->127.0.0.1:22969) size=5131
71474 19:36:51.402636604 1  (host) dnsmasq (20933:20933) < recvfrom res=114 data=
hello-app-httpmyprojectsvcclusterlocal)<*nsdns)
hostmaster)\`tp :< tuple=127.0.0.1:53->0.0.0.0:22969
71479 19:36:51.402643363 1  (host) dnsmasq (20933:20933) > sendmsg fd=6(<4u>10.128.0.81:44993->172.26.11.254:53) size=114 tuple=172.26.11.254:53->10.128.0.81:44993
71492 19:36:51.402666311 1  (host) dnsmasq (20933:20933) < sendmsg res=114 data=
hello-app-httpmyprojectsvcclusterlocal)<*nsdns)
hostmaster)\`tp :<
71493 19:36:51.402668199 1  (host) dnsmasq (20933:20933) > close fd=58(<4u>127.0.0.1:53->127.0.0.1:22969)
71494 19:36:51.402669009 1  (host) dnsmasq (20933:20933) < close res=0
80786 19:36:51.430143868 1 busybox-2-hjhq8 (4d84d98d46f1) wget (84856:26) < sendto res=60 data= hello-app-httpmyprojectsvcclusterlocal 80793 19:36:51.430153453 1 busybox-2-hjhq8 (4d84d98d46f1) wget (84856:26) > recvfrom fd=3(<4u>10.128.0.81:44993->172.26.11.254:53) size=512
80794 19:36:51.430158626 1 busybox-2-hjhq8 (4d84d98d46f1) wget (84856:26) < recvfrom res=114 data=
hello-app-httpmyprojectsvcclusterlocal)<*nsdns)
hostmaster)\`tp :< tuple=NULL 80795 19:36:51.430160257 1 busybox-2-hjhq8 (4d84d98d46f1) wget (84856:26) > close fd=3(<4u>10.128.0.81:44993->172.26.11.254:53)
80796 19:36:51.430161712 1 busybox-2-hjhq8 (4d84d98d46f1) wget (84856:26) < close res=0
80835 19:36:51.430260103 1 busybox-2-hjhq8 (4d84d98d46f1) wget (84856:26) < socket fd=3(<4>)
80838 19:36:51.430261013 1 busybox-2-hjhq8 (4d84d98d46f1) wget (84856:26) > connect fd=3(<4>)
80840 19:36:51.430269080 1 busybox-2-hjhq8 (4d84d98d46f1) wget (84856:26) < connect res=0 tuple=10.128.0.81:41405->172.26.11.254:53
80841 19:36:51.430271011 1 busybox-2-hjhq8 (4d84d98d46f1) wget (84856:26) > sendto fd=3(<4u>10.128.0.81:41405->172.26.11.254:53) size=60 tuple=NULL
80874 19:36:51.430433333 1  (host) dnsmasq (20933:20933) > recvmsg fd=6(<4u>10.128.0.81:44993->172.26.11.254:53)
80879 19:36:51.430439631 1  (host) dnsmasq (20933:20933) < recvmsg res=60 size=60 data= hello-app-httpmyprojectsvcclusterlocal tuple=10.128.0.81:41405->172.26.11.254:53
80881 19:36:51.430454839 1  (host) dnsmasq (20933:20933) > ioctl fd=6(<4u>10.128.0.81:41405->172.26.11.254:53) request=8910 argument=7FFE208E30C0
80885 19:36:51.430457716 1  (host) dnsmasq (20933:20933) < ioctl res=0
80895 19:36:51.430493317 1  (host) dnsmasq (20933:20933) < socket fd=58(<4>)
80896 19:36:51.430494522 1  (host) dnsmasq (20933:20933) > fcntl fd=58(<4>) cmd=4(F_GETFL)
80897 19:36:51.430495527 1  (host) dnsmasq (20933:20933) < fcntl res=2(/dev/null)
80898 19:36:51.430496189 1  (host) dnsmasq (20933:20933) > fcntl fd=58(<4>) cmd=5(F_SETFL)
80899 19:36:51.430496769 1  (host) dnsmasq (20933:20933) < fcntl res=0(/dev/null)
80900 19:36:51.430497538 1  (host) dnsmasq (20933:20933) > bind fd=58(<4>)
80913 19:36:51.430551876 1  (host) dnsmasq (20933:20933) < bind res=0 addr=0.0.0.0:64640
80914 19:36:51.430553226 1  (host) dnsmasq (20933:20933) > sendto fd=58(<4u>0.0.0.0:64640) size=60 tuple=0.0.0.0:64640->127.0.0.1:53
80922 19:36:51.430581962 1  (host) dnsmasq (20933:20933) < sendto res=60 data=
:=hello-app-httpmyprojectsvcclusterlocal
81032 19:36:51.430806106 1  (host) dnsmasq (20933:20933) > recvfrom fd=58(<4u>127.0.0.1:53->127.0.0.1:64640) size=5131
81035 19:36:51.430809074 1  (host) dnsmasq (20933:20933) < recvfrom res=76 data= :=hello-app-httpmyprojectsvcclusterlocal+o tuple=127.0.0.1:53->0.0.0.0:64640
81040 19:36:51.430818116 1  (host) dnsmasq (20933:20933) > sendmsg fd=6(<4u>10.128.0.81:41405->172.26.11.254:53) size=76 tuple=172.26.11.254:53->10.128.0.81:41405
81051 19:36:51.430840305 1  (host) dnsmasq (20933:20933) < sendmsg res=76 data=
hello-app-httpmyprojectsvcclusterlocal+o
81052 19:36:51.430842129 1  (host) dnsmasq (20933:20933) > close fd=58(<4u>127.0.0.1:53->127.0.0.1:64640)
81053 19:36:51.430842956 1  (host) dnsmasq (20933:20933) < close res=0
84676 19:36:51.436248790 1 busybox-2-hjhq8 (4d84d98d46f1) wget (84856:26) < sendto res=60 data= hello-app-httpmyprojectsvcclusterlocal 84683 19:36:51.436254334 1 busybox-2-hjhq8 (4d84d98d46f1) wget (84856:26) > recvfrom fd=3(<4u>10.128.0.81:41405->172.26.11.254:53) size=512
84684 19:36:51.436256892 1 busybox-2-hjhq8 (4d84d98d46f1) wget (84856:26) < recvfrom res=76 data= hello-app-httpmyprojectsvcclusterlocal+o tuple=NULL 84685 19:36:51.436264998 1 busybox-2-hjhq8 (4d84d98d46f1) wget (84856:26) > close fd=3(<4u>10.128.0.81:41405->172.26.11.254:53)
84686 19:36:51.436265743 1 busybox-2-hjhq8 (4d84d98d46f1) wget (84856:26) < close res=0
85420 19:36:51.437492301 1 busybox-2-hjhq8 (4d84d98d46f1) wget (84856:26) < socket fd=3(<4>)
85421 19:36:51.437493337 1 busybox-2-hjhq8 (4d84d98d46f1) wget (84856:26) > connect fd=3(<4>)
86222 19:36:51.438494771 1 busybox-2-hjhq8 (4d84d98d46f1) wget (84856:26) < connect res=0 tuple=10.128.0.81:39656->172.30.43.111:80
86226 19:36:51.438497506 1 busybox-2-hjhq8 (4d84d98d46f1) wget (84856:26) > fcntl fd=3(<4t>10.128.0.81:39656->172.30.43.111:80) cmd=4(F_GETFL)
86228 19:36:51.438498484 1 busybox-2-hjhq8 (4d84d98d46f1) wget (84856:26) < fcntl res=2(/dev/pts/1)
86229 19:36:51.438499943 1 busybox-2-hjhq8 (4d84d98d46f1) wget (84856:26) > ioctl fd=3(<4t>10.128.0.81:39656->172.30.43.111:80) request=5401 argument=7FFDBF5E434C
86233 19:36:51.438501658 1 busybox-2-hjhq8 (4d84d98d46f1) wget (84856:26) < ioctl res=-25(ENOTTY) 86242 19:36:51.438509833 1 busybox-2-hjhq8 (4d84d98d46f1) wget (84856:26) > write fd=3(<4t>10.128.0.81:39656->172.30.43.111:80) size=105
86285 19:36:51.438557309 1 busybox-2-hjhq8 (4d84d98d46f1) wget (84856:26) < write res=105 data= GET / HTTP/1.1 Host: hello-app-http.myproject.svc.cluster.local User-Agent: Wget Connection: close 86291 19:36:51.438561615 1 busybox-2-hjhq8 (4d84d98d46f1) wget (84856:26) > read fd=3(<4t>10.128.0.81:39656->172.30.43.111:80) size=4096
107714 19:36:51.478518400 0 hello-app-http-1-8v57x (5145dc0ea61e) hello-openshift (11185:7) < accept fd=6(<4t>10.128.0.81:39656->10.128.0.77:8080) tuple=10.128.0.81:39656->10.128.0.77:8080 queuepct=0 queuelen=0 queuemax=128
107772 19:36:51.478636516 0 hello-app-http-1-8v57x (5145dc0ea61e) hello-openshift (11185:7) > read fd=6(<4t>10.128.0.81:39656->10.128.0.77:8080) size=4096
107773 19:36:51.478640241 0 hello-app-http-1-8v57x (5145dc0ea61e) hello-openshift (11185:7) < read res=105 data= GET / HTTP/1.1 Host: hello-app-http.myproject.svc.cluster.local User-Agent: Wget Connection: close 107857 19:36:51.478817861 0 hello-app-http-1-8v57x (5145dc0ea61e) hello-openshift (11185:7) > write fd=6(<4t>10.128.0.81:39656->10.128.0.77:8080) size=153
107869 19:36:51.478870349 0 hello-app-http-1-8v57x (5145dc0ea61e) hello-openshift (11185:7) < write res=153 data= HTTP/1.1 200 OK Date: Sun, 10 Feb 2019 19:36:51 GMT Content-Length: 17 Content-Type: text/plain; charset=utf-8 Connection: close Hello OpenShift! 107886 19:36:51.478892928 0 hello-app-http-1-8v57x (5145dc0ea61e) hello-openshift (11185:7) > close fd=6(<4t>10.128.0.81:39656->10.128.0.77:8080)
107887 19:36:51.478893676 0 hello-app-http-1-8v57x (5145dc0ea61e) hello-openshift (11185:7) < close res=0
107899 19:36:51.478998208 0 busybox-2-hjhq8 (4d84d98d46f1) wget (84856:26) < read res=153 data= HTTP/1.1 200 OK Date: Sun, 10 Feb 2019 19:36:51 GMT Content-Length: 17 Content-Type: text/plain; charset=utf-8 Connection: close Hello OpenShift! 108908 19:36:51.480114626 0 busybox-2-hjhq8 (4d84d98d46f1) wget (84856:26) > close fd=3(<4t>10.128.0.81:39656->172.30.43.111:80)
108910 19:36:51.480115482 0 busybox-2-hjhq8 (4d84d98d46f1) wget (84856:26) < close res=0
112966 19:36:51.488041049 0 hello-app-http-1-8v57x (5145dc0ea61e) hello-openshift (11183:6) < accept fd=6(<4t>10.128.0.1:55052->10.128.0.77:8080) tuple=10.128.0.1:55052->10.128.0.77:8080 queuepct=0 queuelen=0 queuemax=128
113001 19:36:51.488096304 0 hello-app-http-1-8v57x (5145dc0ea61e) hello-openshift (11183:6) > read fd=6(<4t>10.128.0.1:55052->10.128.0.77:8080) size=4096
113002 19:36:51.488098693 0 hello-app-http-1-8v57x (5145dc0ea61e) hello-openshift (11183:6) < read res=0 data= 113005 19:36:51.488105730 0 hello-app-http-1-8v57x (5145dc0ea61e) hello-openshift (11183:6) > close fd=6(<4t>10.128.0.1:55052->10.128.0.77:8080)
113006 19:36:51.488106302 0 hello-app-http-1-8v57x (5145dc0ea61e) hello-openshift (11183:6) < close res=0

Below a list of some more useful sysdig cli examples:

# Sysdig Chisels and Filters:
sudo sysdig -cl

# To find out more information about a particular chisel:
sudo sysdig -i lscontainers

# To view a list of available field classes, fields and their description:
sudo sysdig -l

# Create and write sysdig trace files, 2nd option sets byte limit for trace file:
sudo sysdig -w mytrace.scap
sudo sysdig -s 8192 -w trace.scap 

# Read sysdig trace files, 2nd option read and filter based on proc.name:
sudo sysdig -r trace.scap
sudo sysdig -r trace.scap proc.name=dnsmasq

# Monitor linux processes:
sudo sysdig -c ps

# Monitor linux processes by CPU utilisation:
sudo sysdig -c topprocs_cpu

# Monitor network connections:
sudo sysdig -c netstat
sudo sysdig -c topconns
sudo sysdig -c topprocs_net

# Monitor system file i/o:
sudo sysdig -c echo_fds
sudo sysdig -c topprocs_file

# Troubleshoot system performance:
sudo sysdig -c bottlenecks

# Monitor process execution time
sudo sysdig -c proc_exec_time 

# Monitor network i/o performance
sudo sysdig -c netlower 1

# Watch log entries
sudo sysdig -c spy_logs

# Monitor http requests:
sudo sysdig -c httplog    
sudo sysdig -c httptop [Print Top HTTP Requests] 

SysDig Monitor Enterprise

The paid enterprise version provides a web console to centrally access metrics and events from your fleet of monitored nodes.
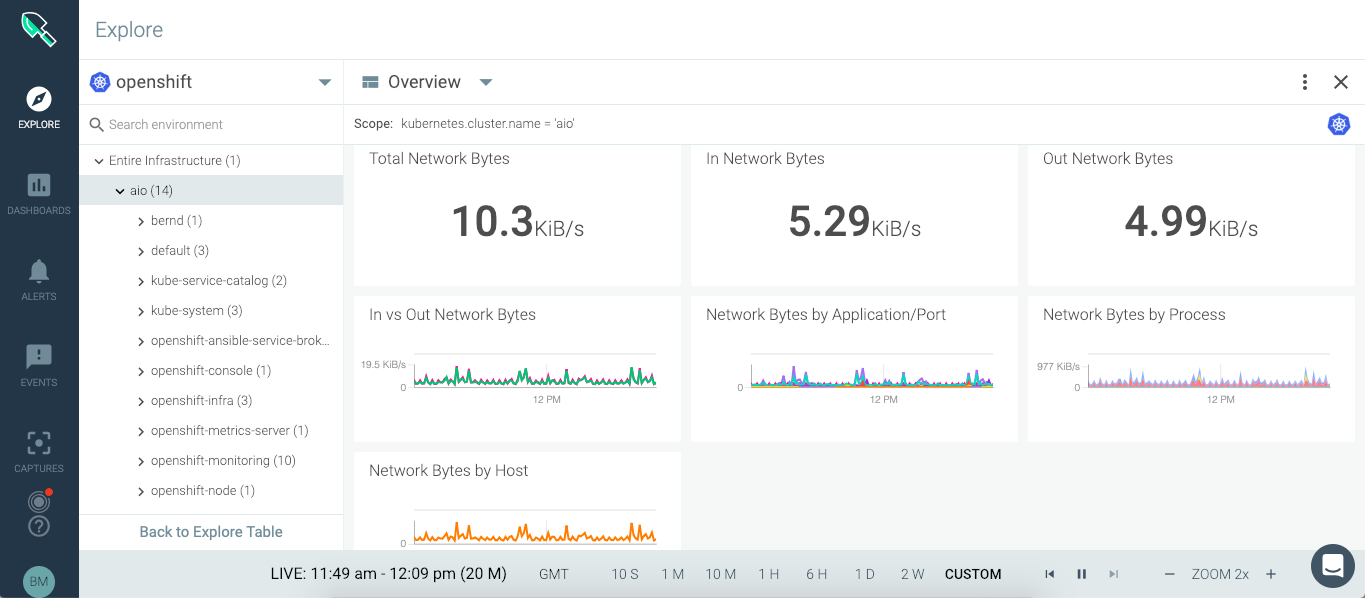
You can run SysDig enterprise directly on OpenShift as DaemonSet and deploy the agent to all nodes in the cluster. For more detailed information about Kubernetes or OpenShift installation, read the official documentation.

oc adm new-project sysdig-agent --node-selector='app=sysdig-agent'
oc project sysdig-agent
oc label node --all "app=sysdig-agent"
oc create serviceaccount sysdig-agent
oc adm policy add-scc-to-user privileged -n sysdig-agent -z sysdig-agent
oc adm policy add-cluster-role-to-user cluster-reader -n sysdig-agent -z sysdig-agent

wget https://raw.githubusercontent.com/draios/sysdig-cloud-scripts/master/agent_deploy/kubernetes/sysdig-agent-daemonset-v2.yaml
wget https://raw.githubusercontent.com/draios/sysdig-cloud-scripts/master/agent_deploy/kubernetes/sysdig-agent-configmap.yaml
oc create secret generic sysdig-agent --from-literal=access-key=<-YOUR-ACCESS-KEY->

# Edit sysdig-agent-daemonset-v2.yaml to uncomment the line: serviceAccount: sysdig-agent and edit sysdig-agent-configmap.yaml to uncomment the line: new_k8s: true
# This allows kube-state-metrics to be automatically detected, monitored, and displayed in Sysdig Monitor. 
# Edit sysdig-agent-configmap.yaml to uncomment the line: k8s_cluster_name: and add your cluster name.

oc create -f sysdig-agent-daemonset-v2.yaml
oc create -f sysdig-agent-configmap.yaml

SysDig is a great tool to monitor and even further provides you the possibility to troubleshoot in depth your linux hosts and container platforms.
OpenShift Container Platform Troubleshooting Guide

On the first look OpenShift/Kubernetes seems like a very complex platform but once you start to get to know the different components and what they are doing, you will see it gets easier and easier. The purpose of this article to give you an every day guide based on my experience on how to successfully troubleshoot issues on OpenShift.

  • OpenShift service logging
# OpenShift 3.1 to OpenShift 3.9:
/etc/sysconfig/atomic-openshift-master-controllers
/etc/sysconfig/atomic-openshift-master-api
/etc/sysconfig/atomic-openshift-node

# OpenShift 3.10 and later versions:
/etc/origin/master/master.env # for API and Controllers
/etc/sysconfig/atomic-openshift-node

The log levels for the OpenShift services can be controlled via the –loglevel parameter in the service options.

0 – Errors and warnings only
2 – Normal information
4 – Debugging information
6 – API- debugging information (request / response)
8 – Body API debugging information

For example add or edit the line in /etc/sysconfig/atomic-openshift-node to OPTIONS=’–loglevel=4′ and afterward restart the service with systemctl restart atomic-openshift-node.

Viewing OpenShift service logs:

# OpenShift 3.1 to OpenShift 3.9:
journalctl -u atomic-openshift-master-api
journalctl -u atomic-openshift-master-controllers
journalctl -u atomic-openshift-node
journalctl -u etcd # or 'etcd_container' for containerized install

# OpenShift 3.10 and later versions:
/usr/local/bin/master-logs api api
/usr/local/bin/master-logs controllers controllers
/usr/local/bin/master-logs etcd etcd
journalctl -u atomic-openshift-node
  • Docker service logging

Change the docker daemon log level and add the parameter –log-level for the OPTIONS variable in dockers service file located in /etc/sysconfig/docker.

The available log levels are: ( debug, info, warn, error, fatal )

See the example below; to enable debug logging in /etc/sysconfig/docker to set log level equal to debug (After making the changes on the docker service you need to will restart with systemctl restart docker.):

OPTIONS='--insecure-registry=172.30.0.0/16 --selinux-enabled --log-level=debug'
  • OC command logging

The oc and oadm command also accept a loglevel option that can help get additional information. Value between 6 and 8 will provide extensive logging, API requests (loglevel 6), API headers (loglevel 7) and API responses received (loglevel 8):

oc whoami --loglevel=8
  • OpenShift SkyDNS

SkyDNS is the internal service discovery for OpenShift and DNS is important for OpenShift to function:

# Test full qualified cluster domain name
nslookup docker-registry.default.svc.cluster.local
# OR
dig +short docker-registry.default.svc.cluster.local

# Check if clusterip match the previous result
oc get svc/docker-registry -n default

# Test short name
nslookup docker-registry.default.svc
nslookup <endpoint-name>.<project-name>.svc

If short name doesn’t work look out if cluster.local is missing in dns search suffix. If resolution doesn’t work at all before enable debug logging, check if Dnsmasq service running and correctly configured. OpenShift uses a dispatcher script to maintain the DNS configuration of a node.

Add the options “–logspec ‘dns=10’” to the /etc/sysconfig/atomic-openshift-node service configuration on a node running skydns and restart the atomic-openshift-node service afterwards. There will then be skydns debug information in the journalctl logs.

OPTIONS="--loglevel=2 --logspec dns*=10"
  • OpenShift Master API and Web Console

In the following example, the internal-master.domain.com is used by the internal cluster, and the master.domain.com is used by external clients

# Run the following commands on any node host
curl https://internal-master.domain.com:443/version
curl -k https://master.domain.com:443/healthz

# The OpenShift API service runs on all master instances. To see the status of the service, view the master-api pods in the kube-system project:
oc get pod -n kube-system -l openshift.io/component=api
oc get pod -n kube-system -o wide
curl -k --insecure https://$HOSTNAME:8443/healthz
  • OpenShift Controller role

The OpenShift Container Platform controller service is available on all master nodes. The service runs in active/passive mode, which means it should only be running on one master.

# Verify the master host running the controller service
oc get -n kube-system cm openshift-master-controllers -o yaml
    • OpenShift Certificates

During the installation of OpenShift the playbooks generates a CA to sign every certificate in the cluster. One of the most common issues are expired node certificates. Below are a list of important certificate files:

# Is the OpenShift Certificate Authority, and it signs every other certificate unless specified otherwise.
/etc/origin/master/ca.crt

# Contains a bundle with the current and the old CA's (if exists) to trust them all. If there has been only one ca.crt, then this file is the same as ca.crt.
/etc/origin/master/ca-bundle.crt

# The internal API, also known as cluster internal address or the variable masterURL here all the internal components authenticates to access the API, such as nodes, routers and other services.
/etc/origin/master/master.server.crt

# Master controller certificate authenticates to kubernetes as a client using the admin.kubeconfig
/etc/origin/master/admin.crt

# Node certificates
/etc/origin/node/ca.crt                   # to be able to trust the API, a copy of masters CA bundle is placed in:
/etc/origin/node/server.crt               # to secure this communication
/etc/origin/node/system:node:{fqdn}.crt   # Nodes needs to authenticate to the Kubernetes API as a client. 

# Etcd certificates
/etc/etcd/ca.crt                          # is the etcd CA, it is used to sign every certificate.
/etc/etcd/server.crt                      # is used by the etcd to listen to clients.
/etc/etcd/peer.crt                        # is used by etcd to authenticate as a client.

# Master certificates to auth to etcd
/etc/origin/master/master.etcd-ca.crt     # is a copy of /etc/etcd/ca.crt. Used to trust the etcd cluster.
/etc/origin/master/master.etcd-client.crt # is used to authenticate as a client of the etcd cluster.

# Services ca certificate. All self-signed internal certificates are signed by this CA.
/etc/origin/master/service-signer.crt

Here’s an example to check the validity of the master server certificate:

cat /etc/origin/master/master.server.crt | openssl x509 -text | grep -i Validity -A2
# OR
openssl x509 -enddate -noout -in /etc/origin/master/master.server.crt

It’s worth checking the documentation about how to re-deploy certificates on OpenShift.

  • OpenShift etcd

On the etcd node (master) set source to etcd.conf file for most of the needed variables.

source /etc/etcd/etcd.conf
export ETCDCTL_API=3

# Set endpoint variable to include all etcd endpoints
ETCD_ALL_ENDPOINTS=` etcdctl  --cert=$ETCD_PEER_CERT_FILE --key=$ETCD_PEER_KEY_FILE --cacert=$ETCD_TRUSTED_CA_FILE --endpoints=$ETCD_LISTEN_CLIENT_URLS --write-out=fields   member list | awk '/ClientURL/{printf "%s%s",sep,$3; sep=","}'`

# Cluster status and health checks
etcdctl  --cert=$ETCD_PEER_CERT_FILE --key=$ETCD_PEER_KEY_FILE --cacert=$ETCD_TRUSTED_CA_FILE --endpoints=$ETCD_LISTEN_CLIENT_URLS --write-out=table  member list
etcdctl  --cert=$ETCD_PEER_CERT_FILE --key=$ETCD_PEER_KEY_FILE --cacert=$ETCD_TRUSTED_CA_FILE --endpoints=$ETCD_ALL_ENDPOINTS  --write-out=table endpoint status
etcdctl  --cert=$ETCD_PEER_CERT_FILE --key=$ETCD_PEER_KEY_FILE --cacert=$ETCD_TRUSTED_CA_FILE --endpoints=$ETCD_ALL_ENDPOINTS endpoint health

Check etcd database key entries:

etcdctl  --cert=$ETCD_PEER_CERT_FILE --key=$ETCD_PEER_KEY_FILE --cacert=$ETCD_TRUSTED_CA_FILE --endpoints="https://$(hostname):2379" get /openshift.io --prefix --keys-only
  • OpenShift Registry

To get detailed information about the pods running the internal registry run the following command:

oc get pods -n default | grep registry | awk '{ print $1 }' | xargs -i oc describe pod {}

For a basic health check that the internal registry is running and responding you need to “curl” the /healthz path. Normally this should return a 200 HTTP response:

Registry=$(oc get svc docker-registry -n default -o 'jsonpath={.spec.clusterIP}:{.spec.ports[0].port}')

curl -vk $Registry/healthz
# OR
curl -vk https://$Registry/healthz

If a persistent volume is attached to the registry make sure that the registry can write to the volume.

oc project default 
oc rsh `oc get pods -o name -l docker-registry`

$ touch /registry/test-file
$ ls -la /registry/ 
$ rm /registry/test-file
$ exit

If the registry is insecure make sure you have edited the /etc/sysconfig/docker file and add –insecure-registry 172.30.0.0/16 to the OPTIONS parameter on the nodes.

For more information about testing the internal registry please have a look at the documentation about Accessing the Registry.

  • OpenShift Router 

To increase the log level for OpenShift router pod, set loglevel=4 in the container args:

# Increase logging level
oc patch dc -n default router -p '[{"op": "add", "path": "/spec/template/spec/containers/0/args", "value":["--loglevel=4"]}]' --type=json 

# View logs
oc logs <router-pod-name> -n default

# Remove logging change 
oc patch dc -n default router -p '[{"op": "remove", "path": "/spec/template/spec/containers/0/args", "value":["--loglevel=4"]}]' --type=json

OpenShift router image version 3.3 and later, the logging for http requests can be forwarded to an external syslog server:

oc set env dc/router ROUTER_SYSLOG_ADDRESS=<syslog-server-ip> ROUTER_LOG_LEVEL=debug

If you are facing issues with ingress routes to your application run the below command to collect more information:

oc logs dc/router -n default
oc get dc/router -o yaml -n default
oc get route <route-name> -n <project-name> 
oc get endpoints --all-namespaces 
oc exec -it <router-pod-name> -- ls -la 
oc exec -it <router-pod-name> -- find /var/lib/haproxy -regex ".*\(.map\|config.*\|.json\)" -print -exec cat {} \; > haproxy_configs_and_maps

Check if your application domain is /paas.domain.com/ and dig for an ANSWER containing the load balancer VIP address:

dig \*.paas.domain.com

Confirm that certificates are being severed out correctly by running the following:

echo -n | openssl s_client -connect :443 -servername myapp.paas.domain.com 2>&1 | openssl x509 -noout -text
curl -kv https://myapp.paas.domain.com 
  • OpenShift SDN

Please checkout the official Troubleshooting OpenShift SDN documentation

To get OpenFlow table export, connect to the openvswitch container and run following command:

docker exec openvswitch ovs-ofctl -O OpenFlow13 dump-flows br0
  • OpenShift Namespace events

Useful to collect events from the namespace to identify pod creation issues before you did in the container logs:

oc get events [-n |--all-namespaces]

In the default namespace you find relevant events for monitoring or auditing a cluster, such as Node and resource events related to the OpenShift platform.

  • OpenShift Pod and Container Logs

Container/pod logs can be viewed using the OpenShift oc command line. Add option “-p” to print the logs for the previous instance of the container in a pod if it exists and add option “-f” to stream the logs:

oc logs <pod-name> [-f]

The logs are saved to the worker nodes disk where the container/pod is running and it is located at:
/var/lib/docker/containers/<container-id>/<container-id>-json.log.

For setting the log file limits for containers on a worker node the –log-opt can be configured with max-size and max-file so that a containers logs are rolled over:

# cat /etc/sysconfig/docker 
OPTIONS='--insecure-registry=172.30.0.0/16 --selinux-enabled --log-opt max-size=50m --log-opt max-file=5'

# Restart docker service for the changes to take effect.
systemctl restart docker 

To remove all logs from a given container run the following commands:

cat /dev/null > /var/lib/docker/containers/<container-id>/<container-id>-json.log
# OR
cat /dev/null >  $(docker inspect --format='{{.LogPath}}' <container-id> )

To generate a list of the largest files run the following commands:

# Log files
find /var/lib/docker/ -name "*.log" -exec ls -sh {} \; | sort -n -r | head -20

# All container files
du -aSh /var/lib/docker/ | sort -n -r | head -n 10

Finding out the veth# interface of a docker container and use tcpdump to capture traffic more easily. The iflink of the container is the same as the ifindex of the veth#. You can get the iflink of the container as follows:

docker exec -it <container-name>  bash -c 'cat /sys/class/net/eth0/iflink'

# Let's say that the results in 14, then grep for 14
grep -l 14 /sys/class/net/veth*/ifindex

# Which will give a unique result on the worker node
/sys/class/net/veth12c4982/ifindex

Here a simple bash script to get the container and veth id’s:

#!/bin/bash
for container in $(docker ps -q); do
    iflink=`docker exec -it $container bash -c 'cat /sys/class/net/eth0/iflink'`
    iflink=`echo $iflink|tr -d '\r'`
    veth=`grep -l $iflink /sys/class/net/veth*/ifindex`
    veth=`echo $veth|sed -e 's;^.*net/\(.*\)/ifindex$;\1;'`
    echo $container:$veth
done
  • OpenShift Builder Pod Logs

If you want to troubleshoot a particular build of “myapp” you can view logs with:

oc logs [bc/|dc/]<name> [-f]

To increase the logging level add a BUILD_LOGLEVEL environment variable to the BuildConfig strategy:

sourceStrategy:
...
  env:
    - name: "BUILD_LOGLEVEL"
      value: "5"

I hope you found this article useful and that it helped you troubleshoot OpenShift. Please let me know what you think and leave a comment.

Deploy OpenShift 3.11 Container Platform on Google Cloud Platform using Terraform

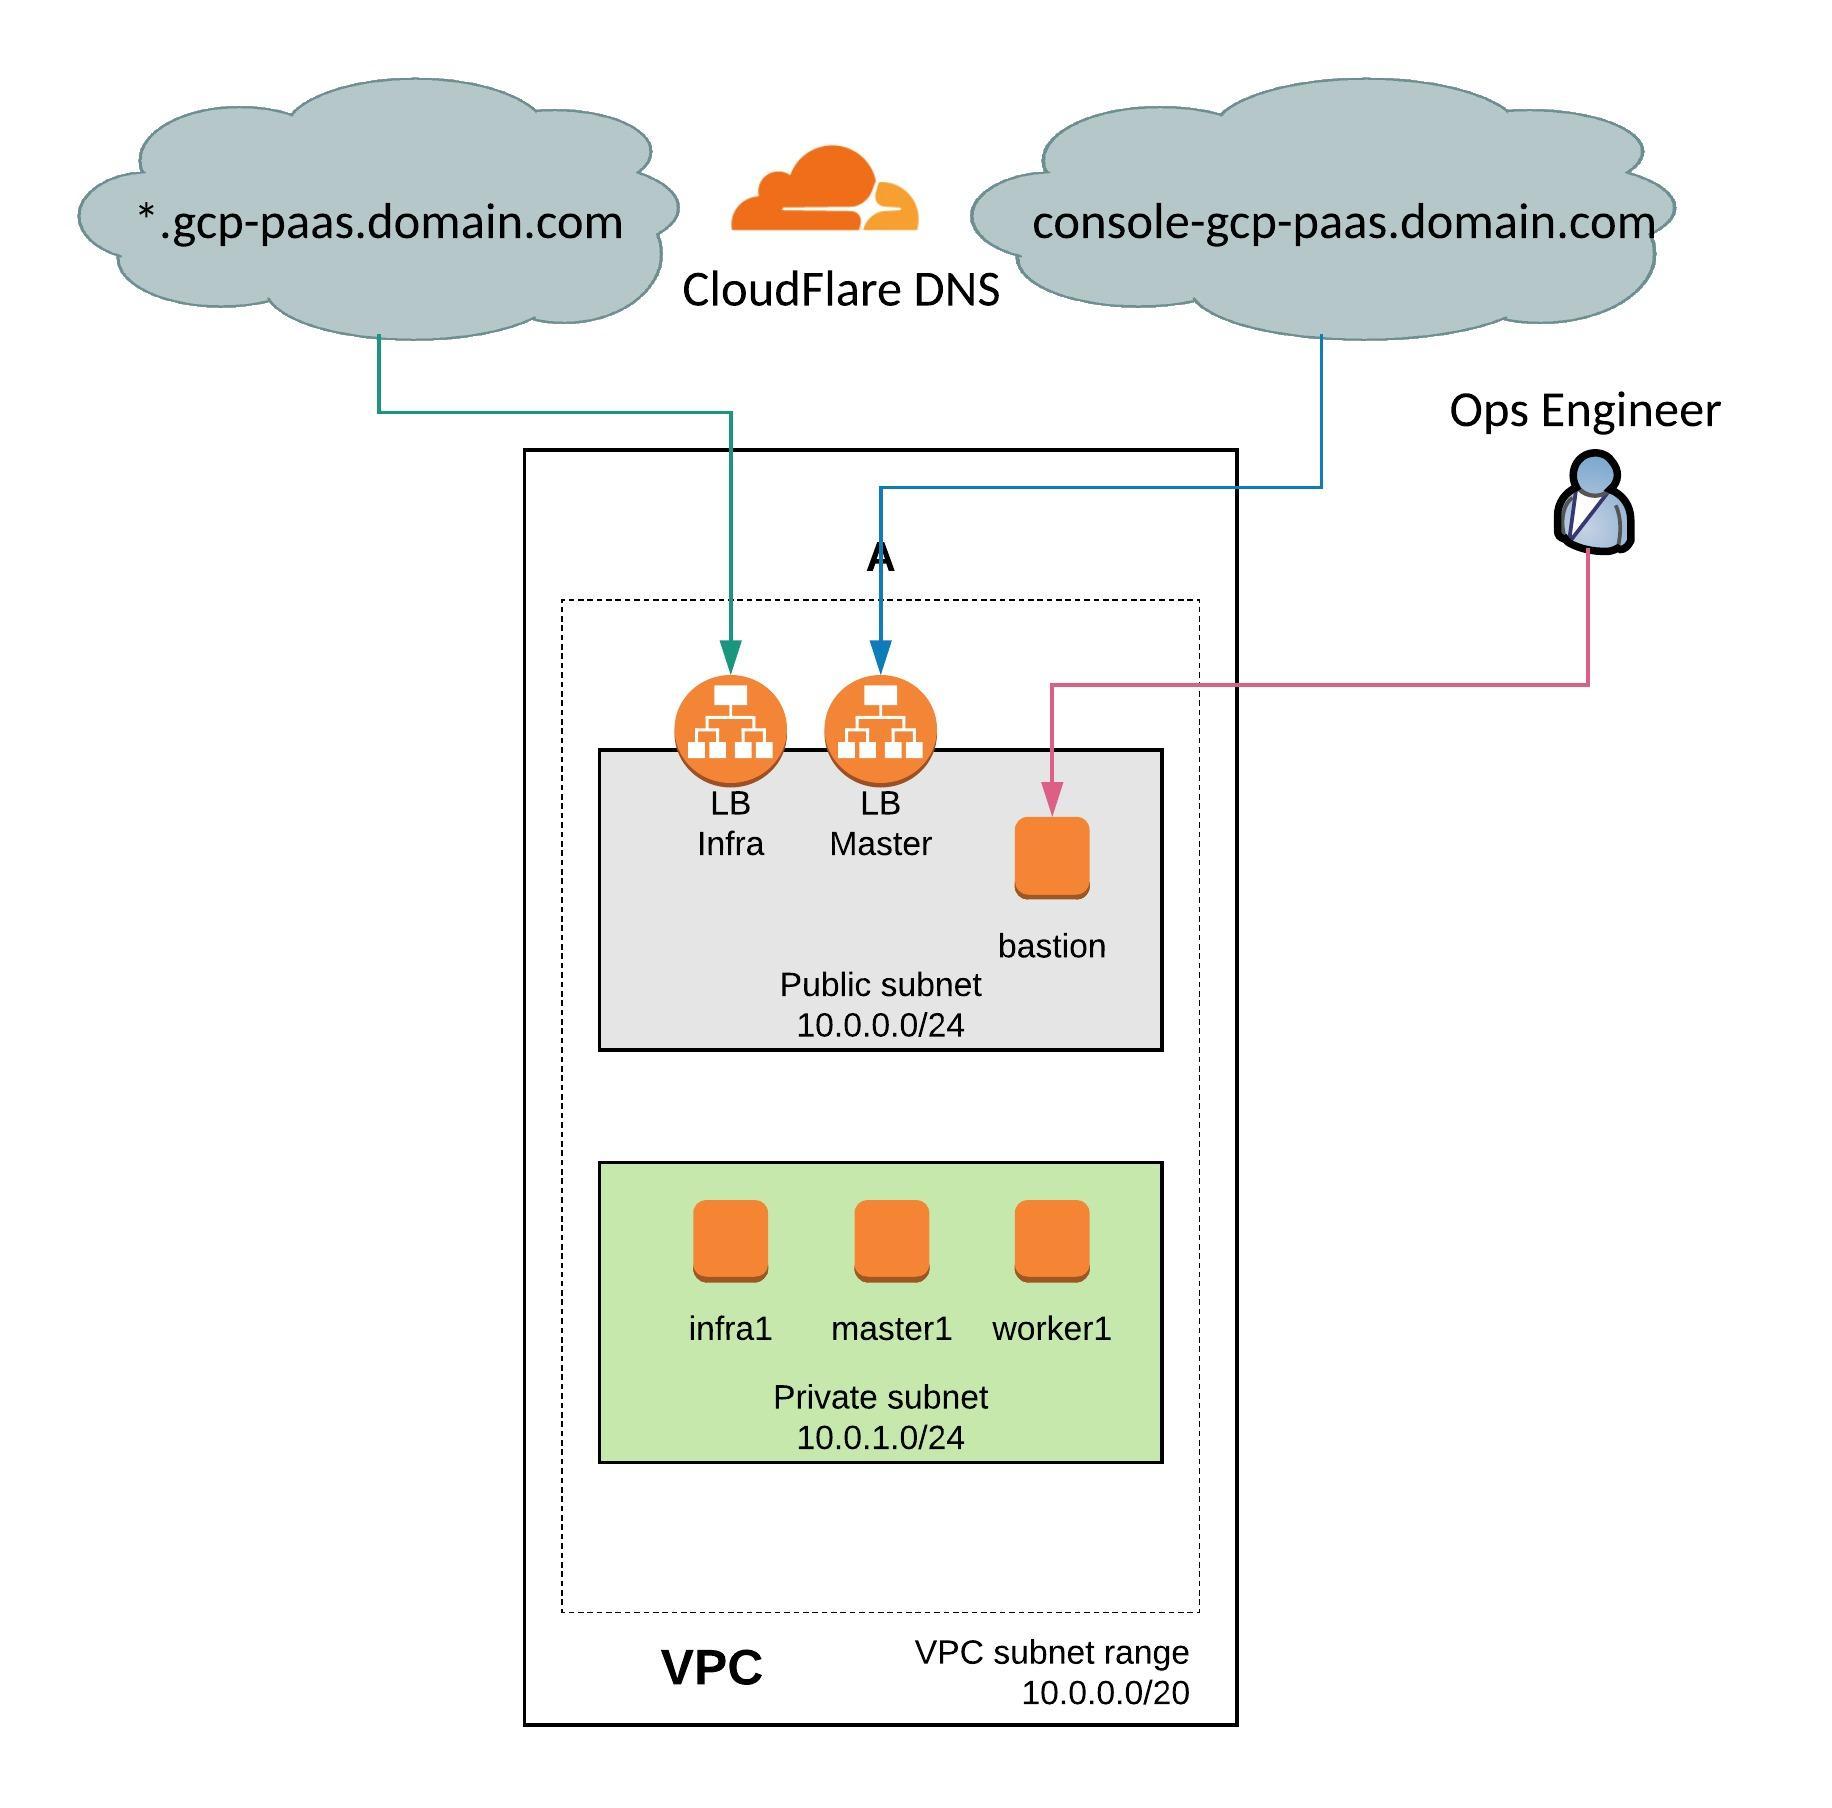
Over the past few days I have converted the OpenShift 3.11 infrastructure on Amazon AWS to run on Google Cloud Platform. I have kept the similar VPC network layout and instances to run OpenShift.

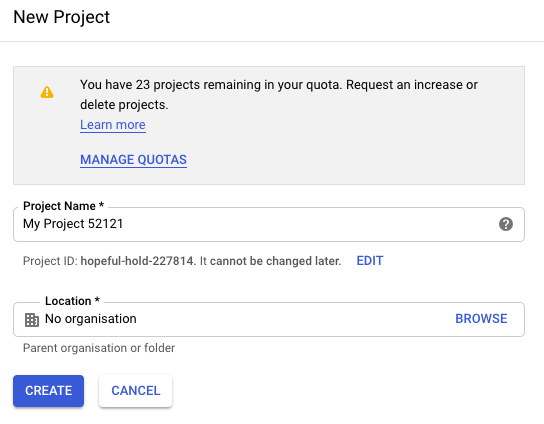
Before you start you need to create a project on Google Cloud Platform, then continue to create the service account and generate the private key and download the credential as JSON file.

Create the new project:

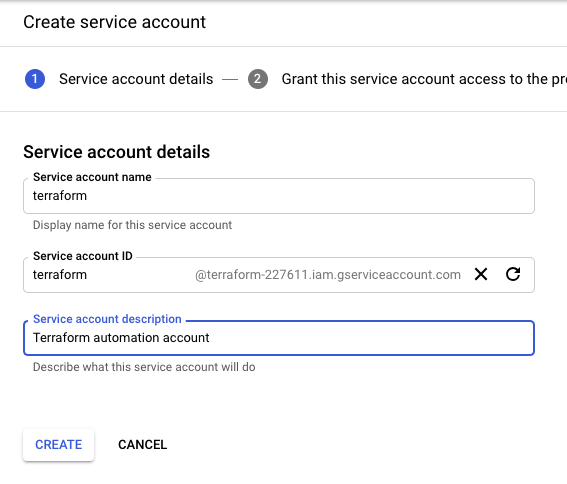
Create the service account:

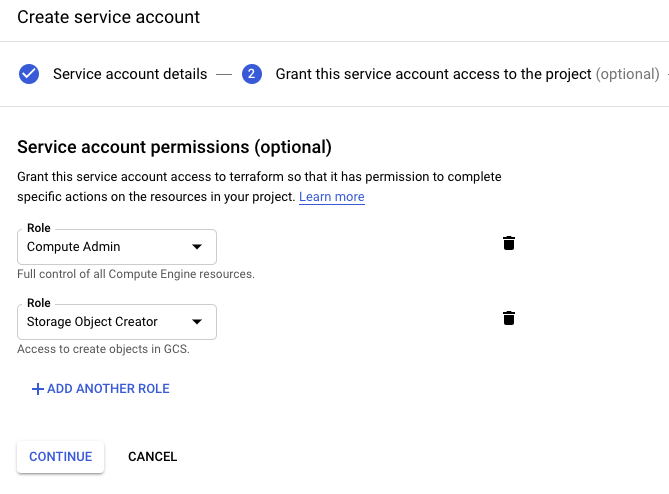
Give the service account compute admin and storage object creator permissions:

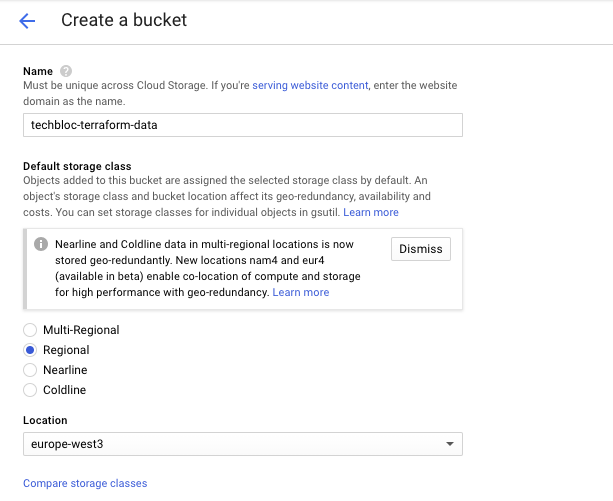
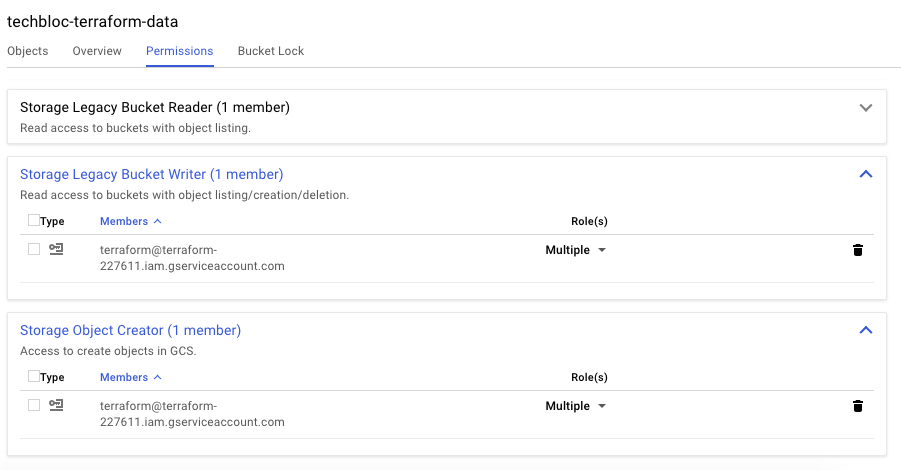
Then create a storage bucket for the Terraform backend state and assign the correct bucket permission to the terraform service account:

Bucket permissions:

To start, clone my openshift-terraform github repository and checkout the google-dev branch:

git clone https://github.com/berndonline/openshift-terraform.git
cd ./openshift-terraform/ && git checkout google-dev

Add your previously downloaded credentials json file:

cat << EOF > ./credentials.json
{
  "type": "service_account",
  "project_id": "<--your-project-->",
  "private_key_id": "<--your-key-id-->",
  "private_key": "-----BEGIN PRIVATE KEY-----

...

}
EOF

There are a few things you need to modify in the main.tf and variables.tf before you can start:

...
terraform {
  backend "gcs" {
    bucket    = "<--your-bucket-name-->"
    prefix    = "openshift-311"
    credentials = "credentials.json"
  }
}
...
...
variable "gcp_region" {
  description = "Google Compute Platform region to launch servers."
  default     = "europe-west3"
}
variable "gcp_project" {
  description = "Google Compute Platform project name."
  default     = "<--your-project-name-->"
}
variable "gcp_zone" {
  type = "string"
  default = "europe-west3-a"
  description = "The zone to provision into"
}
...

Add the needed environment variables to apply changes to CloudFlare DNS:

export TF_VAR_email='<-YOUR-CLOUDFLARE-EMAIL-ADDRESS->'
export TF_VAR_token='<-YOUR-CLOUDFLARE-TOKEN->'
export TF_VAR_domain='<-YOUR-CLOUDFLARE-DOMAIN->'
export TF_VAR_htpasswd='<-YOUR-OPENSHIFT-DEMO-USER-HTPASSWD->'

Let’s start creating the infrastructure and verify afterwards the created resources on GCP.

terraform init && terraform apply -auto-approve

VPC and public and private subnets in region europe-west3:

Created instances:

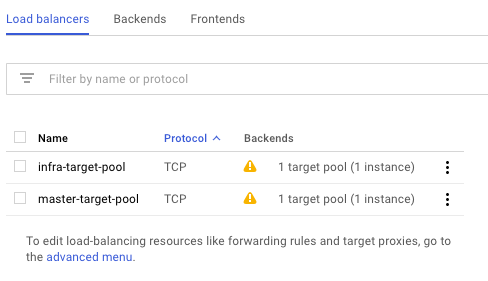
Created load balancers for master and infra nodes:

Copy the ssh key and ansible-hosts file to the bastion host from where you need to run the Ansible OpenShift playbooks.

scp -o StrictHostKeyChecking=no -o UserKnownHostsFile=/dev/null -i ./helper_scripts/id_rsa -r ./helper_scripts/id_rsa centos@$(terraform output bastion):/home/centos/.ssh/
scp -o StrictHostKeyChecking=no -o UserKnownHostsFile=/dev/null -i ./helper_scripts/id_rsa -r ./inventory/ansible-hosts  centos@$(terraform output bastion):/home/centos/ansible-hosts

I recommend waiting a few minutes as the cloud-init script prepares the bastion host. Afterwards continue with the pre and install playbooks. You can connect to the bastion host and run the playbooks directly.

ssh -o StrictHostKeyChecking=no -o UserKnownHostsFile=/dev/null -i ./helper_scripts/id_rsa -l centos $(terraform output bastion) -A "cd /openshift-ansible/ && ansible-playbook ./playbooks/openshift-pre.yml -i ~/ansible-hosts"
ssh -o StrictHostKeyChecking=no -o UserKnownHostsFile=/dev/null -i ./helper_scripts/id_rsa -l centos $(terraform output bastion) -A "cd /openshift-ansible/ && ansible-playbook ./playbooks/openshift-install.yml -i ~/ansible-hosts"

After the installation is completed, continue to create your project and applications:

When you are finished with the testing, run terraform destroy.

terraform destroy -force 

Please share your feedback and leave a comment.

Build Ansible Tower Container

After creating my Jenkins container I thought it would be fun to run Ansible Tower in a container so I created a simple Dockerfile. First you need find out the latest Ansible Tower version: https://releases.ansible.com/ansible-tower/setup/ and update the version variable in the Dockerfile.

Here is my Dockerfile:

...
ARG ANSIBLE_TOWER_VER=3.3.1-1
...

The passwords can be changed in the inventory file:

...
[all:vars]
admin_password='<-your-password->'
...
pg_password='<-your-password->'
...
rabbitmq_password='<-your-password->'
...

Let’s start by building the container:

git clone https://github.com/berndonline/ansible-tower-docker.git && cd ansible-tower-docker/
docker build -t berndonline/ansible-tower .

The docker build will take a few minutes, just wait and look out for errors you might have in the build:

berndonline@lab:~$ git clone https://github.com/berndonline/ansible-tower-docker.git
Cloning into 'ansible-tower-docker'...
remote: Enumerating objects: 17, done.
remote: Counting objects: 100% (17/17), done.
remote: Compressing objects: 100% (11/11), done.
remote: Total 17 (delta 4), reused 14 (delta 4), pack-reused 0
Unpacking objects: 100% (17/17), done.
berndonline@lab:~$ cd ansible-tower-docker/
berndonline@lab:~/ansible-tower-docker$ docker build -t berndonline/ansible-tower .
Sending build context to Docker daemon  87.04kB
Step 1/31 : FROM ubuntu:16.04
16.04: Pulling from library/ubuntu
7b8b6451c85f: Pull complete
ab4d1096d9ba: Pull complete
e6797d1788ac: Pull complete
e25c5c290bde: Pull complete
Digest: sha256:e547ecaba7d078800c358082088e6cc710c3affd1b975601792ec701c80cdd39
Status: Downloaded newer image for ubuntu:16.04
 ---> a51debf7e1eb
Step 2/31 : USER root
 ---> Running in cf5d606130cc
Removing intermediate container cf5d606130cc
 ---> d5b11ed84885
Step 3/31 : WORKDIR /opt
 ---> Running in 1e6703cec6db
Removing intermediate container 1e6703cec6db
 ---> 045cf04ebc1d
Step 4/31 : ARG ANSIBLE_TOWER_VER=3.3.1-1
 ---> Running in 6d65bfe370d4
Removing intermediate container 6d65bfe370d4
 ---> d75c246c3a5c
Step 5/31 : ARG PG_DATA=/var/lib/postgresql/9.6/main
 ---> Running in e8856051aa92
Removing intermediate container e8856051aa92
 ---> 02e6d7593df8

...

PLAY [Install Tower isolated node(s)] ******************************************
skipping: no hosts matched

PLAY RECAP *********************************************************************
localhost                  : ok=125  changed=64   unreachable=0    failed=0

The setup process completed successfully.
Setup log saved to /var/log/tower/setup-2018-11-21-20:21:37.log
Removing intermediate container ad6401292444
 ---> 8f1eb28f16cb
Step 27/31 : ADD entrypoint.sh /entrypoint.sh
 ---> 8503e666ce9c
Step 28/31 : RUN chmod +x /entrypoint.sh
 ---> Running in 8b5ca24a320a
Removing intermediate container 8b5ca24a320a
 ---> 60810dc2a4e3
Step 29/31 : VOLUME ["${PG_DATA}", "${AWX_PROJECTS}","/certs"]
 ---> Running in d836e5455bd5
Removing intermediate container d836e5455bd5
 ---> 3968430a1814
Step 30/31 : EXPOSE 80
 ---> Running in 9a72815e365b
Removing intermediate container 9a72815e365b
 ---> 3613ced2a80c
Step 31/31 : ENTRYPOINT ["/entrypoint.sh", "ansible-tower"]
 ---> Running in 4611a90aff1a
Removing intermediate container 4611a90aff1a
 ---> ce89ea0753d4
Successfully built ce89ea0753d4
Successfully tagged berndonline/ansible-tower:latest

Continue to create a Docker Volume container to store the Postgres database:

sudo docker create -v /var/lib/postgresql/9.6/main --name tower-data berndonline/ansible-tower /bin/true

Start the Ansible Tower Docker container:

sudo docker run -d -p 32456:80 --volumes-from tower-data --name ansible-tower --privileged --restart berndonline/ansible-tower

Afterwards you can connect to http://<your-ip-address>:32456/ and import your Tower license. Ansible provides a free 10 node license which you can request here: https://www.ansible.com/license.

The Ansible Tower playbook installs an Nginx reverse proxy and you can enable SSL by setting the variable nginx_disable_https to false in the inventory file, and publish the container via 443 instead of 80.

Please share your feedback and leave a comment.

Build Jenkins Container with Terraform and Ansible

I thought it might be interesting to show how to build a Docker container running Jenkins and tools like Terraform and Ansible. I am planning to use a Jenkins pipeline to deploy my OpenShift 3.11 example on AWS using Terraform and Ansible but more about this in the next post.

I am using the source Dockerfile from Jenkins and modified it, and added Ansible and Terraform: https://github.com/jenkinsci/docker. Below you see a few variables you might need to change depending on the version you are trying to use or where to place the volume mount. Have a look here for the latest Jenkins version: https://updates.jenkins-ci.org/download/war/.

Here is my Dockerfile:

...
ARG JENKINS_HOME=/var/jenkins_home
...
ENV TERRAFORM_VERSION=0.11.10
... 
ARG JENKINS_VERSION=2.151
ENV JENKINS_VERSION $JENKINS_VERSION
...
ARG JENKINS_SHA=a4335cc626c1f64da61a20174af654283d171b255a928bbacb6402a315e213d7
...

Let’s start and clone my Jenkins Docker repository  and run docker build:

git clone https://github.com/berndonline/jenkins-docker.git && cd ./jenkins-docker/
docker build -t berndonline/jenkins .

The docker build will take a few minutes, just wait and look out for error you might have with the build:

berndonline@lab:~/jenkins-docker$ docker build -t berndonline/jenkins .
Sending build context to Docker daemon  141.3kB
Step 1/51 : FROM openjdk:8-jdk
8-jdk: Pulling from library/openjdk
54f7e8ac135a: Pull complete
d6341e30912f: Pull complete
087a57faf949: Pull complete
5d71636fb824: Pull complete
9da6b28682cf: Pull complete
203f1094a1e2: Pull complete
ee38d9f85cf6: Pull complete
7f692fae02b6: Pull complete
eaa976dc543c: Pull complete
Digest: sha256:94bbc3357f995dd37986d8da0f079a9cd4b99969a3c729bad90f92782853dea7
Status: Downloaded newer image for openjdk:8-jdk
 ---> c14ba9d23b3a
Step 2/51 : USER root
 ---> Running in c78f75ca3d5a
Removing intermediate container c78f75ca3d5a
 ---> f2c6bb7538ea
Step 3/51 : RUN apt-get update && apt-get install -y git curl && rm -rf /var/lib/apt/lists/*
 ---> Running in 4cc857e12f50
Ign:1 http://deb.debian.org/debian stretch InRelease
Get:2 http://security.debian.org/debian-security stretch/updates InRelease [94.3 kB]
Get:3 http://deb.debian.org/debian stretch-updates InRelease [91.0 kB]
Get:4 http://deb.debian.org/debian stretch Release [118 kB]
Get:5 http://security.debian.org/debian-security stretch/updates/main amd64 Packages [459 kB]
Get:6 http://deb.debian.org/debian stretch Release.gpg [2434 B]
Get:7 http://deb.debian.org/debian stretch-updates/main amd64 Packages [5152 B]
Get:8 http://deb.debian.org/debian stretch/main amd64 Packages [7089 kB]
Fetched 7859 kB in 1s (5540 kB/s)
Reading package lists...
Building dependency tree...

...

Step 49/51 : ENTRYPOINT ["/sbin/tini", "--", "/usr/local/bin/jenkins.sh"]
 ---> Running in 28da7c4bf90a
Removing intermediate container 28da7c4bf90a
 ---> f380f1a6f06f
Step 50/51 : COPY plugins.sh /usr/local/bin/plugins.sh
 ---> 82871f0df0dc
Step 51/51 : COPY install-plugins.sh /usr/local/bin/install-plugins.sh
 ---> feea9853af70
Successfully built feea9853af70
Successfully tagged berndonline/jenkins:latest
berndonline@lab:~/jenkins-docker$

The Docker container is successfully build:

berndonline@lab:~/jenkins-docker$ docker images
REPOSITORY                  TAG                 IMAGE ID            CREATED             SIZE
berndonline/jenkins         latest              cd1742c317fa        6 days ago          1.28GB

Let’s start the Docker container:

docker run -d -v /var/jenkins_home:/var/jenkins_home -p 32771:8080 -p 32770:50000 berndonline/jenkins

Quick check that the container is successfully created:

berndonline@lab:~/jenkins-docker$ docker ps
CONTAINER ID        IMAGE                 COMMAND                  CREATED             STATUS              PORTS                                               NAMES
7073fa9c0cd4        berndonline/jenkins   "/sbin/tini -- /usr/…"   5 days ago          Up 7 seconds        0.0.0.0:32771->8080/tcp, 0.0.0.0:32770->50000/tcp   jenkins

Afterwards you can connect to http://<your-ip-address>:32771/ and do the initial Jenkins configuration, like changing admin password and install needed plugins. I recommend putting an Nginx reverse proxy with SSL infront to secure Jenkins properly.

So what about updates or changing the configuration? – Pretty easy; because we are using a Docker bind mount to /var/jenkins_home/, all the Jenkins related data is stored on the local file system of your server and you can re-create or re-build the container at anytime.

I hope you like this article about how to create your down Jenkins Docker container. In my next post I will create a very simple Jenkins pipeline to deploy OpenShift 3.11 on AWS using Terraform.

Please share your feedback and leave a comment.