Deploy OpenShift 3.11 Container Platform on AWS using Terraform

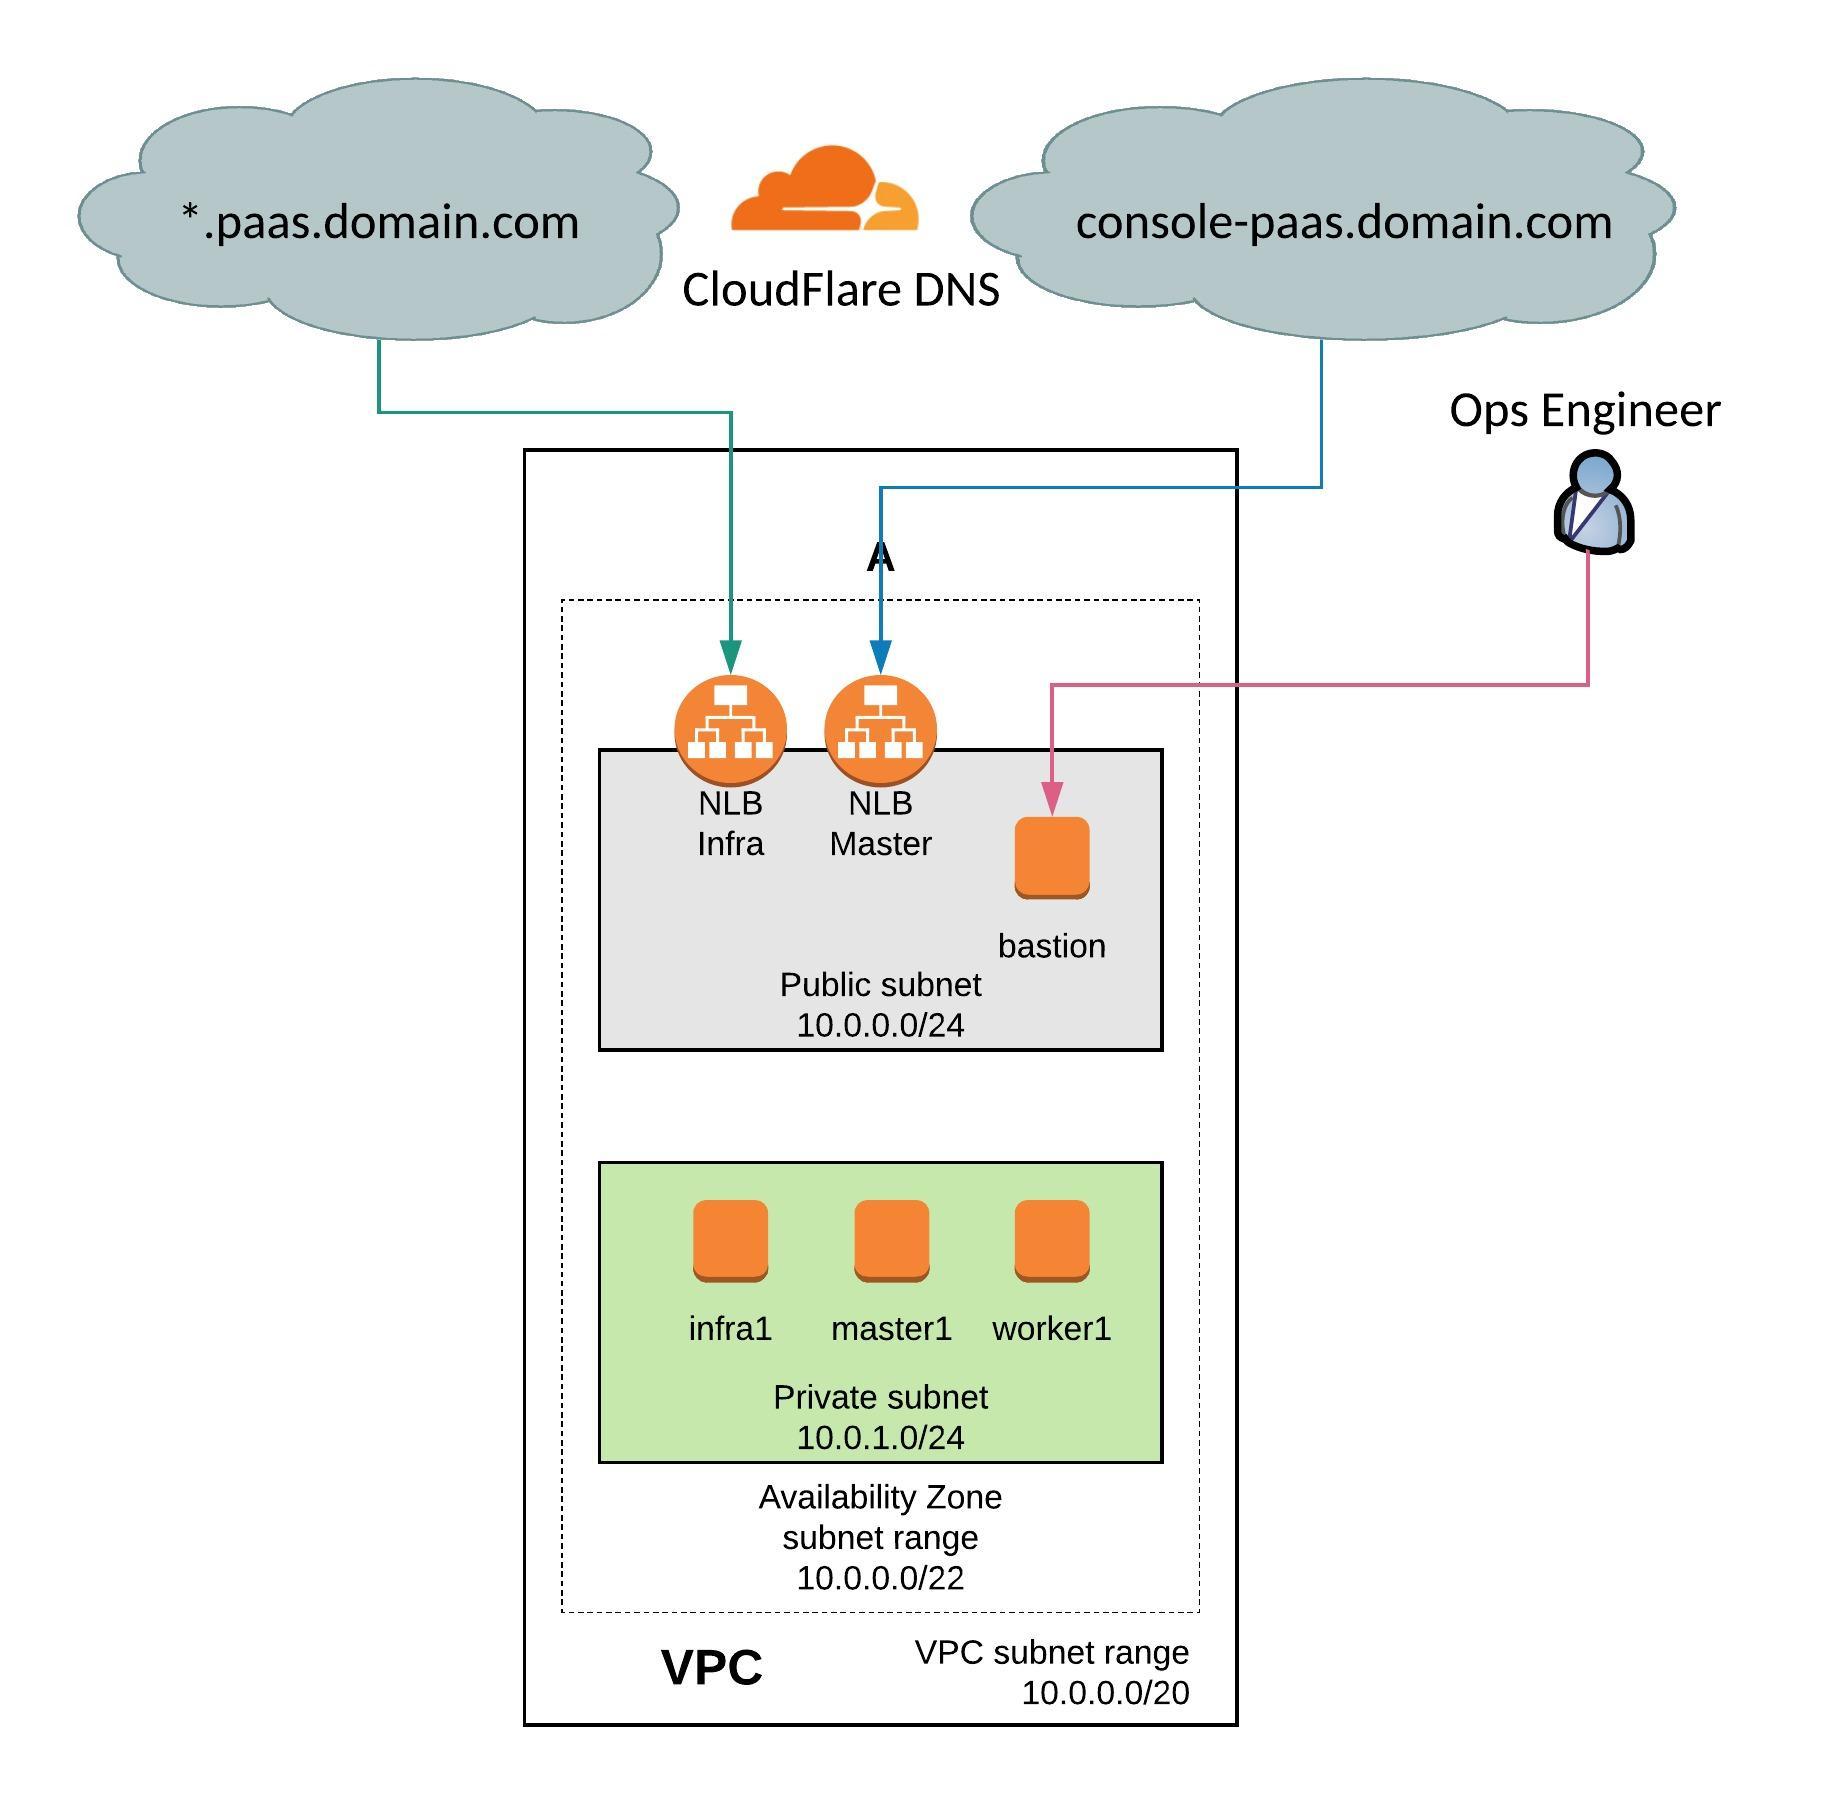
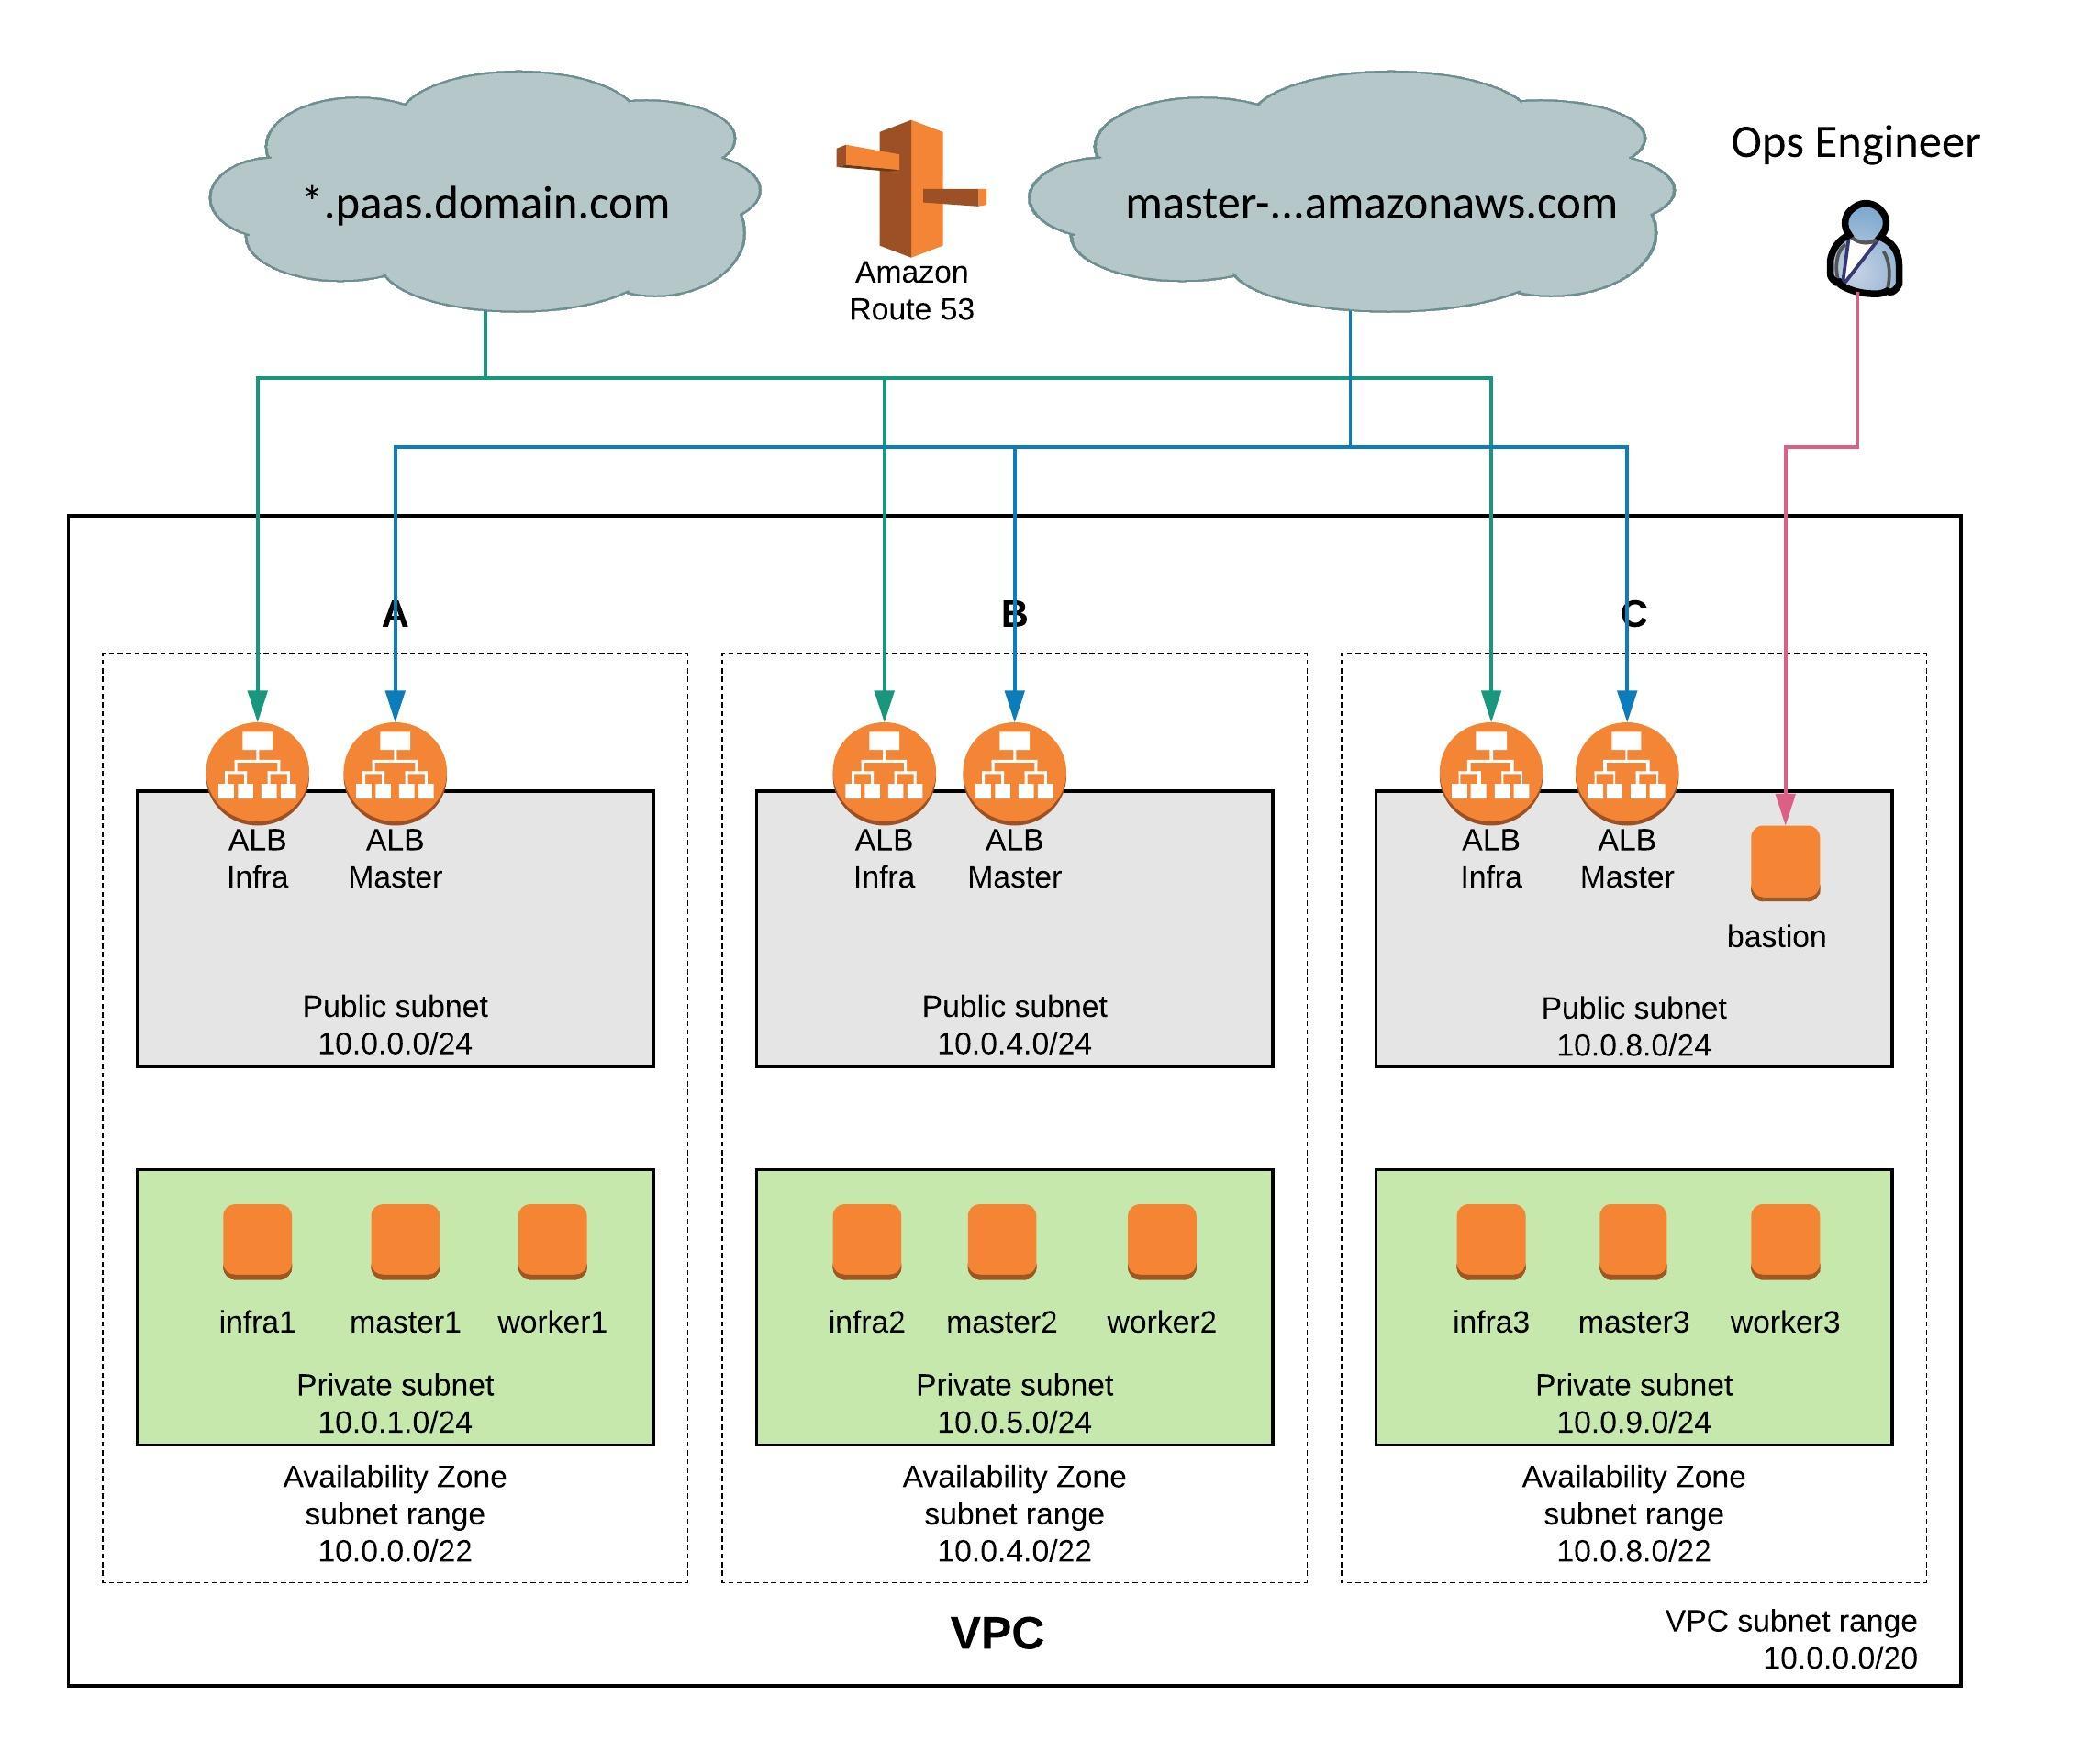
I have done a few changes on my Terraform configuration for OpenShift 3.11 on Amazon AWS. I have downsized the environment because I didn’t needed that many nodes for a quick test setup. I have added CloudFlare DNS to automatically create CNAME for the AWS load balancers on the DNS zone. I have also added an AWS S3 Bucket for storing the backend state. You can find the new Terraform configuration on my Github repository: https://github.com/berndonline/openshift-terraform/tree/aws-dev

From OpenShift 3.10 and later versions the environment variables changes and I modified the ansible-hosts template for the new configuration. You can see the changes in the hosts template: https://github.com/berndonline/openshift-terraform/blob/aws-dev/helper_scripts/ansible-hosts.template.txt

OpenShift 3.11 has changed a few things and put an focus on an Cluster Operator console which is pretty nice and runs on Kubernetes 1.11. I recommend reading the release notes for the 3.11 release for more details: https://docs.openshift.com/container-platform/3.11/release_notes/ocp_3_11_release_notes.html

I don’t wanted to get into too much detail, just follow the steps below and start with cloning my repository, and choose the dev branch:

git clone -b aws-dev https://github.com/berndonline/openshift-terraform.git
cd ./openshift-terraform/
ssh-keygen -b 2048 -t rsa -f ./helper_scripts/id_rsa -q -N ""
chmod 600 ./helper_scripts/id_rsa

You need to modify the cloudflare.tf and add your CloudFlare API credentials otherwise just delete the file. The same for the S3 backend provider, you find the configuration in the main.tf and it can be removed if not needed.

CloudFlare and Amazon AWS credentials can be added through environment variables:

export AWS_ACCESS_KEY_ID='<-YOUR-AWS-ACCESS-KEY->'
export AWS_SECRET_ACCESS_KEY='<-YOUR-AWS-SECRET-KEY->'
export TF_VAR_email='<-YOUR-CLOUDFLARE-EMAIL-ADDRESS->'
export TF_VAR_token='<-YOUR-CLOUDFLARE-TOKEN->'
export TF_VAR_domain='<-YOUR-CLOUDFLARE-DOMAIN->'
export TF_VAR_htpasswd='<-YOUR-OPENSHIFT-DEMO-USER-HTPASSWD->'

Run terraform init and apply to create the environment.

terraform init && terraform apply -auto-approve

Copy the ssh key and ansible-hosts file to the bastion host from where you need to run the Ansible OpenShift playbooks.

scp -o StrictHostKeyChecking=no -o UserKnownHostsFile=/dev/null -i ./helper_scripts/id_rsa -r ./helper_scripts/id_rsa centos@$(terraform output bastion):/home/centos/.ssh/
scp -o StrictHostKeyChecking=no -o UserKnownHostsFile=/dev/null -i ./helper_scripts/id_rsa -r ./inventory/ansible-hosts  centos@$(terraform output bastion):/home/centos/ansible-hosts

I recommend waiting a few minutes as the AWS cloud-init script prepares the bastion host. Afterwards continue with the pre and install playbooks. You can connect to the bastion host and run the playbooks directly.

ssh -o StrictHostKeyChecking=no -o UserKnownHostsFile=/dev/null -i ./helper_scripts/id_rsa -l centos $(terraform output bastion) -A "cd /openshift-ansible/ && ansible-playbook ./playbooks/openshift-pre.yml -i ~/ansible-hosts"
ssh -o StrictHostKeyChecking=no -o UserKnownHostsFile=/dev/null -i ./helper_scripts/id_rsa -l centos $(terraform output bastion) -A "cd /openshift-ansible/ && ansible-playbook ./playbooks/openshift-install.yml -i ~/ansible-hosts"

If for whatever reason the cluster deployment fails, you can run the uninstall playbook to bring the nodes back into a clean state and start from the beginning and run deploy_cluster.

ssh -o StrictHostKeyChecking=no -o UserKnownHostsFile=/dev/null -i ./helper_scripts/id_rsa -l centos $(terraform output bastion) -A "cd /openshift-ansible/ && ansible-playbook ./openshift-ansible/playbooks/adhoc/uninstall.yml -i ~/ansible-hosts"

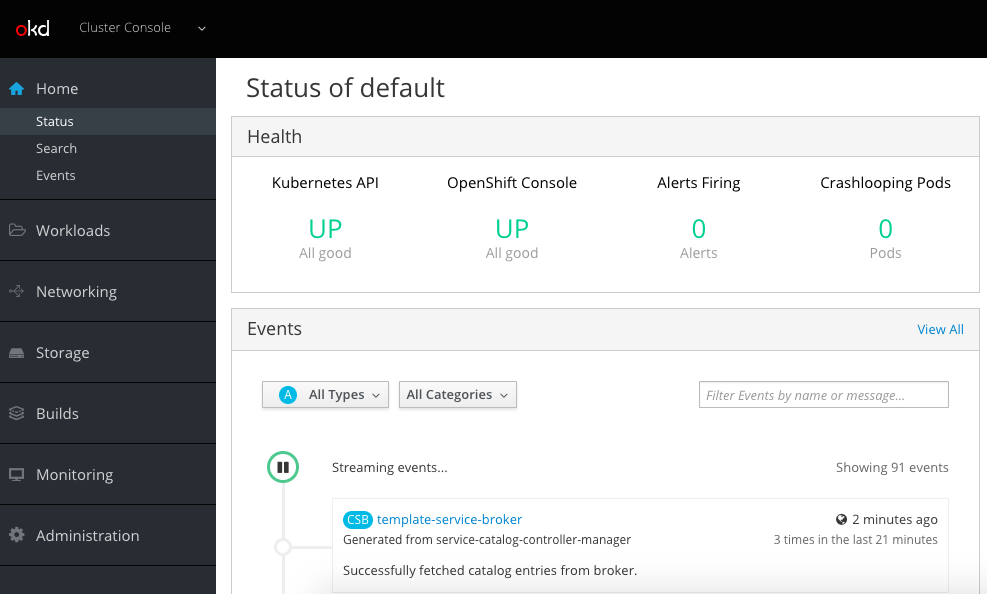
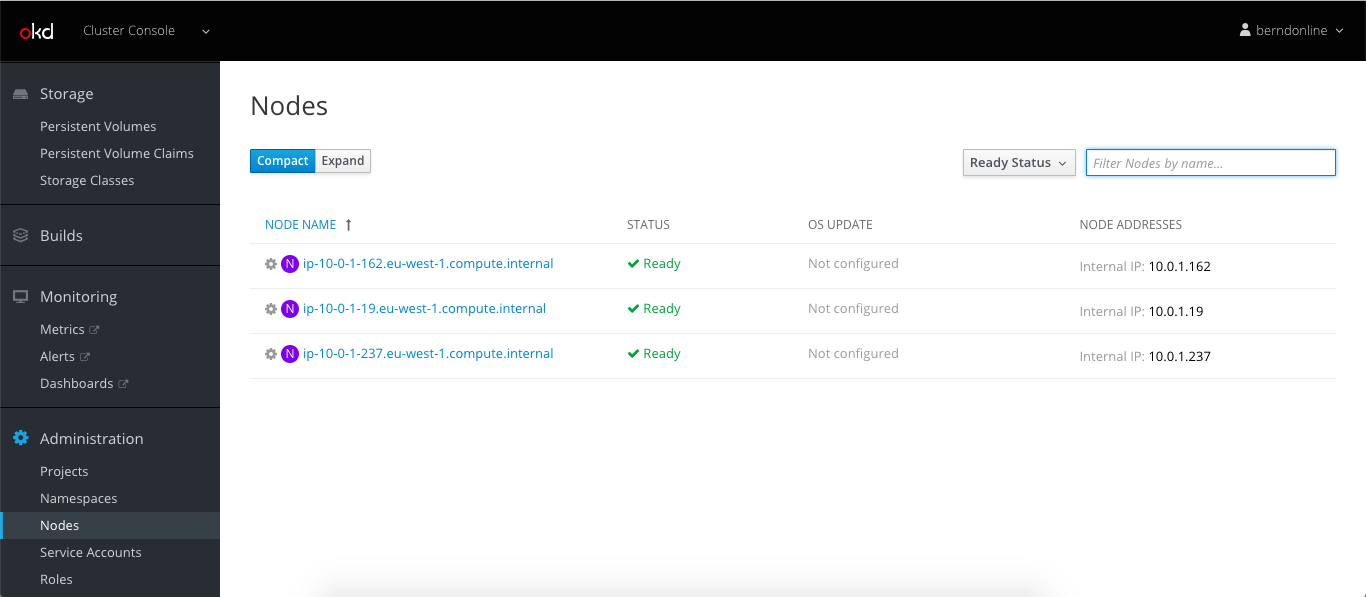
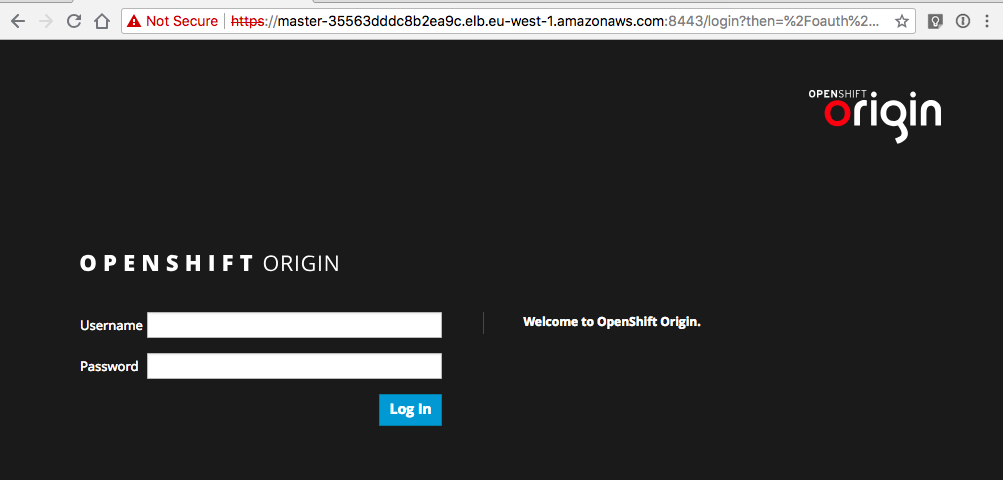
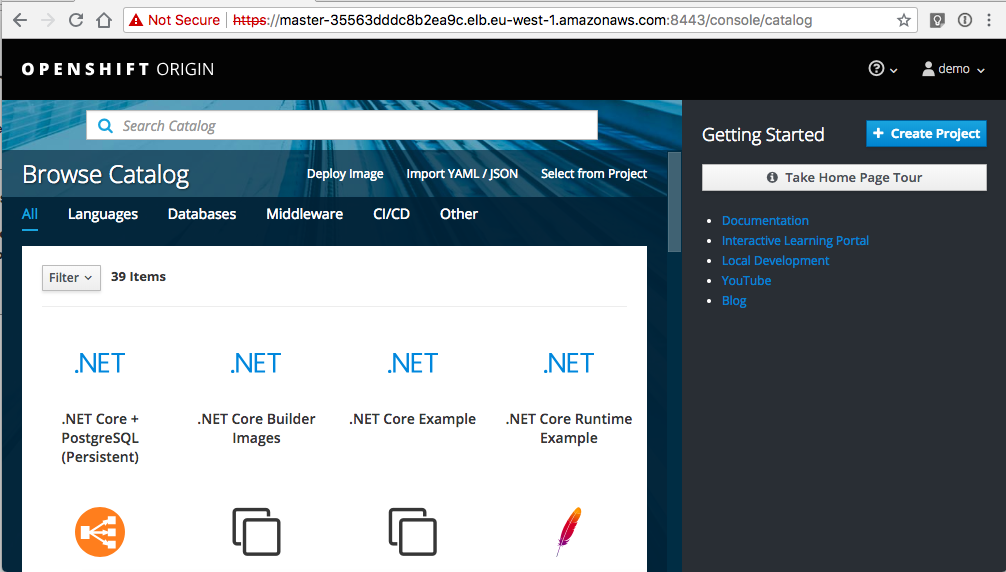
Here are some screenshots of the new cluster console:

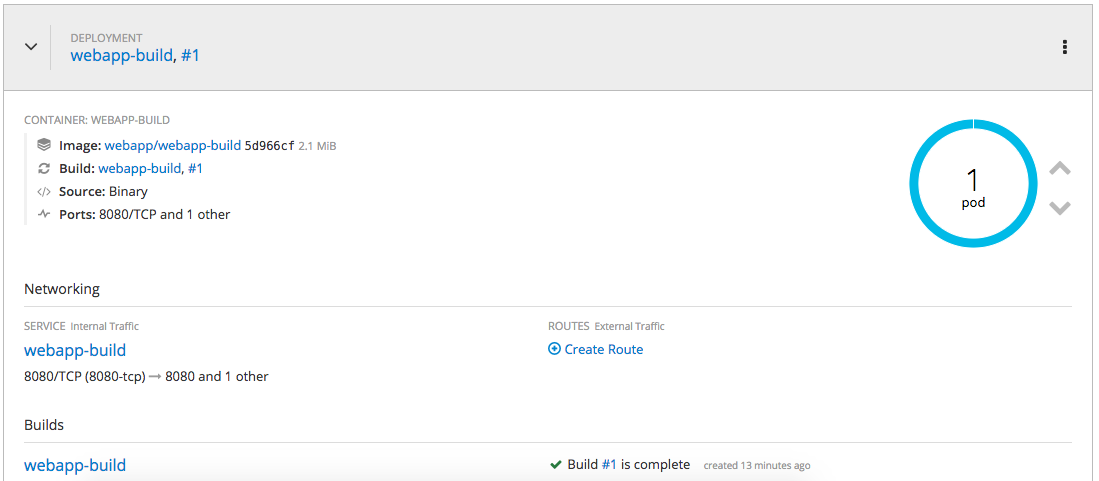
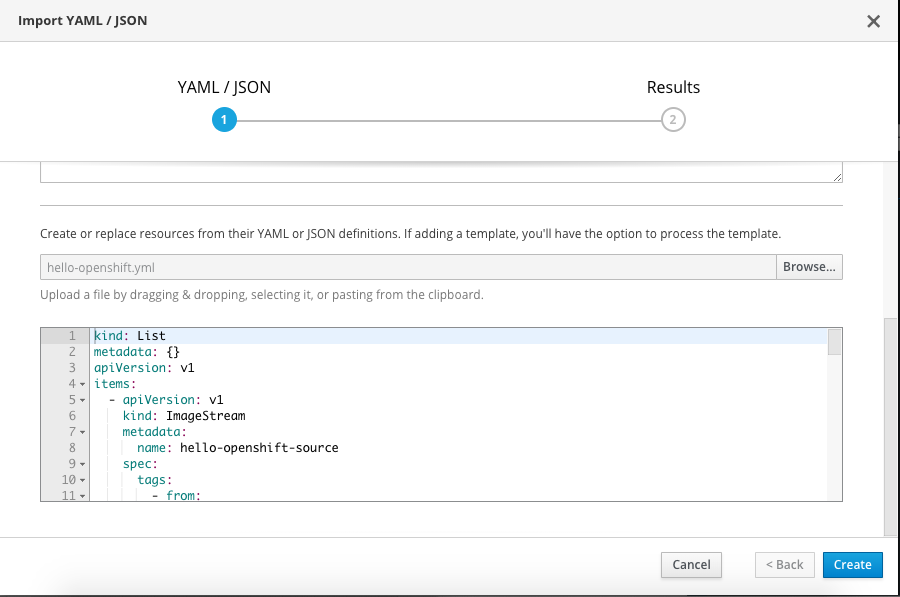
Let’s create a project and import my hello-openshift.yml build configuration:

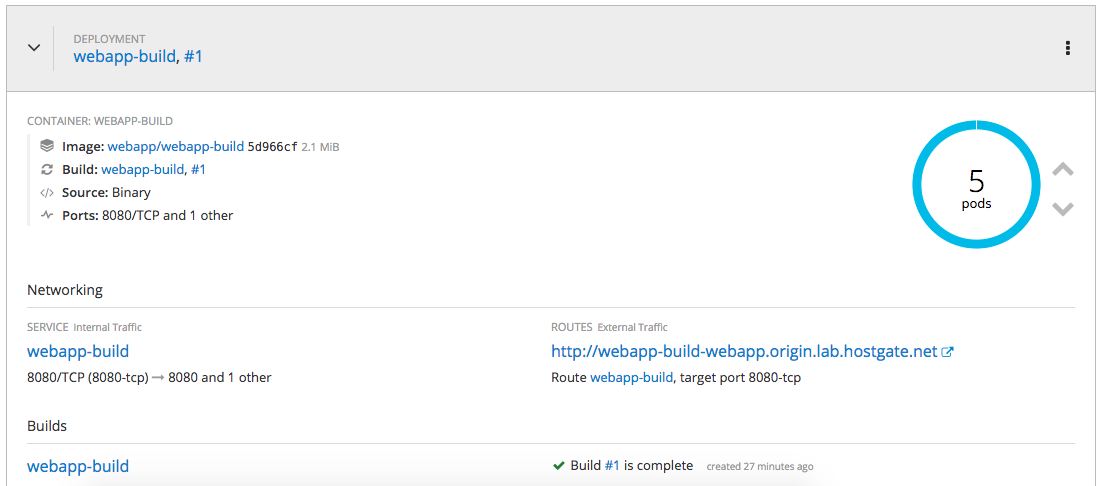
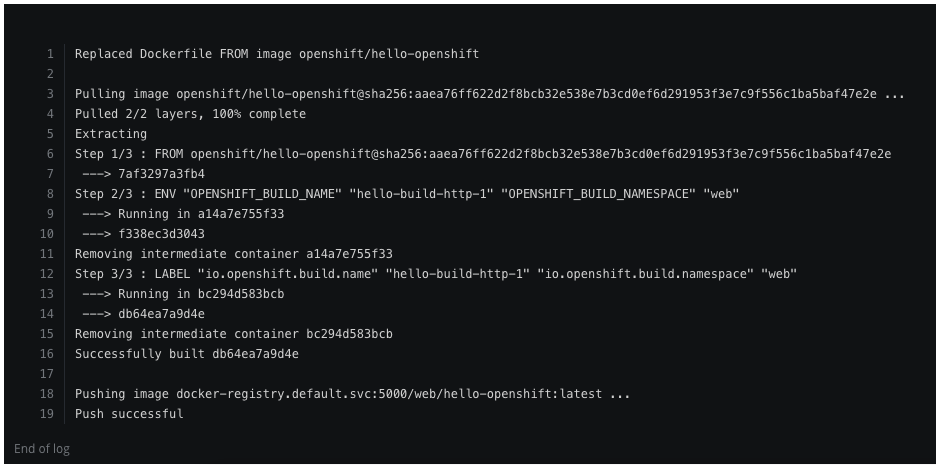
Successful completed the build and deployed the hello-openshift container:

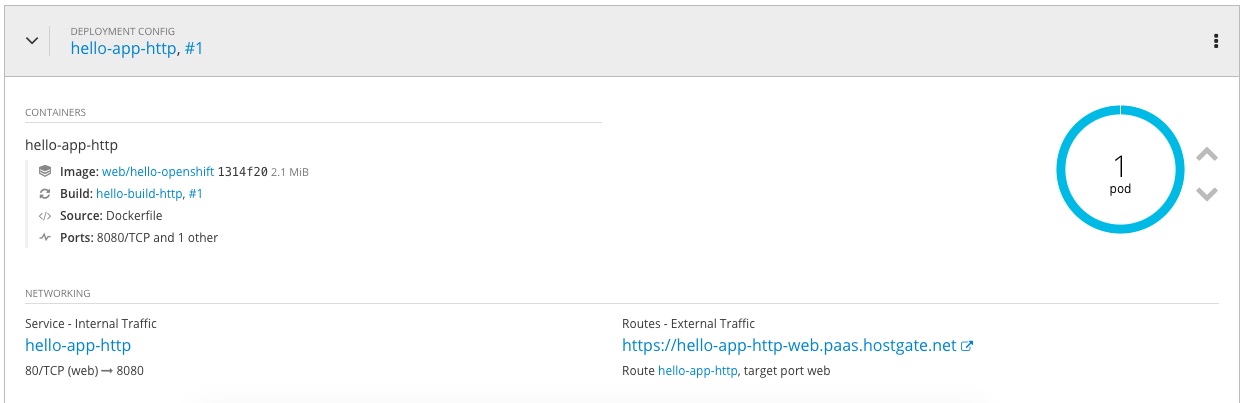
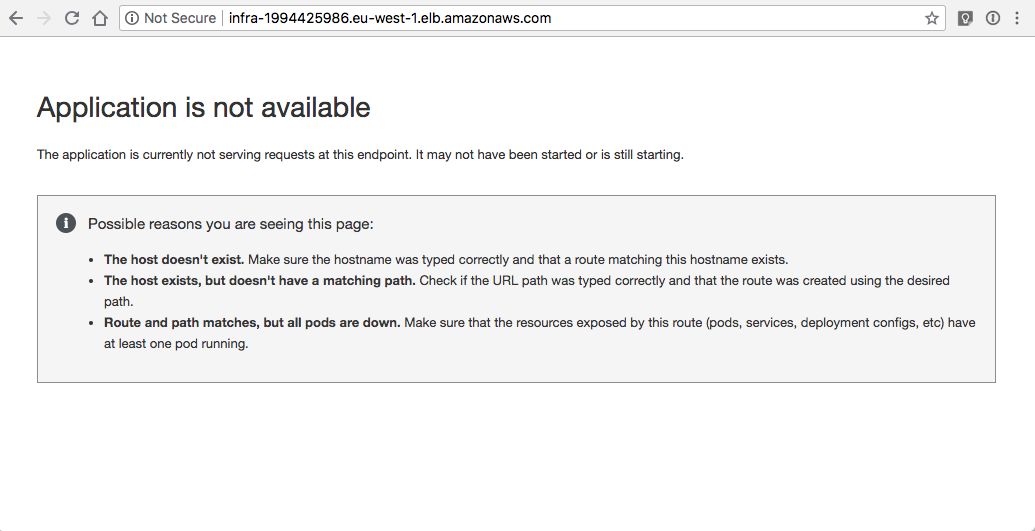
My example hello openshift application:

When you are finished with the testing, run terraform destroy.

terraform destroy -force 


Deploy OpenShift 3.9 Container Platform using Terraform and Ansible on Amazon AWS

After my previous articles on OpenShift and Terraform I wanted to show how to create the necessary infrastructure and to deploy an OpenShift Container Platform in a more real-world scenario. I highly recommend reading my other posts about using Terraform to deploy an Amazon AWS VPC and AWS EC2 Instances and Load Balancers. Once the infrastructure is created we will use the Bastion Host to connect to the environment and deploy OpenShift Origin using Ansible.

I think this might be an interesting topic to show what tools like Terraform and Ansible can do together:

I will not go into detail about the configuration and only show the output of deploying the infrastructure. Please checkout my Github repository to see the detailed configuration: https://github.com/berndonline/openshift-terraform

Before we start you need to clone the repository and generate the ssh key used from the bastion host to access the OpenShift nodes:

git clone https://github.com/berndonline/openshift-terraform.git
cd ./openshift-terraform/
ssh-keygen -b 2048 -t rsa -f ./helper_scripts/id_rsa -q -N ""
chmod 600 ./helper_scripts/id_rsa

We are ready to create the infrastructure and run terraform apply:

berndonline@lab:~/openshift-terraform$ terraform apply

...

Plan: 56 to add, 0 to change, 0 to destroy.

Do you want to perform these actions?
  Terraform will perform the actions described above.
  Only 'yes' will be accepted to approve.

  Enter a value: yes

...

Apply complete! Resources: 19 added, 0 changed, 16 destroyed.

Outputs:

bastion = ec2-34-244-225-35.eu-west-1.compute.amazonaws.com
openshift master = master-35563dddc8b2ea9c.elb.eu-west-1.amazonaws.com
openshift subdomain = infra-1994425986.eu-west-1.elb.amazonaws.com
berndonline@lab:~/openshift-terraform$

Terraform successfully creates the VPC, load balancers and all needed instances. Before we continue wait 5 to 10 minutes because the cloud-init script takes a bit time and all the instance reboot at the end.

Instances:

Security groups:

Target groups for the Master and the Infra load balancers:

Master and the Infra load balancers:

Terraform also automatically creates the inventory file for the OpenShift installation and adds the hostnames for master, infra and worker nodes to the correct inventory groups. The next step is to copy the private ssh key and the inventory file to the bastion host. I am using the terraform output command to get the public hostname from the bastion host:

scp -o StrictHostKeyChecking=no -o UserKnownHostsFile=/dev/null -r ./helper_scripts/id_rsa centos@$(terraform output bastion):/home/centos/.ssh/
scp -o StrictHostKeyChecking=no -o UserKnownHostsFile=/dev/null -r ./inventory/ansible-hosts  centos@$(terraform output bastion):/home/centos/ansible-hosts
ssh -o StrictHostKeyChecking=no -o UserKnownHostsFile=/dev/null -l centos $(terraform output bastion)

On the bastion node, change to the /openshift-ansible/ folder and start running the prerequisites and the deploy-cluster playbooks:

cd /openshift-ansible/
ansible-playbook ./playbooks/prerequisites.yml -i ~/ansible-hosts
ansible-playbook ./playbooks/deploy_cluster.yml -i ~/ansible-hosts

Here the output from running the prerequisites playbook:

[centos@ip-10-0-0-22 ~]$ cd /openshift-ansible/
[centos@ip-10-0-0-22 openshift-ansible]$ ansible-playbook ./playbooks/prerequisites.yml -i ~/ansible-hosts

PLAY [Initialization Checkpoint Start] ****************************************************************************************************************************

TASK [Set install initialization 'In Progress'] *******************************************************************************************************************
Saturday 15 September 2018  11:04:50 +0000 (0:00:00.407)       0:00:00.407 ****
ok: [ip-10-0-1-237.eu-west-1.compute.internal]

PLAY [Populate config host groups] ********************************************************************************************************************************

TASK [Load group name mapping variables] **************************************************************************************************************************
Saturday 15 September 2018  11:04:50 +0000 (0:00:00.110)       0:00:00.517 ****
ok: [localhost]

TASK [Evaluate groups - g_etcd_hosts or g_new_etcd_hosts required] ************************************************************************************************
Saturday 15 September 2018  11:04:51 +0000 (0:00:00.033)       0:00:00.551 ****
skipping: [localhost]

TASK [Evaluate groups - g_master_hosts or g_new_master_hosts required] ********************************************************************************************
Saturday 15 September 2018  11:04:51 +0000 (0:00:00.024)       0:00:00.575 ****
skipping: [localhost]

TASK [Evaluate groups - g_node_hosts or g_new_node_hosts required] ************************************************************************************************
Saturday 15 September 2018  11:04:51 +0000 (0:00:00.024)       0:00:00.599 ****
skipping: [localhost]

...

PLAY RECAP ********************************************************************************************************************************************************
ip-10-0-1-192.eu-west-1.compute.internal : ok=56   changed=14   unreachable=0    failed=0
ip-10-0-1-237.eu-west-1.compute.internal : ok=64   changed=15   unreachable=0    failed=0
ip-10-0-1-248.eu-west-1.compute.internal : ok=56   changed=14   unreachable=0    failed=0
ip-10-0-5-174.eu-west-1.compute.internal : ok=56   changed=14   unreachable=0    failed=0
ip-10-0-5-235.eu-west-1.compute.internal : ok=58   changed=14   unreachable=0    failed=0
ip-10-0-5-35.eu-west-1.compute.internal : ok=56   changed=14   unreachable=0    failed=0
ip-10-0-9-130.eu-west-1.compute.internal : ok=56   changed=14   unreachable=0    failed=0
ip-10-0-9-51.eu-west-1.compute.internal : ok=58   changed=14   unreachable=0    failed=0
ip-10-0-9-85.eu-west-1.compute.internal : ok=56   changed=14   unreachable=0    failed=0
localhost                  : ok=11   changed=0    unreachable=0    failed=0


INSTALLER STATUS **************************************************************************************************************************************************
Initialization             : Complete (0:00:41)

[centos@ip-10-0-0-22 openshift-ansible]$

Continue with the deploy cluster playbook:

[centos@ip-10-0-0-22 openshift-ansible]$ ansible-playbook ./playbooks/deploy_cluster.yml -i ~/ansible-hosts

PLAY [Initialization Checkpoint Start] ****************************************************************************************************************************

TASK [Set install initialization 'In Progress'] *******************************************************************************************************************
Saturday 15 September 2018  11:08:38 +0000 (0:00:00.102)       0:00:00.102 ****
ok: [ip-10-0-1-237.eu-west-1.compute.internal]

PLAY [Populate config host groups] ********************************************************************************************************************************

TASK [Load group name mapping variables] **************************************************************************************************************************
Saturday 15 September 2018  11:08:38 +0000 (0:00:00.064)       0:00:00.167 ****
ok: [localhost]

TASK [Evaluate groups - g_etcd_hosts or g_new_etcd_hosts required] ************************************************************************************************
Saturday 15 September 2018  11:08:38 +0000 (0:00:00.031)       0:00:00.198 ****
skipping: [localhost]

TASK [Evaluate groups - g_master_hosts or g_new_master_hosts required] ********************************************************************************************
Saturday 15 September 2018  11:08:38 +0000 (0:00:00.026)       0:00:00.225 ****
skipping: [localhost]

...

PLAY RECAP ********************************************************************************************************************************************************
ip-10-0-1-192.eu-west-1.compute.internal : ok=132  changed=57   unreachable=0    failed=0
ip-10-0-1-237.eu-west-1.compute.internal : ok=591  changed=256  unreachable=0    failed=0
ip-10-0-1-248.eu-west-1.compute.internal : ok=132  changed=57   unreachable=0    failed=0
ip-10-0-5-174.eu-west-1.compute.internal : ok=132  changed=57   unreachable=0    failed=0
ip-10-0-5-235.eu-west-1.compute.internal : ok=325  changed=145  unreachable=0    failed=0
ip-10-0-5-35.eu-west-1.compute.internal : ok=132  changed=57   unreachable=0    failed=0
ip-10-0-9-130.eu-west-1.compute.internal : ok=132  changed=57   unreachable=0    failed=0
ip-10-0-9-51.eu-west-1.compute.internal : ok=325  changed=145  unreachable=0    failed=0
ip-10-0-9-85.eu-west-1.compute.internal : ok=132  changed=57   unreachable=0    failed=0
localhost                  : ok=13   changed=0    unreachable=0    failed=0

INSTALLER STATUS **************************************************************************************************************************************************
Initialization             : Complete (0:00:55)
Health Check               : Complete (0:00:01)
etcd Install               : Complete (0:01:03)
Master Install             : Complete (0:05:17)
Master Additional Install  : Complete (0:00:26)
Node Install               : Complete (0:08:24)
Hosted Install             : Complete (0:00:57)
Web Console Install        : Complete (0:00:28)
Service Catalog Install    : Complete (0:01:19)

[centos@ip-10-0-0-22 openshift-ansible]$

Once the deploy playbook finishes we have a working Openshift cluster:

Login with username: demo, and password: demo

For the infra load balancers you cannot access OpenShift routes via the Amazon DNS, this is not allowed. You need to create a wildcard DNS CNAME record like *.paas.domain.com and point to the AWS load balancer DNS record.

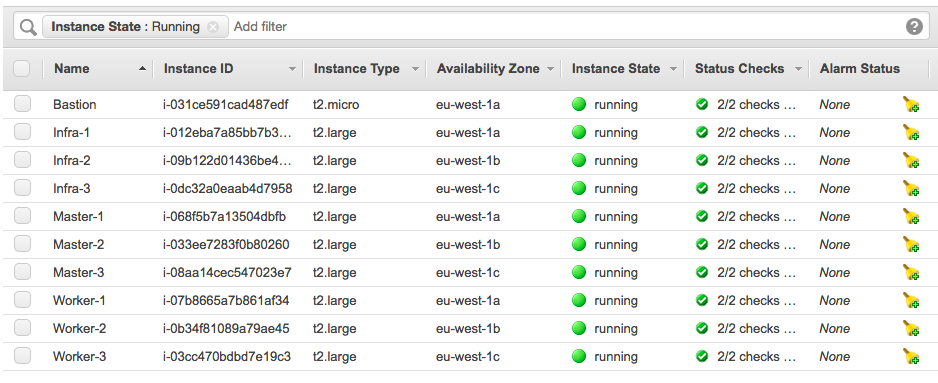
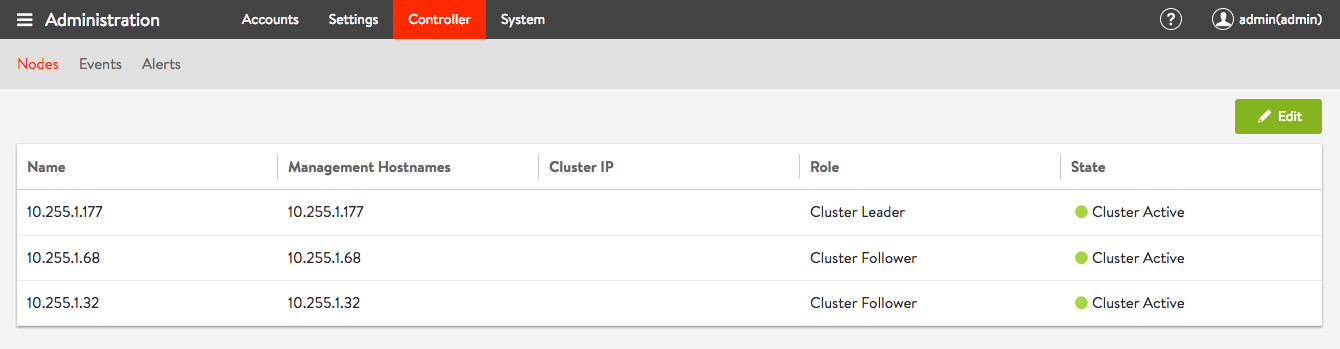
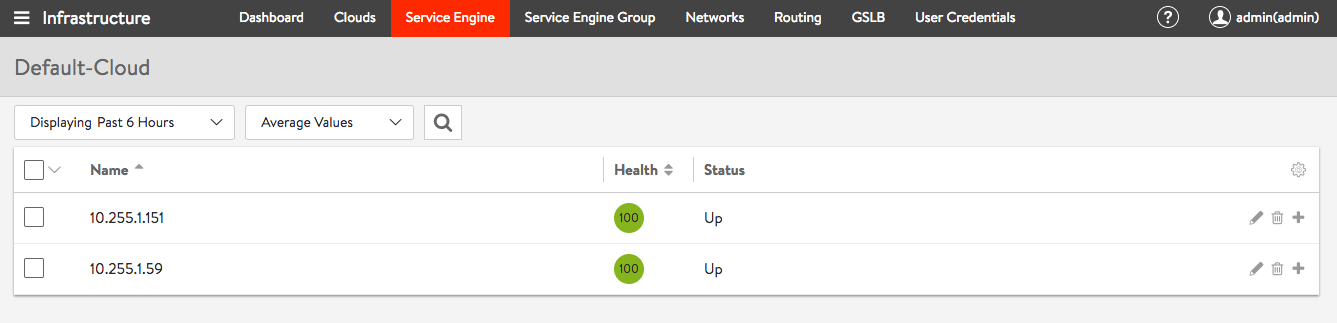
Let’s continue to do some basic cluster checks to see the nodes are in ready state:

[centos@ip-10-0-1-237 ~]$ oc get nodes
NAME                                       STATUS    ROLES     AGE       VERSION
ip-10-0-1-192.eu-west-1.compute.internal   Ready     compute   11m       v1.9.1+a0ce1bc657
ip-10-0-1-237.eu-west-1.compute.internal   Ready     master    16m       v1.9.1+a0ce1bc657
ip-10-0-1-248.eu-west-1.compute.internal   Ready         11m       v1.9.1+a0ce1bc657
ip-10-0-5-174.eu-west-1.compute.internal   Ready     compute   11m       v1.9.1+a0ce1bc657
ip-10-0-5-235.eu-west-1.compute.internal   Ready     master    15m       v1.9.1+a0ce1bc657
ip-10-0-5-35.eu-west-1.compute.internal    Ready         11m       v1.9.1+a0ce1bc657
ip-10-0-9-130.eu-west-1.compute.internal   Ready     compute   11m       v1.9.1+a0ce1bc657
ip-10-0-9-51.eu-west-1.compute.internal    Ready     master    14m       v1.9.1+a0ce1bc657
ip-10-0-9-85.eu-west-1.compute.internal    Ready         11m       v1.9.1+a0ce1bc657
[centos@ip-10-0-1-237 ~]$
[centos@ip-10-0-1-237 ~]$ oc get projects
NAME                                DISPLAY NAME   STATUS
default                                            Active
kube-public                                        Active
kube-service-catalog                               Active
kube-system                                        Active
logging                                            Active
management-infra                                   Active
openshift                                          Active
openshift-ansible-service-broker                   Active
openshift-infra                                    Active
openshift-node                                     Active
openshift-template-service-broker                  Active
openshift-web-console                              Active
[centos@ip-10-0-1-237 ~]$
[centos@ip-10-0-1-237 ~]$ oc get pods -o wide
NAME                       READY     STATUS    RESTARTS   AGE       IP           NODE
docker-registry-1-8798r    1/1       Running   0          10m       10.128.2.2   ip-10-0-5-35.eu-west-1.compute.internal
registry-console-1-zh9m4   1/1       Running   0          10m       10.129.2.3   ip-10-0-9-85.eu-west-1.compute.internal
router-1-96zzf             1/1       Running   0          10m       10.0.9.85    ip-10-0-9-85.eu-west-1.compute.internal
router-1-nfh7h             1/1       Running   0          10m       10.0.1.248   ip-10-0-1-248.eu-west-1.compute.internal
router-1-pcs68             1/1       Running   0          10m       10.0.5.35    ip-10-0-5-35.eu-west-1.compute.internal
[centos@ip-10-0-1-237 ~]$

At the end just destroy the infrastructure with terraform destroy:

berndonline@lab:~/openshift-terraform$ terraform destroy

...

Destroy complete! Resources: 56 destroyed.
berndonline@lab:~/openshift-terraform$

I will continue improving the configuration and I plan to use Jenkins to deploy the AWS infrastructure and OpenShift fully automatically.

Please let me know if you like the article or have questions in the comments below.

Getting started with OpenShift Container Platform

In the recent month I have spend a lot of time around networking and automation but I want to shift more towards running modern container platforms like Kubernetes or OpenShift which both are using networking services and as I have shared in one of my previous article about AVI software load balancer, it all fits nicely into networking in my opinion.

But before we start, please have a look at my previous article about Deploying OpenShift Origin Cluster using Ansible to create a small OpenShift platform for testing.

Create a bash completion file for oc commands:

[root@origin-master ~]# oc completion bash > /etc/bash_completion.d/oc
[root@origin-master ~]# . /etc/bash_completion.d/oc
  • Let’s start and login to OpenShift as a normal user account
[root@origin-master ~]# oc login https://console.lab.hostgate.net:8443/
The server is using a certificate that does not match its hostname: x509: certificate is valid for lab.hostgate.net, not console.lab.hostgate.net
You can bypass the certificate check, but any data you send to the server could be intercepted by others.
Use insecure connections? (y/n): y

Authentication required for https://console.lab.hostgate.net:8443 (openshift)
Username: demo
Password:
Login successful.

[root@origin-master ~]#

Instead of username and password use token which you can get from the web console:

oc login https://console.lab.hostgate.net:8443 --token=***hash token***
  • Now create the project where we want to run our web application:
[root@origin-master ~]# oc new-project webapp
Now using project "webapp" on server "https://console.lab.hostgate.net:8443".

You can add applications to this project with the 'new-app' command. For example, try:

    oc new-app centos/ruby-22-centos7~https://github.com/openshift/ruby-ex.git

to build a new example application in Ruby.
[root@origin-master ~]#

Afterwards we need to create a build configuration, in my example we use an external Dockerfile without starting the build directly:

[root@origin-master ~]#  oc new-build --name webapp-build --binary
warning: Cannot find git. Ensure that it is installed and in your path. Git is required to work with git repositories.
    * A Docker build using binary input will be created
      * The resulting image will be pushed to image stream "webapp-build:latest"
      * A binary build was created, use 'start-build --from-dir' to trigger a new build

--> Creating resources with label build=webapp-build ...
    imagestream "webapp-build" created
    buildconfig "webapp-build" created
--> Success
[root@origin-master ~]#

Create Dockerfile:

[root@origin-master ~]# vi Dockerfile

Copy and paste the line below into the Dockerfile:

FROM openshift/hello-openshift

Let’s continue and start the build from the Dockerfile we specified previously

[root@origin-master ~]#  oc start-build webapp-build --from-file=Dockerfile --follow
Uploading file "Dockerfile" as binary input for the build ...
build "webapp-build-1" started
Receiving source from STDIN as file Dockerfile
Pulling image openshift/hello-openshift ...
Step 1/3 : FROM openshift/hello-openshift
 ---> 7af3297a3fb4
Step 2/3 : ENV "OPENSHIFT_BUILD_NAME" "webapp-build-1" "OPENSHIFT_BUILD_NAMESPACE" "webapp"
 ---> Running in 422f63f69364
 ---> 2cd93085ec93
Removing intermediate container 422f63f69364
Step 3/3 : LABEL "io.openshift.build.name" "webapp-build-1" "io.openshift.build.namespace" "webapp"
 ---> Running in 0c3e6cce6f0b
 ---> cf178dda8238
Removing intermediate container 0c3e6cce6f0b
Successfully built cf178dda8238
Pushing image docker-registry.default.svc:5000/webapp/webapp-build:latest ...
Push successful
[root@origin-master ~]#

Alternatively you can directly inject the Dockerfile options in a single command and the build would start immediately:

[root@origin-master ~]#  oc new-build --name webapp-build -D $'FROM openshift/hello-openshift'
  • Create the web application
[root@origin-master ~]# oc new-app webapp-build
warning: Cannot find git. Ensure that it is installed and in your path. Git is required to work with git repositories.
--> Found image cf178dd (4 minutes old) in image stream "webapp/webapp-build" under tag "latest" for "webapp-build"

    * This image will be deployed in deployment config "webapp-build"
    * Ports 8080/tcp, 8888/tcp will be load balanced by service "webapp-build"
      * Other containers can access this service through the hostname "webapp-build"

--> Creating resources ...
    deploymentconfig "webapp-build" created
    service "webapp-build" created
--> Success
    Application is not exposed. You can expose services to the outside world by executing one or more of the commands below:
     'oc expose svc/webapp-build'
    Run 'oc status' to view your app.
[root@origin-master ~]#

As you see below, we are currently running a single pod:

[root@origin-master ~]#  oc get pod -o wide
NAME                   READY     STATUS      RESTARTS   AGE       IP            NODE
webapp-build-1-build   0/1       Completed   0          8m        10.131.0.27   origin-node-1
webapp-build-1-znk98   1/1       Running     0          3m        10.131.0.29   origin-node-1
[root@origin-master ~]#

Let’s check out endpoints and services:

[root@origin-master ~]# oc get ep
NAME           ENDPOINTS                           AGE
webapp-build   10.131.0.29:8080,10.131.0.29:8888   1m
[root@origin-master ~]# oc get svc
NAME           CLUSTER-IP     EXTERNAL-IP   PORT(S)             AGE
webapp-build   172.30.64.97           8080/TCP,8888/TCP   1m
[root@origin-master ~]#

Running a single pod is not great for redundancy, let’s scale out:

[root@origin-master ~]# oc scale --replicas=5 dc/webapp-build
deploymentconfig "webapp-build" scaled
[root@origin-master ~]#  oc get pod -o wide
NAME                   READY     STATUS      RESTARTS   AGE       IP            NODE
webapp-build-1-4fb98   1/1       Running     0          15s       10.130.0.47   origin-node-2
webapp-build-1-build   0/1       Completed   0          9m        10.131.0.27   origin-node-1
webapp-build-1-dw6ww   1/1       Running     0          15s       10.131.0.30   origin-node-1
webapp-build-1-lswhg   1/1       Running     0          15s       10.131.0.31   origin-node-1
webapp-build-1-z4nk9   1/1       Running     0          15s       10.130.0.46   origin-node-2
webapp-build-1-znk98   1/1       Running     0          4m        10.131.0.29   origin-node-1
[root@origin-master ~]#

We can check our endpoints and services again, and see that we have more endpoints and still one service:

[root@origin-master ~]# oc get ep
NAME           ENDPOINTS                                                        AGE
webapp-build   10.130.0.46:8080,10.130.0.47:8080,10.131.0.29:8080 + 7 more...   4m
[root@origin-master ~]# oc get svc
NAME           CLUSTER-IP     EXTERNAL-IP   PORT(S)             AGE
webapp-build   172.30.64.97           8080/TCP,8888/TCP   4m
[root@origin-master ~]#

OpenShift uses an internal DNS service called SkyDNS to expose services for internal communication:

[root@origin-master ~]# dig webapp-build.webapp.svc.cluster.local

; <<>> DiG 9.9.4-RedHat-9.9.4-61.el7 <<>> webapp-build.webapp.svc.cluster.local
;; global options: +cmd
;; Got answer:
;; ->>HEADER<<- opcode: QUERY, status: NOERROR, id: 20933
;; flags: qr aa rd ra; QUERY: 1, ANSWER: 1, AUTHORITY: 0, ADDITIONAL: 0

;; QUESTION SECTION:
;webapp-build.webapp.svc.cluster.local. IN A

;; ANSWER SECTION:
webapp-build.webapp.svc.cluster.local. 30 IN A	172.30.64.97

;; Query time: 1 msec
;; SERVER: 10.255.1.214#53(10.255.1.214)
;; WHEN: Sat Jun 30 08:58:19 UTC 2018
;; MSG SIZE  rcvd: 71

[root@origin-master ~]#
  • Let’s expose our web application so that it is accessible from the outside world:
[root@origin-master ~]# oc expose svc webapp-build
route "webapp-build" exposed
[root@origin-master ~]#

Connect with a browser to the URL you see under routes:

Modify the WebApp and inject variables via a config map into our application:

[root@origin-master ~]# oc create configmap webapp-map --from-literal=RESPONSE="My first OpenShift WebApp"
configmap "webapp-map" created
[root@origin-master ~]#

Afterwards we need to add the previously created config map to our environment

[root@origin-master ~]# oc env dc/webapp-build --from=configmap/webapp-map
deploymentconfig "webapp-build" updated
[root@origin-master ~]#

Now when we check our web application again you see that the new variables are injected into the pod and displayed:

I will share more about running OpenShift Container Platform and my experience in the coming month. I hope you find this article useful and please share your feedback and leave a comment.

Ansible Playbook to deploy AVI Controller and Service Engines

After my first blog post about Software defined Load Balancing with AVI Networks, here is how to automatically deploy AVI controller and services engines via Ansible.

Here are the links to my repositories; AVI Vagrant environment: https://github.com/berndonline/avi-lab-vagrant and AVI Ansible Playbook: https://github.com/berndonline/avi-lab-provision

Make sure that your vagrant environment is running,

berndonline@lab:~/avi-lab-vagrant$ vagrant status
Current machine states:

avi-controller-1          running (libvirt)
avi-controller-2          running (libvirt)
avi-controller-3          running (libvirt)
avi-se-1                  running (libvirt)
avi-se-2                  running (libvirt)

This environment represents multiple VMs. The VMs are all listed
above with their current state. For more information about a specific
VM, run `vagrant status NAME`.

I needed to modify the ansible.cfg to integrate a filter plugin:

[defaults]
inventory = ./.vagrant/provisioners/ansible/inventory/vagrant_ansible_inventory
host_key_checking=False

library = /home/berndonline/avi-lab-provision/lib
filter_plugins = /home/berndonline/avi-lab-provision/lib/filter_plugins

The controller installation is actually very simple and I got it from the official AVI ansible role they created, I added a second role to check ones the controller nodes are successfully booted:

---
- hosts: avi-controller
  user: '{{ ansible_ssh_user }}'
  gather_facts: "true"
  roles:
    - {role: ansible-role-avicontroller, become: true}
    - {role: avi-post-controller, become: false}

There’s one important thing to know before we run the playbook. When you have an AVI subscription you get custom container images with a predefined default password which makes it easier for you to do the cluster setup fully automated. You find the default password variable in group_vars/all.yml there you set as well if the password should be changed.

Let’s execute the ansible playbook, it takes a bit time for the three nodes to boot up:

berndonline@lab:~/avi-lab-vagrant$ ansible-playbook ../avi-lab-provision/playbooks/avi-controller-install.yml

PLAY [avi-controller] *********************************************************************************************************************************************

TASK [Gathering Facts] ********************************************************************************************************************************************
ok: [avi-controller-3]
ok: [avi-controller-2]
ok: [avi-controller-1]

TASK [ansible-role-avicontroller : Avi Controller | Deployment] ***************************************************************************************************
included: /home/berndonline/avi-lab-provision/roles/ansible-role-avicontroller/tasks/docker/main.yml for avi-controller-1, avi-controller-2, avi-controller-3

TASK [ansible-role-avicontroller : Avi Controller | Services | systemd | Check if Avi Controller installed] *******************************************************
included: /home/berndonline/avi-lab-provision/roles/ansible-role-avicontroller/tasks/docker/services/systemd/check.yml for avi-controller-1, avi-controller-2, avi-controller-3

TASK [ansible-role-avicontroller : Avi Controller | Check if Avi Controller installed] ****************************************************************************
ok: [avi-controller-3]
ok: [avi-controller-2]
ok: [avi-controller-1]

TASK [ansible-role-avicontroller : Avi Controller | Services | init.d | Check if Avi Controller installed] ********************************************************
skipping: [avi-controller-1]
skipping: [avi-controller-2]
skipping: [avi-controller-3]

TASK [ansible-role-avicontroller : Avi Controller | Check minimum requirements] ***********************************************************************************
included: /home/berndonline/avi-lab-provision/roles/ansible-role-avicontroller/tasks/docker/requirements.yml for avi-controller-1, avi-controller-2, avi-controller-3

TASK [ansible-role-avicontroller : Avi Controller | Requirements | Check for docker] ******************************************************************************
ok: [avi-controller-2]
ok: [avi-controller-3]
ok: [avi-controller-1]

...

TASK [avi-post-controller : wait for cluster nodes up] ************************************************************************************************************
FAILED - RETRYING: wait for cluster nodes up (30 retries left).

...

FAILED - RETRYING: wait for cluster nodes up (7 retries left).
FAILED - RETRYING: wait for cluster nodes up (8 retries left).
FAILED - RETRYING: wait for cluster nodes up (7 retries left).
ok: [avi-controller-2]
ok: [avi-controller-3]
ok: [avi-controller-1]

PLAY RECAP ********************************************************************************************************************************************************
avi-controller-1           : ok=36   changed=6    unreachable=0    failed=0
avi-controller-2           : ok=35   changed=5    unreachable=0    failed=0
avi-controller-3           : ok=35   changed=5    unreachable=0    failed=0

berndonline@lab:~/avi-lab-vagrant$

We are not finished yet and need to set basic settings like NTP and DNS, and need to configure the AVI three node controller cluster with another playbook:

---
- hosts: localhost
  connection: local
  roles:
    - {role: avi-cluster-setup, become: false}
    - {role: avi-change-password, become: false, when: avi_change_password == true}

The first role uses the REST API to do the configuration changes and requires the AVI ansible sdk role and for these reason it is very useful using the custom subscription images because you know the default password otherwise you need to modify the main setup.json file.

Let’s run the AVI cluster setup playbook:

berndonline@lab:~/avi-lab-vagrant$ ansible-playbook ../avi-lab-provision/playbooks/avi-cluster-setup.yml

PLAY [localhost] **************************************************************************************************************************************************

TASK [Gathering Facts] ********************************************************************************************************************************************
ok: [localhost]

TASK [ansible-role-avisdk : Checking if avisdk python library is present] *****************************************************************************************
ok: [localhost] => {
    "msg": "Please make sure avisdk is installed via pip. 'pip install avisdk --upgrade'"
}

TASK [avi-cluster-setup : set AVI dns and ntp facts] **************************************************************************************************************
ok: [localhost]

TASK [avi-cluster-setup : set AVI cluster facts] ******************************************************************************************************************
ok: [localhost]

TASK [avi-cluster-setup : configure ntp and dns controller nodes] *************************************************************************************************
changed: [localhost]

TASK [avi-cluster-setup : configure AVI cluster] ******************************************************************************************************************
changed: [localhost]

TASK [avi-cluster-setup : wait for cluster become active] *********************************************************************************************************
FAILED - RETRYING: wait for cluster become active (30 retries left).
FAILED - RETRYING: wait for cluster become active (29 retries left).
FAILED - RETRYING: wait for cluster become active (28 retries left).

...

FAILED - RETRYING: wait for cluster become active (14 retries left).
FAILED - RETRYING: wait for cluster become active (13 retries left).
FAILED - RETRYING: wait for cluster become active (12 retries left).
ok: [localhost]

TASK [avi-change-password : change default admin password on cluster build when subscription] *********************************************************************
skipping: [localhost]

PLAY RECAP ********************************************************************************************************************************************************
localhost                  : ok=7    changed=2    unreachable=0    failed=0

berndonline@lab:~/avi-lab-vagrant$

We can check in the web console to see if the cluster is booted and correctly setup:

Last but not least we need the ansible playbook for the AVI service engines installation which relies on the official AVI ansible se role:

---
- hosts: avi-se
  user: '{{ ansible_ssh_user }}'
  gather_facts: "true"
  roles:
    - {role: ansible-role-avise, become: true}

Let’s run the playbook for the service engines installation:

berndonline@lab:~/avi-lab-vagrant$ ansible-playbook ../avi-lab-provision/playbooks/avi-se-install.yml

PLAY [avi-se] *****************************************************************************************************************************************************

TASK [Gathering Facts] ********************************************************************************************************************************************
ok: [avi-se-2]
ok: [avi-se-1]

TASK [ansible-role-avisdk : Checking if avisdk python library is present] *****************************************************************************************
ok: [avi-se-1] => {
    "msg": "Please make sure avisdk is installed via pip. 'pip install avisdk --upgrade'"
}
ok: [avi-se-2] => {
    "msg": "Please make sure avisdk is installed via pip. 'pip install avisdk --upgrade'"
}

TASK [ansible-role-avise : Avi SE | Set facts] ********************************************************************************************************************
skipping: [avi-se-1]
skipping: [avi-se-2]

TASK [ansible-role-avise : Avi SE | Deployment] *******************************************************************************************************************
included: /home/berndonline/avi-lab-provision/roles/ansible-role-avise/tasks/docker/main.yml for avi-se-1, avi-se-2

TASK [ansible-role-avise : Avi SE | Check minimum requirements] ***************************************************************************************************
included: /home/berndonline/avi-lab-provision/roles/ansible-role-avise/tasks/docker/requirements.yml for avi-se-1, avi-se-2

TASK [ansible-role-avise : Avi SE | Requirements | Check for docker] **********************************************************************************************
ok: [avi-se-2]
ok: [avi-se-1]

TASK [ansible-role-avise : Avi SE | Requirements | Set facts] *****************************************************************************************************
ok: [avi-se-1]
ok: [avi-se-2]

TASK [ansible-role-avise : Avi SE | Requirements | Validate Parameters] *******************************************************************************************
ok: [avi-se-1] => {
    "changed": false,
    "msg": "All assertions passed"
}
ok: [avi-se-2] => {
    "changed": false,
    "msg": "All assertions passed"
}

...

TASK [ansible-role-avise : Avi SE | Services | systemd | Start the service since it's not running] ****************************************************************
changed: [avi-se-1]
changed: [avi-se-2]

RUNNING HANDLER [ansible-role-avise : Avi SE | Services | systemd | Daemon reload] ********************************************************************************
ok: [avi-se-2]
ok: [avi-se-1]

RUNNING HANDLER [ansible-role-avise : Avi SE | Services | Restart the avise service] ******************************************************************************
changed: [avi-se-2]
changed: [avi-se-1]

PLAY RECAP ********************************************************************************************************************************************************
avi-se-1                   : ok=47   changed=7    unreachable=0    failed=0
avi-se-2                   : ok=47   changed=7    unreachable=0    failed=0

berndonline@lab:~/avi-lab-vagrant$

After a few minutes you see the AVI service engines automatically register on the controller cluster and you are ready start configuring the detailed load balancing configuration:

Please share your feedback and leave a comment.

Software defined Load Balancing with AVI Networks

Throughout my career I have used various load balancing platforms, from commercial products like F5 or Citrix NetScaler to open source software like HA proxy. All of them do their job of balancing traffic between servers but the biggest problem is the scalability: yes you can deploy more load balancers but the config is static bound to the appliance.

AVI Networks has a very interesting concept of moving away from the traditional idea of load balancing and solving this problem by decoupling the control-plane from the data-plane which makes the load balancing Service Engines basically just forward traffic and can be more easily scaled-out when needed. Another nice advantage is that these Service Engines are container based and can run on basically every type of infrastructure from Bare Metal, on VMs to modern containerized platforms like Kubernetes or OpenShift:

All the AVI components are running as container image on any type of infrastructure or platform architecture which makes the deployment very easy to run on-premise or cloud systems.

The Service Engines on Hypervisor or Base-metal servers need network cards which support Intel’s DPDK for better packet forwarding. Have a look at the AVI linux server deployment guide: https://avinetworks.com/docs/latest/installing-avi-vantage-for-a-linux-server-cloud/

Here now, is a basic step-by-step guide on how to install the AVI Vantage Controller and additional Service Engines. Have a look at the AVI Knowledge-Base where the install is explained in detail:  https://avinetworks.com/docs/latest/installing-avi-vantage-for-a-linux-server-cloud/

Here is the link to my Vagrant environment: https://github.com/berndonline/avi-lab-vagrant

Let’s start with the manual AVI Controller installation:

[vagrant@localhost ~]$ sudo ./avi_baremetal_setup.py
AviVantage Version Tag: 17.2.11-9014
Found disk with largest capacity at [/]

Welcome to Avi Initialization Script

Pre-requisites: This script assumes the below utilities are installed:
                  docker (yum -y install docker/apt-get install docker.io)
Supported Vers: OEL - 6.5,6.7,6.9,7.0,7.1,7.2,7.3,7.4 Centos/RHEL - 7.0,7.1,7.2,7.3,7.4, Ubuntu - 14.04,16.04

Do you want to run Avi Controller on this Host [y/n] y
Do you want to run Avi SE on this Host [y/n] n
Enter The Number Of Cores For Avi Controller. Range [4, 4] 4
Please Enter Memory (in GB) for Avi Controller. Range [12, 7]
Please enter directory path for Avi Controller Config (Default [/opt/avi/controller/data/])
Please enter disk size (in GB) for Avi Controller Config (Default [30G]) 10
Do you have separate partition for Avi Controller Metrics ? If yes, please enter directory path, else leave it blank
Do you have separate partition for Avi Controller Client Logs ? If yes, please enter directory path, else leave it blank
Please enter Controller IP (Default [10.255.1.232])
Enter the Controller SSH port. (Default [5098])
Enter the Controller system-internal portal port. (Default [8443])
AviVantage Version Tag: 17.2.11-9014
Run SE           : No
Run Controller   : Yes
Controller Cores : 4
Memory(GB)       : 7
Disk(GB)         : 10
Controller IP    : 10.255.1.232
Disabling Avi Services...
Loading Avi CONTROLLER Image. Please Wait..
Installation Successful. Starting Services..
[vagrant@localhost ~]$
[vagrant@localhost ~]$ sudo systemctl start avicontroller

Or as a single command without interactive mode:

[vagrant@localhost ~]$ sudo ./avi_baremetal_setup.py -c -cd 10 -cc 4 -cm 7 -i 10.255.1.232
AviVantage Version Tag: 17.2.11-9014
Found disk with largest capacity at [/]
AviVantage Version Tag: 17.2.11-9014
Run SE           : No
Run Controller   : Yes
Controller Cores : 4
Memory(GB)       : 7
Disk(GB)         : 10
Controller IP    : 10.255.1.232
Disabling Avi Services...
Loading Avi CONTROLLER Image. Please Wait..
Installation Successful. Starting Services..
[vagrant@localhost ~]$
[vagrant@localhost ~]$ sudo systemctl start avicontroller

The installer basically installed a container image on the server which runs the AVI Controller:

[vagrant@localhost ~]$ sudo docker ps
CONTAINER ID        IMAGE                                                 COMMAND                  CREATED              STATUS              PORTS                                                                                                                                    NAMES
c689435f74fd        avinetworks/controller:17.2.11-9014                   "/opt/avi/scripts/do…"   About a minute ago   Up About a minute   0.0.0.0:80->80/tcp, 0.0.0.0:443->443/tcp, 0.0.0.0:5054->5054/tcp, 0.0.0.0:5098->5098/tcp, 0.0.0.0:8443->8443/tcp, 0.0.0.0:161->161/udp   avicontroller
[vagrant@localhost ~]$

Next you can connect via the web console to change the password and finalise the configuration to configure DNS, NTP and SMTP:

When you get to the menu Orchestrator integration you can put in the details for the controller to install additional service engines:

In the meantime the AVI Controller installs the specified Service Engines in the background, which automatically appear once this is completed under the infrastructure menu:

Like with the AVI Controller, the Service Engines run as container image:

[vagrant@localhost ~]$ sudo docker ps
CONTAINER ID        IMAGE                                         COMMAND                  CREATED             STATUS              PORTS               NAMES
2c6b207ed376        avinetworks/se:17.2.11-9014                   "/opt/avi/scripts/do…"   51 seconds ago      Up 50 seconds                           avise
[vagrant@localhost ~]$

The next article will be about automatically deploying the AVI Controller and Service Engines via Ansible, and looking into how to integrate AVI with OpenShift.

Please share your feedback and leave a comment.