Citrix NetScaler (Update)

Almost 3 years ago I evaluated and implemented for my ex company F5 BIG-IP 8950 load balancer; now for my new company I start implementing Citrix NetScaler VPX for our Windows infrastructre (Lync, Exchange and Citrix). Here a short overview how it is integrate in the two data centre’s:

From the first look I like the NetScaler, the CLI is a bit easier to understand from what I think but will see how it goes over the next weeks regarding balancing compare to F5 😉

I like the policy based routing implementation on the Netscaler, here a short example:

add ns pbr mgmt-access ALLOW -srcIP = 10.1.0.200 -destIP = 192.168.0.1-192.168.0.254 -nextHop 10.1.0.254 -priority 10

Access to the 10.1.0.200 will be routed to the gateway 10.1.0.254 even you have a default gateway configured what shows to another direction.

In my set-up you need to configure policy based routing if server in the Windows backend network try to access virtual server IPs in the LB-Transfer network otherwise you have asymetric routing.

add ns pbr VIP-WIND-DC02 ALLOW -srcIP = 10.2.0.1-10.2.0.100 -destIP = 10.1.0.1-10.1.0.254 -nextHop 10.2.0.254 -priority 11

Optimizing Cisco ASA Firewall Configuration

From my experience with Cisco ASAs over the last years it can make a big difference on the performance if the ASA is not correctly configured. You have to keep some things in mind when you install and set-up your firewalls. Of course for low traffic networks it will not make a big difference but for data centre infrastructures it can make a huge difference on the load of your CPU.

In the end from the network perspective everything can influence the performance: throughput (bit/s, packets/s and packet size), sessions (new and max connections), inspection and encryption (VPN). I recommend to have a look at the CiscoLive 365 presentation from 2012 – Maximizing Firewall Performance, very interesting presentation about the ASA hardware platform’s and what influence the performance.

At first some general information about the ASA platform’s before you start configuring

ASA5510 to 5550

  • On-board interfaces are better for higher packet rate

ASA5580

  • Traffic distribution over both I/O bridges
  • Keep flows on same I/O bridge and place interface pairs on the same card (inside and outside)

ASA55xx-X

  • Possible to use jumbo frames but only make sense in end-to-end configuration

All ASA platform’s

  • Use port-channel for 1Gbit interfaces to split frames over multiple FIFO queues and RX rings (10Gbit interface have four RX rings)
  • Avoid inter-context traffic because it uses the loopback buffer

SNMP and Logging settings

Disable SNMP traps if not needed and use polling only

snmp-server host INSIDE 10.255.0.10 poll community public version 2c

Only use one syslog server and proper trap level to reduce CPU overhead also adjust the ASDM logging

logging enable

logging host INSIDE 10.255.0.10
logging trap critical
logging history errors
logging queue 2048 

logging asdm warning 
logging asdm-buffer-size 512 

asdm history enable

Filter logging messages to reduce CPU overhead and prevent misconfigured debug logging to overload the CPU of the firewall

:: Build TCP Connection
no logging message 302013

:: Teardown TCP Connection
no logging message 302014

:: Deny udp reverse path check
no logging message 106021

:: Bad TCP hdr length
no logging message 500003

:: Denied ICMP type=0, no matching session
no logging message 313004

:: No matching connection for ICMP error message
no logging message 313005

:: Inbound TCP connection denied outside Firewall Access
no logging message 106001

:: Inbount UDP connection denied outside Firewall Access
no logging message 106006
no logging message 106007

Disable Threat Detection statistics

threat-detection basic-threat
no threat-detection statistics

Enable threat detection statistics only temporary because it can have a big impact on the performance of your ASA but keep basic threat detection always enabled!

ICMP interface settings

Not really related to optimizing the performance but ICMP should be correctly configured

icmp unreachable rate-limit 1 burst-size 1

icmp permit any echo OUTSIDE
icmp permit any echo-reply OUTSIDE
icmp permit any unreachable OUTSIDE

icmp permit any echo INSIDE
icmp permit any echo-reply INSIDE
icmp permit any unreachable INSIDE

Transport Protocol settings

Adjust default TCP MMS (Maximum Segment Size) 1380 to higher value (Please be careful sometimes it makes sense to leave it at 1380).

sysopt connection tcpmss 1460
sysopt connection tcpmss minimum 0

ASA silently drop packets without sending TCP reset.

no service resetinbound
no service resetoutside

Timeout value settings

Change timeout values for XLATE table, TCP/UDP sessions and Firewall Engine settings

timeout xlate 1:05:00
timeout udp 00:01:00
timeout conn 01:00:00
timeout half-closed 00:10:00
timeout h323 00:00:01
timeout sunrpc 00:01:00
timeout sip 00:05:00
timeout sip_media 00:01:00
timeout h225 00:00:01
timeout mgcp 00:00:01
timeout uauth 00:00:01 absolute

Antispoofing Options

ip verify reverse-path interface OUTSIDE
ip verify reverse-path interface INSIDE

Modular Policy Framework (MPF)

Modular Policy Framework provides a consistent and flexible way to configure security appliance features. For example, you can use Modular Policy Framework to create a timeout configuration that is specific to a particular TCP application, as opposed to one that applies to all TCP applications.
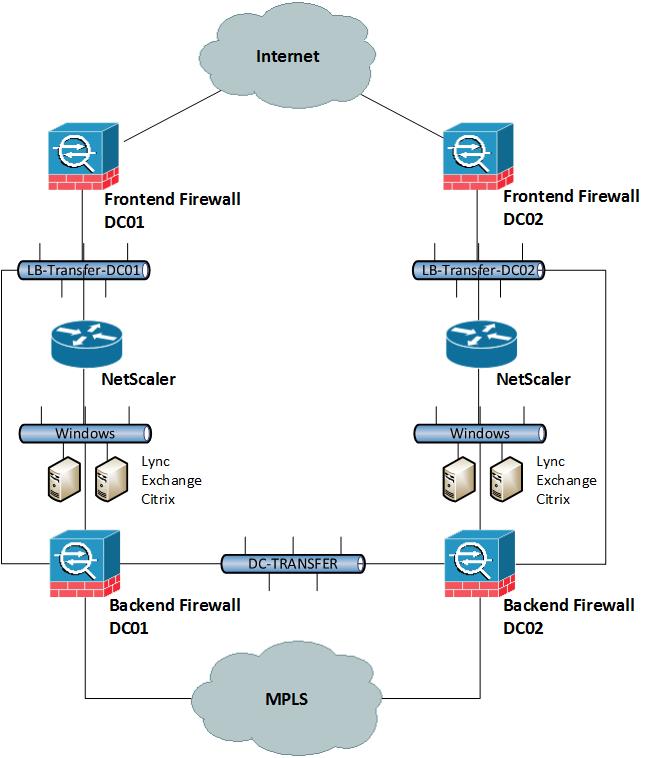
ACL and Class-Map for unrestricted IP traffic between backend networks

access-list UNRESTRICTED-IP-TRAFFIC extended permit ip object NET_10.1.100.0 object NET_10.2.100.0
access-list UNRESTRICTED-IP-TRAFFIC extended permit ip object NET_10.1.200.0 object NET_10.2.200.0
access-list UNRESTRICTED-IP-TRAFFIC extended permit ip object NET_10.1.300.0 object NET_10.2.300.0

class-map unrestricted-ip-traffic
match access-list UNRESTRICTED-IP-TRAFFIC
exit

ACL and Class-Map for any IP traffic

access-list ALL-IP-TRAFFIC extended permit ip any any

class-map all-ip-traffic
match access-list ALL-IP-TRAFFIC
exit

Inspection Policy for DNS traffic

policy-map type inspect dns custom_dns_map
 parameters
  message-length maximum 1280
  dns-guard
  protocol-enforcement
  no nat-rewrite
  no id-randomization
  no tsig enforced
  no id-mismatch
  exit
 exit

Policy Map

Turn off not needed inspection to reduce processing overhead within the CPU. In the policy map you define the TCP connection quotas for the before configured class-map’s ACLs.

policy-map global_policy

  class inspection_default
   inspect icmp
   inspect icmp error
   inspect ftp
   inspect dns custom_dns_map

   no inspect rtsp
   no inspect pptp
   no inspect sip
   no inspect ctiqbe
   no inspect esmtp
   no inspect gtp
   no inspect h323
   no inspect h323 ras
   no inspect h323 h225
   no inspect http
   no inspect ils
   no inspect mgcp
   no inspect netbios
   no inspect rsh
   no inspect skinny
   no inspect snmp
   no inspect sqlnet
   no inspect sunrpc
   no inspect tftp
   no inspect xdmcp
   exit

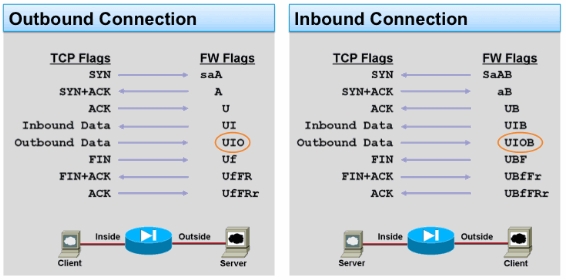
  class unrestricted-ip-traffic
   set connection advanced-options tcp-state-bypass
   set connection per-client-max 0
   set connection conn-max 0
   set connection timeout embryonic 0:00:10
   set connection timeout half-closed 0:10:00
   set connection timeout tcp 1:00:00
   exit

  class all-ip-traffic
   set connection random-sequence-number enable
   set connection per-client-max 500
   set connection conn-max 0
   set connection embryonic-conn-max 100
   set connection per-client-embryonic-max 50
   set connection timeout embryonic 0:00:10
   set connection timeout half-closed 0:10:00
   set connection timeout tcp 1:00:00
   exit
exit

Additional information

There are also some more points to think about what can influense the performance of the ASA firewall.

  • Several smaller ACLs are better than a large one (ACL size mostly impacts conn setup rate)
  • Static NAT entries are best for higher performance
  • Optimize dynamic routing because it has an impact on the CPU
  • Careful with inline packet capturing
  • Keep HTTP conn replication disabled for best performance results
  • Share the load with active virtual contexts on each firewall, see here my post: Cisco ASA Virtual Context Mode


Cisco ASA TCP Connection Flags

I got asked to look into a problem where two servers where not able to communicate with each other, ping didnt work and the application could not connect to the server. Firewall rules and routing was fine and my colleague spend already over an hour but couldnt find something. The first thing I asked, do you see a TCP connection? He told me yes over the ASDM logging I see something…. I double check and connect to the console and run:

show conn address 10.20.100.21

Show conn output:

TCP DMZ 10.10.127.29:2222 TRANSFER 10.20.100.21:42799, idle 0:00:00, bytes 0, flags saA
TCP DMZ 10.10.127.29:2223 TRANSFER 10.20.100.21:63554, idle 0:00:00, bytes 0, flags saA
TCP DMZ 10.5.63.29:2220 TRANSFER 10.20.100.21:59274, idle 0:00:00, bytes 0, flags saA
TCP DMZ 10.5.63.29:2221 TRANSFER 10.20.100.21:55782, idle 0:00:00, bytes 0, flags saA

I saw directly that the TCP connection was not open because the connection flag was “saA” what means outbound SYN was send and a connection is reserved but no SYN ACK came back. The problem in the end was that between these two servers was a VPN and that the IP network was missing in both crypto map’s what was then easy to find and solve in the end.

The command “show conn ?” give you enough information and when it comes to troubleshooting that you need to know basic troubleshooting skills because some stuff is not easy to find out over the ASDM and to use the command line instead.

Here the overview over the ASA TCP connection flags which are important to know or at least to know where to look them up 😉

Here the document from Cisco: ASA TCP Connection Flags (Connection build-up and teardown)


Cisco ASA EtherChannel Interfaces

With the ASA version 8.4 Cisco introduced port-channels (ASA5510 or higher) what is a really nice feature because you can share the load over more interfaces. When it comes to a physical interface the incoming or outgoing traffic is processed through Fifo queues and RX/TX-rings per interface, when theses queues or rings are full nothing can pass through. So its not always related to CPU load of the device also the phsical interfaces are in the scope when it comes to performance. With port-channel you share the load over more Fifo queues and RX/TX-rings but keep in mind about the port-channel balancing mode.

Physical interface configuration

interface GigabitEthernet0/0
  description GigTrunk-Po1
  channel-group 1 mode active
  no shutdown
  exit

interface GigabitEthernet0/1
  description GigTrunk-Po1
  channel-group 1 mode active
  no shutdown
  exit

interface GigabitEthernet0/2
  description GigTrunk-Po1
  channel-group 1 mode active
  no shutdown
  exit

interface GigabitEthernet0/3
  description GigTrunk-Po1
  channel-group 1 mode active
  no shutdown
  exit

Port-channel configuration with VLAN sub-interfaces

interface Port-channel1
  no shutdown
  exit

interface Port-channel1.100
  description Server VLAN
  vlan 100
  nameif SERVER
  security-level 100
  ip address 10.1.0.254 255.255.255.0 standby 10.1.0.253
  mac-address 0a00.0a00.0011 standby 0a00.0a00.0021
  no shutdown
  exit

interface Port-channel1.200
  description Clients VLAN
  vlan 200
  nameif CLIENTS
  security-level 100
  ip address 10.2.0.254 255.255.255.0 standby 10.2.0.253
  mac-address 0a00.0a00.0011 standby 0a00.0a00.0021
  no shutdown
  exit

For more information read the Cisco ASA 8.4 Configuration Guide – EtherChannels

Cisco ASA Virtual Context Mode

A single Cisco ASA or a cluster of two ASAs can be partition into multiple virtual firewalls known as security contexts. Each context has it’s own independent firewall, with its own security policy, interfaces, and administrators. These contexts are similar to having multiple standalone ASA devices. In combination with failover groups you can run a ASA cluster in active/active state and utilize both devices. Don’t forget when a failover happens that both failover groups need to run on a single device, keep enough ressources free on both devices and do not oversubscribe too much.

You have to look because there are limitation what features are supported in context mode. In version 8 is unsupport to use dynamic routing protocols, VPN, Threat Detection and Quality of Service. In version 9 are some changes and now dynamic routing protocols (not RIP or OSPFv3) and site-to-site IPsec VPNs are supported.

Here the configuration example how to set-up an Cisco ASA 5580 with 10 Gigabit Ethernet interfaces.

Enabling the context mode

mode noconfirm multiple

Physical interface configuration

interface GigabitEthernet4/2 
  description Failover 
  no shutdown 
  exit 

interface GigabitEthernet4/3 
  description Stateful 
  no shutdown 
  exit 

interface TenGigabitEthernet5/0 
  description TeTrunk-1st 
  no shutdown 
  exit 

interface TenGigabitEthernet5/1 
  description TeTrunk-2nd 
  no shutdown 
  exit

Redundant interface configuration

interface Redundant 1
  description Redundant-Trunk
  member-interface TenGigabitEthernet5/0
  member-interface TenGigabitEthernet5/1
  exit

interface Redundant 1.800
  vlan 800
  description Link-Outside1
  exit

interface Redundant 1.801
  vlan 801
  description Link-Outside2
  exit

interface Redundant 1.100
  vlan 100
  description Link-Inside1
  exit

interface Redundant 1.101
  vlan 101
  description Link-Inside2
  exit

interface Redundant 1.500
  vlan 500
  description Link-Management
  exit

Here you need to start configuring the ASA failover settings. Like you see in the failover group configuration that I put group 1 to the primary device and group 2 to the seconday device for active/active set-up, when I create the virtual security context I join them to the different failover groups.

failover group 1
  primary
  polltime interface 1 holdtime 5
  exit

failover group 2
  secondary
  polltime interface 1 holdtime 5
  exit

failover

failover lan unit primary
failover lan interface failover GigabitEthernet4/2
failover interface ip failover 169.254.0.1 255.255.255.0 standby 169.254.0.2

failover link stateful GigabitEthernet4/3
failover interface ip stateful 169.254.1.1 255.255.255.0 standby 169.254.1.2

failover polltime unit 2 holdtime 6
failover polltime interface 1 holdtime 5
failover timeout 0:00:00

failover active

Failover configuration on the seconday device

interface GigabitEthernet4/2
  description Failover
  no shutdown
  exit

failover lan unit secondary
failover lan interface failover GigabitEthernet4/2
failover interface ip failover 169.254.0.1 255.255.255.0 standby 169.254.0.2

failover

copy running-config startup-config

Now you start to set-up the virtual contexts and add the interfaces I configured before

admin-context admin-asa-01

context admin-asa-01
  allocate-interface Redundant1.500 Link-Management
  config-url disk0:/admin-asa-01.conf
  join-failover-group 1
  exit

context virtual-asa-02
  allocate-interface Redundant1.800 Link-Outside1
  allocate-interface Redundant1.100 Link-Inside1
  config-url disk0:/virtual-asa-02.conf
  join-failover-group 1
  exit

context virtual-asa-03
  allocate-interface Redundant1.801 Link-Outside2
  allocate-interface Redundant1.101 Link-Inside2
  config-url disk0:/virtual-asa-03.conf
  join-failover-group 2
  exit

In the end save the configuration

write memory all

Afterwards you can change to the configured contexts with the command

changeto context virtual-asa-02

and start configuring your virtual firewalls.