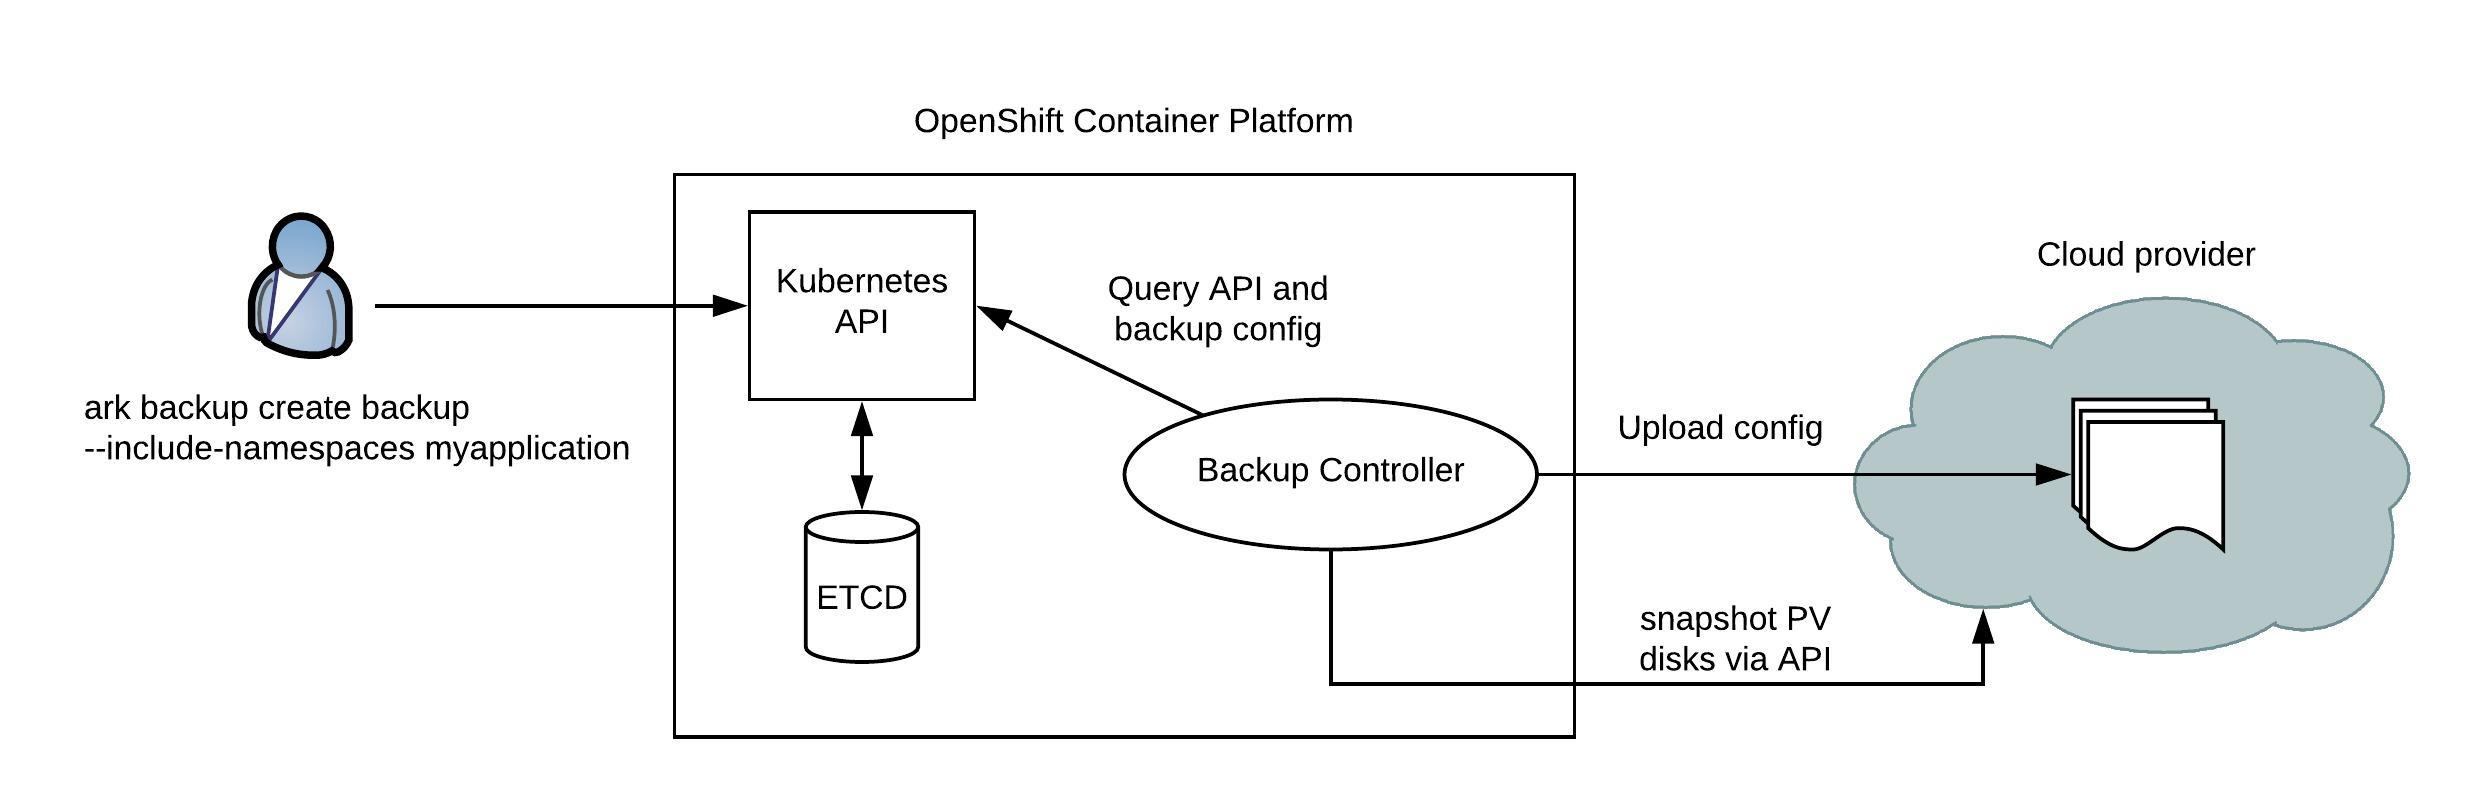
I have found an interesting open source tool called Heptio Velero previously known as Heptio Ark which is able to backup Kubernetes and OpenShift container platforms. The tool mainly does this via the API and backup namespace objects and additionally is able to create snapshots for PVs on Azure, AWS and GCP.
The user uses the ark command line utility to create and restore backups.
The installation on Velero is super simple, just follow the steps below:
# Download and extract the latest Velero release from github
wget https://github.com/heptio/velero/releases/download/v0.10.1/ark-v0.10.1-linux-amd64.tar.gz
tar -xzf ark-v0.10.1-linux-amd64.tar.gz -c ./velero/

# Move the ark binary to somewhere in your PATH
mv ./velero/ark /usr/sbin/

# The last two commands create namespace and applies configuration
oc create -f ./velero/config/common/00-prereqs.yaml
oc create -f ./velero/config/minio/
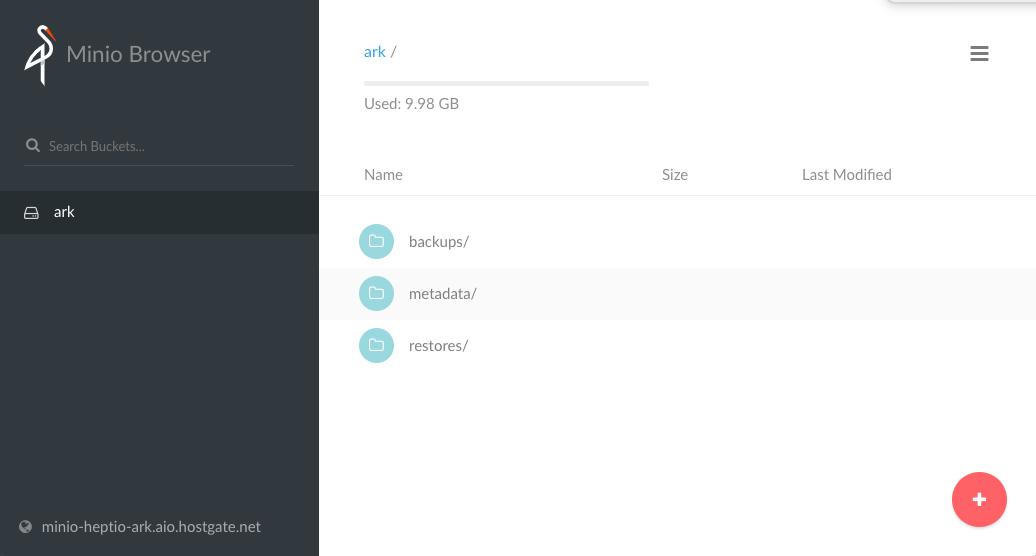
You can expose Minio to access the web console from the outside.
# Create route
oc expose service minio

# View access and secret key to login via the web console
oc describe deployment.apps/minio | grep -i Environment -A2
    Environment:
      MINIO_ACCESS_KEY:  minio
      MINIO_SECRET_KEY:  minio123
Here a few command options on how to backup objects:
# Create a backup for any object that matches the app=pod label selector:
ark backup create <backup-name> --selector <key>=<value>

# Alternatively if you want to backup all objects except those matching the label backup=ignore:
ark backup create <backup-name> --selector 'backup notin (ignore)'

# Create regularly scheduled backups based on a cron expression using the app=pod label selector:
ark schedule create <backup-name> --schedule="0 1 * * *" --selector <key>=<value>

# Create a backup for a namespace:
ark backup create <backup-name> --include-namespaces <namespace-name>
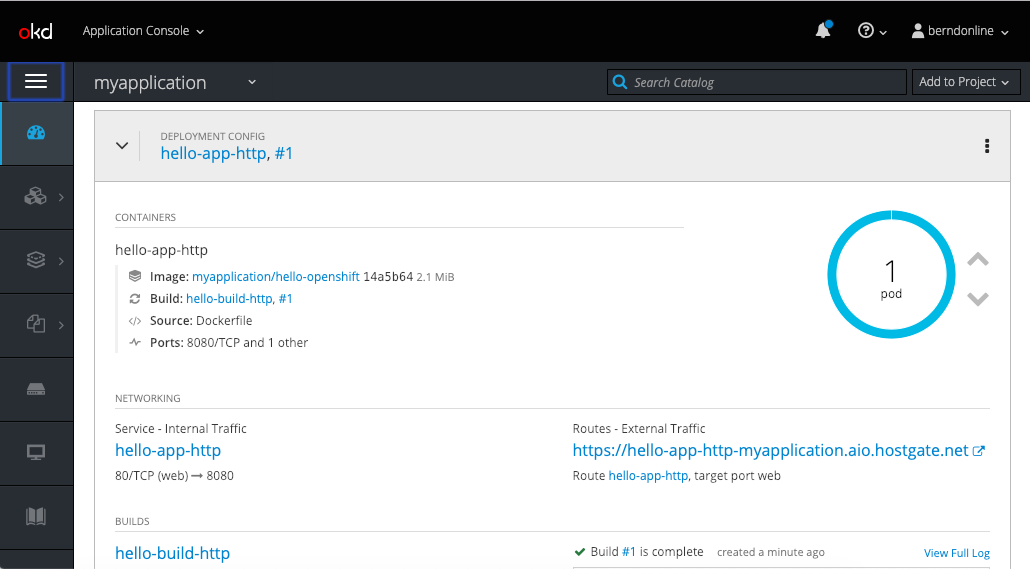
Let’s do a backup and restore tests; I have created a new OpenShift project with a simple hello-openshift build- and deployment-config:
[root@master1 ~]# ark backup create mybackup --include-namespaces myapplication
Backup request "mybackup" submitted successfully.
Run `ark backup describe mybackup` or `ark backup logs mybackup` for more details.
[root@master1 ~]# ark backup get
NAME          STATUS      CREATED                         EXPIRES   STORAGE LOCATION   SELECTOR
mybackup      Completed   2019-02-08 17:14:09 +0000 UTC   29d       default
Once the backup has completed we can delete the project.
[root@master1 ~]# oc delete project myapplication
project.project.openshift.io "myapplication" deleted
Now let’s restore the project namespace from the previous created backup:
[root@master1 ~]# ark restore create --from-backup mybackup
Restore request "mybackup-20190208171745" submitted successfully.
Run `ark restore describe mybackup-20190208171745` or `ark restore logs mybackup-20190208171745` for more details.
[root@master1 ~]# ark restore get
NAME                         BACKUP        STATUS       WARNINGS   ERRORS    CREATED                         SELECTOR
mybackup-20190208171745      mybackup      InProgress   0          0         2019-02-08 17:17:45 +0000 UTC
[root@master1 ~]# ark restore get
NAME                         BACKUP        STATUS      WARNINGS   ERRORS    CREATED                         SELECTOR
mybackup-20190208171745      mybackup      Completed   1          0         2019-02-08 17:17:45 +0000 UTC
The project is back in the state it was when we created the backup.
[root@master1 ~]# oc get pods
NAME                     READY     STATUS    RESTARTS   AGE
hello-app-http-1-qn8jj   1/1       Running   0          2m
[root@master1 ~]# curl -k --insecure https://hello-app-http-myapplication.aio.hostgate.net/
Hello OpenShift!
There are a few issues around the restore which I have seen and I want to explain, I’m not sure if these are related to OpenShift in general or just the latest 3.11 version. The secrets for the builder account are missing or didn’t restore correctly and cannot be used.
[root@master1 ~]# oc get build
NAME                 TYPE      FROM         STATUS                               STARTED   DURATION
hello-build-http-1   Docker    Dockerfile   New (CannotRetrieveServiceAccount)
hello-build-http-2   Docker    Dockerfile   New
[root@master1 ~]# oc get events | grep Failed
1m          1m           2         hello-build-http.15816e39eefb637d         BuildConfig                                     Warning   BuildConfigInstantiateFailed   buildconfig-controller                                error instantiating Build from BuildConfig myapplication/hello-build-http (0): Error resolving ImageStreamTag hello-openshift-source:latest in namespace myapplication: imagestreams.image.openshift.io "hello-openshift-source" not found
1m          1m           6         hello-build-http.15816e39f446207f         BuildConfig                                     Warning   BuildConfigInstantiateFailed   buildconfig-controller                                error instantiating Build from BuildConfig myapplication/hello-build-http (0): Error resolving ImageStreamTag hello-openshift-source:latest in namespace myapplication: unable to find latest tagged image
1m          1m           1         hello-build-http.15816e3a49f21411         BuildConfig                                     Warning   BuildConfigInstantiateFailed   buildconfig-controller                                error instantiating Build from BuildConfig myapplication/hello-build-http (0): builds.build.openshift.io "hello-build-http-1" already exists
[root@master1 ~]# oc get secrets | grep builder
builder-token-5q646        kubernetes.io/service-account-token   4         5m

# OR
[root@master1 ~]# oc get build
NAME                 TYPE      FROM         STATUS                        STARTED   DURATION
hello-build-http-1   Docker    Dockerfile   Pending (MissingPushSecret)
hello-build-http-2   Docker    Dockerfile   New
[root@master1 ~]# oc get events | grep FailedMount
15m         19m          10        hello-build-http-1-build.15816cc22f35795c   Pod                                             Warning   FailedMount                    kubelet, ip-172-26-12-32.eu-west-1.compute.internal   MountVolume.SetUp failed for volume "builder-dockercfg-k55f6-push" : secrets "builder-dockercfg-k55f6" not found
15m         17m          2         hello-build-http-1-build.15816cdec9dc561a   Pod                                             Warning   FailedMount                    kubelet, ip-172-26-12-32.eu-west-1.compute.internal   Unable to mount volumes for pod "hello-build-http-1-build_myapplication(4c2f1113-2bb5-11e9-8a6b-0a007934f01e)": timeout expired waiting for volumes to attach or mount for pod "myapplication"/"hello-build-http-1-build". list of unmounted volumes=[builder-dockercfg-k55f6-push]. list of unattached volumes=[buildworkdir docker-socket crio-socket builder-dockercfg-k55f6-push builder-dockercfg-m6d2v-pull builder-token-sjvw5]
13m         13m          1         hello-build-http-1-build.15816d1e3e65ad2a   Pod                                             Warning   FailedMount                    kubelet, ip-172-26-12-32.eu-west-1.compute.internal   Unable to mount volumes for pod "hello-build-http-1-build_myapplication(4c2f1113-2bb5-11e9-8a6b-0a007934f01e)": timeout expired waiting for volumes to attach or mount for pod "myapplication"/"hello-build-http-1-build". list of unmounted volumes=[buildworkdir docker-socket crio-socket builder-dockercfg-k55f6-push builder-dockercfg-m6d2v-pull builder-token-sjvw5]. list of unattached volumes=[buildworkdir docker-socket crio-socket builder-dockercfg-k55f6-push builder-dockercfg-m6d2v-pull builder-token-sjvw5]
[root@master1 ~]# oc get secrets | grep builder
NAME                       TYPE                                  DATA      AGE
builder-dockercfg-m6d2v    kubernetes.io/dockercfg               1         5m
builder-token-4chx4        kubernetes.io/service-account-token   4         5m
builder-token-sjvw5        kubernetes.io/service-account-token   4         5m
The deployment config seems to be disconnected and doesn’t know the state of the running pod:
[root@ip-172-26-12-32 ~]# oc get dc
NAME             REVISION   DESIRED   CURRENT   TRIGGERED BY
hello-app-http   0          1         0         config,image(hello-openshift:latest)
[root@ip-172-26-12-32 ~]#
Here are the steps to recover out of this situation:
# First cancel all builds - the restore seems to have triggered a new build:
[root@master1 ~]# oc cancel-build $(oc get build --no-headers | awk '{ print $1 }')
build.build.openshift.io/hello-build-http-1 marked for cancellation, waiting to be cancelled
build.build.openshift.io/hello-build-http-2 marked for cancellation, waiting to be cancelled
build.build.openshift.io/hello-build-http-1 cancelled
build.build.openshift.io/hello-build-http-2 cancelled

# Delete all builds otherwise you will get later a problem because of duplicate name:
[root@master1 ~]# oc delete build $(oc get build --no-headers | awk '{ print $1 }')
build.build.openshift.io "hello-build-http-1" deleted
build.build.openshift.io "hello-build-http-2" deleted

# Delete the project builder account - this triggers openshift to re-create the builder
[root@master1 ~]# oc delete sa builder
serviceaccount "builder" deleted
[root@master1 ~]# oc get secrets | grep builder
builder-dockercfg-vwckw    kubernetes.io/dockercfg               1         24s
builder-token-dpgj9        kubernetes.io/service-account-token   4         24s
builder-token-lt7z2        kubernetes.io/service-account-token   4         24s

# Start the build and afterwards do a rollout for the deployment config:
[root@master1 ~]# oc start-build hello-build-http
build.build.openshift.io/hello-build-http-3 started
[root@master1 ~]# oc rollout latest dc/hello-app-http
deploymentconfig.apps.openshift.io/hello-app-http rolled out
After doing all this your build- and deployment-config is back synchronised.
[root@master1 ~]# oc get dc
NAME             REVISION   DESIRED   CURRENT   TRIGGERED BY
hello-app-http   3          1         1         config,image(hello-openshift:latest)
My feedback about Heptio Velero(Ark); apart from the restore issues with the build- and deployment-config, I find the tool great especially in scenarios where I accidently deleted a namespace or for DR where I need to recover a whole cluster. What makes the tool worth it, is actually the possibility to create snapshots from PV disks on your cloud provider.
Check out the official documentation from Heptio for more information and if you like this article please leave a comment.