After my previous articles on OpenShift and Terraform I wanted to show how to create the necessary infrastructure and to deploy an OpenShift Container Platform in a more real-world scenario. I highly recommend reading my other posts about using Terraform to deploy an Amazon AWS VPC and AWS EC2 Instances and Load Balancers. Once the infrastructure is created we will use the Bastion Host to connect to the environment and deploy OpenShift Origin using Ansible.
I think this might be an interesting topic to show what tools like Terraform and Ansible can do together:
I will not go into detail about the configuration and only show the output of deploying the infrastructure. Please checkout my Github repository to see the detailed configuration: https://github.com/berndonline/openshift-terraform
Before we start you need to clone the repository and generate the ssh key used from the bastion host to access the OpenShift nodes:
git clone https://github.com/berndonline/openshift-terraform.git
cd ./openshift-terraform/
ssh-keygen -b 2048 -t rsa -f ./helper_scripts/id_rsa -q -N ""
chmod 600 ./helper_scripts/id_rsa
We are ready to create the infrastructure and run terraform apply:
berndonline@lab:~/openshift-terraform$ terraform apply
...
Plan: 56 to add, 0 to change, 0 to destroy.
Do you want to perform these actions?
Terraform will perform the actions described above.
Only 'yes' will be accepted to approve.
Enter a value: yes
...
Apply complete! Resources: 19 added, 0 changed, 16 destroyed.
Outputs:
bastion = ec2-34-244-225-35.eu-west-1.compute.amazonaws.com
openshift master = master-35563dddc8b2ea9c.elb.eu-west-1.amazonaws.com
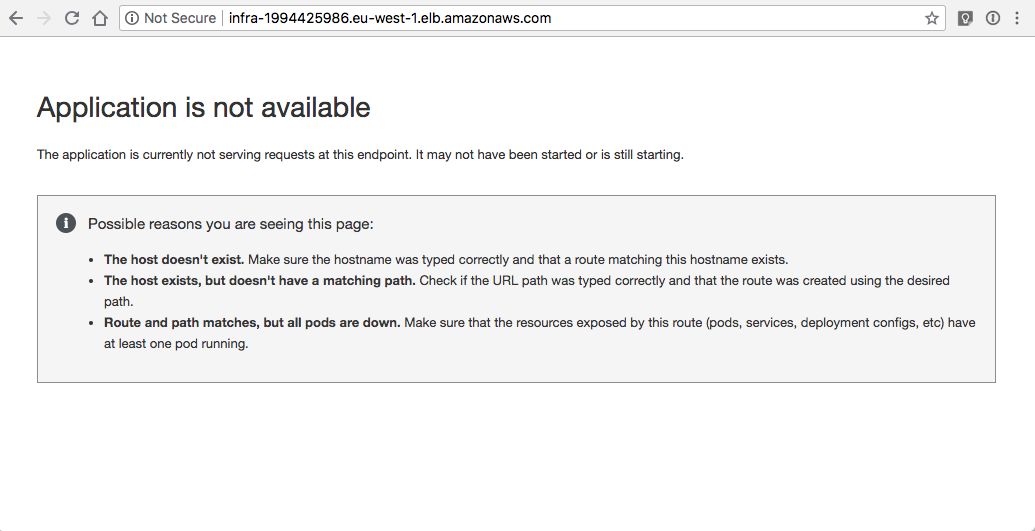
openshift subdomain = infra-1994425986.eu-west-1.elb.amazonaws.com
berndonline@lab:~/openshift-terraform$
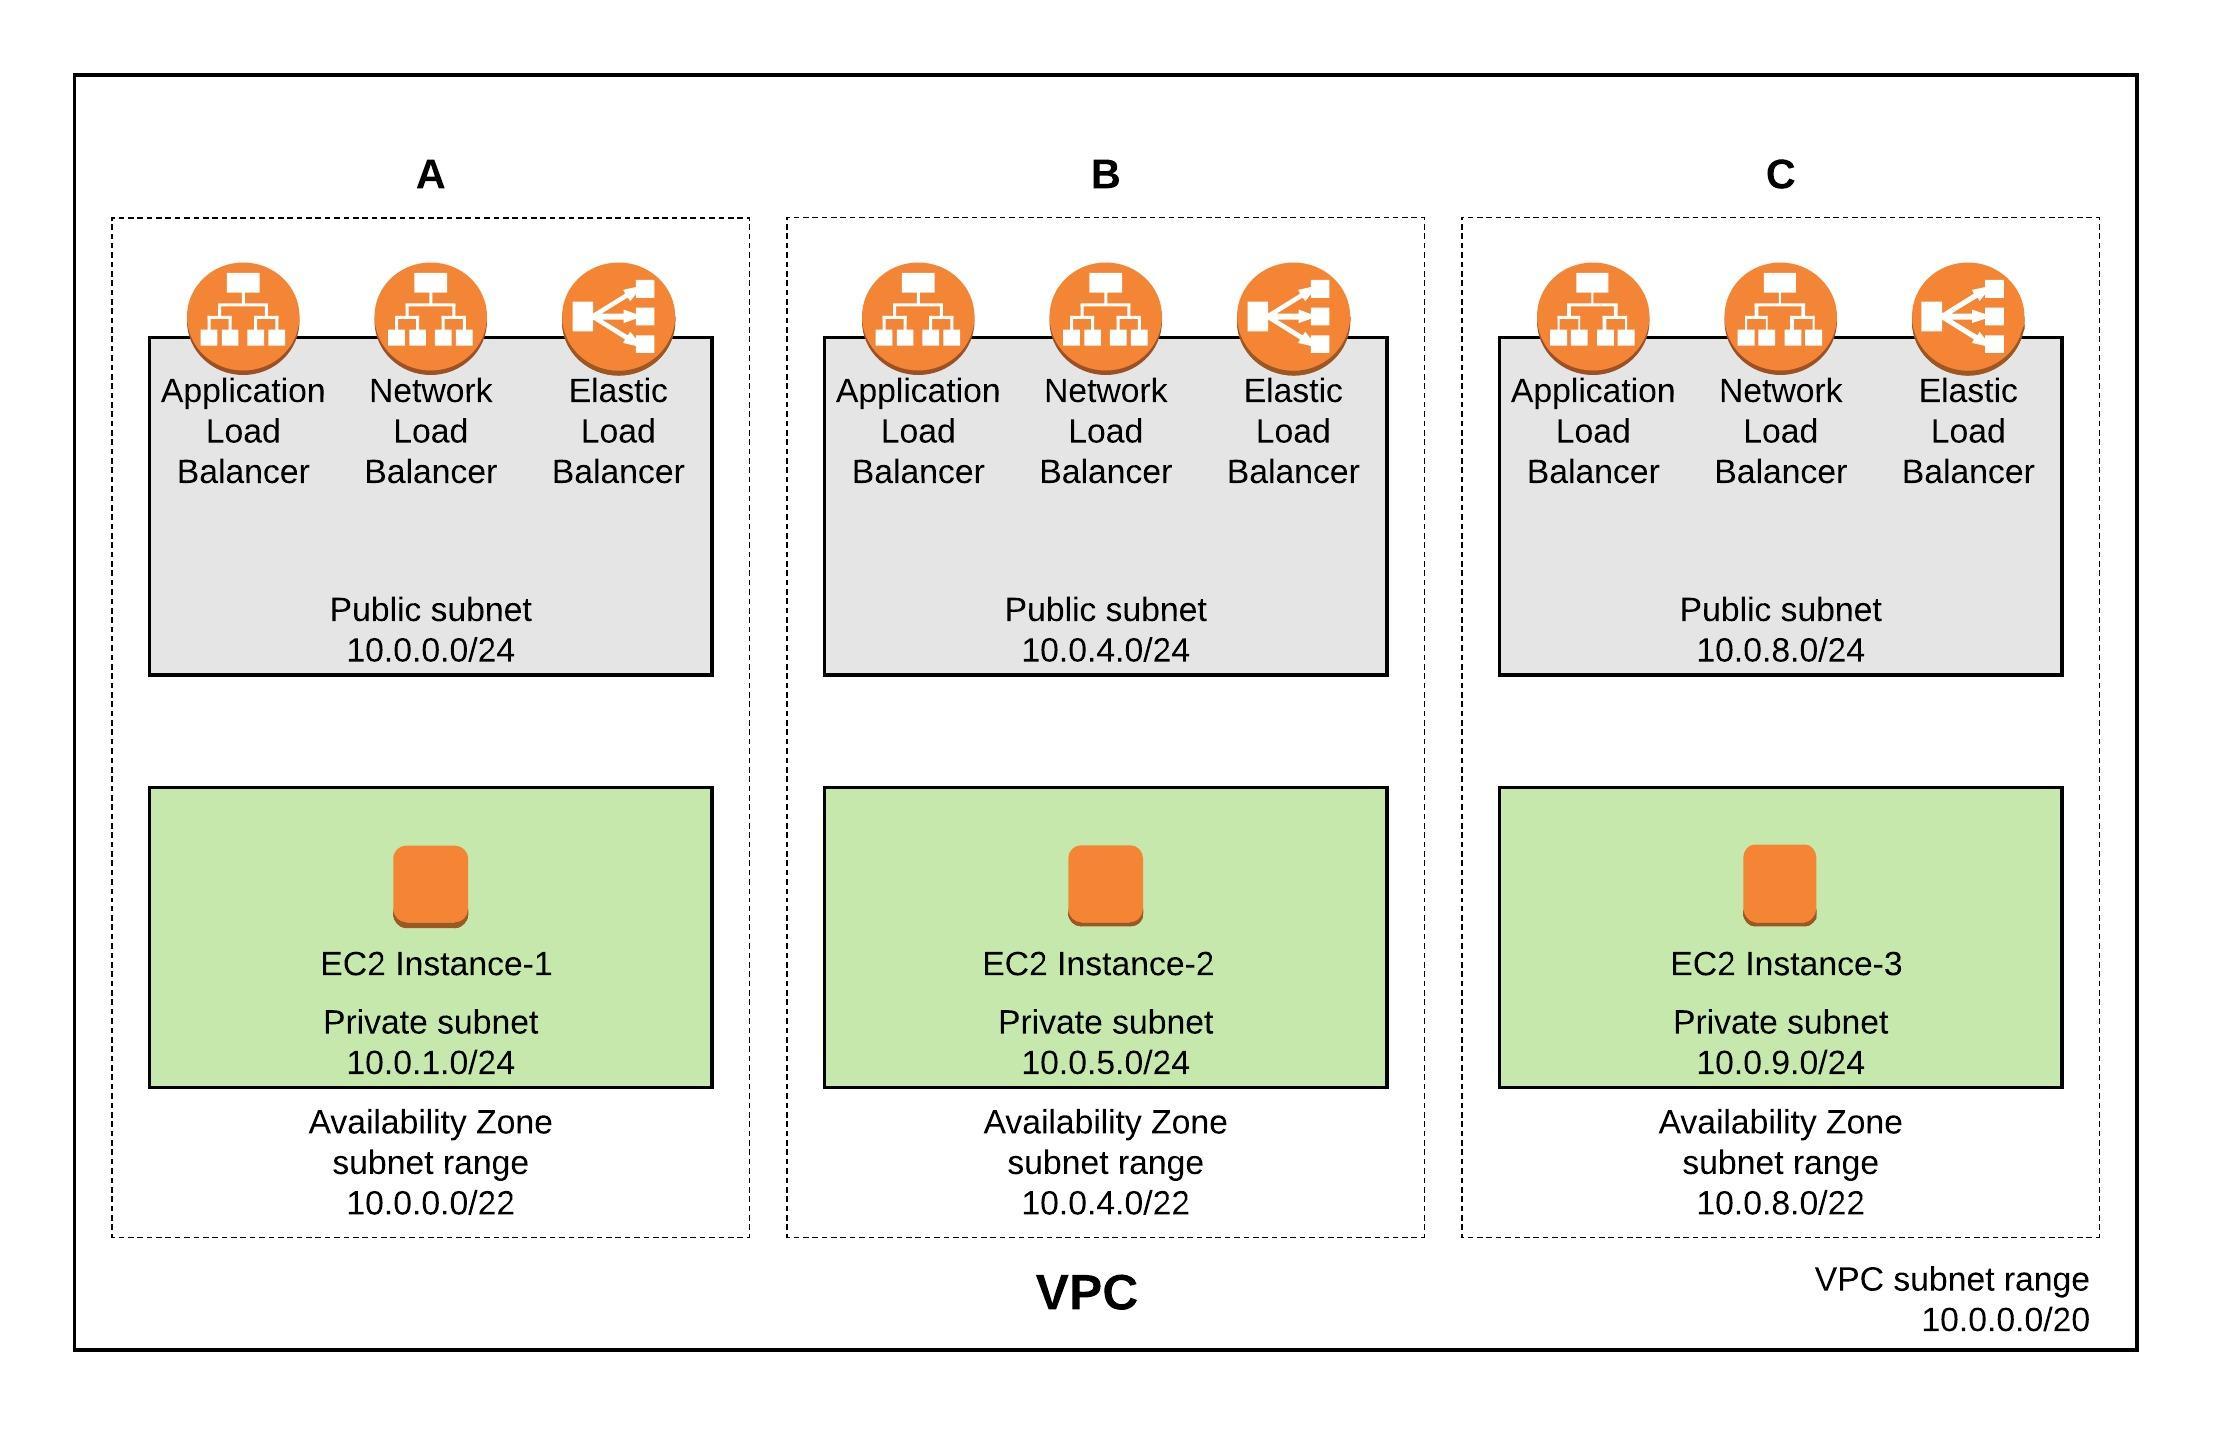
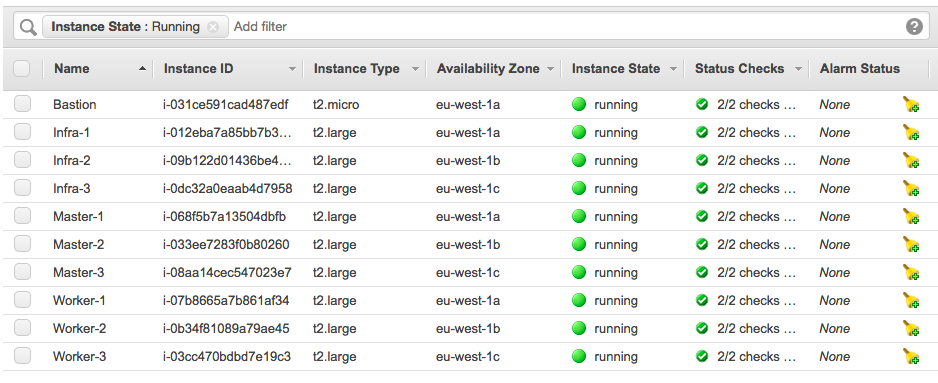
Terraform successfully creates the VPC, load balancers and all needed instances. Before we continue wait 5 to 10 minutes because the cloud-init script takes a bit time and all the instance reboot at the end.
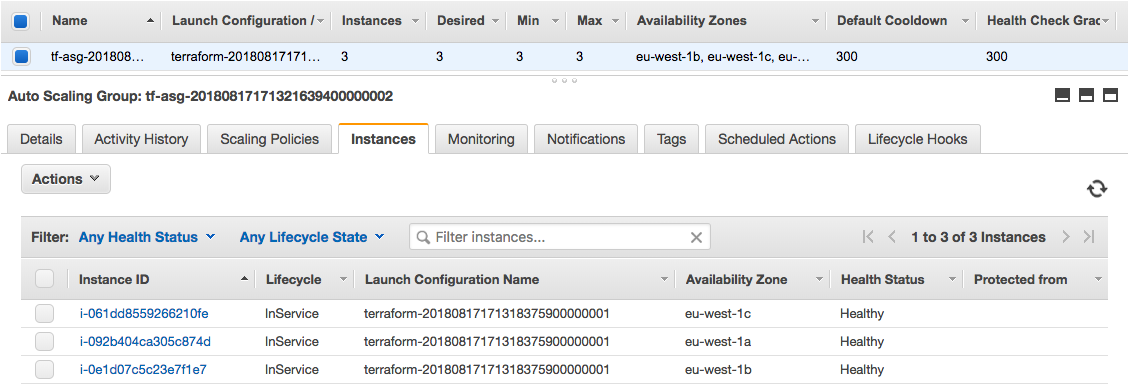
Instances:
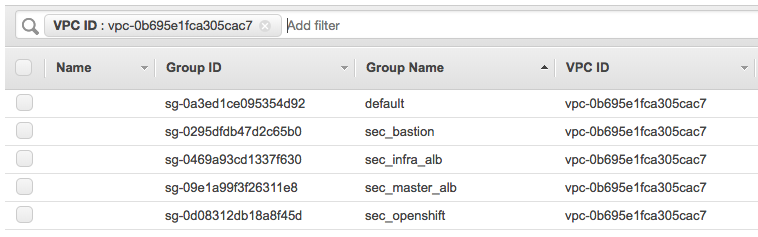
Security groups:
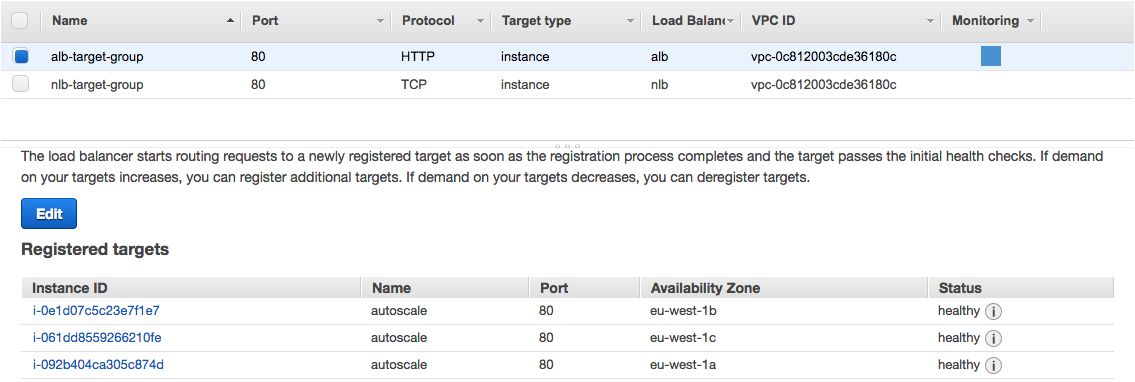
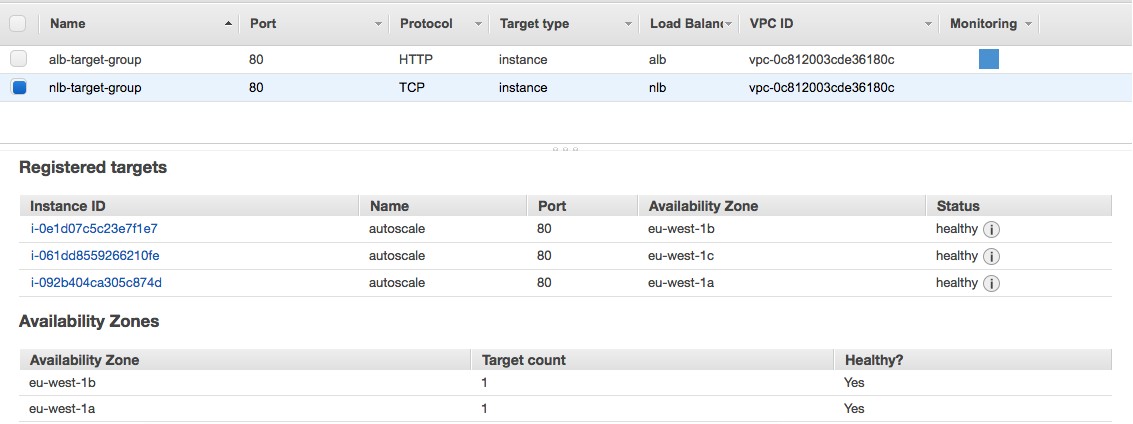
Target groups for the Master and the Infra load balancers:

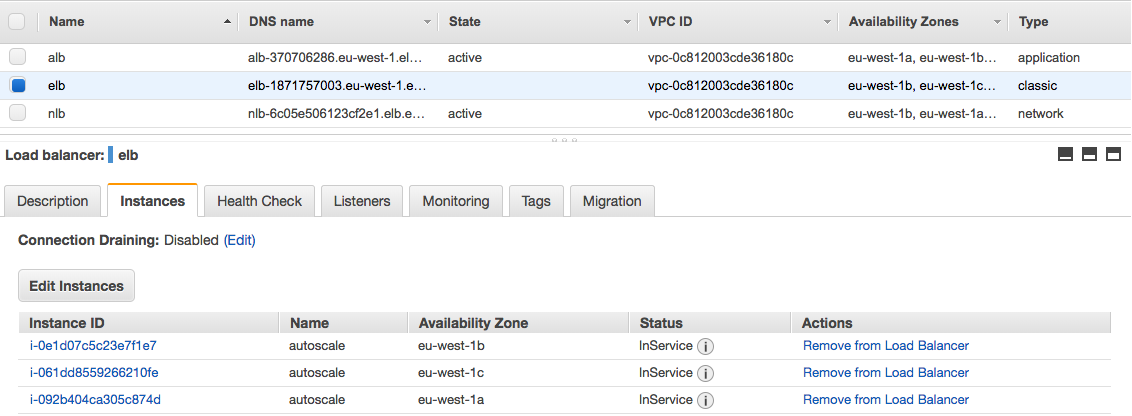
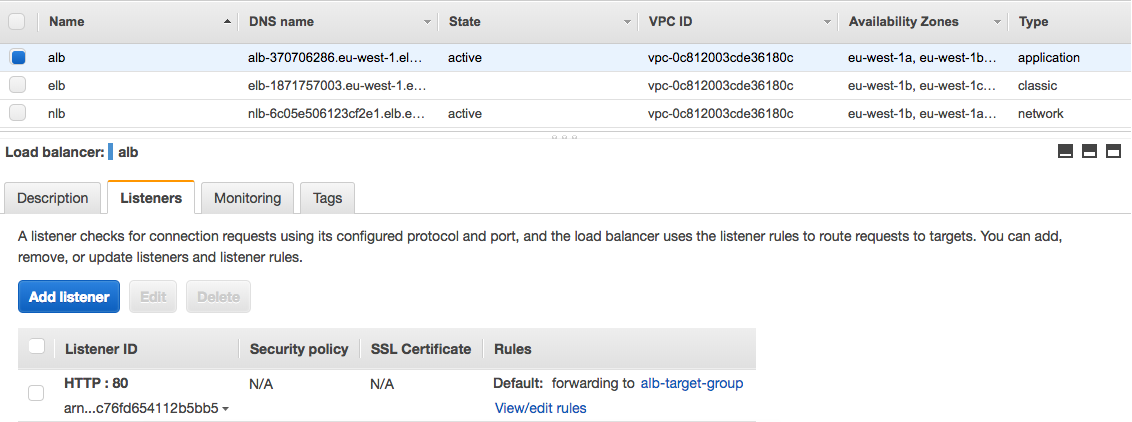
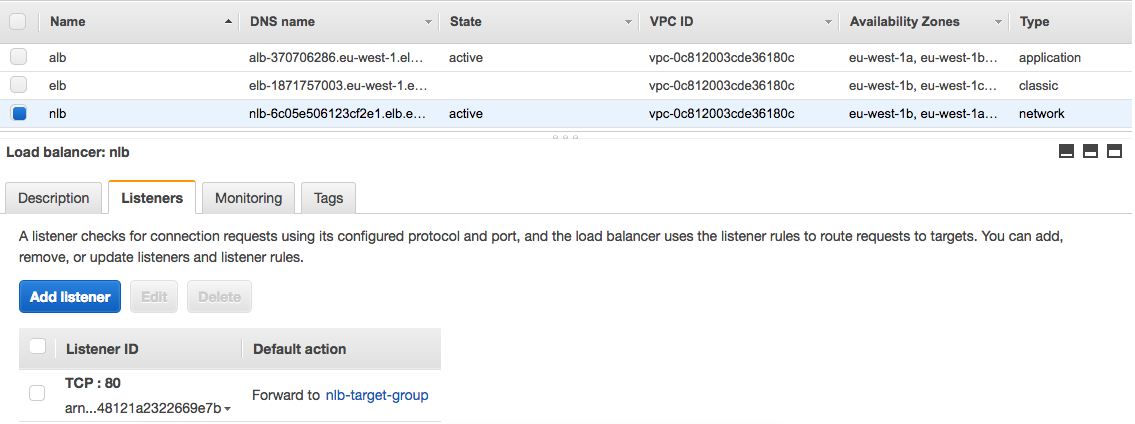
Master and the Infra load balancers:

Terraform also automatically creates the inventory file for the OpenShift installation and adds the hostnames for master, infra and worker nodes to the correct inventory groups. The next step is to copy the private ssh key and the inventory file to the bastion host. I am using the terraform output command to get the public hostname from the bastion host:
scp -o StrictHostKeyChecking=no -o UserKnownHostsFile=/dev/null -r ./helper_scripts/id_rsa centos@$(terraform output bastion):/home/centos/.ssh/
scp -o StrictHostKeyChecking=no -o UserKnownHostsFile=/dev/null -r ./inventory/ansible-hosts  centos@$(terraform output bastion):/home/centos/ansible-hosts
ssh -o StrictHostKeyChecking=no -o UserKnownHostsFile=/dev/null -l centos $(terraform output bastion)
On the bastion node, change to the /openshift-ansible/ folder and start running the prerequisites and the deploy-cluster playbooks:
cd /openshift-ansible/
ansible-playbook ./playbooks/prerequisites.yml -i ~/ansible-hosts
ansible-playbook ./playbooks/deploy_cluster.yml -i ~/ansible-hosts
Here the output from running the prerequisites playbook:
[centos@ip-10-0-0-22 ~]$ cd /openshift-ansible/
[centos@ip-10-0-0-22 openshift-ansible]$ ansible-playbook ./playbooks/prerequisites.yml -i ~/ansible-hosts

PLAY [Initialization Checkpoint Start] ****************************************************************************************************************************

TASK [Set install initialization 'In Progress'] *******************************************************************************************************************
Saturday 15 September 2018  11:04:50 +0000 (0:00:00.407)       0:00:00.407 ****
ok: [ip-10-0-1-237.eu-west-1.compute.internal]

PLAY [Populate config host groups] ********************************************************************************************************************************

TASK [Load group name mapping variables] **************************************************************************************************************************
Saturday 15 September 2018  11:04:50 +0000 (0:00:00.110)       0:00:00.517 ****
ok: [localhost]

TASK [Evaluate groups - g_etcd_hosts or g_new_etcd_hosts required] ************************************************************************************************
Saturday 15 September 2018  11:04:51 +0000 (0:00:00.033)       0:00:00.551 ****
skipping: [localhost]

TASK [Evaluate groups - g_master_hosts or g_new_master_hosts required] ********************************************************************************************
Saturday 15 September 2018  11:04:51 +0000 (0:00:00.024)       0:00:00.575 ****
skipping: [localhost]

TASK [Evaluate groups - g_node_hosts or g_new_node_hosts required] ************************************************************************************************
Saturday 15 September 2018  11:04:51 +0000 (0:00:00.024)       0:00:00.599 ****
skipping: [localhost]

...

PLAY RECAP ********************************************************************************************************************************************************
ip-10-0-1-192.eu-west-1.compute.internal : ok=56   changed=14   unreachable=0    failed=0
ip-10-0-1-237.eu-west-1.compute.internal : ok=64   changed=15   unreachable=0    failed=0
ip-10-0-1-248.eu-west-1.compute.internal : ok=56   changed=14   unreachable=0    failed=0
ip-10-0-5-174.eu-west-1.compute.internal : ok=56   changed=14   unreachable=0    failed=0
ip-10-0-5-235.eu-west-1.compute.internal : ok=58   changed=14   unreachable=0    failed=0
ip-10-0-5-35.eu-west-1.compute.internal : ok=56   changed=14   unreachable=0    failed=0
ip-10-0-9-130.eu-west-1.compute.internal : ok=56   changed=14   unreachable=0    failed=0
ip-10-0-9-51.eu-west-1.compute.internal : ok=58   changed=14   unreachable=0    failed=0
ip-10-0-9-85.eu-west-1.compute.internal : ok=56   changed=14   unreachable=0    failed=0
localhost                  : ok=11   changed=0    unreachable=0    failed=0


INSTALLER STATUS **************************************************************************************************************************************************
Initialization             : Complete (0:00:41)

[centos@ip-10-0-0-22 openshift-ansible]$
Continue with the deploy cluster playbook:
[centos@ip-10-0-0-22 openshift-ansible]$ ansible-playbook ./playbooks/deploy_cluster.yml -i ~/ansible-hosts

PLAY [Initialization Checkpoint Start] ****************************************************************************************************************************

TASK [Set install initialization 'In Progress'] *******************************************************************************************************************
Saturday 15 September 2018  11:08:38 +0000 (0:00:00.102)       0:00:00.102 ****
ok: [ip-10-0-1-237.eu-west-1.compute.internal]

PLAY [Populate config host groups] ********************************************************************************************************************************

TASK [Load group name mapping variables] **************************************************************************************************************************
Saturday 15 September 2018  11:08:38 +0000 (0:00:00.064)       0:00:00.167 ****
ok: [localhost]

TASK [Evaluate groups - g_etcd_hosts or g_new_etcd_hosts required] ************************************************************************************************
Saturday 15 September 2018  11:08:38 +0000 (0:00:00.031)       0:00:00.198 ****
skipping: [localhost]

TASK [Evaluate groups - g_master_hosts or g_new_master_hosts required] ********************************************************************************************
Saturday 15 September 2018  11:08:38 +0000 (0:00:00.026)       0:00:00.225 ****
skipping: [localhost]

...

PLAY RECAP ********************************************************************************************************************************************************
ip-10-0-1-192.eu-west-1.compute.internal : ok=132  changed=57   unreachable=0    failed=0
ip-10-0-1-237.eu-west-1.compute.internal : ok=591  changed=256  unreachable=0    failed=0
ip-10-0-1-248.eu-west-1.compute.internal : ok=132  changed=57   unreachable=0    failed=0
ip-10-0-5-174.eu-west-1.compute.internal : ok=132  changed=57   unreachable=0    failed=0
ip-10-0-5-235.eu-west-1.compute.internal : ok=325  changed=145  unreachable=0    failed=0
ip-10-0-5-35.eu-west-1.compute.internal : ok=132  changed=57   unreachable=0    failed=0
ip-10-0-9-130.eu-west-1.compute.internal : ok=132  changed=57   unreachable=0    failed=0
ip-10-0-9-51.eu-west-1.compute.internal : ok=325  changed=145  unreachable=0    failed=0
ip-10-0-9-85.eu-west-1.compute.internal : ok=132  changed=57   unreachable=0    failed=0
localhost                  : ok=13   changed=0    unreachable=0    failed=0

INSTALLER STATUS **************************************************************************************************************************************************
Initialization             : Complete (0:00:55)
Health Check               : Complete (0:00:01)
etcd Install               : Complete (0:01:03)
Master Install             : Complete (0:05:17)
Master Additional Install  : Complete (0:00:26)
Node Install               : Complete (0:08:24)
Hosted Install             : Complete (0:00:57)
Web Console Install        : Complete (0:00:28)
Service Catalog Install    : Complete (0:01:19)

[centos@ip-10-0-0-22 openshift-ansible]$
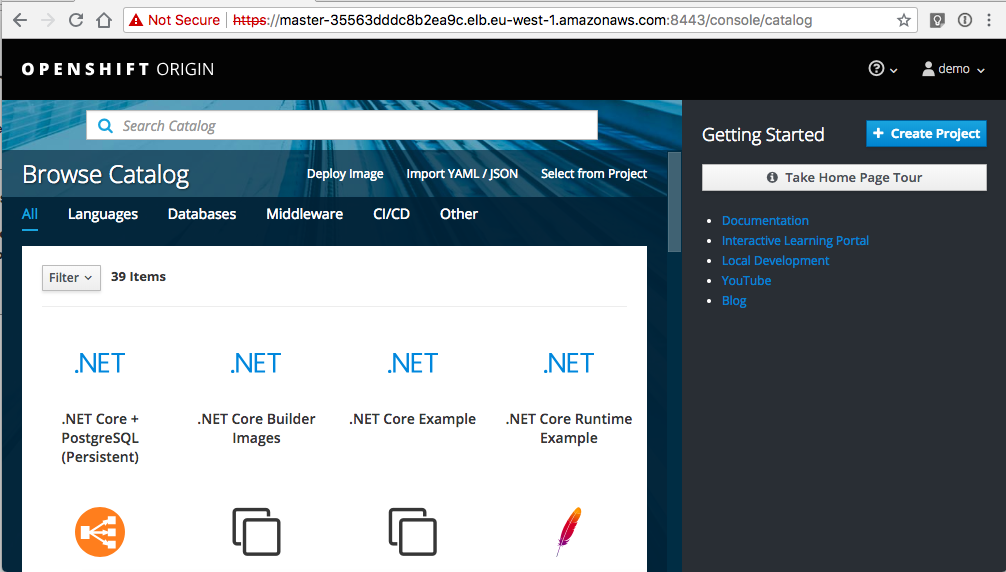
Once the deploy playbook finishes we have a working Openshift cluster:
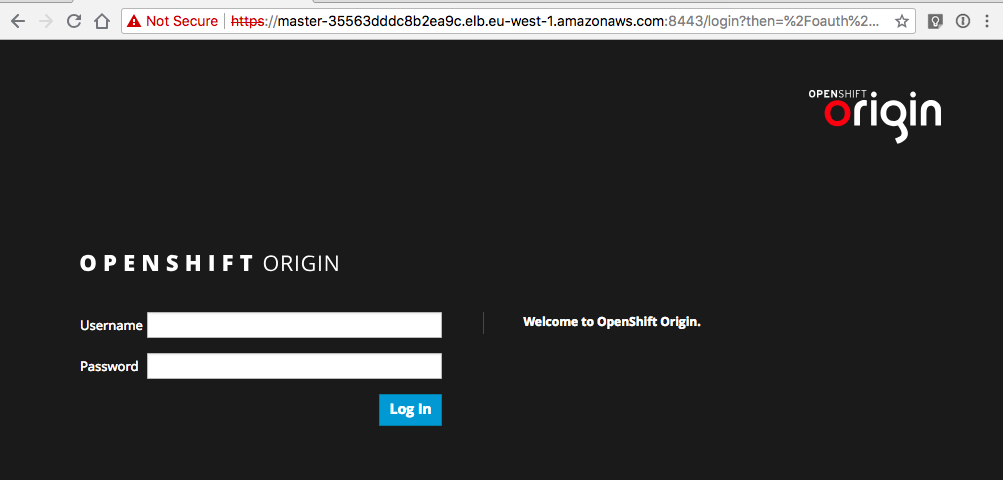
Login with username: demo, and password: demo
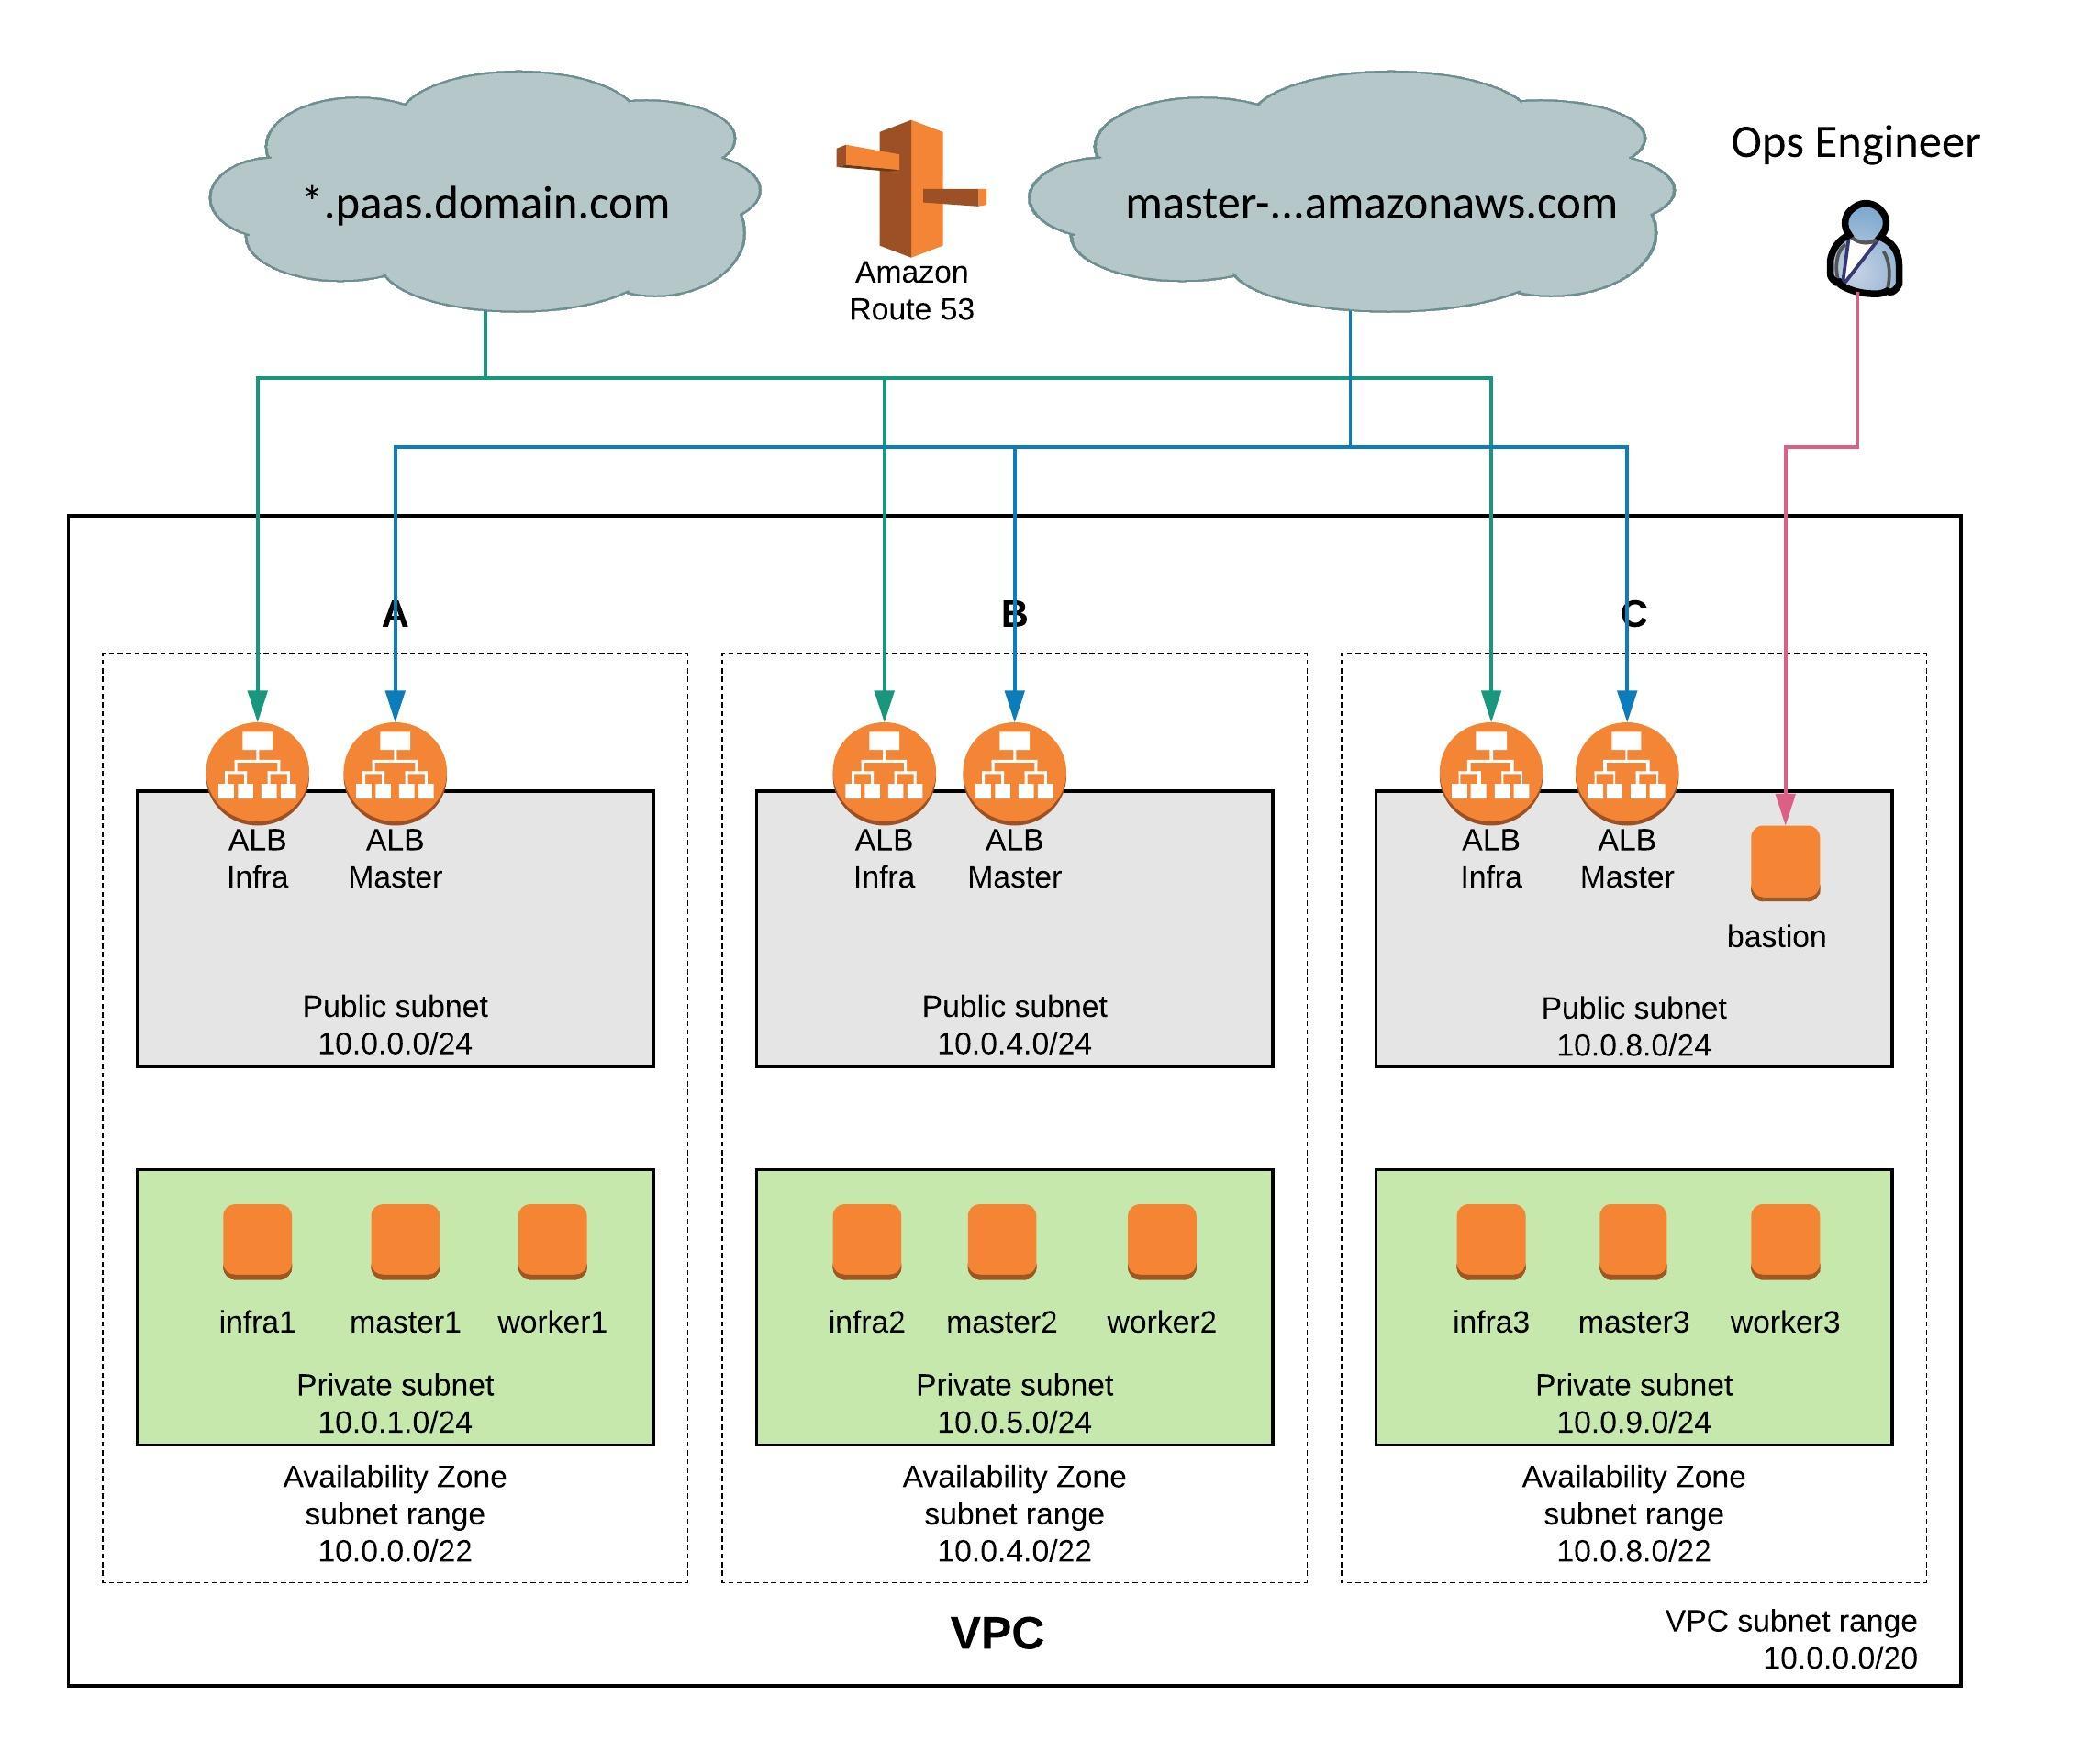
For the infra load balancers you cannot access OpenShift routes via the Amazon DNS, this is not allowed. You need to create a wildcard DNS CNAME record like *.paas.domain.com and point to the AWS load balancer DNS record.
 Let’s continue to do some basic cluster checks to see the nodes are in ready state:
[centos@ip-10-0-1-237 ~]$ oc get nodes
NAME                                       STATUS    ROLES     AGE       VERSION
ip-10-0-1-192.eu-west-1.compute.internal   Ready     compute   11m       v1.9.1+a0ce1bc657
ip-10-0-1-237.eu-west-1.compute.internal   Ready     master    16m       v1.9.1+a0ce1bc657
ip-10-0-1-248.eu-west-1.compute.internal   Ready         11m       v1.9.1+a0ce1bc657
ip-10-0-5-174.eu-west-1.compute.internal   Ready     compute   11m       v1.9.1+a0ce1bc657
ip-10-0-5-235.eu-west-1.compute.internal   Ready     master    15m       v1.9.1+a0ce1bc657
ip-10-0-5-35.eu-west-1.compute.internal    Ready         11m       v1.9.1+a0ce1bc657
ip-10-0-9-130.eu-west-1.compute.internal   Ready     compute   11m       v1.9.1+a0ce1bc657
ip-10-0-9-51.eu-west-1.compute.internal    Ready     master    14m       v1.9.1+a0ce1bc657
ip-10-0-9-85.eu-west-1.compute.internal    Ready         11m       v1.9.1+a0ce1bc657
[centos@ip-10-0-1-237 ~]$
[centos@ip-10-0-1-237 ~]$ oc get projects
NAME                                DISPLAY NAME   STATUS
default                                            Active
kube-public                                        Active
kube-service-catalog                               Active
kube-system                                        Active
logging                                            Active
management-infra                                   Active
openshift                                          Active
openshift-ansible-service-broker                   Active
openshift-infra                                    Active
openshift-node                                     Active
openshift-template-service-broker                  Active
openshift-web-console                              Active
[centos@ip-10-0-1-237 ~]$
[centos@ip-10-0-1-237 ~]$ oc get pods -o wide
NAME                       READY     STATUS    RESTARTS   AGE       IP           NODE
docker-registry-1-8798r    1/1       Running   0          10m       10.128.2.2   ip-10-0-5-35.eu-west-1.compute.internal
registry-console-1-zh9m4   1/1       Running   0          10m       10.129.2.3   ip-10-0-9-85.eu-west-1.compute.internal
router-1-96zzf             1/1       Running   0          10m       10.0.9.85    ip-10-0-9-85.eu-west-1.compute.internal
router-1-nfh7h             1/1       Running   0          10m       10.0.1.248   ip-10-0-1-248.eu-west-1.compute.internal
router-1-pcs68             1/1       Running   0          10m       10.0.5.35    ip-10-0-5-35.eu-west-1.compute.internal
[centos@ip-10-0-1-237 ~]$
At the end just destroy the infrastructure with terraform destroy:
berndonline@lab:~/openshift-terraform$ terraform destroy

...

Destroy complete! Resources: 56 destroyed.
berndonline@lab:~/openshift-terraform$
I will continue improving the configuration and I plan to use Jenkins to deploy the AWS infrastructure and OpenShift fully automatically.
Please let me know if you like the article or have questions in the comments below.