Part two: Ansible URI module and json_query filter

In my previous article I tried to explain how to use the Ansible URI Module and using the Jinja2 template engine to generate the JSON content. In part two I want to explain how to use the json_query filter. I will use the example with AVI Networks Load Balancers but this can be with any device with an REST API.

First we need to get the output from two objects, for both we don’t know the UUIDs and the first two tasks are to collect the configuration from the API using GET and register the output:

- block:
  - name: Avi | Get OpenShift cloud configuration
    uri:
      url: "https://{{ ansible_host }}/api/cloud/"
      method: GET
      user: "{{ avi_username }}"
      password: "{{ avi_password }}"
      return_content: yes
      force_basic_auth: yes
      validate_certs: false
      status_code: 200
      timeout: 180
      headers:
        X-Avi-Version: "{{ api_version }}"
    register: openshift_cloud 
   
  - name: Avi | Get OpenShift Service Engine group
    uri:
      url: "https://{{ ansible_host }}/api/serviceenginegroup/"
      method: GET
      user: "{{ avi_username }}"
      password: "{{ avi_password }}"
      return_content: yes
      force_basic_auth: yes
      validate_certs: false
      status_code: 200
      timeout: 180
      headers:
        X-Avi-Version: "{{ api_version }}"
    register: openshift_segroup
  when: '( inventory_hostname == groups["controller"][0] )'

The two variables openshift_cloud and openshift_segroup contain JSON content with all configuration details. For the OpenShift cloud object I don’t know the UUID, the only reference is the object name “OpenShift Cloud” which I know because I had previously created the object. I am using the Ansible module Set_Fact for specifying the query and writing the output into a new variable openshift_cloud_uuid:

- block:
  - name: Avi | set_fact for OpenShift cloud query
    set_fact:
      openshift_cloud_query: "[?name=='OpenShift Cloud'].uuid"
  
  - name: Avi | set_fact for OpenShift UUID
    set_fact:
      openshift_cloud_uuid: "{{ openshift_cloud.json.results | json_query(openshift_cloud_query) }}"
  when: '( inventory_hostname == groups["controller"][0] )' 

We now have the openshift_cloud_uuid of the OpenShift cloud configuration so let’s continue with the second object of the Service Engine group which is trickier because I don’t know the UUID or the object name. The Service Engine group was automatically set-up in the background when the OpenShift cloud object got created but I know the reference to the OpenShift cloud object and I use the json_query filter and set_fact again:

- block:
  - name: Avi | set_fact for Service Engine group query
    set_fact:
      openshift_segroup_query: "[?cloud_ref=='https://{{ ansible_host }}/api/cloud/{{ openshift_cloud_uuid[0] }}'].uuid"
  
  - name: Avi | set_fact for Service Engine group UUID
    set_fact:
      openshift_segroup_uuid: "{{ openshift_segroup.json.results | json_query(openshift_segroup_query) }}"
  when: '( inventory_hostname == groups["controller"][0] )'

Right now we know the openshift_cloud_uuid and the openshift_segroup_uuid, we use this to load a new Jinja2 template to update the Service Engine group object. See below the Jinja2 template openshift_segroup_json.j2:

{
  ...
  "name": "Default-Group",
  "tenant_ref": "https://{{ ansible_host }}/api/tenant/admin",
  "cloud_ref": "https://{{ ansible_host }}/api/cloud/{{ openshift_cloud_uuid[0] }}",
  ...
  YOUR CHANGES
  ...
}

The last part of this exercise is to load the j2 template and push the json content against the API to update the object using PUT:

- block:
  - name: Avi | set_fact to load Service Engine group json template
    set_fact:
      openshift_segroup_json: "{{ lookup('template', 'openshift_segroup_json.j2') }}"
  
  - name: Avi| Update OpenShift Service Engine group configuration
    uri:
      url: "https://{{ ansible_host }}/api/serviceenginegroup/{{ openshift_segroup_uuid[0] }}"
      method: PUT
      user: "{{ avi_username }}"
      password: "{{ avi_password }}"
      return_content: yes
      force_basic_auth: yes
      validate_certs: false
      body: "{{ openshift_segroup_json }}"
      body_format: json
      status_code: 200
      timeout: 180
      headers:
        X-Avi-Version: "{{ api_version }}"
  when: '( inventory_hostname == groups["controller"][0] )'

I hope this article is helpful on how to use the Ansible URI module and the json_query filter to extract information and update an API object. Please share your feedback and leave a comment.

Here you find the links to the other articles about Ansible URI module:

OpenShift Infra node “Not Ready” running Avi Service Engine

I had to troubleshoot an interesting issue with OpenShift Infra nodes suddenly going into “Not Ready” state during an OpenShift upgrade or not registering on Master nodes after a re-install of OpenShift cluster. On the Infra nodes Avi Service Engines were running for ingress traffic. The problem was not very obvious and RedHat and Avi Networks were not able to identify the issue.

Here the output of oc get nodes:

[root@master01 ~]# oc get nodes -o wide --show-labels | grep 'region=infra'
infra01   NotReady                   1d        v1.7.6+a08f5eeb62           Red Hat Enterprise Linux Server 7.6 (Maipo)   3.10.0-693.11.6.el7.x86_64   beta.kubernetes.io/arch=amd64,beta.kubernetes.io/instance-type=Standard_D8_v3,beta.kubernetes.io/os=linux,failure-domain.beta.kubernetes.io/region=uksouth,failure-domain.beta.kubernetes.io/zone=1,kubernetes.io/hostname=infra01,logging-infra-fluentd=true,purpose=infra,region=infra,zone=1
infra02   NotReady                   1d        v1.7.6+a08f5eeb62           Red Hat Enterprise Linux Server 7.6 (Maipo)   3.10.0-693.11.6.el7.x86_64   beta.kubernetes.io/arch=amd64,beta.kubernetes.io/instance-type=Standard_D8_v3,beta.kubernetes.io/os=linux,failure-domain.beta.kubernetes.io/region=uksouth,failure-domain.beta.kubernetes.io/zone=1,kubernetes.io/hostname=infra02,logging-infra-fluentd=true,purpose=infra,region=infra,zone=0
infra03   NotReady                   1d        v1.7.6+a08f5eeb62           Red Hat Enterprise Linux Server 7.6 (Maipo)   3.10.0-693.11.6.el7.x86_64   beta.kubernetes.io/arch=amd64,beta.kubernetes.io/instance-type=Standard_D8_v3,beta.kubernetes.io/os=linux,failure-domain.beta.kubernetes.io/region=uksouth,failure-domain.beta.kubernetes.io/zone=0,kubernetes.io/hostname=infra03,logging-infra-fluentd=true,purpose=infra,region=infra,zone=2
[root@master01 ~]#

On the Infra node itself you could see that the atomic node service had successfully started but I saw a very strange error message from the kubelet not being able to synchronise the pod:

I1206 14:52:28.115735   21690 cloud_request_manager.go:89] Requesting node addresses from cloud provider for node "infra01"
I1206 14:52:28.170366   21690 cloud_request_manager.go:108] Node addresses from cloud provider for node "infra01" collected
E1206 14:52:28.533560   21690 eviction_manager.go:238] eviction manager: unexpected err: failed GetNode: node 'infra01' not found
I1206 14:52:32.840769   21690 kubelet.go:1808] skipping pod synchronization - [Kubelet failed to get node info: failed to get zone from cloud provider: Get http://169.254.169.254/metadata/v1/InstanceInfo: dial tcp 169.254.169.254:80: getsockopt: no route to host]
I1206 14:52:37.841235   21690 kubelet.go:1808] skipping pod synchronization - [Kubelet failed to get node info: failed to get zone from cloud provider: Get http://169.254.169.254/metadata/v1/InstanceInfo: dial tcp 169.254.169.254:80: getsockopt: no route to host]
I1206 14:52:38.170604   21690 cloud_request_manager.go:89] Requesting node addresses from cloud provider for node "infra01"
I1206 14:52:38.222439   21690 cloud_request_manager.go:108] Node addresses from cloud provider for node "infra01" collected
E1206 14:52:38.545991   21690 eviction_manager.go:238] eviction manager: unexpected err: failed GetNode: node 'infra01' not found
I1206 14:52:42.841547   21690 kubelet.go:1808] skipping pod synchronization - [Kubelet failed to get node info: failed to get zone from cloud provider: Get http://169.254.169.254/metadata/v1/InstanceInfo: dial tcp 169.254.169.254:80: getsockopt: no route to host]
I1206 14:52:47.841819   21690 kubelet.go:1808] skipping pod synchronization - [Kubelet failed to get node info: failed to get zone from cloud provider: Get http://169.254.169.254/metadata/v1/InstanceInfo: dial tcp 169.254.169.254:80: getsockopt: no route to host]

Even stranger is that the kubelet was not able to get the metadata information of the Azure Cloud provider with the fault domain in which the instance is running.

About the “no route to host” error I thought this must be a network issue and that I could reproduce this with a simple curl command:

[root@infra01 ~]# curl -v http://169.254.169.254/metadata/v1/InstanceInfo
* About to connect() to 169.254.169.254 port 80 (#0)
*   Trying 169.254.169.254...
* No route to host
* Failed connect to 169.254.169.254:80; No route to host
* Closing connection 0
curl: (7) Failed connect to 169.254.169.254:80; No route to host
[root@infra01 ~]#

The routing table on the node looked fine and theoretically forwarded the traffic to the default gateway in the subnet.

[root@infra01 ~]# ip route show
default via 10.1.1.1 dev eth0
10.1.1.0/27 dev eth0 proto kernel scope link src 10.1.1.10 
10.128.0.0/15 dev tun0 scope link
10.128.0.0/15 dev tun0
168.63.129.16 via 10.1.1.1 dev eth0 proto static
169.254.0.0/16 dev eth0 scope link metric 1002
169.254.169.254 via 10.1.1.1 dev eth0 proto static
172.17.0.0/16 via 172.17.0.1 dev docker0
172.18.0.0/16 dev bravi proto kernel scope link src 172.18.0.1
[root@infra01 ~]#

What was a bit strange when I used tracepath was that the packets weren’t forwarded to the default gateway but instead forwarded to the node itself:

[root@infra01 ~]# tracepath 169.254.169.254
1?: [LOCALHOST]                                         pmtu 1500
1:  infra01                                     3006.801ms !H
    Resume: pmtu 1500

Same with traceroute or ping output:

[root@infra01 ~]# traceroute 169.254.169.254
traceroute to 169.254.169.254 (169.254.169.254), 30 hops max, 60 byte packets
1  infra01 (172.18.0.1)  1178.146 ms !H  1178.104 ms !H  1178.057 ms !H
[root@infra01 ~]# ping 169.254.169.254
PING 169.254.169.254 (169.254.169.254) 56(84) bytes of data.
From 172.18.0.1 icmp_seq=1 Destination Host Unreachable
From 172.18.0.1 icmp_seq=2 Destination Host Unreachable
From 172.18.0.1 icmp_seq=3 Destination Host Unreachable
From 172.18.0.1 icmp_seq=4 Destination Host Unreachable
^C
--- 169.254.169.254 ping statistics ---
5 packets transmitted, 0 received, +4 errors, 100% packet loss, time 4000ms
pipe 4

What was very obvious was that the packets were forwarded to the bravi bridge 172.18.0.0/16 which is owned by the Avi Service Engine on the Infra node:

...
44: bravi: <NO-CARRIER,BROADCAST,MULTICAST,UP> mtu 1500 qdisc noqueue state DOWN qlen 1000
   link/ether 00:00:00:00:00:01 brd ff:ff:ff:ff:ff:ff
   inet 172.18.0.1/16 scope global bravi
      valid_lft forever preferred_lft forever
   inet6 fe80::200:ff:fe00:1/64 scope link
      valid_lft forever preferred_lft forever
45: bravi-tap: <BROADCAST,MULTICAST> mtu 1500 qdisc noop master bravi state DOWN qlen 1000
   link/ether 00:00:00:00:00:01 brd ff:ff:ff:ff:ff:ff
...

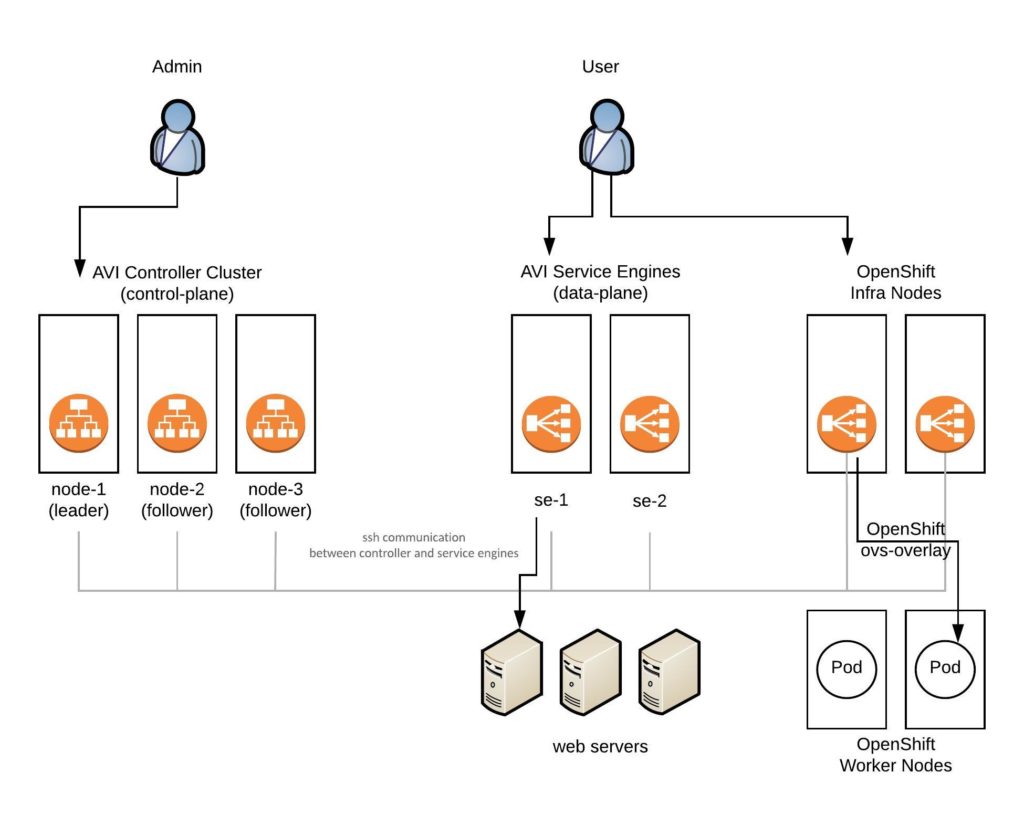
Here is the article about how Avi SE are integrated into the OpenShift SDN. Avi uses PBR (policy based routing) to forward external ingress traffic to the Service Engine.

I have turned off the bravi bridge because PBR could be bypassing the routing table for traffic to the 169.254.169.254.

[root@infra01 ~]# ip link set bravi down

Traffic is now exiting the Infra node:

[root@infra01 ~]# traceroute 169.254.169.254
traceroute to 169.254.169.254 (169.254.169.254), 30 hops max, 60 byte packets
1  * * *
2  * * *
3  * * *
4  * * *
5  * * *
6  *^C
[root@infra01 ~]#

And the Infra node was able to collect metadata information:

[root@infra01 ~]# curl -v http://169.254.169.254/metadata/v1/InstanceInfo
* About to connect() to 169.254.169.254 port 80 (#0)
*   Trying 169.254.169.254...
* Connected to 169.254.169.254 (169.254.169.254) port 80 (#0)
GET /metadata/v1/InstanceInfo HTTP/1.1
User-Agent: curl/7.29.0
Host: 169.254.169.254
Accept: */*

< HTTP/1.1 200 OK
< Content-Type: text/json; charset=utf-8
< Server: Microsoft-IIS/10.0
< Date: Thu, 06 Dec 2018 13:53:16 GMT
< Content-Length: 43
<
* Connection #0 to host 169.254.169.254 left intact
{"ID":"_infra01","UD":"4","FD":"0"}
[root@infra01 ~]#

Simple restart of the atomic node service to trigger the master registration:

[root@infra01 ~]# systemctl restart atomic-openshift-node

The logs showed that the kubelet successfully got zone information

Dec 07 16:03:21 infra01 atomic-openshift-node[36736]: I1207 16:03:21.341611   36813 kubelet_node_status.go:270] Setting node annotation to enable volume controller attach/detach
Dec 07 16:03:21 infra01 atomic-openshift-node[36736]: I1207 16:03:21.414847   36813 kubelet_node_status.go:326] Adding node label from cloud provider: beta.kubernetes.io/instance-type=Standard_D8_
Dec 07 16:03:21 infra01 atomic-openshift-node[36736]: I1207 16:03:21.414881   36813 kubelet_node_status.go:337] Adding node label from cloud provider: failure-domain.beta.kubernetes.io/zone=0
Dec 07 16:03:21 infra01 atomic-openshift-node[36736]: I1207 16:03:21.414890   36813 kubelet_node_status.go:341] Adding node label from cloud provider: failure-domain.beta.kubernetes.io/region=ukso
Dec 07 16:03:21 infra01 atomic-openshift-node[36736]: I1207 16:03:21.414966   36813 kubelet_node_status.go:488] Using Node Hostname from cloudprovider: "infra01"
Dec 07 16:03:21 infra01 atomic-openshift-node[36736]: I1207 16:03:21.420823   36813 kubelet_node_status.go:437] Recording NodeHasSufficientDisk event message for node infra01
Dec 07 16:03:21 infra01 atomic-openshift-node[36736]: I1207 16:03:21.420907   36813 kubelet_node_status.go:437] Recording NodeHasSufficientMemory event message for node infra01
Dec 07 16:03:21 infra01 atomic-openshift-node[36736]: I1207 16:03:21.423139   36813 kubelet_node_status.go:437] Recording NodeHasNoDiskPressure event message for node infra01
Dec 07 16:03:21 infra01 atomic-openshift-node[36736]: I1207 16:03:21.423235   36813 kubelet_node_status.go:82] Attempting to register node infra01
Dec 07 16:03:21 infra01 atomic-openshift-node[36736]: I1207 16:03:21.435412   36813 kubelet_node_status.go:85] Successfully registered node infra01
Dec 07 16:03:21 infra01 atomic-openshift-node[36736]: I1207 16:03:21.437308   36813 kubelet_node_status.go:488] Using Node Hostname from cloudprovider: "infra01"
Dec 07 16:03:21 infra01 atomic-openshift-node[36736]: I1207 16:03:21.441482   36813 manager.go:311] Recovery completed

The Infra node successfully registered again the OpenShift master and the node went into “Ready”:

[root@master01 ~]# oc get nodes -o wide --show-labels | grep 'region=infra'
infra01   Ready                      40s       v1.7.6+a08f5eeb62           Red Hat Enterprise Linux Server 7.6 (Maipo)   3.10.0-693.11.6.el7.x86_64   beta.kubernetes.io/arch=amd64,beta.kubernetes.io/instance-type=Standard_D8_v3,beta.kubernetes.io/os=linux,failure-domain.beta.kubernetes.io/region=uksouth,failure-domain.beta.kubernetes.io/zone=0,kubernetes.io/hostname=infra01,logging-infra-fluentd=true,purpose=infra,region=infra,zone=1
infra02   Ready                      1d        v1.7.6+a08f5eeb62           Red Hat Enterprise Linux Server 7.6 (Maipo)   3.10.0-693.11.6.el7.x86_64   beta.kubernetes.io/arch=amd64,beta.kubernetes.io/instance-type=Standard_D8_v3,beta.kubernetes.io/os=linux,failure-domain.beta.kubernetes.io/region=uksouth,failure-domain.beta.kubernetes.io/zone=1,kubernetes.io/hostname=infra02,logging-infra-fluentd=true,purpose=infra,region=infra,zone=0
infra03   Ready                      1d        v1.7.6+a08f5eeb62           Red Hat Enterprise Linux Server 7.6 (Maipo)   3.10.0-693.11.6.el7.x86_64   beta.kubernetes.io/arch=amd64,beta.kubernetes.io/instance-type=Standard_D8_v3,beta.kubernetes.io/os=linux,failure-domain.beta.kubernetes.io/region=uksouth,failure-domain.beta.kubernetes.io/zone=0,kubernetes.io/hostname=infra03,logging-infra-fluentd=true,purpose=infra,region=infra,zone=2
[root@master01 ~]#

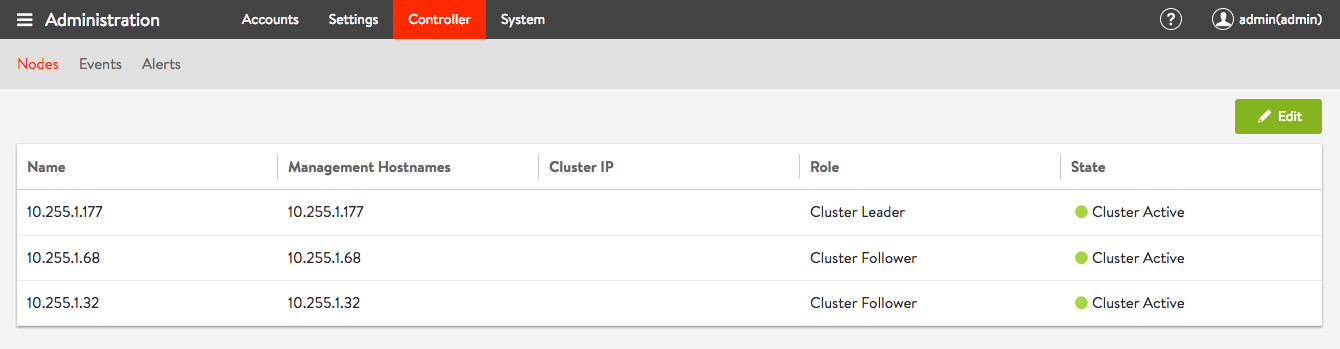
In the end, the root cause was the Avi East West subnet range which was set to 169.254.0.0/16 on the Avi controller nodes. Even the East West communication was deactivated on Avi, because kube_proxy was used, which made the Avi controller configure PBR on the bravi bridge for the 169.254.0.0/16 subnet range. This subnet range was previously used on all the on-prem datacenters and never caused issues since moving to cloud because the 169.254.169.254 is commonly used on cloud provider for instances to collect metadata information.

Part one: Ansible URI module and Jinja2 templating

This article about the Ansible URI module. I have recently spend a lot of time around automation for AVI software defined load balancers and wanted to share some useful information about how to use Ansible to interacting with REST API’s. Please check out my other articles around AVI Networks.

Let’s start with the playbook:

---
- hosts: controller
  gather_facts: false
  roles:
    - { role: "config" }

The config role needs the following folders:

config/
├── defaults    # Useful for default variables
├── tasks       # Includes Ansible tasks using the URI module
├── templates   # Jinja2 json templates
└── vars        # Variables to load json j2 templates

I will use defaults just as an example for variables which I use in the task and the json template.

Here’s the content of defaults/main.yml:

---
dns_servers:
  - 8.8.8.8
  - 8.8.4.4
dns_domain: domain.com
ntp_servers:
  - 0.uk.pool.ntp.org
  - 1.uk.pool.ntp.org
username: admin
password: demo
api_version: 17.2.11

Next the Json Jinja2 template, the example below is the system configuration from AVI load balancers but this can be any json content you want to push to a REST API, templates/systemconfiguration_json.j2:

{
  "dns_configuration": {
    {% if dns_domain is defined %}
    "search_domain": "{{ dns_domain }}"
    {% endif %}
    {% if dns_servers is defined %}
    {% for item in dns_servers %}
    "server_list": [
      {
         "type": "V4",
         "addr": "{{ item }}"
      }
      {% if not loop.last %}
      ,
      {% endif %}
      {% endfor %}
      {% endif %}
    ]
  },
  "ntp_configuration": {
    {% if ntp_servers is defined %}
    {% for item in ntp_servers %}
    "ntp_servers": [
      {
        "server": {
          "type": "DNS",
          "addr": "{{ item }}"
        }
      }
      {% if not loop.last %}
      ,
      {% endif %}
      {% endfor %}
      {% endif %}  
    ]
  },
  "portal_configuration": {
    "password_strength_check": true,
    "use_uuid_from_input": false,
    "redirect_to_https": true,
    "enable_clickjacking_protection": true,
    "enable_https": true,
    "disable_remote_cli_shell": false,
    "http_port": 80,
    "enable_http": true,
    "allow_basic_authentication": true,
  }
}

After we have specified the default variables and created the j2 template, let’s continue and see how we load the json template into a single variables in vars/main.yml:

---
systemconfiguration_json: "{{ lookup('template', 'systemconfiguration_json.j2') }}"

The step is the task itself using the Ansible URI module, tasks/main.yml:

---
- block:
  - name: Config | Systemconfiguration | Configure DNS, NTP and Portal settings
    uri:
      url: "https://{{ ansible_host }}/api/systemconfiguration"
      method: PUT
      user: "{{ username }}"
      password: "{{ password }}"
      return_content: yes
      body: "{{ systemconfiguration_json }}"
      force_basic_auth: yes
      validate_certs: false
      status_code: 200, 201
      timeout: 180
      headers:
        X-Avi-Version: "{{ api_version }}"
  when: '( inventory_hostname == group["controller"][0] )'

I like to use blocks in my Ansible tasks because you can group your tasks and use a single WHEN statement when you have multiple similar tasks.

I hope you find this article useful and please try it out and let me now in the comments below if you have questions.

Continue and read the other parts of this little series:

Here you find the links to the other articles about Ansible URI module:

Ansible Playbook to deploy AVI Controller and Service Engines

After my first blog post about Software defined Load Balancing with AVI Networks, here is how to automatically deploy AVI controller and services engines via Ansible.

Here are the links to my repositories; AVI Vagrant environment: https://github.com/berndonline/avi-lab-vagrant and AVI Ansible Playbook: https://github.com/berndonline/avi-lab-provision

Make sure that your vagrant environment is running,

berndonline@lab:~/avi-lab-vagrant$ vagrant status
Current machine states:

avi-controller-1          running (libvirt)
avi-controller-2          running (libvirt)
avi-controller-3          running (libvirt)
avi-se-1                  running (libvirt)
avi-se-2                  running (libvirt)

This environment represents multiple VMs. The VMs are all listed
above with their current state. For more information about a specific
VM, run `vagrant status NAME`.

I needed to modify the ansible.cfg to integrate a filter plugin:

[defaults]
inventory = ./.vagrant/provisioners/ansible/inventory/vagrant_ansible_inventory
host_key_checking=False

library = /home/berndonline/avi-lab-provision/lib
filter_plugins = /home/berndonline/avi-lab-provision/lib/filter_plugins

The controller installation is actually very simple and I got it from the official AVI ansible role they created, I added a second role to check ones the controller nodes are successfully booted:

---
- hosts: avi-controller
  user: '{{ ansible_ssh_user }}'
  gather_facts: "true"
  roles:
    - {role: ansible-role-avicontroller, become: true}
    - {role: avi-post-controller, become: false}

There’s one important thing to know before we run the playbook. When you have an AVI subscription you get custom container images with a predefined default password which makes it easier for you to do the cluster setup fully automated. You find the default password variable in group_vars/all.yml there you set as well if the password should be changed.

Let’s execute the ansible playbook, it takes a bit time for the three nodes to boot up:

berndonline@lab:~/avi-lab-vagrant$ ansible-playbook ../avi-lab-provision/playbooks/avi-controller-install.yml

PLAY [avi-controller] *********************************************************************************************************************************************

TASK [Gathering Facts] ********************************************************************************************************************************************
ok: [avi-controller-3]
ok: [avi-controller-2]
ok: [avi-controller-1]

TASK [ansible-role-avicontroller : Avi Controller | Deployment] ***************************************************************************************************
included: /home/berndonline/avi-lab-provision/roles/ansible-role-avicontroller/tasks/docker/main.yml for avi-controller-1, avi-controller-2, avi-controller-3

TASK [ansible-role-avicontroller : Avi Controller | Services | systemd | Check if Avi Controller installed] *******************************************************
included: /home/berndonline/avi-lab-provision/roles/ansible-role-avicontroller/tasks/docker/services/systemd/check.yml for avi-controller-1, avi-controller-2, avi-controller-3

TASK [ansible-role-avicontroller : Avi Controller | Check if Avi Controller installed] ****************************************************************************
ok: [avi-controller-3]
ok: [avi-controller-2]
ok: [avi-controller-1]

TASK [ansible-role-avicontroller : Avi Controller | Services | init.d | Check if Avi Controller installed] ********************************************************
skipping: [avi-controller-1]
skipping: [avi-controller-2]
skipping: [avi-controller-3]

TASK [ansible-role-avicontroller : Avi Controller | Check minimum requirements] ***********************************************************************************
included: /home/berndonline/avi-lab-provision/roles/ansible-role-avicontroller/tasks/docker/requirements.yml for avi-controller-1, avi-controller-2, avi-controller-3

TASK [ansible-role-avicontroller : Avi Controller | Requirements | Check for docker] ******************************************************************************
ok: [avi-controller-2]
ok: [avi-controller-3]
ok: [avi-controller-1]

...

TASK [avi-post-controller : wait for cluster nodes up] ************************************************************************************************************
FAILED - RETRYING: wait for cluster nodes up (30 retries left).

...

FAILED - RETRYING: wait for cluster nodes up (7 retries left).
FAILED - RETRYING: wait for cluster nodes up (8 retries left).
FAILED - RETRYING: wait for cluster nodes up (7 retries left).
ok: [avi-controller-2]
ok: [avi-controller-3]
ok: [avi-controller-1]

PLAY RECAP ********************************************************************************************************************************************************
avi-controller-1           : ok=36   changed=6    unreachable=0    failed=0
avi-controller-2           : ok=35   changed=5    unreachable=0    failed=0
avi-controller-3           : ok=35   changed=5    unreachable=0    failed=0

berndonline@lab:~/avi-lab-vagrant$

We are not finished yet and need to set basic settings like NTP and DNS, and need to configure the AVI three node controller cluster with another playbook:

---
- hosts: localhost
  connection: local
  roles:
    - {role: avi-cluster-setup, become: false}
    - {role: avi-change-password, become: false, when: avi_change_password == true}

The first role uses the REST API to do the configuration changes and requires the AVI ansible sdk role and for these reason it is very useful using the custom subscription images because you know the default password otherwise you need to modify the main setup.json file.

Let’s run the AVI cluster setup playbook:

berndonline@lab:~/avi-lab-vagrant$ ansible-playbook ../avi-lab-provision/playbooks/avi-cluster-setup.yml

PLAY [localhost] **************************************************************************************************************************************************

TASK [Gathering Facts] ********************************************************************************************************************************************
ok: [localhost]

TASK [ansible-role-avisdk : Checking if avisdk python library is present] *****************************************************************************************
ok: [localhost] => {
    "msg": "Please make sure avisdk is installed via pip. 'pip install avisdk --upgrade'"
}

TASK [avi-cluster-setup : set AVI dns and ntp facts] **************************************************************************************************************
ok: [localhost]

TASK [avi-cluster-setup : set AVI cluster facts] ******************************************************************************************************************
ok: [localhost]

TASK [avi-cluster-setup : configure ntp and dns controller nodes] *************************************************************************************************
changed: [localhost]

TASK [avi-cluster-setup : configure AVI cluster] ******************************************************************************************************************
changed: [localhost]

TASK [avi-cluster-setup : wait for cluster become active] *********************************************************************************************************
FAILED - RETRYING: wait for cluster become active (30 retries left).
FAILED - RETRYING: wait for cluster become active (29 retries left).
FAILED - RETRYING: wait for cluster become active (28 retries left).

...

FAILED - RETRYING: wait for cluster become active (14 retries left).
FAILED - RETRYING: wait for cluster become active (13 retries left).
FAILED - RETRYING: wait for cluster become active (12 retries left).
ok: [localhost]

TASK [avi-change-password : change default admin password on cluster build when subscription] *********************************************************************
skipping: [localhost]

PLAY RECAP ********************************************************************************************************************************************************
localhost                  : ok=7    changed=2    unreachable=0    failed=0

berndonline@lab:~/avi-lab-vagrant$

We can check in the web console to see if the cluster is booted and correctly setup:

Last but not least we need the ansible playbook for the AVI service engines installation which relies on the official AVI ansible se role:

---
- hosts: avi-se
  user: '{{ ansible_ssh_user }}'
  gather_facts: "true"
  roles:
    - {role: ansible-role-avise, become: true}

Let’s run the playbook for the service engines installation:

berndonline@lab:~/avi-lab-vagrant$ ansible-playbook ../avi-lab-provision/playbooks/avi-se-install.yml

PLAY [avi-se] *****************************************************************************************************************************************************

TASK [Gathering Facts] ********************************************************************************************************************************************
ok: [avi-se-2]
ok: [avi-se-1]

TASK [ansible-role-avisdk : Checking if avisdk python library is present] *****************************************************************************************
ok: [avi-se-1] => {
    "msg": "Please make sure avisdk is installed via pip. 'pip install avisdk --upgrade'"
}
ok: [avi-se-2] => {
    "msg": "Please make sure avisdk is installed via pip. 'pip install avisdk --upgrade'"
}

TASK [ansible-role-avise : Avi SE | Set facts] ********************************************************************************************************************
skipping: [avi-se-1]
skipping: [avi-se-2]

TASK [ansible-role-avise : Avi SE | Deployment] *******************************************************************************************************************
included: /home/berndonline/avi-lab-provision/roles/ansible-role-avise/tasks/docker/main.yml for avi-se-1, avi-se-2

TASK [ansible-role-avise : Avi SE | Check minimum requirements] ***************************************************************************************************
included: /home/berndonline/avi-lab-provision/roles/ansible-role-avise/tasks/docker/requirements.yml for avi-se-1, avi-se-2

TASK [ansible-role-avise : Avi SE | Requirements | Check for docker] **********************************************************************************************
ok: [avi-se-2]
ok: [avi-se-1]

TASK [ansible-role-avise : Avi SE | Requirements | Set facts] *****************************************************************************************************
ok: [avi-se-1]
ok: [avi-se-2]

TASK [ansible-role-avise : Avi SE | Requirements | Validate Parameters] *******************************************************************************************
ok: [avi-se-1] => {
    "changed": false,
    "msg": "All assertions passed"
}
ok: [avi-se-2] => {
    "changed": false,
    "msg": "All assertions passed"
}

...

TASK [ansible-role-avise : Avi SE | Services | systemd | Start the service since it's not running] ****************************************************************
changed: [avi-se-1]
changed: [avi-se-2]

RUNNING HANDLER [ansible-role-avise : Avi SE | Services | systemd | Daemon reload] ********************************************************************************
ok: [avi-se-2]
ok: [avi-se-1]

RUNNING HANDLER [ansible-role-avise : Avi SE | Services | Restart the avise service] ******************************************************************************
changed: [avi-se-2]
changed: [avi-se-1]

PLAY RECAP ********************************************************************************************************************************************************
avi-se-1                   : ok=47   changed=7    unreachable=0    failed=0
avi-se-2                   : ok=47   changed=7    unreachable=0    failed=0

berndonline@lab:~/avi-lab-vagrant$

After a few minutes you see the AVI service engines automatically register on the controller cluster and you are ready start configuring the detailed load balancing configuration:

Please share your feedback and leave a comment.

Software defined Load Balancing with AVI Networks

Throughout my career I have used various load balancing platforms, from commercial products like F5 or Citrix NetScaler to open source software like HA proxy. All of them do their job of balancing traffic between servers but the biggest problem is the scalability: yes you can deploy more load balancers but the config is static bound to the appliance.

AVI Networks has a very interesting concept of moving away from the traditional idea of load balancing and solving this problem by decoupling the control-plane from the data-plane which makes the load balancing Service Engines basically just forward traffic and can be more easily scaled-out when needed. Another nice advantage is that these Service Engines are container based and can run on basically every type of infrastructure from Bare Metal, on VMs to modern containerized platforms like Kubernetes or OpenShift:

All the AVI components are running as container image on any type of infrastructure or platform architecture which makes the deployment very easy to run on-premise or cloud systems.

The Service Engines on Hypervisor or Base-metal servers need network cards which support Intel’s DPDK for better packet forwarding. Have a look at the AVI linux server deployment guide: https://avinetworks.com/docs/latest/installing-avi-vantage-for-a-linux-server-cloud/

Here now, is a basic step-by-step guide on how to install the AVI Vantage Controller and additional Service Engines. Have a look at the AVI Knowledge-Base where the install is explained in detail:  https://avinetworks.com/docs/latest/installing-avi-vantage-for-a-linux-server-cloud/

Here is the link to my Vagrant environment: https://github.com/berndonline/avi-lab-vagrant

Let’s start with the manual AVI Controller installation:

[vagrant@localhost ~]$ sudo ./avi_baremetal_setup.py
AviVantage Version Tag: 17.2.11-9014
Found disk with largest capacity at [/]

Welcome to Avi Initialization Script

Pre-requisites: This script assumes the below utilities are installed:
                  docker (yum -y install docker/apt-get install docker.io)
Supported Vers: OEL - 6.5,6.7,6.9,7.0,7.1,7.2,7.3,7.4 Centos/RHEL - 7.0,7.1,7.2,7.3,7.4, Ubuntu - 14.04,16.04

Do you want to run Avi Controller on this Host [y/n] y
Do you want to run Avi SE on this Host [y/n] n
Enter The Number Of Cores For Avi Controller. Range [4, 4] 4
Please Enter Memory (in GB) for Avi Controller. Range [12, 7]
Please enter directory path for Avi Controller Config (Default [/opt/avi/controller/data/])
Please enter disk size (in GB) for Avi Controller Config (Default [30G]) 10
Do you have separate partition for Avi Controller Metrics ? If yes, please enter directory path, else leave it blank
Do you have separate partition for Avi Controller Client Logs ? If yes, please enter directory path, else leave it blank
Please enter Controller IP (Default [10.255.1.232])
Enter the Controller SSH port. (Default [5098])
Enter the Controller system-internal portal port. (Default [8443])
AviVantage Version Tag: 17.2.11-9014
Run SE           : No
Run Controller   : Yes
Controller Cores : 4
Memory(GB)       : 7
Disk(GB)         : 10
Controller IP    : 10.255.1.232
Disabling Avi Services...
Loading Avi CONTROLLER Image. Please Wait..
Installation Successful. Starting Services..
[vagrant@localhost ~]$
[vagrant@localhost ~]$ sudo systemctl start avicontroller

Or as a single command without interactive mode:

[vagrant@localhost ~]$ sudo ./avi_baremetal_setup.py -c -cd 10 -cc 4 -cm 7 -i 10.255.1.232
AviVantage Version Tag: 17.2.11-9014
Found disk with largest capacity at [/]
AviVantage Version Tag: 17.2.11-9014
Run SE           : No
Run Controller   : Yes
Controller Cores : 4
Memory(GB)       : 7
Disk(GB)         : 10
Controller IP    : 10.255.1.232
Disabling Avi Services...
Loading Avi CONTROLLER Image. Please Wait..
Installation Successful. Starting Services..
[vagrant@localhost ~]$
[vagrant@localhost ~]$ sudo systemctl start avicontroller

The installer basically installed a container image on the server which runs the AVI Controller:

[vagrant@localhost ~]$ sudo docker ps
CONTAINER ID        IMAGE                                                 COMMAND                  CREATED              STATUS              PORTS                                                                                                                                    NAMES
c689435f74fd        avinetworks/controller:17.2.11-9014                   "/opt/avi/scripts/do…"   About a minute ago   Up About a minute   0.0.0.0:80->80/tcp, 0.0.0.0:443->443/tcp, 0.0.0.0:5054->5054/tcp, 0.0.0.0:5098->5098/tcp, 0.0.0.0:8443->8443/tcp, 0.0.0.0:161->161/udp   avicontroller
[vagrant@localhost ~]$

Next you can connect via the web console to change the password and finalise the configuration to configure DNS, NTP and SMTP:

When you get to the menu Orchestrator integration you can put in the details for the controller to install additional service engines:

In the meantime the AVI Controller installs the specified Service Engines in the background, which automatically appear once this is completed under the infrastructure menu:

Like with the AVI Controller, the Service Engines run as container image:

[vagrant@localhost ~]$ sudo docker ps
CONTAINER ID        IMAGE                                         COMMAND                  CREATED             STATUS              PORTS               NAMES
2c6b207ed376        avinetworks/se:17.2.11-9014                   "/opt/avi/scripts/do…"   51 seconds ago      Up 50 seconds                           avise
[vagrant@localhost ~]$

The next article will be about automatically deploying the AVI Controller and Service Engines via Ansible, and looking into how to integrate AVI with OpenShift.

Please share your feedback and leave a comment.