Automate Ansible AWX configuration using Tower-CLI

Some time has gone by since my article about Getting started with Ansible AWX (Open Source Tower version) , and I wanted to continue focusing on AWX and show how to automate the configuration of an AWX Tower server.

Before we configure AWX we should install the tower-cli. You can find more information about the Tower CLI here: https://github.com/ansible/tower-cli. I also recommend having a look at the tower-cli documentation: https://tower-cli.readthedocs.io/en/latest/

sudo pip install ansible-tower-cli

The tower-cli is very useful when you want to monitor the running jobs. The web console is not that great when it comes to large playbook and is pretty slow at showing the running job state. See below the basic configuration before you start using the tower-cli:

berndonline@lab:~$ tower-cli config host 94.130.51.22
Configuration updated successfully.
berndonline@lab:~$ tower-cli login admin
Password:
{
 "id": 1,
 "type": "o_auth2_access_token",
 "url": "/api/v2/tokens/1/",
 "created": "2018-09-15T17:41:23.942572Z",
 "modified": "2018-09-15T17:41:23.955795Z",
 "description": "Tower CLI",
 "user": 1,
 "refresh_token": null,
 "application": null,
 "expires": "3018-01-16T17:41:23.937872Z",
 "scope": "write"
}
Configuration updated successfully.
berndonline@lab:~$ 

But now let’s continue and show how we can use the tower-cli to configure and monitor Ansible AWX Tower.
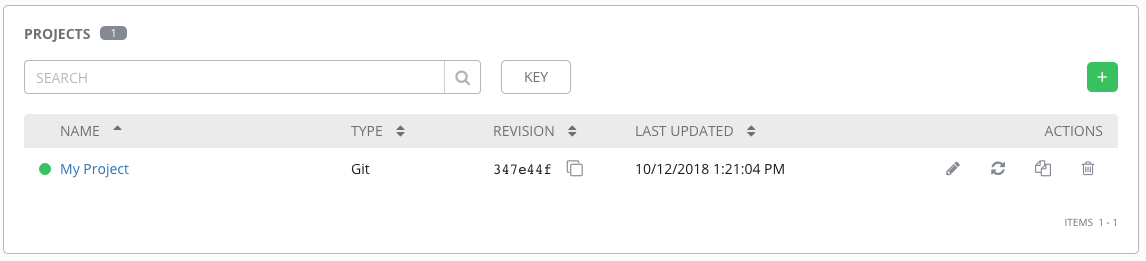
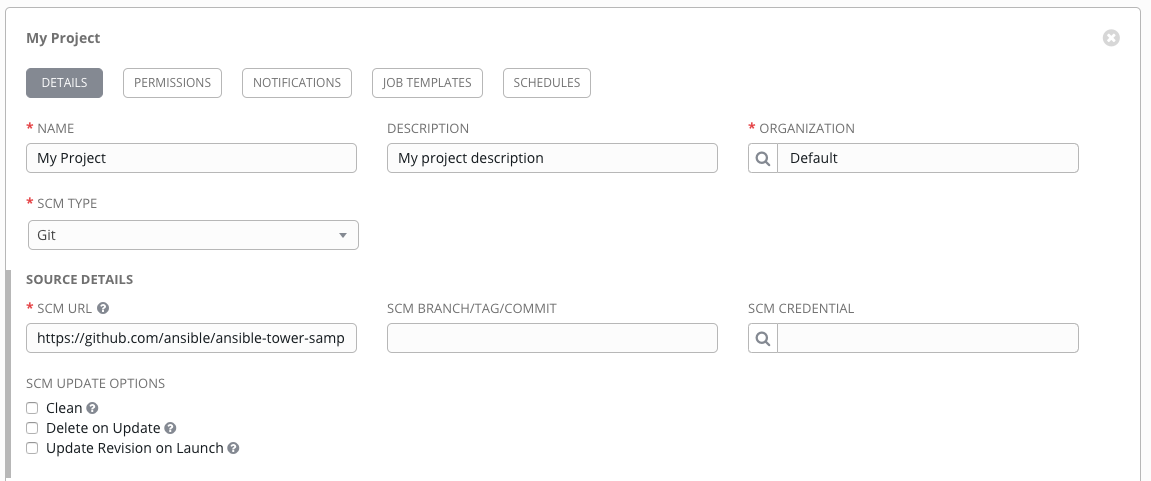
Create a project:

tower-cli project create --name "My Project" --description "My project description" --organization "Default" --scm-type "git" --scm-url "https://github.com/ansible/ansible-tower-samples"

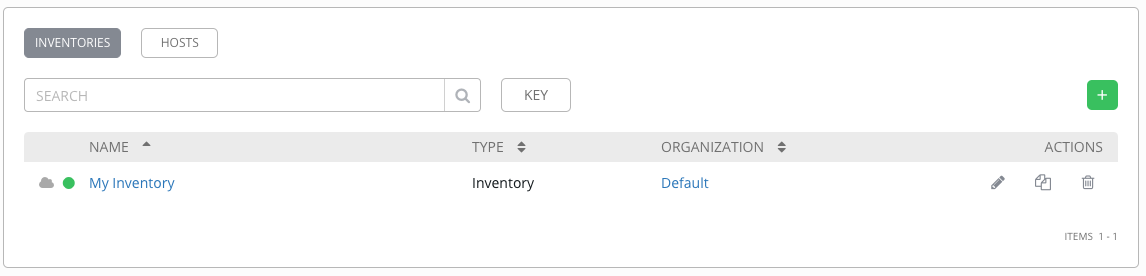
Create an inventory:

tower-cli inventory create --name "My Inventory" --organization "Default"

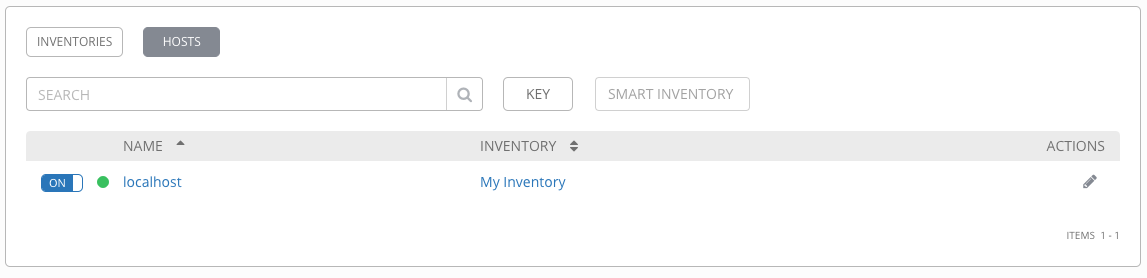
Add hosts to an inventory:

tower-cli host create --name "localhost" --inventory "My Inventory" --variables "ansible_connection: local"
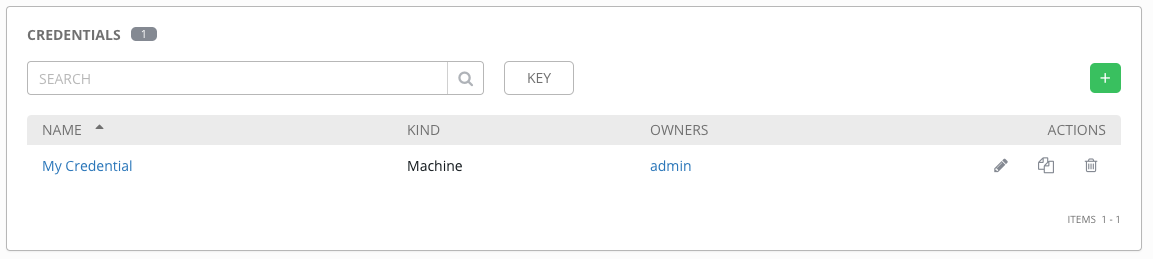
Create credentials:

tower-cli credential create --name "My Credential" --credential-type "Machine" --user "admin"

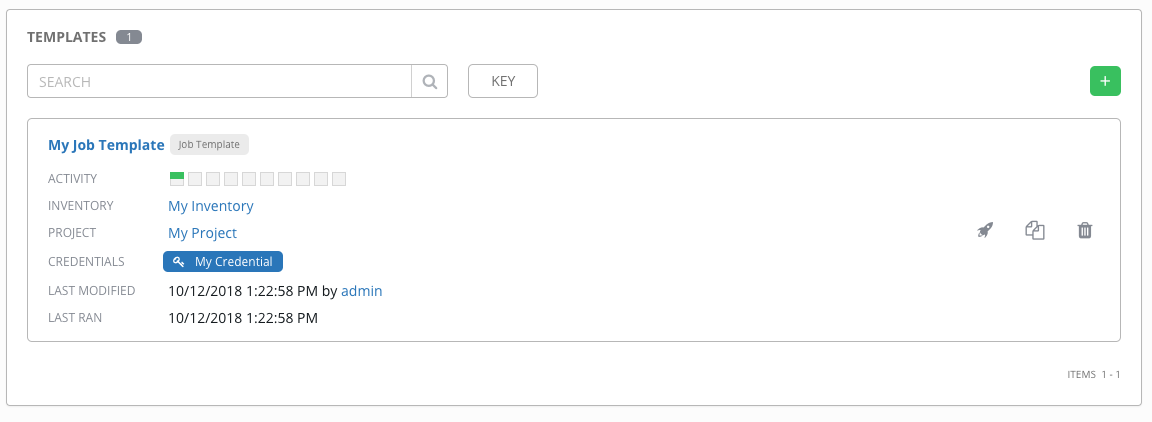
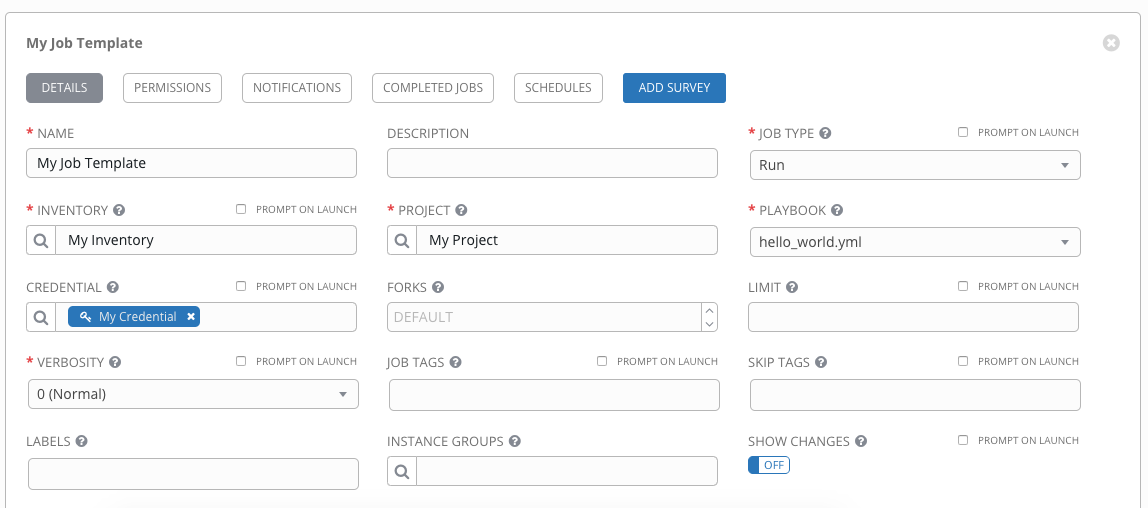
Create a Project Job Template:

tower-cli job_template create --name "My Job Template" --project "My Project" --inventory "My Inventory" --job-type "run" --credential "My Credential" --playbook "hello_world.yml" --verbosity "default"

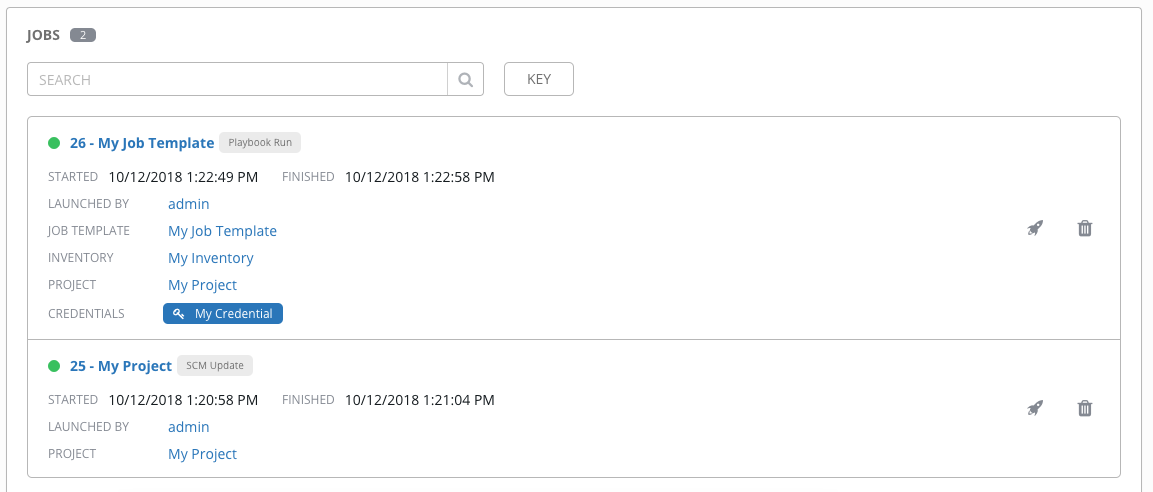
After we successfully created everything let’s now run the job template and monitor the output via the tower-cli:

tower-cli job launch --job-template "My Job Template"
tower-cli job monitor <ID>

Command line output:

berndonline@lab:~$ tower-cli job launch --job-template "My Job Template"
Resource changed.
== ============ =========================== ======= =======
id job_template           created           status  elapsed
== ============ =========================== ======= =======
26           15 2018-10-12T12:22:48.599748Z pending 0.0
== ============ =========================== ======= =======
berndonline@lab:~$ tower-cli job monitor 26
------Starting Standard Out Stream------


PLAY [Hello World Sample] ******************************************************

TASK [Gathering Facts] *********************************************************
ok: [localhost]

TASK [Hello Message] ***********************************************************
ok: [localhost] => {
    "msg": "Hello World!"
}

PLAY RECAP *********************************************************************
localhost                  : ok=2    changed=0    unreachable=0    failed=0

------End of Standard Out Stream--------
Resource changed.
== ============ =========================== ========== =======
id job_template           created             status   elapsed
== ============ =========================== ========== =======
26           15 2018-10-12T12:22:48.599748Z successful 8.861
== ============ =========================== ========== =======
berndonline@lab:~$

With the tower-cli commands we can write a simple playbook using the Ansible Shell module.

Playbook site.yml:

---
- hosts: localhost
  gather_facts: 'no'

  tasks:
    - name: Add tower project
      shell: |
        tower-cli project create \
        --name "My Project" \
        --description "My project description" \
        --organization "Default" \
        --scm-type "git" \
        --scm-url "https://github.com/ansible/ansible-tower-samples"

    - name: Add tower inventory
      shell: |
        tower-cli inventory create \
        --name "My Inventory" \
        --organization "Default"

    - name: Add host to inventory
      shell: |
        tower-cli host create \
        --name "localhost" \
        --inventory "My Inventory" \
        --variables "ansible_connection: local"
    
    - name: Add credential
      shell: |
        tower-cli credential create \
        --name "My Credential" \
        --credential-type "Machine" \
        --user "admin"
        
    - name: wait 15 seconds to pull project SCM content
      wait_for: timeout=15
      delegate_to: localhost
 
    - name: Add job template
      shell: |
        tower-cli job_template create \
        --name "My Job Template" \
        --project "My Project" \
        --inventory "My Inventory" \
        --job-type "run" \
        --credential "My Credential" \
        --playbook "hello_world.yml" \
        --verbosity "default"

Let’s run the playbook:

berndonline@lab:~/awx-provision$ ansible-playbook site.yml

PLAY [localhost] **************************************************************************************************************************************************

TASK [Add tower project] ******************************************************************************************************************************************
changed: [localhost]

TASK [Add tower inventory] ****************************************************************************************************************************************
changed: [localhost]

TASK [Add host to inventory] **************************************************************************************************************************************
changed: [localhost]

TASK [Add credential] *********************************************************************************************************************************************
changed: [localhost]

TASK [wait 15 seconds to pull project SCM content] ****************************************************************************************************************
ok: [localhost -> localhost]

TASK [Add job template] *******************************************************************************************************************************************
changed: [localhost]

PLAY RECAP ********************************************************************************************************************************************************
localhost : ok=6 changed=5 unreachable=0 failed=0

berndonline@lab:~/awx-provision$

If you like this article, please share your feedback and leave a comment.

Part one: Ansible URI module and Jinja2 templating

This article about the Ansible URI module. I have recently spend a lot of time around automation for AVI software defined load balancers and wanted to share some useful information about how to use Ansible to interacting with REST API’s. Please check out my other articles around AVI Networks.

Let’s start with the playbook:

---
- hosts: controller
  gather_facts: false
  roles:
    - { role: "config" }

The config role needs the following folders:

config/
├── defaults    # Useful for default variables
├── tasks       # Includes Ansible tasks using the URI module
├── templates   # Jinja2 json templates
└── vars        # Variables to load json j2 templates

I will use defaults just as an example for variables which I use in the task and the json template.

Here’s the content of defaults/main.yml:

---
dns_servers:
  - 8.8.8.8
  - 8.8.4.4
dns_domain: domain.com
ntp_servers:
  - 0.uk.pool.ntp.org
  - 1.uk.pool.ntp.org
username: admin
password: demo
api_version: 17.2.11

Next the Json Jinja2 template, the example below is the system configuration from AVI load balancers but this can be any json content you want to push to a REST API, templates/systemconfiguration_json.j2:

{
  "dns_configuration": {
    {% if dns_domain is defined %}
    "search_domain": "{{ dns_domain }}"
    {% endif %}
    {% if dns_servers is defined %}
    {% for item in dns_servers %}
    "server_list": [
      {
         "type": "V4",
         "addr": "{{ item }}"
      }
      {% if not loop.last %}
      ,
      {% endif %}
      {% endfor %}
      {% endif %}
    ]
  },
  "ntp_configuration": {
    {% if ntp_servers is defined %}
    {% for item in ntp_servers %}
    "ntp_servers": [
      {
        "server": {
          "type": "DNS",
          "addr": "{{ item }}"
        }
      }
      {% if not loop.last %}
      ,
      {% endif %}
      {% endfor %}
      {% endif %}  
    ]
  },
  "portal_configuration": {
    "password_strength_check": true,
    "use_uuid_from_input": false,
    "redirect_to_https": true,
    "enable_clickjacking_protection": true,
    "enable_https": true,
    "disable_remote_cli_shell": false,
    "http_port": 80,
    "enable_http": true,
    "allow_basic_authentication": true,
  }
}

After we have specified the default variables and created the j2 template, let’s continue and see how we load the json template into a single variables in vars/main.yml:

---
systemconfiguration_json: "{{ lookup('template', 'systemconfiguration_json.j2') }}"

The step is the task itself using the Ansible URI module, tasks/main.yml:

---
- block:
  - name: Config | Systemconfiguration | Configure DNS, NTP and Portal settings
    uri:
      url: "https://{{ ansible_host }}/api/systemconfiguration"
      method: PUT
      user: "{{ username }}"
      password: "{{ password }}"
      return_content: yes
      body: "{{ systemconfiguration_json }}"
      force_basic_auth: yes
      validate_certs: false
      status_code: 200, 201
      timeout: 180
      headers:
        X-Avi-Version: "{{ api_version }}"
  when: '( inventory_hostname == group["controller"][0] )'

I like to use blocks in my Ansible tasks because you can group your tasks and use a single WHEN statement when you have multiple similar tasks.

I hope you find this article useful and please try it out and let me now in the comments below if you have questions.

Continue and read the other parts of this little series:

Here you find the links to the other articles about Ansible URI module:

Deploy OpenShift 3.9 Container Platform using Terraform and Ansible on Amazon AWS

After my previous articles on OpenShift and Terraform I wanted to show how to create the necessary infrastructure and to deploy an OpenShift Container Platform in a more real-world scenario. I highly recommend reading my other posts about using Terraform to deploy an Amazon AWS VPC and AWS EC2 Instances and Load Balancers. Once the infrastructure is created we will use the Bastion Host to connect to the environment and deploy OpenShift Origin using Ansible.

I think this might be an interesting topic to show what tools like Terraform and Ansible can do together:

I will not go into detail about the configuration and only show the output of deploying the infrastructure. Please checkout my Github repository to see the detailed configuration: https://github.com/berndonline/openshift-terraform

Before we start you need to clone the repository and generate the ssh key used from the bastion host to access the OpenShift nodes:

git clone https://github.com/berndonline/openshift-terraform.git
cd ./openshift-terraform/
ssh-keygen -b 2048 -t rsa -f ./helper_scripts/id_rsa -q -N ""
chmod 600 ./helper_scripts/id_rsa

We are ready to create the infrastructure and run terraform apply:

berndonline@lab:~/openshift-terraform$ terraform apply

...

Plan: 56 to add, 0 to change, 0 to destroy.

Do you want to perform these actions?
  Terraform will perform the actions described above.
  Only 'yes' will be accepted to approve.

  Enter a value: yes

...

Apply complete! Resources: 19 added, 0 changed, 16 destroyed.

Outputs:

bastion = ec2-34-244-225-35.eu-west-1.compute.amazonaws.com
openshift master = master-35563dddc8b2ea9c.elb.eu-west-1.amazonaws.com
openshift subdomain = infra-1994425986.eu-west-1.elb.amazonaws.com
berndonline@lab:~/openshift-terraform$

Terraform successfully creates the VPC, load balancers and all needed instances. Before we continue wait 5 to 10 minutes because the cloud-init script takes a bit time and all the instance reboot at the end.

Instances:

Security groups:

Target groups for the Master and the Infra load balancers:

Master and the Infra load balancers:

Terraform also automatically creates the inventory file for the OpenShift installation and adds the hostnames for master, infra and worker nodes to the correct inventory groups. The next step is to copy the private ssh key and the inventory file to the bastion host. I am using the terraform output command to get the public hostname from the bastion host:

scp -o StrictHostKeyChecking=no -o UserKnownHostsFile=/dev/null -r ./helper_scripts/id_rsa centos@$(terraform output bastion):/home/centos/.ssh/
scp -o StrictHostKeyChecking=no -o UserKnownHostsFile=/dev/null -r ./inventory/ansible-hosts  centos@$(terraform output bastion):/home/centos/ansible-hosts
ssh -o StrictHostKeyChecking=no -o UserKnownHostsFile=/dev/null -l centos $(terraform output bastion)

On the bastion node, change to the /openshift-ansible/ folder and start running the prerequisites and the deploy-cluster playbooks:

cd /openshift-ansible/
ansible-playbook ./playbooks/prerequisites.yml -i ~/ansible-hosts
ansible-playbook ./playbooks/deploy_cluster.yml -i ~/ansible-hosts

Here the output from running the prerequisites playbook:

[centos@ip-10-0-0-22 ~]$ cd /openshift-ansible/
[centos@ip-10-0-0-22 openshift-ansible]$ ansible-playbook ./playbooks/prerequisites.yml -i ~/ansible-hosts

PLAY [Initialization Checkpoint Start] ****************************************************************************************************************************

TASK [Set install initialization 'In Progress'] *******************************************************************************************************************
Saturday 15 September 2018  11:04:50 +0000 (0:00:00.407)       0:00:00.407 ****
ok: [ip-10-0-1-237.eu-west-1.compute.internal]

PLAY [Populate config host groups] ********************************************************************************************************************************

TASK [Load group name mapping variables] **************************************************************************************************************************
Saturday 15 September 2018  11:04:50 +0000 (0:00:00.110)       0:00:00.517 ****
ok: [localhost]

TASK [Evaluate groups - g_etcd_hosts or g_new_etcd_hosts required] ************************************************************************************************
Saturday 15 September 2018  11:04:51 +0000 (0:00:00.033)       0:00:00.551 ****
skipping: [localhost]

TASK [Evaluate groups - g_master_hosts or g_new_master_hosts required] ********************************************************************************************
Saturday 15 September 2018  11:04:51 +0000 (0:00:00.024)       0:00:00.575 ****
skipping: [localhost]

TASK [Evaluate groups - g_node_hosts or g_new_node_hosts required] ************************************************************************************************
Saturday 15 September 2018  11:04:51 +0000 (0:00:00.024)       0:00:00.599 ****
skipping: [localhost]

...

PLAY RECAP ********************************************************************************************************************************************************
ip-10-0-1-192.eu-west-1.compute.internal : ok=56   changed=14   unreachable=0    failed=0
ip-10-0-1-237.eu-west-1.compute.internal : ok=64   changed=15   unreachable=0    failed=0
ip-10-0-1-248.eu-west-1.compute.internal : ok=56   changed=14   unreachable=0    failed=0
ip-10-0-5-174.eu-west-1.compute.internal : ok=56   changed=14   unreachable=0    failed=0
ip-10-0-5-235.eu-west-1.compute.internal : ok=58   changed=14   unreachable=0    failed=0
ip-10-0-5-35.eu-west-1.compute.internal : ok=56   changed=14   unreachable=0    failed=0
ip-10-0-9-130.eu-west-1.compute.internal : ok=56   changed=14   unreachable=0    failed=0
ip-10-0-9-51.eu-west-1.compute.internal : ok=58   changed=14   unreachable=0    failed=0
ip-10-0-9-85.eu-west-1.compute.internal : ok=56   changed=14   unreachable=0    failed=0
localhost                  : ok=11   changed=0    unreachable=0    failed=0


INSTALLER STATUS **************************************************************************************************************************************************
Initialization             : Complete (0:00:41)

[centos@ip-10-0-0-22 openshift-ansible]$

Continue with the deploy cluster playbook:

[centos@ip-10-0-0-22 openshift-ansible]$ ansible-playbook ./playbooks/deploy_cluster.yml -i ~/ansible-hosts

PLAY [Initialization Checkpoint Start] ****************************************************************************************************************************

TASK [Set install initialization 'In Progress'] *******************************************************************************************************************
Saturday 15 September 2018  11:08:38 +0000 (0:00:00.102)       0:00:00.102 ****
ok: [ip-10-0-1-237.eu-west-1.compute.internal]

PLAY [Populate config host groups] ********************************************************************************************************************************

TASK [Load group name mapping variables] **************************************************************************************************************************
Saturday 15 September 2018  11:08:38 +0000 (0:00:00.064)       0:00:00.167 ****
ok: [localhost]

TASK [Evaluate groups - g_etcd_hosts or g_new_etcd_hosts required] ************************************************************************************************
Saturday 15 September 2018  11:08:38 +0000 (0:00:00.031)       0:00:00.198 ****
skipping: [localhost]

TASK [Evaluate groups - g_master_hosts or g_new_master_hosts required] ********************************************************************************************
Saturday 15 September 2018  11:08:38 +0000 (0:00:00.026)       0:00:00.225 ****
skipping: [localhost]

...

PLAY RECAP ********************************************************************************************************************************************************
ip-10-0-1-192.eu-west-1.compute.internal : ok=132  changed=57   unreachable=0    failed=0
ip-10-0-1-237.eu-west-1.compute.internal : ok=591  changed=256  unreachable=0    failed=0
ip-10-0-1-248.eu-west-1.compute.internal : ok=132  changed=57   unreachable=0    failed=0
ip-10-0-5-174.eu-west-1.compute.internal : ok=132  changed=57   unreachable=0    failed=0
ip-10-0-5-235.eu-west-1.compute.internal : ok=325  changed=145  unreachable=0    failed=0
ip-10-0-5-35.eu-west-1.compute.internal : ok=132  changed=57   unreachable=0    failed=0
ip-10-0-9-130.eu-west-1.compute.internal : ok=132  changed=57   unreachable=0    failed=0
ip-10-0-9-51.eu-west-1.compute.internal : ok=325  changed=145  unreachable=0    failed=0
ip-10-0-9-85.eu-west-1.compute.internal : ok=132  changed=57   unreachable=0    failed=0
localhost                  : ok=13   changed=0    unreachable=0    failed=0

INSTALLER STATUS **************************************************************************************************************************************************
Initialization             : Complete (0:00:55)
Health Check               : Complete (0:00:01)
etcd Install               : Complete (0:01:03)
Master Install             : Complete (0:05:17)
Master Additional Install  : Complete (0:00:26)
Node Install               : Complete (0:08:24)
Hosted Install             : Complete (0:00:57)
Web Console Install        : Complete (0:00:28)
Service Catalog Install    : Complete (0:01:19)

[centos@ip-10-0-0-22 openshift-ansible]$

Once the deploy playbook finishes we have a working Openshift cluster:

Login with username: demo, and password: demo

For the infra load balancers you cannot access OpenShift routes via the Amazon DNS, this is not allowed. You need to create a wildcard DNS CNAME record like *.paas.domain.com and point to the AWS load balancer DNS record.

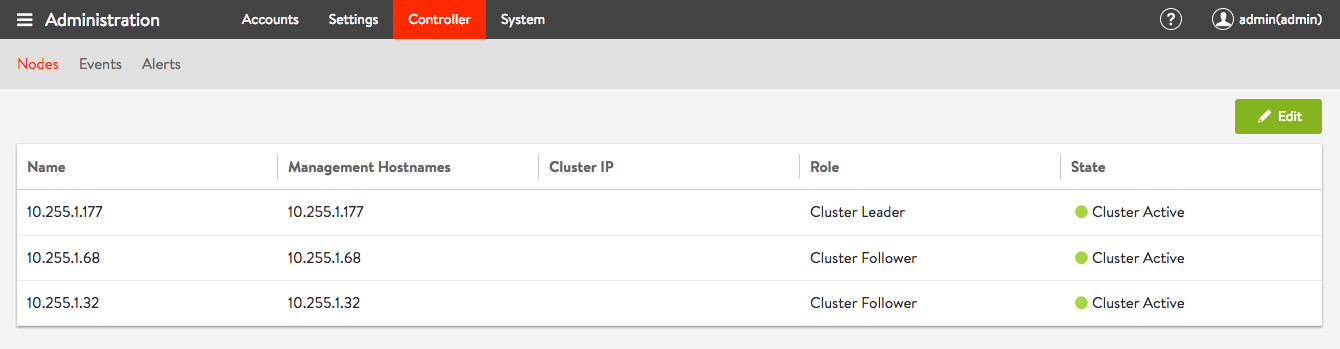
Let’s continue to do some basic cluster checks to see the nodes are in ready state:

[centos@ip-10-0-1-237 ~]$ oc get nodes
NAME                                       STATUS    ROLES     AGE       VERSION
ip-10-0-1-192.eu-west-1.compute.internal   Ready     compute   11m       v1.9.1+a0ce1bc657
ip-10-0-1-237.eu-west-1.compute.internal   Ready     master    16m       v1.9.1+a0ce1bc657
ip-10-0-1-248.eu-west-1.compute.internal   Ready         11m       v1.9.1+a0ce1bc657
ip-10-0-5-174.eu-west-1.compute.internal   Ready     compute   11m       v1.9.1+a0ce1bc657
ip-10-0-5-235.eu-west-1.compute.internal   Ready     master    15m       v1.9.1+a0ce1bc657
ip-10-0-5-35.eu-west-1.compute.internal    Ready         11m       v1.9.1+a0ce1bc657
ip-10-0-9-130.eu-west-1.compute.internal   Ready     compute   11m       v1.9.1+a0ce1bc657
ip-10-0-9-51.eu-west-1.compute.internal    Ready     master    14m       v1.9.1+a0ce1bc657
ip-10-0-9-85.eu-west-1.compute.internal    Ready         11m       v1.9.1+a0ce1bc657
[centos@ip-10-0-1-237 ~]$
[centos@ip-10-0-1-237 ~]$ oc get projects
NAME                                DISPLAY NAME   STATUS
default                                            Active
kube-public                                        Active
kube-service-catalog                               Active
kube-system                                        Active
logging                                            Active
management-infra                                   Active
openshift                                          Active
openshift-ansible-service-broker                   Active
openshift-infra                                    Active
openshift-node                                     Active
openshift-template-service-broker                  Active
openshift-web-console                              Active
[centos@ip-10-0-1-237 ~]$
[centos@ip-10-0-1-237 ~]$ oc get pods -o wide
NAME                       READY     STATUS    RESTARTS   AGE       IP           NODE
docker-registry-1-8798r    1/1       Running   0          10m       10.128.2.2   ip-10-0-5-35.eu-west-1.compute.internal
registry-console-1-zh9m4   1/1       Running   0          10m       10.129.2.3   ip-10-0-9-85.eu-west-1.compute.internal
router-1-96zzf             1/1       Running   0          10m       10.0.9.85    ip-10-0-9-85.eu-west-1.compute.internal
router-1-nfh7h             1/1       Running   0          10m       10.0.1.248   ip-10-0-1-248.eu-west-1.compute.internal
router-1-pcs68             1/1       Running   0          10m       10.0.5.35    ip-10-0-5-35.eu-west-1.compute.internal
[centos@ip-10-0-1-237 ~]$

At the end just destroy the infrastructure with terraform destroy:

berndonline@lab:~/openshift-terraform$ terraform destroy

...

Destroy complete! Resources: 56 destroyed.
berndonline@lab:~/openshift-terraform$

I will continue improving the configuration and I plan to use Jenkins to deploy the AWS infrastructure and OpenShift fully automatically.

Please let me know if you like the article or have questions in the comments below.

Ansible Playbook to deploy AVI Controller and Service Engines

After my first blog post about Software defined Load Balancing with AVI Networks, here is how to automatically deploy AVI controller and services engines via Ansible.

Here are the links to my repositories; AVI Vagrant environment: https://github.com/berndonline/avi-lab-vagrant and AVI Ansible Playbook: https://github.com/berndonline/avi-lab-provision

Make sure that your vagrant environment is running,

berndonline@lab:~/avi-lab-vagrant$ vagrant status
Current machine states:

avi-controller-1          running (libvirt)
avi-controller-2          running (libvirt)
avi-controller-3          running (libvirt)
avi-se-1                  running (libvirt)
avi-se-2                  running (libvirt)

This environment represents multiple VMs. The VMs are all listed
above with their current state. For more information about a specific
VM, run `vagrant status NAME`.

I needed to modify the ansible.cfg to integrate a filter plugin:

[defaults]
inventory = ./.vagrant/provisioners/ansible/inventory/vagrant_ansible_inventory
host_key_checking=False

library = /home/berndonline/avi-lab-provision/lib
filter_plugins = /home/berndonline/avi-lab-provision/lib/filter_plugins

The controller installation is actually very simple and I got it from the official AVI ansible role they created, I added a second role to check ones the controller nodes are successfully booted:

---
- hosts: avi-controller
  user: '{{ ansible_ssh_user }}'
  gather_facts: "true"
  roles:
    - {role: ansible-role-avicontroller, become: true}
    - {role: avi-post-controller, become: false}

There’s one important thing to know before we run the playbook. When you have an AVI subscription you get custom container images with a predefined default password which makes it easier for you to do the cluster setup fully automated. You find the default password variable in group_vars/all.yml there you set as well if the password should be changed.

Let’s execute the ansible playbook, it takes a bit time for the three nodes to boot up:

berndonline@lab:~/avi-lab-vagrant$ ansible-playbook ../avi-lab-provision/playbooks/avi-controller-install.yml

PLAY [avi-controller] *********************************************************************************************************************************************

TASK [Gathering Facts] ********************************************************************************************************************************************
ok: [avi-controller-3]
ok: [avi-controller-2]
ok: [avi-controller-1]

TASK [ansible-role-avicontroller : Avi Controller | Deployment] ***************************************************************************************************
included: /home/berndonline/avi-lab-provision/roles/ansible-role-avicontroller/tasks/docker/main.yml for avi-controller-1, avi-controller-2, avi-controller-3

TASK [ansible-role-avicontroller : Avi Controller | Services | systemd | Check if Avi Controller installed] *******************************************************
included: /home/berndonline/avi-lab-provision/roles/ansible-role-avicontroller/tasks/docker/services/systemd/check.yml for avi-controller-1, avi-controller-2, avi-controller-3

TASK [ansible-role-avicontroller : Avi Controller | Check if Avi Controller installed] ****************************************************************************
ok: [avi-controller-3]
ok: [avi-controller-2]
ok: [avi-controller-1]

TASK [ansible-role-avicontroller : Avi Controller | Services | init.d | Check if Avi Controller installed] ********************************************************
skipping: [avi-controller-1]
skipping: [avi-controller-2]
skipping: [avi-controller-3]

TASK [ansible-role-avicontroller : Avi Controller | Check minimum requirements] ***********************************************************************************
included: /home/berndonline/avi-lab-provision/roles/ansible-role-avicontroller/tasks/docker/requirements.yml for avi-controller-1, avi-controller-2, avi-controller-3

TASK [ansible-role-avicontroller : Avi Controller | Requirements | Check for docker] ******************************************************************************
ok: [avi-controller-2]
ok: [avi-controller-3]
ok: [avi-controller-1]

...

TASK [avi-post-controller : wait for cluster nodes up] ************************************************************************************************************
FAILED - RETRYING: wait for cluster nodes up (30 retries left).

...

FAILED - RETRYING: wait for cluster nodes up (7 retries left).
FAILED - RETRYING: wait for cluster nodes up (8 retries left).
FAILED - RETRYING: wait for cluster nodes up (7 retries left).
ok: [avi-controller-2]
ok: [avi-controller-3]
ok: [avi-controller-1]

PLAY RECAP ********************************************************************************************************************************************************
avi-controller-1           : ok=36   changed=6    unreachable=0    failed=0
avi-controller-2           : ok=35   changed=5    unreachable=0    failed=0
avi-controller-3           : ok=35   changed=5    unreachable=0    failed=0

berndonline@lab:~/avi-lab-vagrant$

We are not finished yet and need to set basic settings like NTP and DNS, and need to configure the AVI three node controller cluster with another playbook:

---
- hosts: localhost
  connection: local
  roles:
    - {role: avi-cluster-setup, become: false}
    - {role: avi-change-password, become: false, when: avi_change_password == true}

The first role uses the REST API to do the configuration changes and requires the AVI ansible sdk role and for these reason it is very useful using the custom subscription images because you know the default password otherwise you need to modify the main setup.json file.

Let’s run the AVI cluster setup playbook:

berndonline@lab:~/avi-lab-vagrant$ ansible-playbook ../avi-lab-provision/playbooks/avi-cluster-setup.yml

PLAY [localhost] **************************************************************************************************************************************************

TASK [Gathering Facts] ********************************************************************************************************************************************
ok: [localhost]

TASK [ansible-role-avisdk : Checking if avisdk python library is present] *****************************************************************************************
ok: [localhost] => {
    "msg": "Please make sure avisdk is installed via pip. 'pip install avisdk --upgrade'"
}

TASK [avi-cluster-setup : set AVI dns and ntp facts] **************************************************************************************************************
ok: [localhost]

TASK [avi-cluster-setup : set AVI cluster facts] ******************************************************************************************************************
ok: [localhost]

TASK [avi-cluster-setup : configure ntp and dns controller nodes] *************************************************************************************************
changed: [localhost]

TASK [avi-cluster-setup : configure AVI cluster] ******************************************************************************************************************
changed: [localhost]

TASK [avi-cluster-setup : wait for cluster become active] *********************************************************************************************************
FAILED - RETRYING: wait for cluster become active (30 retries left).
FAILED - RETRYING: wait for cluster become active (29 retries left).
FAILED - RETRYING: wait for cluster become active (28 retries left).

...

FAILED - RETRYING: wait for cluster become active (14 retries left).
FAILED - RETRYING: wait for cluster become active (13 retries left).
FAILED - RETRYING: wait for cluster become active (12 retries left).
ok: [localhost]

TASK [avi-change-password : change default admin password on cluster build when subscription] *********************************************************************
skipping: [localhost]

PLAY RECAP ********************************************************************************************************************************************************
localhost                  : ok=7    changed=2    unreachable=0    failed=0

berndonline@lab:~/avi-lab-vagrant$

We can check in the web console to see if the cluster is booted and correctly setup:

Last but not least we need the ansible playbook for the AVI service engines installation which relies on the official AVI ansible se role:

---
- hosts: avi-se
  user: '{{ ansible_ssh_user }}'
  gather_facts: "true"
  roles:
    - {role: ansible-role-avise, become: true}

Let’s run the playbook for the service engines installation:

berndonline@lab:~/avi-lab-vagrant$ ansible-playbook ../avi-lab-provision/playbooks/avi-se-install.yml

PLAY [avi-se] *****************************************************************************************************************************************************

TASK [Gathering Facts] ********************************************************************************************************************************************
ok: [avi-se-2]
ok: [avi-se-1]

TASK [ansible-role-avisdk : Checking if avisdk python library is present] *****************************************************************************************
ok: [avi-se-1] => {
    "msg": "Please make sure avisdk is installed via pip. 'pip install avisdk --upgrade'"
}
ok: [avi-se-2] => {
    "msg": "Please make sure avisdk is installed via pip. 'pip install avisdk --upgrade'"
}

TASK [ansible-role-avise : Avi SE | Set facts] ********************************************************************************************************************
skipping: [avi-se-1]
skipping: [avi-se-2]

TASK [ansible-role-avise : Avi SE | Deployment] *******************************************************************************************************************
included: /home/berndonline/avi-lab-provision/roles/ansible-role-avise/tasks/docker/main.yml for avi-se-1, avi-se-2

TASK [ansible-role-avise : Avi SE | Check minimum requirements] ***************************************************************************************************
included: /home/berndonline/avi-lab-provision/roles/ansible-role-avise/tasks/docker/requirements.yml for avi-se-1, avi-se-2

TASK [ansible-role-avise : Avi SE | Requirements | Check for docker] **********************************************************************************************
ok: [avi-se-2]
ok: [avi-se-1]

TASK [ansible-role-avise : Avi SE | Requirements | Set facts] *****************************************************************************************************
ok: [avi-se-1]
ok: [avi-se-2]

TASK [ansible-role-avise : Avi SE | Requirements | Validate Parameters] *******************************************************************************************
ok: [avi-se-1] => {
    "changed": false,
    "msg": "All assertions passed"
}
ok: [avi-se-2] => {
    "changed": false,
    "msg": "All assertions passed"
}

...

TASK [ansible-role-avise : Avi SE | Services | systemd | Start the service since it's not running] ****************************************************************
changed: [avi-se-1]
changed: [avi-se-2]

RUNNING HANDLER [ansible-role-avise : Avi SE | Services | systemd | Daemon reload] ********************************************************************************
ok: [avi-se-2]
ok: [avi-se-1]

RUNNING HANDLER [ansible-role-avise : Avi SE | Services | Restart the avise service] ******************************************************************************
changed: [avi-se-2]
changed: [avi-se-1]

PLAY RECAP ********************************************************************************************************************************************************
avi-se-1                   : ok=47   changed=7    unreachable=0    failed=0
avi-se-2                   : ok=47   changed=7    unreachable=0    failed=0

berndonline@lab:~/avi-lab-vagrant$

After a few minutes you see the AVI service engines automatically register on the controller cluster and you are ready start configuring the detailed load balancing configuration:

Please share your feedback and leave a comment.

Internet Edge and WAN Routing with Cumulus Linux

With this article I wanted to focus on something different than the usual spine and leaf topology and talk about datacenter edge routing.

I was using Cisco routers for many years for Internet Edge and WAN connectivity. The problem with using a vendor like Cisco is the price tag you have to pay and there still might a reason for it to spend the money. But nowadays you get leased-lines handed over as normal Ethernet connection and using a dedicated routers maybe not always necessary if you are not getting too crazy with BGP routing or quality of service.

I was experimenting over the last weeks if I could use a Cumulus Linux switch as an Internet Edge and Wide Area Network router with running different VRFs for internet and WAN connectivity. I came up with the following edge network layout you see below:

For this network, I build an Vagrant topology with Cumulus VX to simulate the edge routing and being able to test the connectivity. Below you see a more detailed view of the Vagrant topology:

Everything is running on Cumulus VX even the firewalls because I just wanted to simulate the traffic flow and see if the network communication is functioning. Also having separate WAN switches might be useful because 1Gbit/s switches are cheaper then 40Gbit/s switches and you need additional SFP for 1Gbit/s connections, another point is to separate your layer 2 WAN connectivity from your internal datacenter network.

Here the assigned IP addresses for this lab:

wan-1 VLAN801 PIP: 217.0.1.2/29 VIP: 217.0.1.1/29
wan-2 VLAN801 PIP: 217.0.1.3/29 VIP: 217.0.1.1/29
wan-1 VLAN802 PIP: 10.100.0.1/29 
wan-2 VLAN802 PIP: 10.100.0.2/29
wan-1 VLAN904 PIP: 217.0.0.2/28 VIP: 217.0.0.1/28
wan-2 VLAN904 PIP: 217.0.0.3/28 VIP: 217.0.0.1/28
fw-1 VLAN904 PIP: 217.0.0.14/28
wan-1 VLAN903 PIP: 10.0.255.34/28 VIP: 10.0.255.33/28
wan-2 VLAN903 PIP: 10.0.255.35/28 VIP: 10.0.255.33/28
fw-2 VLAN903 PIP: 10.0.255.46/28
edge-1 VLAN901 PIP: 10.0.255.2/28 VIP: 10.0.255.1/28
edge-2 VLAN901 PIP: 10.0.255.3/28 VIP: 10.0.255.1/28
fw-1 VLAN901 PIP: 10.0.255.14/28
fw-2 VLAN901 PIP: 10.0.255.12/28
edge-1 VLAN902 PIP: 10.0.255.18/28 VIP: 10.0.255.17/28
edge-2 VLAN902 PIP: 10.0.255.19/28 VIP: 10.0.255.17/28
fw-1 VLAN902 PIP: 10.0.255.30/28

You can find the Github repository for the Vagrant topology here: https://github.com/berndonline/cumulus-edge-vagrant

berndonline@lab:~/cumulus-edge-vagrant$ vagrant status
Current machine states:

fw-2                      running (libvirt)
fw-1                      running (libvirt)
mgmt-1                    running (libvirt)
edge-2                    running (libvirt)
edge-1                    running (libvirt)
wan-1                     running (libvirt)
wan-2                     running (libvirt)

This environment represents multiple VMs. The VMs are all listed
above with their current state. For more information about a specific
VM, run `vagrant status NAME`.
berndonline@lab:~/cumulus-edge-vagrant$

I wrote as well an Ansible Playbook to deploy the initial configuration which you can find here: https://github.com/berndonline/cumulus-edge-provision

Let’s execute the playbook:

berndonline@lab:~/cumulus-edge-vagrant$ ansible-playbook ../cumulus-edge-provision/site.yml

PLAY [edge] ********************************************************************************************************************************************************

TASK [switchgroups : create switch groups based on clag_pairs] *****************************************************************************************************
skipping: [edge-2] => (item=(u'wan', [u'wan-1', u'wan-2']))
skipping: [edge-1] => (item=(u'wan', [u'wan-1', u'wan-2']))
ok: [edge-2] => (item=(u'edge', [u'edge-1', u'edge-2']))
ok: [wan-1] => (item=(u'wan', [u'wan-1', u'wan-2']))
skipping: [wan-1] => (item=(u'edge', [u'edge-1', u'edge-2']))
ok: [edge-1] => (item=(u'edge', [u'edge-1', u'edge-2']))
ok: [wan-2] => (item=(u'wan', [u'wan-1', u'wan-2']))
skipping: [wan-2] => (item=(u'edge', [u'edge-1', u'edge-2']))

TASK [switchgroups : include switch group variables] ***************************************************************************************************************
skipping: [edge-2] => (item=(u'wan', [u'wan-1', u'wan-2']))
skipping: [edge-1] => (item=(u'wan', [u'wan-1', u'wan-2']))
ok: [wan-1] => (item=(u'wan', [u'wan-1', u'wan-2']))
skipping: [wan-1] => (item=(u'edge', [u'edge-1', u'edge-2']))
ok: [wan-2] => (item=(u'wan', [u'wan-1', u'wan-2']))
skipping: [wan-2] => (item=(u'edge', [u'edge-1', u'edge-2']))
ok: [edge-2] => (item=(u'edge', [u'edge-1', u'edge-2']))
ok: [edge-1] => (item=(u'edge', [u'edge-1', u'edge-2']))

...

RUNNING HANDLER [interfaces : reload networking] *******************************************************************************************************************
changed: [edge-2] => (item=ifreload -a)
changed: [edge-1] => (item=ifreload -a)
changed: [wan-1] => (item=ifreload -a)
changed: [wan-2] => (item=ifreload -a)
changed: [edge-2] => (item=sleep 10)
changed: [edge-1] => (item=sleep 10)
changed: [wan-2] => (item=sleep 10)
changed: [wan-1] => (item=sleep 10)

RUNNING HANDLER [routing : reload frr] *****************************************************************************************************************************
changed: [edge-2]
changed: [wan-1]
changed: [wan-2]
changed: [edge-1]

RUNNING HANDLER [ptm : restart ptmd] *******************************************************************************************************************************
changed: [edge-2]
changed: [edge-1]
changed: [wan-2]
changed: [wan-1]

RUNNING HANDLER [ntp : restart ntp] ********************************************************************************************************************************
changed: [wan-1]
changed: [edge-1]
changed: [wan-2]
changed: [edge-2]

RUNNING HANDLER [ifplugd : restart ifplugd] ************************************************************************************************************************
changed: [edge-1]
changed: [wan-1]
changed: [edge-2]
changed: [wan-2]

PLAY RECAP *********************************************************************************************************************************************************
edge-1                     : ok=21   changed=17   unreachable=0    failed=0
edge-2                     : ok=21   changed=17   unreachable=0    failed=0
wan-1                      : ok=21   changed=17   unreachable=0    failed=0
wan-2                      : ok=21   changed=17   unreachable=0    failed=0

berndonline@lab:~/cumulus-edge-vagrant$

At last but not least I wrote a simple Ansible Playbook for connectivity testing using ping what you can find here: https://github.com/berndonline/cumulus-edge-provision/blob/master/icmp_check.yml

berndonline@lab:~/cumulus-edge-vagrant$ ansible-playbook ../cumulus-edge-provision/check_icmp.yml

PLAY [exit edge] *********************************************************************************************************************************************************************************************************************

TASK [connectivity check from frontend firewall] *************************************************************************************************************************************************************************************
skipping: [fw-2] => (item=10.0.255.33)
skipping: [fw-2] => (item=10.0.255.17)
skipping: [fw-2] => (item=10.0.255.1)
skipping: [fw-2] => (item=217.0.0.1)
skipping: [edge-2] => (item=10.0.255.33)
skipping: [edge-2] => (item=10.0.255.17)
skipping: [edge-2] => (item=10.0.255.1)
skipping: [edge-1] => (item=10.0.255.33)
skipping: [edge-2] => (item=217.0.0.1)
skipping: [edge-1] => (item=10.0.255.17)
skipping: [edge-1] => (item=10.0.255.1)
skipping: [wan-1] => (item=10.0.255.33)
skipping: [edge-1] => (item=217.0.0.1)
skipping: [wan-1] => (item=10.0.255.17)
skipping: [wan-1] => (item=10.0.255.1)
skipping: [wan-1] => (item=217.0.0.1)
skipping: [wan-2] => (item=10.0.255.33)
skipping: [wan-2] => (item=10.0.255.17)
skipping: [wan-2] => (item=10.0.255.1)
skipping: [wan-2] => (item=217.0.0.1)
changed: [fw-1] => (item=10.0.255.33)
changed: [fw-1] => (item=10.0.255.17)
changed: [fw-1] => (item=10.0.255.1)
changed: [fw-1] => (item=217.0.0.1)
...
PLAY RECAP ***************************************************************************************************************************************************************************************************************************
edge-1                     : ok=2    changed=2    unreachable=0    failed=0
edge-2                     : ok=2    changed=2    unreachable=0    failed=0
fw-1                       : ok=1    changed=1    unreachable=0    failed=0
fw-2                       : ok=1    changed=1    unreachable=0    failed=0
wan-1                      : ok=2    changed=2    unreachable=0    failed=0
wan-2                      : ok=2    changed=2    unreachable=0    failed=0

berndonline@lab:~/cumulus-edge-vagrant$

The icmp check shows that in general the edge routing is working but I need to do some further testing with this if this can be used in a production environment.

If using switch hardware is not the right fit you can still install and use Free Range Routing (FRR) from Cumulus Networks on other Linux distributions and pick server hardware for your own custom edge router. I would only recommend checking Linux kernel support for VRF when choosing another Linux OS. Also have a look at my article about Open Source Routing GRE over IPSec with StrongSwan and Cisco IOS-XE where I build a Debian software router.

Please share your feedback and leave a comment.