Kube Ops View on OpenShift

This is just short post about Kube Ops view which is a bit older and known for Kubernetes for some time but it is a great status dashboard to visualize a common operational view of your OpenShift or Kubernetes clusters.

The installation on OpenShift is straight forward, follow the steps below:

git clone https://github.com/hjacobs/kube-ops-view.git
cd kube-ops-view/

oc new-project ops-view

oc adm policy add-scc-to-user privileged system:serviceaccount:ops-view:kube-ops-view
oc adm policy add-scc-to-user privileged system:serviceaccount:ops-view:default

sed -i 's|namespace: default|namespace: ops-view|g' deploy/auth.yaml

oc create -f deploy/auth.yaml
oc create -f deploy/deployment.yaml
oc create -f deploy/service.yaml
oc create -f deploy/redis-deployment.yaml
oc create -f deploy/redis-service.yaml

oc create route edge --service=kube-ops-view

Example Kube-Ops view dashboard:

Try it out and have fun.

Build Jenkins Container with Terraform and Ansible

I thought it might be interesting to show how to build a Docker container running Jenkins and tools like Terraform and Ansible. I am planning to use a Jenkins pipeline to deploy my OpenShift 3.11 example on AWS using Terraform and Ansible but more about this in the next post.

I am using the source Dockerfile from Jenkins and modified it, and added Ansible and Terraform: https://github.com/jenkinsci/docker. Below you see a few variables you might need to change depending on the version you are trying to use or where to place the volume mount. Have a look here for the latest Jenkins version: https://updates.jenkins-ci.org/download/war/.

Here is my Dockerfile:

...
ARG JENKINS_HOME=/var/jenkins_home
...
ENV TERRAFORM_VERSION=0.11.10
... 
ARG JENKINS_VERSION=2.151
ENV JENKINS_VERSION $JENKINS_VERSION
...
ARG JENKINS_SHA=a4335cc626c1f64da61a20174af654283d171b255a928bbacb6402a315e213d7
...

Let’s start and clone my Jenkins Docker repository  and run docker build:

git clone https://github.com/berndonline/jenkins-docker.git && cd ./jenkins-docker/
docker build -t berndonline/jenkins .

The docker build will take a few minutes, just wait and look out for error you might have with the build:

berndonline@lab:~/jenkins-docker$ docker build -t berndonline/jenkins .
Sending build context to Docker daemon  141.3kB
Step 1/51 : FROM openjdk:8-jdk
8-jdk: Pulling from library/openjdk
54f7e8ac135a: Pull complete
d6341e30912f: Pull complete
087a57faf949: Pull complete
5d71636fb824: Pull complete
9da6b28682cf: Pull complete
203f1094a1e2: Pull complete
ee38d9f85cf6: Pull complete
7f692fae02b6: Pull complete
eaa976dc543c: Pull complete
Digest: sha256:94bbc3357f995dd37986d8da0f079a9cd4b99969a3c729bad90f92782853dea7
Status: Downloaded newer image for openjdk:8-jdk
 ---> c14ba9d23b3a
Step 2/51 : USER root
 ---> Running in c78f75ca3d5a
Removing intermediate container c78f75ca3d5a
 ---> f2c6bb7538ea
Step 3/51 : RUN apt-get update && apt-get install -y git curl && rm -rf /var/lib/apt/lists/*
 ---> Running in 4cc857e12f50
Ign:1 http://deb.debian.org/debian stretch InRelease
Get:2 http://security.debian.org/debian-security stretch/updates InRelease [94.3 kB]
Get:3 http://deb.debian.org/debian stretch-updates InRelease [91.0 kB]
Get:4 http://deb.debian.org/debian stretch Release [118 kB]
Get:5 http://security.debian.org/debian-security stretch/updates/main amd64 Packages [459 kB]
Get:6 http://deb.debian.org/debian stretch Release.gpg [2434 B]
Get:7 http://deb.debian.org/debian stretch-updates/main amd64 Packages [5152 B]
Get:8 http://deb.debian.org/debian stretch/main amd64 Packages [7089 kB]
Fetched 7859 kB in 1s (5540 kB/s)
Reading package lists...
Building dependency tree...

...

Step 49/51 : ENTRYPOINT ["/sbin/tini", "--", "/usr/local/bin/jenkins.sh"]
 ---> Running in 28da7c4bf90a
Removing intermediate container 28da7c4bf90a
 ---> f380f1a6f06f
Step 50/51 : COPY plugins.sh /usr/local/bin/plugins.sh
 ---> 82871f0df0dc
Step 51/51 : COPY install-plugins.sh /usr/local/bin/install-plugins.sh
 ---> feea9853af70
Successfully built feea9853af70
Successfully tagged berndonline/jenkins:latest
berndonline@lab:~/jenkins-docker$

The Docker container is successfully build:

berndonline@lab:~/jenkins-docker$ docker images
REPOSITORY                  TAG                 IMAGE ID            CREATED             SIZE
berndonline/jenkins         latest              cd1742c317fa        6 days ago          1.28GB

Let’s start the Docker container:

docker run -d -v /var/jenkins_home:/var/jenkins_home -p 32771:8080 -p 32770:50000 berndonline/jenkins

Quick check that the container is successfully created:

berndonline@lab:~/jenkins-docker$ docker ps
CONTAINER ID        IMAGE                 COMMAND                  CREATED             STATUS              PORTS                                               NAMES
7073fa9c0cd4        berndonline/jenkins   "/sbin/tini -- /usr/…"   5 days ago          Up 7 seconds        0.0.0.0:32771->8080/tcp, 0.0.0.0:32770->50000/tcp   jenkins

Afterwards you can connect to http://<your-ip-address>:32771/ and do the initial Jenkins configuration, like changing admin password and install needed plugins. I recommend putting an Nginx reverse proxy with SSL infront to secure Jenkins properly.

So what about updates or changing the configuration? – Pretty easy; because we are using a Docker bind mount to /var/jenkins_home/, all the Jenkins related data is stored on the local file system of your server and you can re-create or re-build the container at anytime.

I hope you like this article about how to create your down Jenkins Docker container. In my next post I will create a very simple Jenkins pipeline to deploy OpenShift 3.11 on AWS using Terraform.

Please share your feedback and leave a comment.

Automate Ansible AWX configuration using Tower-CLI

Some time has gone by since my article about Getting started with Ansible AWX (Open Source Tower version) , and I wanted to continue focusing on AWX and show how to automate the configuration of an AWX Tower server.

Before we configure AWX we should install the tower-cli. You can find more information about the Tower CLI here: https://github.com/ansible/tower-cli. I also recommend having a look at the tower-cli documentation: https://tower-cli.readthedocs.io/en/latest/

sudo pip install ansible-tower-cli

The tower-cli is very useful when you want to monitor the running jobs. The web console is not that great when it comes to large playbook and is pretty slow at showing the running job state. See below the basic configuration before you start using the tower-cli:

berndonline@lab:~$ tower-cli config host 94.130.51.22
Configuration updated successfully.
berndonline@lab:~$ tower-cli login admin
Password:
{
 "id": 1,
 "type": "o_auth2_access_token",
 "url": "/api/v2/tokens/1/",
 "created": "2018-09-15T17:41:23.942572Z",
 "modified": "2018-09-15T17:41:23.955795Z",
 "description": "Tower CLI",
 "user": 1,
 "refresh_token": null,
 "application": null,
 "expires": "3018-01-16T17:41:23.937872Z",
 "scope": "write"
}
Configuration updated successfully.
berndonline@lab:~$ 

But now let’s continue and show how we can use the tower-cli to configure and monitor Ansible AWX Tower.

Create a project:

tower-cli project create --name "My Project" --description "My project description" --organization "Default" --scm-type "git" --scm-url "https://github.com/ansible/ansible-tower-samples"

Create an inventory:

tower-cli inventory create --name "My Inventory" --organization "Default"

Add hosts to an inventory:

tower-cli host create --name "localhost" --inventory "My Inventory" --variables "ansible_connection: local"

Create credentials:

tower-cli credential create --name "My Credential" --credential-type "Machine" --user "admin"

Create a Project Job Template:

tower-cli job_template create --name "My Job Template" --project "My Project" --inventory "My Inventory" --job-type "run" --credential "My Credential" --playbook "hello_world.yml" --verbosity "default"

After we successfully created everything let’s now run the job template and monitor the output via the tower-cli:

tower-cli job launch --job-template "My Job Template"
tower-cli job monitor <ID>

Command line output:

berndonline@lab:~$ tower-cli job launch --job-template "My Job Template"
Resource changed.
== ============ =========================== ======= =======
id job_template           created           status  elapsed
== ============ =========================== ======= =======
26           15 2018-10-12T12:22:48.599748Z pending 0.0
== ============ =========================== ======= =======
berndonline@lab:~$ tower-cli job monitor 26
------Starting Standard Out Stream------


PLAY [Hello World Sample] ******************************************************

TASK [Gathering Facts] *********************************************************
ok: [localhost]

TASK [Hello Message] ***********************************************************
ok: [localhost] => {
    "msg": "Hello World!"
}

PLAY RECAP *********************************************************************
localhost                  : ok=2    changed=0    unreachable=0    failed=0

------End of Standard Out Stream--------
Resource changed.
== ============ =========================== ========== =======
id job_template           created             status   elapsed
== ============ =========================== ========== =======
26           15 2018-10-12T12:22:48.599748Z successful 8.861
== ============ =========================== ========== =======
berndonline@lab:~$

With the tower-cli commands we can write a simple playbook using the Ansible Shell module.

Playbook site.yml:

---
- hosts: localhost
  gather_facts: 'no'

  tasks:
    - name: Add tower project
      shell: |
        tower-cli project create \
        --name "My Project" \
        --description "My project description" \
        --organization "Default" \
        --scm-type "git" \
        --scm-url "https://github.com/ansible/ansible-tower-samples"

    - name: Add tower inventory
      shell: |
        tower-cli inventory create \
        --name "My Inventory" \
        --organization "Default"

    - name: Add host to inventory
      shell: |
        tower-cli host create \
        --name "localhost" \
        --inventory "My Inventory" \
        --variables "ansible_connection: local"
    
    - name: Add credential
      shell: |
        tower-cli credential create \
        --name "My Credential" \
        --credential-type "Machine" \
        --user "admin"
        
    - name: wait 15 seconds to pull project SCM content
      wait_for: timeout=15
      delegate_to: localhost
 
    - name: Add job template
      shell: |
        tower-cli job_template create \
        --name "My Job Template" \
        --project "My Project" \
        --inventory "My Inventory" \
        --job-type "run" \
        --credential "My Credential" \
        --playbook "hello_world.yml" \
        --verbosity "default"

Let’s run the playbook:

berndonline@lab:~/awx-provision$ ansible-playbook site.yml

PLAY [localhost] **************************************************************************************************************************************************

TASK [Add tower project] ******************************************************************************************************************************************
changed: [localhost]

TASK [Add tower inventory] ****************************************************************************************************************************************
changed: [localhost]

TASK [Add host to inventory] **************************************************************************************************************************************
changed: [localhost]

TASK [Add credential] *********************************************************************************************************************************************
changed: [localhost]

TASK [wait 15 seconds to pull project SCM content] ****************************************************************************************************************
ok: [localhost -> localhost]

TASK [Add job template] *******************************************************************************************************************************************
changed: [localhost]

PLAY RECAP ********************************************************************************************************************************************************
localhost : ok=6 changed=5 unreachable=0 failed=0

berndonline@lab:~/awx-provision$

If you like this article, please share your feedback and leave a comment.

NetBox Open Source DCIM and IPAM tool

I wanted to share some information about an open source tool I have found some time ago which helps you to keep track of your infrastructure assets and configuration items. The name is NetBox which is an DCIM (Datacenter infrastructure management) and IPAM (IP address management) tool. NetBox was started by the network engineering team from DigitalOcean, specifically to address the needs of network and infrastructure engineers.

We all know that documentation is something no one wants to do, and no one has time for. What makes NetBox interesting is that not only does it focus on infrastructure documentation with a clean web console, it also comes with a API to push changes via the API , or use NetBox as dynamic inventory for Ansible.

Here a few screenshots showing the look and feel from NetBox:

The rack overview:

The IPAM module:

Here is an example how to add a device via the REST API, very useful if you use ZTP (zero touch provisioning) and add your switches or servers automatically to NetBox or in your automation scripts when you deploy configurations:

vagrant@netbox:~$ curl -X POST -H "Authorization: Token fde02a67ca0c248bf5695bbf5cd56975add33655" -H "Content-Type: application/json" -H "Accept: application/json; indent=4" http://localhost:80/api/dcim/devices/ --data '{ "nae": "server-9", "display_name": "server-9", "device_type": 5, "device_role": 8 , "site": 1 }'
{
    "id": 21,
    "name": "server-9",
    "device_type": 5,
    "device_role": 8,
    "tenant": null,
    "platform": null,
    "serial": "",
    "asset_tag": null,
    "site": 1,
    "rack": null,
    "position": null,
    "face": null,
    "status": 1,
    "primary_ip4": null,
    "primary_ip6": null,
    "cluster": null,
    "virtual_chassis": null,
    "vc_position": null,
    "vc_priority": null,
    "comments": "",
    "created": "2018-04-16",
    "last_updated": "2018-04-16T14:40:47.787862Z"
}
vagrant@netbox:~$

In the web console you see the device I have just added via the REST API:

On the main NetBox Github repository page you find links for a Ansible Role or Vagrant environment.

You can use NetBox as Ansible dynamic inventory and pull out hosts information dynamically when running playbooks. Check out the Github repository I have found.

sudo apt-get install python-setuptools ansible -y
git clone https://github.com/AAbouZaid/netbox-as-ansible-inventory.git
cd ./netbox-as-ansible-inventory/
pip install -r ./requirements.txt
sudo python setup.py install

Usage with Ansible playbook

ansible-playbook -i netbox.py ./site.yml

Please share your feedback and leave a comment.

Getting started with Ansible AWX (Open Source Tower version)

Ansible released AWX a few weeks ago, an open source (community supported) version of their commercial Ansible Tower product. This is a web-based graphical interface to manage Ansible playbooks, inventories, and schedule jobs to run playbooks.

The Github repository you find here: https://github.com/ansible/awx

Let’s start with the installation of Ansible AWX, very easy because everything is dockerized and see the install guide for more information.

Modify the inventory file under the installer folder and change the Postgres data folder which is otherwise located under /tmp, also change Postgres DB username and password if needed. I would recommend binding AWX to localhost and put an Nginx reverse proxy in front with SSL encryption.

Changes in the inventory file:

postgres_data_dir=/var/lib/postgresql/data/
host_port=127.0.0.1:8052

Start the build of the Docker container:

ansible-playbook -i inventory install.yml

After the Ansible Playbook run completes, you see the following Docker container:

berndonline@lab:~/awx/installer$ docker ps
CONTAINER ID        IMAGE                     COMMAND                  CREATED             STATUS              PORTS                                NAMES
26a73c91cb04        ansible/awx_task:latest   "/tini -- /bin/sh ..."   2 days ago          Up 24 hours         8052/tcp                             awx_task
07774696a7f2        ansible/awx_web:latest    "/tini -- /bin/sh ..."   2 days ago          Up 24 hours         127.0.0.1:8052->8052/tcp             awx_web
981f4f02c759        memcached:alpine          "docker-entrypoint..."   2 days ago          Up 24 hours         11211/tcp                            memcached
4f4a3141b54d        rabbitmq:3                "docker-entrypoint..."   2 days ago          Up 24 hours         4369/tcp, 5671-5672/tcp, 25672/tcp   rabbitmq
faf07f7b4682        postgres:9.6              "docker-entrypoint..."   2 days ago          Up 24 hours         5432/tcp                             postgres
berndonline@lab:~/awx/installer$

Install Nginx:

sudo apt-get update
sudo apt-get install nginx
sudo rm /etc/nginx/sites-enabled/default

Create Nginx vhosts configuration:

sudo vi /etc/nginx/sites-available/awx
server {
    listen 443 ssl;
    server_name awx.domain.com;

    ssl on;
    ssl_certificate /etc/nginx/ssl/awx.domain.com-cert.pem;
    ssl_certificate_key /etc/nginx/ssl/awx.domain.com-key.pem;

    location / {
        proxy_pass http://127.0.0.1:8052;
        proxy_set_header Host $host;
        proxy_set_header X-Real-IP $remote_addr;
        proxy_set_header X-Forwarded-For $proxy_add_x_forwarded_for;
        proxy_set_header X-Forwarded-Proto $scheme;
    }
}

Create symlink in sites enable to point to awx config:

sudo ln -s /etc/nginx/sites-available/awx /etc/nginx/sites-enabled/awx

Reload Nginx to apply configuration:

sudo systemctl reload nginx

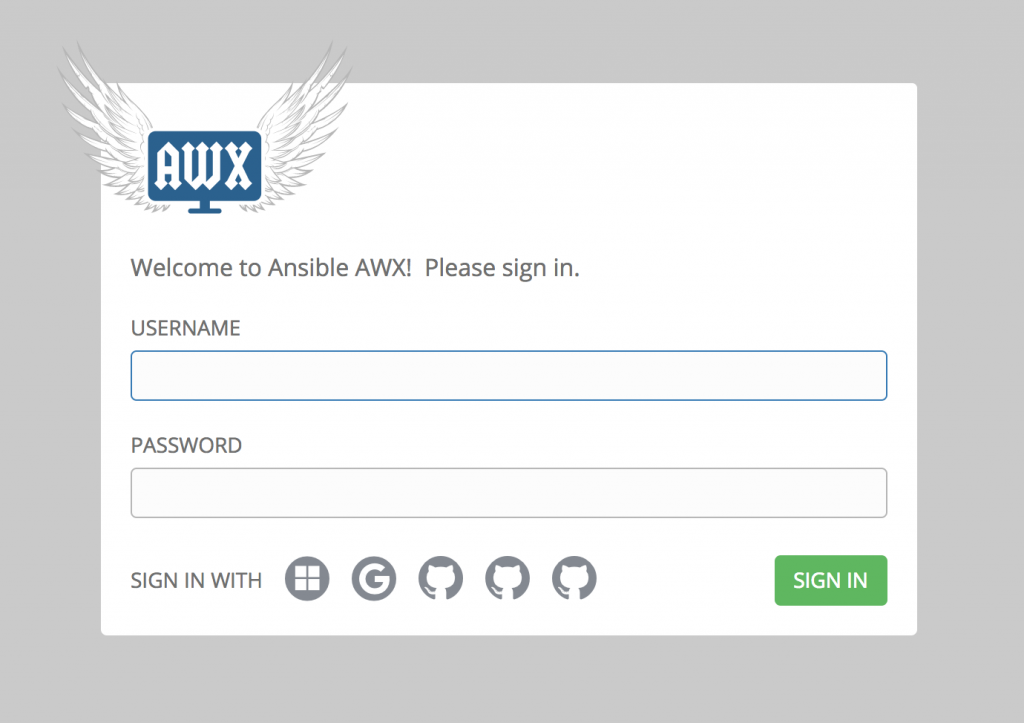
Afterwards you are able to login with username “admin” and password “password”:

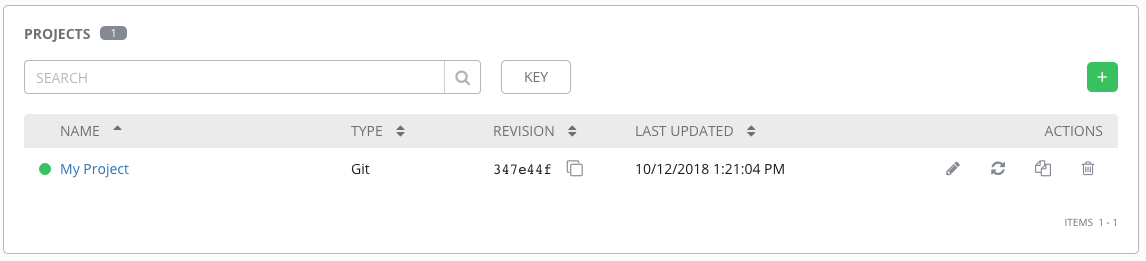
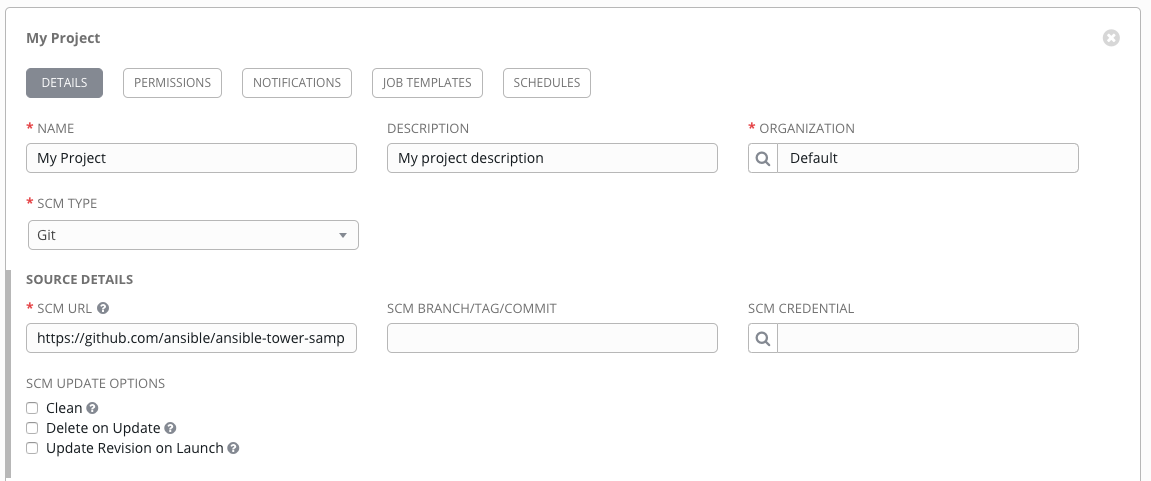
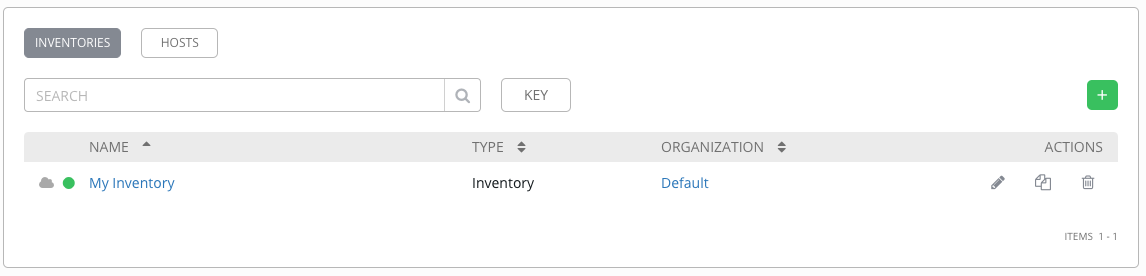
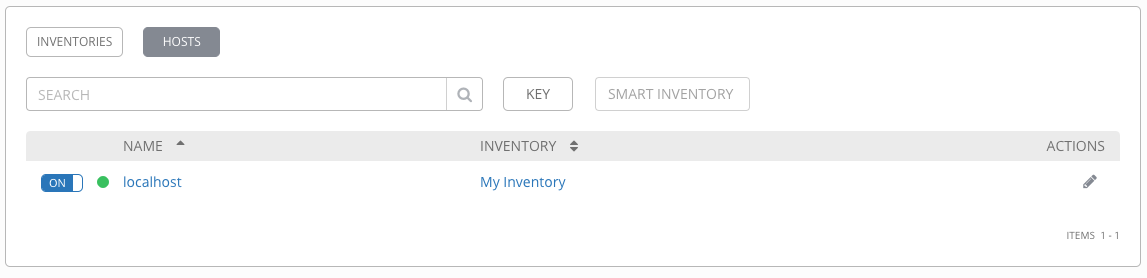
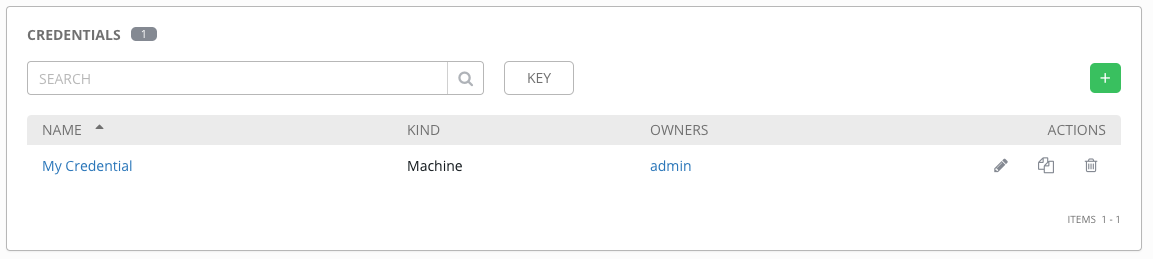
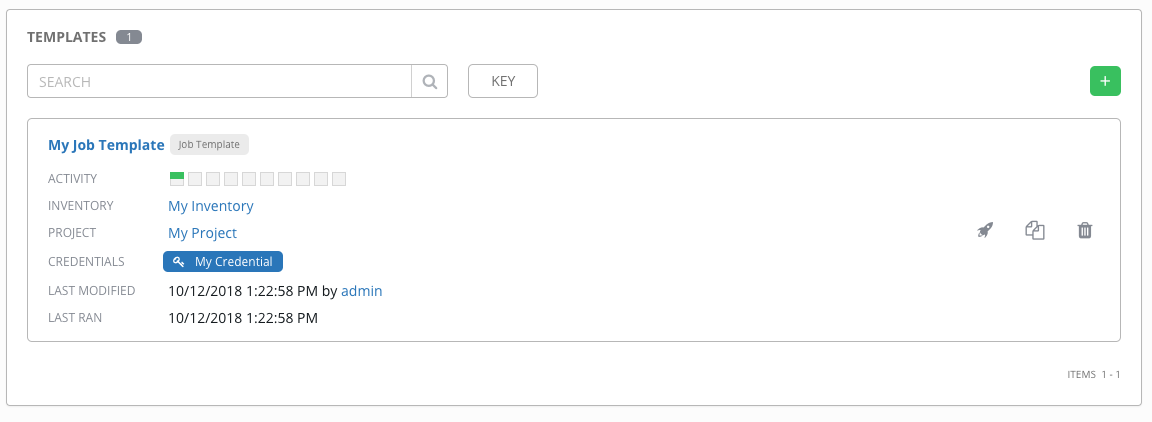
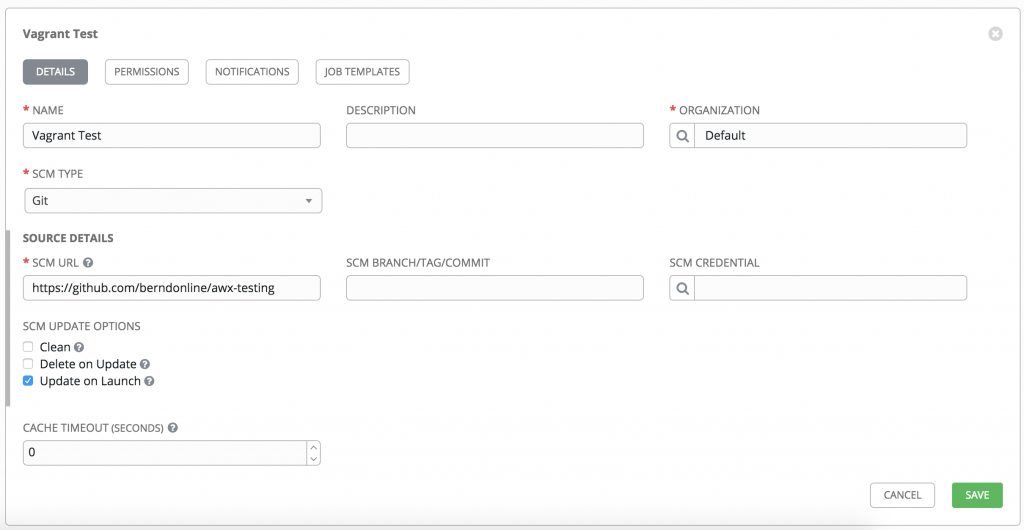
I created a simple job for testing with AWX, you first start to create a project, credentials and inventories. The project points to your Git repository:

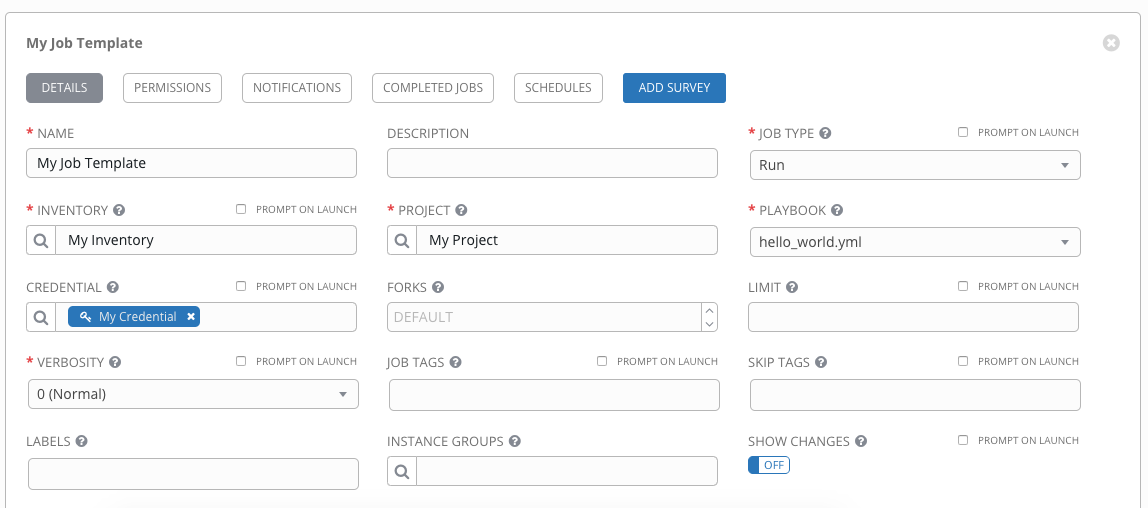
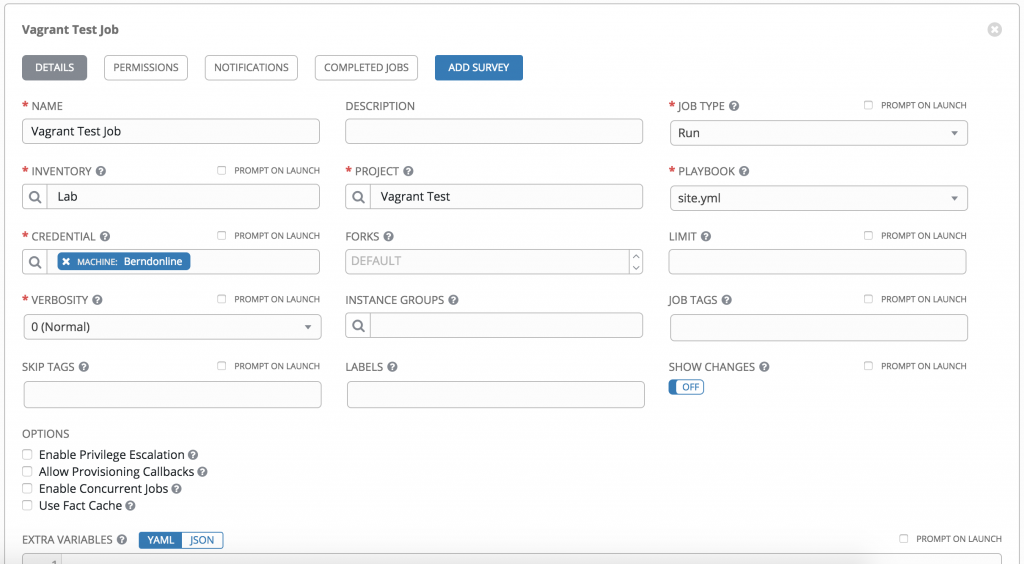
Under the job you configure which project, credentials and inventories to use:

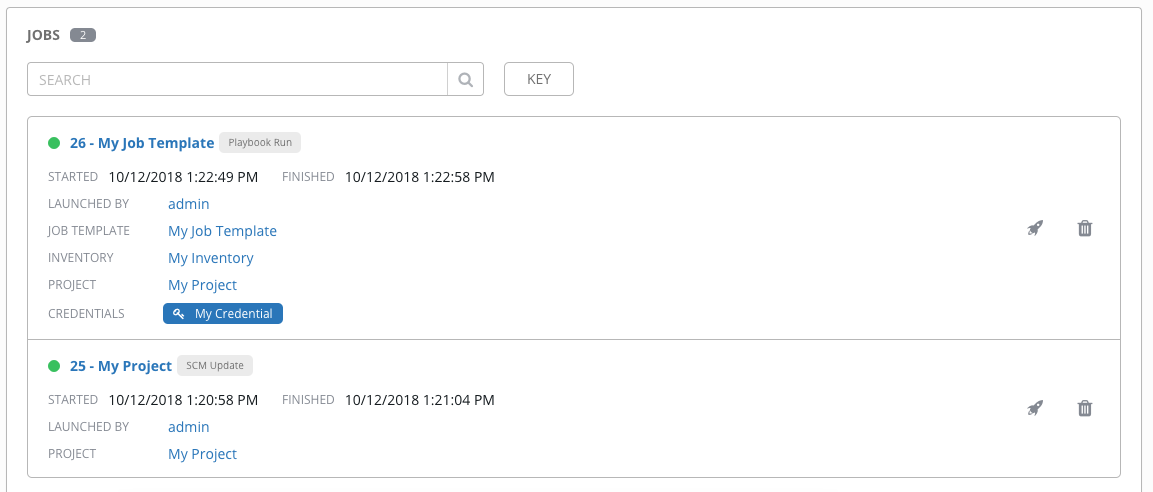
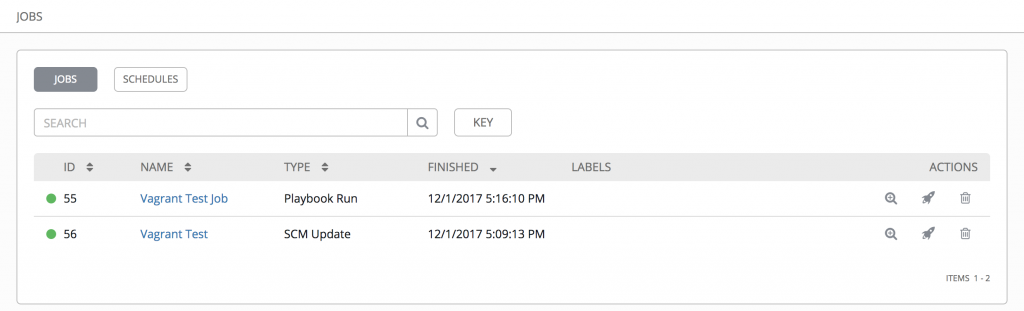
Once saved you can manually trigger the job, it first pulls the latest playbook from your version control repository and afterwards executes the configured Ansible playbook:

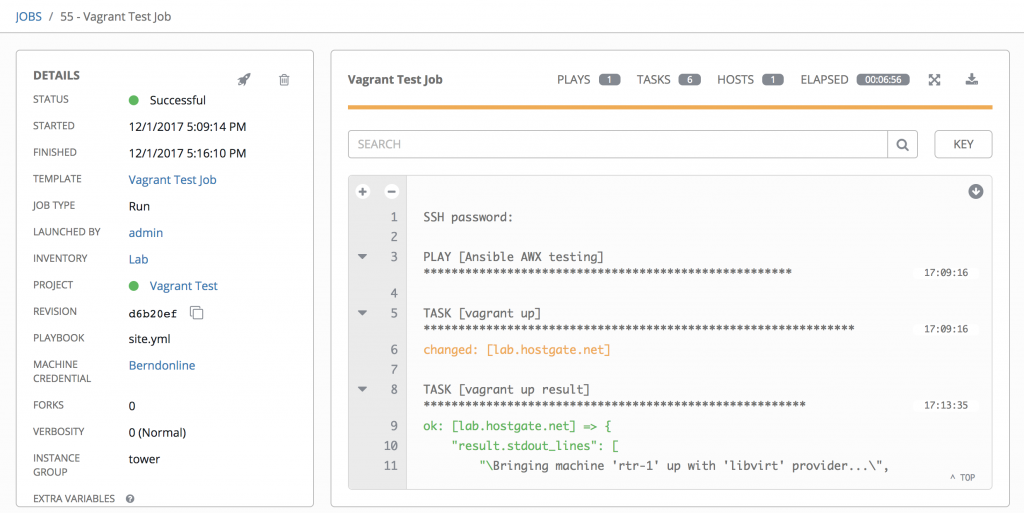
The job details look very similar if you run an playbook on the CLI:

Ansible AWX is a very useful tool if you need to manage different Ansible playbooks and do job scheduling if you are not already using other tools like Jenkins or Gitlab-CI. But even then it is a good addition to use AWX to run ad-hoc playbooks.

Check out my new articles about Automate Ansible AWX configuration using Tower-CLI and Build Ansible Tower Container.

Leave a comment