Howto Update Citrix NetScaler Firmware

Log on to the NetScaler appliance with SSH, such as PuTTY. Use the nsroot credentials to log in to the appliance.

Switch to the shell prompt.

Last login: Tue Mar  4 00:03:13 2014 from 10.49.9.110
Copyright (c) 1980, 1983, 1986, 1988, 1990, 1991, 1993, 1994
        The Regents of the University of California.  All rights reserved.
 Done
> 
> shell
Copyright (c) 1992-2008 The FreeBSD Project.
Copyright (c) 1979, 1980, 1983, 1986, 1988, 1989, 1991, 1992, 1993, 1994
        The Regents of the University of California. All rights reserved.
root@NetScaler01#

Run the following command to change to the default installation directory:

root@NetScaler01# cd /var/nsinstall/
root@NetScaler01# ls
10.1nsinstall   installns_state
root@NetScaler01# cd 10.1nsinstall/
root@NetScaler01# ls
build_123.9
root@NetScaler01# mkdir build_124.13

Upload new firmware in the build directory build-10.1-124.13_nc.tgz

Run the following command to extract the firmware:

root@NetScaler01# cd build_124.13/
root@NetScaler01# ls
build-10.1-124.13_nc.tgz
root@NetScaler01# tar xzvf build-10.1-124.13_nc.tgz 
.ns.version
ns-10.1-124.13.gz
ns-10.1-124.13.sha2
installns
nsconfig
bootloader.tgz
help.tgz
CitrixNetScalerManagementPackSCOM2012.msi
CitrixNetScalerLoadBalancer.msi
BaltimoreCyberTrustRoot.cert
BaltimoreCyberTrustRoot_CH.cert
Citrix_Access_Gateway.dmg
macversion.txt
apidoc.tgz
NSConfig.wsdl
NSStat.wsdl
ns-10.1-124.13-gui.tar
ns-10.1-124.13-nitro-java.tgz
ns-10.1-124.13-nitro-csharp.tgz
ns-10.1-124.13-nitro-rest.tgz
ns-10.1-124.13-nitro-perl-samples.tgz
ns-10.1-124.13-nitro-python-samples.tgz
vmware-tools.tgz

Run the following command to install the software you have downloaded:

root@NetScaler01# ./installns 

installns version (10.1-124.13) kernel (ns-10.1-124.13.gz)

  The Netscaler version 10.1-124.13 checksum file is located on 
  http://www.mycitrix.com under Support > Downloads > Citrix NetScaler.
  Select the Release 10.1-124.13 link and expand the "Show Documentation" link
  to view the SHA2 checksum file for build 10.1-124.13.

  There may be a pause of up to 3 minutes while data is written to the flash.
  Do not interrupt the installation process once it has begun.

Installation will proceed in 5 seconds, CTRL-C to abort
Installation is starting ...
VPX platform. Skipping CallHome checks.

Copying ns-10.1-124.13.gz to /flash/ns-10.1-124.13.gz ... 
.......................................................
Installing XML API documentation...
Installing NSConfig.wsdl...
Installing NSStat.wsdl...
Installing online help...
Installing SCOM Management Pack...
Installing LoadBalancer Pack...
Installing GUI...
Installing Mac binary and Mac version file...
Installing NITRO...
Installing Jazz certificate ...
Installing Call Home certificate ...
Creating after upgrade script ...

Installation has completed.

Reboot NOW? [Y/N] Y
Rebooting ...

Block RFC1918 and RFC3330 IP ranges

I found on the Cisco website an interesting page about protecting core infrastructure which some of the network engineers do like blocking all RFC1918 private IP address ranges. But I never thought about blocking as well all RFC3330 special use IP address ranges.

I think it is worth sharing this information, see below the overview of all RFC1918 and RFC3330:

0.0.0.0/8            "This" Network
10.0.0.0/8           Private Use Networks
14.0.0.0/8           Public-Data Networks
24.0.0.0/8           Cable Television Networks
39.0.0.0/8           Reserved but subject to allocation
127.0.0.0/8          Loopback
128.0.0.0/16         Reserved but subject to allocation
169.254.0.0/16       Link Local
172.16.0.0/12        Private-Use Networks
191.255.0.0/16       Reserved but subject to allocation
192.0.0.0/24         Reserved but subject to allocation
192.0.2.0/24         Test-Net
192.88.99.0/24       6to4 Relay Anycast
192.168.0.0/16       Private-Use Networks
198.18.0.0/15        Network Interconnect Device Benchmark Testing
223.255.255.0/24     Reserved but subject to allocation
224.0.0.0/4          Multicast
240.0.0.0/4          Reserved for Future Use

I got the information directly from the RFC3330 page and it is worth having a look.

If you are a good network engineer you should block externally not only RFC1918 but as well RFC3330 address ranges because they should not traverse the public internet. Even blocking them for outbound traffic would be very useful.

Here an ASA object group:

object-group network rfc3330-subnets
  description Group of all rfc3330 subnets incl private and special use
  network-object 0.0.0.0 255.0.0.0
  network-object 10.0.0.0 255.0.0.0
  network-object 14.0.0.0 255.0.0.0
  network-object 24.0.0.0 255.0.0.0
  network-object 39.0.0.0 255.0.0.0
  network-object 127.0.0.0 255.0.0.0
  network-object 128.0.0.0 255.255.0.0
  network-object 169.254.0.0 255.255.0.0
  network-object 172.16.0.0 255.240.0.0
  network-object 191.255.0.0 255.255.0.0
  network-object 192.0.0.0 255.255.255.0
  network-object 192.0.2.0 255.255.255.0
  network-object 192.88.99.0 255.255.255.0
  network-object 192.168.0.0 255.255.0.0
  network-object 198.18.0.0 255.254.0.0
  network-object 223.255.255.0 255.255.255.0
  network-object 224.0.0.0 240.0.0.0
  network-object 240.0.0.0 240.0.0.0
  exit

Creating access-list entry on your outside and inside interface:

access-list acl_outside-inbound remark Blocking all rfc3330 ip address ranges
access-list acl_outside-inbound extended deny ip object-group rfc3330-subnets any

access-list acl_inside-outbound remark Blocking all rfc3330 ip address ranges
access-list acl_inside-outbound extended deny ip object-group rfc3330-subnets any

Here the links to both RFC1918 and RFC3330:

https://tools.ietf.org/html/rfc1918

https://tools.ietf.org/html/rfc3330

NetScaler Global Server Load Balancing (GSLB) Configuration

Bin some month since I started working with Citrix NetScaler and so far I really like the NetScaler. I will not go into the deep how Global Server Load Balancing (GSLB) works and only explain my configuration. I use Exchange OWA as an example for GSLB, I will also not explain how to set-up a virtual server for Exchange OWA, please have a look at my previous blog post: NetScaler Exchange 2013 Load Balancing.

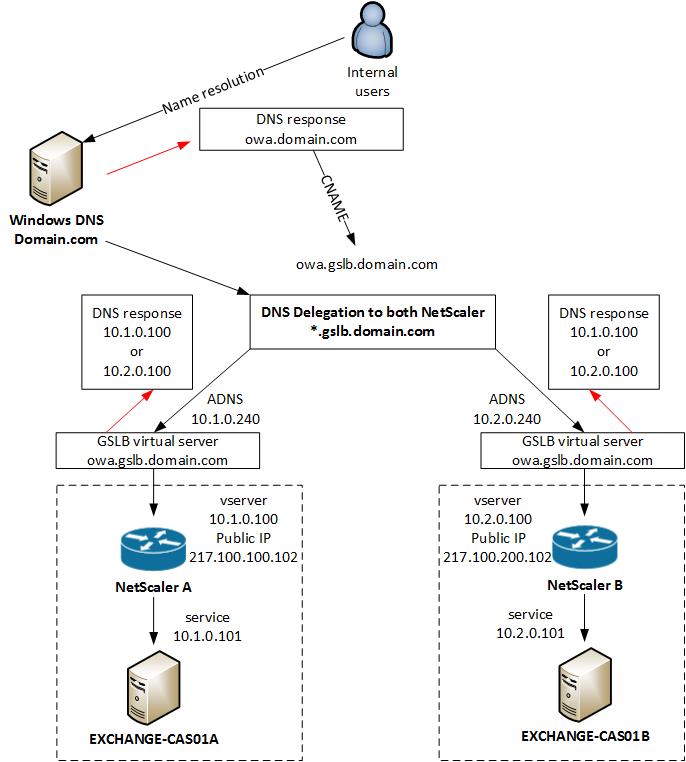
In my configuration I will use the same GSLB virtual server for internal and external access to Exchange OWA. The NetScaler see’s if you are coming from the internal network and give you a private IP address back, or when you are external you get a public IP address back for the same DNS entry.

Internal GSLB
External GSLB
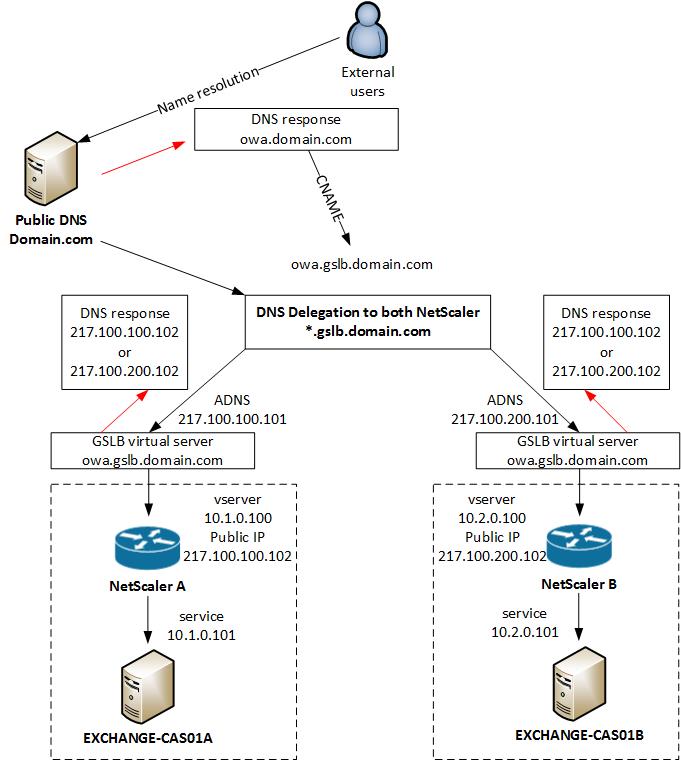
Before you start you have to delegate a Subdomains in Microsoft DNS or BIND for Global Server Load Balancing on a NetScaler Appliance, more information how to do that you find here: http://support.citrix.com/article/CTX121713

VPX A

Enable GSLB on the NetScaler in location A and configure sites and ADNS service

enable ns feature GSLB

add gslb site site-A 10.1.0.200
add gslb site site-B 10.2.0.200

set ns rpcNode 10.1.0.200 -password ***key*** -srcIP * -secure YES
set ns rpcNode 10.2.0.200 -password ***key*** -srcIP * -secure YES

add service service-ADNS_53 10.1.0.240 ADNS 53 -gslb NONE -maxClient 0 -maxReq 0 -cip DISABLED -usip YES -useproxyport NO -sp OFF -cltTimeout 120 -svrTimeout 120 -CustomServerID "\"None\"" -CKA NO -TCPB NO -CMP NO
add service service-ADNS_TCP53 10.1.0.240 ADNS_TCP 53 -gslb NONE -maxClient 0 -maxReq 0 -cip DISABLED -usip YES -useproxyport YES -sp OFF -cltTimeout 180 -svrTimeout 360 -CustomServerID "\"None\"" -CKA NO -TCPB NO -CMP NO

add dns addRec ns01-a.gslb.domain.com 217.100.100.101
add dns soaRec gslb.domain.com -originServer ns01-a.gslb.domain.com -contact hostmaster.gslb.domain.com 
add dns nsRec gslb.domain.com ns01-a.gslb.domain.com -TTL 300 
add dns addRec ns01-a.gslb.domain.com 217.100.100.101 add dns zone gslb.domain.com -proxyMode NO

VPX B

Enable GSLB on the NetScaler in location B and configure sites and ADNS service

enable ns feature GSLB

add gslb site site-A 10.1.0.200
add gslb site site-B 10.2.0.200

set ns rpcNode 10.1.0.200 -password ***key*** -srcIP * -secure YES
set ns rpcNode 10.2.0.200 -password ***key*** -srcIP * -secure YES

add service service-ADNS_53 10.2.0.240 ADNS 53 -gslb NONE -maxClient 0 -maxReq 0 -cip DISABLED -usip YES -useproxyport NO -sp OFF -cltTimeout 120 -svrTimeout 120 -CustomServerID "\"None\"" -CKA NO -TCPB NO -CMP NO
add service service-ADNS_TCP53 10.2.0.240 ADNS_TCP 53 -gslb NONE -maxClient 0 -maxReq 0 -cip DISABLED -usip YES -useproxyport YES -sp OFF -cltTimeout 180 -svrTimeout 360 -CustomServerID "\"None\"" -CKA NO -TCPB NO -CMP NO

add dns addRec ns01-b.gslb.domain.com 217.100.200.101
add dns soaRec gslb.domain.com -originServer ns01-b.gslb.domain.com -contact hostmaster.gslb.domain.com 
add dns nsRec gslb.domain.com ns01-b.gslb.domain.com -TTL 300 
add dns addRec ns01-b.gslb.domain.com 217.100.200.101 add dns zone gslb.domain.com -proxyMode NO

VPX A

Configure GSLB service and virtual server in location A

add server vserver-EXCHANGE-OWA-A 10.1.0.100
add server vserver-EXCHANGE-OWA-B 10.2.0.100

add gslb vserver vserver-GSLB-EXCHANGE-OWA SSL -backupLBMethod ROUNDROBIN -tolerance 0 -EDR ENABLED -appflowLog DISABLED
set gslb vserver vserver-GSLB-EXCHANGE-OWA -backupLBMethod ROUNDROBIN -tolerance 0 -EDR ENABLED -appflowLog DISABLED

add gslb service service-GSLB-EXCHANGE-OWA-A_443 vserver-EXCHANGE-OWA-A SSL 443 -publicIP 217.100.100.102 -publicPort 443 -maxClient 0 -siteName site-A -cltTimeout 180 -svrTimeout 360 -downStateFlush DISABLED
add gslb service service-GSLB-EXCHANGE-OWA-B_443 vserver-EXCHANGE-OWA-B SSL 443 -publicIP 217.100.200.102 -publicPort 443 -maxClient 0 -siteName site-B -cltTimeout 180 -svrTimeout 360 -downStateFlush DISABLED

bind gslb vserver vserver-GSLB-EXCHANGE-OWA_443 -serviceName service-GSLB-EXCHANGE-OWA-A_443
bind gslb vserver vserver-GSLB-EXCHANGE-OWA_443 -serviceName service-GSLB-EXCHANGE-OWA-B_443
bind gslb vserver vserver-GSLB-EXCHANGE-OWA_443 -domainName owa.gslb.domain.com -TTL 5 -sitedomainTTL 300
bind gslb service service-GSLB-EXCHANGE-OWA-D_443 -monitorName https
bind gslb service service-GSLB-EXCHANGE-OWA-C_443 -monitorName https

VPX B

Configure GSLB service and virtual server in location B

add server vserver-EXCHANGE-OWA-A 10.1.0.100
add server vserver-EXCHANGE-OWA-B 10.2.0.100

add gslb vserver vserver-GSLB-EXCHANGE-OWA SSL -backupLBMethod ROUNDROBIN -tolerance 0 -EDR ENABLED -appflowLog DISABLED
set gslb vserver vserver-GSLB-EXCHANGE-OWA -backupLBMethod ROUNDROBIN -tolerance 0 -EDR ENABLED -appflowLog DISABLED

add gslb service service-GSLB-EXCHANGE-OWA-A_443 vserver-EXCHANGE-OWA-A SSL 443 -publicIP 217.100.100.102 -publicPort 443 -maxClient 0 -siteName site-A -cltTimeout 180 -svrTimeout 360 -downStateFlush DISABLED
add gslb service service-GSLB-EXCHANGE-OWA-B_443 vserver-EXCHANGE-OWA-B SSL 443 -publicIP 217.100.200.102 -publicPort 443 -maxClient 0 -siteName site-B -cltTimeout 180 -svrTimeout 360 -downStateFlush DISABLED

bind gslb vserver vserver-GSLB-EXCHANGE-OWA_443 -serviceName service-GSLB-EXCHANGE-OWA-A_443
bind gslb vserver vserver-GSLB-EXCHANGE-OWA_443 -serviceName service-GSLB-EXCHANGE-OWA-B_443
bind gslb vserver vserver-GSLB-EXCHANGE-OWA_443 -domainName owa.gslb.domain.com -TTL 5 -sitedomainTTL 300
bind gslb service service-GSLB-EXCHANGE-OWA-A_443 -monitorName https
bind gslb service service-GSLB-EXCHANGE-OWA-B_443 -monitorName https

Now you need to create an DNS view because  we assign the public IP to the GSLB service and everybody gets the public IP as DNS response. With the internal DNS view, internal users get the internal private IP address back.

VPX A

add dns view view-INTERNAL
add dns action action-DNS-INTERNAL ViewName -viewName view-INTERNAL
add dns policy policy-DNS-INTERNAL "client.IP.SRC.IN_SUBNET(10.0.0.0/8)" action-DNS-INTERNAL
bind dns global policy-DNS-INTERNAL 100 -gotoPriorityExpression END -type REQ_DEFAULT

bind gslb service service-GSLB-EXCHANGE-OWA-A_443 -viewName view-INTERNAL 10.1.0.100
bind gslb service service-GSLB-EXCHANGE-OWA-B_443 -viewName view-INTERNAL 10.2.0.100

VPX B

add dns view view-INTERNAL
add dns action action-DNS-INTERNAL ViewName -viewName view-INTERNAL
add dns policy policy-DNS-INTERNAL "client.IP.SRC.IN_SUBNET(10.0.0.0/8)" action-DNS-INTERNAL
bind dns global policy-DNS-INTERNAL 100 -gotoPriorityExpression END -type REQ_DEFAULT

bind gslb service service-GSLB-EXCHANGE-OWA-A_443 -viewName view-INTERNAL 10.1.0.100
bind gslb service service-GSLB-EXCHANGE-OWA-B_443 -viewName view-INTERNAL 10.2.0.100

That’s it from the configuration for GSLB, quite easy and straight forward 🙂

Here you find a very detailed PDF from Citrix about GSLB: http://support.citrix.com/servlet/KbServlet/download/22506-102-671576/gslb-primer_FINAL_1019.pdf

Configuration re-sync Juniper ISG NSRP cluster

When the ISG cluster devices are correctly configured, they will start synchronizing the configuration. You can check if the configurations is in sync with the following command:

Cluster1:fw01(M)-> exec nsrp sync global-config check-sum     
configuration in sync

It can happen from time to time that the configuration of the cluster run out of sync:

Cluster1:fw01(M)-> exec  nsrp sync global-config check-sum 
Warning: configuration out of sync

To solve this issue, you should force the configuration sync (only on the backup device!!!!):

Cluster1:fw02(B)-> exec nsrp sync global-config save
load peer system config to save
Save global configuration successfully.
Save local configuration successfully.
done.
Please reset your box to let cluster configuration take effect!

Cluster1:fw02(B)-> reset 
System reset, are you sure? y/[n] y
In reset ...

After the reboot of the backup device, the cluster should be fully operational and in sync.

Note : when the device prompts you to save the config, enter “n” (no)

Quality of Service with Cisco ASA

Bin some years since I was working with Cisco ASA and QoS. I am into Cisco ASA performance optimising and tuning, it`s lots of fun to play around with different settings and get as much performance out of the ASA.

The ASA supports the following QoS features:

  • Priority queuing – To prioritize the packets that need prioritization like Voice over IP which is sensitive to latency. The ASA can only support Low Latency Queueing (LLQ).
  • Policing – To prevent traffic to consum all the network bandwidth by one user or one application. The policies restrict the bandwidth and can be applied to inbound and outbound traffic to an interface. The options are either drop or permit when the traffic exeed the limits.
  • Traffic shaping – Traffic that exceed the configured limits will be queued and sent when the traffic goes below the threshold. Traffic shaping will not drop packets that go over the threshold what is better for application which are sensitive to packet loss. Can be only applied to outgoing traffic on a physical interface and traffic shaping on ASA 5500-X models it is not supported.

Some information you need to keep in mind if you configure QoS on a Cisco ASA:

  • Supported in single context mode only. Does not support multiple context mode. Very sad because I prefer using virtual security contexts on ASAs.
  • QoS features can be only applied to physical interfaces (port-channel are not supported)
  • The ASA does not locally mark/remark any classified traffic.

See the following supported feature combinations per interface:

  • Standard priority queuing (for specific traffic) + Policing (for the rest of the traffic).
  • Traffic shaping (for all traffic on an interface) + Hierarchical priority queuing (for a subset of traffic).

In my case I have a Cisco ASA 5515-X and will do standard priority queuing and policing for the rest of the traffic.

Please always read the Cisco ASA Configuration Guide to ensure that your configuration is correct and supported!

::::::::::::::::::::::::::::::::::::::::::::::::::::::::::::::
:: Quality of Service Configuration                         ::
::::::::::::::::::::::::::::::::::::::::::::::::::::::::::::::

::::::::::::::::::::::::::::::::::::::::::::::::::::::::::::::
:: Class of Service	DSCP Marking (codepoint name)	    ::
:: Premium	        46 (EF)		                    ::
:: Business-1		26 (AF31)			    ::
:: Business-2		18 (AF21)		            ::
:: Standard		0				    ::
:: Management		34 (AF41)			    ::
:: Routing Protocol	48 (IP-Precedence 6)		    ::
::::::::::::::::::::::::::::::::::::::::::::::::::::::::::::::   

class-map premium-qos-traffic
	match dscp 46
	exit

class-map business-1-qos-traffic
	match dscp 26
	exit

class-map business-2-qos-traffic
	match dscp 18
	exit		

policy-map transfer-uk-mpls_policy

	class premium-qos-traffic
		priority 
		exit

	class business-1-qos-traffic
		police output 8388500 conform-action transmit exceed-action transmit
		exit

	class business-2-qos-traffic
	 	police output 10485760 655360 conform-action transmit exceed-action drop
	 	exit

	class class-default
		police output 2097000 655360 conform-action transmit exceed-action drop
		exit

priority-queue transfer-uk-mpls
	exit

service-policy transfer-uk-mpls_policy interface transfer-uk-mpls