Deploy OpenShift 3.11 Container Platform on Google Cloud Platform using Terraform

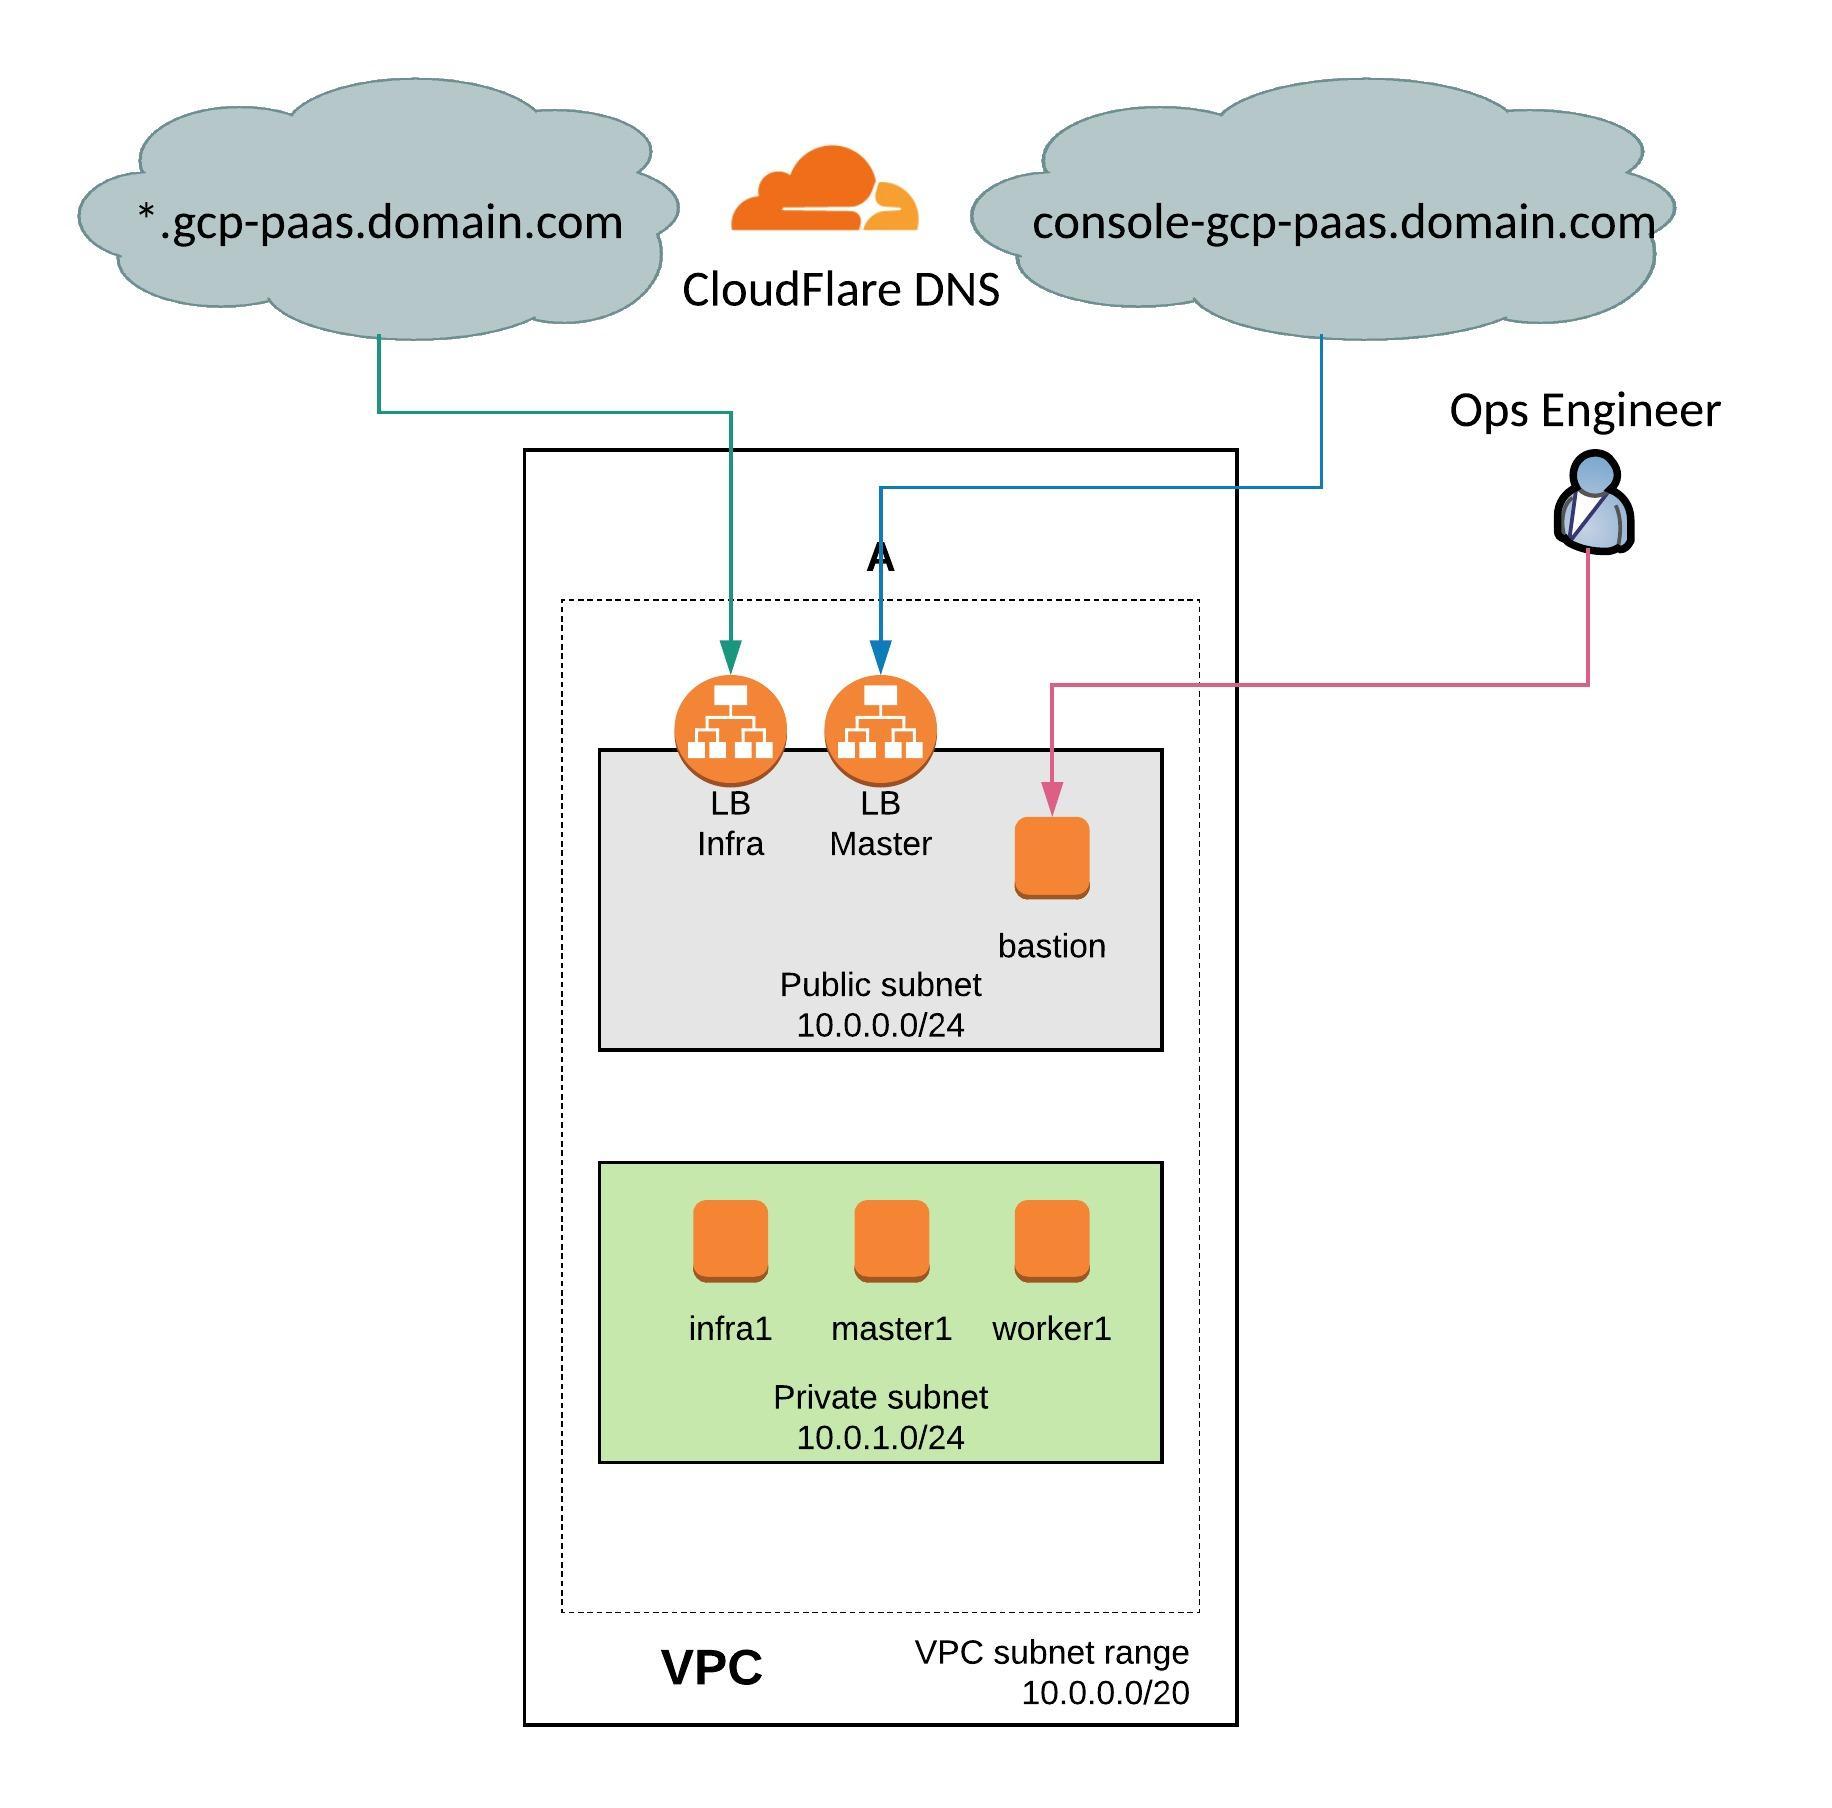
Over the past few days I have converted the OpenShift 3.11 infrastructure on Amazon AWS to run on Google Cloud Platform. I have kept the similar VPC network layout and instances to run OpenShift.

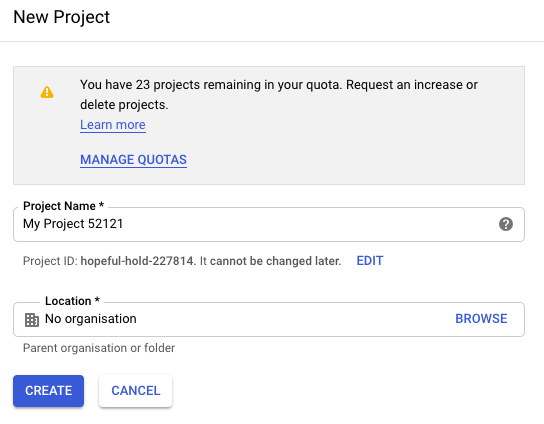
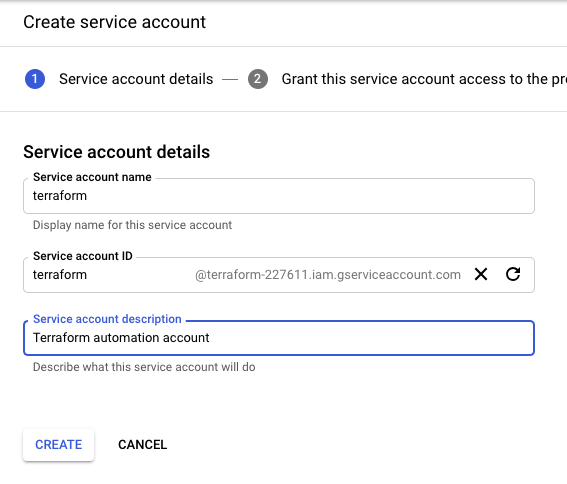
Before you start you need to create a project on Google Cloud Platform, then continue to create the service account and generate the private key and download the credential as JSON file.

Create the new project:

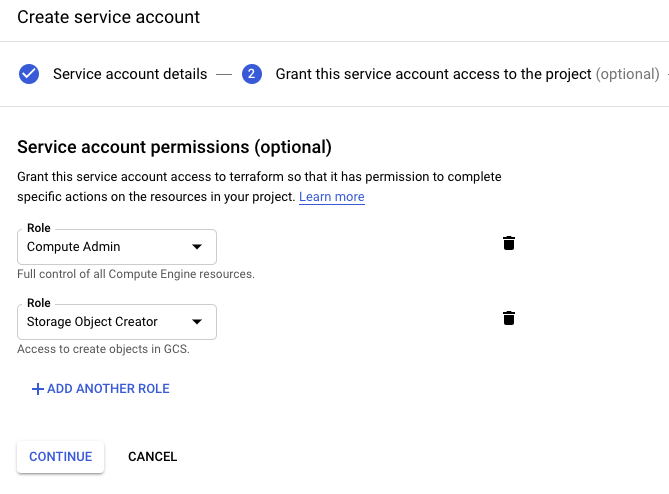
Create the service account:

Give the service account compute admin and storage object creator permissions:

Then create a storage bucket for the Terraform backend state and assign the correct bucket permission to the terraform service account:
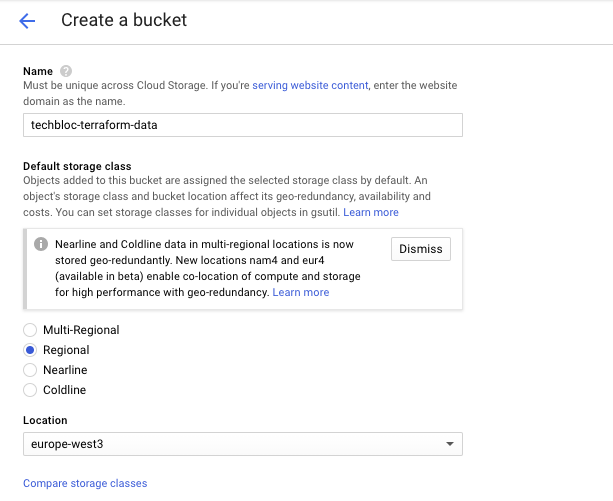
Bucket permissions:

To start, clone my openshift-terraform github repository and checkout the google-dev branch:

git clone https://github.com/berndonline/openshift-terraform.git
cd ./openshift-terraform/ && git checkout google-dev

Add your previously downloaded credentials json file:

cat << EOF > ./credentials.json
{
  "type": "service_account",
  "project_id": "<--your-project-->",
  "private_key_id": "<--your-key-id-->",
  "private_key": "-----BEGIN PRIVATE KEY-----

...

}
EOF

There are a few things you need to modify in the main.tf and variables.tf before you can start:

...
terraform {
  backend "gcs" {
    bucket    = "<--your-bucket-name-->"
    prefix    = "openshift-311"
    credentials = "credentials.json"
  }
}
...
...
variable "gcp_region" {
  description = "Google Compute Platform region to launch servers."
  default     = "europe-west3"
}
variable "gcp_project" {
  description = "Google Compute Platform project name."
  default     = "<--your-project-name-->"
}
variable "gcp_zone" {
  type = "string"
  default = "europe-west3-a"
  description = "The zone to provision into"
}
...

Add the needed environment variables to apply changes to CloudFlare DNS:

export TF_VAR_email='<-YOUR-CLOUDFLARE-EMAIL-ADDRESS->'
export TF_VAR_token='<-YOUR-CLOUDFLARE-TOKEN->'
export TF_VAR_domain='<-YOUR-CLOUDFLARE-DOMAIN->'
export TF_VAR_htpasswd='<-YOUR-OPENSHIFT-DEMO-USER-HTPASSWD->'

Let’s start creating the infrastructure and verify afterwards the created resources on GCP.

terraform init && terraform apply -auto-approve

VPC and public and private subnets in region europe-west3:
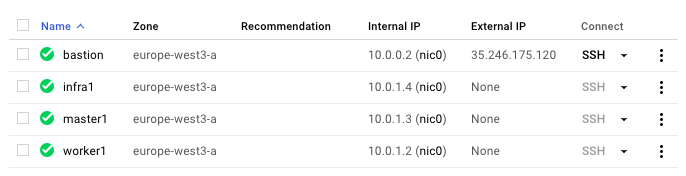
Created instances:

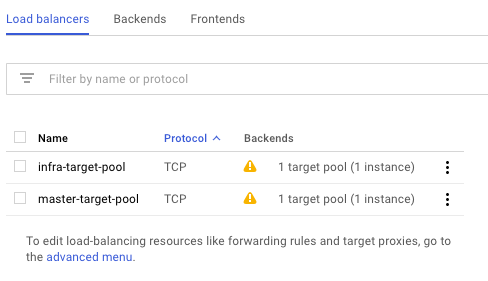
Created load balancers for master and infra nodes:

Copy the ssh key and ansible-hosts file to the bastion host from where you need to run the Ansible OpenShift playbooks.

scp -o StrictHostKeyChecking=no -o UserKnownHostsFile=/dev/null -i ./helper_scripts/id_rsa -r ./helper_scripts/id_rsa centos@$(terraform output bastion):/home/centos/.ssh/
scp -o StrictHostKeyChecking=no -o UserKnownHostsFile=/dev/null -i ./helper_scripts/id_rsa -r ./inventory/ansible-hosts  centos@$(terraform output bastion):/home/centos/ansible-hosts

I recommend waiting a few minutes as the cloud-init script prepares the bastion host. Afterwards continue with the pre and install playbooks. You can connect to the bastion host and run the playbooks directly.

ssh -o StrictHostKeyChecking=no -o UserKnownHostsFile=/dev/null -i ./helper_scripts/id_rsa -l centos $(terraform output bastion) -A "cd /openshift-ansible/ && ansible-playbook ./playbooks/openshift-pre.yml -i ~/ansible-hosts"
ssh -o StrictHostKeyChecking=no -o UserKnownHostsFile=/dev/null -i ./helper_scripts/id_rsa -l centos $(terraform output bastion) -A "cd /openshift-ansible/ && ansible-playbook ./playbooks/openshift-install.yml -i ~/ansible-hosts"

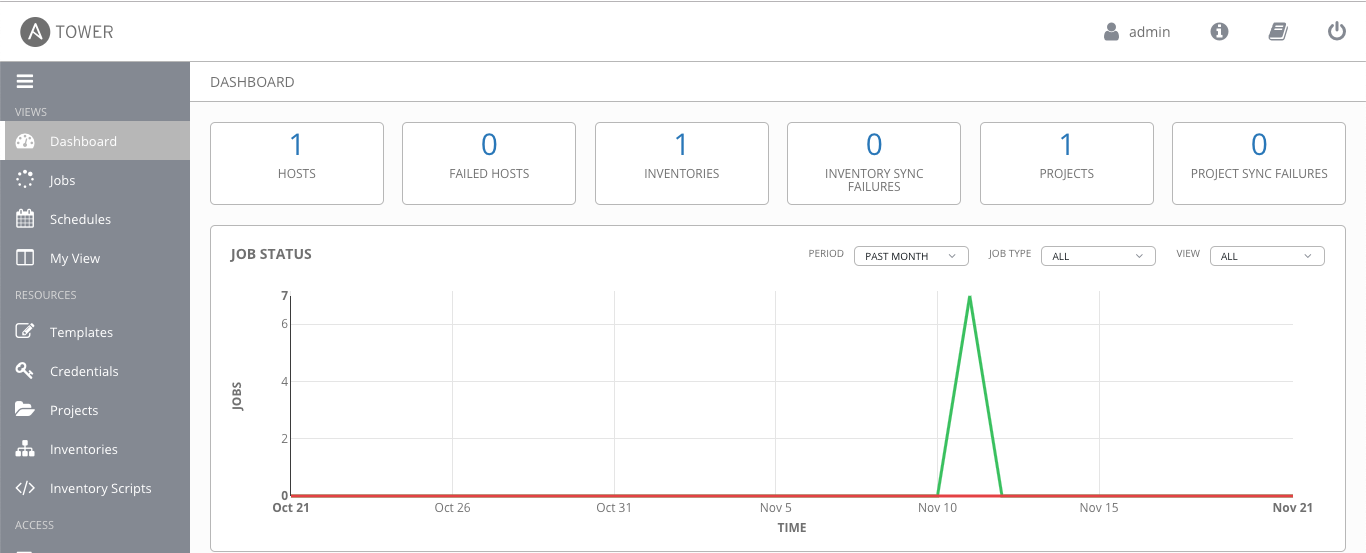
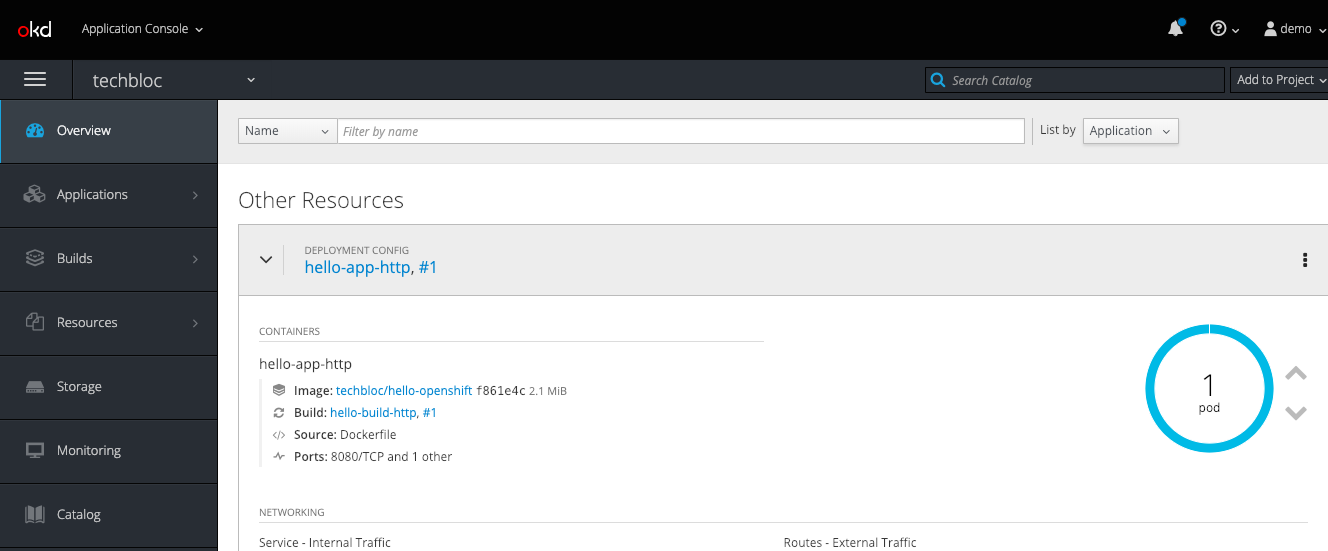
After the installation is completed, continue to create your project and applications:

When you are finished with the testing, run terraform destroy.

terraform destroy -force 

Please share your feedback and leave a comment.

Part three: Ansible URI module and PUT or POST

This will be the last part of my short series on the Ansible URI module and this time I will explain and show examples about when to use PUT or POST when interacting with REST APIs. I make use of the JSON_QUERY filter which I have explained in my previous article.

What is the difference between POST and PUT?

  • PUT – The PUT method is idempotent and needs the universal unique identifier (uuid) to update an API object. Example PUT /api/service/{{ object-uuid }}. The HTTP return code is 200.

  • POST – Is not idempotent and used to create an API object and an unique identifier is not needed for this. In this case the uuid is server-side generated.  Example POST /api/service/. The HTTP return code is 201.

I am again using the example from AVI Network Software Load Balancers and their REST API.

---
password: 123
api_version: 17.2.13
openshift:
  name: openshift-cloud-provider
openshift_cloud_json: "{{ lookup('template','openshift_cloud_json.j2') }}"

(Optional) Set ansible_host variable to IP address. I have had issues in the past using the DNS name and the task below overrides the variable with the IP address of the host:

- block:
  - name: Resolve hostname
    shell: dig +short "{{ ansible_host }}"
    changed_when: false
    register: dig_output
  
  - name: Set ansible_host to IP address
    set_fact:
      ansible_host: "{{ dig_output.stdout }}"
  when: ( inventory_hostname == groups ["controller"][0] )

Let’s start creating an object using POST and afterwards updating the existing object using PUT. The problem with POST is, that it is not idempotent so we need to first check if the object exists before creating it. We need to do this because creating the same object twice could be an issue:

- block: 
  - name: Avi | OpenShift | Check cloud config
    uri:
      url: "https://{{ ansible_host }}/api/cloud/?name={{ openshift.name }}" 
      method: GET 
      user: "{{ username }}" 
      password: "{{ password }}" 
      return_content: yes 
      body_format: json 
      force_basic_auth: yes 
      validate_certs: false 
      status_code: 200 
      timeout: 180 
      headers:
        X-Avi-Version: "{{ api_version }}" 
    register: check

  - name: Avi | OpenShift | Create cloud config
    uri:
      url: "https://{{ ansible_host }}/api/cloud/" 
      method: POST 
      user: "{{ username }}" 
      password: "{{ password }}" 
      return_content: yes 
      body: "{{ openshift_cloud_json }}" 
      body_format: json 
      force_basic_auth: yes 
      validate certs: false 
      status_code: 201 
      timeout: 180 
      headers:
        X-Avi-Version: "{{ api_version }}"
    when: check.json.count == 0 
  when: ( inventory_hostname == groups ["controller"][0] ) and update_config is undefined

Let’s continue with the example and using PUT to update the configuration of an existing object. To do this you need to define a extra variable update_config=true for the tasks below to be executed:

- block: 
  - name: Avi | OpenShift | Check cloud config
    uri:
      url: "https://{{ ansible_host }}/api/cloud/" 
      method: GET 
      user: "{{ username }}" 
      password: "{{ password }}" 
      return_content: yes 
      body_format: json 
      force_basic_auth: yes 
      validate_certs: false 
      status_code: 200 
      timeout: 180 
      headers:
        X-Avi-Version: "{{ api_version }}" 
    register: check

  - name: Avi | Set_fact for OpenShift name 
    set_fact:
      openshift_cloud_name: "[?name=='{{ openshift.name }}').uuid"
      
  - name: Avi | Set_fact for OpenShift uuid
    set_fact:
      openshift_cloud_uuid: "{{ check.json.results | json_query(penshift_cloud_name) }}" 
      
  - name: Avi | OpenShift | Update cloud config
    uri:
      url: "https://{{ ansible_host }}/api/cloud/{{ openshift_cloud_uuid [0] }}" 
      method: PUT 
      user: "{{ username }}" 
      password: "{{ password }}" 
      return_content: yes 
      body: "{{ openshift_cloud_json }}" 
      body_format: json 
      force_basic_auth: yes 
      validate_certs: false 
      status_code: 200 
      timeout: 180 
      headers:
        X-Avi-Version: "{{ api_version }}" 
    when: ( inventory_hostname == groups ("controller"][0] ) and update_config is defined

Here you find the links to the other articles about Ansible URI module:

Please share your feedback and leave a comment.

Part two: Ansible URI module and json_query filter

In my previous article I tried to explain how to use the Ansible URI Module and using the Jinja2 template engine to generate the JSON content. In part two I want to explain how to use the json_query filter. I will use the example with AVI Networks Load Balancers but this can be with any device with an REST API.

First we need to get the output from two objects, for both we don’t know the UUIDs and the first two tasks are to collect the configuration from the API using GET and register the output:

- block:
  - name: Avi | Get OpenShift cloud configuration
    uri:
      url: "https://{{ ansible_host }}/api/cloud/"
      method: GET
      user: "{{ avi_username }}"
      password: "{{ avi_password }}"
      return_content: yes
      force_basic_auth: yes
      validate_certs: false
      status_code: 200
      timeout: 180
      headers:
        X-Avi-Version: "{{ api_version }}"
    register: openshift_cloud 
   
  - name: Avi | Get OpenShift Service Engine group
    uri:
      url: "https://{{ ansible_host }}/api/serviceenginegroup/"
      method: GET
      user: "{{ avi_username }}"
      password: "{{ avi_password }}"
      return_content: yes
      force_basic_auth: yes
      validate_certs: false
      status_code: 200
      timeout: 180
      headers:
        X-Avi-Version: "{{ api_version }}"
    register: openshift_segroup
  when: '( inventory_hostname == groups["controller"][0] )'

The two variables openshift_cloud and openshift_segroup contain JSON content with all configuration details. For the OpenShift cloud object I don’t know the UUID, the only reference is the object name “OpenShift Cloud” which I know because I had previously created the object. I am using the Ansible module Set_Fact for specifying the query and writing the output into a new variable openshift_cloud_uuid:

- block:
  - name: Avi | set_fact for OpenShift cloud query
    set_fact:
      openshift_cloud_query: "[?name=='OpenShift Cloud'].uuid"
  
  - name: Avi | set_fact for OpenShift UUID
    set_fact:
      openshift_cloud_uuid: "{{ openshift_cloud.json.results | json_query(openshift_cloud_query) }}"
  when: '( inventory_hostname == groups["controller"][0] )' 

We now have the openshift_cloud_uuid of the OpenShift cloud configuration so let’s continue with the second object of the Service Engine group which is trickier because I don’t know the UUID or the object name. The Service Engine group was automatically set-up in the background when the OpenShift cloud object got created but I know the reference to the OpenShift cloud object and I use the json_query filter and set_fact again:

- block:
  - name: Avi | set_fact for Service Engine group query
    set_fact:
      openshift_segroup_query: "[?cloud_ref=='https://{{ ansible_host }}/api/cloud/{{ openshift_cloud_uuid[0] }}'].uuid"
  
  - name: Avi | set_fact for Service Engine group UUID
    set_fact:
      openshift_segroup_uuid: "{{ openshift_segroup.json.results | json_query(openshift_segroup_query) }}"
  when: '( inventory_hostname == groups["controller"][0] )'

Right now we know the openshift_cloud_uuid and the openshift_segroup_uuid, we use this to load a new Jinja2 template to update the Service Engine group object. See below the Jinja2 template openshift_segroup_json.j2:

{
  ...
  "name": "Default-Group",
  "tenant_ref": "https://{{ ansible_host }}/api/tenant/admin",
  "cloud_ref": "https://{{ ansible_host }}/api/cloud/{{ openshift_cloud_uuid[0] }}",
  ...
  YOUR CHANGES
  ...
}

The last part of this exercise is to load the j2 template and push the json content against the API to update the object using PUT:

- block:
  - name: Avi | set_fact to load Service Engine group json template
    set_fact:
      openshift_segroup_json: "{{ lookup('template', 'openshift_segroup_json.j2') }}"
  
  - name: Avi| Update OpenShift Service Engine group configuration
    uri:
      url: "https://{{ ansible_host }}/api/serviceenginegroup/{{ openshift_segroup_uuid[0] }}"
      method: PUT
      user: "{{ avi_username }}"
      password: "{{ avi_password }}"
      return_content: yes
      force_basic_auth: yes
      validate_certs: false
      body: "{{ openshift_segroup_json }}"
      body_format: json
      status_code: 200
      timeout: 180
      headers:
        X-Avi-Version: "{{ api_version }}"
  when: '( inventory_hostname == groups["controller"][0] )'

I hope this article is helpful on how to use the Ansible URI module and the json_query filter to extract information and update an API object. Please share your feedback and leave a comment.

Here you find the links to the other articles about Ansible URI module:

Build Ansible Tower Container

After creating my Jenkins container I thought it would be fun to run Ansible Tower in a container so I created a simple Dockerfile. First you need find out the latest Ansible Tower version: https://releases.ansible.com/ansible-tower/setup/ and update the version variable in the Dockerfile.

Here is my Dockerfile:

...
ARG ANSIBLE_TOWER_VER=3.3.1-1
...

The passwords can be changed in the inventory file:

...
[all:vars]
admin_password='<-your-password->'
...
pg_password='<-your-password->'
...
rabbitmq_password='<-your-password->'
...

Let’s start by building the container:

git clone https://github.com/berndonline/ansible-tower-docker.git && cd ansible-tower-docker/
docker build -t berndonline/ansible-tower .

The docker build will take a few minutes, just wait and look out for errors you might have in the build:

berndonline@lab:~$ git clone https://github.com/berndonline/ansible-tower-docker.git
Cloning into 'ansible-tower-docker'...
remote: Enumerating objects: 17, done.
remote: Counting objects: 100% (17/17), done.
remote: Compressing objects: 100% (11/11), done.
remote: Total 17 (delta 4), reused 14 (delta 4), pack-reused 0
Unpacking objects: 100% (17/17), done.
berndonline@lab:~$ cd ansible-tower-docker/
berndonline@lab:~/ansible-tower-docker$ docker build -t berndonline/ansible-tower .
Sending build context to Docker daemon  87.04kB
Step 1/31 : FROM ubuntu:16.04
16.04: Pulling from library/ubuntu
7b8b6451c85f: Pull complete
ab4d1096d9ba: Pull complete
e6797d1788ac: Pull complete
e25c5c290bde: Pull complete
Digest: sha256:e547ecaba7d078800c358082088e6cc710c3affd1b975601792ec701c80cdd39
Status: Downloaded newer image for ubuntu:16.04
 ---> a51debf7e1eb
Step 2/31 : USER root
 ---> Running in cf5d606130cc
Removing intermediate container cf5d606130cc
 ---> d5b11ed84885
Step 3/31 : WORKDIR /opt
 ---> Running in 1e6703cec6db
Removing intermediate container 1e6703cec6db
 ---> 045cf04ebc1d
Step 4/31 : ARG ANSIBLE_TOWER_VER=3.3.1-1
 ---> Running in 6d65bfe370d4
Removing intermediate container 6d65bfe370d4
 ---> d75c246c3a5c
Step 5/31 : ARG PG_DATA=/var/lib/postgresql/9.6/main
 ---> Running in e8856051aa92
Removing intermediate container e8856051aa92
 ---> 02e6d7593df8

...

PLAY [Install Tower isolated node(s)] ******************************************
skipping: no hosts matched

PLAY RECAP *********************************************************************
localhost                  : ok=125  changed=64   unreachable=0    failed=0

The setup process completed successfully.
Setup log saved to /var/log/tower/setup-2018-11-21-20:21:37.log
Removing intermediate container ad6401292444
 ---> 8f1eb28f16cb
Step 27/31 : ADD entrypoint.sh /entrypoint.sh
 ---> 8503e666ce9c
Step 28/31 : RUN chmod +x /entrypoint.sh
 ---> Running in 8b5ca24a320a
Removing intermediate container 8b5ca24a320a
 ---> 60810dc2a4e3
Step 29/31 : VOLUME ["${PG_DATA}", "${AWX_PROJECTS}","/certs"]
 ---> Running in d836e5455bd5
Removing intermediate container d836e5455bd5
 ---> 3968430a1814
Step 30/31 : EXPOSE 80
 ---> Running in 9a72815e365b
Removing intermediate container 9a72815e365b
 ---> 3613ced2a80c
Step 31/31 : ENTRYPOINT ["/entrypoint.sh", "ansible-tower"]
 ---> Running in 4611a90aff1a
Removing intermediate container 4611a90aff1a
 ---> ce89ea0753d4
Successfully built ce89ea0753d4
Successfully tagged berndonline/ansible-tower:latest

Continue to create a Docker Volume container to store the Postgres database:

sudo docker create -v /var/lib/postgresql/9.6/main --name tower-data berndonline/ansible-tower /bin/true

Start the Ansible Tower Docker container:

sudo docker run -d -p 32456:80 --volumes-from tower-data --name ansible-tower --privileged --restart berndonline/ansible-tower

Afterwards you can connect to http://<your-ip-address>:32456/ and import your Tower license. Ansible provides a free 10 node license which you can request here: https://www.ansible.com/license.

The Ansible Tower playbook installs an Nginx reverse proxy and you can enable SSL by setting the variable nginx_disable_https to false in the inventory file, and publish the container via 443 instead of 80.

Please share your feedback and leave a comment.

How to delegate Ansible host variables with set_fact

I ran into an interesting issues about making an service account token on OpenShift accessible by another group of nodes when running a playbook. When you run an oc command and register the output, you face the issue that the registered variable is stored under hostvars of the node name.

Normally you can access hostvars from other nodes like you see below:

"{{ hostvars['hostname']['variable-name'] }}"

I came up with something different and more flexible, instead of accessing hostvars[‘hostname’][‘variable-name’] I am delegating the variable to a group of nodes and make the variable more easily accessible there:

---
- hosts: avi-controller:masters
  gather_facts: false

  pre_tasks:
    - block:
      - name: Get OpenShift token
        command: "oc sa get-token <serveraccount-name> -n <project-name> --config=/etc/origin/master/admin.kubeconfig"
        register: token

      - name: Set serviceaccount token variable and delegate
        set_fact:
          serviceaccount_token: "{{ token.stdout }}"
        delegate_to: "{{ item }}"
        delegate_facts: true
        with_items: "{{ groups['avi-controller'] }}"
      when: ( inventory_hostname == groups["masters"][0] )
 
 roles:
    - { role: "config", when: "'avi-controller' in group_names" }

In the following Ansible role after pre tasks, you are able to access the variable serviceaccount_token on any member of the group “avi-controller” and use with the rest of your automation code.

If you like this article, please share your feedback and leave a comment.