A few month back I stumbled across the Weave.works command-line tool eksctl.io to create and manage AWS EKS clusters. Amazon recently announced eksctl.io is the official command-line tool for managing AWS EKS clusters. It follows a similar approach what we have seen with the new openshift-installer to create an OpenShift 4 cluster or with the Google Cloud Shell to create a GKE cluster with a single command and I really like the simplicity of these tools.
Before we start creating a EKS cluster, see below the IAM user policy to set the required permissions for eksctl.
{
    "Version": "2012-10-17",
    "Statement": [
        {
            "Sid": "VisualEditor0",
            "Effect": "Allow",
            "Action": [
                "iam:CreateInstanceProfile",
                "iam:DeleteInstanceProfile",
                "iam:GetRole",
                "iam:GetInstanceProfile",
                "iam:RemoveRoleFromInstanceProfile",
                "iam:CreateRole",
                "iam:DeleteRole",
                "iam:AttachRolePolicy",
                "iam:PutRolePolicy",
                "iam:ListInstanceProfiles",
                "iam:AddRoleToInstanceProfile",
                "iam:ListInstanceProfilesForRole",
                "iam:PassRole",
                "iam:CreateServiceLinkedRole",
                "iam:DetachRolePolicy",
                "iam:DeleteRolePolicy",
                "iam:DeleteServiceLinkedRole",
                "ec2:DeleteInternetGateway",
                "iam:GetOpenIDConnectProvider",
                "iam:GetRolePolicy"
            ],
            "Resource": [
                "arn:aws:iam::552276840222:instance-profile/eksctl-*",
                "arn:aws:iam::552276840222:oidc-provider/oidc.eks*",
                "arn:aws:iam::552276840222:role/eksctl-*",
                "arn:aws:ec2:*:*:internet-gateway/*"
            ]
        },
        {
            "Sid": "VisualEditor1",
            "Effect": "Allow",
            "Action": [
                "ec2:AuthorizeSecurityGroupIngress",
                "ec2:DeleteSubnet",
                "ec2:AttachInternetGateway",
                "ec2:DeleteRouteTable",
                "ec2:AssociateRouteTable",
                "ec2:DescribeInternetGateways",
                "autoscaling:DescribeAutoScalingGroups",
                "ec2:CreateRoute",
                "ec2:CreateInternetGateway",
                "ec2:RevokeSecurityGroupEgress",
                "autoscaling:UpdateAutoScalingGroup",
                "ec2:DeleteInternetGateway",
                "ec2:DescribeKeyPairs",
                "ec2:DescribeRouteTables",
                "ec2:ImportKeyPair",
                "ec2:DescribeLaunchTemplates",
                "ec2:CreateTags",
                "ec2:CreateRouteTable",
                "ec2:RunInstances",
                "cloudformation:*",
                "ec2:DetachInternetGateway",
                "ec2:DisassociateRouteTable",
                "ec2:RevokeSecurityGroupIngress",
                "ec2:DescribeImageAttribute",
                "ec2:DeleteNatGateway",
                "autoscaling:DeleteAutoScalingGroup",
                "ec2:DeleteVpc",
                "ec2:CreateSubnet",
                "ec2:DescribeSubnets",
                "eks:*",
                "autoscaling:CreateAutoScalingGroup",
                "ec2:DescribeAddresses",
                "ec2:DeleteTags",
                "ec2:CreateNatGateway",
                "autoscaling:DescribeLaunchConfigurations",
                "ec2:CreateVpc",
                "ec2:DescribeVpcAttribute",
                "autoscaling:DescribeScalingActivities",
                "ec2:DescribeAvailabilityZones",
                "ec2:CreateSecurityGroup",
                "ec2:ModifyVpcAttribute",
                "ec2:ReleaseAddress",
                "ec2:AuthorizeSecurityGroupEgress",
                "ec2:DeleteLaunchTemplate",
                "ec2:DescribeTags",
                "ec2:DeleteRoute",
                "ec2:DescribeLaunchTemplateVersions",
                "elasticloadbalancing:*",
                "ec2:DescribeNatGateways",
                "ec2:AllocateAddress",
                "ec2:DescribeSecurityGroups",
                "autoscaling:CreateLaunchConfiguration",
                "ec2:DescribeImages",
                "ec2:CreateLaunchTemplate",
                "autoscaling:DeleteLaunchConfiguration",
                "iam:ListOpenIDConnectProviders",
                "ec2:DescribeVpcs",
                "ec2:DeleteSecurityGroup"
            ],
            "Resource": "*"
        }
    ]
}
Now let’s create the EKS cluster with the following command:
$ eksctl create cluster --name=cluster-1 --region=eu-west-1 --nodes=3 --auto-kubeconfig
[ℹ]  eksctl version 0.10.2
[ℹ]  using region eu-west-1
[ℹ]  setting availability zones to [eu-west-1a eu-west-1c eu-west-1b]
[ℹ]  subnets for eu-west-1a - public:192.168.0.0/19 private:192.168.96.0/19
[ℹ]  subnets for eu-west-1c - public:192.168.32.0/19 private:192.168.128.0/19
[ℹ]  subnets for eu-west-1b - public:192.168.64.0/19 private:192.168.160.0/19
[ℹ]  nodegroup "ng-b17ac84f" will use "ami-059c6874350e63ca9" [AmazonLinux2/1.14]
[ℹ]  using Kubernetes version 1.14
[ℹ]  creating EKS cluster "cluster-1" in "eu-west-1" region
[ℹ]  will create 2 separate CloudFormation stacks for cluster itself and the initial nodegroup
[ℹ]  if you encounter any issues, check CloudFormation console or try 'eksctl utils describe-stacks --region=eu-west-1 --cluster=cluster-1'
[ℹ]  CloudWatch logging will not be enabled for cluster "cluster-1" in "eu-west-1"
[ℹ]  you can enable it with 'eksctl utils update-cluster-logging --region=eu-west-1 --cluster=cluster-1'
[ℹ]  Kubernetes API endpoint access will use default of {publicAccess=true, privateAccess=false} for cluster "cluster-1" in "eu-west-1"
[ℹ]  2 sequential tasks: { create cluster control plane "cluster-1", create nodegroup "ng-b17ac84f" }
[ℹ]  building cluster stack "eksctl-cluster-1-cluster"
[ℹ]  deploying stack "eksctl-cluster-1-cluster"
[ℹ]  building nodegroup stack "eksctl-cluster-1-nodegroup-ng-b17ac84f"
[ℹ]  --nodes-min=3 was set automatically for nodegroup ng-b17ac84f
[ℹ]  --nodes-max=3 was set automatically for nodegroup ng-b17ac84f
[ℹ]  deploying stack "eksctl-cluster-1-nodegroup-ng-b17ac84f"
[✔]  all EKS cluster resources for "cluster-1" have been created
[✔]  saved kubeconfig as "/home/ubuntu/.kube/eksctl/clusters/cluster-1"
[ℹ]  adding identity "arn:aws:iam::xxxxxxxxxx:role/eksctl-cluster-1-nodegroup-ng-b17-NodeInstanceRole-1DK2K493T8OM7" to auth ConfigMap
[ℹ]  nodegroup "ng-b17ac84f" has 0 node(s)
[ℹ]  waiting for at least 3 node(s) to become ready in "ng-b17ac84f"
[ℹ]  nodegroup "ng-b17ac84f" has 3 node(s)
[ℹ]  node "ip-192-168-5-192.eu-west-1.compute.internal" is ready
[ℹ]  node "ip-192-168-62-86.eu-west-1.compute.internal" is ready
[ℹ]  node "ip-192-168-64-47.eu-west-1.compute.internal" is ready
[ℹ]  kubectl command should work with "/home/ubuntu/.kube/eksctl/clusters/cluster-1", try 'kubectl --kubeconfig=/home/ubuntu/.kube/eksctl/clusters/cluster-1 get nodes'
[✔]  EKS cluster "cluster-1" in "eu-west-1" region is ready
Alternatively there is the option to create the EKS cluster in an existing VPC without eksctl creating the full-stack, you are required to specify the subnet IDs for private and public subnets:
eksctl create cluster --name=cluster-1 --region=eu-west-1 --nodes=3 \
       --vpc-private-subnets=subnet-0ff156e0c4a6d300c,subnet-0426fb4a607393184,subnet-0426fb4a604827314 \
       --vpc-public-subnets=subnet-0153e560b3129a696,subnet-009fa0199ec203c37,subnet-0426fb4a412393184
The option –auto-kubeconfig stores the kubeconfig under the users home directory in ~/.kube/eksctl/clusters/<-cluster-name-> or you can obtain cluster credentials at any point in time with the following command:
$ eksctl utils write-kubeconfig --cluster=cluster-1
[ℹ]  eksctl version 0.10.2
[ℹ]  using region eu-west-1
[✔]  saved kubeconfig as "/home/ubuntu/.kube/config"
Using kubectl to connect and manage the EKS cluster:
$ kubectl get nodes
NAME                                          STATUS   ROLES    AGE     VERSION
ip-192-168-5-192.eu-west-1.compute.internal   Ready    <none>   3m42s   v1.14.7-eks-1861c5
ip-192-168-62-86.eu-west-1.compute.internal   Ready    <none>   3m43s   v1.14.7-eks-1861c5
ip-192-168-64-47.eu-west-1.compute.internal   Ready    <none>   3m41s   v1.14.7-eks-1861c5
You are able to view the created EKS clusters:
$ eksctl get clusters
NAME		REGION
cluster-1	eu-west-1
As easy it is to create an EKS cluster you can also delete the cluster with a single command:
$ eksctl delete cluster --name=cluster-1 --region=eu-west-1
[ℹ]  eksctl version 0.10.2
[ℹ]  using region eu-west-1
[ℹ]  deleting EKS cluster "cluster-1"
[✔]  kubeconfig has been updated
[ℹ]  cleaning up LoadBalancer services
[ℹ]  2 sequential tasks: { delete nodegroup "ng-b17ac84f", delete cluster control plane "cluster-1" [async] }
[ℹ]  will delete stack "eksctl-cluster-1-nodegroup-ng-b17ac84f"
[ℹ]  waiting for stack "eksctl-cluster-1-nodegroup-ng-b17ac84f" to get deleted
[ℹ]  will delete stack "eksctl-cluster-1-cluster"
[✔]  all cluster resources were deleted
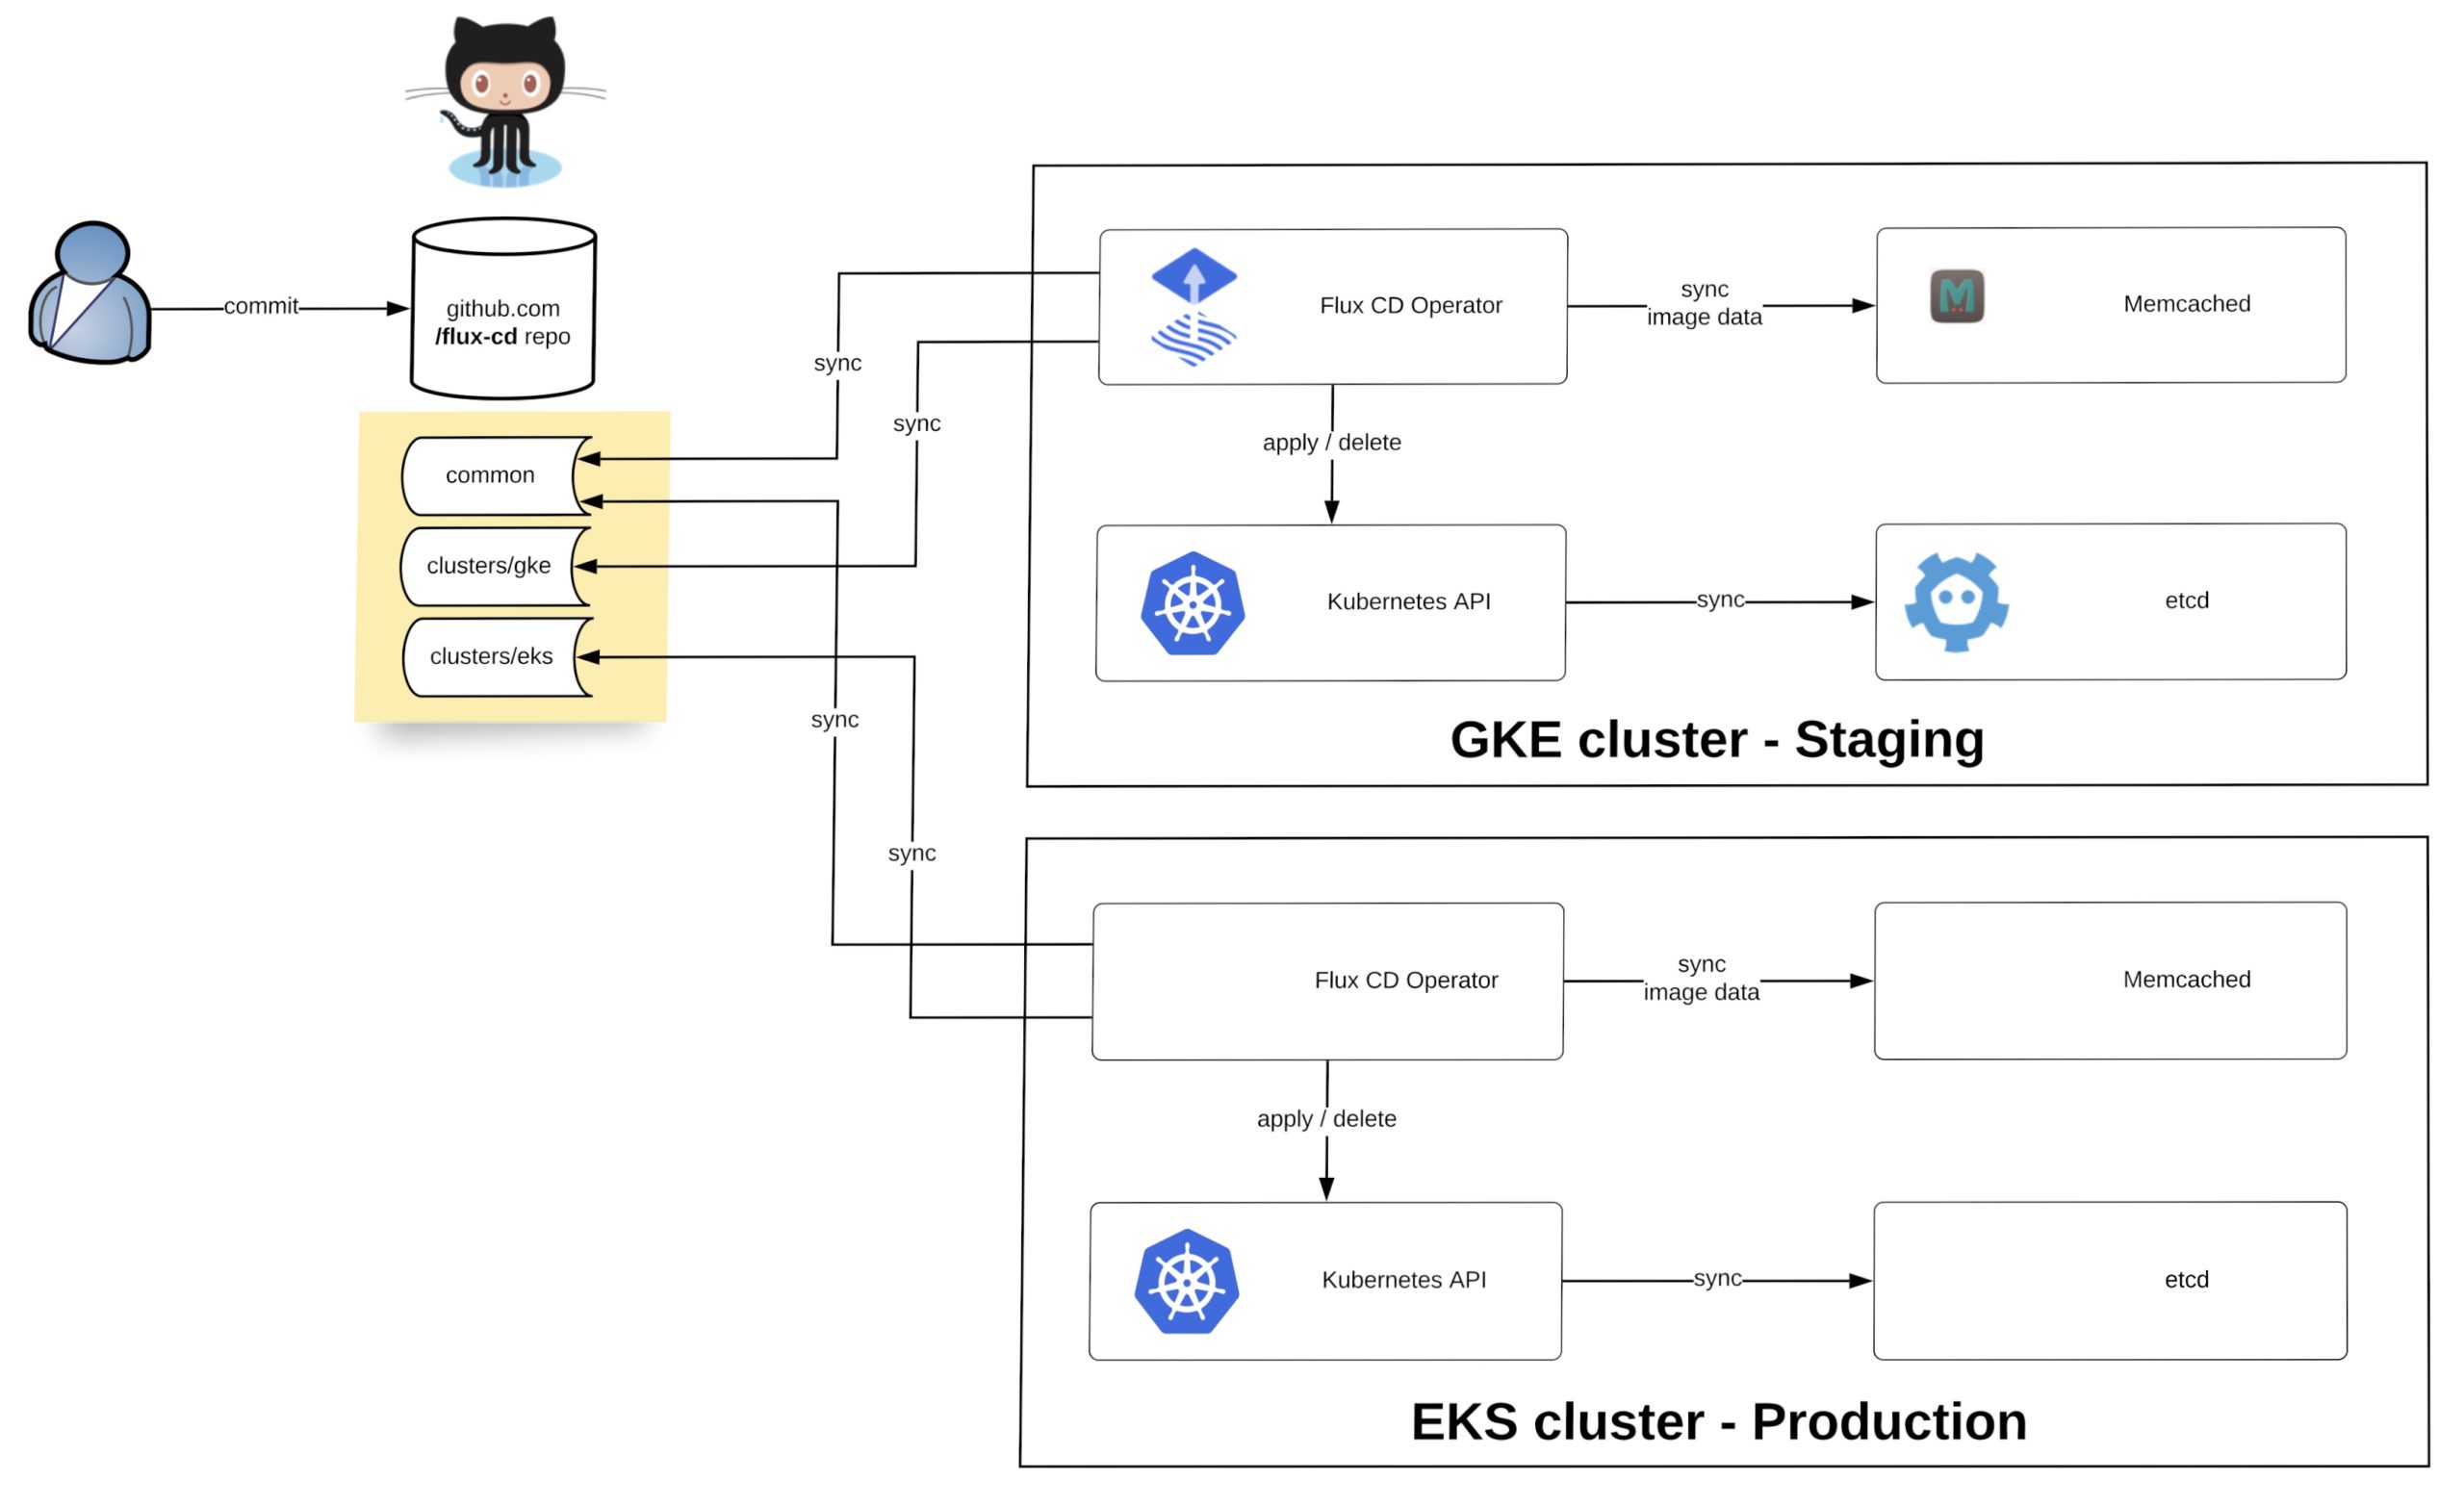
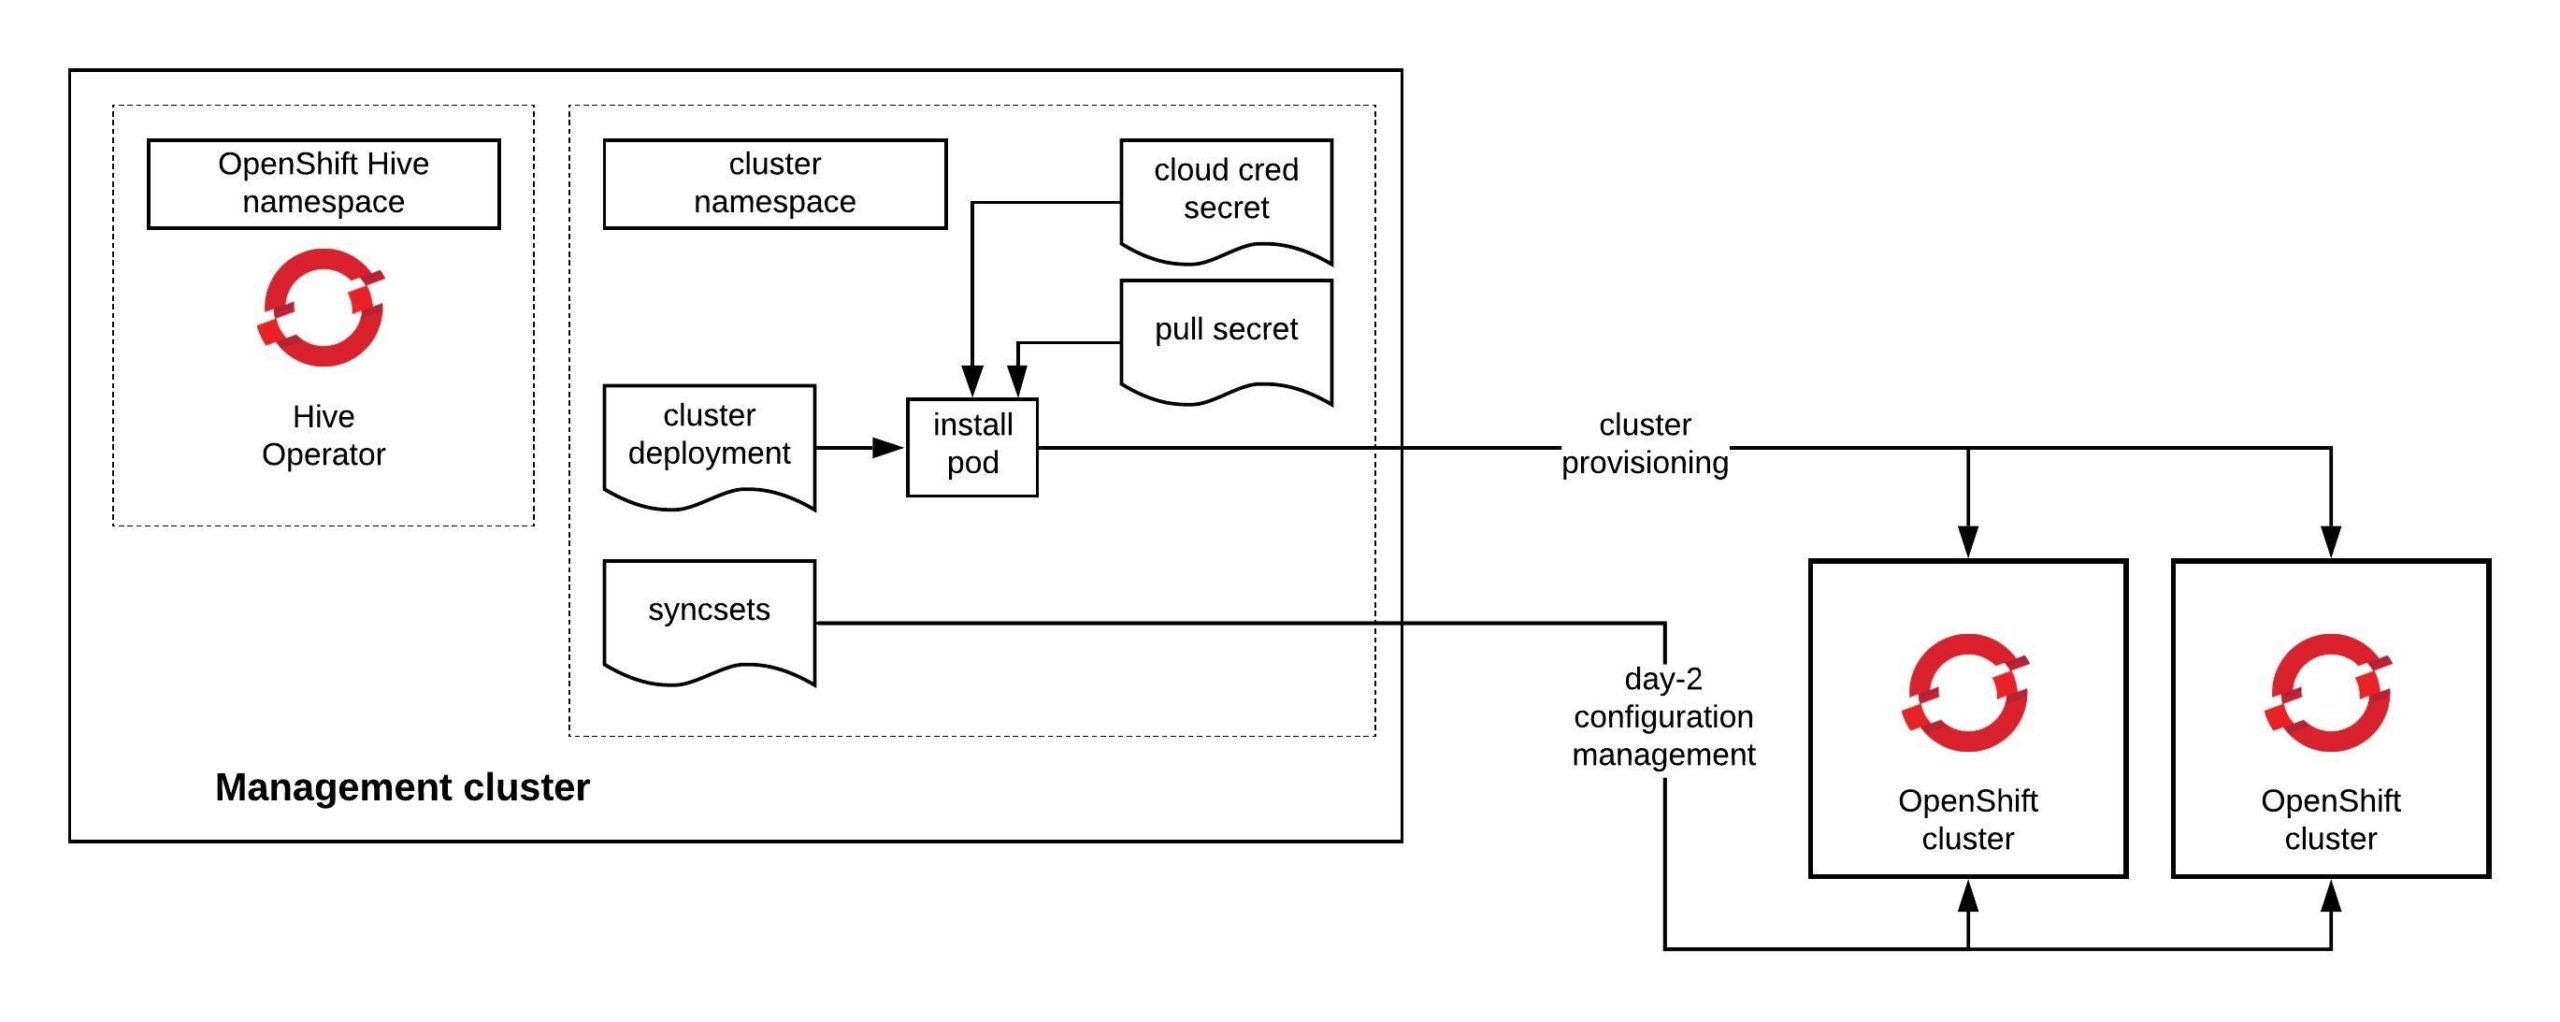
I can only recommend checking out eksctl.io because it has lot of potentials and the move towards an GitOps model to manage EKS clusters in a declarative way using a cluster manifests or hopefully in the future an eksctld operator to do the job. RedHat is working on a similar tool for OpenShift 4 called OpenShift Hive which I will write about very soon.
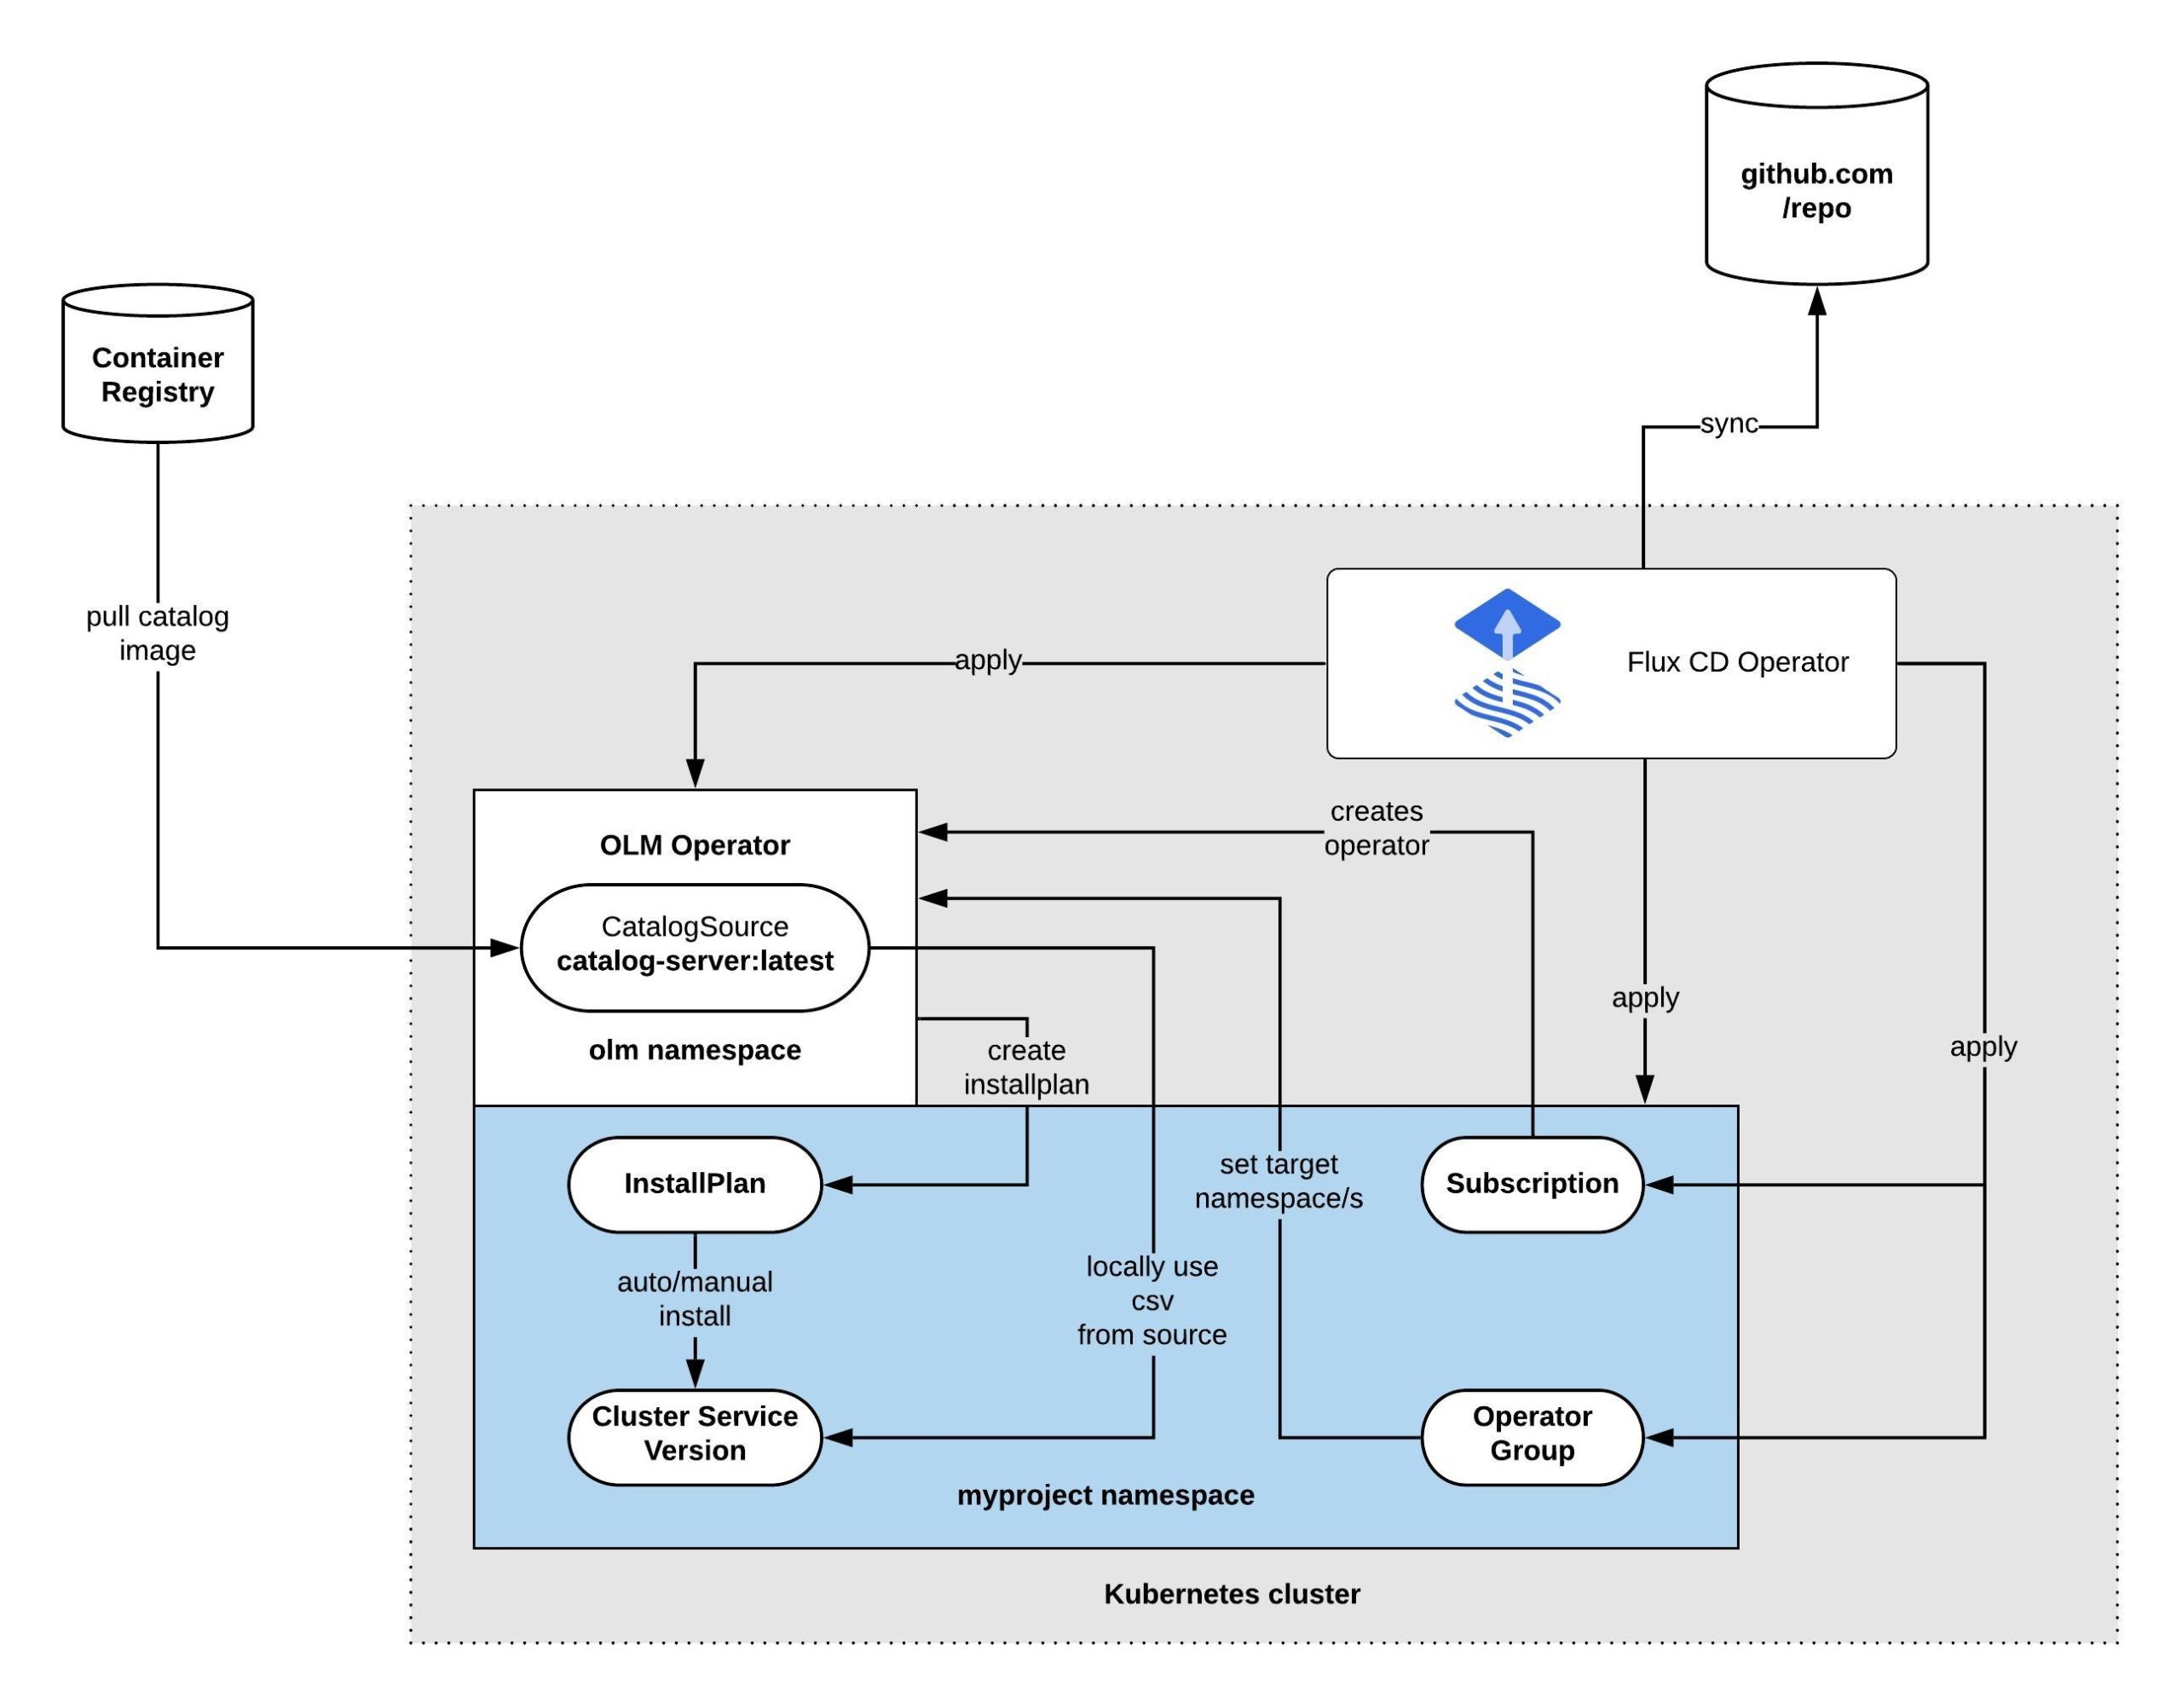
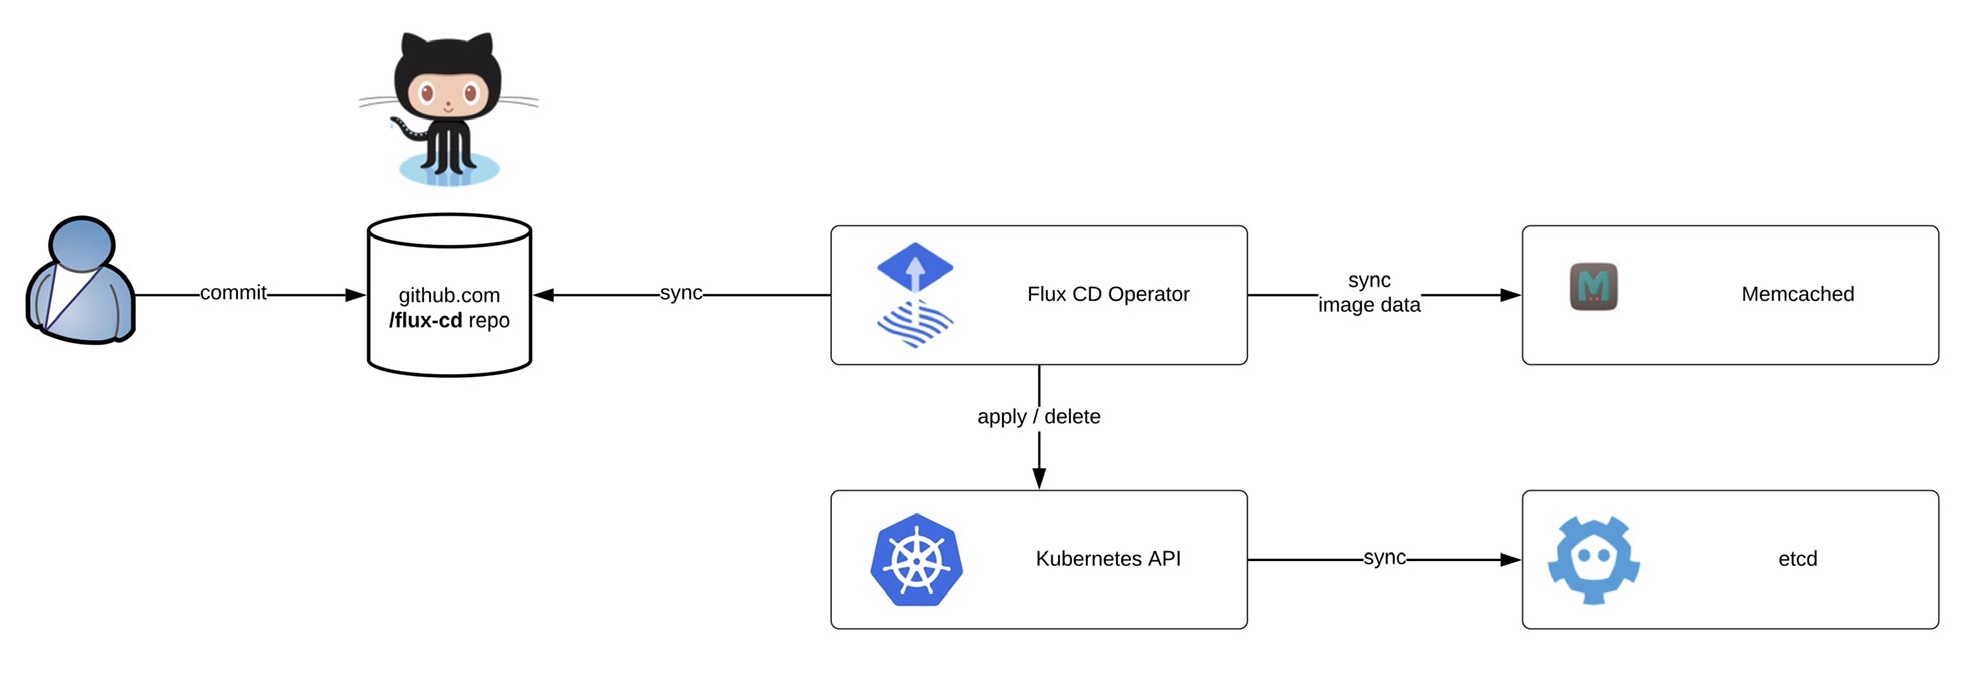 Before we start deploying the operator we need to install the fluxctl command-line utility and create the namespace:
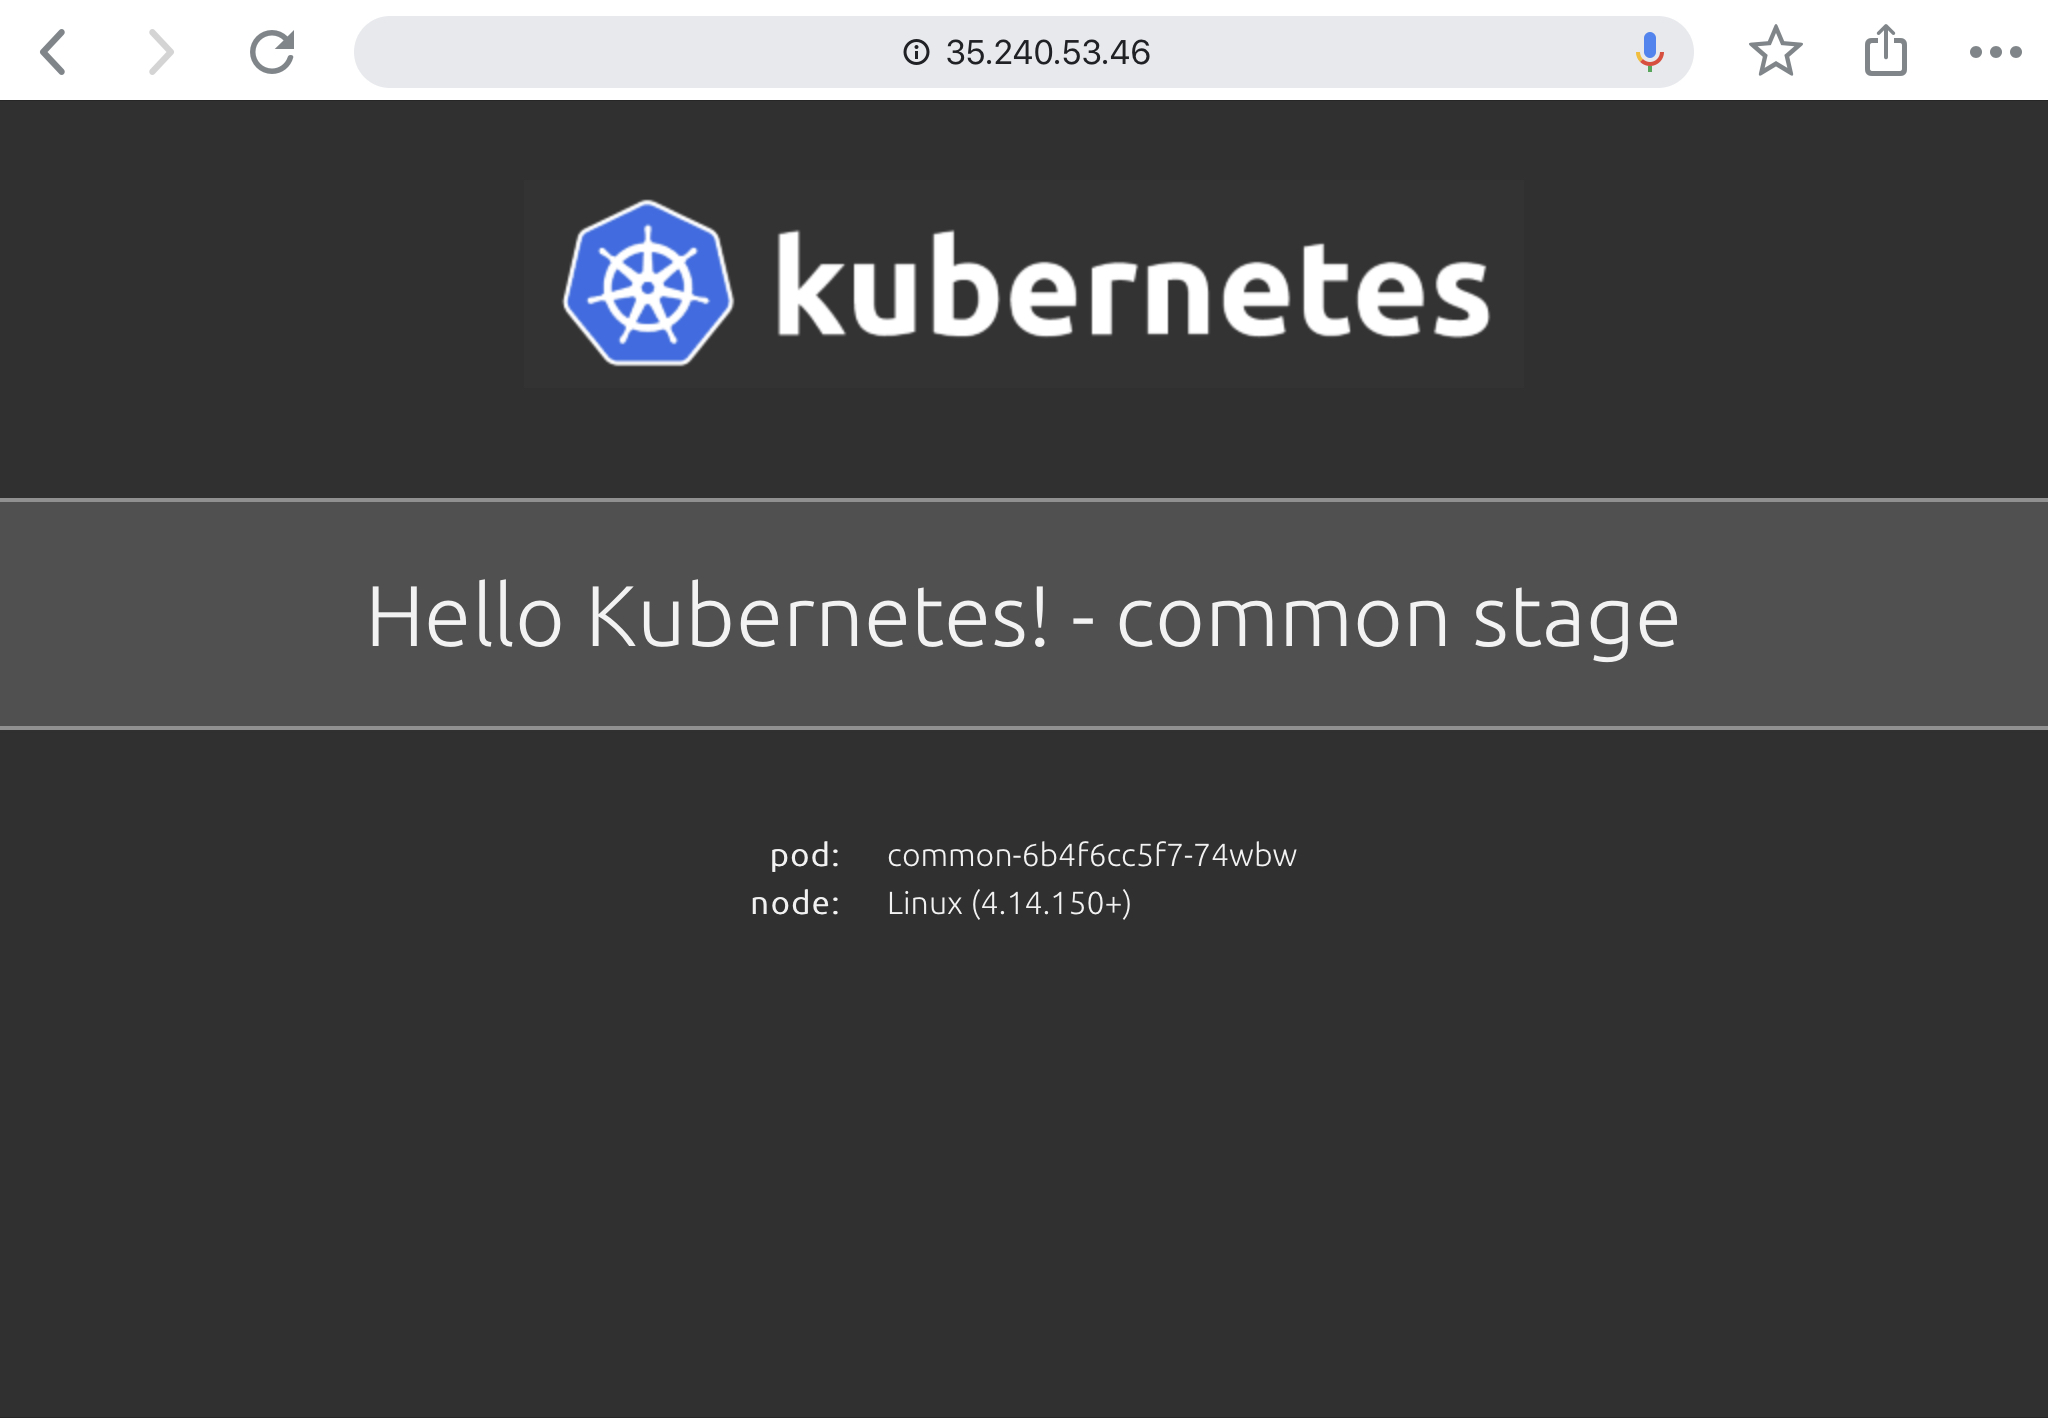
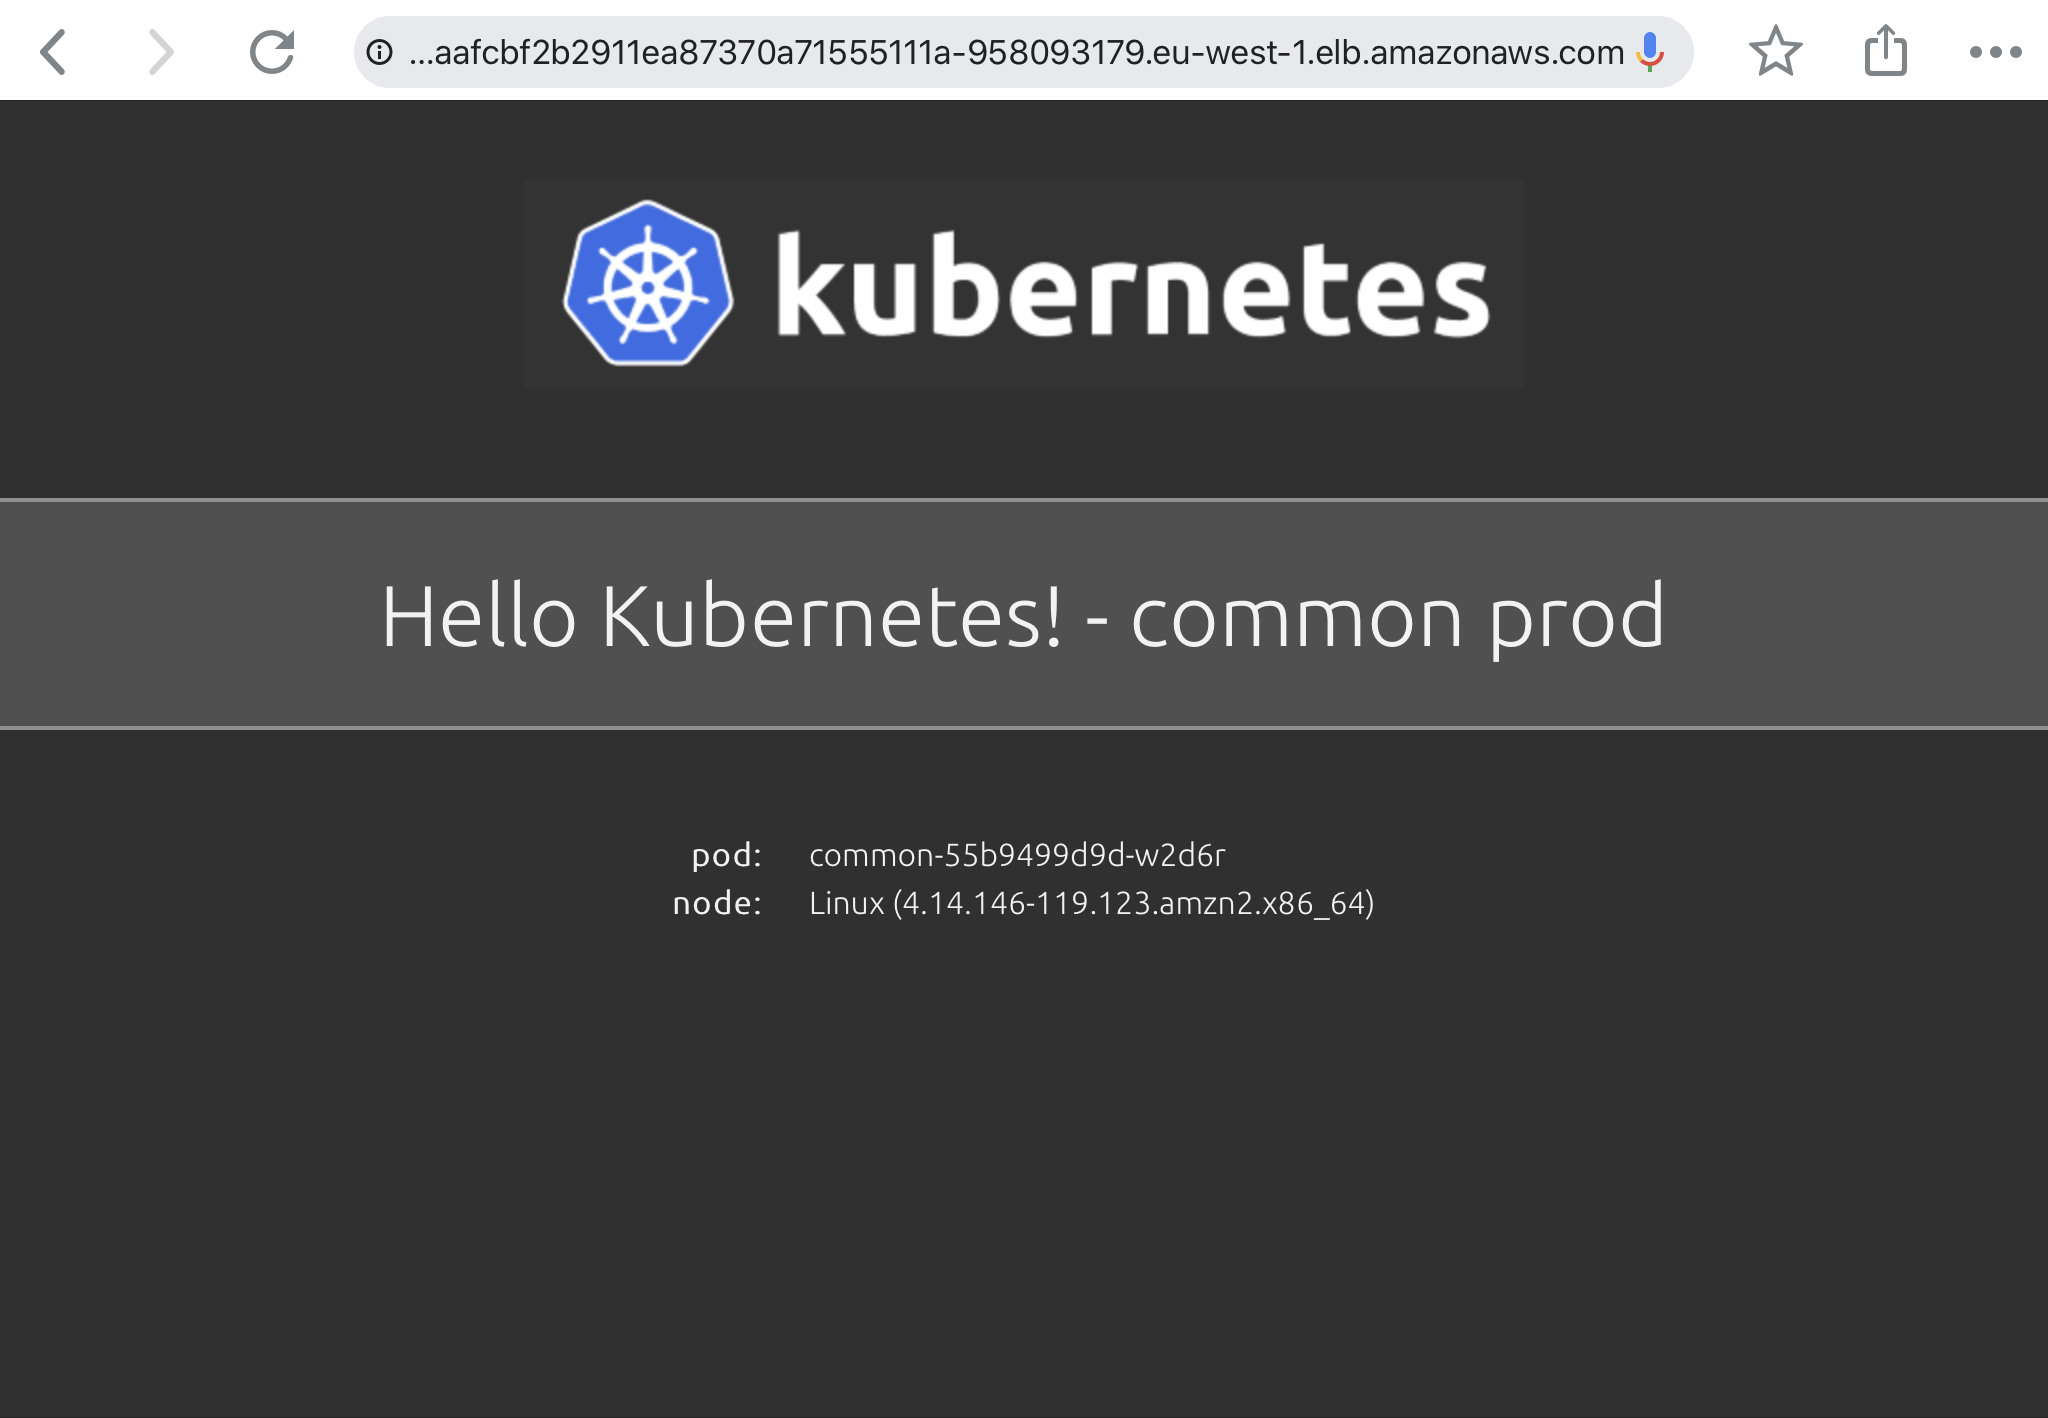
 Now you are ready to synchronise the Flux operator with the repository. By default Flux automatically synchronises every 5 minutes to apply configuration changes: