This time not something about Cisco ASAs or Citrix NetScaler 😉 Here a little example how to redirect traffic with policy based routing.
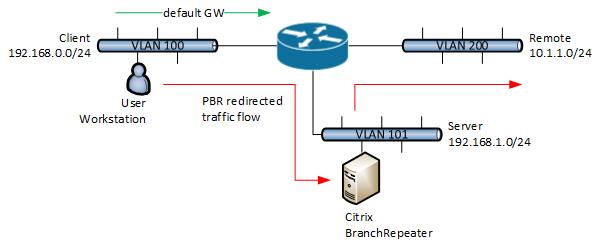
The workstation in the client network 192.168.0.0/24 wants to access systems in the remote network 10.1.1.0/24, its just an example the remote network can be somewhere else. So I want to redirect the traffic to the Citrix Branch Repeater in the server network 192.168.1.0/24.
Here the configuration you need to apply on the router:
interface GigabitEthernet1/0/1
ip address 192.168.0.254 255.255.255.0
ip policy route-map client-policy-map

interface GigabitEthernet1/0/2
ip address 10.1.1.1 255.255.255.0
ip policy route-map remote-policy-map

interface GigabitEthernet1/0/3
ip address 192.168.1.254 255.255.255.0

ip access-list extended client-acl permit ip 192.168.0.0 0.0.0.255 10.1.1.0 0.0.0.255
ip access-list extended remote-acl permit ip 10.1.1.0.0 0.0.0.255 192.168.0.0 0.0.0.255

route-map remote-policy-map permit 20
 match ip address remote-acl
 set ip next-hop 192.168.1.200

route-map client-policy-map permit 10
 match ip address client-acl
 set ip next-hop 192.168.1.200
Here route maps with health checking over Cisco IP SLA, see my post: Cisco IP SLA Configuration
route-map remote-policy-map permit 20
 match ip address remote-acl
 set ip next-hop verify-availability 192.168.1.200 20 track 123

route-map client-policy-map permit 10
 match ip address client-acl
 set ip next-hop verify-availability 192.168.1.200 10 track 123