Ansible Playbook for Cisco ASAv Firewall Topology

More about Ansible network automation with Cisco ASAv and continuous integration testing like in my previous posts using Vagrant and Gitlab-CI.

Network overview:

Here’s my Github repository where you can find the complete Ansible Playbook: https://github.com/berndonline/asa-lab-provision

Automating firewall configuration is not that easy and can get very complicated because you have different objects, access-lists and service policies to configure which all together makes the playbook complex rather than simple.

What you won’t find in my playbook is how to automate the cluster deployment because this wasn’t possible in my scenario using ASAv and Vagrant. I didn’t have physical Cisco ASA firewall on hand to do this but I might add this later in the coming months.

Let’s look at the different variable files I created; first the host_vars for asa-1.yml which is very similar to a Cisco router:

---

hostname: asa-1
domain_name: lab.local

interfaces:
  0/0:
    alias: connection rtr-1 inside
    nameif: inside
    security_level: 100
    address: 10.0.255.1
    mask: 255.255.255.0

  0/1:
    alias: connection rtr-2 outside
    nameif: outside
    security_level: 0
    address: 217.100.100.1
    mask: 255.255.255.0

routes:
  - route outside 0.0.0.0 0.0.0.0 217.100.100.254 1

I then use multiple files in group_vars for objects.ymlobject-groups.ymlaccess-lists.yml and nat.yml to configure specific firewall settings.

Roles:

  • Hostname: The task in main.yml uses the Ansible module asa_config and configures hostname and domain name.
  • Interfaces:  This role uses the Ansible module asa_config to deploy the template interfaces.j2 to configure the interfaces. In the main.yml is a second task to enable the interfaces when the previous template applied the configuration.
  • Routing: Similar to the interfaces role and uses also the asa_config module to deploy the template routing.j2 for the static routes
  • Objects: The first task in main.yml loads the objects.yml from group_vars, the second task deploys the template objects.j2.
  • Object-Groups: Uses same tasks in main.yml and template object-groups.j2 like the objects role but the commands are slightly different.
  • Access-Lists: One of the more complicated roles I needed to work on, in the main.yml are multiple tasks to load variables like in the previous roles, then runs a task to clear access-lists if the variable “override_acl” from access-lists.yml group_vars is set to “true” otherwise it skips the next tasks. When the variable are set to true and the access-lists are cleared it then writes new access-lists using the Ansible module asa_acl and finishes with a task to assigning the newly created access-lists to the interfaces.
  • NAT: This role is again similar to the objects role using a task main.yml to load variable file and deploys the template nat.j2. The NAT role uses object nat and only works if you created the object before in the objects group_vars.
  • Policy-Framework: Multiple tasks in main.yml first clears global policy and policy maps and afterwards recreates them. Similar approach like the access lists to keep it consistent.

Main Ansible Playbook site.yml

---

- hosts: asa-1

  connection: local
  user: vagrant
  gather_facts: 'no'

  roles:
    - hostname
    - interfaces
    - routing
    - objects
    - object-groups
    - access-lists
    - nat
    - policy-framework

When a change triggers the gitlab-ci pipeline it spins up the Vagrant instances and executes the main Ansible Playbook. After the Vagrant instances are booted, first the two router rtr-1 and rtr-2 need to be configured with cisco_router_config.yml, then afterwards the main site.yml will be run.

Once the main playbook finishes for the Cisco ASA a last connectivity check will be execute using the playbook asa_check_icmp.yml. Just a simple ping to see if the base configuration is applied correctly.

If everything goes well, like in this example, the job is successful:

I will continue to improve the Playbook and the CICD pipeline so come back later to check it out.

Leave a comment

Ansible Playbook for Cisco BGP Routing Topology

This is my Ansible Playbook for a simple Cisco BGP routing topology and using a CICD pipeline for integration testing. The virtual network environment is created on-demand by using Vagrant, see my post about Cisco IOSv and XE network simulation using Vagrant.

Network overview:

Here’s my Github repository where you can find the complete Ansible Playbook: https://github.com/berndonline/cisco-lab-provision

You can find all the variables for the interface and routing configuration under host_vars. Below is an example for router rtr-1:

---

hostname: rtr-1
domain_name: lab.local

loopback:
  address: 10.255.0.1
  mask: 255.255.255.255

interfaces:
  0/1:
    alias: connection rtr-2
    address: 10.0.255.1
    mask: 255.255.255.252

  0/2:
    alias: connection rtr-3
    address: 10.0.255.5
    mask: 255.255.255.252

bgp:
  asn: 65001
  neighbor:
    - {address: 10.0.255.2, remote_as: 65000}
    - {address: 10.0.255.6, remote_as: 65000}
  networks:
    - {network: 10.0.255.0, mask: 255.255.255.252}
    - {network: 10.0.255.4, mask: 255.255.255.252}
    - {network: 10.255.0.1, mask: 255.255.255.255}
  maxpath: 2

Roles:

  • Hostname: The task in main.yml uses the Ansible module ios_system and configures hostname, domain name and disables dns lookups.
  • Interfaces: This role uses the Ansible module ios_config to deploy the template interfaces.j2 to configure the interfaces. In the main.yml is a second task to enable the interfaces when the previous template applied the configuration.
  • Routing: Very similar to the interfaces role and uses also the ios_config module to deploy the template routing.j2 for the BGP routing configuration.

Main Ansible Playbook site.yml:

---

- hosts: all

  connection: local
  user: vagrant
  gather_facts: 'no'

  roles:
    - hostname
    - interfaces
    - routing

When a change triggers the gitlab-ci pipeline it spins up the Vagrant instances and executes the main Ansible Playbook:

After the main site.yml ran, a second Playbook is executed for basic connectivity testing cisco_check_icmp.yml. This uses the Ansible module ios_ping and can be useful in my case to validate if the configuration was correctly applied:

If everything goes well, like in this example, the job is successful:

I will continue to improve the Playbook and the CICD pipeline so come back later to check it out.

Leave a comment

Ansible Playbook for Cumulus Linux BGP IP-Fabric and Cumulus NetQ Validation

This is my Ansible Playbook for a Cumulus Linux BGP IP-Fabric using BGP unnumbered and Cumulus NetQ to validate the configuration in a CICD pipeline. I use the same CICD pipeline from my previous post about Continuous Integration and Delivery for Networking with Cumulus Linux but added the Cumulus NetQ validation in the production stage to check BGP and CLAG configuration.

Network overview:

Here’s my Github repository where you find the complete Ansible Playbook: https://github.com/berndonline/cumulus-lab-provision

The variables are split between group_vars and host_vars. Still need to see if I can find a better way for the variables because interface settings for spine and edge switches are in group_vars, and for leaf switches the interface configuration is per host in host_vars. Not ideal at the moment, it should be the same for all devices.

Roles:

  • Hostname: This task changes the hostname
  • Interfaces: This creates the interfaces and bridge (only leafs and edges) configuration. The task uses templates interfaces.j2 and interfaces_config.j2 to create the configuration files under /etc/network/…
  • Routing: The template frr.j2 creates the FRR (Free Range Routing) configuration file. FRR replaces Quagga since Cumulus Linux version 3.4.x
  • PTM: Uses as well an template topology.j2 to generate the topology file for the Prescriptive Topology Manager (PTM)
  • NTP: Ntp and timezone settings

In most of the cases I use Jinja2 templates to generate configuration files. The site.yml is otherwise very simple. It executes the different roles, and triggers the handlers if a change is made by a role.

---

- hosts: network
  strategy: free

  user: cumulus
  become: 'True'
  gather_facts: 'False'

  handlers:
    - name: reload networking
      command: "{{item}}"
      with_items:
        - ifreload -a
        - sleep 10

    - name: reload frr
      service: name=frr state=reloaded

    - name: apply hostname
      command: hostname -F /etc/hostname

    - name: restart netq agent
      command: netq config agent restart

    - name: reload ptmd
      service: name=ptmd state=reloaded

    - name: apply timezone
      command: /usr/sbin/dpkg-reconfigure --frontend noninteractive tzdata

    - name: restart ntp
      service: name=ntp state=restarted

  roles:
    - hostname
    - interfaces
    - routing
    - ptm
    - ntp

Like mentioned in previous posts, I use Gitlab-CI for my Continuous Integration / Continuous Delivery (CICD) pipeline to simulate changes against a virtual Cumulus Linux network using Vagrant. You can find more information about the pipeline configuration in the .gitlab-ci.yml.

Changes in the staging branch will spin-up the Vagrant environment but only executes the the Ansible Playbook:

Cumulus NetQ configuration validation in production:

The production stage in the pipeline spins-up the Vagrant environment and executes the Ansible Playbook, then continues executing the two NetQ checks netq_check_bgp.yml and netq_check_clag.yml to validate the BGP and CLAG configuration:

The result will look like this when all stages finish successfully:

I will continue to improve the Playbook and the CICD pipeline so come back later to check it out.

In my repository I have some other useful Playbooks for config backup and restore but also to collect and remove cl-support.

config_backup.yml

config_restore.yml

cl-support_get.yml

cl-support_remove.yml

Please tell me if you like it and share your feedback.

See my new post about BGP EVPN and VXLAN with Cumulus Linux

Leave a comment

Cisco ASAv network simulation using Vagrant

After creating IOSv and IOS XE Vagrant images, now doing the same for Cisco ASAv. Like in my last post same basic idea to create an simulated on-demand  network environment for continuous integration testing.

You need to buy the Cisco ASAv to get access to the KVM image on the Cisco website!

The Cisco ASAv is pretty easy because you can get QCOW2 images directly on the Cisco website, there are a few changes you need to do before you can use this together with Vagrant.

Boot the ASAv QCOW2 image on KVM and add the configuration below:

conf t
interface Management0/0
 nameif management
 security-level 0
 ip address dhcp
 no shutdown
 exit

hostname asa
domain-name lab.local
username vagrant password vagrant privilege 15
aaa authentication ssh console LOCAL
aaa authorization exec LOCAL auto-enable
ssh version 2
ssh timeout 60
ssh key-exchange group dh-group14-sha1
ssh 0 0 management

username vagrant attributes
  service-type admin
  ssh authentication publickey AAAAB3NzaC1yc2EAAAABIwAAAQEA6NF8iallvQVp22WDkTkyrtvp9eWW6A8YVr+kz4TjGYe7gHzIw+niNltGEFHzD8+v1I2YJ6oXevct1YeS0o9HZyN1Q9qgCgzUFtdOKLv6IedplqoPkcmF0aYet2PkEDo3MlTBckFXPITAMzF8dJSIFo9D8HfdOV0IAdx4O7PtixWKn5y2hMNG0zQPyUecp4pzC6kivAIhyfHilFR61RGL+GPXQ2MWZWFYbAGjyiYJnAmCP3NOTd0jMZEnDkbUvxhMmBYSdETk1rRgm+R4LOzFUGaHqHDLKLX+FIPKcF96hrucXzcWyLbIbEgE98OHlnVYCzRdK8jlqm8tehUc9c9WhQ==

Now the image is ready to use with Vagrant. Create an instance folder under the user vagrant directory and copy the QCOW2 image. As well create an metadata.json file:

mkdir -p ~/.vagrant.d/boxes/asav/0/libvirt/
cp ASAv.qcow2 ~/.vagrant.d/boxes/asav/0/libvirt/box.img
printf '{"provider":"libvirt","format":"qcow2","virtual_size":2}' > metadata.json

Create a Vagrantfile with the needed configuration and boot up the VMs. You have to start the VMs one by one.

berndonline@lab:~/asa-lab-vagrant$ vagrant status
Current machine states:

asa-1                     not created (libvirt)
asa-2                     not created (libvirt)

This environment represents multiple VMs. The VMs are all listed
above with their current state. For more information about a specific
VM, run `vagrant status NAME`.
berndonline@lab:~/asa-lab-vagrant$ vagrant up asa-1
Bringing machine 'asa-1' up with 'libvirt' provider...
==> asa-1: Creating image (snapshot of base box volume).
==> asa-1: Creating domain with the following settings...
==> asa-1:  -- Name:              asa-lab-vagrant_asa-1
==> asa-1:  -- Domain type:       kvm
==> asa-1:  -- Cpus:              1
==> asa-1:  -- Feature:           acpi
==> asa-1:  -- Feature:           apic
==> asa-1:  -- Feature:           pae
==> asa-1:  -- Memory:            2048M
==> asa-1:  -- Management MAC:
==> asa-1:  -- Loader:
==> asa-1:  -- Base box:          asav
==> asa-1:  -- Storage pool:      default
==> asa-1:  -- Image:             /var/lib/libvirt/images/asa-lab-vagrant_asa-1.img (8G)
==> asa-1:  -- Volume Cache:      default
==> asa-1:  -- Kernel:
==> asa-1:  -- Initrd:
==> asa-1:  -- Graphics Type:     vnc
==> asa-1:  -- Graphics Port:     5900
==> asa-1:  -- Graphics IP:       127.0.0.1
==> asa-1:  -- Graphics Password: Not defined
==> asa-1:  -- Video Type:        cirrus
==> asa-1:  -- Video VRAM:        9216
==> asa-1:  -- Sound Type:
==> asa-1:  -- Keymap:            en-us
==> asa-1:  -- TPM Path:
==> asa-1:  -- INPUT:             type=mouse, bus=ps2
==> asa-1: Creating shared folders metadata...
==> asa-1: Starting domain.
==> asa-1: Waiting for domain to get an IP address...
==> asa-1: Waiting for SSH to become available...
==> asa-1: Configuring and enabling network interfaces...
    asa-1: SSH address: 10.255.1.238:22
    asa-1: SSH username: vagrant
    asa-1: SSH auth method: private key
    asa-1: Warning: Connection refused. Retrying...
==> asa-1: Running provisioner: ansible...
    asa-1: Running ansible-playbook...

PLAY [all] *********************************************************************

PLAY RECAP *********************************************************************

berndonline@lab:~/asa-lab-vagrant$ vagrant up asa-2
Bringing machine 'asa-2' up with 'libvirt' provider...
==> asa-2: Creating image (snapshot of base box volume).
==> asa-2: Creating domain with the following settings...
==> asa-2:  -- Name:              asa-lab-vagrant_asa-2
==> asa-2:  -- Domain type:       kvm
==> asa-2:  -- Cpus:              1
==> asa-2:  -- Feature:           acpi
==> asa-2:  -- Feature:           apic
==> asa-2:  -- Feature:           pae
==> asa-2:  -- Memory:            2048M
==> asa-2:  -- Management MAC:
==> asa-2:  -- Loader:
==> asa-2:  -- Base box:          asav
==> asa-2:  -- Storage pool:      default
==> asa-2:  -- Image:             /var/lib/libvirt/images/asa-lab-vagrant_asa-2.img (8G)
==> asa-2:  -- Volume Cache:      default
==> asa-2:  -- Kernel:
==> asa-2:  -- Initrd:
==> asa-2:  -- Graphics Type:     vnc
==> asa-2:  -- Graphics Port:     5900
==> asa-2:  -- Graphics IP:       127.0.0.1
==> asa-2:  -- Graphics Password: Not defined
==> asa-2:  -- Video Type:        cirrus
==> asa-2:  -- Video VRAM:        9216
==> asa-2:  -- Sound Type:
==> asa-2:  -- Keymap:            en-us
==> asa-2:  -- TPM Path:
==> asa-2:  -- INPUT:             type=mouse, bus=ps2
==> asa-2: Creating shared folders metadata...
==> asa-2: Starting domain.
==> asa-2: Waiting for domain to get an IP address...
==> asa-2: Waiting for SSH to become available...
==> asa-2: Configuring and enabling network interfaces...
    asa-2: SSH address: 10.255.1.131:22
    asa-2: SSH username: vagrant
    asa-2: SSH auth method: private key
==> asa-2: Running provisioner: ansible...
    asa-2: Running ansible-playbook...

PLAY [all] *********************************************************************

PLAY RECAP *********************************************************************

berndonline@lab:~/asa-lab-vagrant$ vagrant status
Current machine states:

asa-1                     running (libvirt)
asa-2                     running (libvirt)

berndonline@lab:~/asa-lab-vagrant$

After the VMs are successfully booted you can connect with vagrant ssh:

berndonline@lab:~/asa-lab-vagrant$ vagrant ssh asa-1
Type help or '?' for a list of available commands.
asa# show version

Cisco Adaptive Security Appliance Software Version 9.6(2)
Device Manager Version 7.6(2)

Compiled on Tue 23-Aug-16 18:38 PDT by builders
System image file is "boot:/asa962-smp-k8.bin"
Config file at boot was "startup-config"

asa up 10 mins 31 secs

Hardware:   ASAv, 2048 MB RAM, CPU Xeon E5 series 3600 MHz,
Model Id:   ASAv10
Internal ATA Compact Flash, 8192MB
Slot 1: ATA Compact Flash, 8192MB
BIOS Flash Firmware Hub @ 0x0, 0KB

....

Configuration has not been modified since last system restart.
asa# exit

Logoff

Connection to 10.255.1.238 closed by remote host.
Connection to 10.255.1.238 closed.
berndonline@lab:~/asa-lab-vagrant$ vagrant destroy
==> asa-2: Removing domain...
==> asa-2: Running triggers after destroy...
Removing known host entries
==> asa-1: Removing domain...
==> asa-1: Running triggers after destroy...
Removing known host entries
berndonline@lab:~/asa-lab-vagrant$

Here I have a virtual ASAv environment which I can spin-up and down as needed for automation testing.

The example Vagrantfile you can find in my Github repository:

https://github.com/berndonline/asa-lab-vagrant/blob/master/Vagrantfile

Read my new post about an Ansible Playbook for Cisco ASAv Firewall Topology

Cisco IOSv and XE network simulation using Vagrant

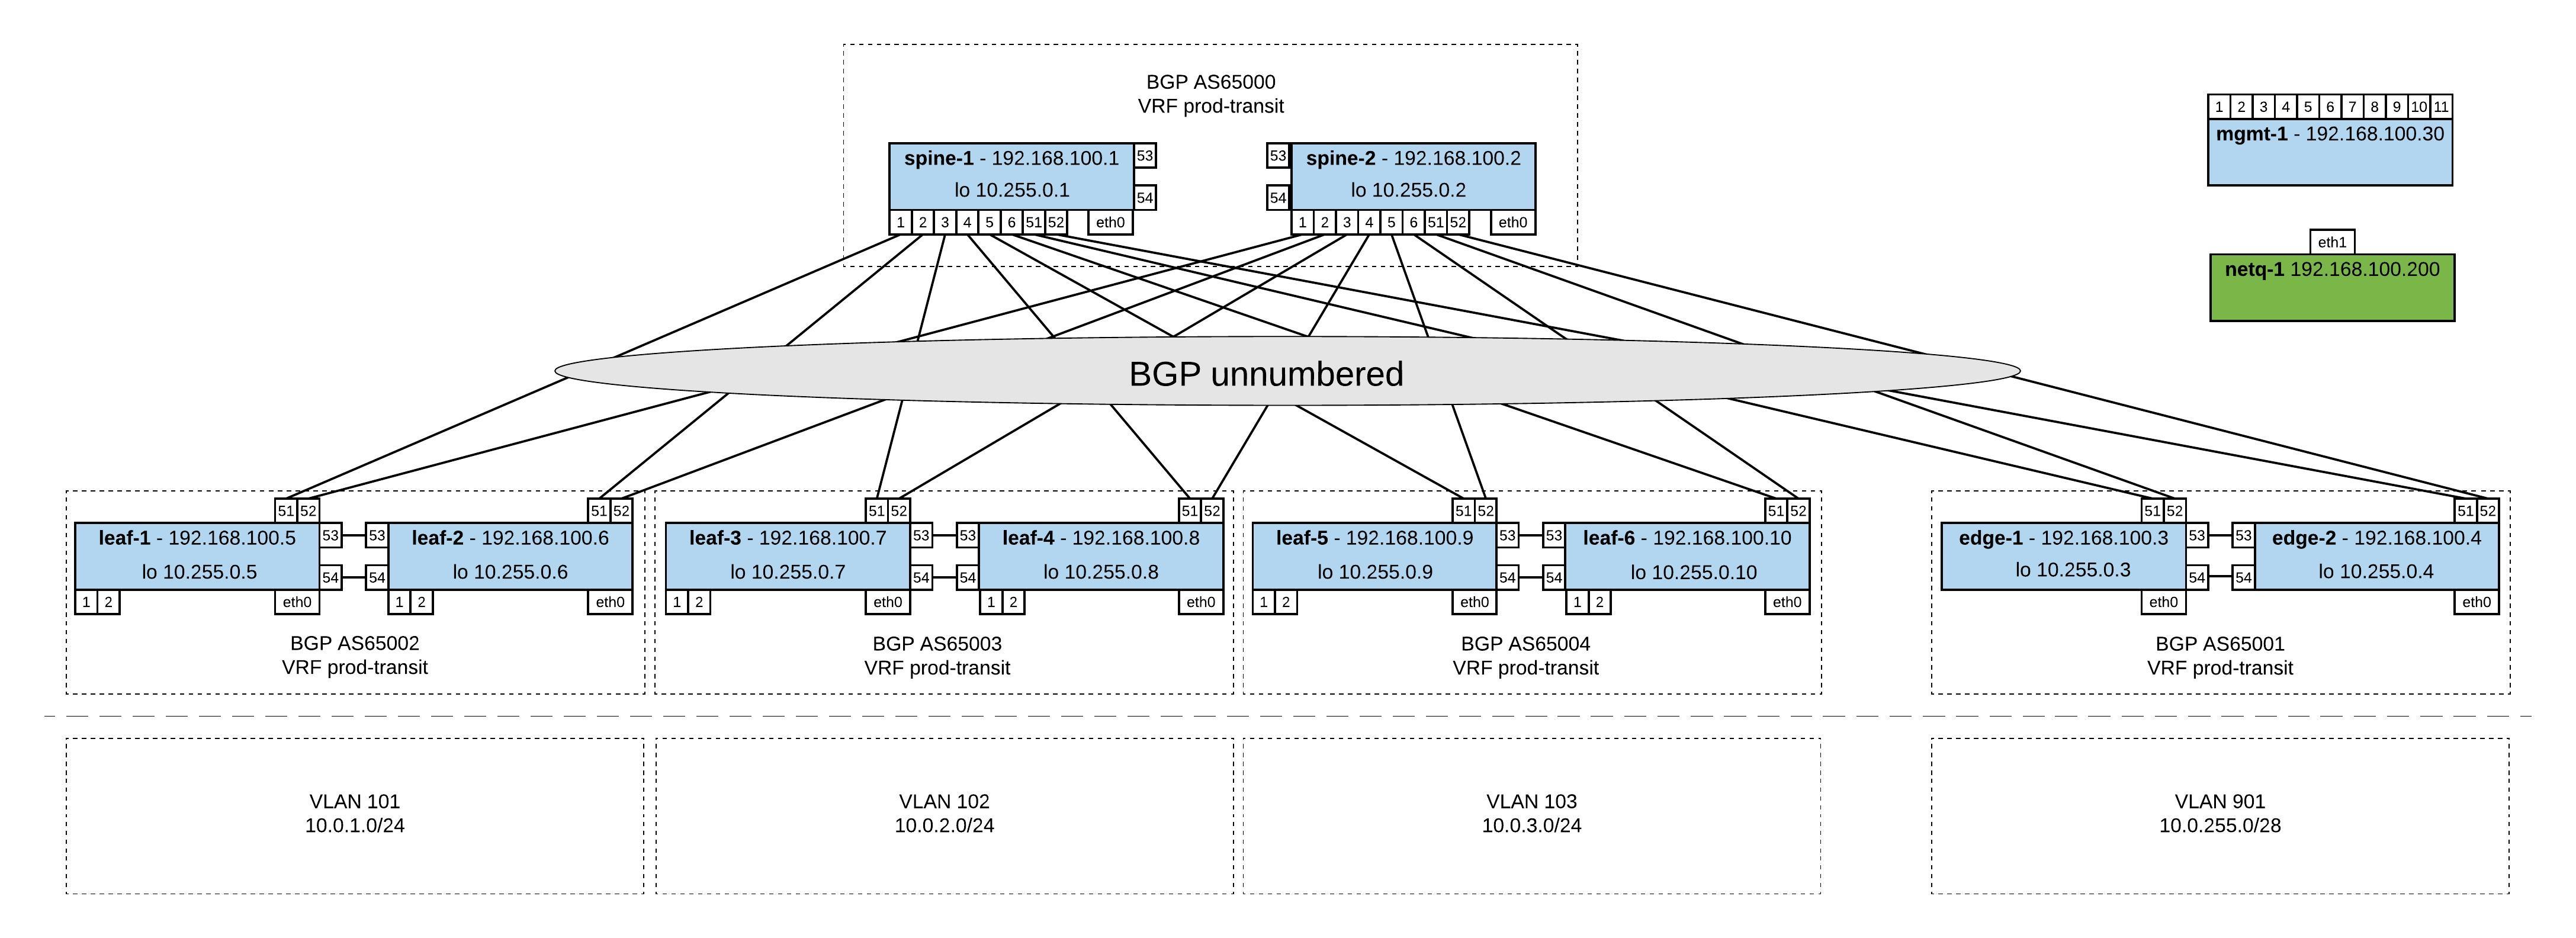
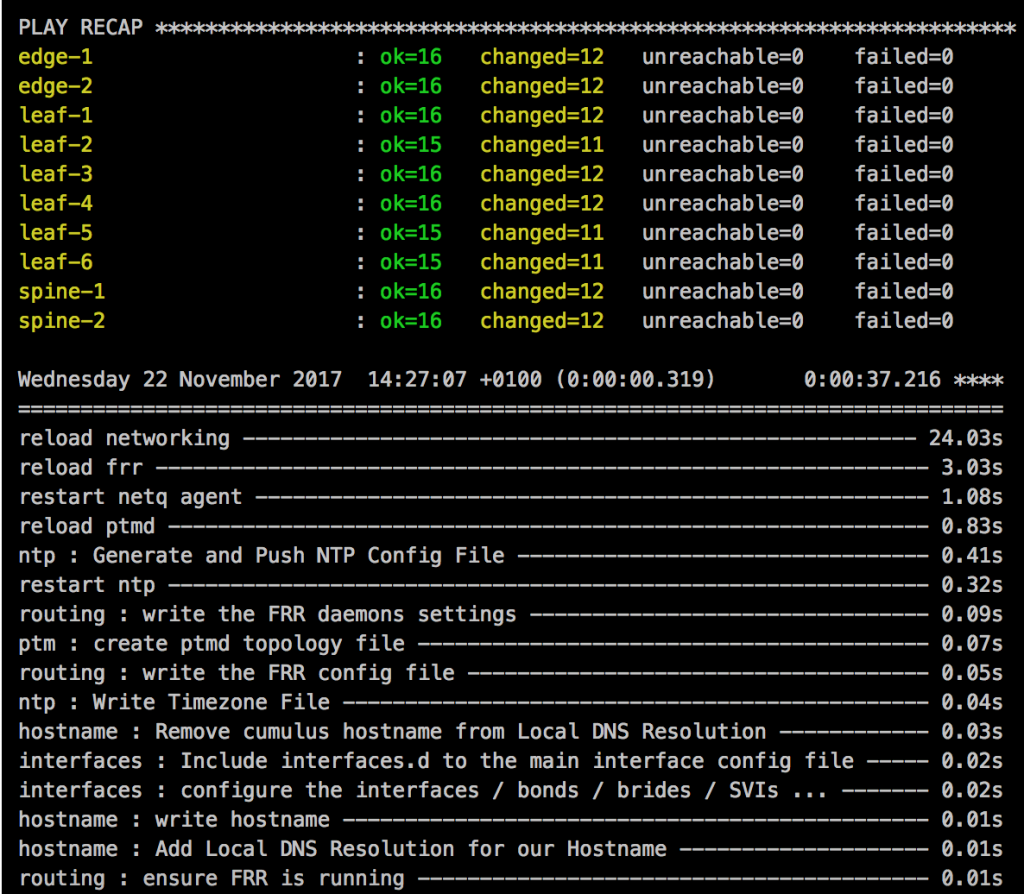
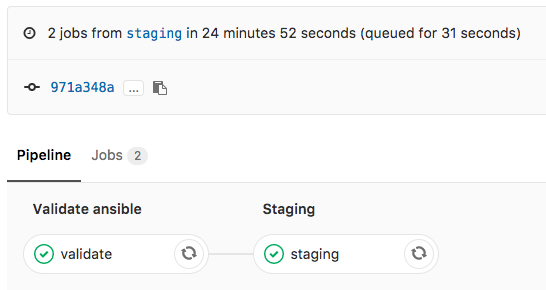
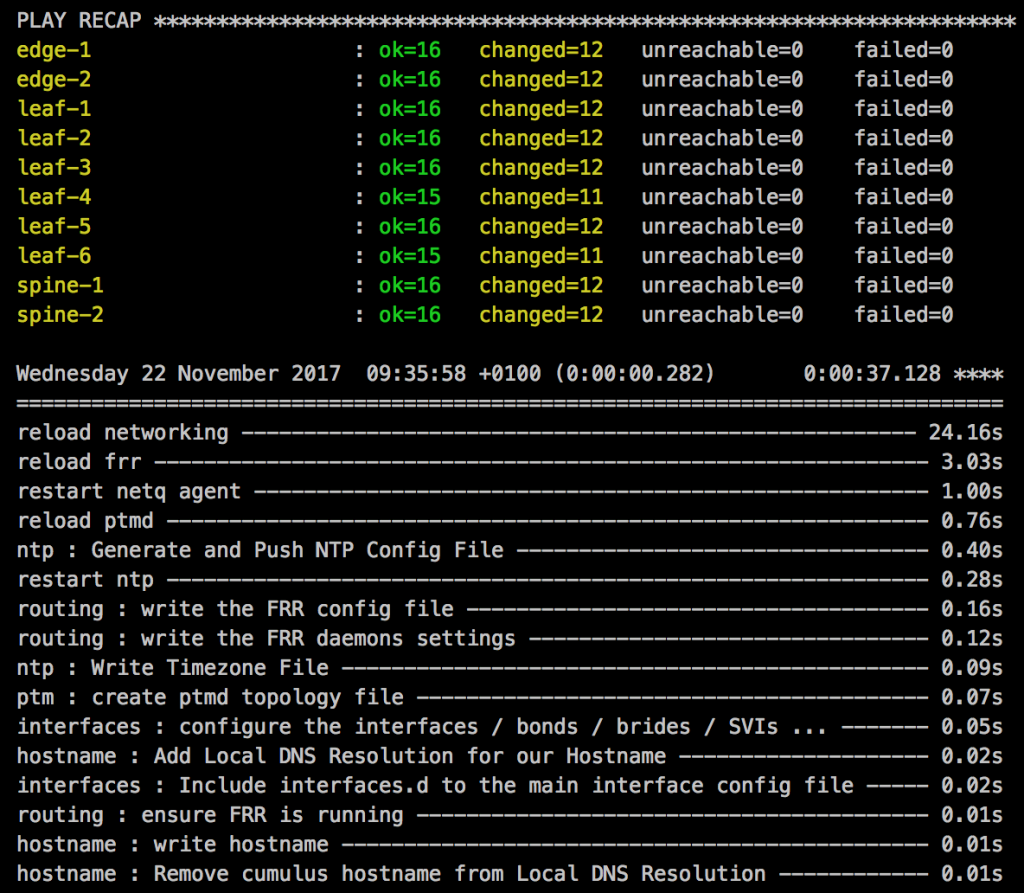
Here some interesting things I did with on-demand network simulation of Cisco IOSv and IOS XE using Vagrant. Yes, Cisco has is own product for network simulation called Cisco VIRL (Cisco Virtual Internet Routing Lab) but this is not as flexible and on-demand like using Vagrant and KVM. One of the reason was to do some continuous integration testing, same what I did with Cumulus Linux: Continuous Integration and Delivery for Networking with Cumulus Linux

You need to have an active Cisco VIRL subscription to download the VMDK images or buy the Cisco CSR1000V to get access to the ISO on the Cisco website!

IOS XE was the easiest because I found a Github repository to convert an existing CSR1000V ISO to vbox image to use with Vagrant. The only thing I needed to do was to converting the vbox image to KVM using vagrant mutate.

berndonline@lab:~/cisco-lab-vagrant$ vagrant status
Current machine states:

rtr-1                     not created (libvirt)
rtr-2                     not created (libvirt)

berndonline@lab:~/cisco-lab-vagrant$ vagrant up
Bringing machine 'rtr-1' up with 'libvirt' provider...
Bringing machine 'rtr-2' up with 'libvirt' provider...
==> rtr-1: Creating image (snapshot of base box volume).
==> rtr-2: Creating image (snapshot of base box volume).
==> rtr-1: Creating domain with the following settings...
==> rtr-1:  -- Name:              cisco-lab-vagrant_rtr-1
==> rtr-2: Creating domain with the following settings...
==> rtr-1:  -- Domain type:       kvm
==> rtr-2:  -- Name:              cisco-lab-vagrant_rtr-2
==> rtr-1:  -- Cpus:              1
==> rtr-2:  -- Domain type:       kvm
==> rtr-1:  -- Feature:           acpi
==> rtr-2:  -- Cpus:              1
==> rtr-2:  -- Feature:           acpi
==> rtr-2:  -- Feature:           apic
==> rtr-1:  -- Feature:           apic
==> rtr-2:  -- Feature:           pae
==> rtr-1:  -- Feature:           pae
==> rtr-2:  -- Memory:            2048M
==> rtr-2:  -- Management MAC:
==> rtr-2:  -- Loader:
==> rtr-1:  -- Memory:            2048M
==> rtr-2:  -- Base box:          iosxe

....

==> rtr-1: Waiting for SSH to become available...
==> rtr-2: Waiting for SSH to become available...
==> rtr-1: Configuring and enabling network interfaces...
==> rtr-2: Configuring and enabling network interfaces...
    rtr-1: SSH address: 10.255.1.84:22
    rtr-1: SSH username: vagrant
    rtr-1: SSH auth method: private key
    rtr-2: SSH address: 10.255.1.208:22
    rtr-2: SSH username: vagrant
    rtr-2: SSH auth method: private key
==> rtr-1: Running provisioner: ansible...
    rtr-1: Running ansible-playbook...

PLAY [all] *********************************************************************

TASK [run show version on remote devices] **************************************
==> rtr-2: Running provisioner: ansible...
    rtr-2: Running ansible-playbook...

PLAY [all] *********************************************************************

TASK [run show version on remote devices] **************************************
ok: [rtr-1]

PLAY RECAP *********************************************************************
rtr-1                      : ok=1    changed=0    unreachable=0    failed=0

ok: [rtr-2]

PLAY RECAP *********************************************************************
rtr-2                      : ok=1    changed=0    unreachable=0    failed=0
berndonline@lab:~/cisco-lab-vagrant$ vagrant status
Current machine states:

rtr-1                     running (libvirt)
rtr-2                     running (libvirt)

berndonline@lab:~/cisco-lab-vagrant$

Afterwards you can connect with vagrant ssh to your virtual IOS XE VM:

berndonline@lab:~/cisco-lab-vagrant$ vagrant ssh rtr-1

csr1kv#show version
Cisco IOS XE Software, Version 03.16.00.S - Extended Support Release
Cisco IOS Software, CSR1000V Software (X86_64_LINUX_IOSD-UNIVERSALK9-M), Version 15.5(3)S, RELEASE SOFTWARE (fc6)
Technical Support: http://www.cisco.com/techsupport
Copyright (c) 1986-2015 by Cisco Systems, Inc.
Compiled Sun 26-Jul-15 20:16 by mcpre

Cisco IOS-XE software, Copyright (c) 2005-2015 by cisco Systems, Inc.
All rights reserved.  Certain components of Cisco IOS-XE software are
licensed under the GNU General Public License ("GPL") Version 2.0.  The
software code licensed under GPL Version 2.0 is free software that comes
with ABSOLUTELY NO WARRANTY.  You can redistribute and/or modify such
GPL code under the terms of GPL Version 2.0.  For more details, see the
documentation or "License Notice" file accompanying the IOS-XE software,
or the applicable URL provided on the flyer accompanying the IOS-XE
software.

ROM: IOS-XE ROMMON

csr1kv uptime is 9 minutes
Uptime for this control processor is 10 minutes
System returned to ROM by reload
System image file is "bootflash:packages.conf"
Last reload reason: 

....

berndonline@lab:~/cisco-lab-vagrant$ vagrant destroy
==> rtr-2: Removing domain...
==> rtr-1: Removing domain...
berndonline@lab:~/cisco-lab-vagrant$

Running IOSv on KVM wasn’t that easy because you only get VMDK (Virtual Machine Disk) which you need to convert to a QCOW2 image. The next step is to boot the QCOW2 image and add some additional configuration changes before you can use this with Vagrant. Give the VM at least 2048 MB and min. 1 vCPU.

Ones the VM is booted, connect and add the following configuration below. You need to create an vagrant user and add the ssh key from Vagrant, additionally create an EEM applet to generate the rsa key during boot otherwise Vagrant cannot connect to the VM. Afterwards save the running-config and turn off the VM:

conf t
ip vrf vrf-mgmt
	rd 1:1
	exit

interface Gig0/0
 description management
 ip vrf forwarding vrf-mgmt
 ip address dhcp
 no shutdown
 exit

ip domain-name lab.local

aaa new-model
aaa authentication login default local
aaa authorization exec default local 

username vagrant privilege 15 secret vagrant

crypto key generate rsa general-keys modulus 2048 

ip ssh version 2
ip ssh authentication-retries 5

ip ssh pubkey-chain
   username vagrant
    key-hash ssh-rsa DD3BB82E850406E9ABFFA80AC0046ED6
    exit
   exit

line vty 0 4
 exec-timeout 0 0
 transport input ssh
 exit

shell processing full

event manager session cli username vagrant
event manager applet EEM_SSH_Keygen authorization bypass

event syslog pattern SYS-5-RESTART
action 0.0 info type routername
action 0.1 set status none
action 1.0 cli command enable
action 2.0 cli command "show ip ssh | include ^SSH"
action 2.1 regexp "([ED][^ ]+)" \$_cli_result result status
action 2.2 syslog priority informational msg "SSH is currently \$status"
action 3.0 if \$status eq Disabled
action 3.1 cli command "configure terminal"
action 3.2 cli command "crypto key generate rsa usage-keys label SSHKEYS modulus 2048"
action 3.3 cli command "end"
action 3.4 cli command "copy run start"
action 3.5 syslog priority informational msg "SSH keys generated by EEM"
action 4.0 end
end

exit
write mem

Now the QCOW2 image is ready to use with Vagrant. Create an instance folder under the user vagrant directory and copy the QCOW2 image. As well create an metadata.json file:

mkdir -p ~/.vagrant.d/boxes/iosv/0/libvirt/
cp IOSv.qcow2 ~/.vagrant.d/boxes/iosv/0/libvirt/box.img
printf '{"provider":"libvirt","format":"qcow2","virtual_size":2}' > metadata.json

The IOSv image is ready to use with Vagrant, just create an Vagrantfile with the needed configuration and boot up the VMs.

berndonline@lab:~/cisco-lab-vagrant$ vagrant status
Current machine states:

rtr-1                     not created (libvirt)
rtr-2                     not created (libvirt)

berndonline@lab:~/cisco-lab-vagrant$ vagrant up
Bringing machine 'rtr-1' up with 'libvirt' provider...
Bringing machine 'rtr-2' up with 'libvirt' provider...
==> rtr-2: Creating image (snapshot of base box volume).
==> rtr-1: Creating image (snapshot of base box volume).
==> rtr-2: Creating domain with the following settings...
==> rtr-1: Creating domain with the following settings...
==> rtr-2:  -- Name:              cisco-lab-vagrant_rtr-2
==> rtr-2:  -- Domain type:       kvm
==> rtr-1:  -- Name:              cisco-lab-vagrant_rtr-1
==> rtr-2:  -- Cpus:              1
==> rtr-1:  -- Domain type:       kvm
==> rtr-2:  -- Feature:           acpi
==> rtr-1:  -- Cpus:              1
==> rtr-2:  -- Feature:           apic
==> rtr-1:  -- Feature:           acpi
==> rtr-2:  -- Feature:           pae
==> rtr-1:  -- Feature:           apic
==> rtr-2:  -- Memory:            2048M
==> rtr-1:  -- Feature:           pae
==> rtr-2:  -- Management MAC:
==> rtr-1:  -- Memory:            2048M
==> rtr-2:  -- Loader:
==> rtr-1:  -- Management MAC:
==> rtr-2:  -- Base box:          iosv
==> rtr-1:  -- Loader:
==> rtr-1:  -- Base box:          iosv

....

==> rtr-2: Waiting for SSH to become available...
==> rtr-1: Waiting for SSH to become available...
==> rtr-2: Configuring and enabling network interfaces...
==> rtr-1: Configuring and enabling network interfaces...
    rtr-2: SSH address: 10.255.1.234:22
    rtr-2: SSH username: vagrant
    rtr-2: SSH auth method: private key
    rtr-1: SSH address: 10.255.1.237:22
    rtr-1: SSH username: vagrant
    rtr-1: SSH auth method: private key
==> rtr-2: Running provisioner: ansible...
    rtr-2: Running ansible-playbook...

PLAY [all] *********************************************************************

TASK [run show version on remote devices] **************************************
Thursday 26 October 2017  18:21:22 +0200 (0:00:00.015)       0:00:00.015 ******
==> rtr-1: Running provisioner: ansible...
    rtr-1: Running ansible-playbook...

PLAY [all] *********************************************************************

TASK [run show version on remote devices] **************************************
Thursday 26 October 2017  18:21:23 +0200 (0:00:00.014)       0:00:00.014 ******
ok: [rtr-2]

PLAY RECAP *********************************************************************
rtr-2                      : ok=1    changed=0    unreachable=0    failed=0

Thursday 26 October 2017  18:21:24 +0200 (0:00:01.373)       0:00:01.388 ******
===============================================================================
run show version on remote devices -------------------------------------- 1.37s
ok: [rtr-1]

PLAY RECAP *********************************************************************
rtr-1                      : ok=1    changed=0    unreachable=0    failed=0

Thursday 26 October 2017  18:21:24 +0200 (0:00:01.380)       0:00:01.395 ******
===============================================================================
run show version on remote devices -------------------------------------- 1.38s
berndonline@lab:~/cisco-lab-vagrant$

After the VMs are successfully booted you can connect again with vagrant ssh:

berndonline@lab:~/cisco-lab-vagrant$ vagrant ssh rtr-1
**************************************************************************
* IOSv is strictly limited to use for evaluation, demonstration and IOS  *
* education. IOSv is provided as-is and is not supported by Cisco's      *
* Technical Advisory Center. Any use or disclosure, in whole or in part, *
* of the IOSv Software or Documentation to any third party for any       *
* purposes is expressly prohibited except as otherwise authorized by     *
* Cisco in writing.                                                      *
**************************************************************************
router#show version
Cisco IOS Software, IOSv Software (VIOS-ADVENTERPRISEK9-M), Version 15.6(2)T, RELEASE SOFTWARE (fc2)
Technical Support: http://www.cisco.com/techsupport
Copyright (c) 1986-2016 by Cisco Systems, Inc.
Compiled Tue 22-Mar-16 16:19 by prod_rel_team

ROM: Bootstrap program is IOSv

router uptime is 1 minute
System returned to ROM by reload
System image file is "flash0:/vios-adventerprisek9-m"
Last reload reason: Unknown reason

....

berndonline@lab:~/cisco-lab-vagrant$ vagrant destroy
==> rtr-2: Removing domain...
==> rtr-1: Removing domain...
berndonline@lab:~/cisco-lab-vagrant$

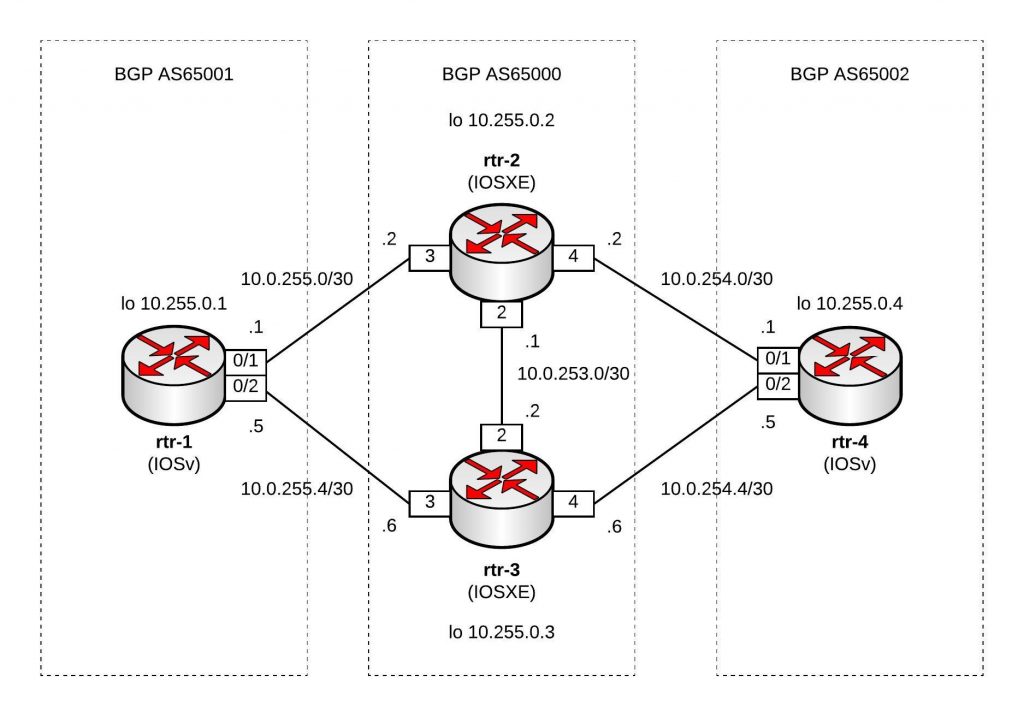
Basically thats it, your on-demand IOSv and IOS XE lab using Vagrant, ready for some automation and continuous integration testing.

The example Vagrantfiles you can find in my Github repository:

https://github.com/berndonline/cisco-lab-vagrant/blob/master/Vagrantfile-IOSXE

https://github.com/berndonline/cisco-lab-vagrant/blob/master/Vagrantfile-IOSv