OpenShift Hive – API driven OpenShift cluster provisioning and management operator

RedHat invited me and my colleague Matt to speak at RedHat OpenShift Commons in London about the API driven OpenShift cluster provisioning and management operator called OpenShift Hive. We have been using OpenShift Hive for the past few months to provision and manage the OpenShift 4 estate across multiple environments. Below the video recording of our talk at OpenShift Commons London:

The Hive operator requires to run on a separate Kubernetes cluster to centrally provision and manage the OpenShift 4 clusters. With Hive you can manage hundreds of cluster deployments and configuration with a single operator. There is nothing required on the OpenShift 4 clusters itself, Hive only requires access to the cluster API:

The ClusterDeployment custom resource is the definition for the cluster specs, similar to the openshift-installer install-config where you define cluster specifications, cloud credential and image pull secrets. Below is an example of the ClusterDeployment manifest:

---
apiVersion: hive.openshift.io/v1
kind: ClusterDeployment
metadata:
  name: mycluster
  namespace: mynamespace
spec:
  baseDomain: hive.example.com
  clusterName: mycluster
  platform:
    aws:
      credentialsSecretRef:
        name: mycluster-aws-creds
      region: eu-west-1
  provisioning:
    imageSetRef:
      name: openshift-v4.3.0
    installConfigSecretRef:
      name: mycluster-install-config
    sshPrivateKeySecretRef:
      name: mycluster-ssh-key
  pullSecretRef:
    name: mycluster-pull-secret

The SyncSet custom resource is defining the configuration and is able to regularly reconcile the manifests to keep all clusters synchronised. With SyncSets you can apply resources and patches as you see in the example below:

---
apiVersion: hive.openshift.io/v1
kind: SyncSet
metadata:
  name: mygroup
spec:
  clusterDeploymentRefs:
  - name: ClusterName
  resourceApplyMode: Upsert
  resources:
  - apiVersion: user.openshift.io/v1
    kind: Group
    metadata:
      name: mygroup
    users:
    - myuser
  patches:
  - kind: ConfigMap
    apiVersion: v1
    name: foo
    namespace: default
    patch: |-
      { "data": { "foo": "new-bar" } }
    patchType: merge
  secretReferences:
  - source:
      name: ad-bind-password
      namespace: default
    target:
      name: ad-bind-password
      namespace: openshift-config

Depending of the amount of resource and patches you want to apply, a SyncSet can get pretty large and is not very easy to manage. My colleague Matt wrote a SyncSet Generator, please check this Github repository.

In one of my next articles I will go into more detail on how to deploy OpenShift Hive and I’ll provide more examples of how to use ClusterDeployment and SyncSets. In the meantime please check out the OpenShift Hive repository for more details, additionally here are links to the Hive documentation on using Hive and Syncsets.

Read my new article about installing OpenShift Hive.

OpenShift Container Platform Troubleshooting Guide

On the first look OpenShift/Kubernetes seems like a very complex platform but once you start to get to know the different components and what they are doing, you will see it gets easier and easier. The purpose of this article to give you an every day guide based on my experience on how to successfully troubleshoot issues on OpenShift.

  • OpenShift service logging
# OpenShift 3.1 to OpenShift 3.9:
/etc/sysconfig/atomic-openshift-master-controllers
/etc/sysconfig/atomic-openshift-master-api
/etc/sysconfig/atomic-openshift-node

# OpenShift 3.10 and later versions:
/etc/origin/master/master.env # for API and Controllers
/etc/sysconfig/atomic-openshift-node

The log levels for the OpenShift services can be controlled via the –loglevel parameter in the service options.

0 – Errors and warnings only
2 – Normal information
4 – Debugging information
6 – API- debugging information (request / response)
8 – Body API debugging information

For example add or edit the line in /etc/sysconfig/atomic-openshift-node to OPTIONS=’–loglevel=4′ and afterward restart the service with systemctl restart atomic-openshift-node.

Viewing OpenShift service logs:

# OpenShift 3.1 to OpenShift 3.9:
journalctl -u atomic-openshift-master-api
journalctl -u atomic-openshift-master-controllers
journalctl -u atomic-openshift-node
journalctl -u etcd # or 'etcd_container' for containerized install

# OpenShift 3.10 and later versions:
/usr/local/bin/master-logs api api
/usr/local/bin/master-logs controllers controllers
/usr/local/bin/master-logs etcd etcd
journalctl -u atomic-openshift-node
  • Docker service logging

Change the docker daemon log level and add the parameter –log-level for the OPTIONS variable in dockers service file located in /etc/sysconfig/docker.

The available log levels are: ( debug, info, warn, error, fatal )

See the example below; to enable debug logging in /etc/sysconfig/docker to set log level equal to debug (After making the changes on the docker service you need to will restart with systemctl restart docker.):

OPTIONS='--insecure-registry=172.30.0.0/16 --selinux-enabled --log-level=debug'
  • OC command logging

The oc and oadm command also accept a loglevel option that can help get additional information. Value between 6 and 8 will provide extensive logging, API requests (loglevel 6), API headers (loglevel 7) and API responses received (loglevel 8):

oc whoami --loglevel=8
  • OpenShift SkyDNS

SkyDNS is the internal service discovery for OpenShift and DNS is important for OpenShift to function:

# Test full qualified cluster domain name
nslookup docker-registry.default.svc.cluster.local
# OR
dig +short docker-registry.default.svc.cluster.local

# Check if clusterip match the previous result
oc get svc/docker-registry -n default

# Test short name
nslookup docker-registry.default.svc
nslookup <endpoint-name>.<project-name>.svc

If short name doesn’t work look out if cluster.local is missing in dns search suffix. If resolution doesn’t work at all before enable debug logging, check if Dnsmasq service running and correctly configured. OpenShift uses a dispatcher script to maintain the DNS configuration of a node.

Add the options “–logspec ‘dns=10’” to the /etc/sysconfig/atomic-openshift-node service configuration on a node running skydns and restart the atomic-openshift-node service afterwards. There will then be skydns debug information in the journalctl logs.

OPTIONS="--loglevel=2 --logspec dns*=10"
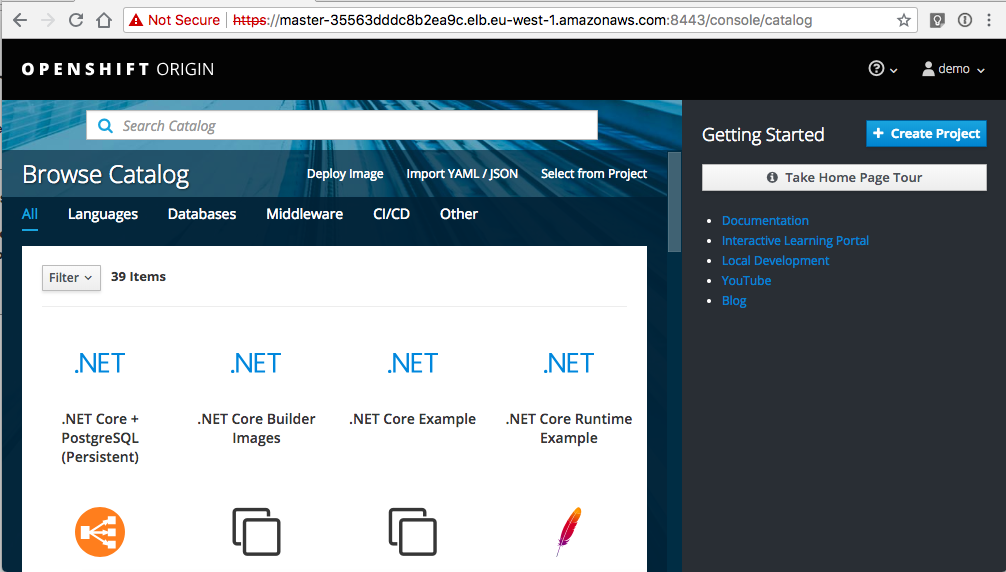
  • OpenShift Master API and Web Console

In the following example, the internal-master.domain.com is used by the internal cluster, and the master.domain.com is used by external clients

# Run the following commands on any node host
curl https://internal-master.domain.com:443/version
curl -k https://master.domain.com:443/healthz

# The OpenShift API service runs on all master instances. To see the status of the service, view the master-api pods in the kube-system project:
oc get pod -n kube-system -l openshift.io/component=api
oc get pod -n kube-system -o wide
curl -k --insecure https://$HOSTNAME:8443/healthz
  • OpenShift Controller role

The OpenShift Container Platform controller service is available on all master nodes. The service runs in active/passive mode, which means it should only be running on one master.

# Verify the master host running the controller service
oc get -n kube-system cm openshift-master-controllers -o yaml
    • OpenShift Certificates

During the installation of OpenShift the playbooks generates a CA to sign every certificate in the cluster. One of the most common issues are expired node certificates. Below are a list of important certificate files:

# Is the OpenShift Certificate Authority, and it signs every other certificate unless specified otherwise.
/etc/origin/master/ca.crt

# Contains a bundle with the current and the old CA's (if exists) to trust them all. If there has been only one ca.crt, then this file is the same as ca.crt.
/etc/origin/master/ca-bundle.crt

# The internal API, also known as cluster internal address or the variable masterURL here all the internal components authenticates to access the API, such as nodes, routers and other services.
/etc/origin/master/master.server.crt

# Master controller certificate authenticates to kubernetes as a client using the admin.kubeconfig
/etc/origin/master/admin.crt

# Node certificates
/etc/origin/node/ca.crt                   # to be able to trust the API, a copy of masters CA bundle is placed in:
/etc/origin/node/server.crt               # to secure this communication
/etc/origin/node/system:node:{fqdn}.crt   # Nodes needs to authenticate to the Kubernetes API as a client. 

# Etcd certificates
/etc/etcd/ca.crt                          # is the etcd CA, it is used to sign every certificate.
/etc/etcd/server.crt                      # is used by the etcd to listen to clients.
/etc/etcd/peer.crt                        # is used by etcd to authenticate as a client.

# Master certificates to auth to etcd
/etc/origin/master/master.etcd-ca.crt     # is a copy of /etc/etcd/ca.crt. Used to trust the etcd cluster.
/etc/origin/master/master.etcd-client.crt # is used to authenticate as a client of the etcd cluster.

# Services ca certificate. All self-signed internal certificates are signed by this CA.
/etc/origin/master/service-signer.crt

Here’s an example to check the validity of the master server certificate:

cat /etc/origin/master/master.server.crt | openssl x509 -text | grep -i Validity -A2
# OR
openssl x509 -enddate -noout -in /etc/origin/master/master.server.crt

It’s worth checking the documentation about how to re-deploy certificates on OpenShift.

  • OpenShift etcd

On the etcd node (master) set source to etcd.conf file for most of the needed variables.

source /etc/etcd/etcd.conf
export ETCDCTL_API=3

# Set endpoint variable to include all etcd endpoints
ETCD_ALL_ENDPOINTS=` etcdctl  --cert=$ETCD_PEER_CERT_FILE --key=$ETCD_PEER_KEY_FILE --cacert=$ETCD_TRUSTED_CA_FILE --endpoints=$ETCD_LISTEN_CLIENT_URLS --write-out=fields   member list | awk '/ClientURL/{printf "%s%s",sep,$3; sep=","}'`

# Cluster status and health checks
etcdctl  --cert=$ETCD_PEER_CERT_FILE --key=$ETCD_PEER_KEY_FILE --cacert=$ETCD_TRUSTED_CA_FILE --endpoints=$ETCD_LISTEN_CLIENT_URLS --write-out=table  member list
etcdctl  --cert=$ETCD_PEER_CERT_FILE --key=$ETCD_PEER_KEY_FILE --cacert=$ETCD_TRUSTED_CA_FILE --endpoints=$ETCD_ALL_ENDPOINTS  --write-out=table endpoint status
etcdctl  --cert=$ETCD_PEER_CERT_FILE --key=$ETCD_PEER_KEY_FILE --cacert=$ETCD_TRUSTED_CA_FILE --endpoints=$ETCD_ALL_ENDPOINTS endpoint health

Check etcd database key entries:

etcdctl  --cert=$ETCD_PEER_CERT_FILE --key=$ETCD_PEER_KEY_FILE --cacert=$ETCD_TRUSTED_CA_FILE --endpoints="https://$(hostname):2379" get /openshift.io --prefix --keys-only
  • OpenShift Registry

To get detailed information about the pods running the internal registry run the following command:

oc get pods -n default | grep registry | awk '{ print $1 }' | xargs -i oc describe pod {}

For a basic health check that the internal registry is running and responding you need to “curl” the /healthz path. Normally this should return a 200 HTTP response:

Registry=$(oc get svc docker-registry -n default -o 'jsonpath={.spec.clusterIP}:{.spec.ports[0].port}')

curl -vk $Registry/healthz
# OR
curl -vk https://$Registry/healthz

If a persistent volume is attached to the registry make sure that the registry can write to the volume.

oc project default 
oc rsh `oc get pods -o name -l docker-registry`

$ touch /registry/test-file
$ ls -la /registry/ 
$ rm /registry/test-file
$ exit

If the registry is insecure make sure you have edited the /etc/sysconfig/docker file and add –insecure-registry 172.30.0.0/16 to the OPTIONS parameter on the nodes.

For more information about testing the internal registry please have a look at the documentation about Accessing the Registry.

  • OpenShift Router 

To increase the log level for OpenShift router pod, set loglevel=4 in the container args:

# Increase logging level
oc patch dc -n default router -p '[{"op": "add", "path": "/spec/template/spec/containers/0/args", "value":["--loglevel=4"]}]' --type=json 

# View logs
oc logs <router-pod-name> -n default

# Remove logging change 
oc patch dc -n default router -p '[{"op": "remove", "path": "/spec/template/spec/containers/0/args", "value":["--loglevel=4"]}]' --type=json

OpenShift router image version 3.3 and later, the logging for http requests can be forwarded to an external syslog server:

oc set env dc/router ROUTER_SYSLOG_ADDRESS=<syslog-server-ip> ROUTER_LOG_LEVEL=debug

If you are facing issues with ingress routes to your application run the below command to collect more information:

oc logs dc/router -n default
oc get dc/router -o yaml -n default
oc get route <route-name> -n <project-name> 
oc get endpoints --all-namespaces 
oc exec -it <router-pod-name> -- ls -la 
oc exec -it <router-pod-name> -- find /var/lib/haproxy -regex ".*\(.map\|config.*\|.json\)" -print -exec cat {} \; > haproxy_configs_and_maps

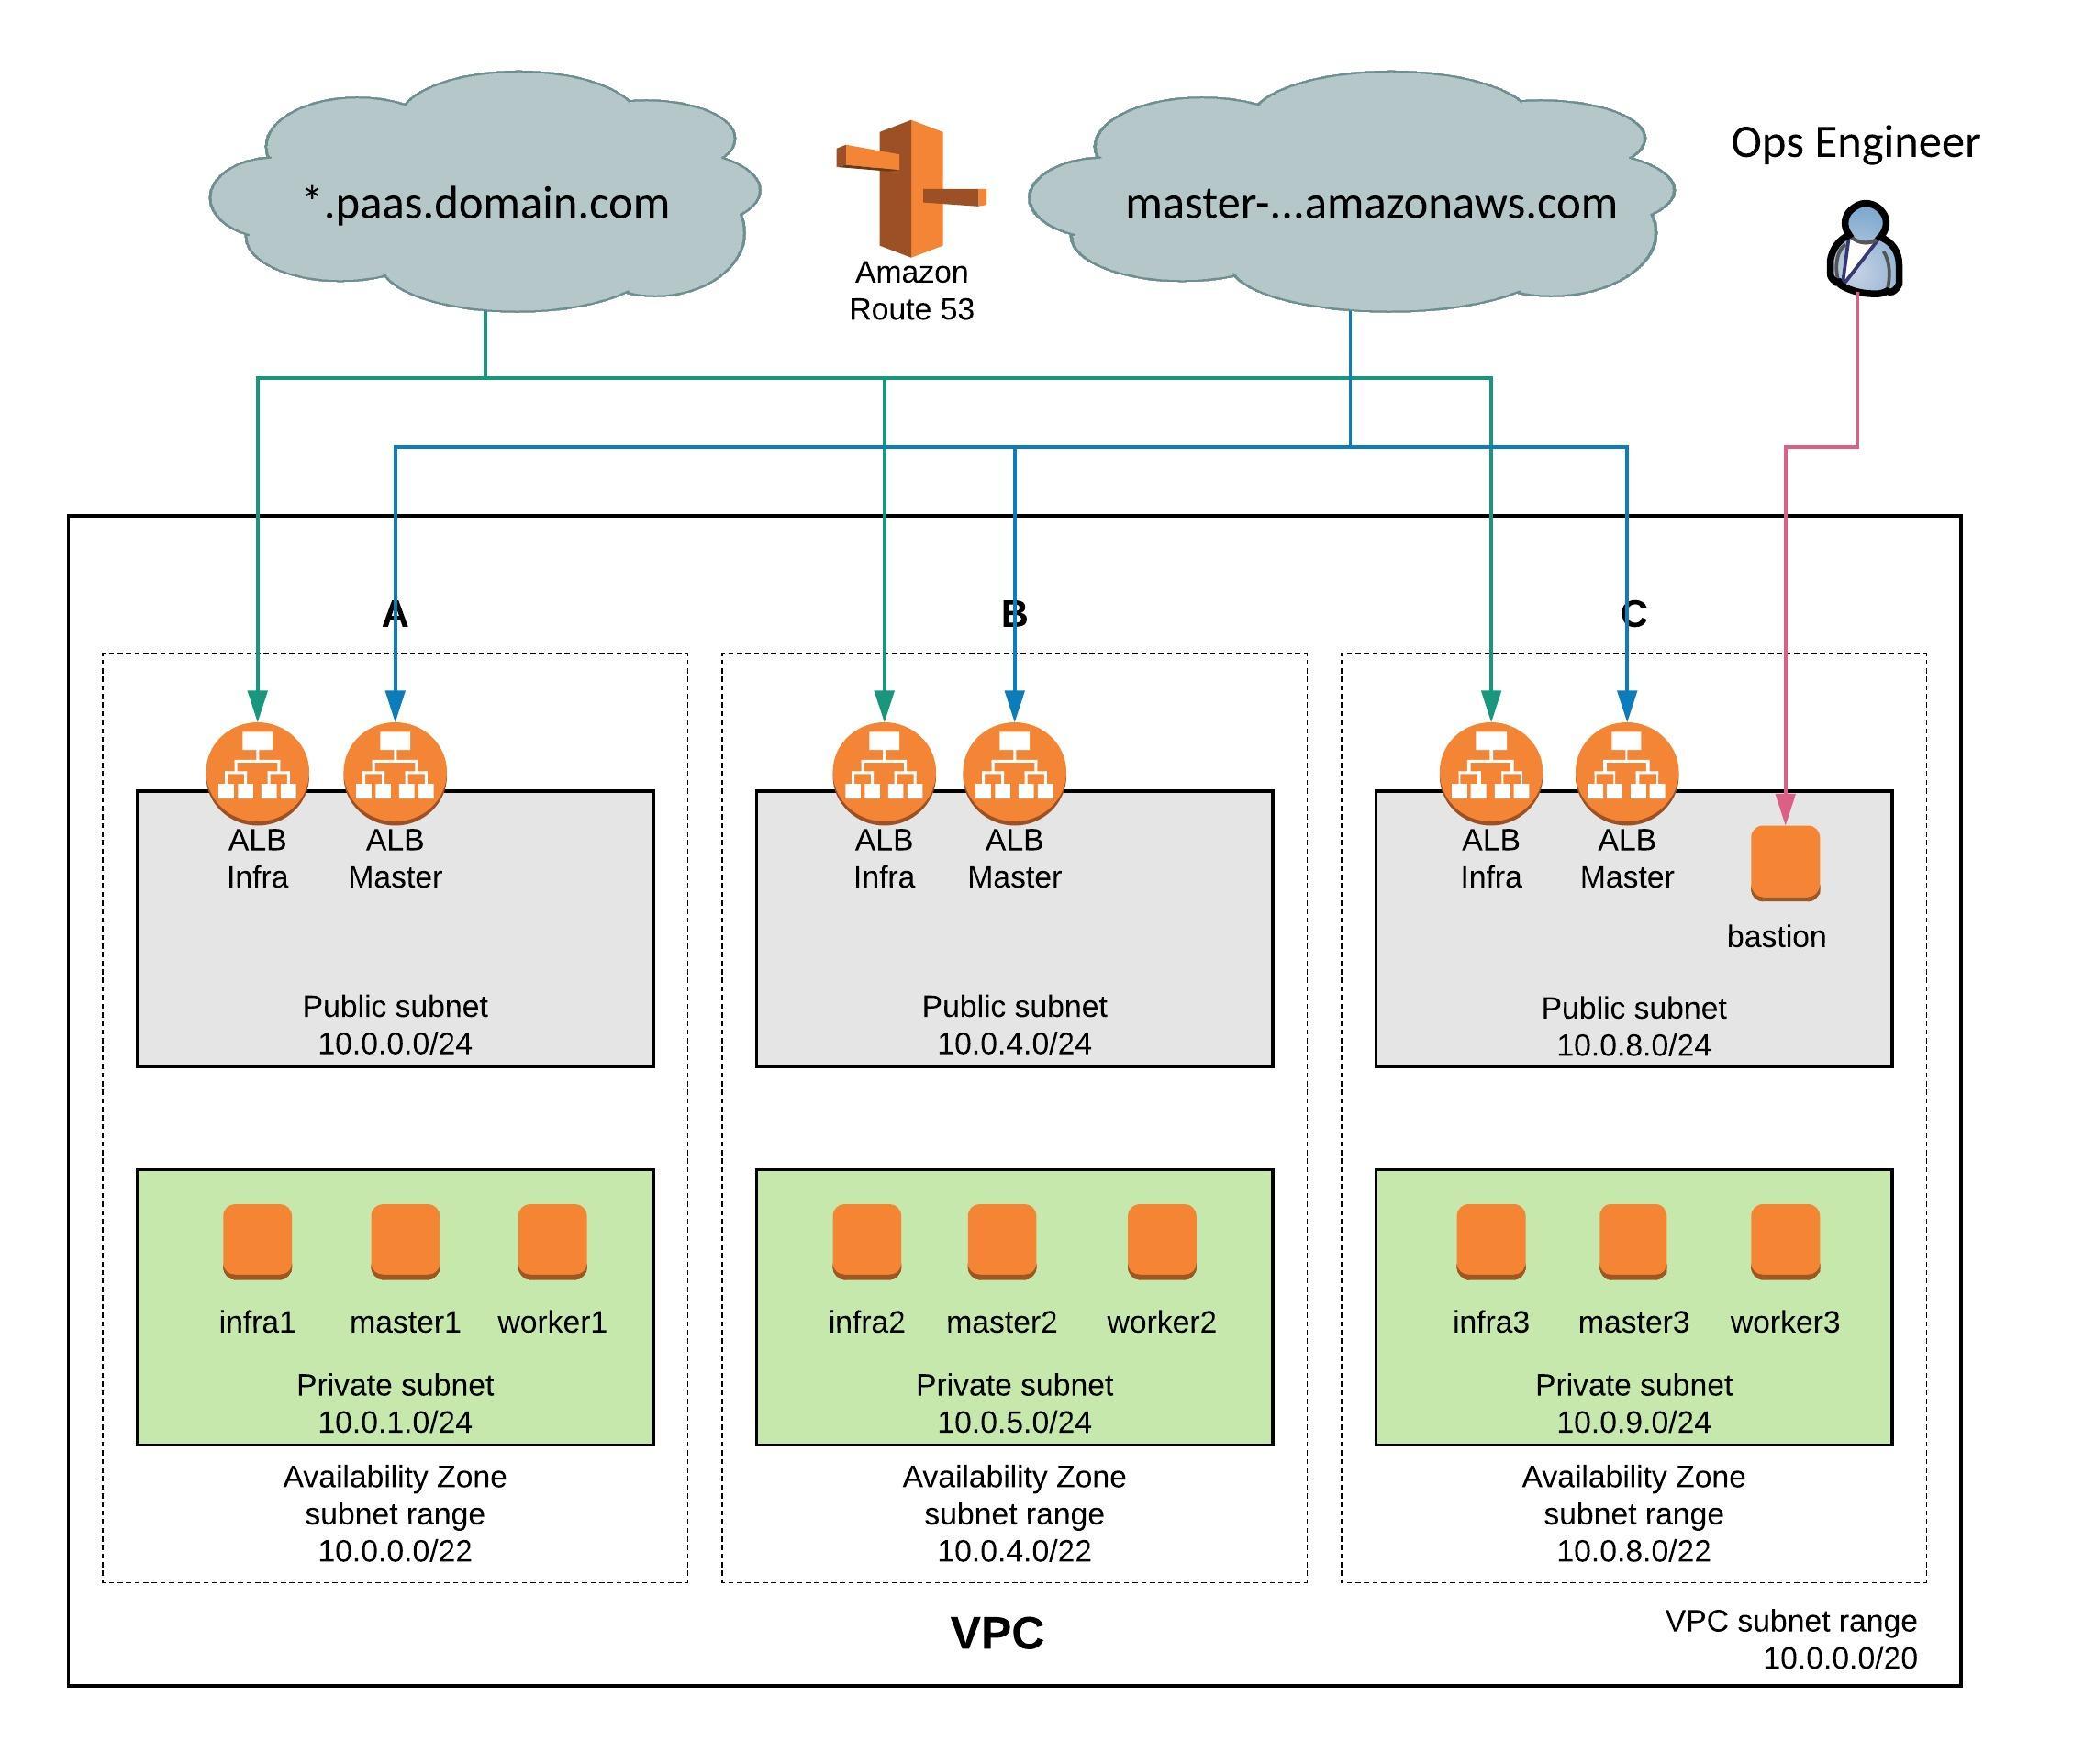
Check if your application domain is /paas.domain.com/ and dig for an ANSWER containing the load balancer VIP address:

dig \*.paas.domain.com

Confirm that certificates are being severed out correctly by running the following:

echo -n | openssl s_client -connect :443 -servername myapp.paas.domain.com 2>&1 | openssl x509 -noout -text
curl -kv https://myapp.paas.domain.com 
  • OpenShift SDN

Please checkout the official Troubleshooting OpenShift SDN documentation

To get OpenFlow table export, connect to the openvswitch container and run following command:

docker exec openvswitch ovs-ofctl -O OpenFlow13 dump-flows br0
  • OpenShift Namespace events

Useful to collect events from the namespace to identify pod creation issues before you did in the container logs:

oc get events [-n |--all-namespaces]

In the default namespace you find relevant events for monitoring or auditing a cluster, such as Node and resource events related to the OpenShift platform.

  • OpenShift Pod and Container Logs

Container/pod logs can be viewed using the OpenShift oc command line. Add option “-p” to print the logs for the previous instance of the container in a pod if it exists and add option “-f” to stream the logs:

oc logs <pod-name> [-f]

The logs are saved to the worker nodes disk where the container/pod is running and it is located at:
/var/lib/docker/containers/<container-id>/<container-id>-json.log.

For setting the log file limits for containers on a worker node the –log-opt can be configured with max-size and max-file so that a containers logs are rolled over:

# cat /etc/sysconfig/docker 
OPTIONS='--insecure-registry=172.30.0.0/16 --selinux-enabled --log-opt max-size=50m --log-opt max-file=5'

# Restart docker service for the changes to take effect.
systemctl restart docker 

To remove all logs from a given container run the following commands:

cat /dev/null > /var/lib/docker/containers/<container-id>/<container-id>-json.log
# OR
cat /dev/null >  $(docker inspect --format='{{.LogPath}}' <container-id> )

To generate a list of the largest files run the following commands:

# Log files
find /var/lib/docker/ -name "*.log" -exec ls -sh {} \; | sort -n -r | head -20

# All container files
du -aSh /var/lib/docker/ | sort -n -r | head -n 10

Finding out the veth# interface of a docker container and use tcpdump to capture traffic more easily. The iflink of the container is the same as the ifindex of the veth#. You can get the iflink of the container as follows:

docker exec -it <container-name>  bash -c 'cat /sys/class/net/eth0/iflink'

# Let's say that the results in 14, then grep for 14
grep -l 14 /sys/class/net/veth*/ifindex

# Which will give a unique result on the worker node
/sys/class/net/veth12c4982/ifindex

Here a simple bash script to get the container and veth id’s:

#!/bin/bash
for container in $(docker ps -q); do
    iflink=`docker exec -it $container bash -c 'cat /sys/class/net/eth0/iflink'`
    iflink=`echo $iflink|tr -d '\r'`
    veth=`grep -l $iflink /sys/class/net/veth*/ifindex`
    veth=`echo $veth|sed -e 's;^.*net/\(.*\)/ifindex$;\1;'`
    echo $container:$veth
done
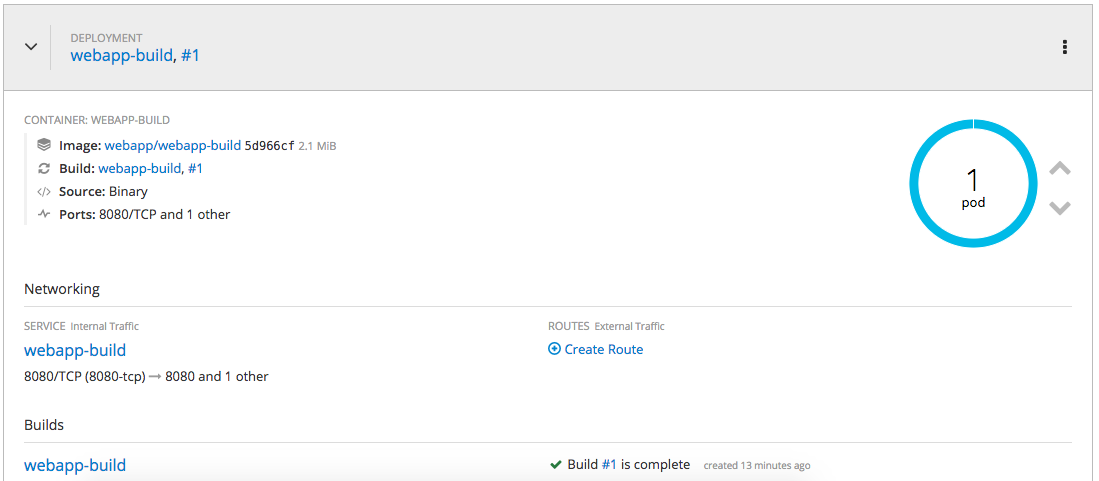
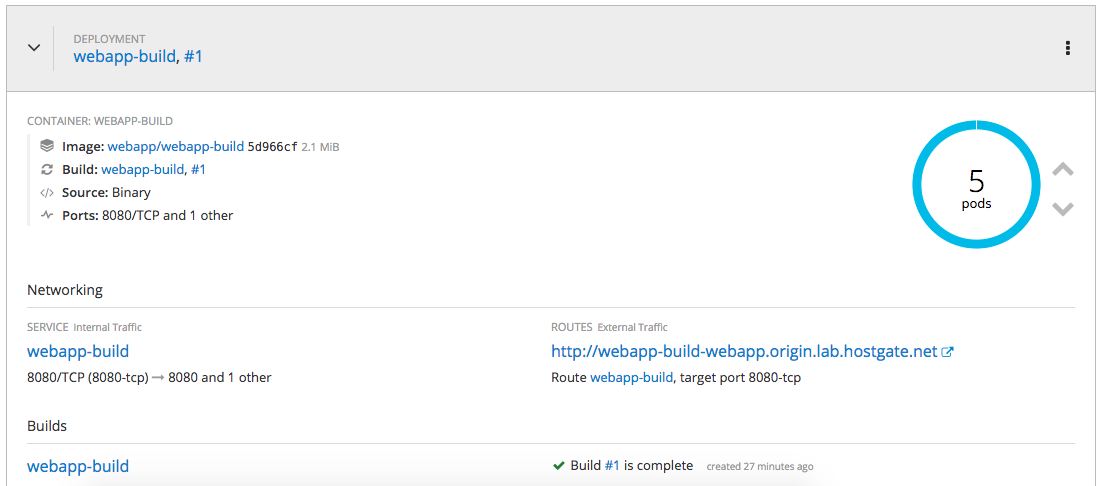
  • OpenShift Builder Pod Logs

If you want to troubleshoot a particular build of “myapp” you can view logs with:

oc logs [bc/|dc/]<name> [-f]

To increase the logging level add a BUILD_LOGLEVEL environment variable to the BuildConfig strategy:

sourceStrategy:
...
  env:
    - name: "BUILD_LOGLEVEL"
      value: "5"

I hope you found this article useful and that it helped you troubleshoot OpenShift. Please let me know what you think and leave a comment.

Deploy OpenShift 3.9 Container Platform using Terraform and Ansible on Amazon AWS

After my previous articles on OpenShift and Terraform I wanted to show how to create the necessary infrastructure and to deploy an OpenShift Container Platform in a more real-world scenario. I highly recommend reading my other posts about using Terraform to deploy an Amazon AWS VPC and AWS EC2 Instances and Load Balancers. Once the infrastructure is created we will use the Bastion Host to connect to the environment and deploy OpenShift Origin using Ansible.

I think this might be an interesting topic to show what tools like Terraform and Ansible can do together:

I will not go into detail about the configuration and only show the output of deploying the infrastructure. Please checkout my Github repository to see the detailed configuration: https://github.com/berndonline/openshift-terraform

Before we start you need to clone the repository and generate the ssh key used from the bastion host to access the OpenShift nodes:

git clone https://github.com/berndonline/openshift-terraform.git
cd ./openshift-terraform/
ssh-keygen -b 2048 -t rsa -f ./helper_scripts/id_rsa -q -N ""
chmod 600 ./helper_scripts/id_rsa

We are ready to create the infrastructure and run terraform apply:

berndonline@lab:~/openshift-terraform$ terraform apply

...

Plan: 56 to add, 0 to change, 0 to destroy.

Do you want to perform these actions?
  Terraform will perform the actions described above.
  Only 'yes' will be accepted to approve.

  Enter a value: yes

...

Apply complete! Resources: 19 added, 0 changed, 16 destroyed.

Outputs:

bastion = ec2-34-244-225-35.eu-west-1.compute.amazonaws.com
openshift master = master-35563dddc8b2ea9c.elb.eu-west-1.amazonaws.com
openshift subdomain = infra-1994425986.eu-west-1.elb.amazonaws.com
berndonline@lab:~/openshift-terraform$

Terraform successfully creates the VPC, load balancers and all needed instances. Before we continue wait 5 to 10 minutes because the cloud-init script takes a bit time and all the instance reboot at the end.

Instances:

Security groups:

Target groups for the Master and the Infra load balancers:

Master and the Infra load balancers:

Terraform also automatically creates the inventory file for the OpenShift installation and adds the hostnames for master, infra and worker nodes to the correct inventory groups. The next step is to copy the private ssh key and the inventory file to the bastion host. I am using the terraform output command to get the public hostname from the bastion host:

scp -o StrictHostKeyChecking=no -o UserKnownHostsFile=/dev/null -r ./helper_scripts/id_rsa centos@$(terraform output bastion):/home/centos/.ssh/
scp -o StrictHostKeyChecking=no -o UserKnownHostsFile=/dev/null -r ./inventory/ansible-hosts  centos@$(terraform output bastion):/home/centos/ansible-hosts
ssh -o StrictHostKeyChecking=no -o UserKnownHostsFile=/dev/null -l centos $(terraform output bastion)

On the bastion node, change to the /openshift-ansible/ folder and start running the prerequisites and the deploy-cluster playbooks:

cd /openshift-ansible/
ansible-playbook ./playbooks/prerequisites.yml -i ~/ansible-hosts
ansible-playbook ./playbooks/deploy_cluster.yml -i ~/ansible-hosts

Here the output from running the prerequisites playbook:

[centos@ip-10-0-0-22 ~]$ cd /openshift-ansible/
[centos@ip-10-0-0-22 openshift-ansible]$ ansible-playbook ./playbooks/prerequisites.yml -i ~/ansible-hosts

PLAY [Initialization Checkpoint Start] ****************************************************************************************************************************

TASK [Set install initialization 'In Progress'] *******************************************************************************************************************
Saturday 15 September 2018  11:04:50 +0000 (0:00:00.407)       0:00:00.407 ****
ok: [ip-10-0-1-237.eu-west-1.compute.internal]

PLAY [Populate config host groups] ********************************************************************************************************************************

TASK [Load group name mapping variables] **************************************************************************************************************************
Saturday 15 September 2018  11:04:50 +0000 (0:00:00.110)       0:00:00.517 ****
ok: [localhost]

TASK [Evaluate groups - g_etcd_hosts or g_new_etcd_hosts required] ************************************************************************************************
Saturday 15 September 2018  11:04:51 +0000 (0:00:00.033)       0:00:00.551 ****
skipping: [localhost]

TASK [Evaluate groups - g_master_hosts or g_new_master_hosts required] ********************************************************************************************
Saturday 15 September 2018  11:04:51 +0000 (0:00:00.024)       0:00:00.575 ****
skipping: [localhost]

TASK [Evaluate groups - g_node_hosts or g_new_node_hosts required] ************************************************************************************************
Saturday 15 September 2018  11:04:51 +0000 (0:00:00.024)       0:00:00.599 ****
skipping: [localhost]

...

PLAY RECAP ********************************************************************************************************************************************************
ip-10-0-1-192.eu-west-1.compute.internal : ok=56   changed=14   unreachable=0    failed=0
ip-10-0-1-237.eu-west-1.compute.internal : ok=64   changed=15   unreachable=0    failed=0
ip-10-0-1-248.eu-west-1.compute.internal : ok=56   changed=14   unreachable=0    failed=0
ip-10-0-5-174.eu-west-1.compute.internal : ok=56   changed=14   unreachable=0    failed=0
ip-10-0-5-235.eu-west-1.compute.internal : ok=58   changed=14   unreachable=0    failed=0
ip-10-0-5-35.eu-west-1.compute.internal : ok=56   changed=14   unreachable=0    failed=0
ip-10-0-9-130.eu-west-1.compute.internal : ok=56   changed=14   unreachable=0    failed=0
ip-10-0-9-51.eu-west-1.compute.internal : ok=58   changed=14   unreachable=0    failed=0
ip-10-0-9-85.eu-west-1.compute.internal : ok=56   changed=14   unreachable=0    failed=0
localhost                  : ok=11   changed=0    unreachable=0    failed=0


INSTALLER STATUS **************************************************************************************************************************************************
Initialization             : Complete (0:00:41)

[centos@ip-10-0-0-22 openshift-ansible]$

Continue with the deploy cluster playbook:

[centos@ip-10-0-0-22 openshift-ansible]$ ansible-playbook ./playbooks/deploy_cluster.yml -i ~/ansible-hosts

PLAY [Initialization Checkpoint Start] ****************************************************************************************************************************

TASK [Set install initialization 'In Progress'] *******************************************************************************************************************
Saturday 15 September 2018  11:08:38 +0000 (0:00:00.102)       0:00:00.102 ****
ok: [ip-10-0-1-237.eu-west-1.compute.internal]

PLAY [Populate config host groups] ********************************************************************************************************************************

TASK [Load group name mapping variables] **************************************************************************************************************************
Saturday 15 September 2018  11:08:38 +0000 (0:00:00.064)       0:00:00.167 ****
ok: [localhost]

TASK [Evaluate groups - g_etcd_hosts or g_new_etcd_hosts required] ************************************************************************************************
Saturday 15 September 2018  11:08:38 +0000 (0:00:00.031)       0:00:00.198 ****
skipping: [localhost]

TASK [Evaluate groups - g_master_hosts or g_new_master_hosts required] ********************************************************************************************
Saturday 15 September 2018  11:08:38 +0000 (0:00:00.026)       0:00:00.225 ****
skipping: [localhost]

...

PLAY RECAP ********************************************************************************************************************************************************
ip-10-0-1-192.eu-west-1.compute.internal : ok=132  changed=57   unreachable=0    failed=0
ip-10-0-1-237.eu-west-1.compute.internal : ok=591  changed=256  unreachable=0    failed=0
ip-10-0-1-248.eu-west-1.compute.internal : ok=132  changed=57   unreachable=0    failed=0
ip-10-0-5-174.eu-west-1.compute.internal : ok=132  changed=57   unreachable=0    failed=0
ip-10-0-5-235.eu-west-1.compute.internal : ok=325  changed=145  unreachable=0    failed=0
ip-10-0-5-35.eu-west-1.compute.internal : ok=132  changed=57   unreachable=0    failed=0
ip-10-0-9-130.eu-west-1.compute.internal : ok=132  changed=57   unreachable=0    failed=0
ip-10-0-9-51.eu-west-1.compute.internal : ok=325  changed=145  unreachable=0    failed=0
ip-10-0-9-85.eu-west-1.compute.internal : ok=132  changed=57   unreachable=0    failed=0
localhost                  : ok=13   changed=0    unreachable=0    failed=0

INSTALLER STATUS **************************************************************************************************************************************************
Initialization             : Complete (0:00:55)
Health Check               : Complete (0:00:01)
etcd Install               : Complete (0:01:03)
Master Install             : Complete (0:05:17)
Master Additional Install  : Complete (0:00:26)
Node Install               : Complete (0:08:24)
Hosted Install             : Complete (0:00:57)
Web Console Install        : Complete (0:00:28)
Service Catalog Install    : Complete (0:01:19)

[centos@ip-10-0-0-22 openshift-ansible]$

Once the deploy playbook finishes we have a working Openshift cluster:

Login with username: demo, and password: demo

For the infra load balancers you cannot access OpenShift routes via the Amazon DNS, this is not allowed. You need to create a wildcard DNS CNAME record like *.paas.domain.com and point to the AWS load balancer DNS record.

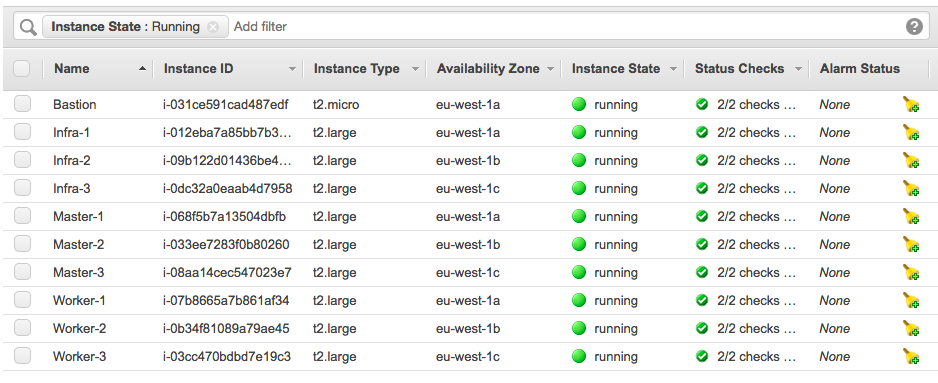
Let’s continue to do some basic cluster checks to see the nodes are in ready state:

[centos@ip-10-0-1-237 ~]$ oc get nodes
NAME                                       STATUS    ROLES     AGE       VERSION
ip-10-0-1-192.eu-west-1.compute.internal   Ready     compute   11m       v1.9.1+a0ce1bc657
ip-10-0-1-237.eu-west-1.compute.internal   Ready     master    16m       v1.9.1+a0ce1bc657
ip-10-0-1-248.eu-west-1.compute.internal   Ready         11m       v1.9.1+a0ce1bc657
ip-10-0-5-174.eu-west-1.compute.internal   Ready     compute   11m       v1.9.1+a0ce1bc657
ip-10-0-5-235.eu-west-1.compute.internal   Ready     master    15m       v1.9.1+a0ce1bc657
ip-10-0-5-35.eu-west-1.compute.internal    Ready         11m       v1.9.1+a0ce1bc657
ip-10-0-9-130.eu-west-1.compute.internal   Ready     compute   11m       v1.9.1+a0ce1bc657
ip-10-0-9-51.eu-west-1.compute.internal    Ready     master    14m       v1.9.1+a0ce1bc657
ip-10-0-9-85.eu-west-1.compute.internal    Ready         11m       v1.9.1+a0ce1bc657
[centos@ip-10-0-1-237 ~]$
[centos@ip-10-0-1-237 ~]$ oc get projects
NAME                                DISPLAY NAME   STATUS
default                                            Active
kube-public                                        Active
kube-service-catalog                               Active
kube-system                                        Active
logging                                            Active
management-infra                                   Active
openshift                                          Active
openshift-ansible-service-broker                   Active
openshift-infra                                    Active
openshift-node                                     Active
openshift-template-service-broker                  Active
openshift-web-console                              Active
[centos@ip-10-0-1-237 ~]$
[centos@ip-10-0-1-237 ~]$ oc get pods -o wide
NAME                       READY     STATUS    RESTARTS   AGE       IP           NODE
docker-registry-1-8798r    1/1       Running   0          10m       10.128.2.2   ip-10-0-5-35.eu-west-1.compute.internal
registry-console-1-zh9m4   1/1       Running   0          10m       10.129.2.3   ip-10-0-9-85.eu-west-1.compute.internal
router-1-96zzf             1/1       Running   0          10m       10.0.9.85    ip-10-0-9-85.eu-west-1.compute.internal
router-1-nfh7h             1/1       Running   0          10m       10.0.1.248   ip-10-0-1-248.eu-west-1.compute.internal
router-1-pcs68             1/1       Running   0          10m       10.0.5.35    ip-10-0-5-35.eu-west-1.compute.internal
[centos@ip-10-0-1-237 ~]$

At the end just destroy the infrastructure with terraform destroy:

berndonline@lab:~/openshift-terraform$ terraform destroy

...

Destroy complete! Resources: 56 destroyed.
berndonline@lab:~/openshift-terraform$

I will continue improving the configuration and I plan to use Jenkins to deploy the AWS infrastructure and OpenShift fully automatically.

Please let me know if you like the article or have questions in the comments below.

Getting started with OpenShift Container Platform

In the recent month I have spend a lot of time around networking and automation but I want to shift more towards running modern container platforms like Kubernetes or OpenShift which both are using networking services and as I have shared in one of my previous article about AVI software load balancer, it all fits nicely into networking in my opinion.

But before we start, please have a look at my previous article about Deploying OpenShift Origin Cluster using Ansible to create a small OpenShift platform for testing.

Create a bash completion file for oc commands:

[root@origin-master ~]# oc completion bash > /etc/bash_completion.d/oc
[root@origin-master ~]# . /etc/bash_completion.d/oc
  • Let’s start and login to OpenShift as a normal user account
[root@origin-master ~]# oc login https://console.lab.hostgate.net:8443/
The server is using a certificate that does not match its hostname: x509: certificate is valid for lab.hostgate.net, not console.lab.hostgate.net
You can bypass the certificate check, but any data you send to the server could be intercepted by others.
Use insecure connections? (y/n): y

Authentication required for https://console.lab.hostgate.net:8443 (openshift)
Username: demo
Password:
Login successful.

[root@origin-master ~]#

Instead of username and password use token which you can get from the web console:

oc login https://console.lab.hostgate.net:8443 --token=***hash token***
  • Now create the project where we want to run our web application:
[root@origin-master ~]# oc new-project webapp
Now using project "webapp" on server "https://console.lab.hostgate.net:8443".

You can add applications to this project with the 'new-app' command. For example, try:

    oc new-app centos/ruby-22-centos7~https://github.com/openshift/ruby-ex.git

to build a new example application in Ruby.
[root@origin-master ~]#

Afterwards we need to create a build configuration, in my example we use an external Dockerfile without starting the build directly:

[root@origin-master ~]#  oc new-build --name webapp-build --binary
warning: Cannot find git. Ensure that it is installed and in your path. Git is required to work with git repositories.
    * A Docker build using binary input will be created
      * The resulting image will be pushed to image stream "webapp-build:latest"
      * A binary build was created, use 'start-build --from-dir' to trigger a new build

--> Creating resources with label build=webapp-build ...
    imagestream "webapp-build" created
    buildconfig "webapp-build" created
--> Success
[root@origin-master ~]#

Create Dockerfile:

[root@origin-master ~]# vi Dockerfile

Copy and paste the line below into the Dockerfile:

FROM openshift/hello-openshift

Let’s continue and start the build from the Dockerfile we specified previously

[root@origin-master ~]#  oc start-build webapp-build --from-file=Dockerfile --follow
Uploading file "Dockerfile" as binary input for the build ...
build "webapp-build-1" started
Receiving source from STDIN as file Dockerfile
Pulling image openshift/hello-openshift ...
Step 1/3 : FROM openshift/hello-openshift
 ---> 7af3297a3fb4
Step 2/3 : ENV "OPENSHIFT_BUILD_NAME" "webapp-build-1" "OPENSHIFT_BUILD_NAMESPACE" "webapp"
 ---> Running in 422f63f69364
 ---> 2cd93085ec93
Removing intermediate container 422f63f69364
Step 3/3 : LABEL "io.openshift.build.name" "webapp-build-1" "io.openshift.build.namespace" "webapp"
 ---> Running in 0c3e6cce6f0b
 ---> cf178dda8238
Removing intermediate container 0c3e6cce6f0b
Successfully built cf178dda8238
Pushing image docker-registry.default.svc:5000/webapp/webapp-build:latest ...
Push successful
[root@origin-master ~]#

Alternatively you can directly inject the Dockerfile options in a single command and the build would start immediately:

[root@origin-master ~]#  oc new-build --name webapp-build -D $'FROM openshift/hello-openshift'
  • Create the web application
[root@origin-master ~]# oc new-app webapp-build
warning: Cannot find git. Ensure that it is installed and in your path. Git is required to work with git repositories.
--> Found image cf178dd (4 minutes old) in image stream "webapp/webapp-build" under tag "latest" for "webapp-build"

    * This image will be deployed in deployment config "webapp-build"
    * Ports 8080/tcp, 8888/tcp will be load balanced by service "webapp-build"
      * Other containers can access this service through the hostname "webapp-build"

--> Creating resources ...
    deploymentconfig "webapp-build" created
    service "webapp-build" created
--> Success
    Application is not exposed. You can expose services to the outside world by executing one or more of the commands below:
     'oc expose svc/webapp-build'
    Run 'oc status' to view your app.
[root@origin-master ~]#

As you see below, we are currently running a single pod:

[root@origin-master ~]#  oc get pod -o wide
NAME                   READY     STATUS      RESTARTS   AGE       IP            NODE
webapp-build-1-build   0/1       Completed   0          8m        10.131.0.27   origin-node-1
webapp-build-1-znk98   1/1       Running     0          3m        10.131.0.29   origin-node-1
[root@origin-master ~]#

Let’s check out endpoints and services:

[root@origin-master ~]# oc get ep
NAME           ENDPOINTS                           AGE
webapp-build   10.131.0.29:8080,10.131.0.29:8888   1m
[root@origin-master ~]# oc get svc
NAME           CLUSTER-IP     EXTERNAL-IP   PORT(S)             AGE
webapp-build   172.30.64.97           8080/TCP,8888/TCP   1m
[root@origin-master ~]#

Running a single pod is not great for redundancy, let’s scale out:

[root@origin-master ~]# oc scale --replicas=5 dc/webapp-build
deploymentconfig "webapp-build" scaled
[root@origin-master ~]#  oc get pod -o wide
NAME                   READY     STATUS      RESTARTS   AGE       IP            NODE
webapp-build-1-4fb98   1/1       Running     0          15s       10.130.0.47   origin-node-2
webapp-build-1-build   0/1       Completed   0          9m        10.131.0.27   origin-node-1
webapp-build-1-dw6ww   1/1       Running     0          15s       10.131.0.30   origin-node-1
webapp-build-1-lswhg   1/1       Running     0          15s       10.131.0.31   origin-node-1
webapp-build-1-z4nk9   1/1       Running     0          15s       10.130.0.46   origin-node-2
webapp-build-1-znk98   1/1       Running     0          4m        10.131.0.29   origin-node-1
[root@origin-master ~]#

We can check our endpoints and services again, and see that we have more endpoints and still one service:

[root@origin-master ~]# oc get ep
NAME           ENDPOINTS                                                        AGE
webapp-build   10.130.0.46:8080,10.130.0.47:8080,10.131.0.29:8080 + 7 more...   4m
[root@origin-master ~]# oc get svc
NAME           CLUSTER-IP     EXTERNAL-IP   PORT(S)             AGE
webapp-build   172.30.64.97           8080/TCP,8888/TCP   4m
[root@origin-master ~]#

OpenShift uses an internal DNS service called SkyDNS to expose services for internal communication:

[root@origin-master ~]# dig webapp-build.webapp.svc.cluster.local

; <<>> DiG 9.9.4-RedHat-9.9.4-61.el7 <<>> webapp-build.webapp.svc.cluster.local
;; global options: +cmd
;; Got answer:
;; ->>HEADER<<- opcode: QUERY, status: NOERROR, id: 20933
;; flags: qr aa rd ra; QUERY: 1, ANSWER: 1, AUTHORITY: 0, ADDITIONAL: 0

;; QUESTION SECTION:
;webapp-build.webapp.svc.cluster.local. IN A

;; ANSWER SECTION:
webapp-build.webapp.svc.cluster.local. 30 IN A	172.30.64.97

;; Query time: 1 msec
;; SERVER: 10.255.1.214#53(10.255.1.214)
;; WHEN: Sat Jun 30 08:58:19 UTC 2018
;; MSG SIZE  rcvd: 71

[root@origin-master ~]#
  • Let’s expose our web application so that it is accessible from the outside world:
[root@origin-master ~]# oc expose svc webapp-build
route "webapp-build" exposed
[root@origin-master ~]#

Connect with a browser to the URL you see under routes:

Modify the WebApp and inject variables via a config map into our application:

[root@origin-master ~]# oc create configmap webapp-map --from-literal=RESPONSE="My first OpenShift WebApp"
configmap "webapp-map" created
[root@origin-master ~]#

Afterwards we need to add the previously created config map to our environment

[root@origin-master ~]# oc env dc/webapp-build --from=configmap/webapp-map
deploymentconfig "webapp-build" updated
[root@origin-master ~]#

Now when we check our web application again you see that the new variables are injected into the pod and displayed:

I will share more about running OpenShift Container Platform and my experience in the coming month. I hope you find this article useful and please share your feedback and leave a comment.