OpenShift Hive – Deploy Single Node (All-in-One) OKD Cluster on AWS

The concept of a single-node or All-in-One OpenShift / Kubernetes cluster isn’t something new, years ago when I was working with OpenShift 3 and before that with native Kubernetes, we were using single-node clusters as ephemeral development environment, integrations testing for pull-request or platform releases. It was only annoying because this required complex Jenkins pipelines, provision the node first, then install prerequisites and run the openshift-ansible installer playbook. Not always reliable and not a great experience but it done the job.

This is possible as well with the new OpenShift/OKD 4 version and with the help from OpenShift Hive. The experience is more reliable and quicker than previously and I don’t need to worry about de-provisioning, I will let Hive delete the cluster after a few hours automatically.

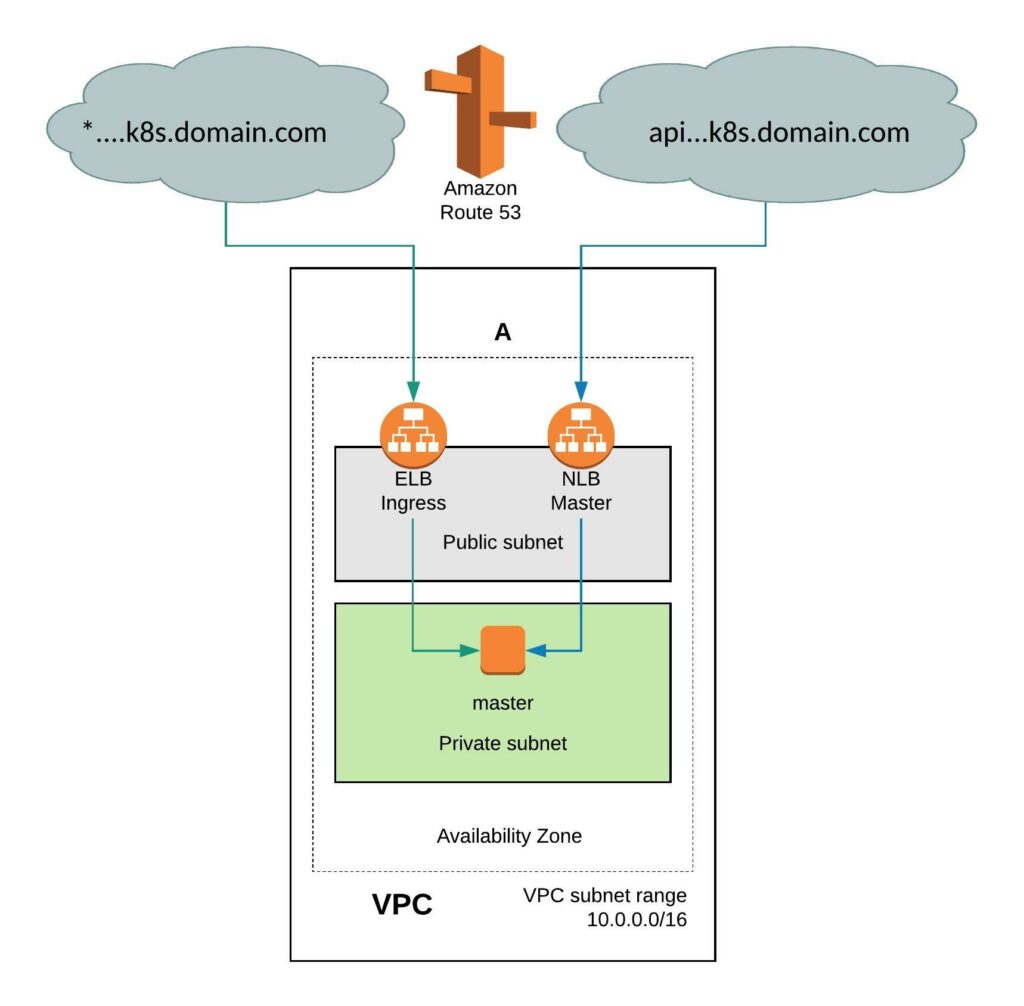
It requires a few simple modifications in the install-config. You need to add the Availability Zone you want where the instance will be created. When doing this the VPC will only have two subnets, one public and one private subnet in eu-west-1. You can also install the single-node cluster into an existing VPC you just have to specify subnet ids. Change the compute worker node replicas zero and control-plane replicas to one. Make sure to have an instance size with enough CPU and memory for all OpenShift components because they need to fit onto the single node. The rest of the install-config is pretty much standard.

---
apiVersion: v1
baseDomain: k8s.domain.com
compute:
- name: worker
  platform:
    aws:
      zones:
      - eu-west-1a
      rootVolume:
        iops: 100
        size: 22
        type: gp2
      type: r4.xlarge
  replicas: 0
controlPlane:
  name: master
  platform:
    aws:
      zones:
      - eu-west-1a
      rootVolume:
        iops: 100
        size: 22
        type: gp2
      type: r5.2xlarge
  replicas: 1
metadata:
  creationTimestamp: null
  name: okd-aio
networking:
  clusterNetwork:
  - cidr: 10.128.0.0/14
    hostPrefix: 23
  machineCIDR: 10.0.0.0/16
  networkType: OpenShiftSDN
  serviceNetwork:
  - 172.30.0.0/16
platform:
  aws:
    region: eu-west-1
pullSecret: ""
sshKey: ""

Create a new install-config secret for the cluster.

kubectl create secret generic install-config-aio -n okd --from-file=install-config.yaml=./install-config-aio.yaml

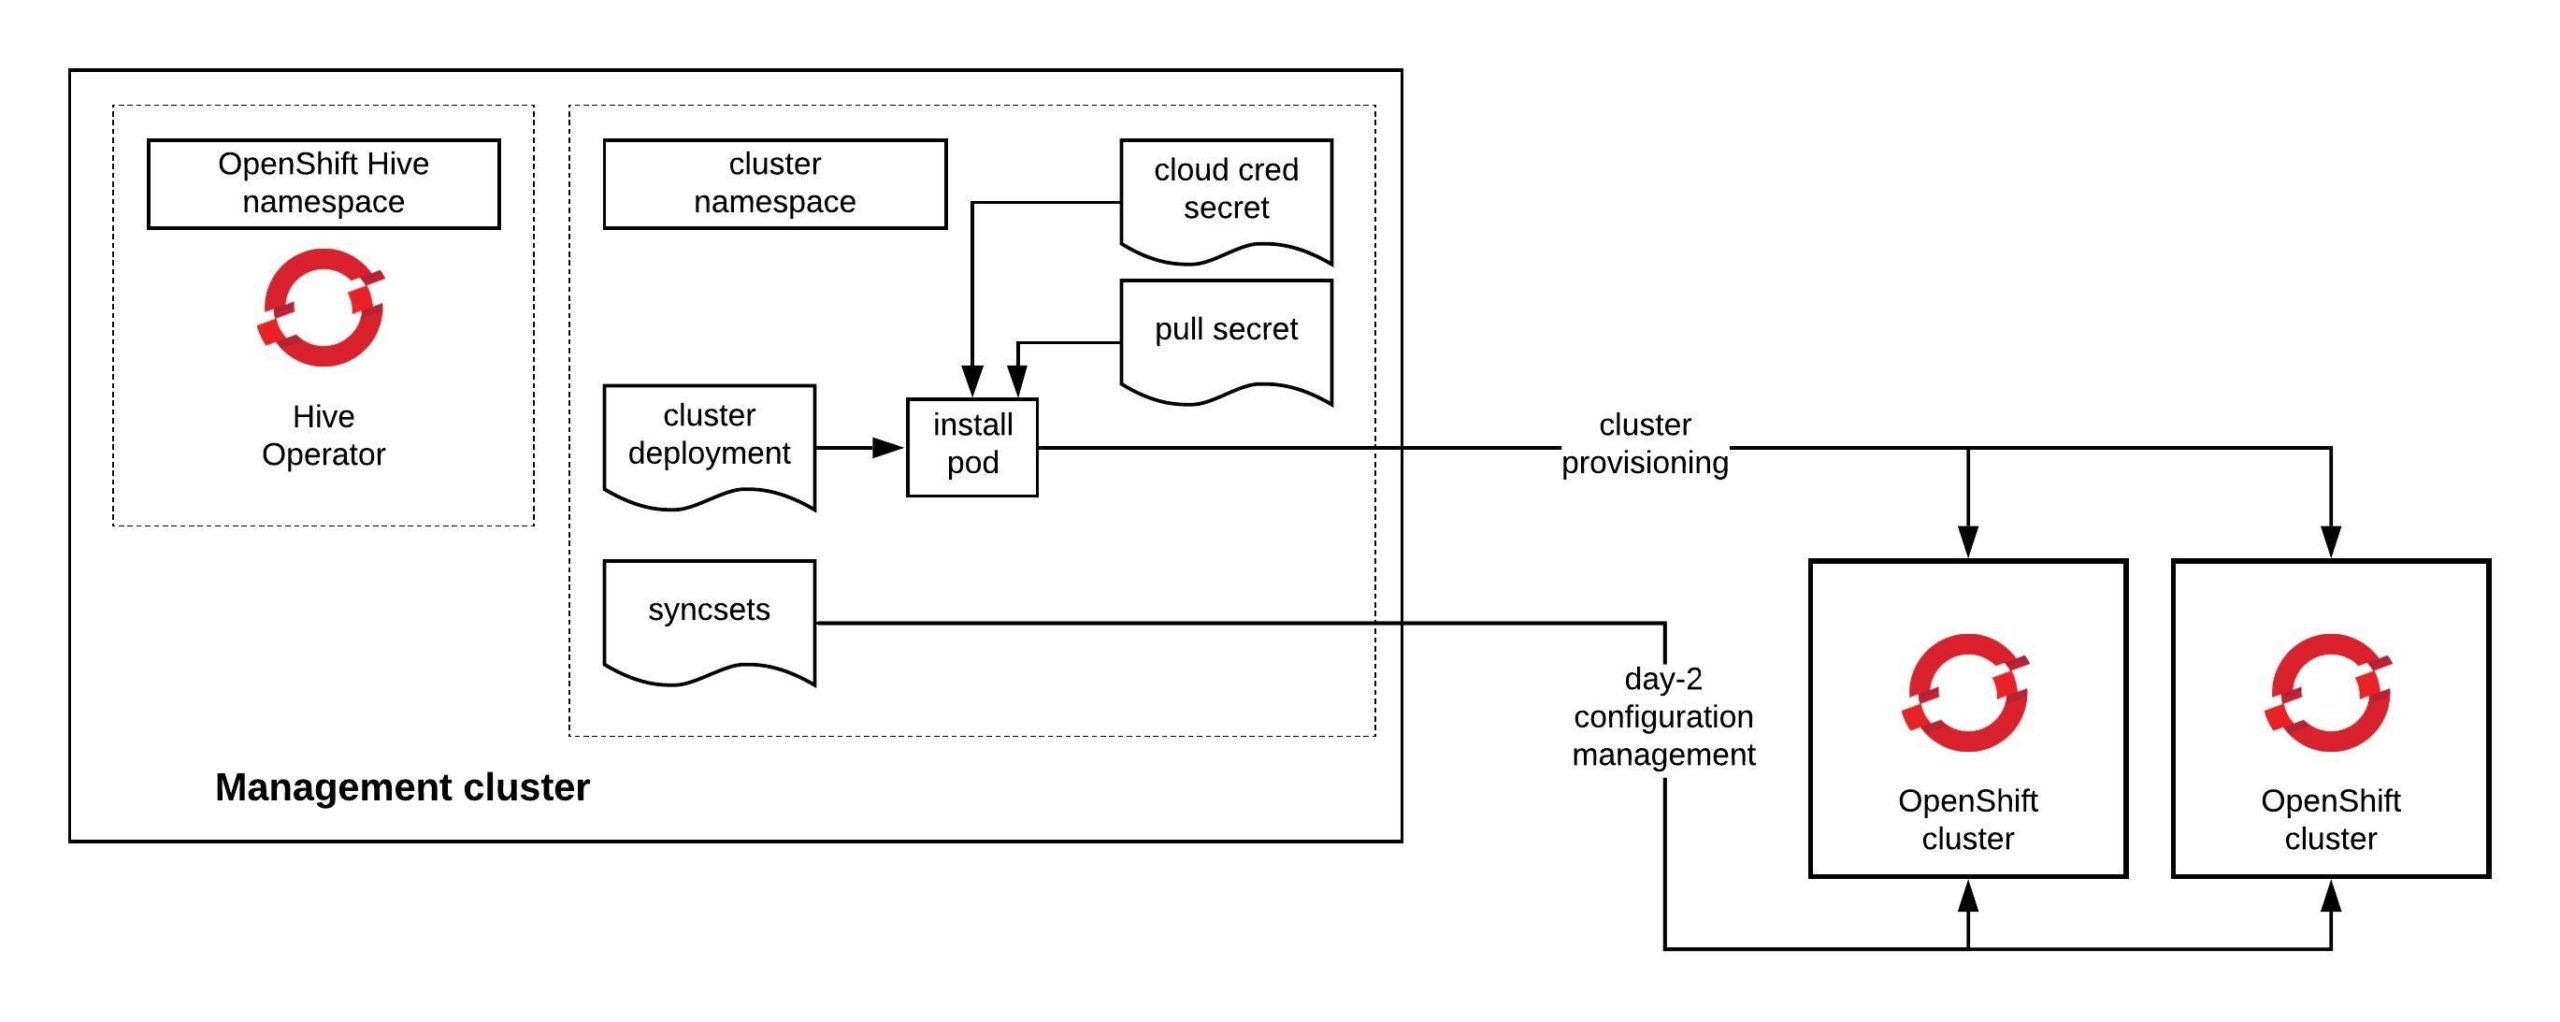
We will be using OpenShift Hive for the cluster deployment because the provision is more simplified and Hive can also apply any configuration using SyncSets or SelectorSyncSets which is needed. Add the annotation hive.openshift.io/delete-after: “2h” and Hive will automatically delete the cluster after 4 hours.

---
apiVersion: hive.openshift.io/v1
kind: ClusterDeployment
metadata:
  creationTimestamp: null
  annotations:
    hive.openshift.io/delete-after: "2h"
  name: okd-aio 
  namespace: okd
spec:
  baseDomain: k8s.domain.com
  clusterName: okd-aio
  controlPlaneConfig:
    servingCertificates: {}
  installed: false
  platform:
    aws:
      credentialsSecretRef:
        name: aws-creds
      region: eu-west-1
  provisioning:
    releaseImage: quay.io/openshift/okd:4.5.0-0.okd-2020-07-14-153706-ga
    installConfigSecretRef:
      name: install-config-aio
  pullSecretRef:
    name: pull-secret
  sshKey:
    name: ssh-key
status:
  clusterVersionStatus:
    availableUpdates: null
    desired:
      force: false
      image: ""
      version: ""
    observedGeneration: 0
    versionHash: ""

Apply the cluster deployment to your clusters namespace.

kubectl apply -f  ./clusterdeployment-aio.yaml

This is slightly faster than provision 6 nodes cluster and will take around 30mins until your ephemeral test cluster is ready to use.

Mozilla SOPS and GitOps Toolkit (Flux CD v2) to decrypt and apply Kubernetes secrets

Using GitOps way of working and tools like the GitOps toolkit (Flux CD v2) is great for applying configuration to your Kubernetes clusters but what about secrets and how can you store them securely in your repository? The perfect tool for this is Mozilla’s SOPS which uses a cloud based KMS, HashiCorp Vault or a PGP key to encrypt and decrypt your secrets and store them in encrypted form with the rest of your configuration in a code repostory. There is a guide in the Flux documentation about how to use SOPS but I did this slightly differently with a Google Cloud KMS.

Start by downloading the latest version of the Mozilla SOPS command-line binary. This is what makes SOPS so easy to use, there is not much you need to encrypt or decrypt secrets apart for an KMS system or a simple PGP key.

sudo wget -O /usr/local/bin/sops https://github.com/mozilla/sops/releases/download/v3.7.1/sops-v3.7.1.linux
sudo chmod 755 /usr/local/bin/sops

Next create the Google Cloud KMS, which I am using in my example.

$ gcloud auth application-default login
Go to the following link in your browser:

    https://accounts.google.com/o/oauth2/auth?code_challenge=xxxxxxx&prompt=select_account&code_challenge_method=S256&access_type=offline&redirect_uri=urn%3Aietf%3Awg%3Aoauth%3A2.0%3Aoob&response_type=code&client_id=xxxxxxxxx-xxxxxxxxxxxxxxxxxx.apps.googleusercontent.com&scope=https%3A%2F%2Fwww.googleapis.com%2Fauth%2Fuserinfo.email+https%3A%2F%2Fwww.googleapis.com%2Fauth%2Fcloud-platform+https%3A%2F%2Fwww.googleapis.com%2Fauth%2Faccounts.reauth


Enter verification code: xxxxxxxxxxxxxxx

Credentials saved to file: [/home/ubuntu/.config/gcloud/application_default_credentials.json]

These credentials will be used by any library that requests Application Default Credentials (ADC).
$ gcloud kms keyrings create sops --location global
$ gcloud kms keys create sops-key --location global --keyring sops --purpose encryption
$ gcloud kms keys list --location global --keyring sops
NAME                                                                           PURPOSE          ALGORITHM                    PROTECTION_LEVEL  LABELS  PRIMARY_ID  PRIMARY_STATE
projects/kubernetes-xxxxxx/locations/global/keyRings/sops/cryptoKeys/sops-key  ENCRYPT_DECRYPT  GOOGLE_SYMMETRIC_ENCRYPTION  SOFTWARE                  1           ENABLED

To encrypt secrets you need to create a .sops.yaml file in root your code repository.

creation_rules:
  - path_regex: \.yaml$
    gcp_kms: projects/kubernetes-xxxxxx/locations/global/keyRings/sops/cryptoKeys/sops-key
    encrypted_regex: ^(data|stringData)$

Let’s create a simple Kubernetes secret for testing.

$ cat secret.yaml
---
apiVersion: v1
kind: Secret
metadata:
  name: mysecret
  namespace: default
type: Opaque
data:
  username: YWRtaW4=
  password: MWYyZDFlMmU2N2Rm

Encrypt your secret.yaml using SOPS with the following example.

$ sops -e secret.yaml
apiVersion: v1
kind: Secret
metadata:
    name: mysecret
    namespace: default
type: Opaque
data:
    username: ENC[AES256_GCM,data:<-HASH->,type:str]
    password: ENC[AES256_GCM,data:<-HASH->,type:str]
sops:
    kms: []
    gcp_kms:
    -   resource_id: projects/kubernetes-xxxxxx/locations/global/keyRings/sops/cryptoKeys/sops-key
        created_at: '2021-03-01T17:25:29Z'
        enc: <-HASH->
    azure_kv: []
    lastmodified: '2021-03-01T17:25:29Z'
    mac: ENC[AES256_GCM,data:<-HASH->,type:str]
    pgp: []
    encrypted_regex: ^(data|stringData)$
    version: 3.5.0

Alternatively you can encrypt and replace the file in-place.

$ sops -i -e secret.yaml

To decrypt the yaml file use sops -d or replace in-place using sops -i -d.

$ sops -d secret.yaml
apiVersion: v1
kind: Secret
metadata:
    name: mysecret
    namespace: default
type: Opaque
data:
    username: YWRtaW4=
    password: MWYyZDFlMmU2N2Rm

You can also edit an encrypted file with the default terminal editor by directly using the sops command without any options.

$ sops secret.yaml
File has not changed, exiting.

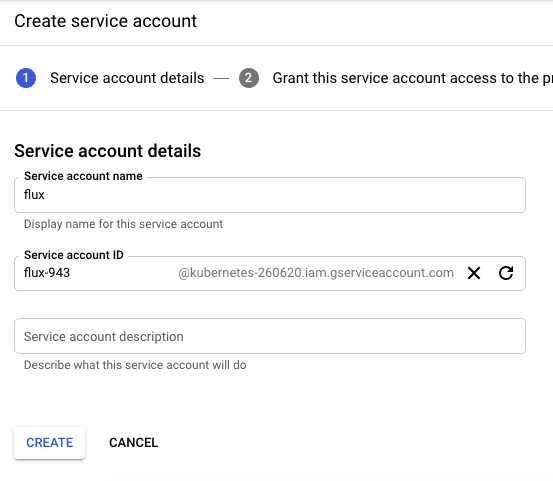
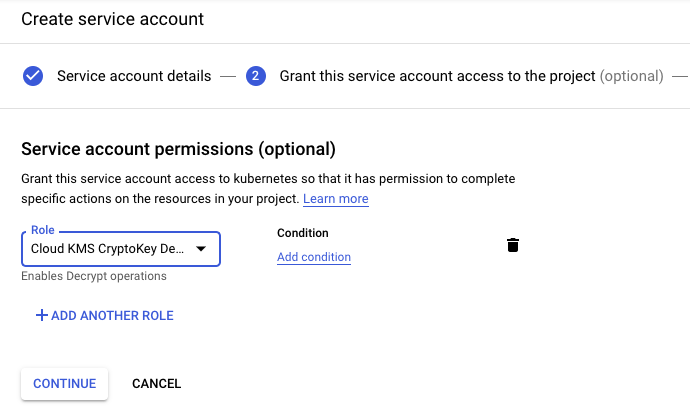
Let’s use the Flux CD Kustomize controller for this to decrypt Kubernetes secrets and apply to the specified namespace. First you need to create a GCP service account for Flux and grant the permission to decrypt.

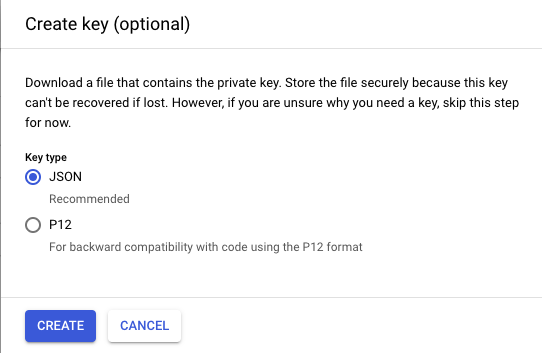
Download the GCP json authentication file for the service account and create a new secret in the Flux namespace.

$ kubectl create secret generic gcp-auth -n gotk-system --from-file=./sops-gcp
$ kubectl get secrets -n gotk-system gcp-auth -o yaml
apiVersion: v1
data:
  sops-gcp: <-BASE64-ENCODED-GCP-AUTH-JSON->
kind: Secret
metadata:
  creationTimestamp: "2021-03-01T17:34:11Z"
  name: gcp-auth
  namespace: gotk-system
  resourceVersion: "1879000"
  selfLink: /api/v1/namespaces/gotk-system/secrets/gcp-auth
  uid: 10a14c1f-19a6-41a2-8610-694b12efefee
type: Opaque

You need to update the kustomize-controller deployment and add the volume mount for the sops GCP secret and the environment variable with the value where to find the Google application credential file. This is where my example is different to what is documented because I am not using integrated cloud authentication because my cluster is running locally.

...
    spec:
      containers:
...
      - env:
        - name: GOOGLE_APPLICATION_CREDENTIALS
          value: /tmp/.gcp/credentials/sops-gcp
        name: manager
        volumeMounts:
        - mountPath: /tmp/.gcp/credentials
          name: sops-gcp
          readOnly: true
      volumes:
      - name: sops-gcp
        secret:
          defaultMode: 420
          secretName: sops-gcp
...

In the Kustomize object you enable the sops decryption provider and the controller automatically decrypts and applies secrets in the next reconcile loop.

apiVersion: kustomize.toolkit.fluxcd.io/v1beta1
kind: Kustomization
metadata:
  name: cluster
  namespace: gotk-system
spec:
  decryption:
    provider: sops
  interval: 5m0s
  path: ./clusters/cluster-dev
  prune: true
  sourceRef:
    kind: GitRepository
    name: github-source

This takes a few minutes until the sync is completed and we can find out if the example secret got created correctly.

$ kubectl get secrets mysecret -n default -o yaml
apiVersion: v1
data:
  password: MWYyZDFlMmU2N2Rm
  username: YWRtaW4=
kind: Secret
metadata:
  name: mysecret
  namespace: default
  resourceVersion: "3439293"
  selfLink: /api/v1/namespaces/default/secrets/mysecret
  uid: 4a009675-3c89-448b-bb86-6211cec3d4ea
type: Opaque

This is how to use SOPS and Flux CD v2 to decrypt and apply Kubernetes secrets using GitOps.

Getting started with Kubernetes Operators in Go

In the past few weeks I started to learn Go and beginners like me can make quick progress once you understand the structure and some basics about the programming language. I felt that from all the learning and reading I’ve done on Go and Kubernetes operators, I had enough knowledge to start writing my own Kubernetes operator in Go.

At the beginning of last year, RedHat released the operator-sdk which helps to create the scaffolding for writing your own operators in Ansible, Helm or natively in Go. There has been quite a few changes along the way around the operator-sdk and it is maturing a lot over the course of the past year.

The instructions on how to install Go can be found on the Go website and we need the latest version of the operator-sdk:

$ wget https://github.com/operator-framework/operator-sdk/releases/download/v1.2.0/operator-sdk-v1.2.0-x86_64-linux-gnu
$ mv operator-sdk-v1.2.0-x86_64-linux-gnu operator-sdk
$ sudo mv operator-sdk /usr/local/bin/

Create a new folder and start to initialise the project. You see that I have already set the option --domain so all API groups will be <-group->.helloworld.io. The --repo option allows me to create the project folder outside of my $GOPATH environment. Infos about the folder structure you can find in the Kubebuilder documentation:

$ mkdir k8s-helloworld-operator
$ cd k8s-helloworld-operator
$ operator-sdk init --domain=helloworld.io --repo=github.com/berndonline/k8s-helloworld-operator

The last thing we need before we start writing the operator is to create a new API and Controller and this will scaffold the operator API at api/v1alpha1/operator_types.go and the controller at controllers/operator_controller.go.

$ operator-sdk create api --group app --version v1alpha1 --kind Operator
Create Resource [y/n]
y
Create Controller [y/n]
y
Writing scaffold for you to edit...
api/v1alpha1/operator_types.go
controllers/operator_controller.go
...
  • Define your API

Define your API for the operator custom resource by editing the Go type definitions at api/v1alpha1/operator_types.go

// OperatorSpec defines the desired state of Operator
type OperatorSpec struct {
	// INSERT ADDITIONAL SPEC FIELDS - desired state of cluster
	// Important: Run "make" to regenerate code after modifying this file

	// Foo is an example field of Operator. Edit Operator_types.go to remove/update
	Size     int32  `json:"size"`
	Image    string `json:"image"`
	Response string `json:"response"`
}
// OperatorStatus defines the observed state of Operator
type OperatorStatus struct {
	// INSERT ADDITIONAL STATUS FIELD - define observed state of cluster
	// Important: Run "make" to regenerate code after modifying this file
	Nodes []string `json:"nodes"`
}

// Operator is the Schema for the operators API
// +kubebuilder:subresource:status
type Operator struct {
	metav1.TypeMeta   `json:",inline"`
	metav1.ObjectMeta `json:"metadata,omitempty"`

	Spec   OperatorSpec   `json:"spec,omitempty"`
	Status OperatorStatus `json:"status,omitempty"`
}

After modifying the _types.go file you always need to run the following command to update the generated code for that resource type:

$ make generate 
/home/ubuntu/.go/bin/controller-gen object:headerFile="hack/boilerplate.go.txt" paths="./..."
  • Generate Custom Resource Definition (CRD) manifests

In the previous step we defined the API with spec and status fields of the CRD manifests, which can be generated and updated with the following command:

$ make manifests
/home/ubuntu/.go/bin/controller-gen "crd:trivialVersions=true" rbac:roleName=manager-role webhook paths="./..." output:crd:artifacts:config=config/crd/bases

This makefile will invoke the controller-gen to generate the CRD manifests at config/crd/bases/app.helloworld.io_operators.yaml and below you see my custom resource example for the operator:

apiVersion: app.helloworld.io/v1alpha1
kind: Operator
metadata:
  name: operator-sample
spec:
  size: 1
  response: "Hello, World!"
  image: "ghcr.io/berndonline/k8s/go-helloworld:latest"
  • Controller

In the beginning when I created the API, the operator-sdk automatically created the controller file for me at controllers/operator_controller.go which we now start to modify and add the Go code. I will not go into every detail because the different resources you will create will all look very similar and repeat like you will see in example code. I will mainly focus on the Deployment for my Helloworld container image which I want to deploy using the operator.

Let’s start looking at the deploymentForOperator function which defines and returns the Kubernetes Deployment object. You see there that I invoke an imported Go packages like &appsv1.Deployment and the import is defined at the top of the controller file. You can find details about this in the Go Doc reference: godoc.org/k8s.io/api/apps/v1

// deploymentForOperator returns a operator Deployment object
func (r *OperatorReconciler) deploymentForOperator(m *appv1alpha1.Operator) *appsv1.Deployment {
	ls := labelsForOperator(m.Name)
	replicas := m.Spec.Size

	dep := &appsv1.Deployment{
		ObjectMeta: metav1.ObjectMeta{
			Name:      m.Name,
			Namespace: m.Namespace,
		},
		Spec: appsv1.DeploymentSpec{
			Replicas: &replicas,
			Selector: &metav1.LabelSelector{
				MatchLabels: ls,
			},
			Template: corev1.PodTemplateSpec{
				ObjectMeta: metav1.ObjectMeta{
					Labels: ls,
				},
				Spec: corev1.PodSpec{
					Containers: []corev1.Container{{
						Image:           m.Spec.Image,
						ImagePullPolicy: "Always",
						Name:            "helloworld",
						Ports: []corev1.ContainerPort{{
							ContainerPort: 8080,
							Name:          "operator",
						}},
						Env: []corev1.EnvVar{{
							Name:  "RESPONSE",
							Value: m.Spec.Response,
						}},
						EnvFrom: []corev1.EnvFromSource{{
							ConfigMapRef: &corev1.ConfigMapEnvSource{
								LocalObjectReference: corev1.LocalObjectReference{
									Name: m.Name,
								},
							},
						}},
						VolumeMounts: []corev1.VolumeMount{{
							Name:      m.Name,
							ReadOnly:  true,
							MountPath: "/helloworld/",
						}},
					}},
					Volumes: []corev1.Volume{{
						Name: m.Name,
						VolumeSource: corev1.VolumeSource{
							ConfigMap: &corev1.ConfigMapVolumeSource{
								LocalObjectReference: corev1.LocalObjectReference{
									Name: m.Name,
								},
							},
						},
					}},
				},
			},
		},
	}

	// Set Operator instance as the owner and controller
	ctrl.SetControllerReference(m, dep, r.Scheme)
	return dep
}

We have defined the deploymentForOperator function and now we can look into the Reconcile function and add the step to check if the deployment already exists and, if not, to create the new deployment:

// Check if the deployment already exists, if not create a new one
found := &appsv1.Deployment{}
err = r.Get(ctx, types.NamespacedName{Name: operator.Name, Namespace: operator.Namespace}, found)
if err != nil && errors.IsNotFound(err) {
	// Define a new deployment
	dep := r.deploymentForOperator(operator)
	log.Info("Creating a new Deployment", "Deployment.Namespace", dep.Namespace, "Deployment.Name", dep.Name)
	err = r.Create(ctx, dep)
	if err != nil {
		log.Error(err, "Failed to create new Deployment", "Deployment.Namespace", dep.Namespace, "Deployment.Name", dep.Name)
		return ctrl.Result{}, err
	}
	// Deployment created successfully - return and requeue
	return ctrl.Result{Requeue: true}, nil
} else if err != nil {
	log.Error(err, "Failed to get Deployment")
	return ctrl.Result{}, err
}

Unfortunately this isn’t enough because this will only check if the deployment exists or not and create a new deployment, but it will not update the deployment if the custom resource is changed.

We need to add two more steps to check if the created Deployment Spec.Template matches the Spec.Template from the  deploymentForOperator function and the Deployment Spec.Replicas the defined size from the custom resource. I will make use of the defined variable found := &appsv1.Deployment{} from the previous step when I checked if the deployment exists.

// Check if the deployment Spec.Template, matches the found Spec.Template
deploy := r.deploymentForOperator(operator)
if !equality.Semantic.DeepDerivative(deploy.Spec.Template, found.Spec.Template) {
	found = deploy
	log.Info("Updating Deployment", "Deployment.Namespace", found.Namespace, "Deployment.Name", found.Name)
	err := r.Update(ctx, found)
	if err != nil {
		log.Error(err, "Failed to update Deployment", "Deployment.Namespace", found.Namespace, "Deployment.Name", found.Name)
		return ctrl.Result{}, err
	}
	return ctrl.Result{Requeue: true}, nil
}

// Ensure the deployment size is the same as the spec
size := operator.Spec.Size
if *found.Spec.Replicas != size {
	found.Spec.Replicas = &size
	err = r.Update(ctx, found)
	if err != nil {
		log.Error(err, "Failed to update Deployment", "Deployment.Namespace", found.Namespace, "Deployment.Name", found.Name)
		return ctrl.Result{}, err
	}
	// Spec updated - return and requeue
	return ctrl.Result{Requeue: true}, nil
}

The SetupWithManager() function in controllers/operator_controller.go specifies how the controller is built to watch a custom resource and other resources that are owned and managed by that controller.

func (r *OperatorReconciler) SetupWithManager(mgr ctrl.Manager) error {
	return ctrl.NewControllerManagedBy(mgr).
		For(&appv1alpha1.Operator{}).
		Owns(&appsv1.Deployment{}).
		Owns(&corev1.ConfigMap{}).
		Owns(&corev1.Service{}).
		Owns(&networkingv1beta1.Ingress{}).
		Complete(r)
}

Basically that’s all I need to write for the controller to deploy my Helloworld container image using an Kubernetes operator. In my code example you will find that I also create a Kubernetes Service, Ingress and ConfigMap but you see that this mostly repeats what I have done with the Deployment object.

  • RBAC permissions

Before we can start running the operator, we need to define the RBAC permissions the controller needs to interact with the resources it manages otherwise your controller will not work. These are specified via [RBAC markers] like these:

// +kubebuilder:rbac:groups=app.helloworld.io,resources=operators,verbs=get;list;watch;create;update;patch;delete
// +kubebuilder:rbac:groups=app.helloworld.io,resources=operators/status,verbs=get;update;patch
// +kubebuilder:rbac:groups=app.helloworld.io,resources=operators/finalizers,verbs=update
// +kubebuilder:rbac:groups=apps,resources=deployments,verbs=get;list;watch;create;update;patch;delete
// +kubebuilder:rbac:groups=core,resources=services,verbs=get;list;watch;create;update;patch;delete
// +kubebuilder:rbac:groups=core,resources=configmaps,verbs=get;list;watch;create;update;patch;delete
// +kubebuilder:rbac:groups=networking.k8s.io,resources=ingresses,verbs=get;list;watch;create;update;patch;delete
// +kubebuilder:rbac:groups=core,resources=pods,verbs=get;list;watch

The ClusterRole manifest at config/rbac/role.yaml is generated from the above markers via controller-gen with the following command:

$ make manifests 
/home/ubuntu/.go/bin/controller-gen "crd:trivialVersions=true" rbac:roleName=manager-role webhook paths="./..." output:crd:artifacts:config=config/crd/bases
  • Running the Operator

We need a Kubernetes cluster and admin privileges to run the operator. I will use Kind which will run a lightweight Kubernetes cluster in your local Docker engine, which is all I need to run and test my Helloworld operator:

$ ./scripts/create-kind-cluster.sh 
Creating cluster "kind" ...
 ✓ Ensuring node image (kindest/node:v1.19.1) 🖼 
 ✓ Preparing nodes 📦  
 ✓ Writing configuration 📜 
 ✓ Starting control-plane 🕹️ 
 ✓ Installing CNI 🔌 
 ✓ Installing StorageClass 💾 
Set kubectl context to "kind-kind"
You can now use your cluster with:

kubectl cluster-info --context kind-kind

Have a question, bug, or feature request? Let us know! https://kind.sigs.k8s.io/#community 🙂

Before running the operator the custom resource Definition must be registered with the Kubernetes apiserver:

$ make install
/home/ubuntu/.go/bin/controller-gen "crd:trivialVersions=true" rbac:roleName=manager-role webhook paths="./..." output:crd:artifacts:config=config/crd/bases
/usr/bin/kustomize build config/crd | kubectl apply -f -
Warning: apiextensions.k8s.io/v1beta1 CustomResourceDefinition is deprecated in v1.16+, unavailable in v1.22+; use apiextensions.k8s.io/v1 CustomResourceDefinition
customresourcedefinition.apiextensions.k8s.io/operators.app.helloworld.io created

We can now run the operator locally on my workstation:

$ make run
/home/ubuntu/.go/bin/controller-gen object:headerFile="hack/boilerplate.go.txt" paths="./..."
go fmt ./...
go vet ./...
/home/ubuntu/.go/bin/controller-gen "crd:trivialVersions=true" rbac:roleName=manager-role webhook paths="./..." output:crd:artifacts:config=config/crd/bases
go run ./main.go
2020-11-22T18:12:49.023Z	INFO	controller-runtime.metrics	metrics server is starting to listen	{"addr": ":8080"}
2020-11-22T18:12:49.024Z	INFO	setup	starting manager
2020-11-22T18:12:49.025Z	INFO	controller-runtime.manager	starting metrics server	{"path": "/metrics"}
2020-11-22T18:12:49.025Z	INFO	controller	Starting EventSource	{"reconcilerGroup": "app.helloworld.io", "reconcilerKind": "Operator", "controller": "operator", "source": "kind source: /, Kind="}
2020-11-22T18:12:49.126Z	INFO	controller	Starting EventSource	{"reconcilerGroup": "app.helloworld.io", "reconcilerKind": "Operator", "controller": "operator", "source": "kind source: /, Kind="}
2020-11-22T18:12:49.226Z	INFO	controller	Starting EventSource	{"reconcilerGroup": "app.helloworld.io", "reconcilerKind": "Operator", "controller": "operator", "source": "kind source: /, Kind="}
2020-11-22T18:12:49.327Z	INFO	controller	Starting EventSource	{"reconcilerGroup": "app.helloworld.io", "reconcilerKind": "Operator", "controller": "operator", "source": "kind source: /, Kind="}
2020-11-22T18:12:49.428Z	INFO	controller	Starting EventSource	{"reconcilerGroup": "app.helloworld.io", "reconcilerKind": "Operator", "controller": "operator", "source": "kind source: /, Kind="}
2020-11-22T18:12:49.528Z	INFO	controller	Starting Controller	{"reconcilerGroup": "app.helloworld.io", "reconcilerKind": "Operator", "controller": "operator"}
2020-11-22T18:12:49.528Z	INFO	controller	Starting workers	{"reconcilerGroup": "app.helloworld.io", "reconcilerKind": "Operator", "controller": "operator", "worker count": 1}

Let’s open a new terminal and apply the custom resource example:

$ kubectl apply -f config/samples/app_v1alpha1_operator.yaml 
operator.app.helloworld.io/operator-sample created

Going back to the terminal where the operator is running, you see the log messages that it invoke the different functions to deploy the defined resource objects:

2020-11-22T18:15:30.412Z	INFO	controllers.Operator	Creating a new Deployment	{"operator": "default/operator-sample", "Deployment.Namespace": "default", "Deployment.Name": "operator-sample"}
2020-11-22T18:15:30.446Z	INFO	controllers.Operator	Creating a new ConfigMap	{"operator": "default/operator-sample", "ConfigMap.Namespace": "default", "ConfigMap.Name": "operator-sample"}
2020-11-22T18:15:30.453Z	INFO	controllers.Operator	Creating a new Service	{"operator": "default/operator-sample", "Service.Namespace": "default", "Service.Name": "operator-sample"}
2020-11-22T18:15:30.470Z	INFO	controllers.Operator	Creating a new Ingress	{"operator": "default/operator-sample", "Ingress.Namespace": "default", "Ingress.Name": "operator-sample"}
2020-11-22T18:15:30.927Z	DEBUG	controller	Successfully Reconciled	{"reconcilerGroup": "app.helloworld.io", "reconcilerKind": "Operator", "controller": "operator", "name": "operator-sample", "namespace": "default"}
2020-11-22T18:15:33.776Z	DEBUG	controller	Successfully Reconciled	{"reconcilerGroup": "app.helloworld.io", "reconcilerKind": "Operator", "controller": "operator", "name": "operator-sample", "namespace": "default"}
2020-11-22T18:15:35.181Z	DEBUG	controller	Successfully Reconciled	{"reconcilerGroup": "app.helloworld.io", "reconcilerKind": "Operator", "controller": "operator", "name": "operator-sample", "namespace": "default"}

In the default namespace where I applied the custom resource you will see the deployed resources by the operator:

$ kubectl get operators.app.helloworld.io 
NAME              AGE
operator-sample   6m11s
$ kubectl get all
NAME                                   READY   STATUS    RESTARTS   AGE
pod/operator-sample-767897c4b9-8zwsd   1/1     Running   0          2m59s

NAME                      TYPE        CLUSTER-IP      EXTERNAL-IP   PORT(S)    AGE
service/kubernetes        ClusterIP   10.96.0.1               443/TCP    29m
service/operator-sample   ClusterIP   10.96.199.188           8080/TCP   2m59s

NAME                              READY   UP-TO-DATE   AVAILABLE   AGE
deployment.apps/operator-sample   1/1     1            1           2m59s

NAME                                         DESIRED   CURRENT   READY   AGE
replicaset.apps/operator-sample-767897c4b9   1         1         1       2m59s

There is not much else to do other than to build the operator image and push to an image registry so that I can run the operator on a Kubernetes cluster.

$ make docker-build IMG=ghcr.io/berndonline/k8s/helloworld-operator:latest
$ make docker-push IMG=ghcr.io/berndonline/k8s/helloworld-operator:latest
$ kustomize build config/default | kubectl apply -f -

I hope this article is useful for getting you started on writing your own Kubernetes operator in Go.
New Kubernetes GitOps Toolkit – Flux CD v2

I have been using the Flux CD operator for a few month to manage Kubernetes clusters in dev and prod and it is a great tool. When I initially reviewed Flux the first time back then, I liked it because of its simplicity but it was missing some important features such as the possibility to synchronise based on tags instead of a single branch, and configuring the Flux operator through the deployment wasn’t as good and intuitive, and caused some headaches.

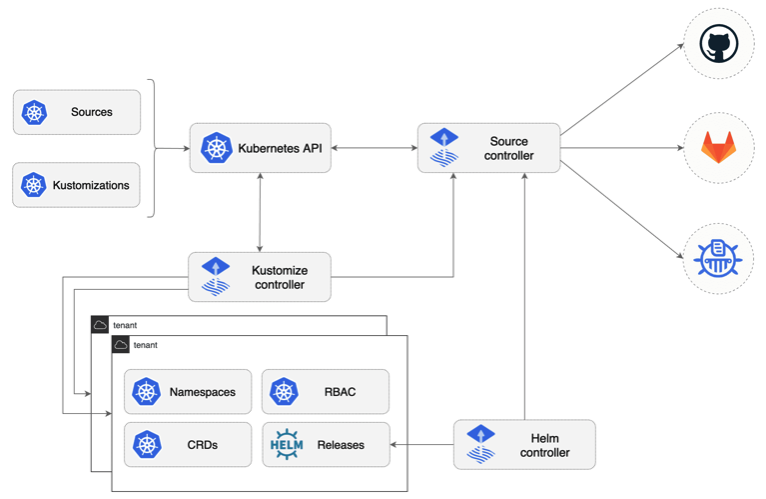
A few days ago I stumbled across the new Flux CD GitOps Toolkit and it got my attention when I saw the new Flux v2 operator architecture. They’ve split the operator functions into three controller and using CRDs to configure Source, Kustomize and Helm configuration:

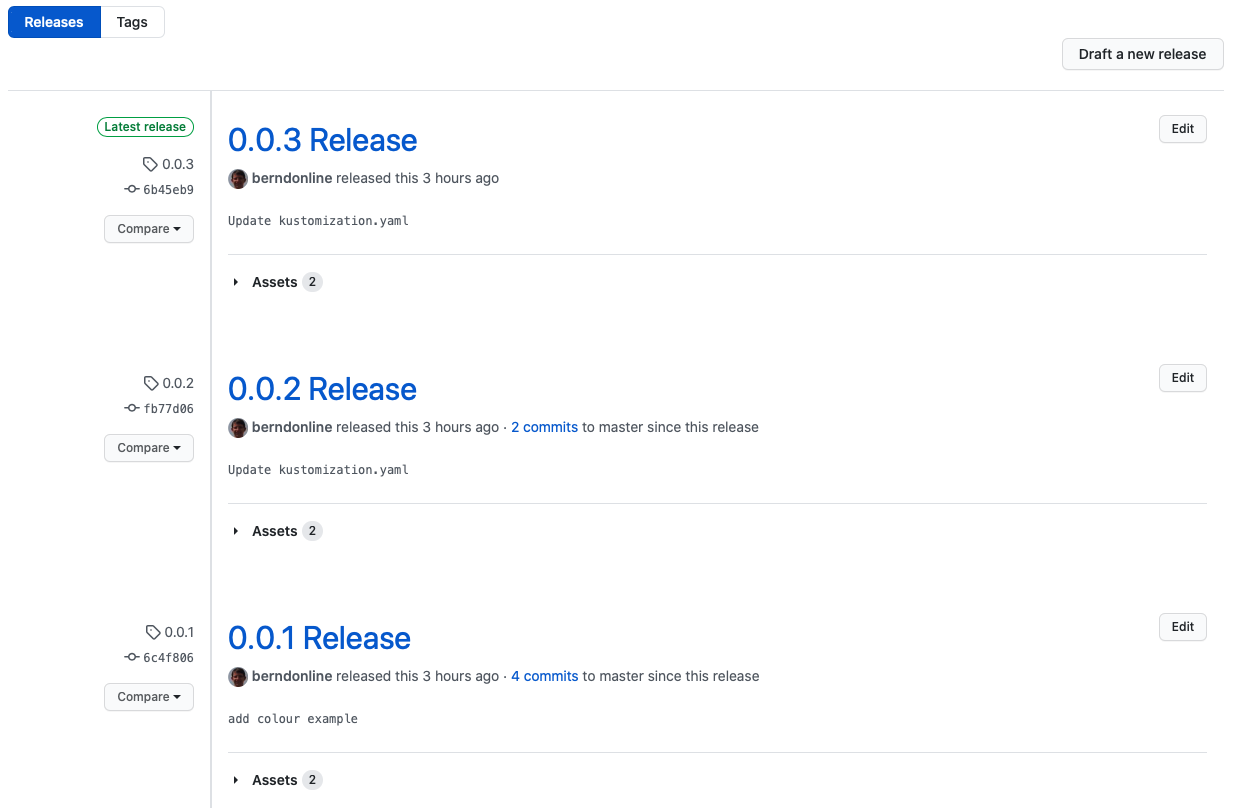
The feature which I was really waiting for was the support for Semantic Versioning semver in your GitRepository source. With this I am able to create platform releases, and can separate non-prod and prod clusters better which makes the deployment of configuration more controlled and flexible than previously with Flux v1.

You can see below the different release versions I’ve created in my cluster management repository:

The following two GitRepository examples; the first one syncs based on a static release tag 0.0.1 and the second syncs within a Semantic version range >=0.0.1 <0.1.0:

---
apiVersion: source.toolkit.fluxcd.io/v1alpha1
kind: GitRepository
metadata:
  creationTimestamp: null
  name: gitops-system
  namespace: gitops-system
spec:
  interval: 1m0s
  ref:
    tag: 0.0.1
  secretRef:
    name: gitops-system
  url: ssh://github.com/berndonline/gitops-toolkit
status: {}
---
apiVersion: source.toolkit.fluxcd.io/v1alpha1
kind: GitRepository
metadata:
  creationTimestamp: null
  name: gitops-system
  namespace: gitops-system
spec:
  interval: 1m0s
  ref:
    semver: '>=0.0.1 <0.1.0'
  secretRef:
    name: gitops-system
  url: ssh://github.com/berndonline/gitops-toolkit
status: {}

There are improvements for the Kustomize configuration to add additional overlays depending on your repository folder structure or combine this with another GitRepository source. In my example repository I have a cluster folder cluster-dev and a folder for common configuration:

.
|____cluster-dev
| |____kustomization.yaml
| |____hello-world_base
| | |____kustomization.yaml
| | |____deploy.yaml
|____common
  |____kustomization.yaml
  |____nginx-service.yaml
  |____nginx_base
    |____kustomization.yaml
    |____service.yaml
    |____nginx.yaml

You can add multiple Kustomize custom resources as you can see in my examples, one for the cluster specific config and a second one for the common configuration with can be applied to multiple clusters:

---
apiVersion: kustomize.toolkit.fluxcd.io/v1alpha1
kind: Kustomization
metadata:
  creationTimestamp: null
  name: cluster-conf
  namespace: gitops-system
spec:
  interval: 5m0s
  path: ./cluster-dev
  prune: true
  sourceRef:
    kind: GitRepository
    name: gitops-system
status: {}
---
apiVersion: kustomize.toolkit.fluxcd.io/v1alpha1
kind: Kustomization
metadata:
  creationTimestamp: null
  name: common-con
  namespace: gitops-system
spec:
  interval: 5m0s
  path: ./common
  prune: true
  sourceRef:
    kind: GitRepository
    name: gitops-system
status: {}

Let’s install the Flux CD GitOps Toolkit. The toolkit comes again with its own command-line utility tk which you use to install and configure the operator . You find available CLI versions on the Github release page.

Set up a  new repository to store you k8s configuration:

$ git clone ssh://github.com/berndonline/gitops-toolkit
$ cd gitops-toolkit
$ mkdir -p ./cluster-dev/gitops-system

Generate the GitOps Toolkit manifests and store under gitops-system folder, afterwards apply the configuration to your k8s cluster:

$ tk install --version=latest \
    --export > ./cluster-dev/gitops-system/toolkit-components.yaml
$ kubectl apply -f ./cluster-dev/gitops-system/toolkit-components.yaml 
namespace/gitops-system created
customresourcedefinition.apiextensions.k8s.io/alerts.notification.toolkit.fluxcd.io created
customresourcedefinition.apiextensions.k8s.io/gitrepositories.source.toolkit.fluxcd.io created
customresourcedefinition.apiextensions.k8s.io/helmcharts.source.toolkit.fluxcd.io created
customresourcedefinition.apiextensions.k8s.io/helmreleases.helm.toolkit.fluxcd.io created
customresourcedefinition.apiextensions.k8s.io/helmrepositories.source.toolkit.fluxcd.io created
customresourcedefinition.apiextensions.k8s.io/kustomizations.kustomize.toolkit.fluxcd.io created
customresourcedefinition.apiextensions.k8s.io/providers.notification.toolkit.fluxcd.io created
customresourcedefinition.apiextensions.k8s.io/receivers.notification.toolkit.fluxcd.io created
role.rbac.authorization.k8s.io/crd-controller-gitops-system created
rolebinding.rbac.authorization.k8s.io/crd-controller-gitops-system created
clusterrolebinding.rbac.authorization.k8s.io/cluster-reconciler-gitops-system created
service/notification-controller created
service/source-controller created
service/webhook-receiver created
deployment.apps/helm-controller created
deployment.apps/kustomize-controller created
deployment.apps/notification-controller created
deployment.apps/source-controller created
networkpolicy.networking.k8s.io/deny-ingress created

Check if all the pods are running and use the command tk check to see if the toolkit is working correctly:

$ kubectl get pod -n gitops-system
NAME                                       READY   STATUS    RESTARTS   AGE
helm-controller-64f846df8c-g4mhv           1/1     Running   0          19s
kustomize-controller-6d9745c8cd-n8tth      1/1     Running   0          19s
notification-controller-587c49f7fc-ldcg2   1/1     Running   0          18s
source-controller-689dcd8bd7-rzp55         1/1     Running   0          18s
$ tk check
► checking prerequisites
✔ kubectl 1.18.3 >=1.18.0
✔ Kubernetes 1.18.6 >=1.16.0
► checking controllers
✔ source-controller is healthy
✔ kustomize-controller is healthy
✔ helm-controller is healthy
✔ notification-controller is healthy
✔ all checks passed

Now you can create a GitRepository custom resource, it will generate a ssh key local and displays the public key which you need to add to your repository deploy keys:

$ tk create source git gitops-system \
  --url=ssh://github.com/berndonline/gitops-toolkit \ 
  --ssh-key-algorithm=ecdsa \
  --ssh-ecdsa-curve=p521 \
  --branch=master \
  --interval=1m
► generating deploy key pair
ecdsa-sha2-nistp521 xxxxxxxxxxx
Have you added the deploy key to your repository: y
► collecting preferred public key from SSH server
✔ collected public key from SSH server:
github.com ssh-rsa xxxxxxxxxxx
► applying secret with keys
✔ authentication configured
✚ generating source
► applying source
✔ source created
◎ waiting for git sync
✗ git clone error: remote repository is empty

Continue with adding the Kustomize configuration:

$ tk create kustomization gitops-system \
  --source=gitops-system \
  --path="./cluster-dev" \
  --prune=true \
  --interval=5m
✚ generating kustomization
► applying kustomization
✔ kustomization created
◎ waiting for kustomization sync
✗ Source is not ready

Afterwards you can add your Kubernetes manifests to your repository and the operator will start synchronising the repository and apply the configuration which you’ve defined.

You can export the Source and Kustomize configuration:

$ tk export source git gitops-system \
 > ./cluster-dev/gitops-system/toolkit-source.yaml
$ tk export kustomization gitops-system \
 > ./cluster-dev/gitops-system/toolkit-kustomization.yaml

You basically finished installing the GitOps Toolkit and below you have some useful commands to reconcile the configured custom resources:

$ tk reconcile source git gitops-system
$ tk reconcile kustomization gitops-system

I was thinking of explaining how to setup a Kubernetes platform repository and do release versioning with the Flux GitOps Toolkit in one of my next articles. Please let me know if you have questions.

Synchronize Cluster Configuration using OpenShift Hive – SyncSets and SelectorSyncSets

It has been some time since my last post but I want to continue my OpenShift Hive article series about Getting started with OpenShift Hive and how to Deploy OpenShift/OKD 4.x clusters using Hive. In this blog post I want to explain how you can use Hive to synchronise cluster configuration using SyncSets. There are two different types of SyncSets, the SyncSet (namespaced custom resource), which you assign to a specific cluster name in the Cluster Deployment Reference, and a SelectorSyncSet (cluster-wide custom resource) using the Cluster Deployment Selector, which uses a label selector to apply configuration to a set of clusters matching the label across cluster namespaces.

Let’s look at the first example of a SyncSet (namespaced resource), which you can see in the example below. In the clusterDeploymentRefs you need to match a cluster name which is created in the same namespace where you create the SyncSet. In SyncSet there are sections where you can create resources or apply patches to a cluster. The last section is secretReference which you use to apply secrets to a cluster without having them in clear text written in the SyncSet:

apiVersion: hive.openshift.io/v1
kind: SyncSet
metadata:
  name: example-syncset
  namespace: okd
spec:
  clusterDeploymentRefs:
  - name: okd
  resources:
  - apiVersion: v1
    kind: Namespace
    metadata:
      name: myproject
  patches:
  - kind: Config
    apiVersion: imageregistry.operator.openshift.io/v1
    name: cluster
    applyMode: AlwaysApply
    patch: |-
      { "spec": { "defaultRoute": true }}
    patchType: merge
  secretReferences:
  - source:
      name: mysecret
      namespace: okd
    target:
      name: mysecret
      namespace: myproject

The second SyncSet example for an SelectorSyncSet (cluster-wide resource) is very similar to the previous example but more flexible because you can use a label selector clusterDeploymentSelector and the configuration can be applied to multiple clusters matching the label across cluster namespaces. Great use-case for common or environment configuration which is the same for all OpenShift clusters:

---
apiVersion: hive.openshift.io/v1
kind: SelectorSyncSet
metadata:
  name: mygroup
spec:
  resources:
  - apiVersion: v1
    kind: Namespace
    metadata:
      name: myproject
  resourceApplyMode: Sync
  clusterDeploymentSelector:
    matchLabels:
      cluster-group: okd

The problem with SyncSets is that they can get pretty large and it is complicated to write them by yourself depending on the size of configuration. My colleague Matt wrote a syncset generator which solves the problem and automatically generates a  SelectorSyncSet, please checkout his github repository:

$ wget -O syncset-gen https://github.com/matt-simons/syncset-gen/releases/download/v0.5/syncset-gen_linux_amd64 && chmod +x ./syncset-gen
$ sudo mv ./syncset-gen /usr/bin/
$ syncset-gen view -h
Parses a manifest directory and prints a SyncSet/SelectorSyncSet representation of the objects it contains.

Usage:
  ss view [flags]

Flags:
  -c, --cluster-name string   The cluster name used to match the SyncSet to a Cluster
  -h, --help                  help for view
  -p, --patches string        The directory of patch manifest files to use
  -r, --resources string      The directory of resource manifest files to use
  -s, --selector string       The selector key/value pair used to match the SelectorSyncSet to Cluster(s)

Next we need a repository to store the configuration for the OpenShift/OKD clusters. Below you can see a very simple example. The ./config folder contains common configuration which is using a SelectorSyncSet with a clusterDeploymentSelector:

$ tree
.
└── config
    ├── patch
    │   └── cluster-version.yaml
    └── resource
        └── namespace.yaml

To generate a SelectorSyncSet from the ./config folder, run the syncset-gen and the following command options:

$ syncset-gen view okd-cluster-group-selectorsyncset --selector cluster-group/okd -p ./config/patch/ -r ./config/resource/
{
    "kind": "SelectorSyncSet",
    "apiVersion": "hive.openshift.io/v1",
    "metadata": {
        "name": "okd-cluster-group-selectorsyncset",
        "creationTimestamp": null,
        "labels": {
            "generated": "true"
        }
    },
    "spec": {
        "resources": [
            {
                "apiVersion": "v1",
                "kind": "Namespace",
                "metadata": {
                    "name": "myproject"
                }
            }
        ],
        "resourceApplyMode": "Sync",
        "patches": [
            {
                "apiVersion": "config.openshift.io/v1",
                "kind": "ClusterVersion",
                "name": "version",
                "patch": "{\"spec\": {\"channel\": \"stable-4.3\",\"desiredUpdate\": {\"version\": \"4.3.0\", \"image\": \"quay.io/openshift-release-dev/ocp-release@sha256:3a516480dfd68e0f87f702b4d7bdd6f6a0acfdac5cd2e9767b838ceede34d70d\"}}}",
                "patchType": "merge"
            },
            {
                "apiVersion": "rbac.authorization.k8s.io/v1",
                "kind": "ClusterRoleBinding",
                "name": "self-provisioners",
                "patch": "{\"subjects\": null}",
                "patchType": "merge"
            }
        ],
        "clusterDeploymentSelector": {
            "matchExpressions": [
                {
                    "key": "cluster-group/okd",
                    "operator": "Exists"
                }
            ]
        }
    },
    "status": {}
}

To debug SyncSets use the below command in the cluster deployment namespace which can give you a status of whether the configuration has successfully applied or if it has failed to apply:

$ oc get syncsetinstance -n <namespace>
$ oc get syncsetinstances <synsetinstance name> -o yaml

I hope this was useful to get you started using OpenShift Hive and SyncSets to apply configuration to OpenShift/OKD clusters. More information about SyncSets can be found in the OpenShift Hive repository.