In the beginning of 2019 RedHat announced the launch of the OperatorHub.io and a lot of things have happened since then; OpenShift version 4 got released which is fully managed by Kubernetes operators and other vendors started to release their own operators to deploy their applications to Kubernetes. Even creating your own operators is becoming more popular and state-of-the-art if you run your own Kubernetes clusters.
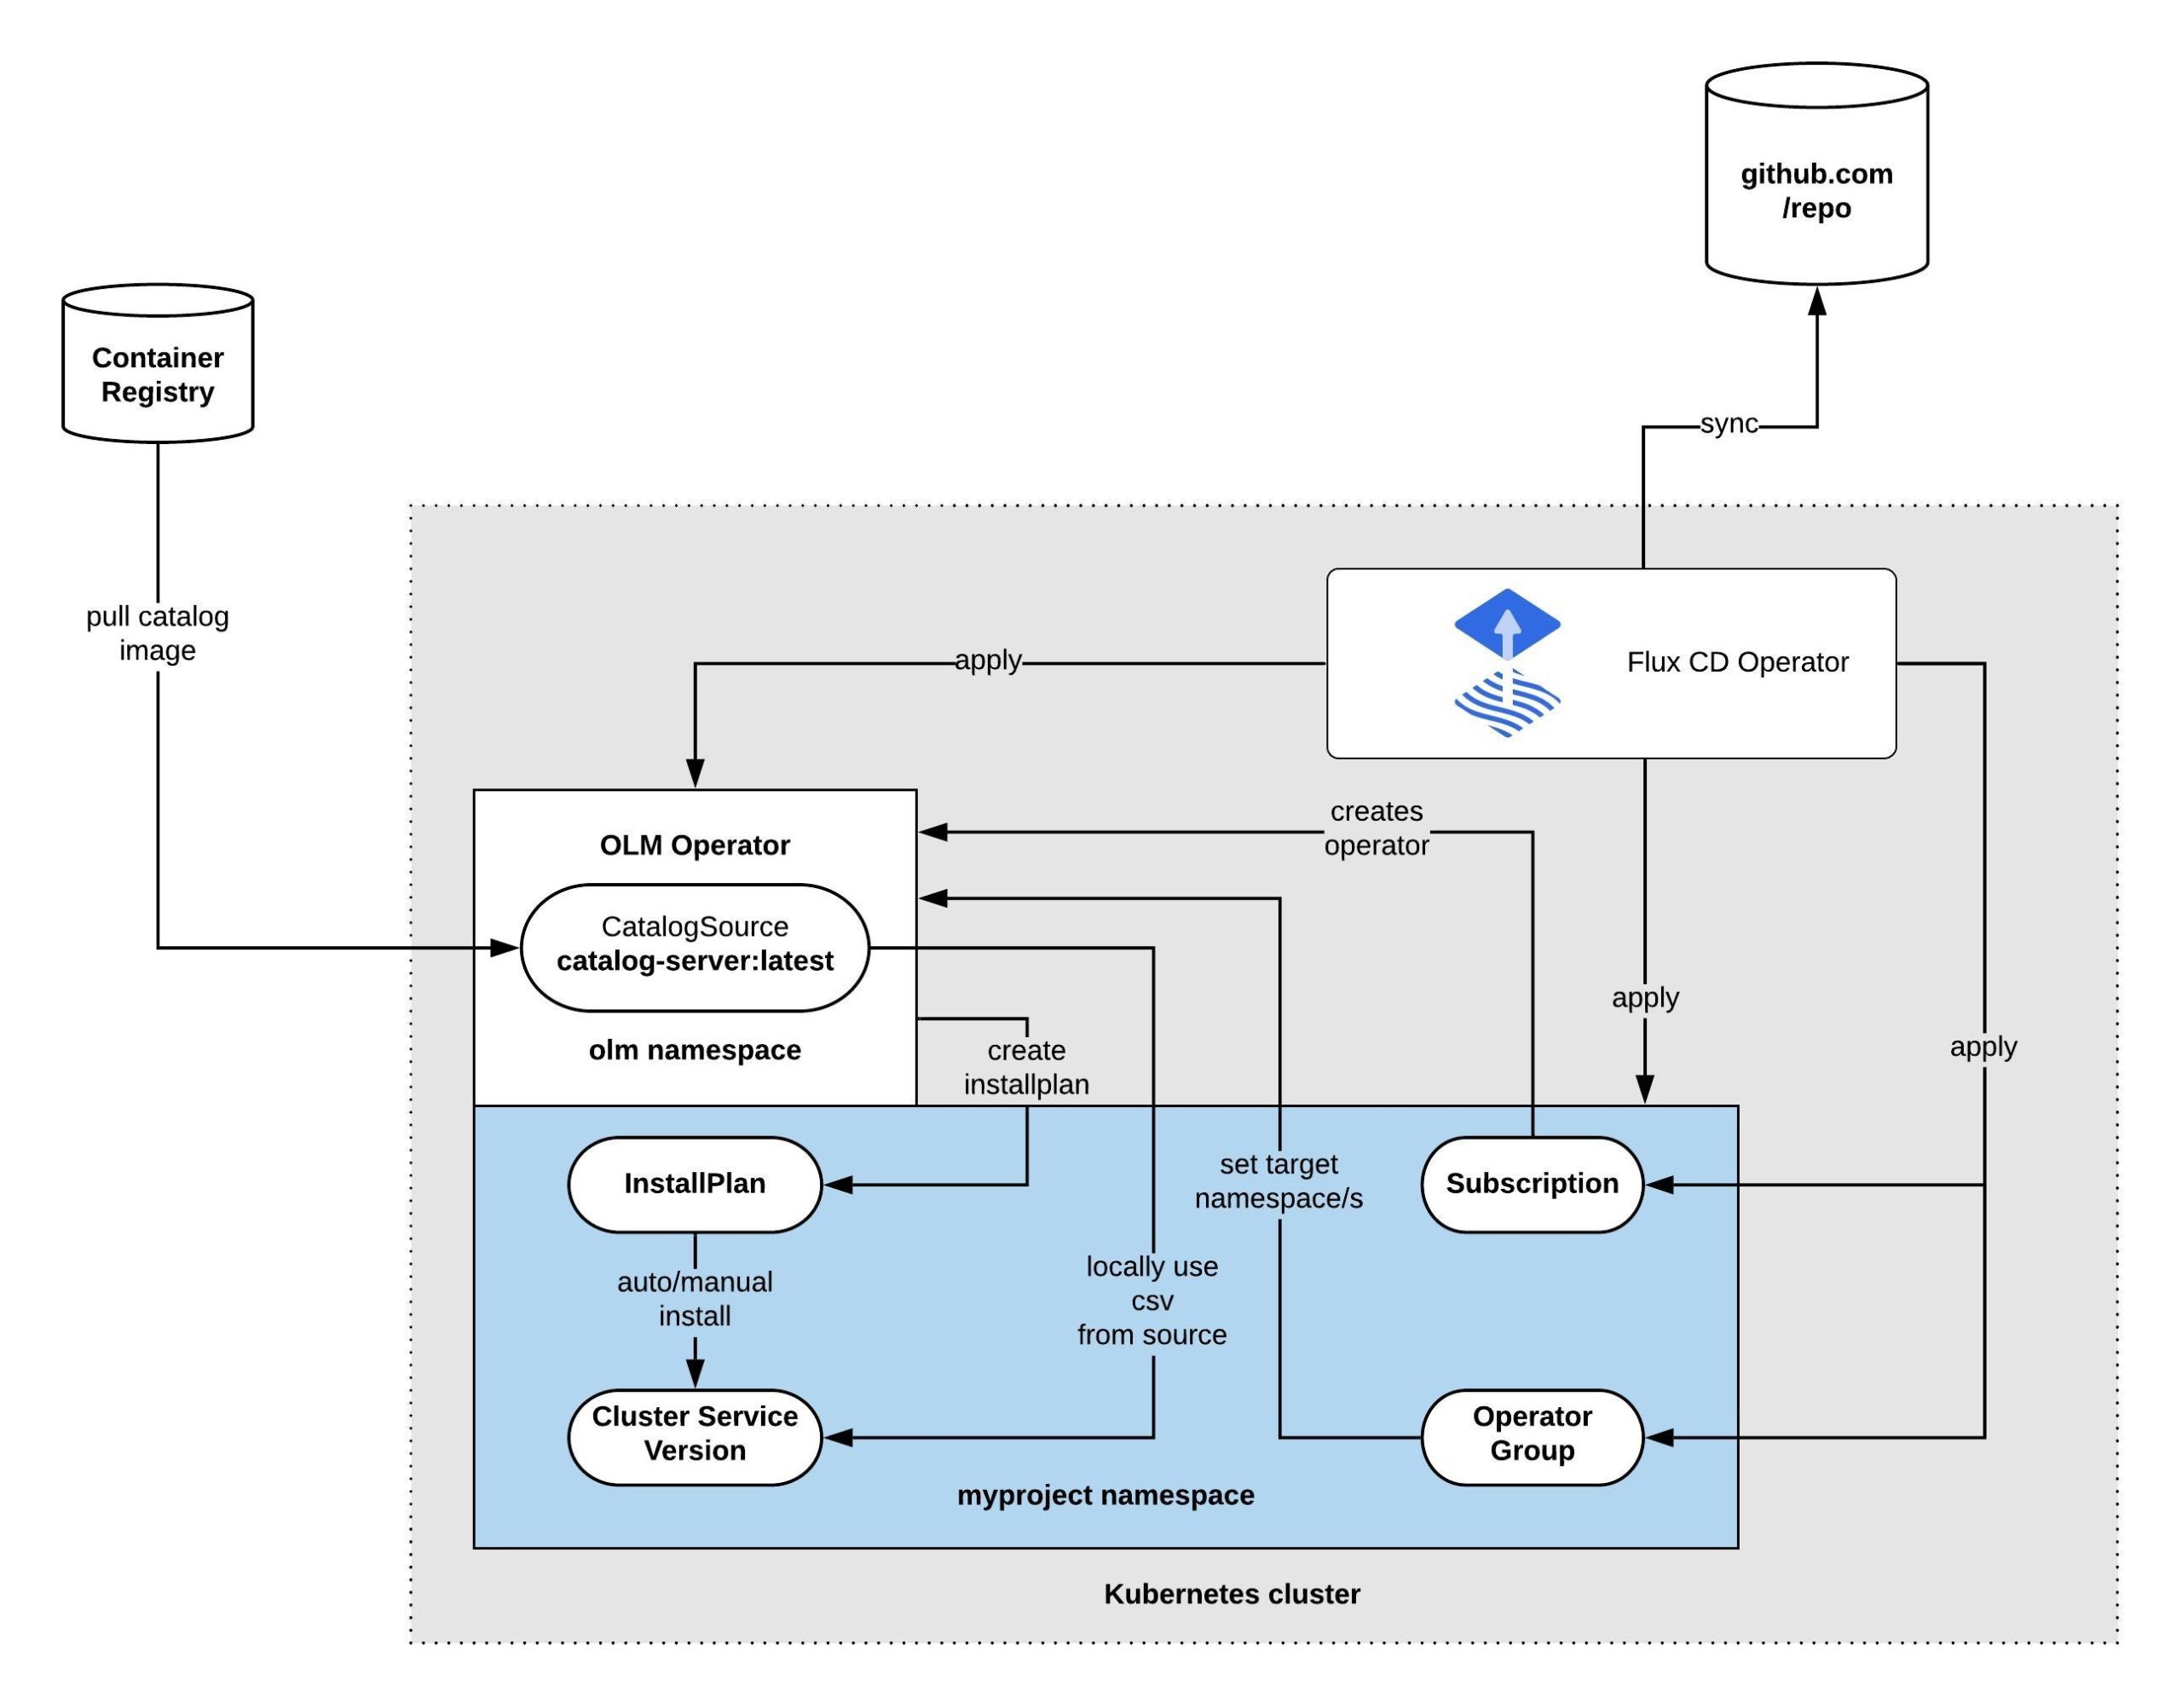
I want to go into the details of how the Operator Lifecycle Manager (OLM) works and how you can create your own operator Catalog Server and use with Kubernetes to install operators but before we start let’s look how this works. The OLM is responsible for installing and managing the lifecycle of Kubernetes operators and uses a CatalogSource from which it installs the operators.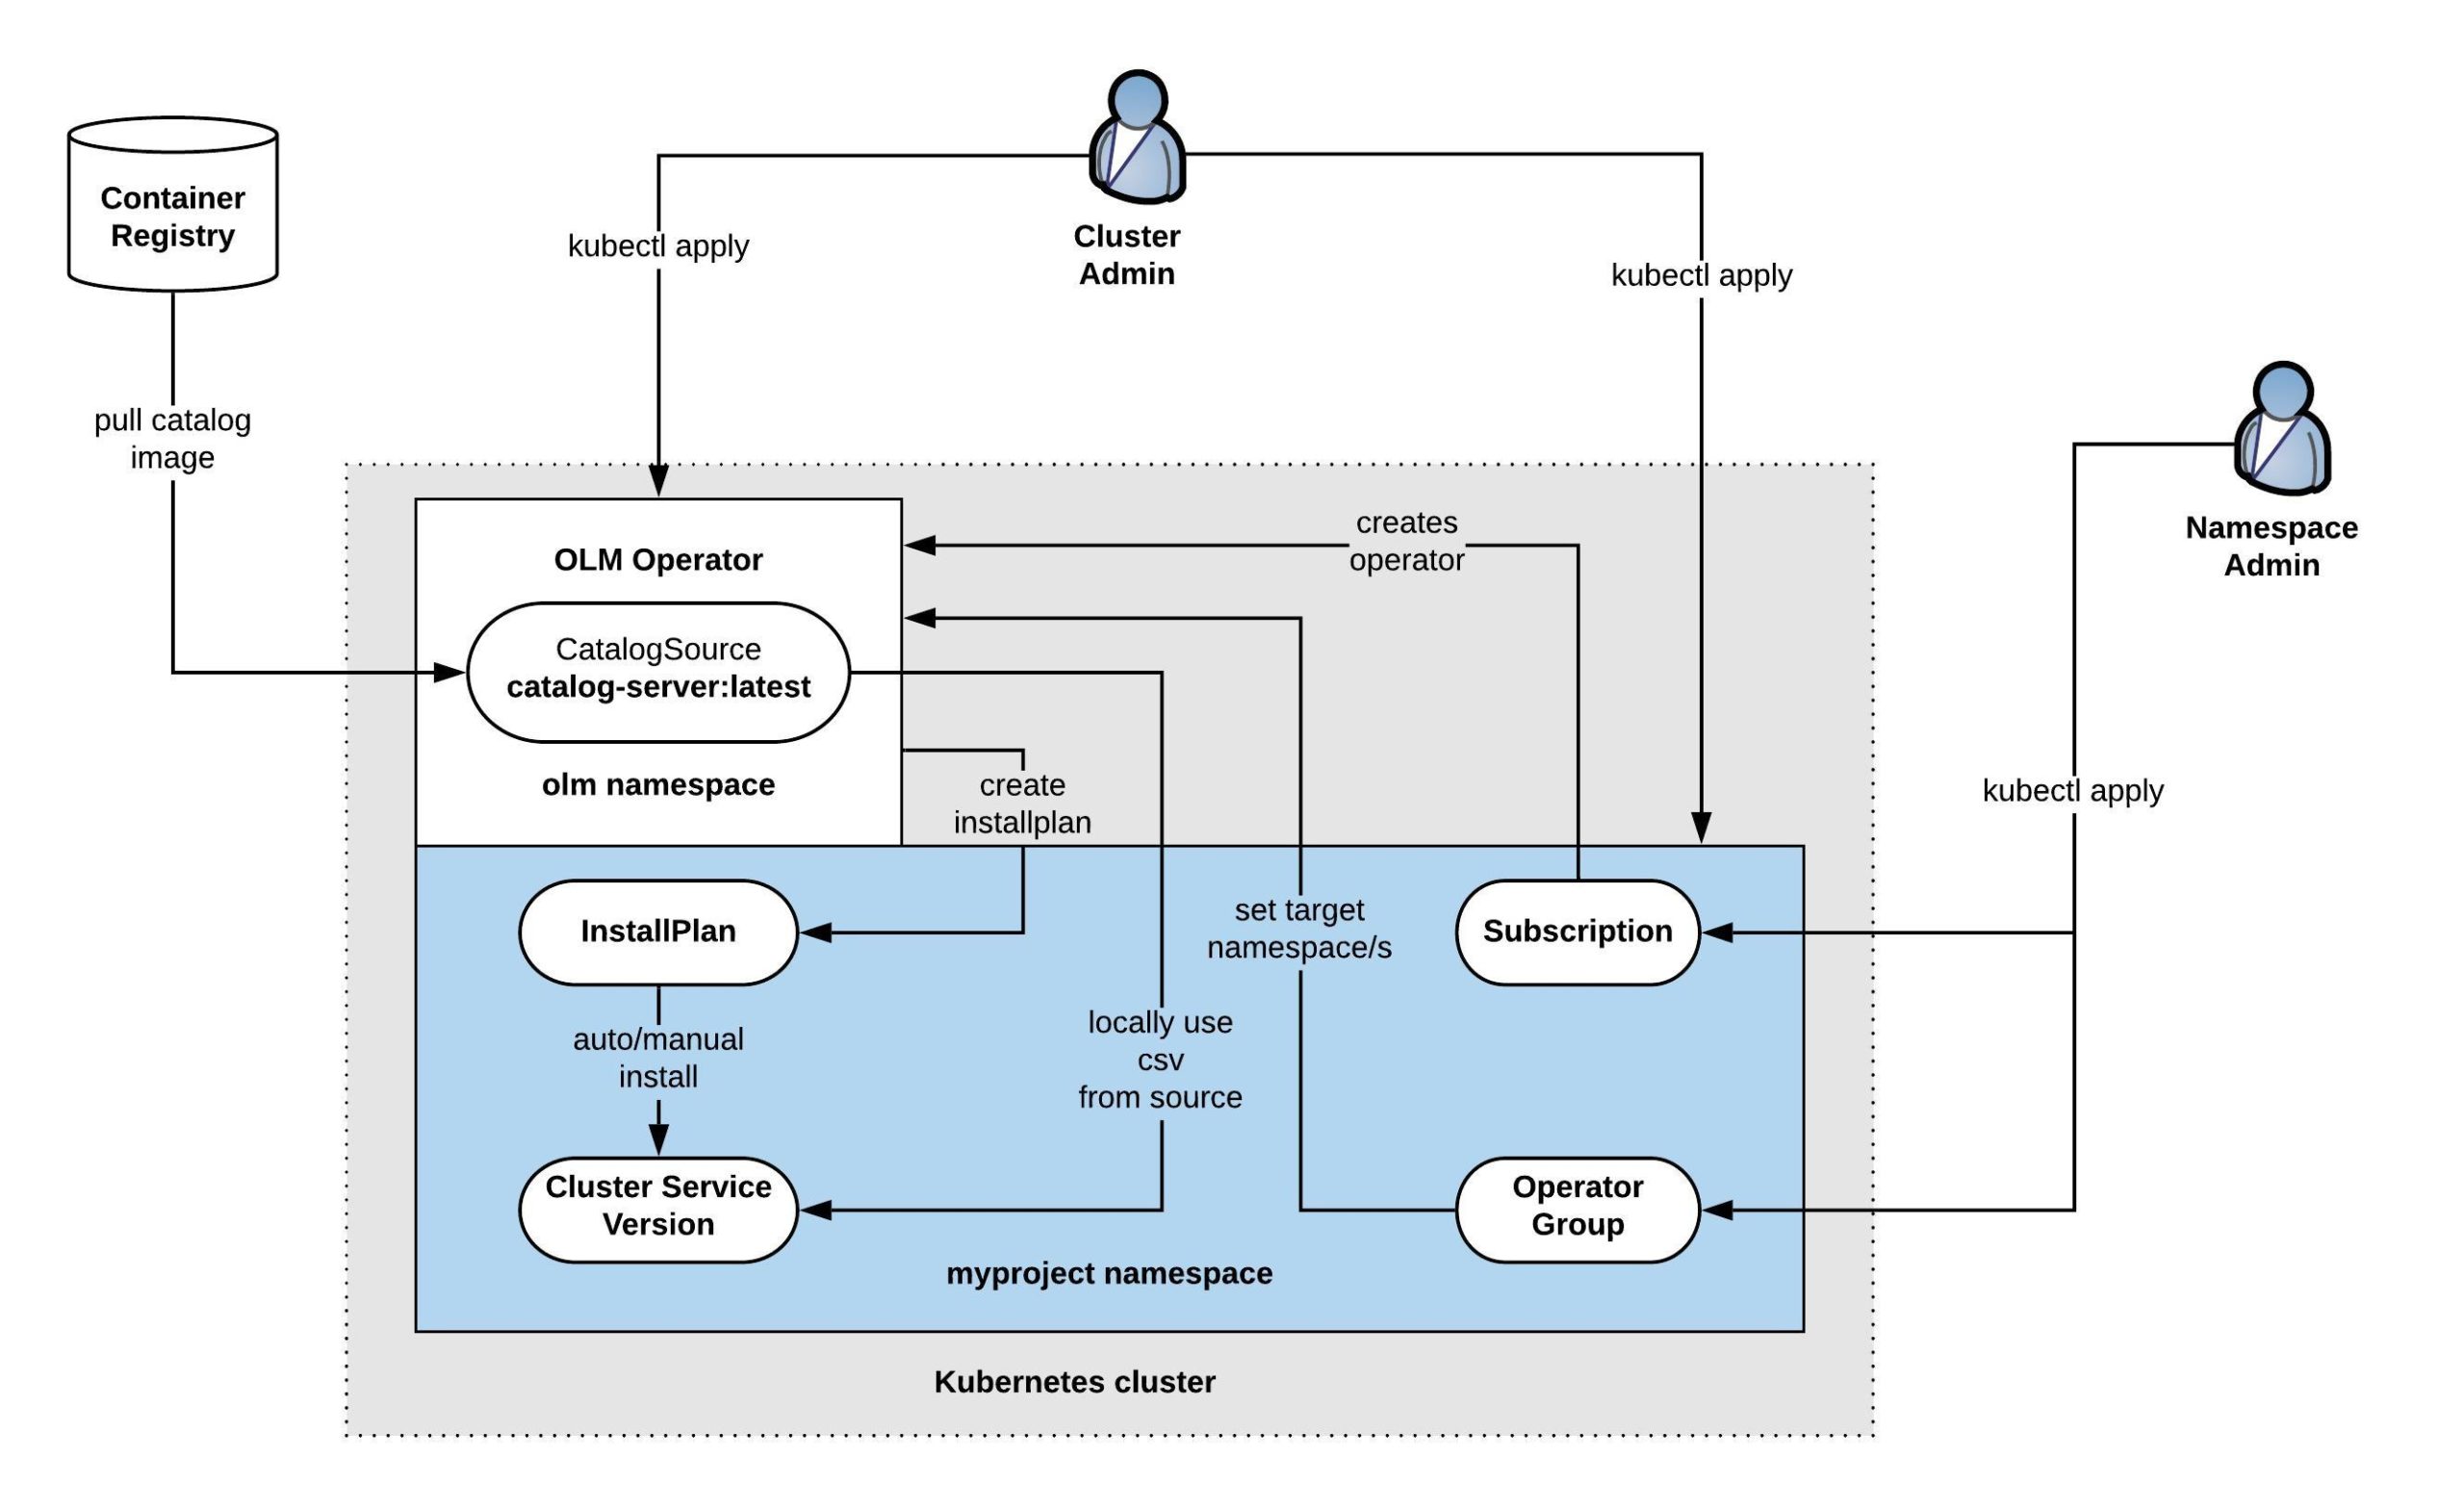
We should start by creating our own Catalog Server which is straightforward: we need to clone the community-operator repository and build a new catalog-server container image. If you would like to modify which operators should be in the catalog just delete the operators in the ./upstream-community-operators/ folder or add your own operators, in my example I only want to keep the SysDig operator:
git clone https://github.com/operator-framework/community-operators
cd community-operators/
rm ci.Dockerfile
mv upstream.Dockerfile Dockerfile
cd upstream-community-operators/
rm -rfv !("sysdig")
cd ..
Now we can build the new catalog container image and push to the registry:
$ docker build . --rm -t berndonline/catalog-server
Sending build context to Docker daemon  23.34MB
Step 1/10 : FROM quay.io/operator-framework/upstream-registry-builder:v1.3.0 as builder
 ---> e08ceacda476
Step 2/10 : COPY upstream-community-operators manifests
 ---> 9e4b4e98a968
Step 3/10 : RUN ./bin/initializer -o ./bundles.db
 ---> Running in b11415b71497
time="2020-01-11T15:14:02Z" level=info msg="loading Bundles" dir=manifests
time="2020-01-11T15:14:02Z" level=info msg=directory dir=manifests file=manifests load=bundles
time="2020-01-11T15:14:02Z" level=info msg=directory dir=manifests file=sysdig load=bundles
time="2020-01-11T15:14:02Z" level=info msg=directory dir=manifests file=1.4.0 load=bundles
time="2020-01-11T15:14:02Z" level=info msg="found csv, loading bundle" dir=manifests file=sysdig-operator.v1.4.0.clusterserviceversion.yaml load=bundles
time="2020-01-11T15:14:02Z" level=info msg="loading bundle file" dir=manifests file=sysdig-operator.v1.4.0.clusterserviceversion.yaml load=bundle
time="2020-01-11T15:14:02Z" level=info msg="loading bundle file" dir=manifests file=sysdigagents.sysdig.com.crd.yaml load=bundle
time="2020-01-11T15:14:02Z" level=info msg=directory dir=manifests file=1.4.7 load=bundles
time="2020-01-11T15:14:02Z" level=info msg="found csv, loading bundle" dir=manifests file=sysdig-operator.v1.4.7.clusterserviceversion.yaml load=bundles
time="2020-01-11T15:14:02Z" level=info msg="loading bundle file" dir=manifests file=sysdig-operator.v1.4.7.clusterserviceversion.yaml load=bundle
time="2020-01-11T15:14:02Z" level=info msg="loading bundle file" dir=manifests file=sysdigagents.sysdig.com.crd.yaml load=bundle
time="2020-01-11T15:14:02Z" level=info msg="loading Packages and Entries" dir=manifests
time="2020-01-11T15:14:02Z" level=info msg=directory dir=manifests file=manifests load=package
time="2020-01-11T15:14:02Z" level=info msg=directory dir=manifests file=sysdig load=package
time="2020-01-11T15:14:02Z" level=info msg=directory dir=manifests file=1.4.0 load=package
time="2020-01-11T15:14:02Z" level=info msg=directory dir=manifests file=1.4.7 load=package
Removing intermediate container b11415b71497
 ---> d3e1417fd1ee
Step 4/10 : FROM scratch
 --->
Step 5/10 : COPY --from=builder /build/bundles.db /bundles.db
 ---> 32c4b0ba7422
Step 6/10 : COPY --from=builder /build/bin/registry-server /registry-server
 ---> 5607183f50e7
Step 7/10 : COPY --from=builder /bin/grpc_health_probe /bin/grpc_health_probe
 ---> 6e612705cab1
Step 8/10 : EXPOSE 50051
 ---> Running in 5930349a782e
Removing intermediate container 5930349a782e
 ---> 2a0e6d01f7f5
Step 9/10 : ENTRYPOINT ["/registry-server"]
 ---> Running in 1daf50f151ae
Removing intermediate container 1daf50f151ae
 ---> 9fe3fed7cc2a
Step 10/10 : CMD ["--database", "/bundles.db"]
 ---> Running in 154a8d3bb346
Removing intermediate container 154a8d3bb346
 ---> f4d99376cbef
Successfully built f4d99376cbef
Successfully tagged berndonline/catalog-server:latest
$ docker push berndonline/catalog-server
The push refers to repository [docker.io/berndonline/catalog-server]
0516ee590bf5: Pushed
3bbd78f51bb3: Pushed
e4bd72ca23da: Pushed
latest: digest: sha256:b2251ebb6049a1ea994fd710c9182c89866255011ee50fd2a6eeb55c6de2fa21 size: 947
Next we need to install the Operator Lifecycle Manager, go to the release page in Github and install the latest version. First this will add the Custom Resource Definitions for OLM and afterwards deploys the required OLM operator resources:
kubectl apply -f https://github.com/operator-framework/operator-lifecycle-manager/releases/download/0.13.0/crds.yaml
kubectl apply -f https://github.com/operator-framework/operator-lifecycle-manager/releases/download/0.13.0/olm.yaml
Next we need to add the new CatalogSource and delete the default OperatorHub one to limit which operator can be installed:
cat <<EOF | kubectl apply -n olm -f -
---
apiVersion: operators.coreos.com/v1alpha1
kind: CatalogSource
metadata:
  name: custom-catalog
  namespace: olm
spec:
  sourceType: grpc
  image: docker.io/berndonline/catalog-server:latest
  displayName: Custom Operators
  publisher: techbloc.net
EOF

kubectl delete catalogsource operatorhubio-catalog -n olm
Do a quick check to make sure that the OLM components are running, you will see a pod with the custom-catalog which we previously created:
$ kubectl get pods -n olm
NAME                               READY   STATUS    RESTARTS   AGE
catalog-operator-5bdf7fc7b-wcbcs   1/1     Running   0          100s
custom-catalog-4hrbg               1/1     Running   0          32s
olm-operator-5ff565fcfc-2j9gt      1/1     Running   0          100s
packageserver-7fcbddc745-6s666     1/1     Running   0          88s
packageserver-7fcbddc745-jkfxs     1/1     Running   0          88s
Now we can look for the available operator manifests and see that our Custom Operator catalog only has the SysDig operator available:
$ kubectl get packagemanifests
NAME     CATALOG            AGE
sysdig   Custom Operators   36s
To install the SysDig operator we need to create the namespace, the operator group and the subscription which will instruct OLM to install the SysDig operator:
cat <<EOF | kubectl apply -f -
---
apiVersion: v1
kind: Namespace
metadata:
  name: sysdig
---
apiVersion: operators.coreos.com/v1alpha2
kind: OperatorGroup
metadata:
  name: operatorgroup
  namespace: sysdig
spec:
  targetNamespaces:
  - sysdig
---
apiVersion: operators.coreos.com/v1alpha1
kind: Subscription
metadata:
  name: sysdig
  namespace: sysdig
spec:
  channel: stable
  name: sysdig
  source: custom-catalog
  sourceNamespace: olm
EOF
At the end we need to check if the OLM installed the SysDig operator:
# Check that the subscription is created
$ kubectl get sub -n sysdig
NAME     PACKAGE   SOURCE           CHANNEL
sysdig   sysdig    custom-catalog   stable

# Check that OLM created an InstallPlan for installing the operator
$ kubectl get ip -n sysdig
NAME            CSV                      APPROVAL    APPROVED
install-sf6dl   sysdig-operator.v1.4.7   Automatic   true

# Check that the InstallPlan created the Cluster Service Version and installed the operator
$ kubectl get csv -n sysdig
NAME                     DISPLAY                 VERSION   REPLACES                 PHASE
sysdig-operator.v1.4.7   Sysdig Agent Operator   1.4.7     sysdig-operator.v1.4.0   Succeeded

# Check that the SysDig operator is running
$ kubectl get pod -n sysdig
NAME                               READY   STATUS    RESTARTS   AGE
sysdig-operator-74c9f665d9-bb8l9   1/1     Running   0          46s
Now you can install the SysDig agent by adding the following custom resource:
cat <<EOF | kubectl apply -f -
---
apiVersion: sysdig.com/v1alpha1
kind: SysdigAgent
metadata:
  name: agent
  namespace: sysdig
spec:
  ebpf:
    enabled: true
  secure:
    enabled: true
  sysdig:
    accessKey: XXXXXXX
EOF
To delete the SysDig operator just delete the namespace or run the following commands to delete subscription, operator group and cluster service version:
kubectl delete sub sysdig -n sysdig
kubectl delete operatorgroup operatorgroup -n sysdig
kubectl delete csv sysdig-operator.v1.4.7 -n sysdig
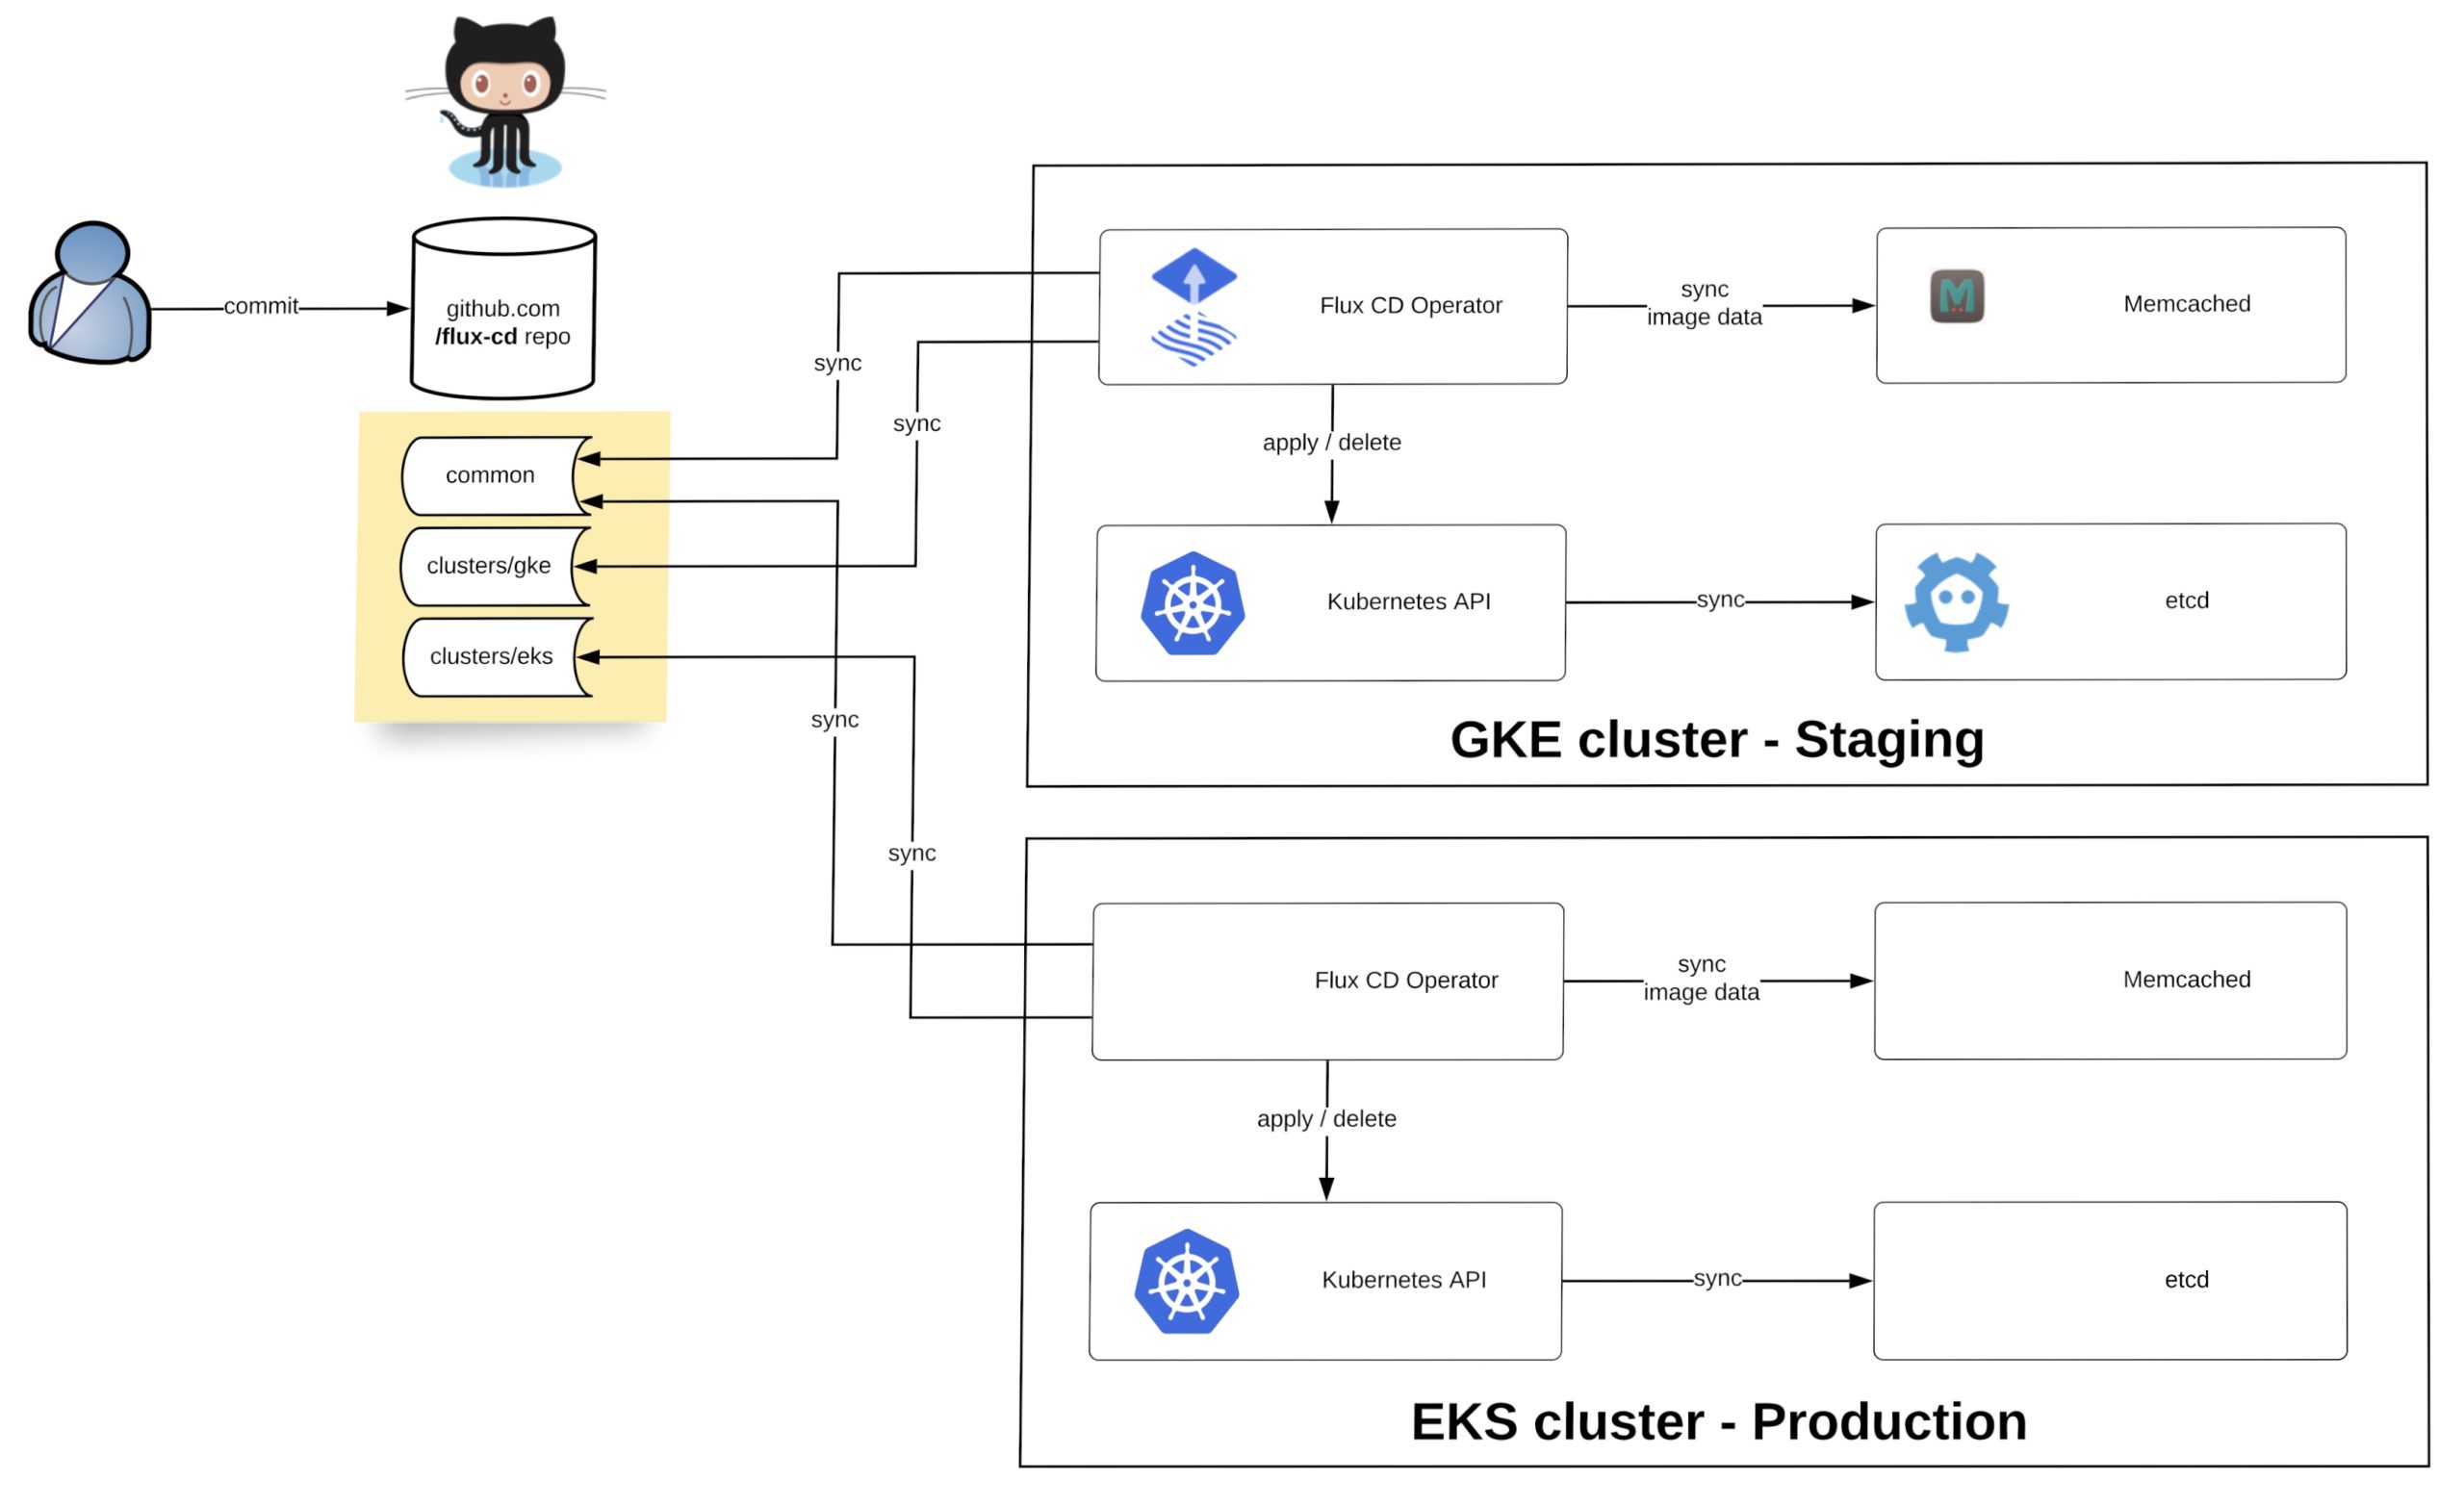
Thinking ahead you can let the Flux-CD operator manage all the resources and only use GitOps to apply cluster configuration:
I hope this article is interesting and useful, if you want to read more information about the Operator Lifecycle Manager please read the olm-book which has some useful information.
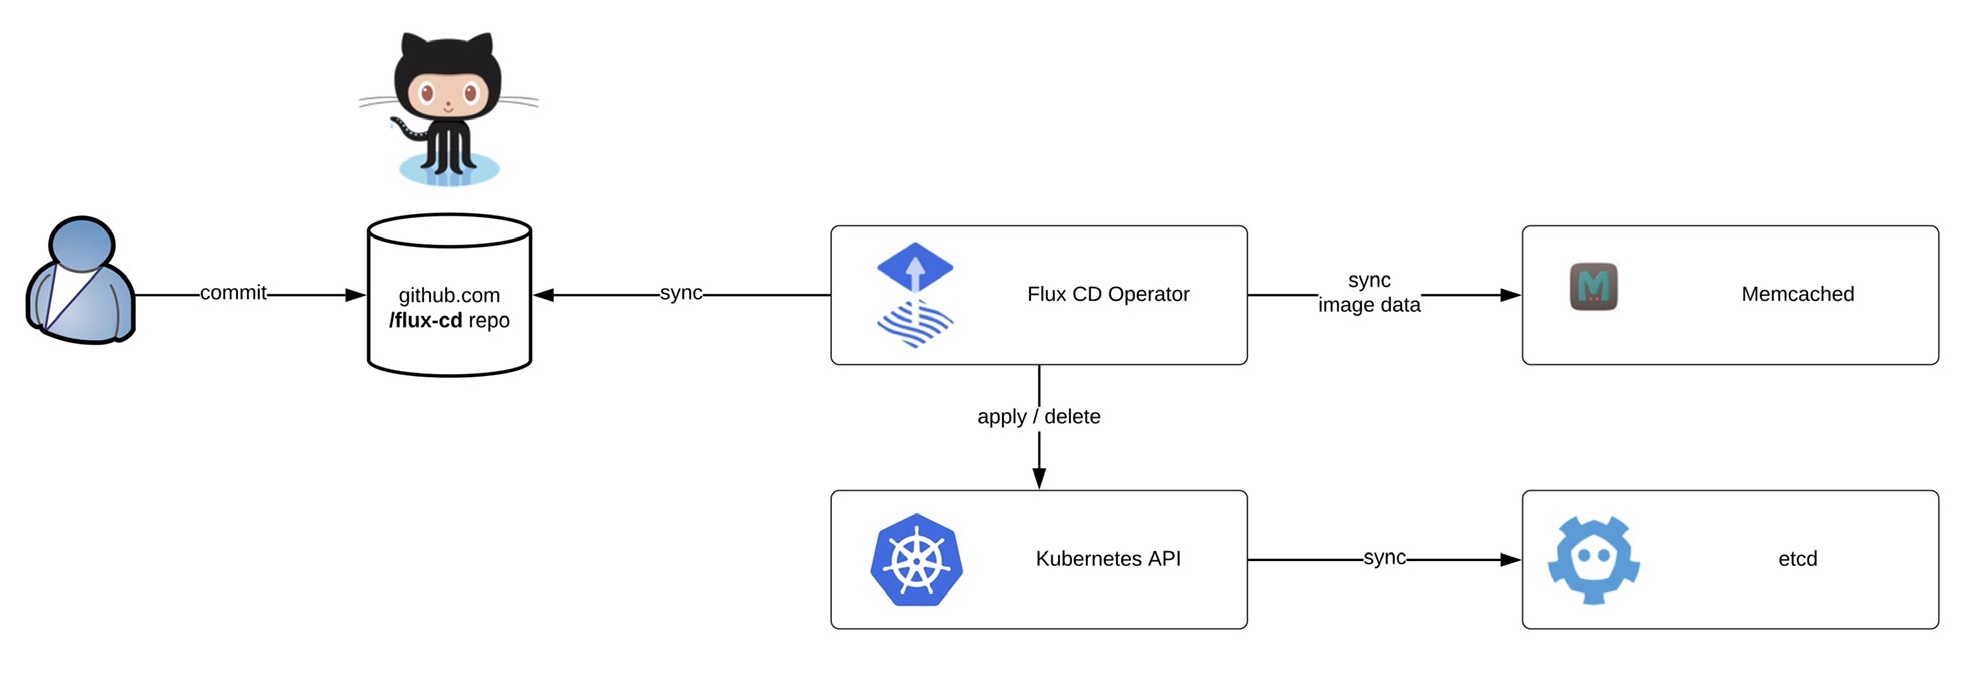 Before we start deploying the operator we need to install the fluxctl command-line utility and create the namespace:
 Now you are ready to synchronise the Flux operator with the repository. By default Flux automatically synchronises every 5 minutes to apply configuration changes: