Getting started with Gitlab-CI for Network Automation

Ken Murphy from networkautomationblog.com asked me to do a more detailed post about how to setup Gitlab-Runner on your local server to use with Gitlab-CI. I will not get into too much detail about the installation because Gitlab has a very detailed information about it which you can find here: https://docs.gitlab.com/runner/install/linux-repository.html

Once the Gitlab Runner is installed on your server you need to configure and register the runner with your Gitlab repo. If you are interested in information about this, you can find the documentation here: https://docs.gitlab.com/runner/register/ but lets continue with how to register the runner.

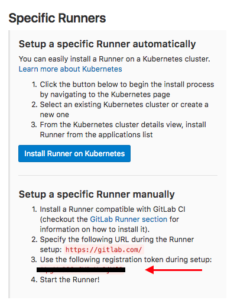
In your project go to ‘Settings -> CI / CD’ to find the registration token:

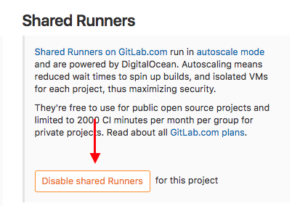
It is important to disable the shared runners:

Now let’s register the gitlab runner:

berndonline@lab ~ # sudo gitlab-runner register
Running in system-mode.

Please enter the gitlab-ci coordinator URL (e.g. https://gitlab.com/):
https://gitlab.com
Please enter the gitlab-ci token for this runner:
xxxxxxxxx
Please enter the gitlab-ci description for this runner:
[lab]:
Please enter the gitlab-ci tags for this runner (comma separated):
lab
Whether to run untagged builds [true/false]:
[false]: true
Whether to lock the Runner to current project [true/false]:
[true]: false
Registering runner... succeeded                     runner=xxxxx
Please enter the executor: docker-ssh, parallels, ssh, virtualbox, kubernetes, docker, shell, docker+machine, docker-ssh+machine:
shell
Runner registered successfully. Feel free to start it, but if it's running already the config should be automatically reloaded!
berndonline@lab ~ #

You will find the main configuration file under /etc/gitlab-runner/config.toml.

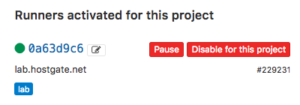
When everything goes well the runner is registered and active, and ready to apply the CI pipeline what is defined in the .gitlab-ci.yml.

To use the runner with Vagrant and KVM (libvirt) there are a few changes needed on the linux server itself, first the gitlab-runner user account needs to be able to control KVM, second the vagrant-libvirt plugin needs to be installed:

usermod -aG libvirtd gitlab-runner
sudo su gitlab-runner
vagrant plugin install vagrant-libvirt

Optional: you may need to copy custom Vagrant boxes into the users vagrant folder ‘/home/gitlab-runner/.vagrant.d/boxes/*’.

Here the example from my Cumulus CI-pipeline .gitlab-ci.yml that I have already shared in my other blog post about Continuous Integration and Delivery for Networking with Cumulus Linux:

---
stages:
    - validate ansible
    - staging
    - production
validate:
    stage: validate ansible
    script:
        - bash ./linter.sh
staging:
    before_script:
        - git clone https://github.com/berndonline/cumulus-lab-vagrant.git
        - cd cumulus-lab-vagrant/
        - python ./topology_converter.py ./topology-production.dot
          -p libvirt --ansible-hostfile
    stage: staging
    script:
        - bash ../staging.sh
production:
    before_script:
        - git clone https://github.com/berndonline/cumulus-lab-vagrant.git
        - cd cumulus-lab-vagrant/
        - python ./topology_converter.py ./topology-production.dot
          -p libvirt --ansible-hostfile
    stage: production
    when: manual
    script:
        - bash ../production.sh
    only:
        - master

The next step is the staging.sh shell script which boots up the vagrant instances and executes the Ansible playbooks. It is better to use a script and report the exit state so that if something goes wrong the Vagrant instances are correctly destroyed.

#!/bin/bash

EXIT=0
vagrant up mgmt-1 --color <<< 'mgmt-1 boot' || EXIT=$?
vagrant up netq-1 --color <<< 'netq-1 boot' || EXIT=$?
sleep 300
vagrant up spine-1 --color <<< 'spine-1 boot' || EXIT=$?
vagrant up spine-2 --color <<< 'spine-2 boot' || EXIT=$?
sleep 60
vagrant up edge-1 --color <<< 'edge-1 boot' || EXIT=$?
vagrant up edge-2 --color <<< 'edge-2 boot' || EXIT=$?
sleep 60
vagrant up leaf-1 --color <<< 'leaf-1 boot' || EXIT=$?
vagrant up leaf-2 --color <<< 'leaf-2 boot' || EXIT=$?
vagrant up leaf-3 --color <<< 'leaf-3 boot' || EXIT=$?
vagrant up leaf-4 --color <<< 'leaf-4 boot' || EXIT=$?
vagrant up leaf-5 --color <<< 'leaf-5 boot' || EXIT=$?
vagrant up leaf-6 --color <<< 'leaf-6 boot' || EXIT=$?
sleep 60
vagrant up server-1 --color <<< 'server-1 boot' || EXIT=$?
vagrant up server-2 --color <<< 'server-2 boot' || EXIT=$?
vagrant up server-3 --color <<< 'server-3 boot' || EXIT=$?
vagrant up server-4 --color <<< 'server-4 boot' || EXIT=$?
vagrant up server-5 --color <<< 'server-5 boot' || EXIT=$?
vagrant up server-6 --color <<< 'server-6 boot' || EXIT=$?
sleep 60
export ANSIBLE_FORCE_COLOR=true
ansible-playbook ./helper_scripts/configure_servers.yml <<< 'ansible playbook' || EXIT=$?
ansible-playbook ../site.yml <<< 'ansible playbook' || EXIT=$?
sleep 60
ansible-playbook ../icmp_check.yml <<< 'icmp check' || EXIT=$?
vagrant destroy -f
echo $EXIT
exit $EXIT

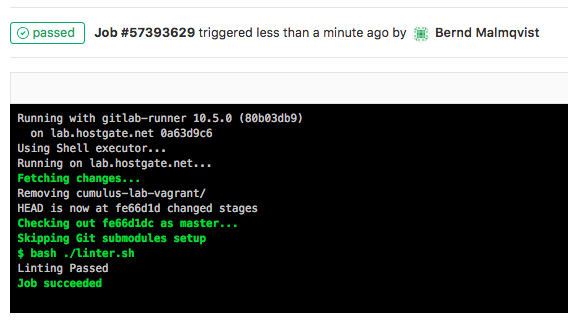
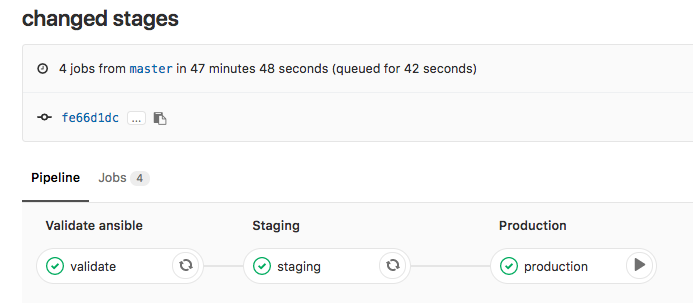
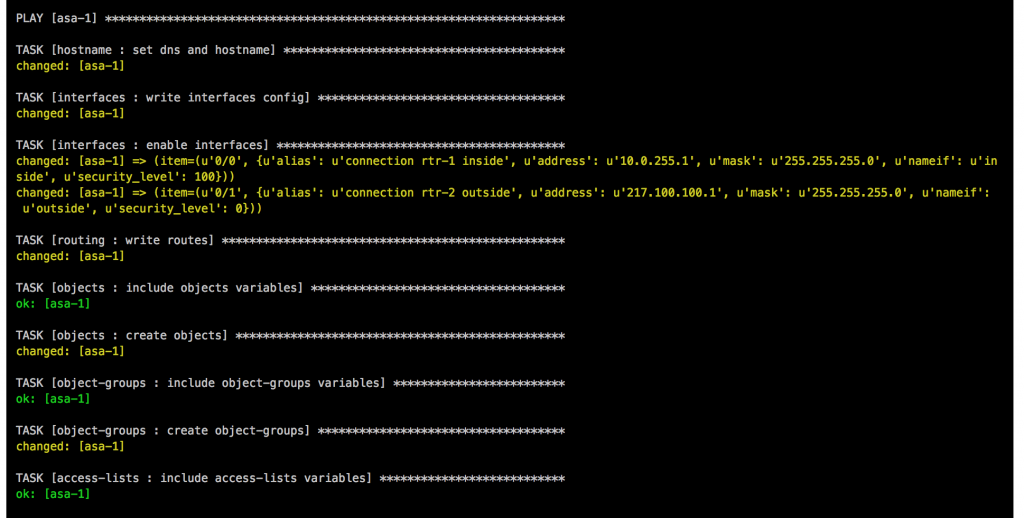
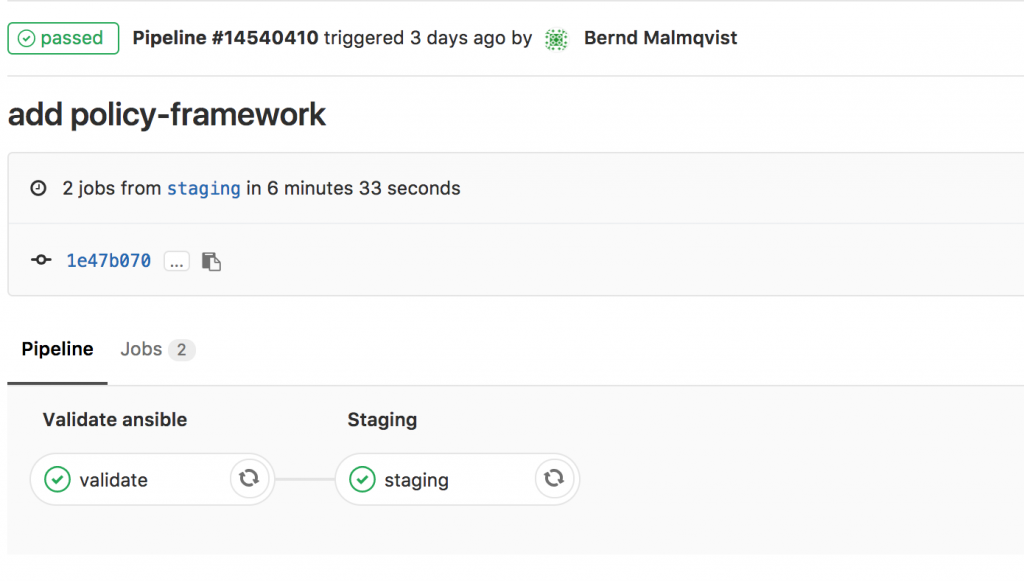
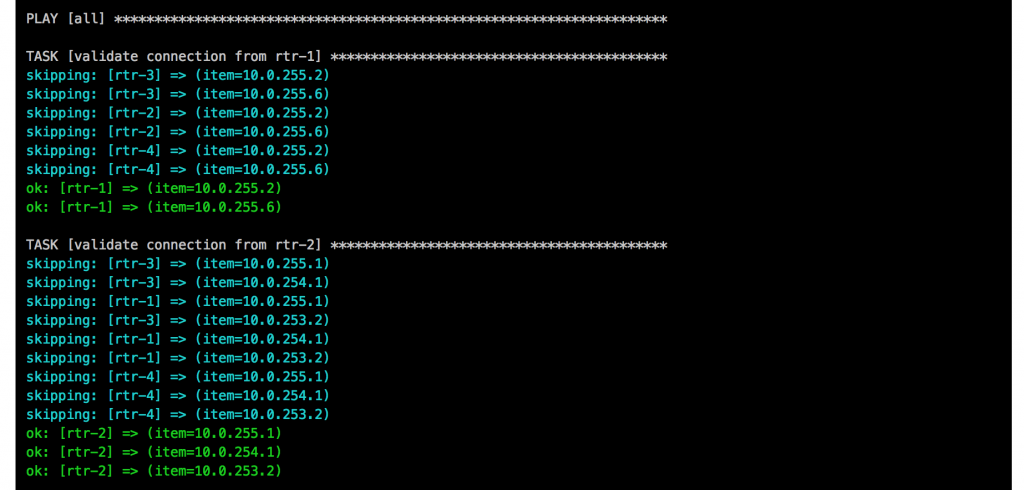
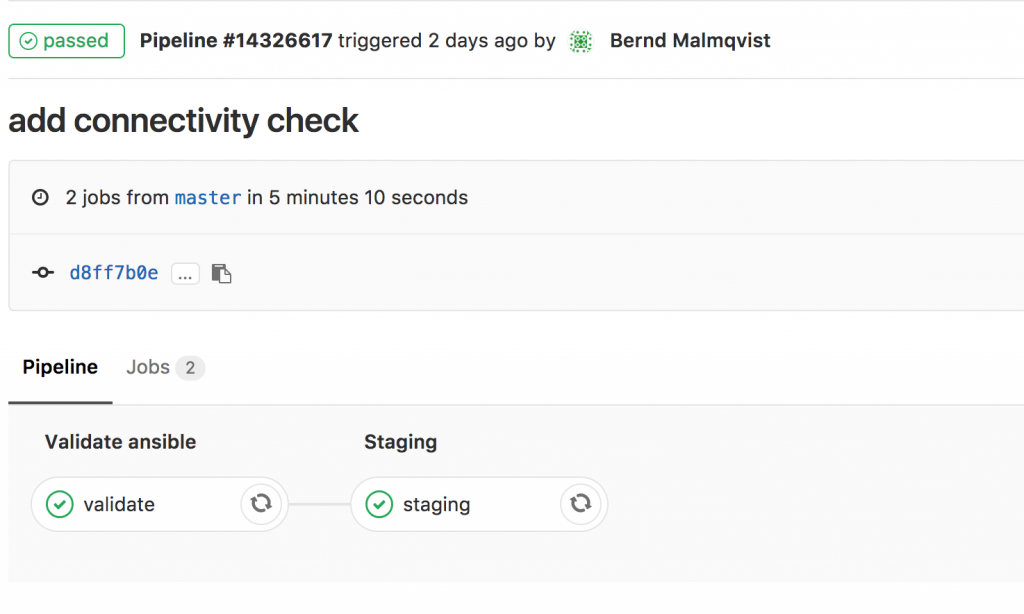
Basically any change in the repository triggers the .gitlab-ci.yml and executes the pipeline; starting with the stage validating the Ansible syntax:

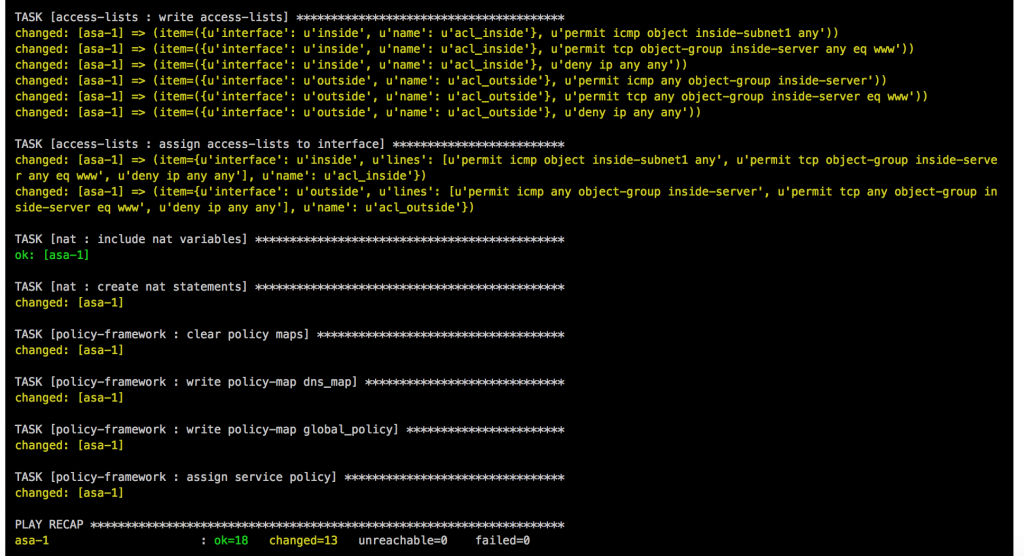
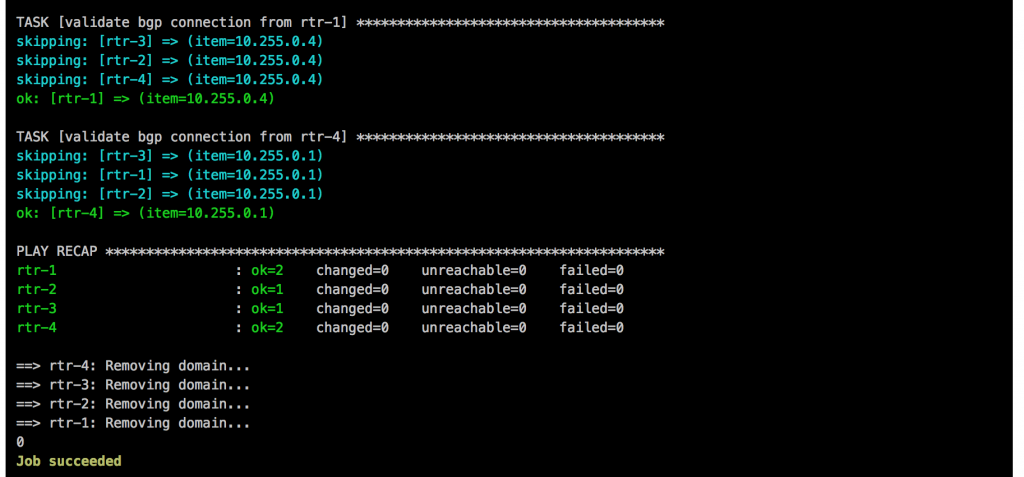
Continue with staging the configuration and deploying to production. The production stage is a manual trigger to have a controlled deployment:

In one of my next posts I will explain how to use Jenkins instead of Gitlab-CI for Network Automation. Jenkins is very similar to the runner but more flexible with what you can do with it.

Leave a comment

Ansible Playbook for Cisco ASAv Firewall Topology

More about Ansible network automation with Cisco ASAv and continuous integration testing like in my previous posts using Vagrant and Gitlab-CI.

Network overview:

Here’s my Github repository where you can find the complete Ansible Playbook: https://github.com/berndonline/asa-lab-provision

Automating firewall configuration is not that easy and can get very complicated because you have different objects, access-lists and service policies to configure which all together makes the playbook complex rather than simple.

What you won’t find in my playbook is how to automate the cluster deployment because this wasn’t possible in my scenario using ASAv and Vagrant. I didn’t have physical Cisco ASA firewall on hand to do this but I might add this later in the coming months.

Let’s look at the different variable files I created; first the host_vars for asa-1.yml which is very similar to a Cisco router:

---

hostname: asa-1
domain_name: lab.local

interfaces:
  0/0:
    alias: connection rtr-1 inside
    nameif: inside
    security_level: 100
    address: 10.0.255.1
    mask: 255.255.255.0

  0/1:
    alias: connection rtr-2 outside
    nameif: outside
    security_level: 0
    address: 217.100.100.1
    mask: 255.255.255.0

routes:
  - route outside 0.0.0.0 0.0.0.0 217.100.100.254 1

I then use multiple files in group_vars for objects.ymlobject-groups.ymlaccess-lists.yml and nat.yml to configure specific firewall settings.

Roles:

  • Hostname: The task in main.yml uses the Ansible module asa_config and configures hostname and domain name.
  • Interfaces:  This role uses the Ansible module asa_config to deploy the template interfaces.j2 to configure the interfaces. In the main.yml is a second task to enable the interfaces when the previous template applied the configuration.
  • Routing: Similar to the interfaces role and uses also the asa_config module to deploy the template routing.j2 for the static routes
  • Objects: The first task in main.yml loads the objects.yml from group_vars, the second task deploys the template objects.j2.
  • Object-Groups: Uses same tasks in main.yml and template object-groups.j2 like the objects role but the commands are slightly different.
  • Access-Lists: One of the more complicated roles I needed to work on, in the main.yml are multiple tasks to load variables like in the previous roles, then runs a task to clear access-lists if the variable “override_acl” from access-lists.yml group_vars is set to “true” otherwise it skips the next tasks. When the variable are set to true and the access-lists are cleared it then writes new access-lists using the Ansible module asa_acl and finishes with a task to assigning the newly created access-lists to the interfaces.
  • NAT: This role is again similar to the objects role using a task main.yml to load variable file and deploys the template nat.j2. The NAT role uses object nat and only works if you created the object before in the objects group_vars.
  • Policy-Framework: Multiple tasks in main.yml first clears global policy and policy maps and afterwards recreates them. Similar approach like the access lists to keep it consistent.

Main Ansible Playbook site.yml

---

- hosts: asa-1

  connection: local
  user: vagrant
  gather_facts: 'no'

  roles:
    - hostname
    - interfaces
    - routing
    - objects
    - object-groups
    - access-lists
    - nat
    - policy-framework

When a change triggers the gitlab-ci pipeline it spins up the Vagrant instances and executes the main Ansible Playbook. After the Vagrant instances are booted, first the two router rtr-1 and rtr-2 need to be configured with cisco_router_config.yml, then afterwards the main site.yml will be run.

Once the main playbook finishes for the Cisco ASA a last connectivity check will be execute using the playbook asa_check_icmp.yml. Just a simple ping to see if the base configuration is applied correctly.

If everything goes well, like in this example, the job is successful:

I will continue to improve the Playbook and the CICD pipeline so come back later to check it out.

Leave a comment

Ansible Playbook for Cisco BGP Routing Topology

This is my Ansible Playbook for a simple Cisco BGP routing topology and using a CICD pipeline for integration testing. The virtual network environment is created on-demand by using Vagrant, see my post about Cisco IOSv and XE network simulation using Vagrant.

Network overview:

Here’s my Github repository where you can find the complete Ansible Playbook: https://github.com/berndonline/cisco-lab-provision

You can find all the variables for the interface and routing configuration under host_vars. Below is an example for router rtr-1:

---

hostname: rtr-1
domain_name: lab.local

loopback:
  address: 10.255.0.1
  mask: 255.255.255.255

interfaces:
  0/1:
    alias: connection rtr-2
    address: 10.0.255.1
    mask: 255.255.255.252

  0/2:
    alias: connection rtr-3
    address: 10.0.255.5
    mask: 255.255.255.252

bgp:
  asn: 65001
  neighbor:
    - {address: 10.0.255.2, remote_as: 65000}
    - {address: 10.0.255.6, remote_as: 65000}
  networks:
    - {network: 10.0.255.0, mask: 255.255.255.252}
    - {network: 10.0.255.4, mask: 255.255.255.252}
    - {network: 10.255.0.1, mask: 255.255.255.255}
  maxpath: 2

Roles:

  • Hostname: The task in main.yml uses the Ansible module ios_system and configures hostname, domain name and disables dns lookups.
  • Interfaces: This role uses the Ansible module ios_config to deploy the template interfaces.j2 to configure the interfaces. In the main.yml is a second task to enable the interfaces when the previous template applied the configuration.
  • Routing: Very similar to the interfaces role and uses also the ios_config module to deploy the template routing.j2 for the BGP routing configuration.

Main Ansible Playbook site.yml:

---

- hosts: all

  connection: local
  user: vagrant
  gather_facts: 'no'

  roles:
    - hostname
    - interfaces
    - routing

When a change triggers the gitlab-ci pipeline it spins up the Vagrant instances and executes the main Ansible Playbook:

After the main site.yml ran, a second Playbook is executed for basic connectivity testing cisco_check_icmp.yml. This uses the Ansible module ios_ping and can be useful in my case to validate if the configuration was correctly applied:

If everything goes well, like in this example, the job is successful:

I will continue to improve the Playbook and the CICD pipeline so come back later to check it out.

Leave a comment