Kubernetes GitOps at Scale with Cluster API and Flux CD

What does GitOps mean and how you run this at scale with Kubernetes? GitOps is basically a framework that takes traditional DevOps practices which where used for application development and apply them to platform automation.

This is nothing new and some maybe have done similar type of automation in the past but this wasn’t called GitOps back then. Kubernetes is great because of it’s declarative configuration management which makes it very easy to configure. This can become a challenge when you suddenly have to run 5, 10, 20 or 40 of these clusters across various cloud providers and multiple environments. We need a cluster management system feeding configuration from a code repository to run all our Kubernetes “cattle” workload clusters.

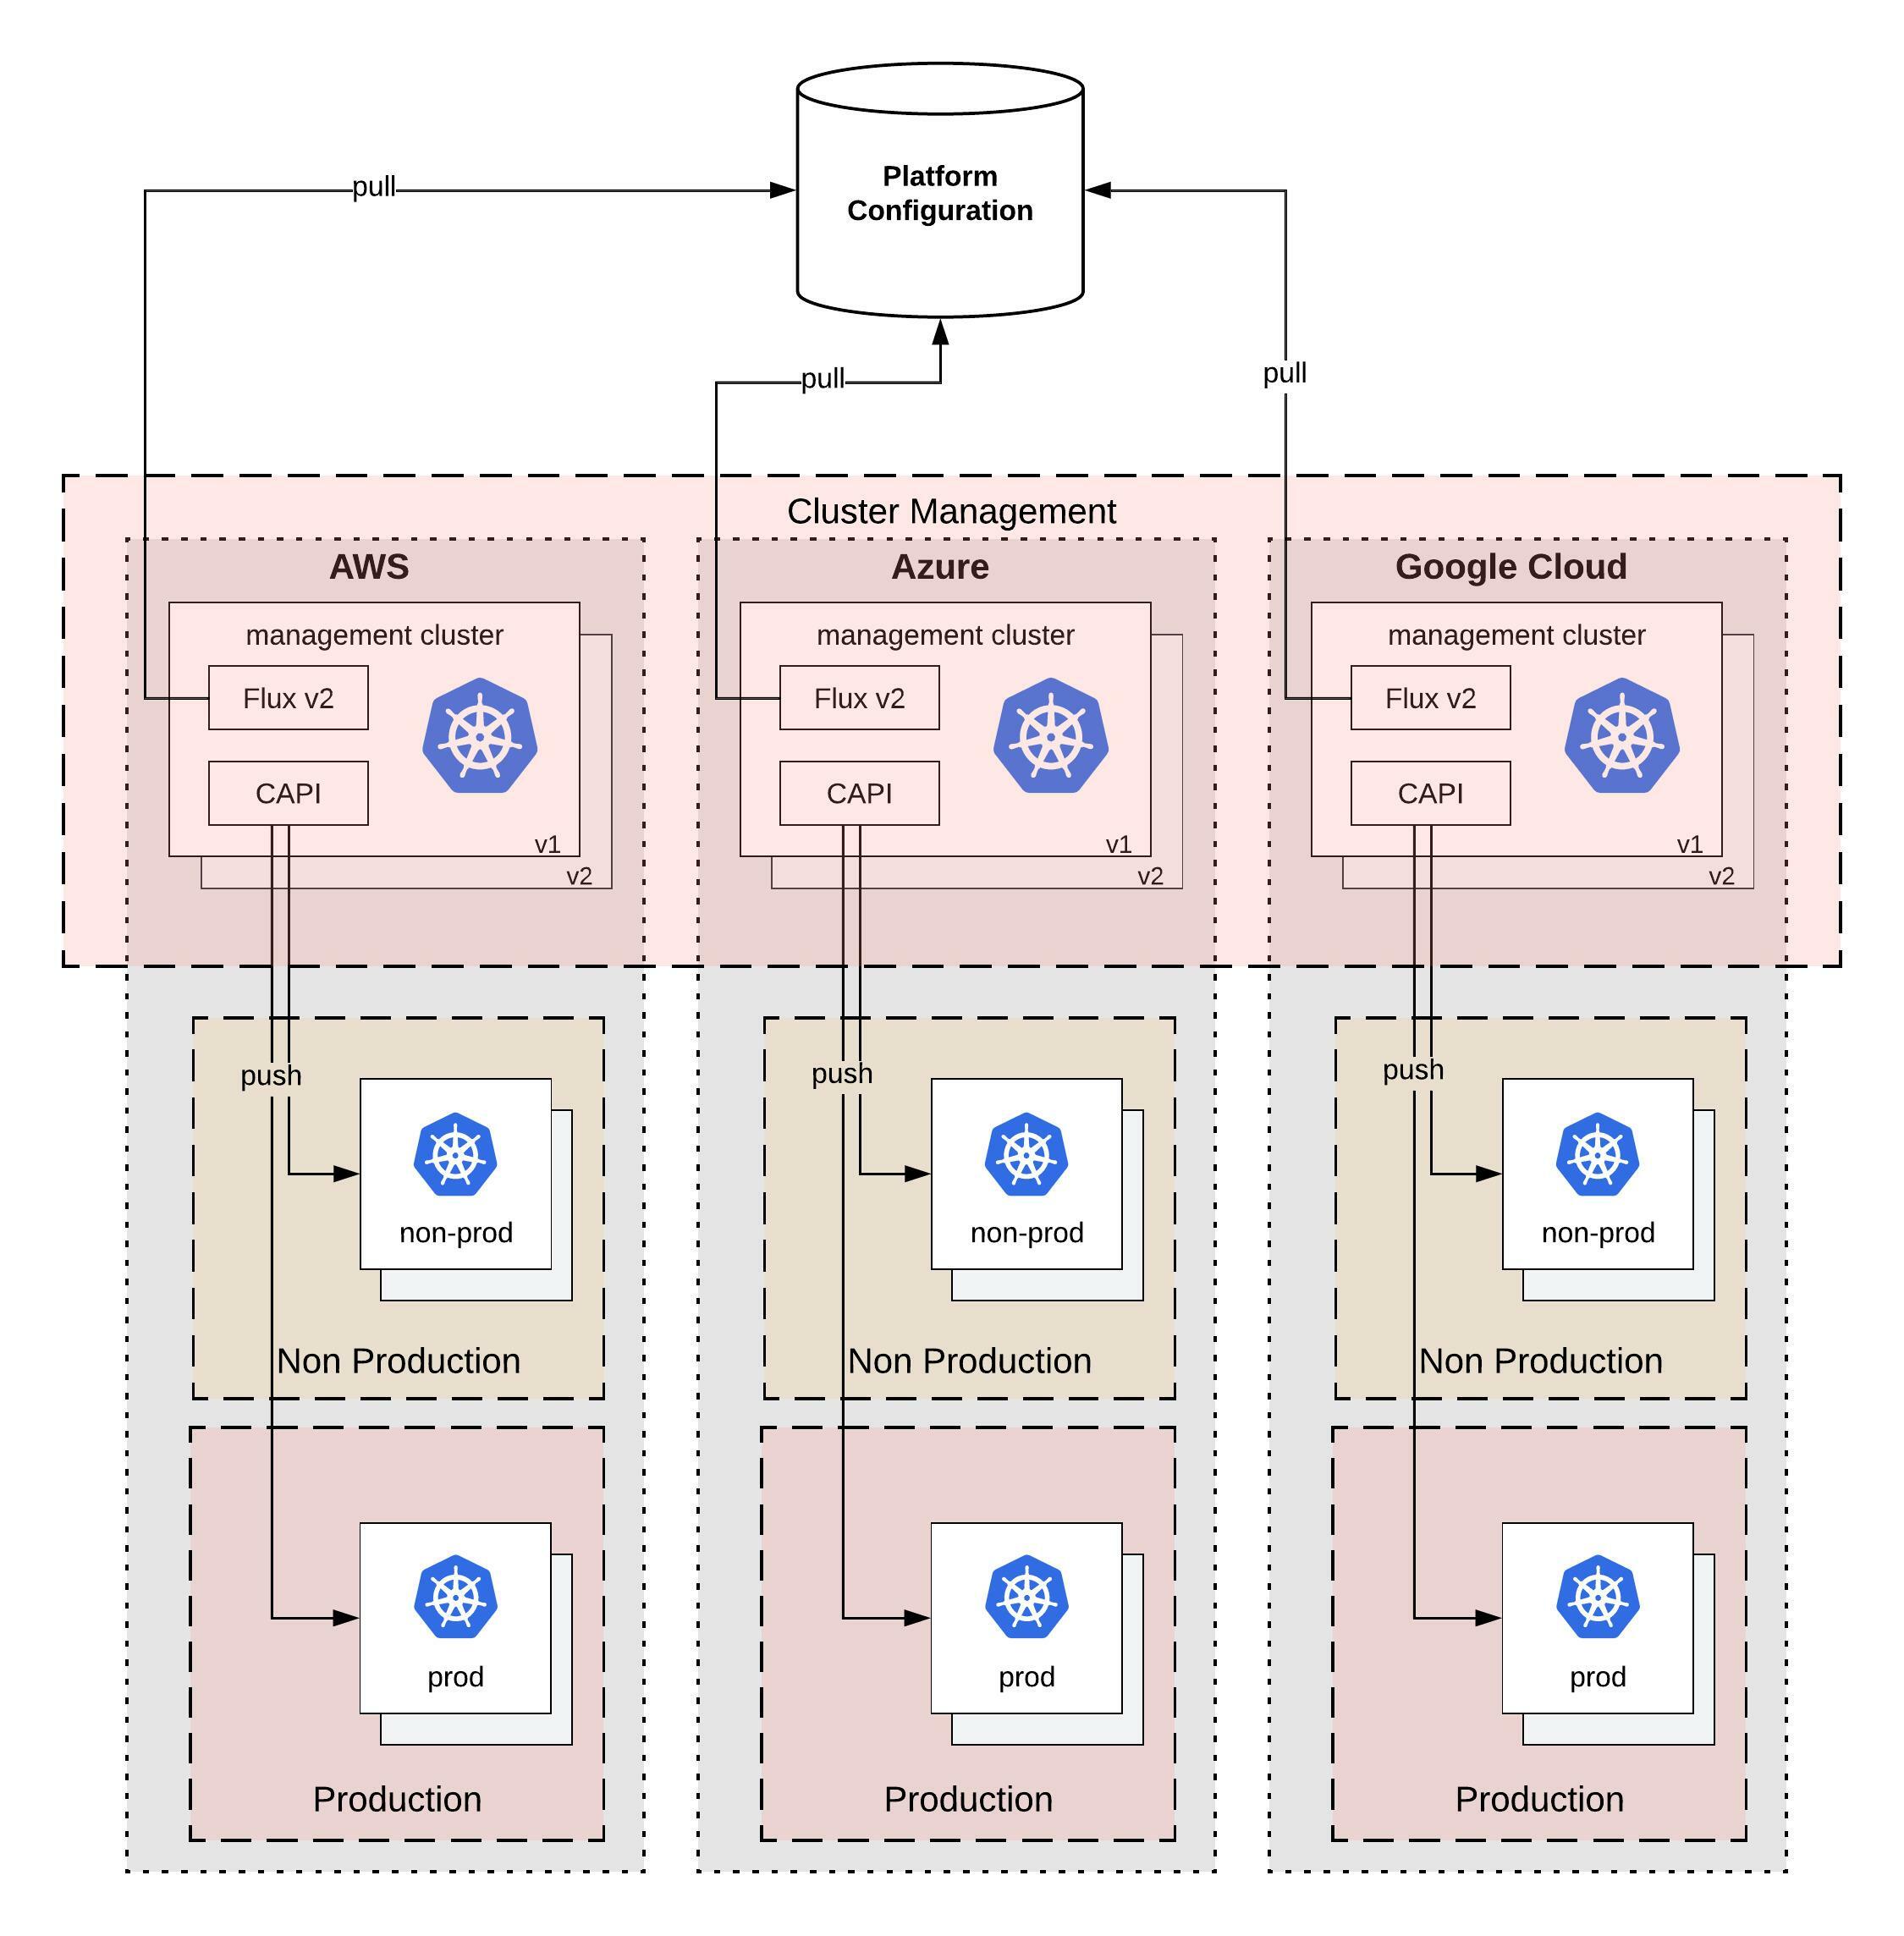
What I am trying to achieve with this design; that you can easily horizontally scale not only your workload clusters but also your cluster management system which is versioned across multiple cloud providers like you see in the diagram above.

There is of course a technical problem to all of this, finding the right tools to solve the problem and which work well together. In my example I will use the Cluster API for provisioning and managing the lifecycle of these Kubernetes workload clusters. Then we need Flux CD for the configuration management both the cluster management which runs the Cluster API components but also the configuration for the workload clusters. The Cluster API you can also replace with OpenShift Hive to run instead OKD or RedHat OpenShift clusters.

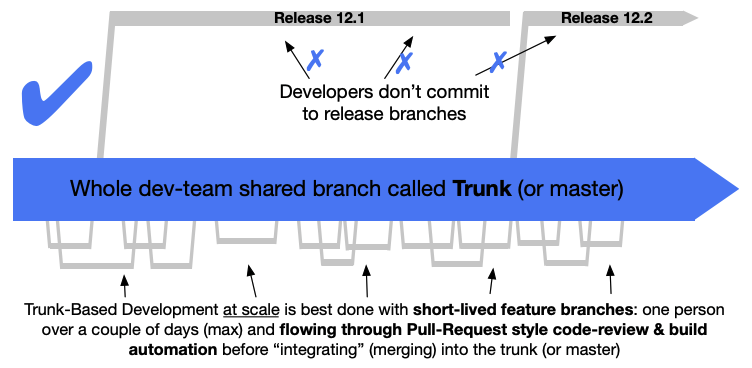
Another problem we need to think about is version control and the branching model for the platform configuration. The structure of the configuration is important but also how you implement changes or the versioning of your configuration through releases. I highly recommend reading about Trunk Based Development which is a modern branching model and specifically solves the versioning problem for us.

Git repository and folder structure

We need a git repository for storing the platform configuration both for the management- and workload-clusters, and the tenant namespace configuration (this also can be stored in a separate repositories). Let’s go through the folder structure of the repository and I will explain this in more detail. Checkout my example repository for more detail: github.com/berndonline/k8s-gitops-at-scale.
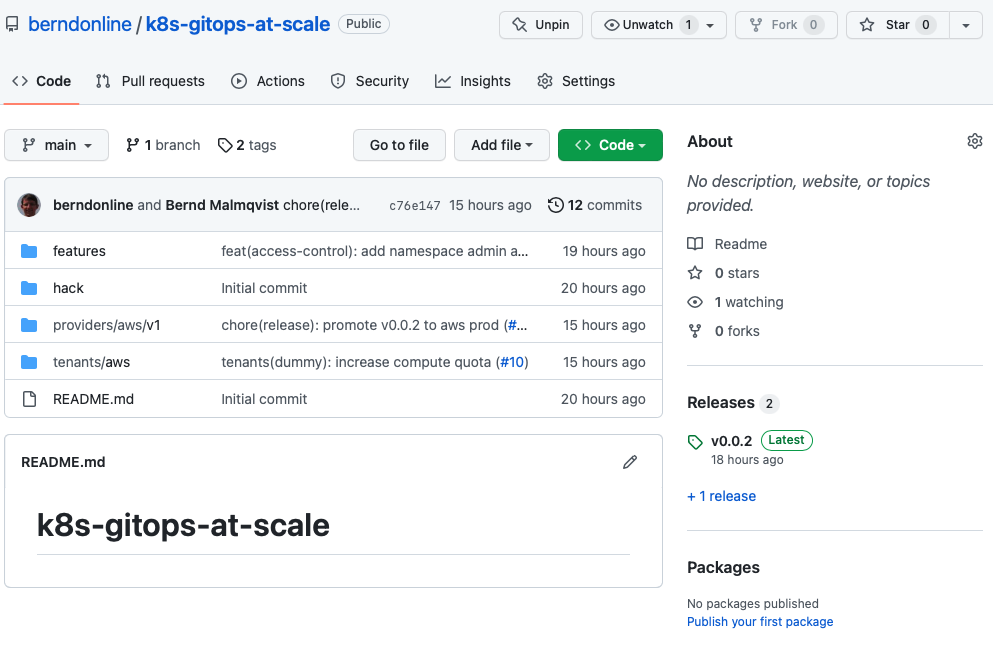
  • The features folder on the top-level will store configuration for specific features we want to enable and apply to our clusters (both management and worker). Under each <feature name> you find two subfolders for namespace(d)- and cluster-wide (non-namespaced) configuration. Features are part of platform configuration which will be promoted between environments. You will see namespaced and non-namespaced subfolders throughout the folder structure which is basically to group your configuration files.
    ├── features
    │   ├── access-control
    │   │   └── non-namespaced
    │   ├── helloworld-operator
    │   │   ├── namespaced
    │   │   └── non-namespaced
    │   └── ingress-nginx
    │       ├── namespaced
    │       └── non-namespaced
    
  • The providers folder will store the configuration based on cloud provider <name> and the <version> of your cluster management. The version below the cloud provider folder is needed to be able to spin up new management clusters in the future. You can be creative with the folder structure and have management cluster per environment and/or instead of the version if required. The mgmt folder will store the configuration for the management cluster which includes manifests for Flux CD controllers, the Cluster API to spin-up workload clusters which are separated by cluster name and anything else you want to configure on your management cluster. The clusters folder will store configuration for all workload clusters separated based on <environment> and common (applies across multiple clusters in the same environment) and by <cluster name> (applies to a dedicated cluster).
    ├── providers
    │   └── aws
    │       └── v1
    │           ├── clusters
    │           │   ├── non-prod
    │           │   │   ├── common
    │           │   │   │   ├── namespaced
    │           │   │   │   │   └── non-prod-common
    │           │   │   │   └── non-namespaced
    │           │   │   │       └── non-prod-common
    │           │   │   └── non-prod-eu-west-1
    │           │   │       ├── namespaced
    │           │   │       │   └── non-prod-eu-west-1
    │           │   │       └── non-namespaced
    │           │   │           └── non-prod-eu-west-1
    │           │   └── prod
    │           │       ├── common
    │           │       │   ├── namespaced
    │           │       │   │   └── prod-common
    │           │       │   └── non-namespaced
    │           │       │       └── prod-common
    │           │       └── prod-eu-west-1
    │           │           ├── namespaced
    │           │           │   └── prod-eu-west-1
    │           │           └── non-namespaced
    │           │               └── prod-eu-west-1
    │           └── mgmt
    │               ├── namespaced
    │               │   ├── flux-system
    │               │   ├── non-prod-eu-west-1
    │               │   └── prod-eu-west-1
    │               └── non-namespaced
    │                   ├── non-prod-eu-west-1
    │                   └── prod-eu-west-1
    
  • The tenants folder will store the namespace configuration of the onboarded teams and is applied to our workload clusters. Similar to the providers folder tenants has subfolders based on the cloud provider <name> and below subfolders for common (applies across environments) and <environments> (applied to a dedicated environment) configuration. There you find the tenant namespace <name> and all the needed manifests to create and configure the namespace/s.
    └── tenants
        └── aws
            ├── common
            │   └── dummy
            ├── non-prod
            │   └── dummy
            └── prod
                └── dummy
    

Why do we need a common folder for tenants? The common folder will contain namespace configuration which will be promoted between the environments from non-prod to prod using a release but more about release and promotion you find more down below.

Configuration changes

Applying changes to your platform configuration has to follow the Trunk Based Development model of doing small incremental changes through feature branches.

Let’s look into an example change the our dummy tenant onboarding pull-request. You see that I checked-out a branch called “tenant-dummy” to apply my changes, then push and publish the branch in the repository to raised the pull-request.
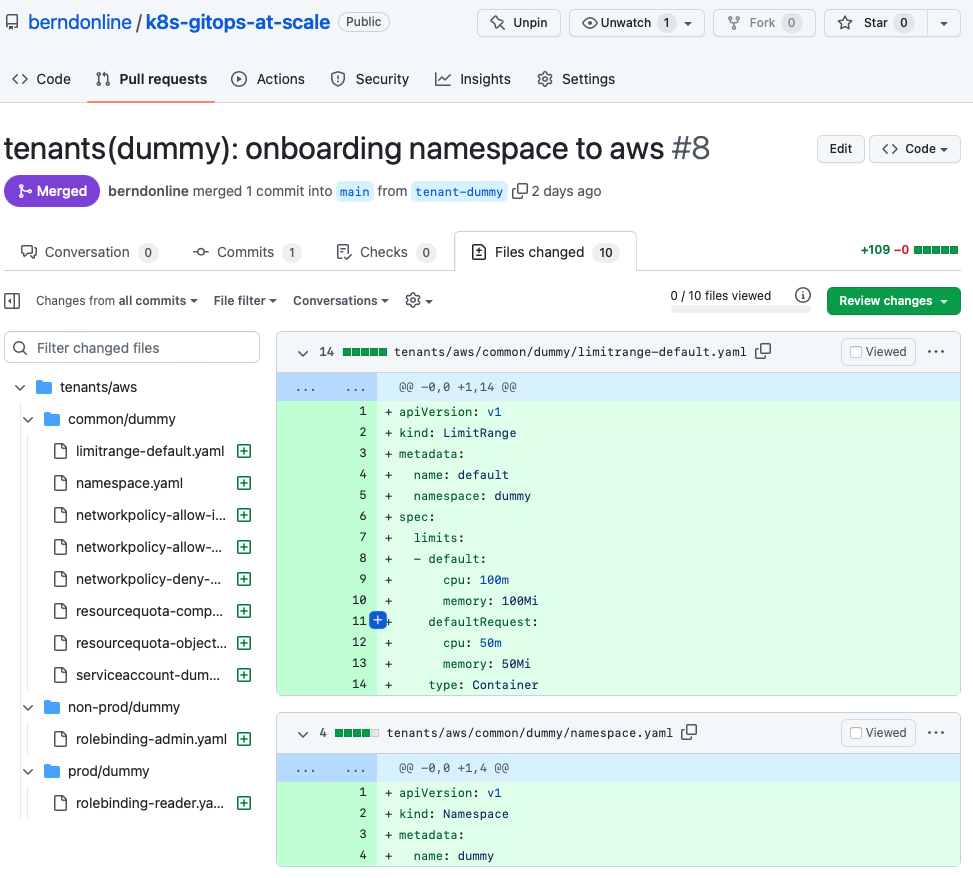
Important is that your commit messages and pull-request name are following a strict naming convention.
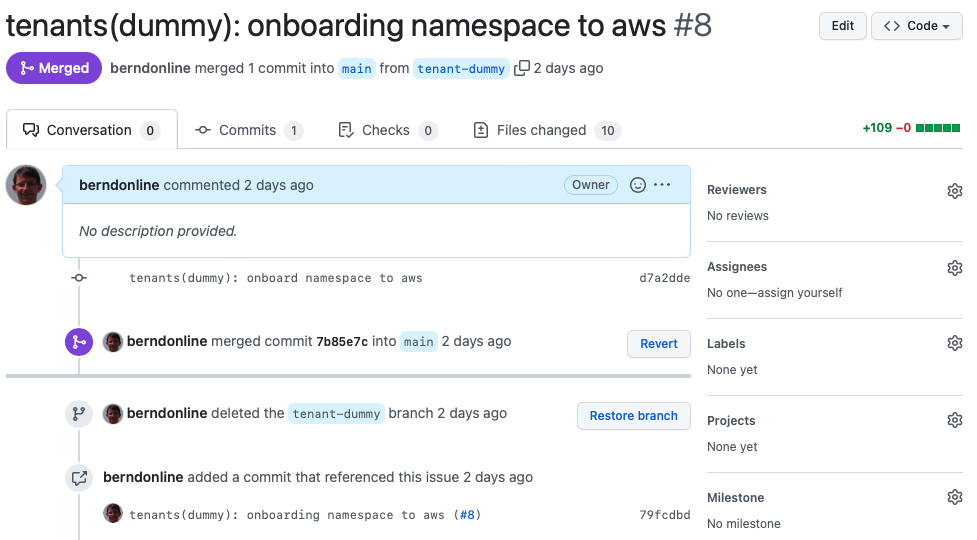
I would also strongly recommend to squash your commit messages into the name of your pull-request. This will keep your git history clean.
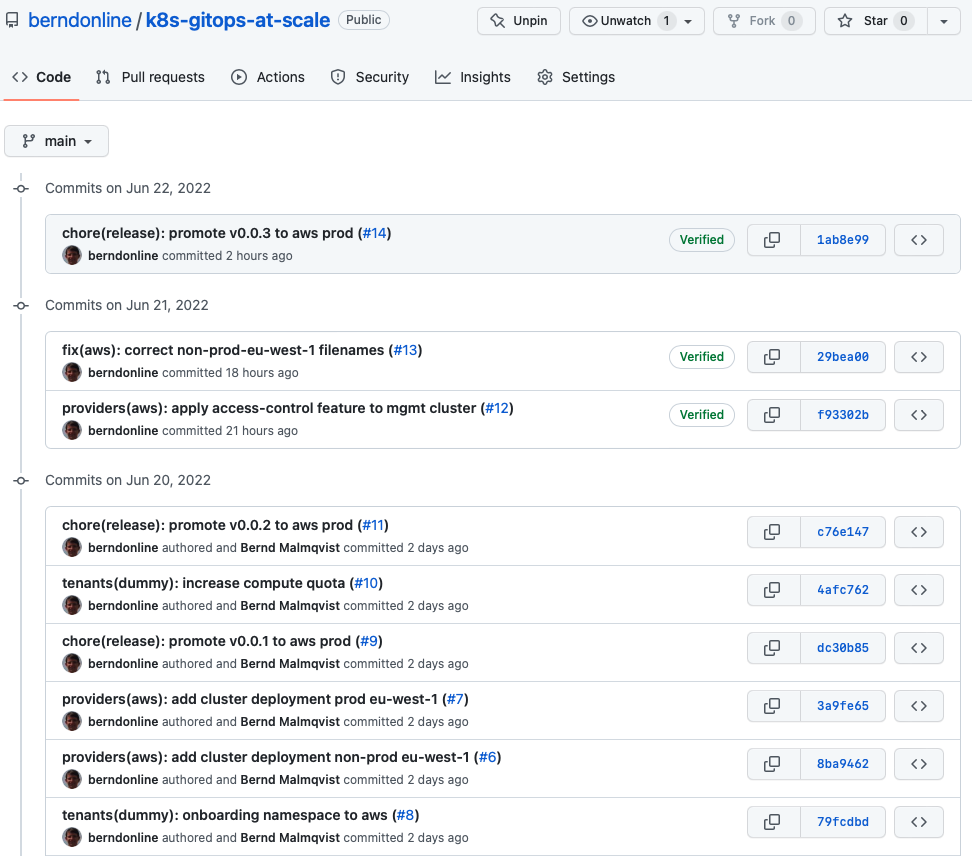
This naming convention makes it easier later for auto-generating your release notes when you publish your release. Having the clean well formatted git history combined with your release notes nicely cross references your changes for to a particular release tag.
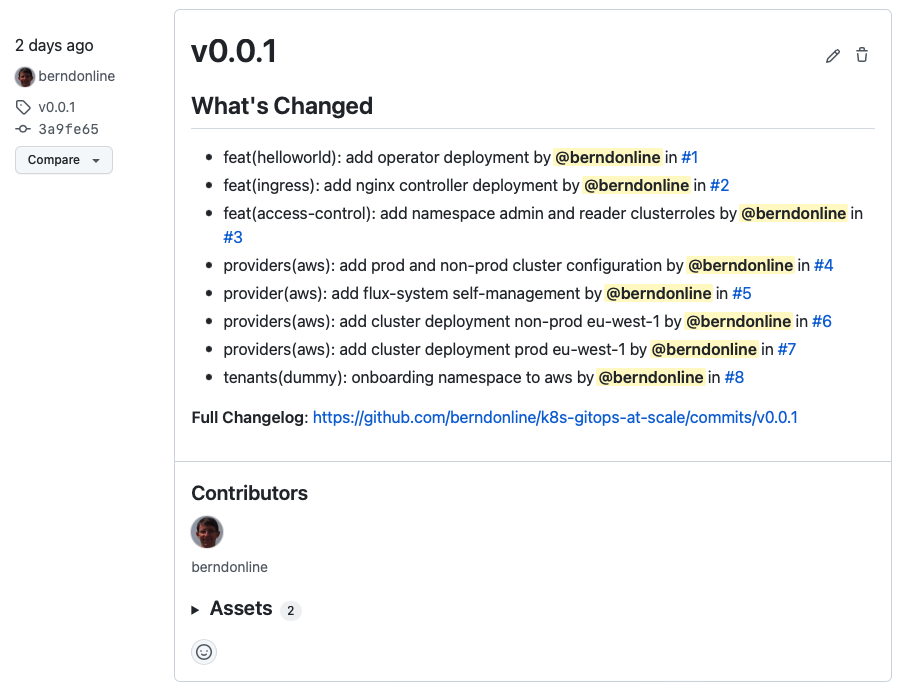
More about creating a release a bit later in this article.

GitOps configuration

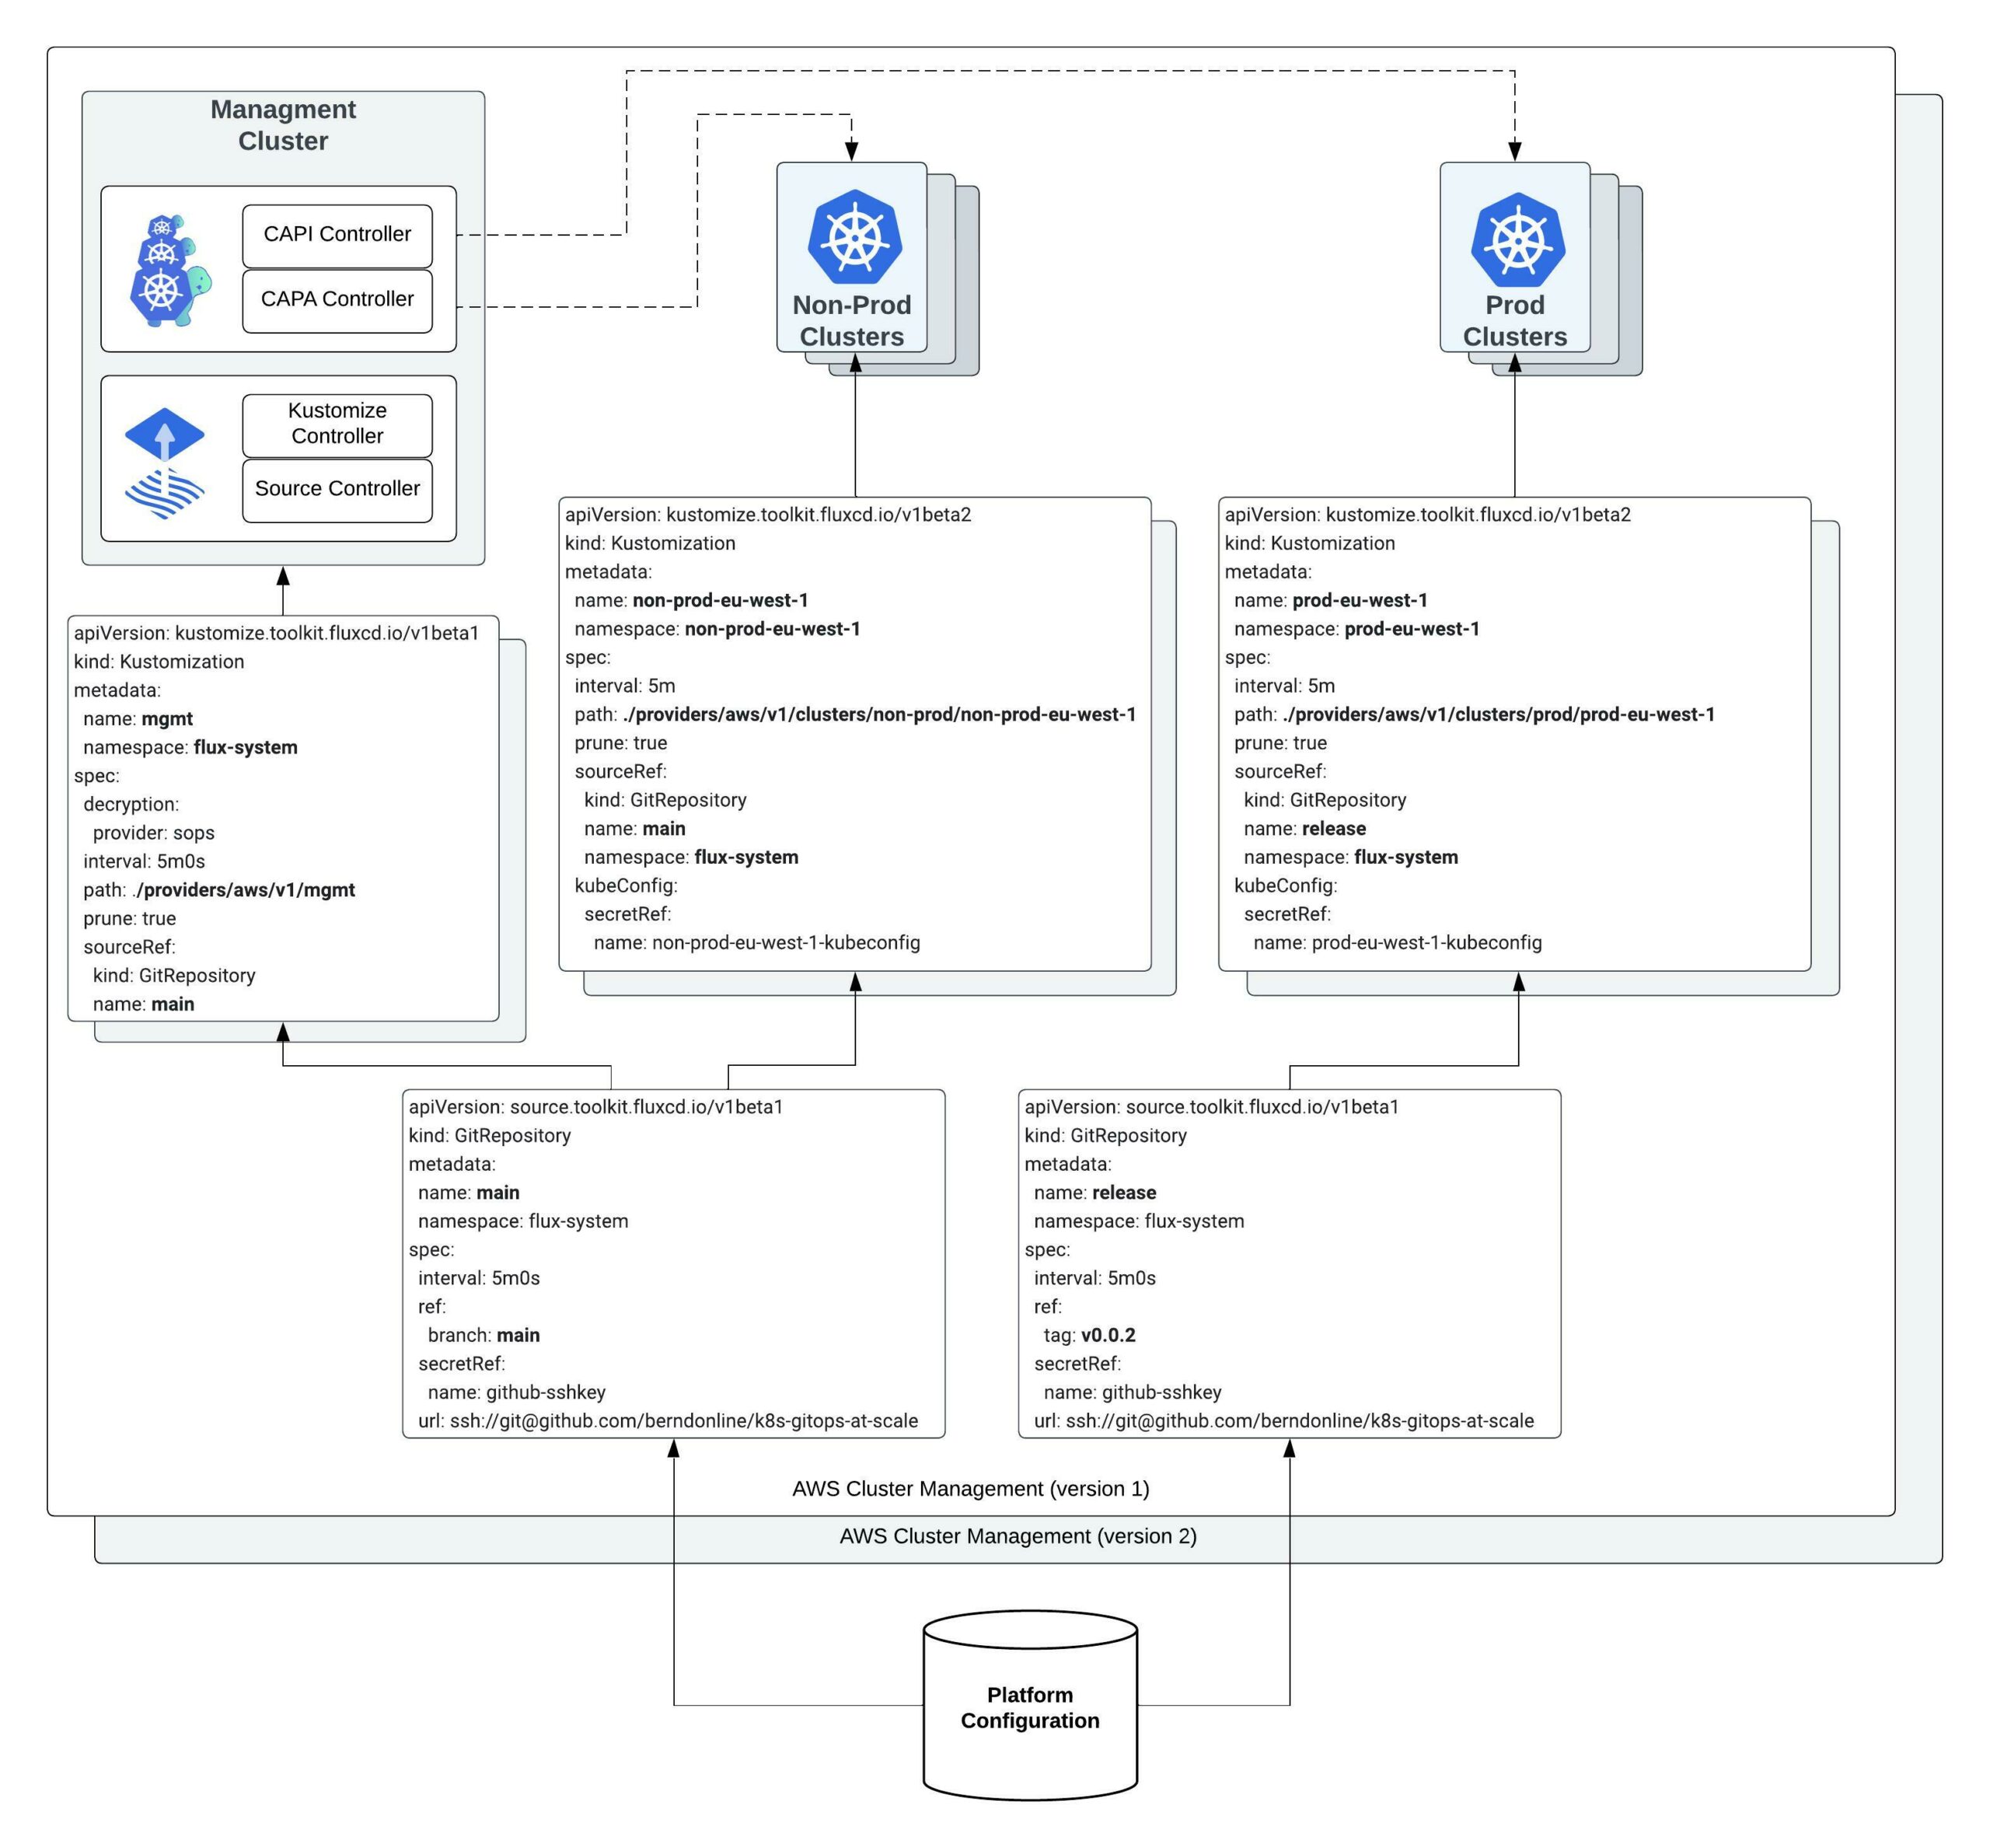
The configuration from the platform repository gets pulled on the management cluster using different gitrepository resources following the main branch or a version tag.

$ kubectl get gitrepositories.source.toolkit.fluxcd.io -A
NAMESPACE     NAME      URL                                                    AGE   READY   STATUS
flux-system   main      ssh://[email protected]/berndonline/k8s-gitops-at-scale   2d    True    stored artifact for revision 'main/ee3e71efb06628775fa19e9664b9194848c6450e'
flux-system   release   ssh://[email protected]/berndonline/k8s-gitops-at-scale   2d    True    stored artifact for revision 'v0.0.2/a5a5edd1194b629f6b41977483dca49aaad957ff'

The kustomization resources will then render and apply the configuration locally to the management cluster (diagram left-side) or remote clusters to our non-prod and prod workload clusters (diagram right-side) using the kubeconfig of the cluster created by the Cluster API stored during the bootstrap.

There are multiple kustomization resources to apply configuration based off the folder structure which I explained above. See the output below and checkout the repository for more details.

$ kubectl get kustomizations.kustomize.toolkit.fluxcd.io -A
NAMESPACE            NAME                          AGE   READY   STATUS
flux-system          feature-access-control        13h   True    Applied revision: v0.0.2/a5a5edd1194b629f6b41977483dca49aaad957ff
flux-system          mgmt                          2d    True    Applied revision: main/ee3e71efb06628775fa19e9664b9194848c6450e
non-prod-eu-west-1   common                        21m   True    Applied revision: main/ee3e71efb06628775fa19e9664b9194848c6450e
non-prod-eu-west-1   feature-access-control        21m   True    Applied revision: main/ee3e71efb06628775fa19e9664b9194848c6450e
non-prod-eu-west-1   feature-helloworld-operator   21m   True    Applied revision: main/ee3e71efb06628775fa19e9664b9194848c6450e
non-prod-eu-west-1   feature-ingress-nginx         21m   True    Applied revision: main/ee3e71efb06628775fa19e9664b9194848c6450e
non-prod-eu-west-1   non-prod-eu-west-1            21m   True    Applied revision: main/ee3e71efb06628775fa19e9664b9194848c6450e
non-prod-eu-west-1   tenants-common                21m   True    Applied revision: main/ee3e71efb06628775fa19e9664b9194848c6450e
non-prod-eu-west-1   tenants-non-prod              21m   True    Applied revision: main/ee3e71efb06628775fa19e9664b9194848c6450e
prod-eu-west-1       common                        15m   True    Applied revision: v0.0.2/a5a5edd1194b629f6b41977483dca49aaad957ff
prod-eu-west-1       feature-access-control        15m   True    Applied revision: v0.0.2/a5a5edd1194b629f6b41977483dca49aaad957ff
prod-eu-west-1       feature-helloworld-operator   15m   True    Applied revision: v0.0.2/a5a5edd1194b629f6b41977483dca49aaad957ff
prod-eu-west-1       feature-ingress-nginx         15m   True    Applied revision: v0.0.2/a5a5edd1194b629f6b41977483dca49aaad957ff
prod-eu-west-1       prod-eu-west-1                15m   True    Applied revision: v0.0.2/a5a5edd1194b629f6b41977483dca49aaad957ff
prod-eu-west-1       tenants-common                15m   True    Applied revision: v0.0.2/a5a5edd1194b629f6b41977483dca49aaad957ff
prod-eu-west-1       tenants-prod                  15m   True    Applied revision: v0.0.2/a5a5edd1194b629f6b41977483dca49aaad957ff

Release and promotion

The GitOps framework doesn’t explain about how to do promotion to higher environments and this is where the Trunk Based Development model comes in helpful together with the gitrepository resource to be able to pull a tagged version instead of a branch.

This allows us applying configuration first to lower environments to non-prod following the main branch, means pull-requests which are merged will be applied instantly. Configuration for higher environments to production requires to create a version tag and publish a release in the repository.

Why using a tag and not a release branch? A tag in your repository is a point in time snapshot of your configuration and can’t be easily modified which is required for creating the release. A branch on the other hand can be modified using pull-requests and you end up with lots of release branches which is less ideal.

To create a new version tag in the git repository I use the following commands:

$ git tag v0.0.3
$ git push origin --tags
Total 0 (delta 0), reused 0 (delta 0)
To github.com:berndonline/k8s-gitops-at-scale.git
* [new tag] v0.0.3 -> v0.0.3

This doesn’t do much after we pushed the new tag because the gitrepository release is set to v0.0.2 but I can see the new tag is available in the repository.
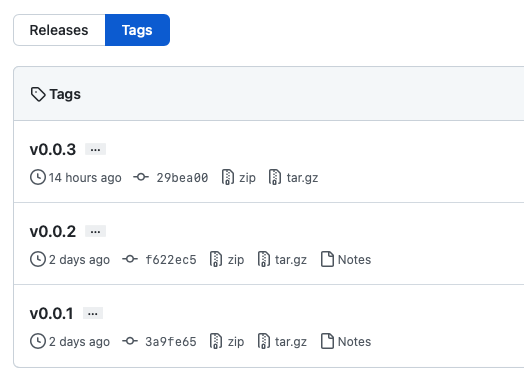
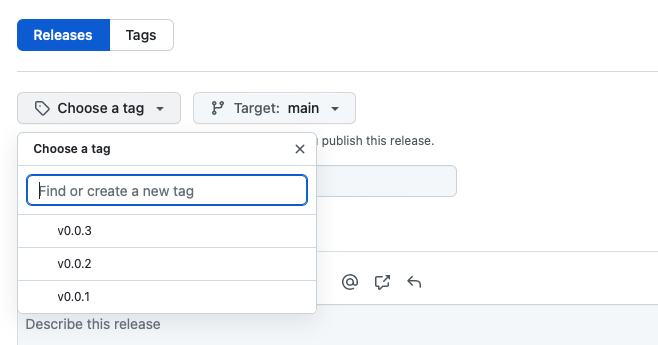
In the repository I can go to releases and click on “Draft a new release” and choose the new tag v0.0.3 I pushed previously.
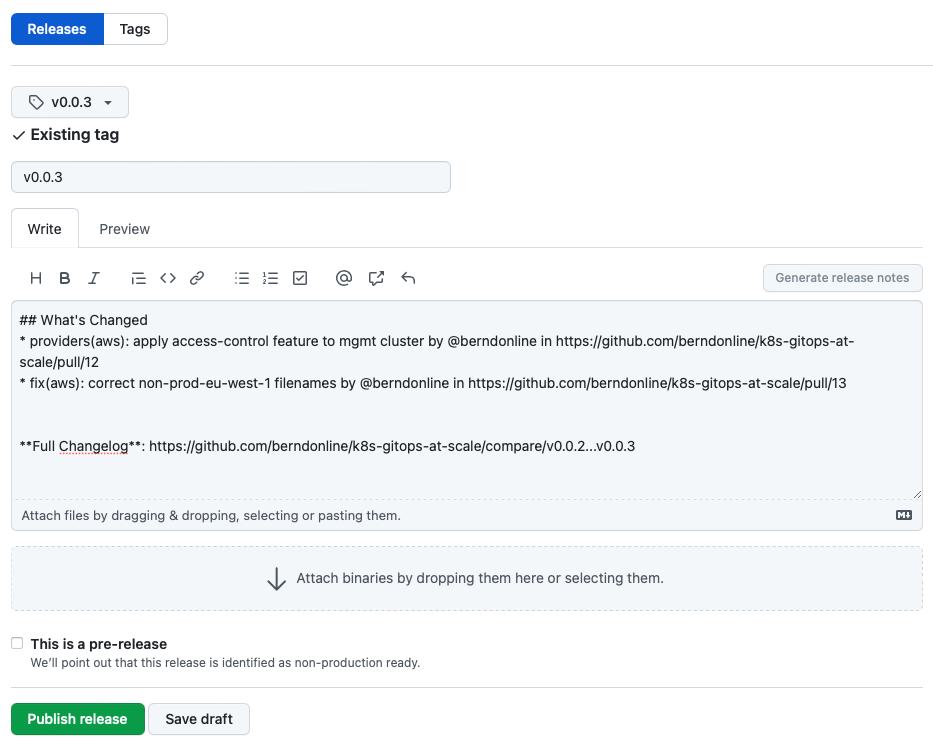
The release notes you see below can be auto-generate from the pull-requests you merged between v0.0.2 and v0.0.3 by clicking “Generate release notes”. To finish this off save and publish the release.

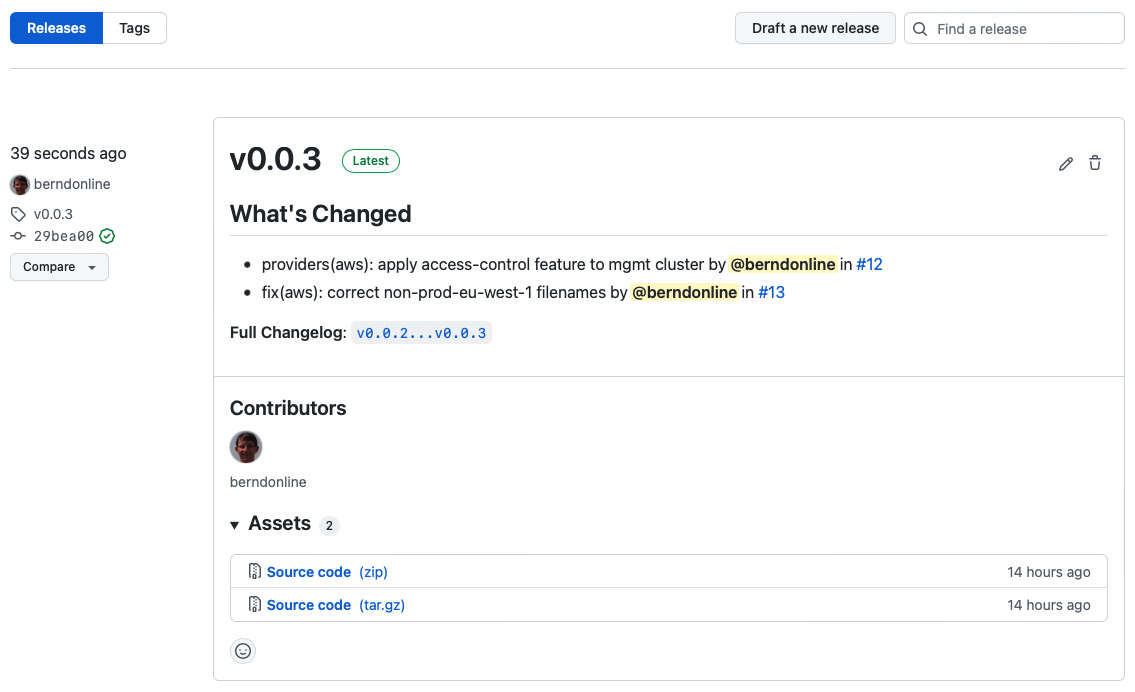
The release is publish and release notes are visible to everyone which is great for product teams on your platform because they will get visibility about upcoming changes including their own modifications to namespace configuration.
Until now all the changes are applied to our lower non-prod environment following the main branch and for doing the promotion we need to raise a pull-request and update the gitrepository release the new version v0.0.3.

If you follow ITIL change procedures then this is the point where you would normally raise a change for merging your pull-request because this triggers the rollout of your configuration to production.
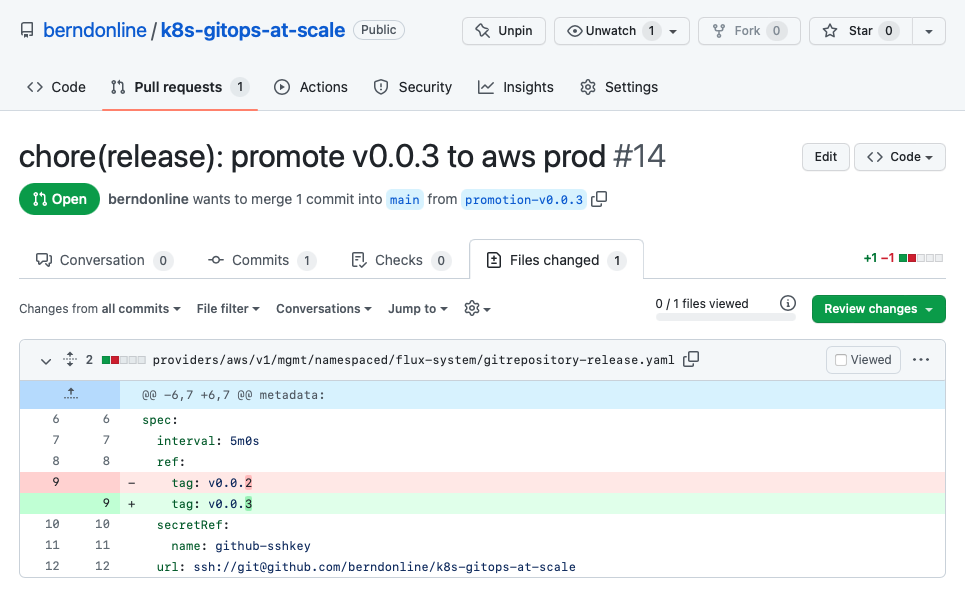
When the pull-request is merged the release gitrepository is updated by the kustomization resources through the main branch.

$ kubectl get gitrepositories.source.toolkit.fluxcd.io -A
NAMESPACE     NAME      URL                                           AGE   READY   STATUS
flux-system   main      ssh://[email protected]/berndonline/k8s-gitops   2d    True    stored artifact for revision 'main/83133756708d2526cca565880d069445f9619b70'
flux-system   release   ssh://[email protected]/berndonline/k8s-gitops   2d    True    stored artifact for revision 'v0.0.3/ee3e71efb06628885fa19e9664b9198a8c6450e8'

Shortly after the kustomization resources referencing the release will reconcile and automatically push down the new rendered configuration to the production clusters.

$ kubectl get kustomizations.kustomize.toolkit.fluxcd.io -A
NAMESPACE            NAME                          AGE   READY   STATUS
flux-system          feature-access-control        13h   True    Applied revision: v0.0.3/ee3e71efb06628885fa19e9664b9198a8c6450e8
flux-system          mgmt                          2d    True    Applied revision: main/83133756708d2526cca565880d069445f9619b70
non-prod-eu-west-1   common                        31m   True    Applied revision: main/83133756708d2526cca565880d069445f9619b70
non-prod-eu-west-1   feature-access-control        31m   True    Applied revision: main/83133756708d2526cca565880d069445f9619b70
non-prod-eu-west-1   feature-helloworld-operator   31m   True    Applied revision: main/83133756708d2526cca565880d069445f9619b70
non-prod-eu-west-1   feature-ingress-nginx         31m   True    Applied revision: main/83133756708d2526cca565880d069445f9619b70
non-prod-eu-west-1   non-prod-eu-west-1            31m   True    Applied revision: main/83133756708d2526cca565880d069445f9619b70
non-prod-eu-west-1   tenants-common                31m   True    Applied revision: main/83133756708d2526cca565880d069445f9619b70
non-prod-eu-west-1   tenants-non-prod              31m   True    Applied revision: main/83133756708d2526cca565880d069445f9619b70
prod-eu-west-1       common                        26m   True    Applied revision: v0.0.3/ee3e71efb06628885fa19e9664b9198a8c6450e8
prod-eu-west-1       feature-access-control        26m   True    Applied revision: v0.0.3/ee3e71efb06628885fa19e9664b9198a8c6450e8
prod-eu-west-1       feature-helloworld-operator   26m   True    Applied revision: v0.0.3/ee3e71efb06628885fa19e9664b9198a8c6450e8
prod-eu-west-1       feature-ingress-nginx         26m   True    Applied revision: v0.0.3/ee3e71efb06628885fa19e9664b9198a8c6450e8
prod-eu-west-1       prod-eu-west-1                26m   True    Applied revision: v0.0.3/ee3e71efb06628885fa19e9664b9198a8c6450e8
prod-eu-west-1       tenants-common                26m   True    Applied revision: v0.0.3/ee3e71efb06628885fa19e9664b9198a8c6450e8
prod-eu-west-1       tenants-prod                  26m   True    Applied revision: v0.0.3/ee3e71efb06628885fa19e9664b9198a8c6450e8

Why using Kustomize for managing the configuration and not Helm? I know the difficulties of managing these raw YAML manifests. Kustomize gets you going quick where with Helm there is a higher initial effort writing your Charts. In my next article I will focus specifically on Helm.

I showed a very simplistic example having a single cloud provider (aws) and a single management cluster but as you have seen you can easily add Azure or Google cloud providers in your configuration and scale horizontally. I think this is what makes Kubernetes and controllers like Flux CD great together that you don’t need to have complex pipelines or workflows to rollout and promote your changes completely pipeline-less.
 

Install OpenShift/OKD 4.9.x Single Node Cluster (SNO) using OpenShift Hive/ACM

I haven’t written much since the summer 2021 and I thought I start the New Year with a little update regarding OpenShift/OKD 4.9 Single Node cluster (SNO) installation. The single node type is not new because I have been using these All-in-One or Single Node clusters since OpenShift 3.x and it worked great until OpenShift 4.7. When RedHat released OpenShift 4.8 the single node installation stopped working because of issue with the control-plane because it expected three nodes for high availability and this installation method was possible till then but not officially supported by RedHat.

When the OpenShift 4.9 release was announced the single node installation method called SNO became a supported way for deploying OpenShift Edge clusters on  bare-metal or virtual machine using the RedHat Cloud Assisted Installer.

This opened the possibility again to install OpenShift/OKD 4.9 as a single node (SNO) on any cloud provider like AWS, GCP or Azure through the openshift-install command line utility or through OpenShift Hive / Advanced Cluster Management operator.

The install-config.yaml for a single node cluster is pretty much the same like for a normal cluster only that you change the worker node replicas to zero and control-plane (master) nodes to one. Make sure your instance size has minimum 8x vCPUs and 32 GB of memory.

---
apiVersion: v1
baseDomain: k8s.domain.com
compute:
- name: worker
  platform:
    aws:
      rootVolume:
        iops: 100
        size: 22
        type: gp2
      type: m5.2xlarge
  replicas: 0
controlPlane:
  name: master
  platform:
    aws:
      rootVolume:
        iops: 100
        size: 22
        type: gp2
      type: m5.2xlarge
  replicas: 1
metadata:
  creationTimestamp: null
  name: okd-eu-west-1
networking:
  clusterNetwork:
  - cidr: 10.128.0.0/14
    hostPrefix: 23
  machineCIDR: 10.0.0.0/16
  networkType: OpenShiftSDN
  serviceNetwork:
  - 172.30.0.0/16
platform:
  aws:
    region: eu-west-1
pullSecret: ""
sshKey: ""

I am using OpenShift Hive for installing the OKD 4.9 single node cluster which requires Kubernetes to run the Hive operator.

Create a install-config secret:

$ kubectl create secret generic install-config -n okd --from-file=install-config.yaml=./okd-sno-install-config.yaml 

In the ClusterDeployment you specify AWS credentials, reference the install-config and the release image for OKD 4.9. Here you can find the latest OKD release image tags: https://quay.io/repository/openshift/okd

---
apiVersion: hive.openshift.io/v1
kind: ClusterDeployment
metadata:
  creationTimestamp: null
  name: okd-eu-west-1
  namespace: okd
spec:
  baseDomain: k8s.domain.com
  clusterName: okd-eu-west-1
  controlPlaneConfig:
    servingCertificates: {}
  installed: false
  platform:
    aws:
      credentialsSecretRef:
        name: aws-creds
      region: eu-west-1
  provisioning:
    releaseImage: quay.io/openshift/okd:4.9.0-0.okd-2022-01-14-230113
    installConfigSecretRef:
      name: install-config
  pullSecretRef:
    name: pull-secret

Apply the cluster deployment and wait for Hive to install the OpenShift/OKD cluster.

$ kubectl apply -f ./okd-clusterdeployment.yaml 

The provision pod will output the messages from the openshift-install binary and the cluster will be finish the installation in around 35mins.

$ kubectl logs okd-eu-west-1-0-8vhnf-provision-qrjrg -c hive -f
time="2022-01-15T15:51:32Z" level=debug msg="Couldn't find install logs provider environment variable. Skipping."
time="2022-01-15T15:51:32Z" level=debug msg="checking for SSH private key" installID=m2zcxsds
time="2022-01-15T15:51:32Z" level=info msg="unable to initialize host ssh key" error="cannot configure SSH agent as SSH_PRIV_KEY_PATH is unset or empty" installID=m2zcxsds
time="2022-01-15T15:51:32Z" level=info msg="waiting for files to be available: [/output/openshift-install /output/oc]" installID=m2zcxsds
time="2022-01-15T15:51:32Z" level=info msg="found file" installID=m2zcxsds path=/output/openshift-install
time="2022-01-15T15:51:32Z" level=info msg="found file" installID=m2zcxsds path=/output/oc
time="2022-01-15T15:51:32Z" level=info msg="all files found, ready to proceed" installID=m2zcxsds
time="2022-01-15T15:51:35Z" level=info msg="copied /output/openshift-install to /home/hive/openshift-install" installID=m2zcxsds
time="2022-01-15T15:51:36Z" level=info msg="copied /output/oc to /home/hive/oc" installID=m2zcxsds
time="2022-01-15T15:51:36Z" level=info msg="copying install-config.yaml" installID=m2zcxsds
time="2022-01-15T15:51:36Z" level=info msg="copied /installconfig/install-config.yaml to /output/install-config.yaml" installID=m2zcxsds
time="2022-01-15T15:51:36Z" level=info msg="waiting for files to be available: [/output/.openshift_install.log]" installID=m2zcxsds
time="2022-01-15T15:51:36Z" level=info msg="cleaning up from past install attempts" installID=m2zcxsds
time="2022-01-15T15:51:36Z" level=warning msg="skipping cleanup as no infra ID set" installID=m2zcxsds
time="2022-01-15T15:51:36Z" level=debug msg="object does not exist" installID=m2zcxsds object=okd/okd-eu-west-1-0-8vhnf-admin-kubeconfig
time="2022-01-15T15:51:36Z" level=debug msg="object does not exist" installID=m2zcxsds object=okd/okd-eu-west-1-0-8vhnf-admin-password
time="2022-01-15T15:51:36Z" level=info msg="generating assets" installID=m2zcxsds
time="2022-01-15T15:51:36Z" level=info msg="running openshift-install create manifests" installID=m2zcxsds
time="2022-01-15T15:51:36Z" level=info msg="running openshift-install binary" args="[create manifests]" installID=m2zcxsds
time="2022-01-15T15:51:37Z" level=info msg="found file" installID=m2zcxsds path=/output/.openshift_install.log
time="2022-01-15T15:51:37Z" level=info msg="all files found, ready to proceed" installID=m2zcxsds
time="2022-01-15T15:51:36Z" level=debug msg="OpenShift Installer unreleased-master-5011-geb132dae953888e736c382f1176c799c0e1aa49e-dirty"
time="2022-01-15T15:51:36Z" level=debug msg="Built from commit eb132dae953888e736c382f1176c799c0e1aa49e"
time="2022-01-15T15:51:36Z" level=debug msg="Fetching Master Machines..."
time="2022-01-15T15:51:36Z" level=debug msg="Loading Master Machines..."
time="2022-01-15T15:51:36Z" level=debug msg="  Loading Cluster ID..."
time="2022-01-15T15:51:36Z" level=debug msg="    Loading Install Config..."
time="2022-01-15T15:51:36Z" level=debug msg="      Loading SSH Key..."
time="2022-01-15T15:51:36Z" level=debug msg="      Loading Base Domain..."

....

time="2022-01-15T16:14:17Z" level=debug msg="Still waiting for the cluster to initialize: Working towards 4.9.0-0.okd-2022-01-14-230113"
time="2022-01-15T16:14:31Z" level=debug msg="Still waiting for the cluster to initialize: Working towards 4.9.0-0.okd-2022-01-14-230113: 529 of 744 done (71% complete)"
time="2022-01-15T16:14:32Z" level=debug msg="Still waiting for the cluster to initialize: Working towards 4.9.0-0.okd-2022-01-14-230113: 585 of 744 done (78% complete)"
time="2022-01-15T16:14:47Z" level=debug msg="Still waiting for the cluster to initialize: Working towards 4.9.0-0.okd-2022-01-14-230113: 702 of 744 done (94% complete)"
time="2022-01-15T16:15:02Z" level=debug msg="Still waiting for the cluster to initialize: Working towards 4.9.0-0.okd-2022-01-14-230113: 703 of 744 done (94% complete)"
time="2022-01-15T16:15:32Z" level=debug msg="Still waiting for the cluster to initialize: Working towards 4.9.0-0.okd-2022-01-14-230113: 708 of 744 done (95% complete)"
time="2022-01-15T16:15:47Z" level=debug msg="Still waiting for the cluster to initialize: Working towards 4.9.0-0.okd-2022-01-14-230113: 720 of 744 done (96% complete)"
time="2022-01-15T16:16:02Z" level=debug msg="Still waiting for the cluster to initialize: Working towards 4.9.0-0.okd-2022-01-14-230113: 722 of 744 done (97% complete)"
time="2022-01-15T16:17:17Z" level=debug msg="Still waiting for the cluster to initialize: Some cluster operators are still updating: authentication, console, monitoring"
time="2022-01-15T16:18:02Z" level=debug msg="Cluster is initialized"
time="2022-01-15T16:18:02Z" level=info msg="Waiting up to 10m0s for the openshift-console route to be created..."
time="2022-01-15T16:18:02Z" level=debug msg="Route found in openshift-console namespace: console"
time="2022-01-15T16:18:02Z" level=debug msg="OpenShift console route is admitted"
time="2022-01-15T16:18:02Z" level=info msg="Install complete!"
time="2022-01-15T16:18:02Z" level=info msg="To access the cluster as the system:admin user when using 'oc', run 'export KUBECONFIG=/output/auth/kubeconfig'"
time="2022-01-15T16:18:02Z" level=info msg="Access the OpenShift web-console here: https://console-openshift-console.apps.okd-eu-west-1.k8s.domain.com"
time="2022-01-15T16:18:02Z" level=debug msg="Time elapsed per stage:"
time="2022-01-15T16:18:02Z" level=debug msg="           cluster: 6m35s"
time="2022-01-15T16:18:02Z" level=debug msg="         bootstrap: 34s"
time="2022-01-15T16:18:02Z" level=debug msg="Bootstrap Complete: 12m46s"
time="2022-01-15T16:18:02Z" level=debug msg="               API: 4m2s"
time="2022-01-15T16:18:02Z" level=debug msg=" Bootstrap Destroy: 1m15s"
time="2022-01-15T16:18:02Z" level=debug msg=" Cluster Operators: 4m59s"
time="2022-01-15T16:18:02Z" level=info msg="Time elapsed: 26m13s"
time="2022-01-15T16:18:03Z" level=info msg="command completed successfully" installID=m2zcxsds
time="2022-01-15T16:18:03Z" level=info msg="saving installer output" installID=m2zcxsds
time="2022-01-15T16:18:03Z" level=info msg="install completed successfully" installID=m2zcxsds

Check the cluster deployment and get the kubeadmin password from the secret the Hive operator created during the installation and login to the web console:

$ kubectl get clusterdeployments
NAME            PLATFORM   REGION      CLUSTERTYPE   INSTALLED   INFRAID               VERSION   POWERSTATE   AGE
okd-eu-west-1   aws        eu-west-1                 true        okd-eu-west-1-l4g4n   4.9.0     Running      39m
$ kubectl get secrets okd-eu-west-1-0-8vhnf-admin-password -o jsonpath={.data.password} | base64 -d
EP5Fs-TZrKj-Vtst6-5GWZ9

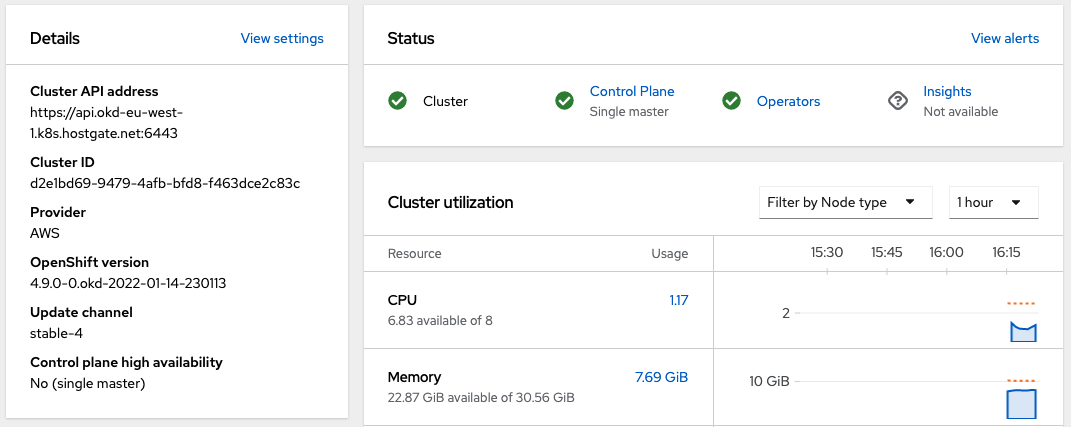
The cluster details show that the control plane runs as single master node:

Your cluster has a single combined master/worker node:

These single node type clusters can be used in combination with OpenShift Hive ClusterPools to have an amount of pre-installed OpenShift/OKD clusters available for automated tests or as temporary development environment.

apiVersion: hive.openshift.io/v1
kind: ClusterPool
metadata:
  name: okd-eu-west-1-pool
  namespace: okd
spec:
  baseDomain: k8s.domain.com
  imageSetRef:
    name: 4.9.0-0.okd-2022-01-14
  installConfigSecretTemplateRef:
    name: install-config
  platform:
    aws:
      credentialsSecretRef:
        name: aws-creds
      region: eu-west-1
  pullSecretRef:
    name: pull-secret
  size: 3

The clusters are hibernating (shutdown) in the pool and will be powered on when you apply the ClusterClaim to allocate a cluster with a lifetime set to 8 hours. After 8 hours the cluster gets automatically deleted by the Hive operator.

apiVersion: hive.openshift.io/v1
kind: ClusterClaim
metadata:
  name: test-1
  namespace: okd
spec:
  clusterPoolName: okd-eu-west-1-pool
  lifetime: 8h

This sums up how to deploy a OpenShift/OKD 4.9 as single node cluster. I hope this article is helpful and leave a comment if you have questions.

Getting started with GKE – Google Kubernetes Engine

I have not spend much time with Google Cloud Platform because I have used mostly AWS cloud services like EKS but I wanted to give Google’s GKE – Kubernetes Engine a try to compare both offerings. My first impression is great about how easy it is to create a cluster and to enable options for NetworkPolicy or Istio Service Mesh without the need to manually install these compare to AWS EKS.

The GKE integration into the cloud offering is perfect, there is no need for a Kubernetes dashboard or custom monitoring / logging solutions, all is nicely integrated into the Google cloud services and can be used straight away once you created the cluster.

I created a new project called Kubernetes for deploying the GKE cluster. The command you see below creates a GKE cluster with the defined settings and options, and I really like the simplicity of a single command to create and manage the cluster similar like eksctl does:

gcloud beta container --project "kubernetes-xxxxxx" clusters create "cluster-1" \
  --region "europe-west1" \
  --no-enable-basic-auth \
  --cluster-version "1.15.4-gke.22" \
  --machine-type "n1-standard-2" \
  --image-type "COS" \
  --disk-type "pd-standard" \
  --disk-size "100" \
  --metadata disable-legacy-endpoints=true \
  --scopes "https://www.googleapis.com/auth/devstorage.read_only","https://www.googleapis.com/auth/logging.write","https://www.googleapis.com/auth/monitoring","https://www.googleapis.com/auth/servicecontrol","https://www.googleapis.com/auth/service.management.readonly","https://www.googleapis.com/auth/trace.append" \
  --num-nodes "1" \
  --enable-stackdriver-kubernetes \
  --enable-ip-alias \
  --network "projects/kubernetes-xxxxxx/global/networks/default" \
  --subnetwork "projects/kubernetes-xxxxxx/regions/europe-west1/subnetworks/default" \
  --default-max-pods-per-node "110" \
  --enable-network-policy \
  --addons HorizontalPodAutoscaling,HttpLoadBalancing,Istio \
  --istio-config auth=MTLS_PERMISSIVE \
  --enable-autoupgrade \
  --enable-autorepair \
  --maintenance-window-start "2019-12-29T00:00:00Z" \
  --maintenance-window-end "2019-12-30T00:00:00Z" \
  --maintenance-window-recurrence "FREQ=WEEKLY;BYDAY=MO,TU,WE,TH,FR,SA,SU" \
  --enable-vertical-pod-autoscaling

With the gcloud command you can authenticate and generate a kubeconfig file for your cluster and start using kubectl directly to deploy your applications.

gcloud beta container clusters get-credentials cluster-1 --region europe-west1 --project kubernetes-xxxxxx

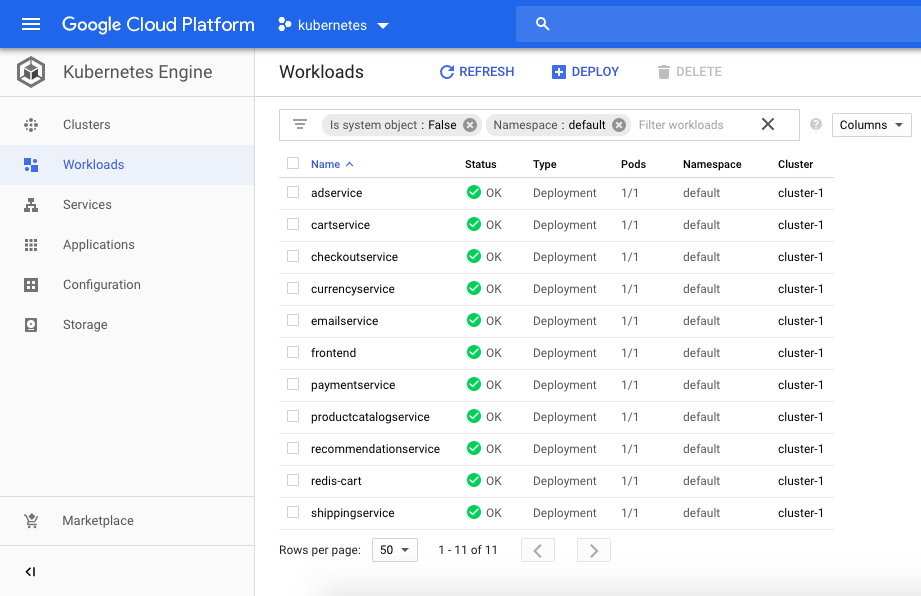
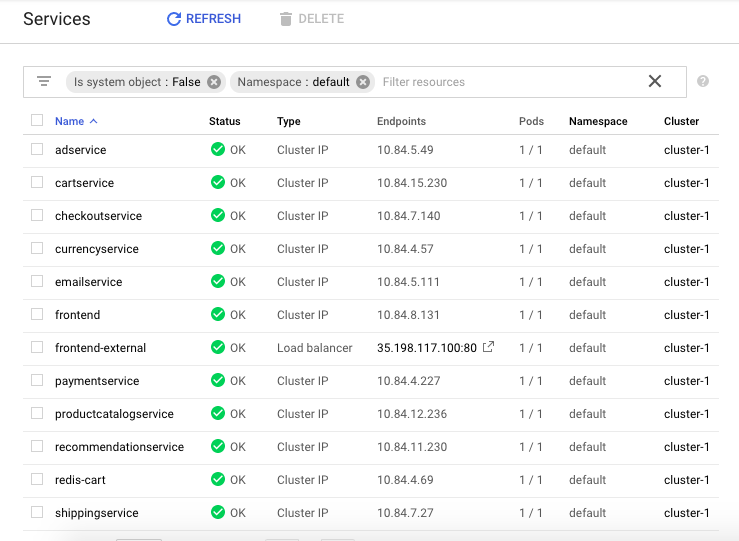
There is no need for a Kubernetes dashboard what I have mentioned because it is integrated into the Google Kubernetes Engine console. You are able to see cluster information and deployed workloads, and you are able to drill down to detailed information about running pods:

Google is offering the Kubernetes control-plane for free and which is a massive advantage for GKE because AWS on the other hand charges for the EKS control-plane around $144 per month.

You can keep your GKE control-plane running and scale down your instance pool to zero if no compute capacity is needed and scale up later if required:

# scale down node pool
gcloud container clusters resize cluster-1 --num-nodes=0 --region "europe-west1"

# scale up node pool 
gcloud container clusters resize cluster-1 --num-nodes=1 --region "europe-west1"

Let’s deploy the Google microservices demo application with Istio Service Mesh enabled:

# label default namespace to inject Envoy sidecar
kubectl label namespace default istio-injection=enabled

# check istio sidecar injector label
kubectl get namespace -L istio-injection

# deploy Google microservices demo manifests
kubectl create -f https://raw.githubusercontent.com/berndonline/microservices-demo/master/kubernetes-manifests/hipster-shop.yml
kubectl create -f https://raw.githubusercontent.com/berndonline/microservices-demo/master/istio-manifests/istio.yml

Get the public IP addresses for the frontend service and ingress gateway to connect with your browser:

# get frontend-external service IP address
kubectl get svc frontend-external --no-headers | awk '{ print $4 }'

# get istio ingress gateway service IP address
kubectl get svc istio-ingressgateway -n istio-system --no-headers | awk '{ print $4 }'

To delete the GKE cluster simply run the following gcloud command:

gcloud beta container --project "kubernetes-xxxxxx" clusters delete "cluster-1" --region "europe-west1"

Googles Kubernetes Engine is in my opinion the better offering compared to AWS EKS which seems a bit too basic.

How to backup OpenShift with Heptio Velero(Ark)

I have found an interesting open source tool called Heptio Velero previously known as Heptio Ark which is able to backup Kubernetes and OpenShift container platforms. The tool mainly does this via the API and backup namespace objects and additionally is able to create snapshots for PVs on Azure, AWS and GCP.

The user uses the ark command line utility to create and restore backups.

The installation on Velero is super simple, just follow the steps below:

# Download and extract the latest Velero release from github
wget https://github.com/heptio/velero/releases/download/v0.10.1/ark-v0.10.1-linux-amd64.tar.gz
tar -xzf ark-v0.10.1-linux-amd64.tar.gz -c ./velero/

# Move the ark binary to somewhere in your PATH
mv ./velero/ark /usr/sbin/

# The last two commands create namespace and applies configuration
oc create -f ./velero/config/common/00-prereqs.yaml
oc create -f ./velero/config/minio/

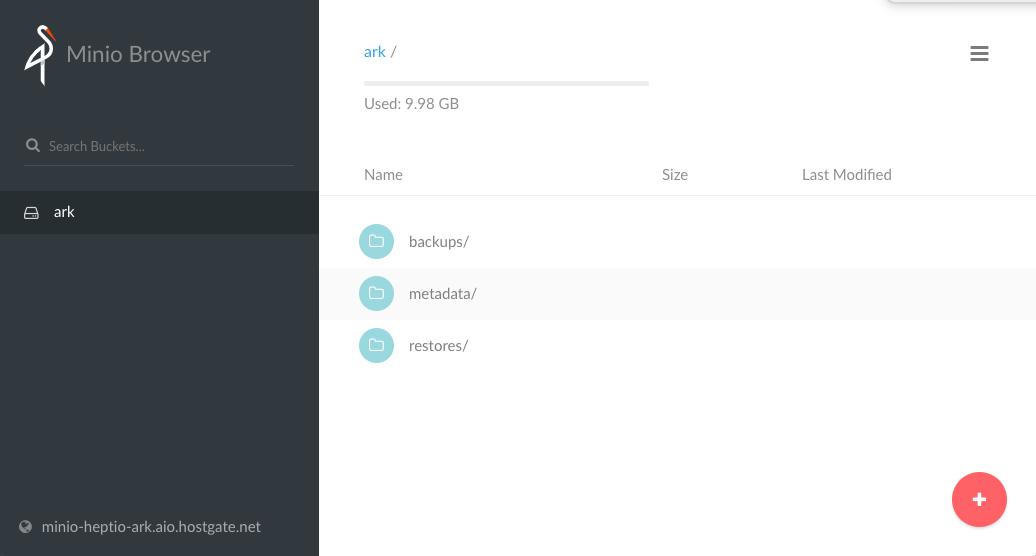
You can expose Minio to access the web console from the outside.

# Create route
oc expose service minio

# View access and secret key to login via the web console
oc describe deployment.apps/minio | grep -i Environment -A2
    Environment:
      MINIO_ACCESS_KEY:  minio
      MINIO_SECRET_KEY:  minio123

Here a few command options on how to backup objects:

# Create a backup for any object that matches the app=pod label selector:
ark backup create <backup-name> --selector <key>=<value> 

# Alternatively if you want to backup all objects except those matching the label backup=ignore:
ark backup create <backup-name> --selector 'backup notin (ignore)'

# Create regularly scheduled backups based on a cron expression using the app=pod label selector:
ark schedule create <backup-name> --schedule="0 1 * * *" --selector <key>=<value>

# Create a backup for a namespace:
ark backup create <backup-name> --include-namespaces <namespace-name>

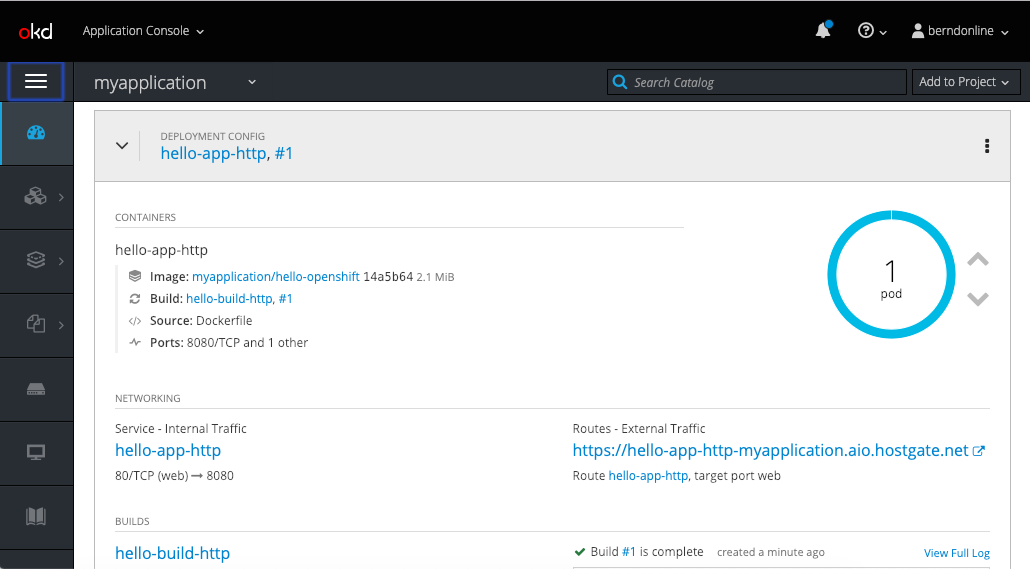
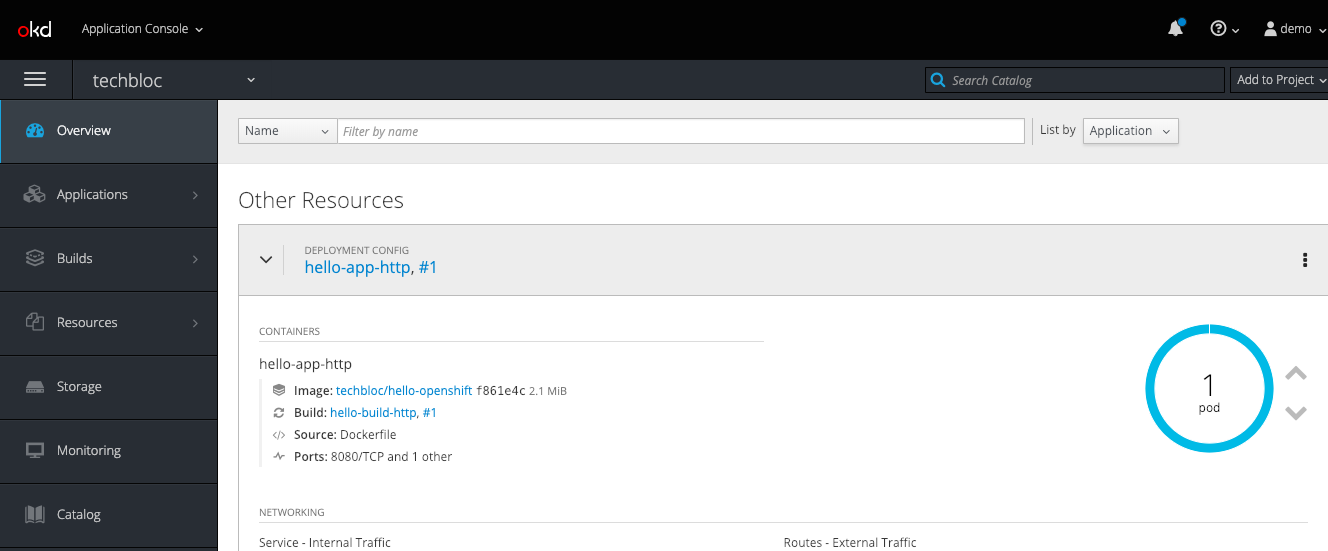
Let’s do a backup and restore tests; I have created a new OpenShift project with a simple hello-openshift build- and deployment-config:

[root@master1 ~]# ark backup create mybackup --include-namespaces myapplication
Backup request "mybackup" submitted successfully.
Run `ark backup describe mybackup` or `ark backup logs mybackup` for more details.
[root@master1 ~]# ark backup get
NAME          STATUS      CREATED                         EXPIRES   STORAGE LOCATION   SELECTOR
mybackup      Completed   2019-02-08 17:14:09 +0000 UTC   29d       default            

Once the backup has completed we can delete the project.

[root@master1 ~]# oc delete project myapplication
project.project.openshift.io "myapplication" deleted

Now let’s restore the project namespace from the previous created backup:

[root@master1 ~]# ark restore create --from-backup mybackup
Restore request "mybackup-20190208171745" submitted successfully.
Run `ark restore describe mybackup-20190208171745` or `ark restore logs mybackup-20190208171745` for more details.
[root@master1 ~]# ark restore get
NAME                         BACKUP        STATUS       WARNINGS   ERRORS    CREATED                         SELECTOR
mybackup-20190208171745      mybackup      InProgress   0          0         2019-02-08 17:17:45 +0000 UTC   
[root@master1 ~]# ark restore get
NAME                         BACKUP        STATUS      WARNINGS   ERRORS    CREATED                         SELECTOR
mybackup-20190208171745      mybackup      Completed   1          0         2019-02-08 17:17:45 +0000 UTC   

The project is back in the state it was when we created the backup.

[root@master1 ~]# oc get pods
NAME                     READY     STATUS    RESTARTS   AGE
hello-app-http-1-qn8jj   1/1       Running   0          2m
[root@master1 ~]# curl -k --insecure https://hello-app-http-myapplication.aio.hostgate.net/
Hello OpenShift!

There are a few issues around the restore which I have seen and I want to explain, I’m not sure if these are related to OpenShift in general or just the latest 3.11 version. The secrets for the builder account are missing or didn’t restore correctly and cannot be used.

[root@master1 ~]# oc get build
NAME                 TYPE      FROM         STATUS                               STARTED   DURATION
hello-build-http-1   Docker    Dockerfile   New (CannotRetrieveServiceAccount)
hello-build-http-2   Docker    Dockerfile   New
[root@master1 ~]# oc get events | grep Failed
1m          1m           2         hello-build-http.15816e39eefb637d         BuildConfig                                     Warning   BuildConfigInstantiateFailed   buildconfig-controller                                error instantiating Build from BuildConfig myapplication/hello-build-http (0): Error resolving ImageStreamTag hello-openshift-source:latest in namespace myapplication: imagestreams.image.openshift.io "hello-openshift-source" not found
1m          1m           6         hello-build-http.15816e39f446207f         BuildConfig                                     Warning   BuildConfigInstantiateFailed   buildconfig-controller                                error instantiating Build from BuildConfig myapplication/hello-build-http (0): Error resolving ImageStreamTag hello-openshift-source:latest in namespace myapplication: unable to find latest tagged image
1m          1m           1         hello-build-http.15816e3a49f21411         BuildConfig                                     Warning   BuildConfigInstantiateFailed   buildconfig-controller                                error instantiating Build from BuildConfig myapplication/hello-build-http (0): builds.build.openshift.io "hello-build-http-1" already exists
[root@master1 ~]# oc get secrets | grep builder
builder-token-5q646        kubernetes.io/service-account-token   4         5m

# OR
[root@master1 ~]# oc get build
NAME                 TYPE      FROM         STATUS                        STARTED   DURATION
hello-build-http-1   Docker    Dockerfile   Pending (MissingPushSecret)
hello-build-http-2   Docker    Dockerfile   New
[root@master1 ~]# oc get events | grep FailedMount
15m         19m          10        hello-build-http-1-build.15816cc22f35795c   Pod                                             Warning   FailedMount                    kubelet, ip-172-26-12-32.eu-west-1.compute.internal   MountVolume.SetUp failed for volume "builder-dockercfg-k55f6-push" : secrets "builder-dockercfg-k55f6" not found
15m         17m          2         hello-build-http-1-build.15816cdec9dc561a   Pod                                             Warning   FailedMount                    kubelet, ip-172-26-12-32.eu-west-1.compute.internal   Unable to mount volumes for pod "hello-build-http-1-build_myapplication(4c2f1113-2bb5-11e9-8a6b-0a007934f01e)": timeout expired waiting for volumes to attach or mount for pod "myapplication"/"hello-build-http-1-build". list of unmounted volumes=[builder-dockercfg-k55f6-push]. list of unattached volumes=[buildworkdir docker-socket crio-socket builder-dockercfg-k55f6-push builder-dockercfg-m6d2v-pull builder-token-sjvw5]
13m         13m          1         hello-build-http-1-build.15816d1e3e65ad2a   Pod                                             Warning   FailedMount                    kubelet, ip-172-26-12-32.eu-west-1.compute.internal   Unable to mount volumes for pod "hello-build-http-1-build_myapplication(4c2f1113-2bb5-11e9-8a6b-0a007934f01e)": timeout expired waiting for volumes to attach or mount for pod "myapplication"/"hello-build-http-1-build". list of unmounted volumes=[buildworkdir docker-socket crio-socket builder-dockercfg-k55f6-push builder-dockercfg-m6d2v-pull builder-token-sjvw5]. list of unattached volumes=[buildworkdir docker-socket crio-socket builder-dockercfg-k55f6-push builder-dockercfg-m6d2v-pull builder-token-sjvw5]
[root@master1 ~]# oc get secrets | grep builder
NAME                       TYPE                                  DATA      AGE
builder-dockercfg-m6d2v    kubernetes.io/dockercfg               1         5m
builder-token-4chx4        kubernetes.io/service-account-token   4         5m
builder-token-sjvw5        kubernetes.io/service-account-token   4         5m

The deployment config seems to be disconnected and doesn’t know the state of the running pod:

[root@ip-172-26-12-32 ~]# oc get dc
NAME             REVISION   DESIRED   CURRENT   TRIGGERED BY
hello-app-http   0          1         0         config,image(hello-openshift:latest)
[root@ip-172-26-12-32 ~]#

Here are the steps to recover out of this situation:

# First cancel all builds - the restore seems to have triggered a new build:
[root@master1 ~]# oc cancel-build $(oc get build --no-headers | awk '{ print $1 }')
build.build.openshift.io/hello-build-http-1 marked for cancellation, waiting to be cancelled
build.build.openshift.io/hello-build-http-2 marked for cancellation, waiting to be cancelled
build.build.openshift.io/hello-build-http-1 cancelled
build.build.openshift.io/hello-build-http-2 cancelled

# Delete all builds otherwise you will get later a problem because of duplicate name:
[root@master1 ~]# oc delete build $(oc get build --no-headers | awk '{ print $1 }')
build.build.openshift.io "hello-build-http-1" deleted
build.build.openshift.io "hello-build-http-2" deleted

# Delete the project builder account - this triggers openshift to re-create the builder
[root@master1 ~]# oc delete sa builder
serviceaccount "builder" deleted
[root@master1 ~]# oc get secrets | grep builder
builder-dockercfg-vwckw    kubernetes.io/dockercfg               1         24s
builder-token-dpgj9        kubernetes.io/service-account-token   4         24s
builder-token-lt7z2        kubernetes.io/service-account-token   4         24s

# Start the build and afterwards do a rollout for the deployment config:
[root@master1 ~]# oc start-build hello-build-http
build.build.openshift.io/hello-build-http-3 started
[root@master1 ~]# oc rollout latest dc/hello-app-http
deploymentconfig.apps.openshift.io/hello-app-http rolled out

After doing all this your build- and deployment-config is back synchronised.

[root@master1 ~]# oc get dc
NAME             REVISION   DESIRED   CURRENT   TRIGGERED BY
hello-app-http   3          1         1         config,image(hello-openshift:latest)

My feedback about Heptio Velero(Ark); apart from the restore issues with the build- and deployment-config, I find the tool great especially in scenarios where I accidently deleted a namespace or for DR where I need to recover a whole cluster. What makes the tool worth it, is actually the possibility to create snapshots from PV disks on your cloud provider.

Check out the official documentation from Heptio for more information and if you like this article please leave a comment.

Deploy OpenShift 3.11 Container Platform on Google Cloud Platform using Terraform

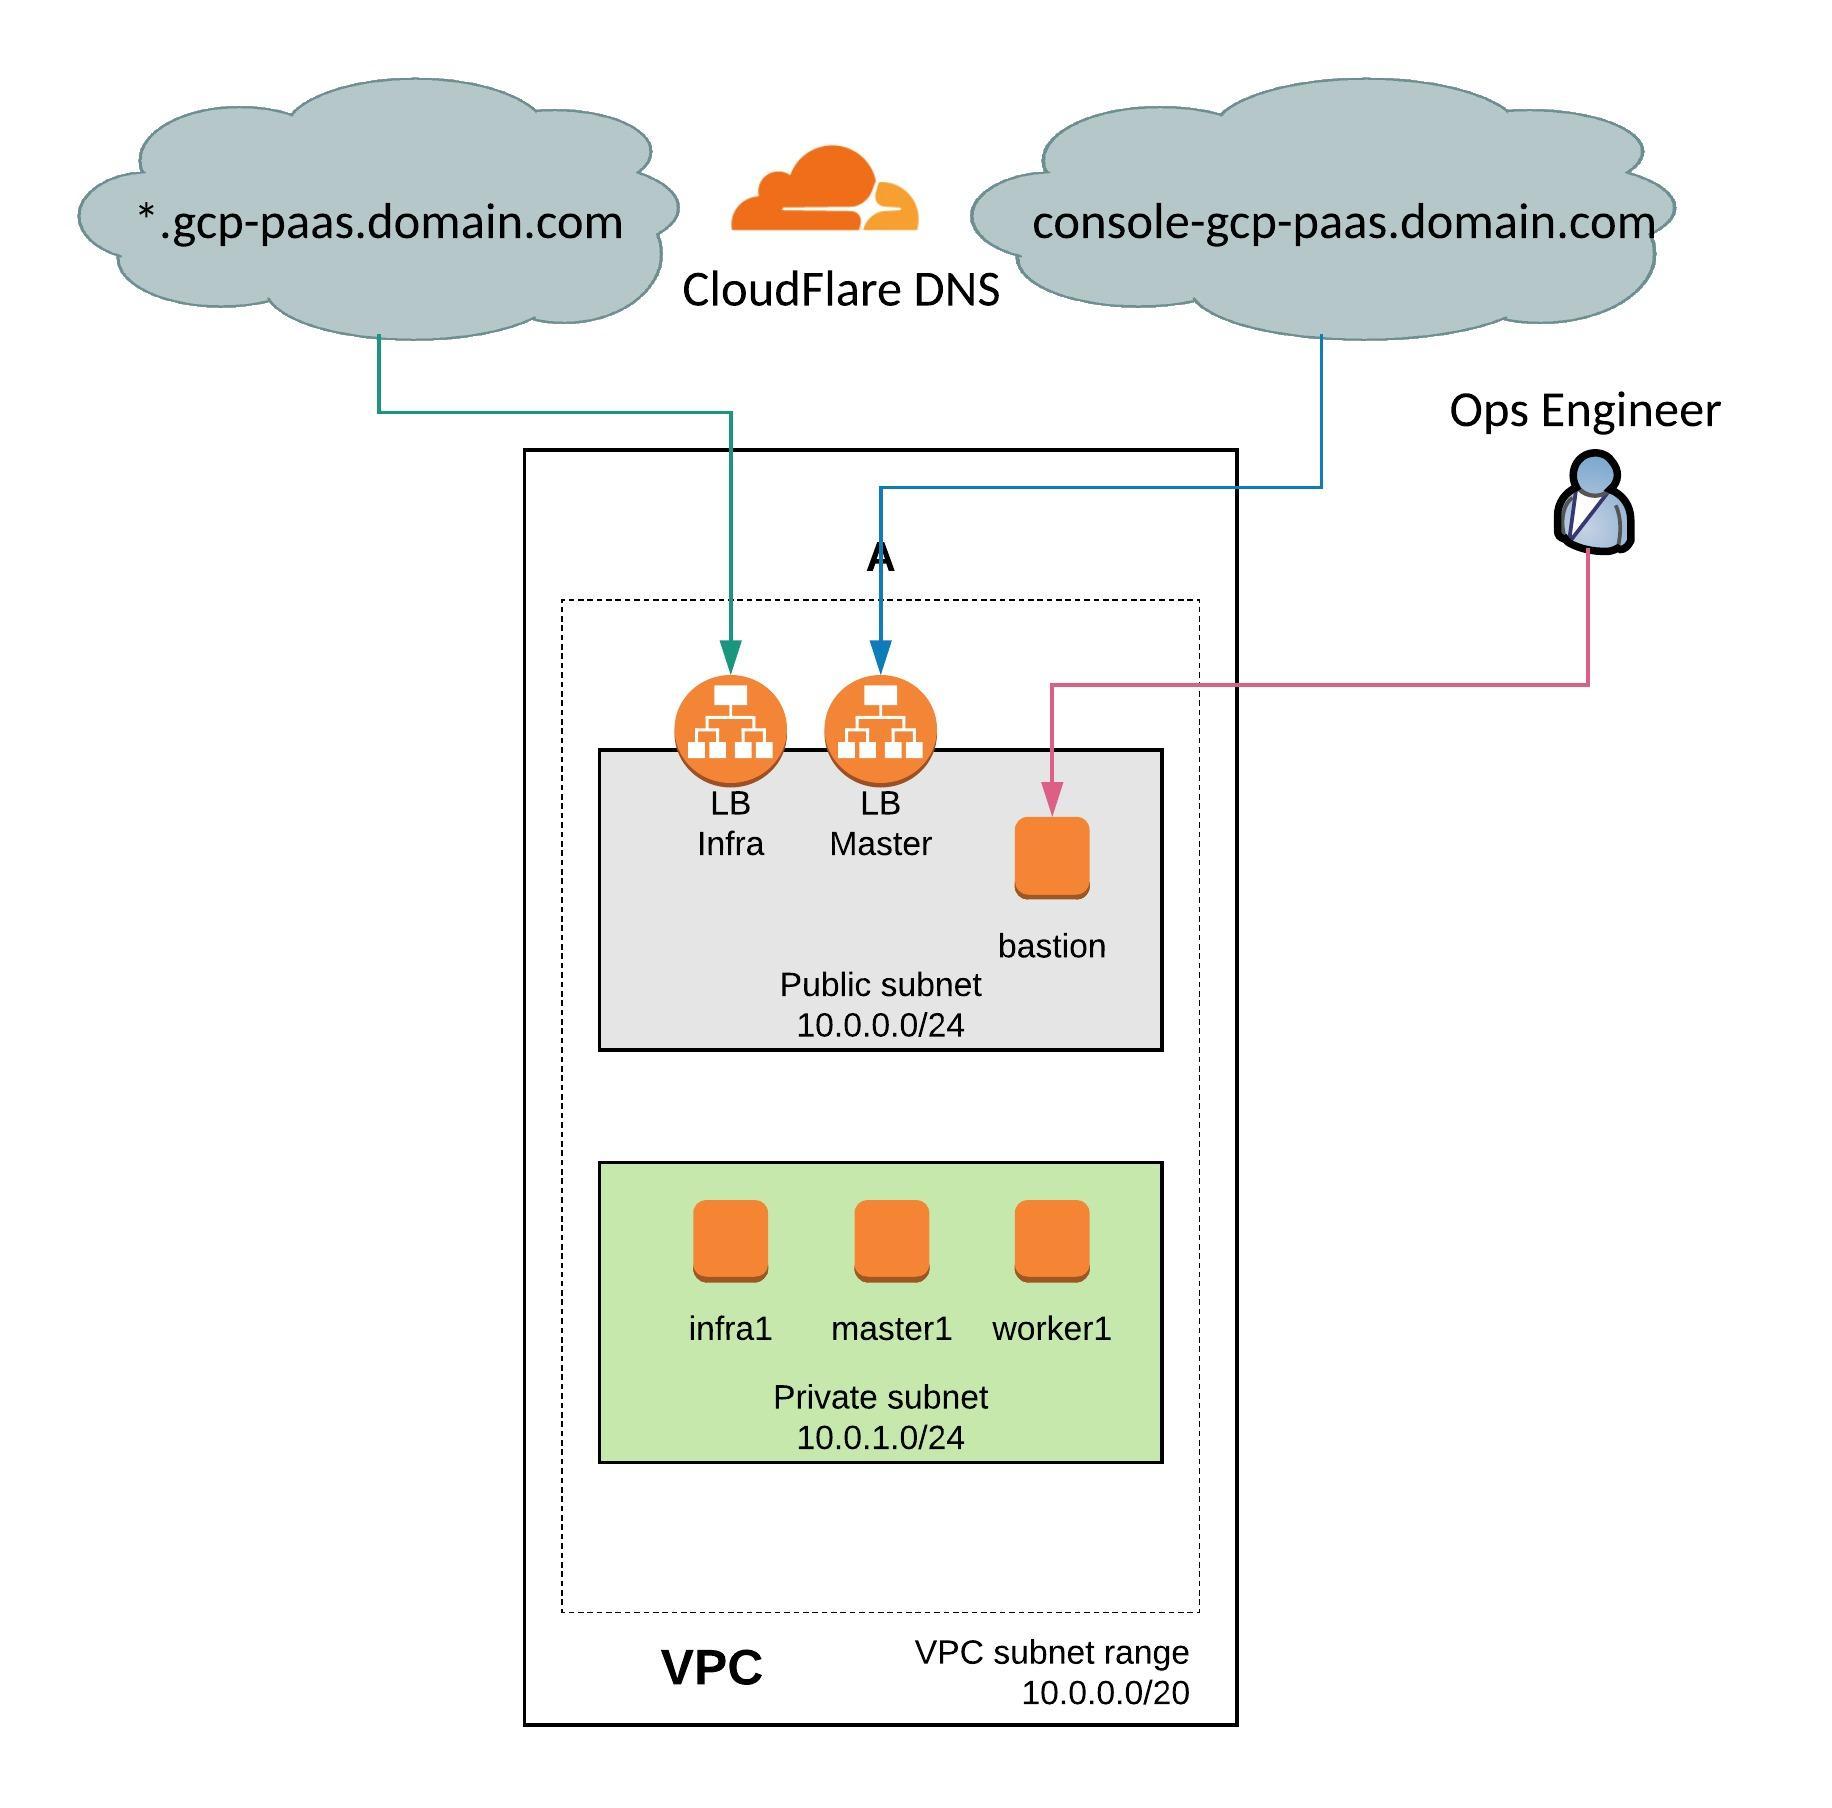
Over the past few days I have converted the OpenShift 3.11 infrastructure on Amazon AWS to run on Google Cloud Platform. I have kept the similar VPC network layout and instances to run OpenShift.

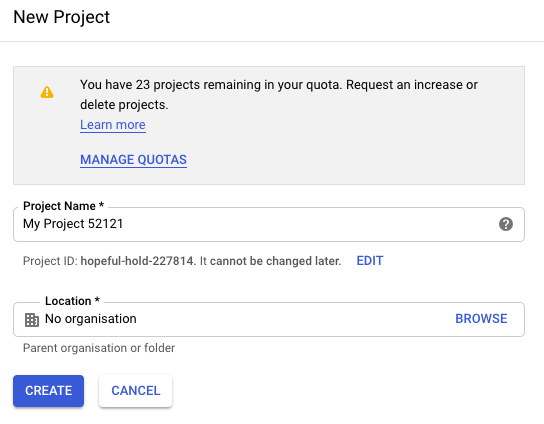
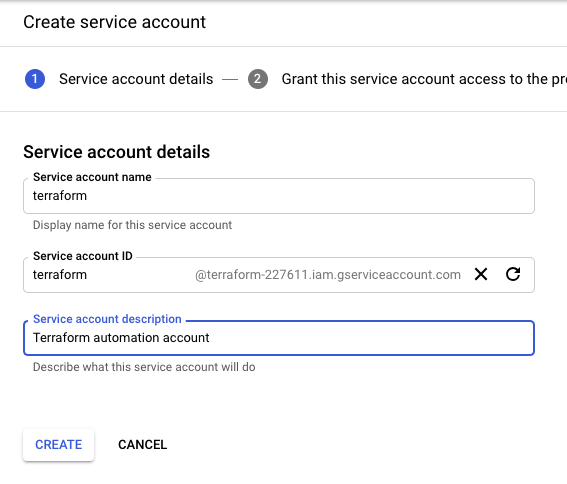
Before you start you need to create a project on Google Cloud Platform, then continue to create the service account and generate the private key and download the credential as JSON file.

Create the new project:

Create the service account:

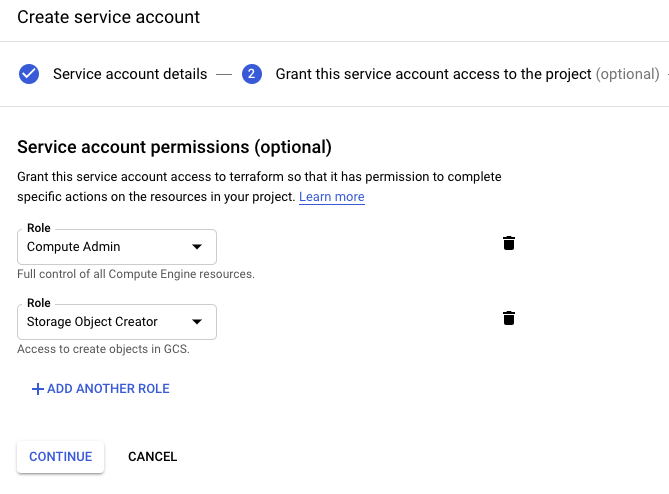
Give the service account compute admin and storage object creator permissions:

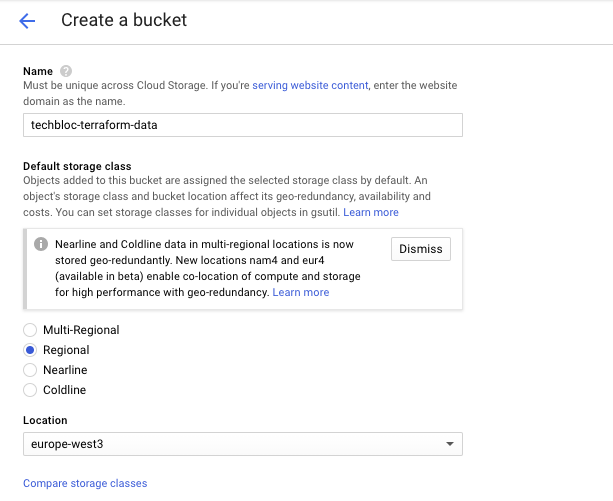
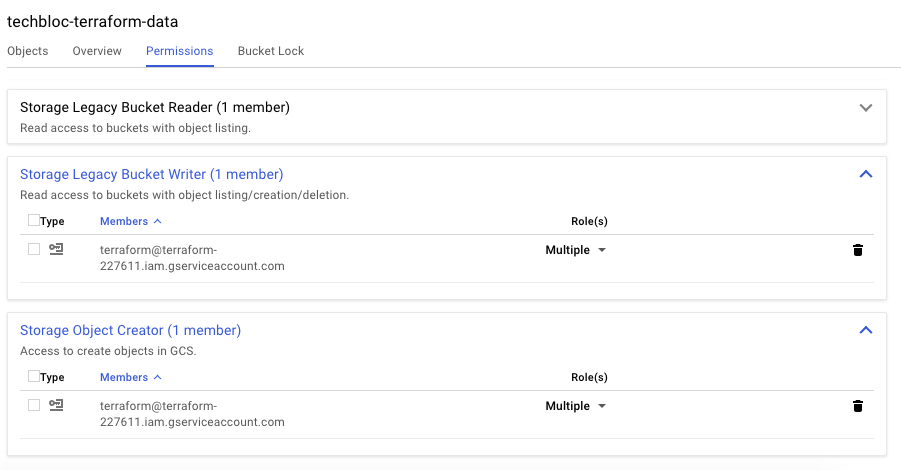
Then create a storage bucket for the Terraform backend state and assign the correct bucket permission to the terraform service account:

Bucket permissions:

To start, clone my openshift-terraform github repository and checkout the google-dev branch:

git clone https://github.com/berndonline/openshift-terraform.git
cd ./openshift-terraform/ && git checkout google-dev

Add your previously downloaded credentials json file:

cat << EOF > ./credentials.json
{
  "type": "service_account",
  "project_id": "<--your-project-->",
  "private_key_id": "<--your-key-id-->",
  "private_key": "-----BEGIN PRIVATE KEY-----

...

}
EOF

There are a few things you need to modify in the main.tf and variables.tf before you can start:

...
terraform {
  backend "gcs" {
    bucket    = "<--your-bucket-name-->"
    prefix    = "openshift-311"
    credentials = "credentials.json"
  }
}
...
...
variable "gcp_region" {
  description = "Google Compute Platform region to launch servers."
  default     = "europe-west3"
}
variable "gcp_project" {
  description = "Google Compute Platform project name."
  default     = "<--your-project-name-->"
}
variable "gcp_zone" {
  type = "string"
  default = "europe-west3-a"
  description = "The zone to provision into"
}
...

Add the needed environment variables to apply changes to CloudFlare DNS:

export TF_VAR_email='<-YOUR-CLOUDFLARE-EMAIL-ADDRESS->'
export TF_VAR_token='<-YOUR-CLOUDFLARE-TOKEN->'
export TF_VAR_domain='<-YOUR-CLOUDFLARE-DOMAIN->'
export TF_VAR_htpasswd='<-YOUR-OPENSHIFT-DEMO-USER-HTPASSWD->'

Let’s start creating the infrastructure and verify afterwards the created resources on GCP.

terraform init && terraform apply -auto-approve

VPC and public and private subnets in region europe-west3:

Created instances:

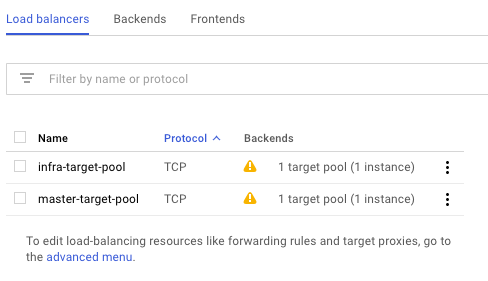
Created load balancers for master and infra nodes:

Copy the ssh key and ansible-hosts file to the bastion host from where you need to run the Ansible OpenShift playbooks.

scp -o StrictHostKeyChecking=no -o UserKnownHostsFile=/dev/null -i ./helper_scripts/id_rsa -r ./helper_scripts/id_rsa centos@$(terraform output bastion):/home/centos/.ssh/
scp -o StrictHostKeyChecking=no -o UserKnownHostsFile=/dev/null -i ./helper_scripts/id_rsa -r ./inventory/ansible-hosts  centos@$(terraform output bastion):/home/centos/ansible-hosts

I recommend waiting a few minutes as the cloud-init script prepares the bastion host. Afterwards continue with the pre and install playbooks. You can connect to the bastion host and run the playbooks directly.

ssh -o StrictHostKeyChecking=no -o UserKnownHostsFile=/dev/null -i ./helper_scripts/id_rsa -l centos $(terraform output bastion) -A "cd /openshift-ansible/ && ansible-playbook ./playbooks/openshift-pre.yml -i ~/ansible-hosts"
ssh -o StrictHostKeyChecking=no -o UserKnownHostsFile=/dev/null -i ./helper_scripts/id_rsa -l centos $(terraform output bastion) -A "cd /openshift-ansible/ && ansible-playbook ./playbooks/openshift-install.yml -i ~/ansible-hosts"

After the installation is completed, continue to create your project and applications:

When you are finished with the testing, run terraform destroy.

terraform destroy -force 

Please share your feedback and leave a comment.