Ansible Playbook for Arista vEOS BGP IP-Fabric

Over the Christmas holidays, I was working just for fun on an Arista vEOS Vagrant topology and Ansible Playbook. I reused my Ansible Playbook from my previous post about an Ansible Playbook for Cumulus Linux BGP IP-Fabric and Cumulus NetQ Validation.

Arista only has a Virtualbox vEOS image and there is an ISO image to boot the virtual appliance which I don’t understand why they have done this, rather I prefer the way Cumulus provide their VX images for testing to use with Virtualbox or KVM.

I found an interesting blog post on how to run vEOS images with KVM (Libvirt). I tried it and I could run vEOS in KVM but unfortunately, it wasn’t  stable enough to run more complex virtual network topologies so I had to switch back to Virtualbox. I will give it a try again in a few month because I prefer KVM over Virtualbox.

Anyway, you’ll find more information about how to use vEOS with Virtualbox and Vagrant.

My Virtualbox Vagrantfile can be found in my Github repository: https://github.com/berndonline/arista-lab-vagrant

Network overview:

Ansible Playbook:

As I have mentioned before I tried to be close as possible to my Cumulus Linux Ansible Playbook and tried to keep the variables and roles the same. They are differences of course in the Jinja2 templates and tasks but the overall structure is similar.

Here you’ll find the repository with the Ansible Playbook: https://github.com/berndonline/arista-lab-provision

Because Arista didn’t prepare the images very well and only created a vagrant user without adding the ssh key for authentication I needed to use a CLI provider with a username and password. But this is only a minor issue otherwise it works the same. See the site.yml below:

---

- hosts: network

  connection: local
  gather_facts: 'False'

  vars:
    cli:
      username: vagrant
      password: vagrant

  roles:
    - leafgroups
    - hostname
    - interfaces
    - routing
    - ntp

In the roles, I have used the Arista EOS Ansible modules eos_config and eos_system.

Boot up the Vagrant environment and then run the Playbook afterwards:

PLAY [network] *****************************************************************

TASK [leafgroups : create leaf groups based on clag_pairs] *********************
ok: [leaf-1] => (item=(u'leafgroup1', [u'leaf-1', u'leaf-2']))
skipping: [leaf-1] => (item=(u'leafgroup2', [u'leaf-3', u'leaf-4'])) 
skipping: [leaf-3] => (item=(u'leafgroup1', [u'leaf-1', u'leaf-2'])) 
ok: [leaf-3] => (item=(u'leafgroup2', [u'leaf-3', u'leaf-4']))
skipping: [leaf-4] => (item=(u'leafgroup1', [u'leaf-1', u'leaf-2'])) 
ok: [leaf-2] => (item=(u'leafgroup1', [u'leaf-1', u'leaf-2']))
skipping: [leaf-2] => (item=(u'leafgroup2', [u'leaf-3', u'leaf-4'])) 
ok: [leaf-4] => (item=(u'leafgroup2', [u'leaf-3', u'leaf-4']))
skipping: [spine-1] => (item=(u'leafgroup1', [u'leaf-1', u'leaf-2'])) 
skipping: [spine-1] => (item=(u'leafgroup2', [u'leaf-3', u'leaf-4'])) 
skipping: [spine-2] => (item=(u'leafgroup1', [u'leaf-1', u'leaf-2'])) 
skipping: [spine-2] => (item=(u'leafgroup2', [u'leaf-3', u'leaf-4'])) 

TASK [leafgroups : include leaf group variables] *******************************
ok: [leaf-1] => (item=(u'leafgroup1', [u'leaf-1', u'leaf-2']))
skipping: [leaf-3] => (item=(u'leafgroup1', [u'leaf-1', u'leaf-2'])) 
skipping: [leaf-1] => (item=(u'leafgroup2', [u'leaf-3', u'leaf-4'])) 
skipping: [leaf-4] => (item=(u'leafgroup1', [u'leaf-1', u'leaf-2'])) 
skipping: [spine-1] => (item=(u'leafgroup1', [u'leaf-1', u'leaf-2'])) 
skipping: [spine-1] => (item=(u'leafgroup2', [u'leaf-3', u'leaf-4'])) 
ok: [leaf-3] => (item=(u'leafgroup2', [u'leaf-3', u'leaf-4']))
ok: [leaf-2] => (item=(u'leafgroup1', [u'leaf-1', u'leaf-2']))
skipping: [leaf-2] => (item=(u'leafgroup2', [u'leaf-3', u'leaf-4'])) 
ok: [leaf-4] => (item=(u'leafgroup2', [u'leaf-3', u'leaf-4']))
skipping: [spine-2] => (item=(u'leafgroup1', [u'leaf-1', u'leaf-2'])) 
skipping: [spine-2] => (item=(u'leafgroup2', [u'leaf-3', u'leaf-4'])) 

TASK [hostname : write hostname and domain name] *******************************
changed: [leaf-4]
changed: [spine-1]
changed: [leaf-1]
changed: [leaf-3]
changed: [leaf-2]
changed: [spine-2]

TASK [interfaces : write interface configuration] ******************************
changed: [spine-1]
changed: [leaf-2]
changed: [leaf-4]
changed: [leaf-3]
changed: [leaf-1]
changed: [spine-2]

TASK [routing : write routing configuration] ***********************************
changed: [leaf-1]
changed: [leaf-4]
changed: [spine-1]
changed: [leaf-2]
changed: [leaf-3]
changed: [spine-2]

TASK [ntp : write ntp configuration] *******************************************
changed: [leaf-2] => (item=216.239.35.8)
changed: [leaf-1] => (item=216.239.35.8)
changed: [leaf-3] => (item=216.239.35.8)
changed: [spine-1] => (item=216.239.35.8)
changed: [leaf-4] => (item=216.239.35.8)
changed: [spine-2] => (item=216.239.35.8)

PLAY RECAP *********************************************************************
leaf-1                     : ok=6    changed=4    unreachable=0    failed=0   
leaf-2                     : ok=6    changed=4    unreachable=0    failed=0   
leaf-3                     : ok=6    changed=4    unreachable=0    failed=0   
leaf-4                     : ok=6    changed=4    unreachable=0    failed=0   
spine-1                    : ok=4    changed=4    unreachable=0    failed=0   
spine-2                    : ok=4    changed=4    unreachable=0    failed=0   

I didn’t use the leafgroups role for variables in my Playbook but I left it just in case.

Because Arista has nothing similar to Cumulus NetQ to validate the configuration I create a simple arista_check_icmp.yml playbook and use ping from the leaf switches to test if the configuration is successfully deployed.

PLAY [leaf] ********************************************************************

TASK [validate connection from leaf-1] *****************************************
skipping: [leaf-3] => (item=10.255.0.4) 
skipping: [leaf-3] => (item=10.255.0.5) 
skipping: [leaf-3] => (item=10.255.0.6) 
skipping: [leaf-2] => (item=10.255.0.4) 
skipping: [leaf-2] => (item=10.255.0.5) 
skipping: [leaf-2] => (item=10.255.0.6) 
skipping: [leaf-3] => (item=10.0.102.252) 
skipping: [leaf-4] => (item=10.255.0.4) 
skipping: [leaf-3] => (item=10.0.102.253) 
skipping: [leaf-3] => (item=10.0.102.254) 
skipping: [leaf-4] => (item=10.255.0.5) 
skipping: [leaf-2] => (item=10.0.102.252) 
skipping: [leaf-4] => (item=10.255.0.6) 
skipping: [leaf-2] => (item=10.0.102.253) 
skipping: [leaf-2] => (item=10.0.102.254) 
skipping: [leaf-4] => (item=10.0.102.252) 
skipping: [leaf-4] => (item=10.0.102.253) 
skipping: [leaf-4] => (item=10.0.102.254) 
ok: [leaf-1] => (item=10.255.0.4)
ok: [leaf-1] => (item=10.255.0.5)
ok: [leaf-1] => (item=10.255.0.6)
ok: [leaf-1] => (item=10.0.102.252)
ok: [leaf-1] => (item=10.0.102.253)
ok: [leaf-1] => (item=10.0.102.254)

TASK [validate connection from leaf-2] *****************************************
skipping: [leaf-1] => (item=10.255.0.3) 
skipping: [leaf-3] => (item=10.255.0.3) 
skipping: [leaf-1] => (item=10.255.0.5) 
skipping: [leaf-3] => (item=10.255.0.5) 
skipping: [leaf-1] => (item=10.255.0.6) 
skipping: [leaf-3] => (item=10.255.0.6) 
skipping: [leaf-1] => (item=10.0.102.252) 
skipping: [leaf-1] => (item=10.0.102.253) 
skipping: [leaf-4] => (item=10.255.0.3) 
skipping: [leaf-3] => (item=10.0.102.252) 
skipping: [leaf-1] => (item=10.0.102.254) 
skipping: [leaf-3] => (item=10.0.102.253) 
skipping: [leaf-3] => (item=10.0.102.254) 
skipping: [leaf-4] => (item=10.255.0.5) 
skipping: [leaf-4] => (item=10.255.0.6) 
skipping: [leaf-4] => (item=10.0.102.252) 
skipping: [leaf-4] => (item=10.0.102.253) 
skipping: [leaf-4] => (item=10.0.102.254) 
ok: [leaf-2] => (item=10.255.0.3)
ok: [leaf-2] => (item=10.255.0.5)
ok: [leaf-2] => (item=10.255.0.6)
ok: [leaf-2] => (item=10.0.102.252)
ok: [leaf-2] => (item=10.0.102.253)
ok: [leaf-2] => (item=10.0.102.254)

TASK [validate connection from leaf-3] *****************************************
skipping: [leaf-1] => (item=10.255.0.3) 
skipping: [leaf-1] => (item=10.255.0.4) 
skipping: [leaf-2] => (item=10.255.0.3) 
skipping: [leaf-1] => (item=10.255.0.6) 
skipping: [leaf-1] => (item=10.0.101.252) 
skipping: [leaf-2] => (item=10.255.0.4) 
skipping: [leaf-2] => (item=10.255.0.6) 
skipping: [leaf-1] => (item=10.0.101.253) 
skipping: [leaf-4] => (item=10.255.0.3) 
skipping: [leaf-2] => (item=10.0.101.252) 
skipping: [leaf-4] => (item=10.255.0.4) 
skipping: [leaf-1] => (item=10.0.101.254) 
skipping: [leaf-4] => (item=10.255.0.6) 
skipping: [leaf-2] => (item=10.0.101.253) 
skipping: [leaf-4] => (item=10.0.101.252) 
skipping: [leaf-2] => (item=10.0.101.254) 
skipping: [leaf-4] => (item=10.0.101.253) 
skipping: [leaf-4] => (item=10.0.101.254) 
ok: [leaf-3] => (item=10.255.0.3)
ok: [leaf-3] => (item=10.255.0.4)
ok: [leaf-3] => (item=10.255.0.6)
ok: [leaf-3] => (item=10.0.101.252)
ok: [leaf-3] => (item=10.0.101.253)
ok: [leaf-3] => (item=10.0.101.254)

TASK [validate connection from leaf-4] *****************************************
skipping: [leaf-1] => (item=10.255.0.3) 
skipping: [leaf-3] => (item=10.255.0.3) 
skipping: [leaf-1] => (item=10.255.0.4) 
skipping: [leaf-3] => (item=10.255.0.4) 
skipping: [leaf-1] => (item=10.255.0.5) 
skipping: [leaf-2] => (item=10.255.0.3) 
skipping: [leaf-3] => (item=10.255.0.5) 
skipping: [leaf-3] => (item=10.0.101.252) 
skipping: [leaf-2] => (item=10.255.0.4) 
skipping: [leaf-1] => (item=10.0.101.252) 
skipping: [leaf-2] => (item=10.255.0.5) 
skipping: [leaf-2] => (item=10.0.101.252) 
skipping: [leaf-3] => (item=10.0.101.253) 
skipping: [leaf-1] => (item=10.0.101.253) 
skipping: [leaf-1] => (item=10.0.101.254) 
skipping: [leaf-3] => (item=10.0.101.254) 
skipping: [leaf-2] => (item=10.0.101.253) 
skipping: [leaf-2] => (item=10.0.101.254) 
ok: [leaf-4] => (item=10.255.0.3)
ok: [leaf-4] => (item=10.255.0.4)
ok: [leaf-4] => (item=10.255.0.5)
ok: [leaf-4] => (item=10.0.101.252)
ok: [leaf-4] => (item=10.0.101.253)
ok: [leaf-4] => (item=10.0.101.254)

PLAY RECAP *********************************************************************
leaf-1                     : ok=1    changed=0    unreachable=0    failed=0   
leaf-2                     : ok=1    changed=0    unreachable=0    failed=0   
leaf-3                     : ok=1    changed=0    unreachable=0    failed=0   
leaf-4                     : ok=1    changed=0    unreachable=0    failed=0   

I don’t usually work with Arista devices and this was a try to use a different switch vendor but still keep using the type of Ansible Playbook.

Please tell me if you like it and share your feedback.

Leave a comment

Ansible Playbook for Cisco ASAv Firewall Topology

More about Ansible network automation with Cisco ASAv and continuous integration testing like in my previous posts using Vagrant and Gitlab-CI.

Network overview:

Here’s my Github repository where you can find the complete Ansible Playbook: https://github.com/berndonline/asa-lab-provision

Automating firewall configuration is not that easy and can get very complicated because you have different objects, access-lists and service policies to configure which all together makes the playbook complex rather than simple.

What you won’t find in my playbook is how to automate the cluster deployment because this wasn’t possible in my scenario using ASAv and Vagrant. I didn’t have physical Cisco ASA firewall on hand to do this but I might add this later in the coming months.

Let’s look at the different variable files I created; first the host_vars for asa-1.yml which is very similar to a Cisco router:

---

hostname: asa-1
domain_name: lab.local

interfaces:
  0/0:
    alias: connection rtr-1 inside
    nameif: inside
    security_level: 100
    address: 10.0.255.1
    mask: 255.255.255.0

  0/1:
    alias: connection rtr-2 outside
    nameif: outside
    security_level: 0
    address: 217.100.100.1
    mask: 255.255.255.0

routes:
  - route outside 0.0.0.0 0.0.0.0 217.100.100.254 1

I then use multiple files in group_vars for objects.ymlobject-groups.ymlaccess-lists.yml and nat.yml to configure specific firewall settings.

Roles:

  • Hostname: The task in main.yml uses the Ansible module asa_config and configures hostname and domain name.
  • Interfaces:  This role uses the Ansible module asa_config to deploy the template interfaces.j2 to configure the interfaces. In the main.yml is a second task to enable the interfaces when the previous template applied the configuration.
  • Routing: Similar to the interfaces role and uses also the asa_config module to deploy the template routing.j2 for the static routes
  • Objects: The first task in main.yml loads the objects.yml from group_vars, the second task deploys the template objects.j2.
  • Object-Groups: Uses same tasks in main.yml and template object-groups.j2 like the objects role but the commands are slightly different.
  • Access-Lists: One of the more complicated roles I needed to work on, in the main.yml are multiple tasks to load variables like in the previous roles, then runs a task to clear access-lists if the variable “override_acl” from access-lists.yml group_vars is set to “true” otherwise it skips the next tasks. When the variable are set to true and the access-lists are cleared it then writes new access-lists using the Ansible module asa_acl and finishes with a task to assigning the newly created access-lists to the interfaces.
  • NAT: This role is again similar to the objects role using a task main.yml to load variable file and deploys the template nat.j2. The NAT role uses object nat and only works if you created the object before in the objects group_vars.
  • Policy-Framework: Multiple tasks in main.yml first clears global policy and policy maps and afterwards recreates them. Similar approach like the access lists to keep it consistent.

Main Ansible Playbook site.yml

---

- hosts: asa-1

  connection: local
  user: vagrant
  gather_facts: 'no'

  roles:
    - hostname
    - interfaces
    - routing
    - objects
    - object-groups
    - access-lists
    - nat
    - policy-framework

When a change triggers the gitlab-ci pipeline it spins up the Vagrant instances and executes the main Ansible Playbook. After the Vagrant instances are booted, first the two router rtr-1 and rtr-2 need to be configured with cisco_router_config.yml, then afterwards the main site.yml will be run.

Once the main playbook finishes for the Cisco ASA a last connectivity check will be execute using the playbook asa_check_icmp.yml. Just a simple ping to see if the base configuration is applied correctly.

If everything goes well, like in this example, the job is successful:

I will continue to improve the Playbook and the CICD pipeline so come back later to check it out.

Leave a comment

Ansible Playbook for Cisco BGP Routing Topology

This is my Ansible Playbook for a simple Cisco BGP routing topology and using a CICD pipeline for integration testing. The virtual network environment is created on-demand by using Vagrant, see my post about Cisco IOSv and XE network simulation using Vagrant.

Network overview:

Here’s my Github repository where you can find the complete Ansible Playbook: https://github.com/berndonline/cisco-lab-provision

You can find all the variables for the interface and routing configuration under host_vars. Below is an example for router rtr-1:

---

hostname: rtr-1
domain_name: lab.local

loopback:
  address: 10.255.0.1
  mask: 255.255.255.255

interfaces:
  0/1:
    alias: connection rtr-2
    address: 10.0.255.1
    mask: 255.255.255.252

  0/2:
    alias: connection rtr-3
    address: 10.0.255.5
    mask: 255.255.255.252

bgp:
  asn: 65001
  neighbor:
    - {address: 10.0.255.2, remote_as: 65000}
    - {address: 10.0.255.6, remote_as: 65000}
  networks:
    - {network: 10.0.255.0, mask: 255.255.255.252}
    - {network: 10.0.255.4, mask: 255.255.255.252}
    - {network: 10.255.0.1, mask: 255.255.255.255}
  maxpath: 2

Roles:

  • Hostname: The task in main.yml uses the Ansible module ios_system and configures hostname, domain name and disables dns lookups.
  • Interfaces: This role uses the Ansible module ios_config to deploy the template interfaces.j2 to configure the interfaces. In the main.yml is a second task to enable the interfaces when the previous template applied the configuration.
  • Routing: Very similar to the interfaces role and uses also the ios_config module to deploy the template routing.j2 for the BGP routing configuration.

Main Ansible Playbook site.yml:

---

- hosts: all

  connection: local
  user: vagrant
  gather_facts: 'no'

  roles:
    - hostname
    - interfaces
    - routing

When a change triggers the gitlab-ci pipeline it spins up the Vagrant instances and executes the main Ansible Playbook:

After the main site.yml ran, a second Playbook is executed for basic connectivity testing cisco_check_icmp.yml. This uses the Ansible module ios_ping and can be useful in my case to validate if the configuration was correctly applied:

If everything goes well, like in this example, the job is successful:

I will continue to improve the Playbook and the CICD pipeline so come back later to check it out.

Leave a comment

Cumulus Linux network simulation using Vagrant

I was using GNS3 for quite some time but it was not very flexible if you quickly wanted to test something and even more complicated if you used a different computer or shared your projects.

I spend some time with Vagrant to build a virtual Cumulus Linux lab environment which can run basically on every computer. Simulating network environments is the future when you want to test and validate your automation scripts.
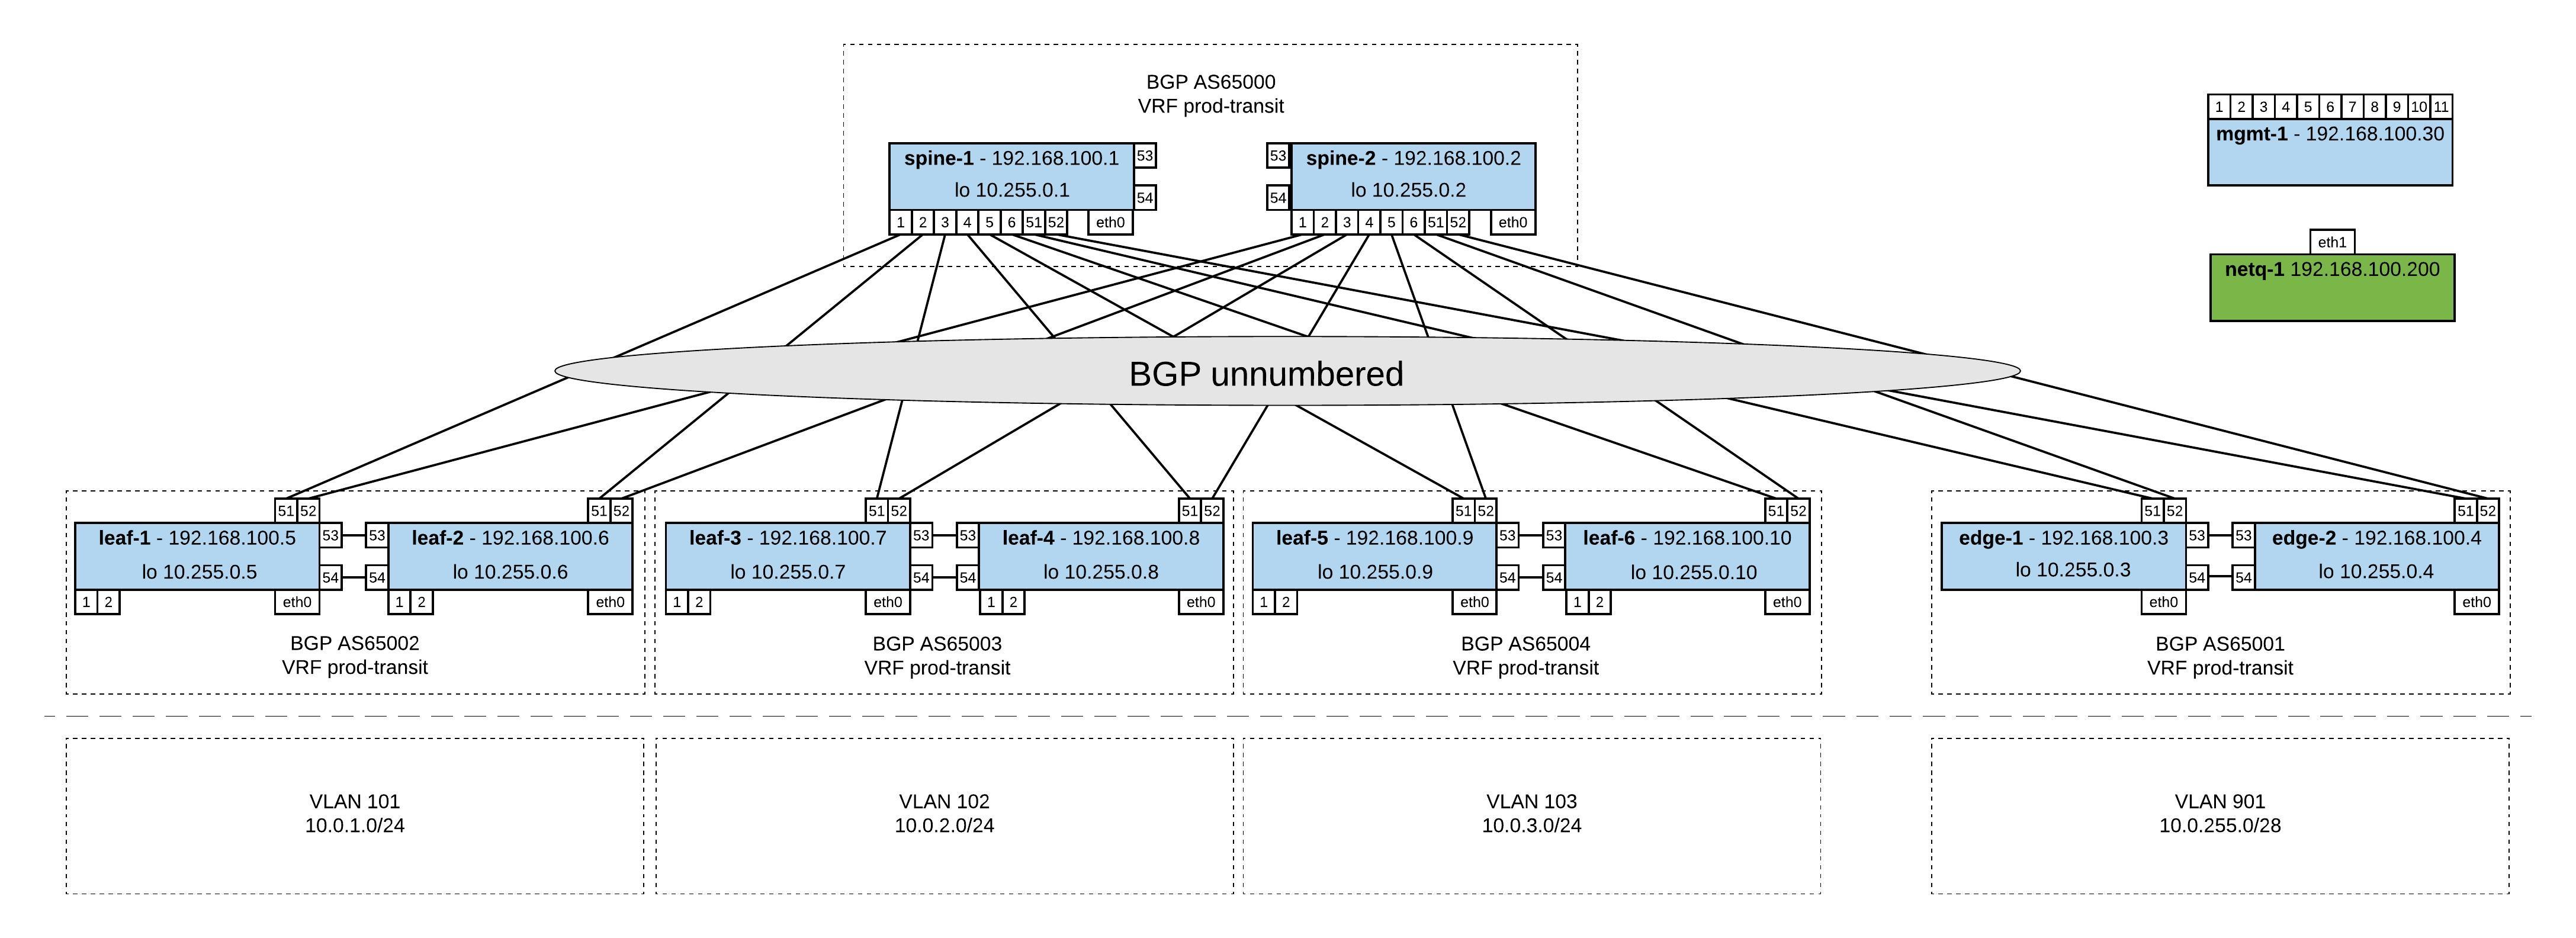
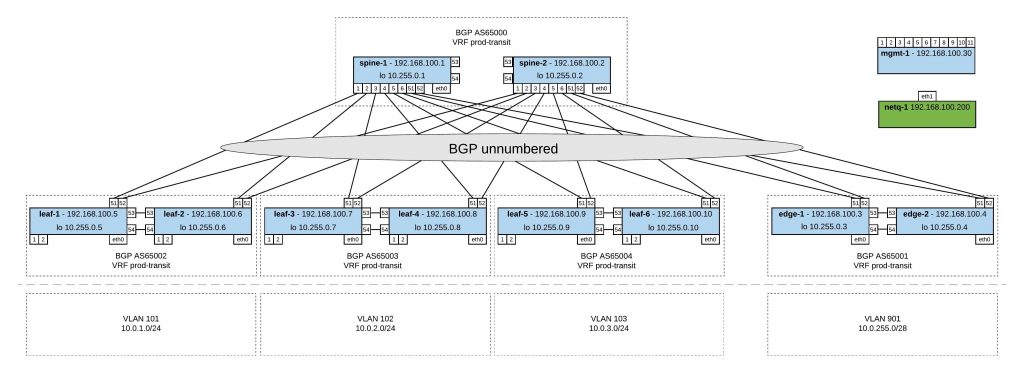
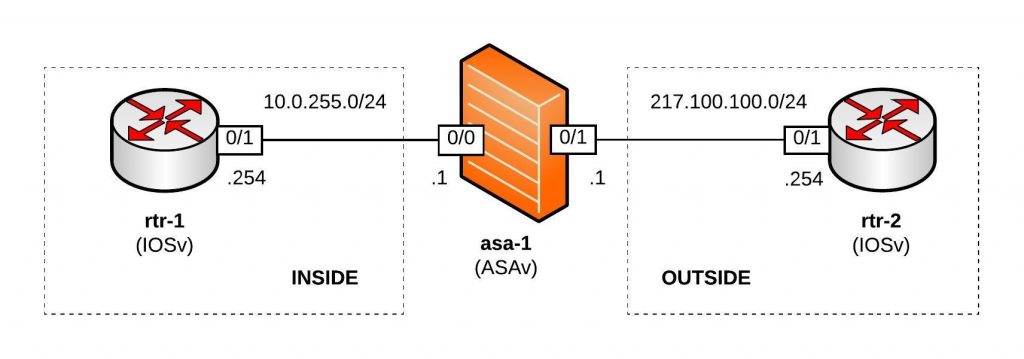
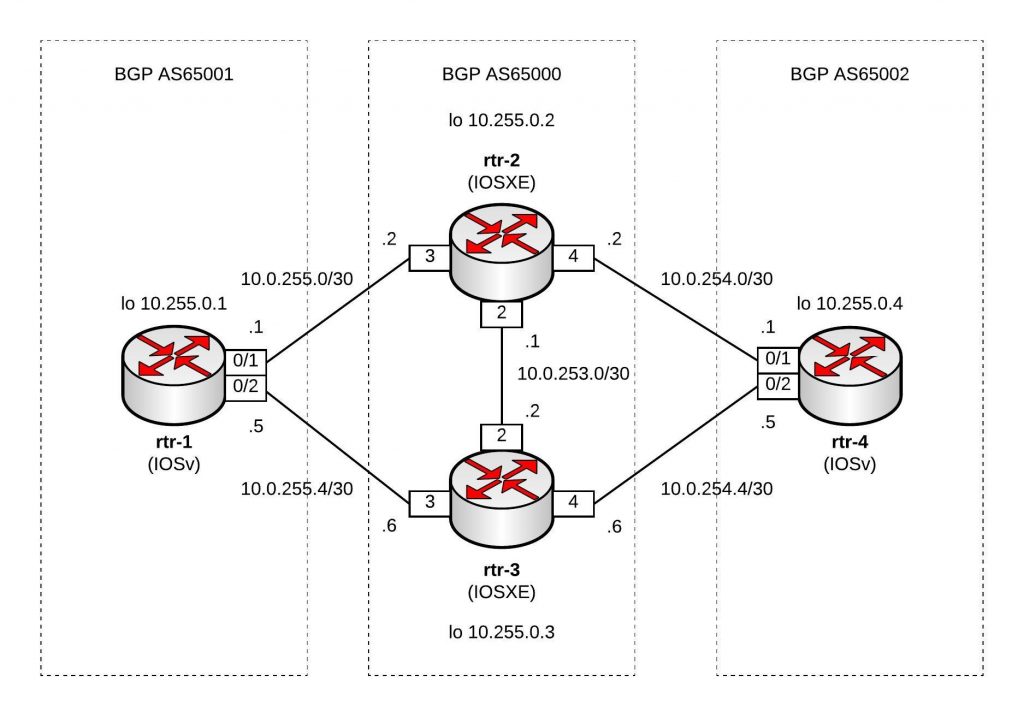
My lab diagram:

I created different topology.dot files and used the Cumulus topology converter on Github to create my lab with Virtualbox or Libvirt (KVM). I did some modification to the initialise scripts for the switches and the management server. Everything you find in my Github repo https://github.com/berndonline/cumulus-lab-vagrant.

The topology file basically defines your network and the converter creates the Vagrantfile.

In the management topology file you have all servers (incl. management) like in the network diagram above. The Cumulus switches you can only access via the management server.

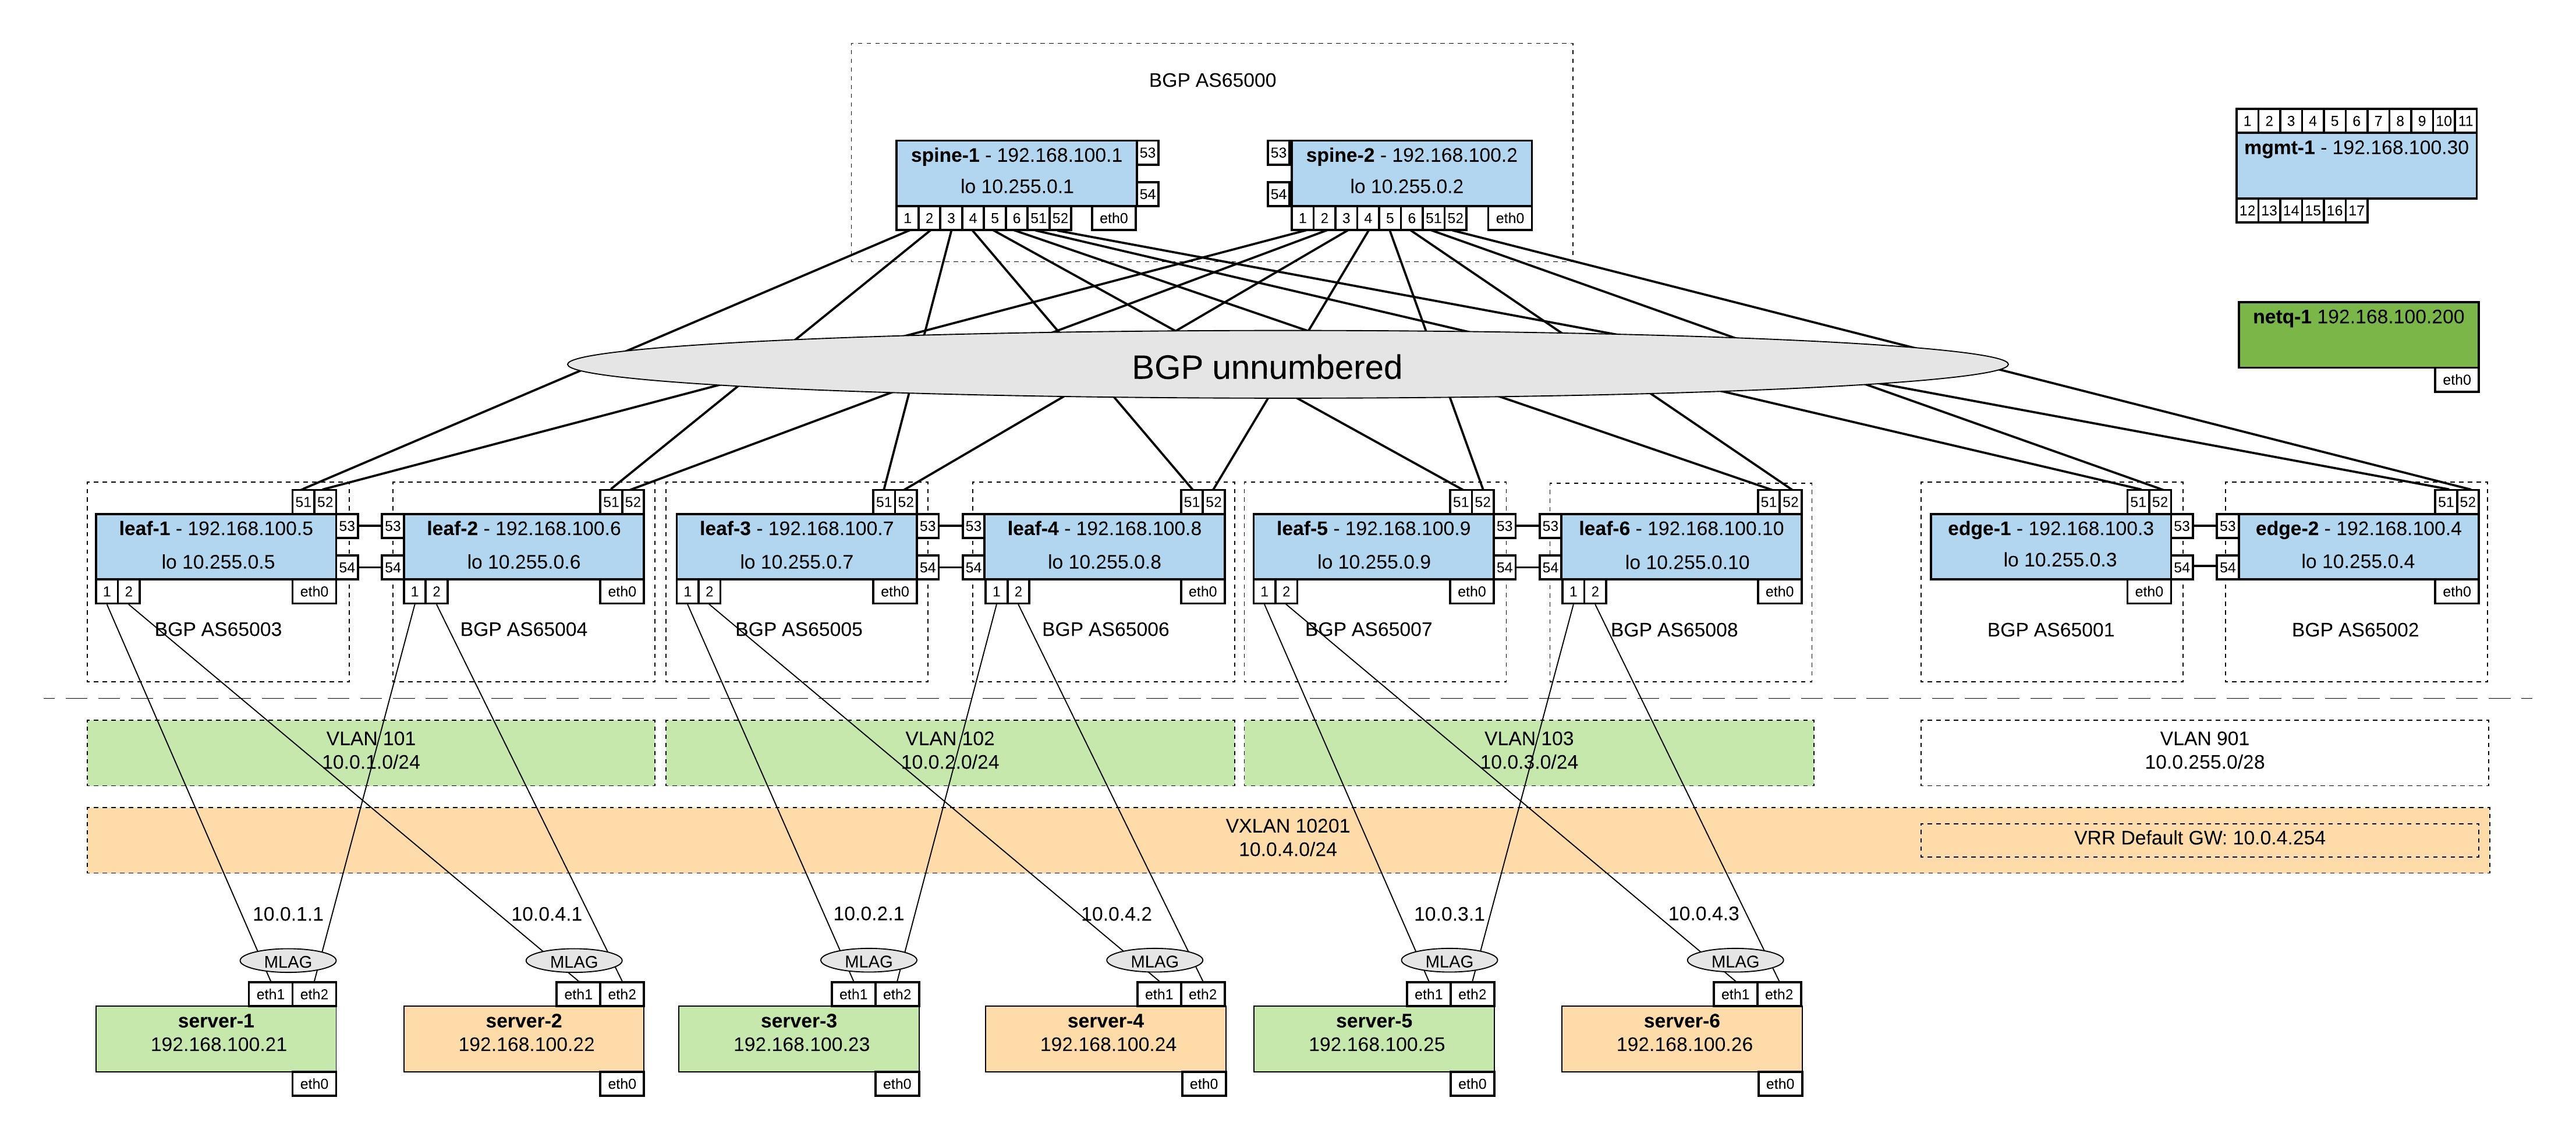
Very similar to the topology-mgmt.dot but in this one the management server is running Cumulus NetQ which you need to first import into your Vagrant. Here the link to the Cumulus NetQ demo on Github.

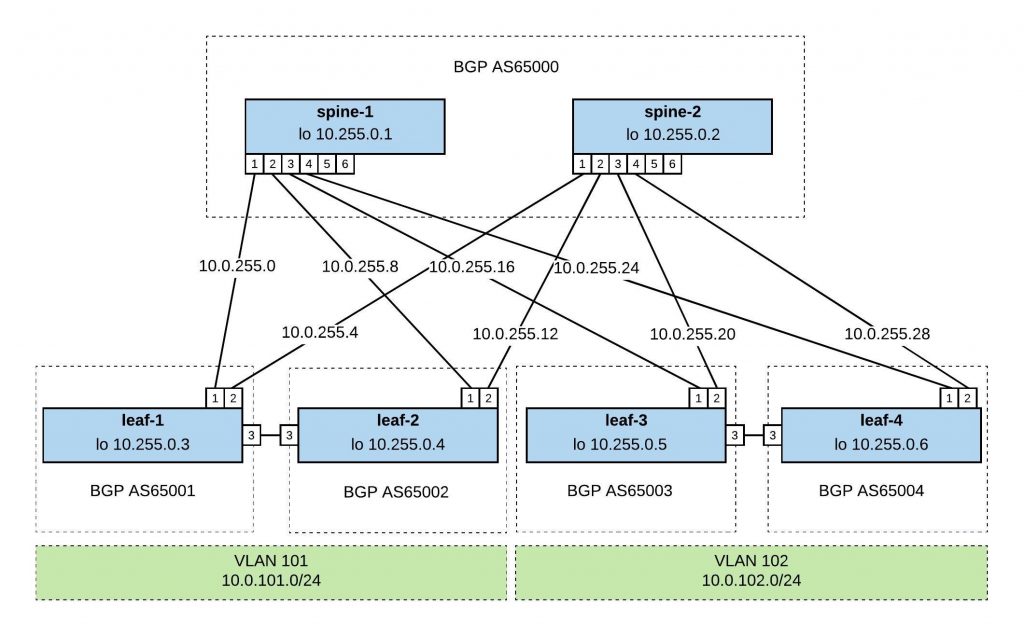
In this topology file you find a basic staging lab without servers where you can access the Cumulus switches directly via their Vagrant IP. I mainly use this to quickly test something like updating Cumulus switches or validating Ansible playbooks.

In this topology file you find a basic production lab where you can access the Cumulus switches directly via their Vagrant IP and have Cumulus NetQ as management server.

Basically to convert a topology into a Vagrantfile you just need to run the following command:

python topology_converter.py topology-staging.dot -p libvirt --ansible-hostfile

I use KVM in my example and want that Vagrant creates an Ansible inventory file and run playbooks directly agains the switches.

Check the status of the vagrant environment:

berndonline@lab:~/cumulus-lab-vagrant$ vagrant status
Current machine states:

spine-1                   not created (libvirt)
spine-2                   not created (libvirt)
leaf-1                    not created (libvirt)
leaf-3                    not created (libvirt)
leaf-2                    not created (libvirt)
leaf-4                    not created (libvirt)
mgmt-1                    not created (libvirt)
edge-2                    not created (libvirt)
edge-1                    not created (libvirt)

This environment represents multiple VMs. The VMs are all listed
above with their current state. For more information about a specific
VM, run `vagrant status NAME`.
berndonline@lab:~/cumulus-lab-vagrant$

To start the devices run:

vagrant up

If you use the topology files with management server you need to start first the management server and then the management switch before you boot the rest of the switches:

vagrant up mgmt-server
vagrant up mgmt-1
vagrant up

The switches will pull some part of their configuration from the management server.

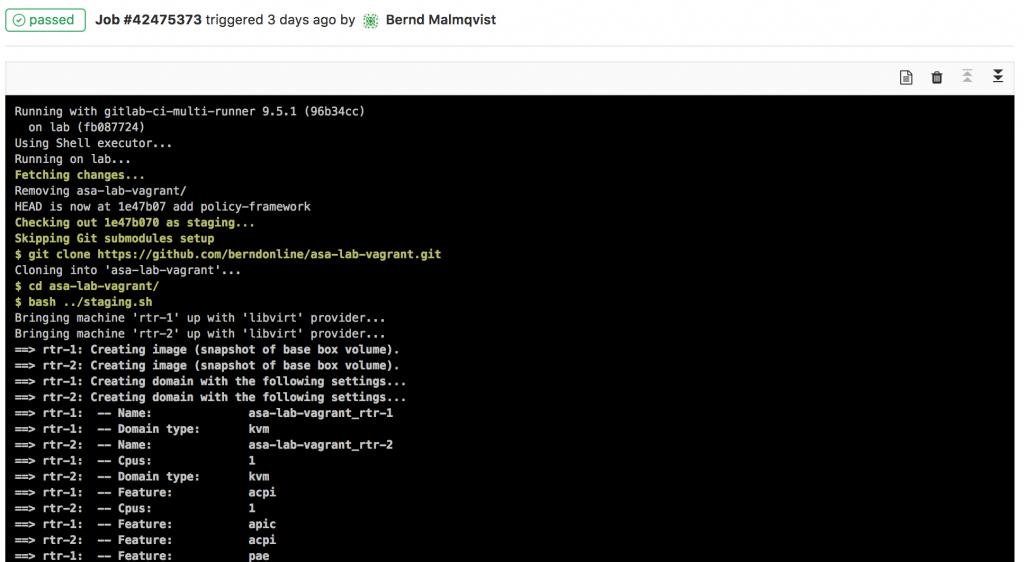
Output if you start the environment:

berndonline@lab:~/cumulus-lab-vagrant$ vagrant up spine-1
Bringing machine 'spine-1' up with 'libvirt' provider...
==> spine-1: Creating image (snapshot of base box volume).
==> spine-1: Creating domain with the following settings...
==> spine-1:  -- Name:              cumulus-lab-vagrant_spine-1
==> spine-1:  -- Domain type:       kvm
==> spine-1:  -- Cpus:              1
==> spine-1:  -- Feature:           acpi
==> spine-1:  -- Feature:           apic
==> spine-1:  -- Feature:           pae
==> spine-1:  -- Memory:            512M
==> spine-1:  -- Management MAC:
==> spine-1:  -- Loader:
==> spine-1:  -- Base box:          CumulusCommunity/cumulus-vx
==> spine-1:  -- Storage pool:      default
==> spine-1:  -- Image:             /var/lib/libvirt/images/cumulus-lab-vagrant_spine-1.img (4G)
==> spine-1:  -- Volume Cache:      default
==> spine-1:  -- Kernel:
==> spine-1:  -- Initrd:
==> spine-1:  -- Graphics Type:     vnc
==> spine-1:  -- Graphics Port:     5900
==> spine-1:  -- Graphics IP:       127.0.0.1
==> spine-1:  -- Graphics Password: Not defined
==> spine-1:  -- Video Type:        cirrus
==> spine-1:  -- Video VRAM:        9216
==> spine-1:  -- Sound Type:
==> spine-1:  -- Keymap:            en-us
==> spine-1:  -- TPM Path:
==> spine-1:  -- INPUT:             type=mouse, bus=ps2
==> spine-1: Creating shared folders metadata...
==> spine-1: Starting domain.
==> spine-1: Waiting for domain to get an IP address...
==> spine-1: Waiting for SSH to become available...
    spine-1:
    spine-1: Vagrant insecure key detected. Vagrant will automatically replace
    spine-1: this with a newly generated keypair for better security.
    spine-1:
    spine-1: Inserting generated public key within guest...
    spine-1: Removing insecure key from the guest if it's present...
    spine-1: Key inserted! Disconnecting and reconnecting using new SSH key...
==> spine-1: Setting hostname...
==> spine-1: Configuring and enabling network interfaces...
....
==> spine-1: #################################
==> spine-1:   Running Switch Post Config (config_vagrant_switch.sh)
==> spine-1: #################################
==> spine-1:  ###Creating SSH keys for cumulus user ###
==> spine-1: #################################
==> spine-1:    Finished
==> spine-1: #################################
==> spine-1: Running provisioner: shell...
    spine-1: Running: inline script
==> spine-1: Running provisioner: shell...
    spine-1: Running: inline script
==> spine-1:   INFO: Adding UDEV Rule: a0:00:00:00:00:21 --> eth0
==> spine-1: Running provisioner: shell...
    spine-1: Running: inline script
==> spine-1:   INFO: Adding UDEV Rule: 44:38:39:00:00:30 --> swp1
==> spine-1: Running provisioner: shell...
    spine-1: Running: inline script
==> spine-1:   INFO: Adding UDEV Rule: 44:38:39:00:00:04 --> swp2
==> spine-1: Running provisioner: shell...
    spine-1: Running: inline script
==> spine-1:   INFO: Adding UDEV Rule: 44:38:39:00:00:26 --> swp3
==> spine-1: Running provisioner: shell...
    spine-1: Running: inline script
==> spine-1:   INFO: Adding UDEV Rule: 44:38:39:00:00:0a --> swp4
==> spine-1: Running provisioner: shell...
    spine-1: Running: inline script
==> spine-1:   INFO: Adding UDEV Rule: 44:38:39:00:00:22 --> swp51
==> spine-1: Running provisioner: shell...
    spine-1: Running: inline script
==> spine-1:   INFO: Adding UDEV Rule: 44:38:39:00:00:0d --> swp52
==> spine-1: Running provisioner: shell...
    spine-1: Running: inline script
==> spine-1:   INFO: Adding UDEV Rule: 44:38:39:00:00:10 --> swp53
==> spine-1: Running provisioner: shell...
    spine-1: Running: inline script
==> spine-1:   INFO: Adding UDEV Rule: 44:38:39:00:00:23 --> swp54
==> spine-1: Running provisioner: shell...
    spine-1: Running: inline script
==> spine-1:   INFO: Adding UDEV Rule: Vagrant interface = eth1
==> spine-1: #### UDEV Rules (/etc/udev/rules.d/70-persistent-net.rules) ####
==> spine-1: ACTION=="add", SUBSYSTEM=="net", ATTR{address}=="a0:00:00:00:00:21", NAME="eth0", SUBSYSTEMS=="pci"
==> spine-1: ACTION=="add", SUBSYSTEM=="net", ATTR{address}=="44:38:39:00:00:30", NAME="swp1", SUBSYSTEMS=="pci"
==> spine-1: ACTION=="add", SUBSYSTEM=="net", ATTR{address}=="44:38:39:00:00:04", NAME="swp2", SUBSYSTEMS=="pci"
==> spine-1: ACTION=="add", SUBSYSTEM=="net", ATTR{address}=="44:38:39:00:00:26", NAME="swp3", SUBSYSTEMS=="pci"
==> spine-1: ACTION=="add", SUBSYSTEM=="net", ATTR{address}=="44:38:39:00:00:0a", NAME="swp4", SUBSYSTEMS=="pci"
==> spine-1: ACTION=="add", SUBSYSTEM=="net", ATTR{address}=="44:38:39:00:00:22", NAME="swp51", SUBSYSTEMS=="pci"
==> spine-1: ACTION=="add", SUBSYSTEM=="net", ATTR{address}=="44:38:39:00:00:0d", NAME="swp52", SUBSYSTEMS=="pci"
==> spine-1: ACTION=="add", SUBSYSTEM=="net", ATTR{address}=="44:38:39:00:00:10", NAME="swp53", SUBSYSTEMS=="pci"
==> spine-1: ACTION=="add", SUBSYSTEM=="net", ATTR{address}=="44:38:39:00:00:23", NAME="swp54", SUBSYSTEMS=="pci"
==> spine-1: ACTION=="add", SUBSYSTEM=="net", ATTR{ifindex}=="2", NAME="eth1", SUBSYSTEMS=="pci"
==> spine-1: Running provisioner: shell...
    spine-1: Running: inline script
==> spine-1: ### RUNNING CUMULUS EXTRA CONFIG ###
==> spine-1:   INFO: Detected a 3.x Based Release
==> spine-1: ### Disabling default remap on Cumulus VX...
==> spine-1: ### Disabling ZTP service...
==> spine-1: Removed symlink /etc/systemd/system/multi-user.target.wants/ztp.service.
==> spine-1: ### Resetting ZTP to work next boot...
==> spine-1: Created symlink from /etc/systemd/system/multi-user.target.wants/ztp.service to /lib/systemd/system/ztp.service.
==> spine-1:   INFO: Detected Cumulus Linux v3.3.2 Release
==> spine-1: ### Fixing ONIE DHCP to avoid Vagrant Interface ###
==> spine-1:      Note: Installing from ONIE will undo these changes.
==> spine-1: ### Giving Vagrant User Ability to Run NCLU Commands ###
==> spine-1: ### DONE ###
==> spine-1: ### Rebooting Device to Apply Remap...

At the end you are able to connect to the Cumulus switch:

berndonline@lab:~/cumulus-lab-vagrant$ vagrant ssh spine-1

Welcome to Cumulus VX (TM)

Cumulus VX (TM) is a community supported virtual appliance designed for
experiencing, testing and prototyping Cumulus Networks' latest technology.
For any questions or technical support, visit our community site at:
http://community.cumulusnetworks.com

The registered trademark Linux (R) is used pursuant to a sublicense from LMI,
the exclusive licensee of Linus Torvalds, owner of the mark on a world-wide
basis.
vagrant@cumulus:~$

To destroy the Vagrant environment:

berndonline@lab:~/cumulus-lab-vagrant$ vagrant destroy spine-1
==> spine-2: Remove stale volume...
==> spine-2: Domain is not created. Please run `vagrant up` first.
==> spine-1: Removing domain...

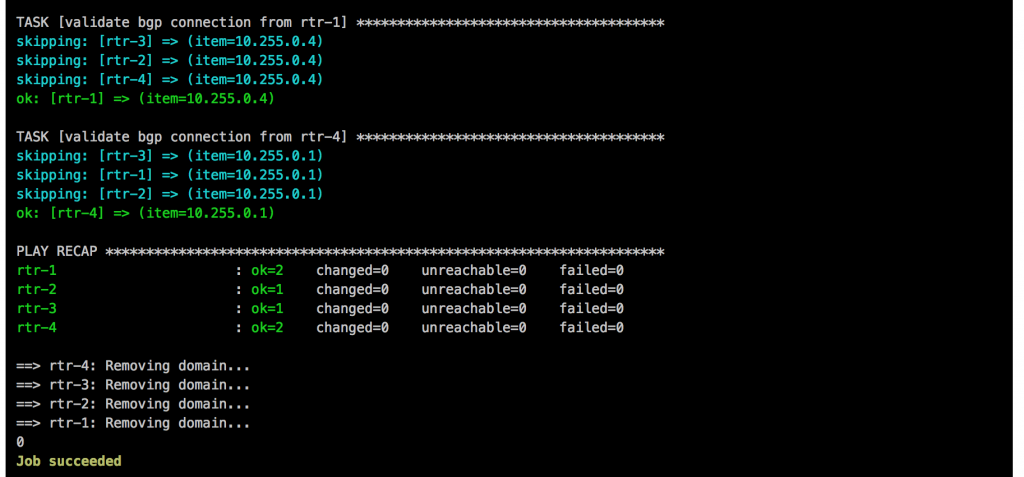
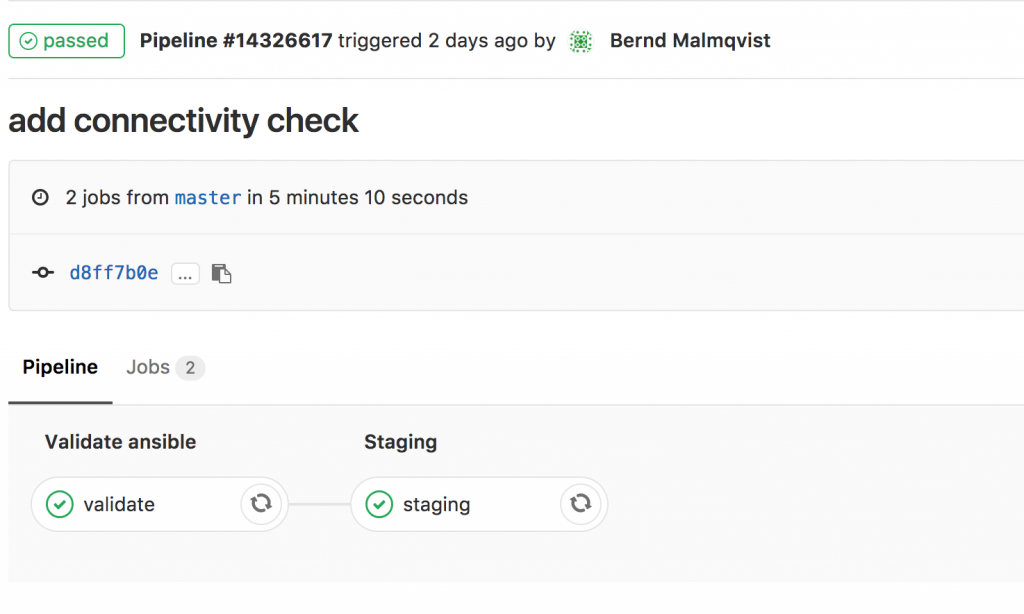
My goal is to adopt some NetDevOps practice and use this in networking = NetOps, currently working on an Continuous Integration and Delivery (CI/CD) pipeline for Cumulus Linux network environments. The Vagrant lab was one of the prerequisites to simulate the changes before deploying this to production but more will follow in my next blog post.

Read my new post about an Ansible Playbook for Cumulus Linux BGP IP-Fabric and Cumulus NetQ Validation.

Data centre network redesign

Over the last month I was busy working on an data centre redesign for my company which I finished this weekend in one of the three data centre’s.

The old network design was very outdated and bad choice of network equipment; Cisco Catalyst 6500 core switch for a small data centre environment with 8 racks is total overkill, two firewall clusters Juniper ISG2000 and Cisco ASA 5550 which were badly integrated and the configuration was a mess.

For the new network I followed a more converged idea to use a small and compact network to be as flexible as possible but also downsize the overall footprint and remove complexity. We adopted parts of DevOps “I like to call it NetOps” and used Ansible to automate the configuration deployment, the whole network stack is deployed within 90 seconds.

Used equipment:

  1. Top two switches were Dell S3048-ON running Cumulus Networks OS and used for internet- and leased-lines
  2. Under the two Dell WAN switches are two Cisco ASR 1001-X router for internet and wide area network (OSPF) routing.
  3. Under the Cisco router, two Dell S4048-ON core switches running Cumulus Network OS and connected existing HP Blade Center’s and HP DL servers. The new Tintri storage for the VMware vSphere clusters was also connected directly to the core switches.
  4. Under the Dell core switches are two Cisco ASA 5545-X in multi-context mode running Production, Corporate and S2S VPN firewalls.
  5. On the bottom of the network stack were existing serial console server and Cisco Catalyst switch for management network.

Now I will start with the deployment of VMware NSX SDN (Software defined Network) in this data centre. Ones VMware NSX is finished and handed over to the Systems Engineers I will do the same exercise for the 2nd data centre in the UK.

About Cumulus Linux and VMware NSX SDN I will publish some more information and my experience in the coming month.