Deploy OpenShift 3.11 Container Platform on AWS using Terraform

I have done a few changes on my Terraform configuration for OpenShift 3.11 on Amazon AWS. I have downsized the environment because I didn’t needed that many nodes for a quick test setup. I have added CloudFlare DNS to automatically create CNAME for the AWS load balancers on the DNS zone. I have also added an AWS S3 Bucket for storing the backend state. You can find the new Terraform configuration on my Github repository: https://github.com/berndonline/openshift-terraform/tree/aws-dev

From OpenShift 3.10 and later versions the environment variables changes and I modified the ansible-hosts template for the new configuration. You can see the changes in the hosts template: https://github.com/berndonline/openshift-terraform/blob/aws-dev/helper_scripts/ansible-hosts.template.txt

OpenShift 3.11 has changed a few things and put an focus on an Cluster Operator console which is pretty nice and runs on Kubernetes 1.11. I recommend reading the release notes for the 3.11 release for more details: https://docs.openshift.com/container-platform/3.11/release_notes/ocp_3_11_release_notes.html

I don’t wanted to get into too much detail, just follow the steps below and start with cloning my repository, and choose the dev branch:

git clone -b aws-dev https://github.com/berndonline/openshift-terraform.git
cd ./openshift-terraform/
ssh-keygen -b 2048 -t rsa -f ./helper_scripts/id_rsa -q -N ""
chmod 600 ./helper_scripts/id_rsa

You need to modify the cloudflare.tf and add your CloudFlare API credentials otherwise just delete the file. The same for the S3 backend provider, you find the configuration in the main.tf and it can be removed if not needed.

CloudFlare and Amazon AWS credentials can be added through environment variables:

export AWS_ACCESS_KEY_ID='<-YOUR-AWS-ACCESS-KEY->'
export AWS_SECRET_ACCESS_KEY='<-YOUR-AWS-SECRET-KEY->'
export TF_VAR_email='<-YOUR-CLOUDFLARE-EMAIL-ADDRESS->'
export TF_VAR_token='<-YOUR-CLOUDFLARE-TOKEN->'
export TF_VAR_domain='<-YOUR-CLOUDFLARE-DOMAIN->'
export TF_VAR_htpasswd='<-YOUR-OPENSHIFT-DEMO-USER-HTPASSWD->'

Run terraform init and apply to create the environment.

terraform init && terraform apply -auto-approve

Copy the ssh key and ansible-hosts file to the bastion host from where you need to run the Ansible OpenShift playbooks.

scp -o StrictHostKeyChecking=no -o UserKnownHostsFile=/dev/null -i ./helper_scripts/id_rsa -r ./helper_scripts/id_rsa centos@$(terraform output bastion):/home/centos/.ssh/
scp -o StrictHostKeyChecking=no -o UserKnownHostsFile=/dev/null -i ./helper_scripts/id_rsa -r ./inventory/ansible-hosts  centos@$(terraform output bastion):/home/centos/ansible-hosts

I recommend waiting a few minutes as the AWS cloud-init script prepares the bastion host. Afterwards continue with the pre and install playbooks. You can connect to the bastion host and run the playbooks directly.

ssh -o StrictHostKeyChecking=no -o UserKnownHostsFile=/dev/null -i ./helper_scripts/id_rsa -l centos $(terraform output bastion) -A "cd /openshift-ansible/ && ansible-playbook ./playbooks/openshift-pre.yml -i ~/ansible-hosts"
ssh -o StrictHostKeyChecking=no -o UserKnownHostsFile=/dev/null -i ./helper_scripts/id_rsa -l centos $(terraform output bastion) -A "cd /openshift-ansible/ && ansible-playbook ./playbooks/openshift-install.yml -i ~/ansible-hosts"

If for whatever reason the cluster deployment fails, you can run the uninstall playbook to bring the nodes back into a clean state and start from the beginning and run deploy_cluster.

ssh -o StrictHostKeyChecking=no -o UserKnownHostsFile=/dev/null -i ./helper_scripts/id_rsa -l centos $(terraform output bastion) -A "cd /openshift-ansible/ && ansible-playbook ./openshift-ansible/playbooks/adhoc/uninstall.yml -i ~/ansible-hosts"

Here are some screenshots of the new cluster console:

Let’s create a project and import my hello-openshift.yml build configuration:

Successful completed the build and deployed the hello-openshift container:

My example hello openshift application:

When you are finished with the testing, run terraform destroy.

terraform destroy -force 


Terraform AWS S3 Bucket backend state and create IAM credentials

I am currently working on refactoring my Terraform configuration for deploying OpenShift 3.11 on AWS. I wanted to share some of the improvements I have made on the configuration by adding AWS S3 as a backend provider and using a custom IAM user for Terraform.

Let’s start with creating an AWS S3 Bucket for the Terraform backend state. You can find information about the Terraform S3 backend provider here: https://www.terraform.io/docs/backends/types/s3.html

First you need to create the S3 bucket on the AWS console:


It’s a pretty simple setup and below we see the successfully created S3 bucket:

To use the S3 bucket for the backend state, modify your my main.tf:

terraform {
  backend "s3" {
    bucket = "techbloc-terraform-data"
    key    = "openshift-311"
    region = "eu-west-1"
  }
}

When you run terraform apply it uses the specified S3 bucket to store the backend state and can be used from multiple users.

Instead of using your AWS Root account, it’s  better to create a custom AWS IAM user for Terraform and apply a few limitations for what the user is able to do on AWS.

Go to the AWS IAM service and create a new user with name Terraform. I would strongly recommend using only programmatic access which generates Access Key ID and Secret Access Key.

Create a Terraform IAM user:

In my simple example I created three additional policies to control the access to my AWS subscription:

See the json config for each policy below.

terraform-eu-west-1

{
    "Version": "2012-10-17",
    "Statement": [
        {
            "Effect": "Allow",
            "Action": "*",
            "Resource": "*",
            "Condition": {
                "StringEquals": {
                    "ec2:Region": "eu-west-1"
                }
            }
        }
    ]
}

terraform-elb

{
    "Version": "2012-10-17",
    "Statement": [
        {
            "Effect": "Allow",
            "Action": "elasticloadbalancing:*",
            "Resource": "*"
        }
    ]
}

terraform-s3

{
    "Version": "2012-10-17",
    "Statement": [
        {
            "Effect": "Allow",
            "Action": "s3:ListBucket",
            "Resource": "arn:aws:s3:::techbloc-terraform-data"
        },
        {
            "Effect": "Allow",
            "Action": [
                "s3:GetObject",
                "s3:PutObject"
            ],
            "Resource": "arn:aws:s3:::techbloc-terraform-data/openshift-311"
        }
    ]
}

The IAM policies are not very complex, I just wanted to limit the access to a specific region.

The S3 backend provider is very important because I am planning to use Jenkins to deploy the AWS infrastructure with Terraform and storing the backend state locally on the Jenkins server is not very ideal.

Deploy OpenShift 3.9 Container Platform using Terraform and Ansible on Amazon AWS

After my previous articles on OpenShift and Terraform I wanted to show how to create the necessary infrastructure and to deploy an OpenShift Container Platform in a more real-world scenario. I highly recommend reading my other posts about using Terraform to deploy an Amazon AWS VPC and AWS EC2 Instances and Load Balancers. Once the infrastructure is created we will use the Bastion Host to connect to the environment and deploy OpenShift Origin using Ansible.

I think this might be an interesting topic to show what tools like Terraform and Ansible can do together:

I will not go into detail about the configuration and only show the output of deploying the infrastructure. Please checkout my Github repository to see the detailed configuration: https://github.com/berndonline/openshift-terraform

Before we start you need to clone the repository and generate the ssh key used from the bastion host to access the OpenShift nodes:

git clone https://github.com/berndonline/openshift-terraform.git
cd ./openshift-terraform/
ssh-keygen -b 2048 -t rsa -f ./helper_scripts/id_rsa -q -N ""
chmod 600 ./helper_scripts/id_rsa

We are ready to create the infrastructure and run terraform apply:

berndonline@lab:~/openshift-terraform$ terraform apply

...

Plan: 56 to add, 0 to change, 0 to destroy.

Do you want to perform these actions?
  Terraform will perform the actions described above.
  Only 'yes' will be accepted to approve.

  Enter a value: yes

...

Apply complete! Resources: 19 added, 0 changed, 16 destroyed.

Outputs:

bastion = ec2-34-244-225-35.eu-west-1.compute.amazonaws.com
openshift master = master-35563dddc8b2ea9c.elb.eu-west-1.amazonaws.com
openshift subdomain = infra-1994425986.eu-west-1.elb.amazonaws.com
berndonline@lab:~/openshift-terraform$

Terraform successfully creates the VPC, load balancers and all needed instances. Before we continue wait 5 to 10 minutes because the cloud-init script takes a bit time and all the instance reboot at the end.

Instances:

Security groups:

Target groups for the Master and the Infra load balancers:

Master and the Infra load balancers:

Terraform also automatically creates the inventory file for the OpenShift installation and adds the hostnames for master, infra and worker nodes to the correct inventory groups. The next step is to copy the private ssh key and the inventory file to the bastion host. I am using the terraform output command to get the public hostname from the bastion host:

scp -o StrictHostKeyChecking=no -o UserKnownHostsFile=/dev/null -r ./helper_scripts/id_rsa centos@$(terraform output bastion):/home/centos/.ssh/
scp -o StrictHostKeyChecking=no -o UserKnownHostsFile=/dev/null -r ./inventory/ansible-hosts  centos@$(terraform output bastion):/home/centos/ansible-hosts
ssh -o StrictHostKeyChecking=no -o UserKnownHostsFile=/dev/null -l centos $(terraform output bastion)

On the bastion node, change to the /openshift-ansible/ folder and start running the prerequisites and the deploy-cluster playbooks:

cd /openshift-ansible/
ansible-playbook ./playbooks/prerequisites.yml -i ~/ansible-hosts
ansible-playbook ./playbooks/deploy_cluster.yml -i ~/ansible-hosts

Here the output from running the prerequisites playbook:

[centos@ip-10-0-0-22 ~]$ cd /openshift-ansible/
[centos@ip-10-0-0-22 openshift-ansible]$ ansible-playbook ./playbooks/prerequisites.yml -i ~/ansible-hosts

PLAY [Initialization Checkpoint Start] ****************************************************************************************************************************

TASK [Set install initialization 'In Progress'] *******************************************************************************************************************
Saturday 15 September 2018  11:04:50 +0000 (0:00:00.407)       0:00:00.407 ****
ok: [ip-10-0-1-237.eu-west-1.compute.internal]

PLAY [Populate config host groups] ********************************************************************************************************************************

TASK [Load group name mapping variables] **************************************************************************************************************************
Saturday 15 September 2018  11:04:50 +0000 (0:00:00.110)       0:00:00.517 ****
ok: [localhost]

TASK [Evaluate groups - g_etcd_hosts or g_new_etcd_hosts required] ************************************************************************************************
Saturday 15 September 2018  11:04:51 +0000 (0:00:00.033)       0:00:00.551 ****
skipping: [localhost]

TASK [Evaluate groups - g_master_hosts or g_new_master_hosts required] ********************************************************************************************
Saturday 15 September 2018  11:04:51 +0000 (0:00:00.024)       0:00:00.575 ****
skipping: [localhost]

TASK [Evaluate groups - g_node_hosts or g_new_node_hosts required] ************************************************************************************************
Saturday 15 September 2018  11:04:51 +0000 (0:00:00.024)       0:00:00.599 ****
skipping: [localhost]

...

PLAY RECAP ********************************************************************************************************************************************************
ip-10-0-1-192.eu-west-1.compute.internal : ok=56   changed=14   unreachable=0    failed=0
ip-10-0-1-237.eu-west-1.compute.internal : ok=64   changed=15   unreachable=0    failed=0
ip-10-0-1-248.eu-west-1.compute.internal : ok=56   changed=14   unreachable=0    failed=0
ip-10-0-5-174.eu-west-1.compute.internal : ok=56   changed=14   unreachable=0    failed=0
ip-10-0-5-235.eu-west-1.compute.internal : ok=58   changed=14   unreachable=0    failed=0
ip-10-0-5-35.eu-west-1.compute.internal : ok=56   changed=14   unreachable=0    failed=0
ip-10-0-9-130.eu-west-1.compute.internal : ok=56   changed=14   unreachable=0    failed=0
ip-10-0-9-51.eu-west-1.compute.internal : ok=58   changed=14   unreachable=0    failed=0
ip-10-0-9-85.eu-west-1.compute.internal : ok=56   changed=14   unreachable=0    failed=0
localhost                  : ok=11   changed=0    unreachable=0    failed=0


INSTALLER STATUS **************************************************************************************************************************************************
Initialization             : Complete (0:00:41)

[centos@ip-10-0-0-22 openshift-ansible]$

Continue with the deploy cluster playbook:

[centos@ip-10-0-0-22 openshift-ansible]$ ansible-playbook ./playbooks/deploy_cluster.yml -i ~/ansible-hosts

PLAY [Initialization Checkpoint Start] ****************************************************************************************************************************

TASK [Set install initialization 'In Progress'] *******************************************************************************************************************
Saturday 15 September 2018  11:08:38 +0000 (0:00:00.102)       0:00:00.102 ****
ok: [ip-10-0-1-237.eu-west-1.compute.internal]

PLAY [Populate config host groups] ********************************************************************************************************************************

TASK [Load group name mapping variables] **************************************************************************************************************************
Saturday 15 September 2018  11:08:38 +0000 (0:00:00.064)       0:00:00.167 ****
ok: [localhost]

TASK [Evaluate groups - g_etcd_hosts or g_new_etcd_hosts required] ************************************************************************************************
Saturday 15 September 2018  11:08:38 +0000 (0:00:00.031)       0:00:00.198 ****
skipping: [localhost]

TASK [Evaluate groups - g_master_hosts or g_new_master_hosts required] ********************************************************************************************
Saturday 15 September 2018  11:08:38 +0000 (0:00:00.026)       0:00:00.225 ****
skipping: [localhost]

...

PLAY RECAP ********************************************************************************************************************************************************
ip-10-0-1-192.eu-west-1.compute.internal : ok=132  changed=57   unreachable=0    failed=0
ip-10-0-1-237.eu-west-1.compute.internal : ok=591  changed=256  unreachable=0    failed=0
ip-10-0-1-248.eu-west-1.compute.internal : ok=132  changed=57   unreachable=0    failed=0
ip-10-0-5-174.eu-west-1.compute.internal : ok=132  changed=57   unreachable=0    failed=0
ip-10-0-5-235.eu-west-1.compute.internal : ok=325  changed=145  unreachable=0    failed=0
ip-10-0-5-35.eu-west-1.compute.internal : ok=132  changed=57   unreachable=0    failed=0
ip-10-0-9-130.eu-west-1.compute.internal : ok=132  changed=57   unreachable=0    failed=0
ip-10-0-9-51.eu-west-1.compute.internal : ok=325  changed=145  unreachable=0    failed=0
ip-10-0-9-85.eu-west-1.compute.internal : ok=132  changed=57   unreachable=0    failed=0
localhost                  : ok=13   changed=0    unreachable=0    failed=0

INSTALLER STATUS **************************************************************************************************************************************************
Initialization             : Complete (0:00:55)
Health Check               : Complete (0:00:01)
etcd Install               : Complete (0:01:03)
Master Install             : Complete (0:05:17)
Master Additional Install  : Complete (0:00:26)
Node Install               : Complete (0:08:24)
Hosted Install             : Complete (0:00:57)
Web Console Install        : Complete (0:00:28)
Service Catalog Install    : Complete (0:01:19)

[centos@ip-10-0-0-22 openshift-ansible]$

Once the deploy playbook finishes we have a working Openshift cluster:

Login with username: demo, and password: demo

For the infra load balancers you cannot access OpenShift routes via the Amazon DNS, this is not allowed. You need to create a wildcard DNS CNAME record like *.paas.domain.com and point to the AWS load balancer DNS record.

Let’s continue to do some basic cluster checks to see the nodes are in ready state:

[centos@ip-10-0-1-237 ~]$ oc get nodes
NAME                                       STATUS    ROLES     AGE       VERSION
ip-10-0-1-192.eu-west-1.compute.internal   Ready     compute   11m       v1.9.1+a0ce1bc657
ip-10-0-1-237.eu-west-1.compute.internal   Ready     master    16m       v1.9.1+a0ce1bc657
ip-10-0-1-248.eu-west-1.compute.internal   Ready         11m       v1.9.1+a0ce1bc657
ip-10-0-5-174.eu-west-1.compute.internal   Ready     compute   11m       v1.9.1+a0ce1bc657
ip-10-0-5-235.eu-west-1.compute.internal   Ready     master    15m       v1.9.1+a0ce1bc657
ip-10-0-5-35.eu-west-1.compute.internal    Ready         11m       v1.9.1+a0ce1bc657
ip-10-0-9-130.eu-west-1.compute.internal   Ready     compute   11m       v1.9.1+a0ce1bc657
ip-10-0-9-51.eu-west-1.compute.internal    Ready     master    14m       v1.9.1+a0ce1bc657
ip-10-0-9-85.eu-west-1.compute.internal    Ready         11m       v1.9.1+a0ce1bc657
[centos@ip-10-0-1-237 ~]$
[centos@ip-10-0-1-237 ~]$ oc get projects
NAME                                DISPLAY NAME   STATUS
default                                            Active
kube-public                                        Active
kube-service-catalog                               Active
kube-system                                        Active
logging                                            Active
management-infra                                   Active
openshift                                          Active
openshift-ansible-service-broker                   Active
openshift-infra                                    Active
openshift-node                                     Active
openshift-template-service-broker                  Active
openshift-web-console                              Active
[centos@ip-10-0-1-237 ~]$
[centos@ip-10-0-1-237 ~]$ oc get pods -o wide
NAME                       READY     STATUS    RESTARTS   AGE       IP           NODE
docker-registry-1-8798r    1/1       Running   0          10m       10.128.2.2   ip-10-0-5-35.eu-west-1.compute.internal
registry-console-1-zh9m4   1/1       Running   0          10m       10.129.2.3   ip-10-0-9-85.eu-west-1.compute.internal
router-1-96zzf             1/1       Running   0          10m       10.0.9.85    ip-10-0-9-85.eu-west-1.compute.internal
router-1-nfh7h             1/1       Running   0          10m       10.0.1.248   ip-10-0-1-248.eu-west-1.compute.internal
router-1-pcs68             1/1       Running   0          10m       10.0.5.35    ip-10-0-5-35.eu-west-1.compute.internal
[centos@ip-10-0-1-237 ~]$

At the end just destroy the infrastructure with terraform destroy:

berndonline@lab:~/openshift-terraform$ terraform destroy

...

Destroy complete! Resources: 56 destroyed.
berndonline@lab:~/openshift-terraform$

I will continue improving the configuration and I plan to use Jenkins to deploy the AWS infrastructure and OpenShift fully automatically.

Please let me know if you like the article or have questions in the comments below.

Deploy Amazon EC2 Autoscaling Group and AWS Load Balancers with Terraform

This is the next article about using Terraform to create EC2 autoscaling group and the different load balancing options for EC2 instances. This setup depends on my previous blog post about using Terraform to deploy a AWS VPC so please read this first. In my Github repository you will find all the needed Terraform files ec2.tf and vpc.tf to deploy the full environment.

EC2 resource overview:

Let’s start with the launch configuration and creating the autoscaling group. I am using eu-west-1 and a standard Ubuntu 16.04 AMI. The instances are created in the private subnet and don’t get a public IP address assigned but have internet access via the NAT gateway:

resource "aws_launch_configuration" "autoscale_launch" {
  image_id = "${lookup(var.aws_amis, var.aws_region)}"
  instance_type = "t2.micro"
  security_groups = ["${aws_security_group.sec_web.id}"]
  key_name = "${aws_key_pair.auth.id}"
  user_data = <<-EOF
              #!/bin/bash
              sudo apt-get -y update
              sudo apt-get -y install nginx
              EOF
  lifecycle {
    create_before_destroy = true
  }
}

resource "aws_autoscaling_group" "autoscale_group" {
  launch_configuration = "${aws_launch_configuration.autoscale_launch.id}"
  vpc_zone_identifier = ["${aws_subnet.PrivateSubnetA.id}","${aws_subnet.PrivateSubnetB.id}","${aws_subnet.PrivateSubnetC.id}"]
  load_balancers = ["${aws_elb.elb.name}"]
  min_size = 3
  max_size = 3
  tag {
    key = "Name"
    value = "autoscale"
    propagate_at_launch = true
  }
}

I also created a few security groups to allow the traffic,  please have look for more detail in the ec2.tf.

Autoscaling Group

Now the configuration for a AWS Elastic (Classic) Load Balancer:

resource "aws_elb" "elb" {
  name = "elb"
  security_groups = ["${aws_security_group.sec_lb.id}"]
  subnets            = ["${aws_subnet.PublicSubnetA.id}","${aws_subnet.PublicSubnetB.id}","${aws_subnet.PublicSubnetC.id}"]
  cross_zone_load_balancing   = true
  health_check {
    healthy_threshold = 2
    unhealthy_threshold = 2
    timeout = 3
    interval = 30
    target = "HTTP:80/"
  }
  listener {
    lb_port = 80
    lb_protocol = "http"
    instance_port = "80"
    instance_protocol = "http"
  }
}

Elastic Load Balancer (Classic LB)

Use the Application Load Balancing (ALB) for more advanced web load balancing which only support http and https protocols. You start with creating the ALB resource, afterwards creating the target group where you can define stickiness and health checks. The listener defines which protocol type the ALB uses and assigns the target group. In the end you attach the target- with the autoscaling group:

resource "aws_lb" "alb" {  
  name            = "alb"  
  subnets         = ["${aws_subnet.PublicSubnetA.id}","${aws_subnet.PublicSubnetB.id}","${aws_subnet.PublicSubnetC.id}"]
  security_groups = ["${aws_security_group.sec_lb.id}"]
  internal        = false 
  idle_timeout    = 60   
  tags {    
    Name    = "alb"    
  }   
}

resource "aws_lb_target_group" "alb_target_group" {  
  name     = "alb-target-group"  
  port     = "80"  
  protocol = "HTTP"  
  vpc_id   = "${aws_vpc.default.id}"   
  tags {    
    name = "alb_target_group"    
  }   
  stickiness {    
    type            = "lb_cookie"    
    cookie_duration = 1800    
    enabled         = true 
  }   
  health_check {    
    healthy_threshold   = 3    
    unhealthy_threshold = 10    
    timeout             = 5    
    interval            = 10    
    path                = "/"    
    port                = 80
  }
}

resource "aws_lb_listener" "alb_listener" {  
  load_balancer_arn = "${aws_lb.alb.arn}"  
  port              = 80  
  protocol          = "http"
  
  default_action {    
    target_group_arn = "${aws_lb_target_group.alb_target_group.arn}"
    type             = "forward"  
  }
}

resource "aws_autoscaling_attachment" "alb_autoscale" {
  alb_target_group_arn   = "${aws_lb_target_group.alb_target_group.arn}"
  autoscaling_group_name = "${aws_autoscaling_group.autoscale_group.id}"
}

Application Load Balancer (ALB)

ALB Target Group

The Network Load Balancing (NLB) is very similar to the configuration like the ALB only that it supports the TCP protocol which should be only used for performance because of the limited health check functionality:

resource "aws_lb" "nlb" {
  name               = "nlb"
  internal           = false
  load_balancer_type = "network"
  subnets            = ["${aws_subnet.PublicSubnetA.id}","${aws_subnet.PublicSubnetB.id}","${aws_subnet.PublicSubnetC.id}"]
  enable_cross_zone_load_balancing  = true
  tags {
    Name = "nlb"
  }
}

resource "aws_lb_target_group" "nlb_target_group" {  
  name     = "nlb-target-group"  
  port     = "80"  
  protocol = "TCP"  
  vpc_id   = "${aws_vpc.default.id}"   
  tags {    
    name = "nlb_target_group"    
  }     
}

resource "aws_lb_listener" "nlb_listener" {  
  load_balancer_arn = "${aws_lb.nlb.arn}"  
  port              = 80  
  protocol          = "TCP"
  
  default_action {    
    target_group_arn = "${aws_lb_target_group.nlb_target_group.arn}"
    type             = "forward"  
  }
}

resource "aws_autoscaling_attachment" "nlb_autoscale" {
  alb_target_group_arn   = "${aws_lb_target_group.nlb_target_group.arn}"
  autoscaling_group_name = "${aws_autoscaling_group.autoscale_group.id}"
}

Network Load Balancer (NLB)

NLB Target Group

Let’s run terraform apply:

berndonline@lab:~/aws-terraform$ terraform apply
data.aws_availability_zones.available: Refreshing state...

An execution plan has been generated and is shown below.
Resource actions are indicated with the following symbols:
  + create

Terraform will perform the following actions:

  + aws_autoscaling_attachment.alb_autoscale
      id:                                          
      alb_target_group_arn:                        "${aws_lb_target_group.alb_target_group.arn}"
      autoscaling_group_name:                      "${aws_autoscaling_group.autoscale_group.id}"

  + aws_autoscaling_attachment.nlb_autoscale
      id:                                          
      alb_target_group_arn:                        "${aws_lb_target_group.nlb_target_group.arn}"
      autoscaling_group_name:                      "${aws_autoscaling_group.autoscale_group.id}"

...

Plan: 41 to add, 0 to change, 0 to destroy.

Do you want to perform these actions?
  Terraform will perform the actions described above.
  Only 'yes' will be accepted to approve.

  Enter a value: yes

...

aws_lb.nlb: Creation complete after 2m53s (ID: arn:aws:elasticloadbalancing:eu-west-1:...:loadbalancer/net/nlb/235e69c61779b723)
aws_lb_listener.nlb_listener: Creating...
  arn:                               "" => ""
  default_action.#:                  "" => "1"
  default_action.0.target_group_arn: "" => "arn:aws:elasticloadbalancing:eu-west-1:552276840222:targetgroup/nlb-target-group/7b3c10cbdd411669"
  default_action.0.type:             "" => "forward"
  load_balancer_arn:                 "" => "arn:aws:elasticloadbalancing:eu-west-1:552276840222:loadbalancer/net/nlb/235e69c61779b723"
  port:                              "" => "80"
  protocol:                          "" => "TCP"
  ssl_policy:                        "" => ""
aws_lb_listener.nlb_listener: Creation complete after 0s (ID: arn:aws:elasticloadbalancing:eu-west-1:.../nlb/235e69c61779b723/dfde2530387b470f)

Apply complete! Resources: 41 added, 0 changed, 0 destroyed.

Outputs:

alb_dns_name = alb-1295224636.eu-west-1.elb.amazonaws.com
elb_dns_name = elb-611107604.eu-west-1.elb.amazonaws.com
nlb_dns_name = nlb-235e69c61779b723.elb.eu-west-1.amazonaws.com
berndonline@lab:~/aws-terraform$

Together with the VPC configuration from my previous article, this deploys the different load balancers and provides you the DNS names as an output and ready to use.

Over the coming weeks I will optimise the Terraform code and move some of the resource settings into the variables.tf file to make this more scaleable.

If you like this article, please share your feedback and leave a comment.

Using HashiCorp Terraform to deploy Amazon AWS VPC

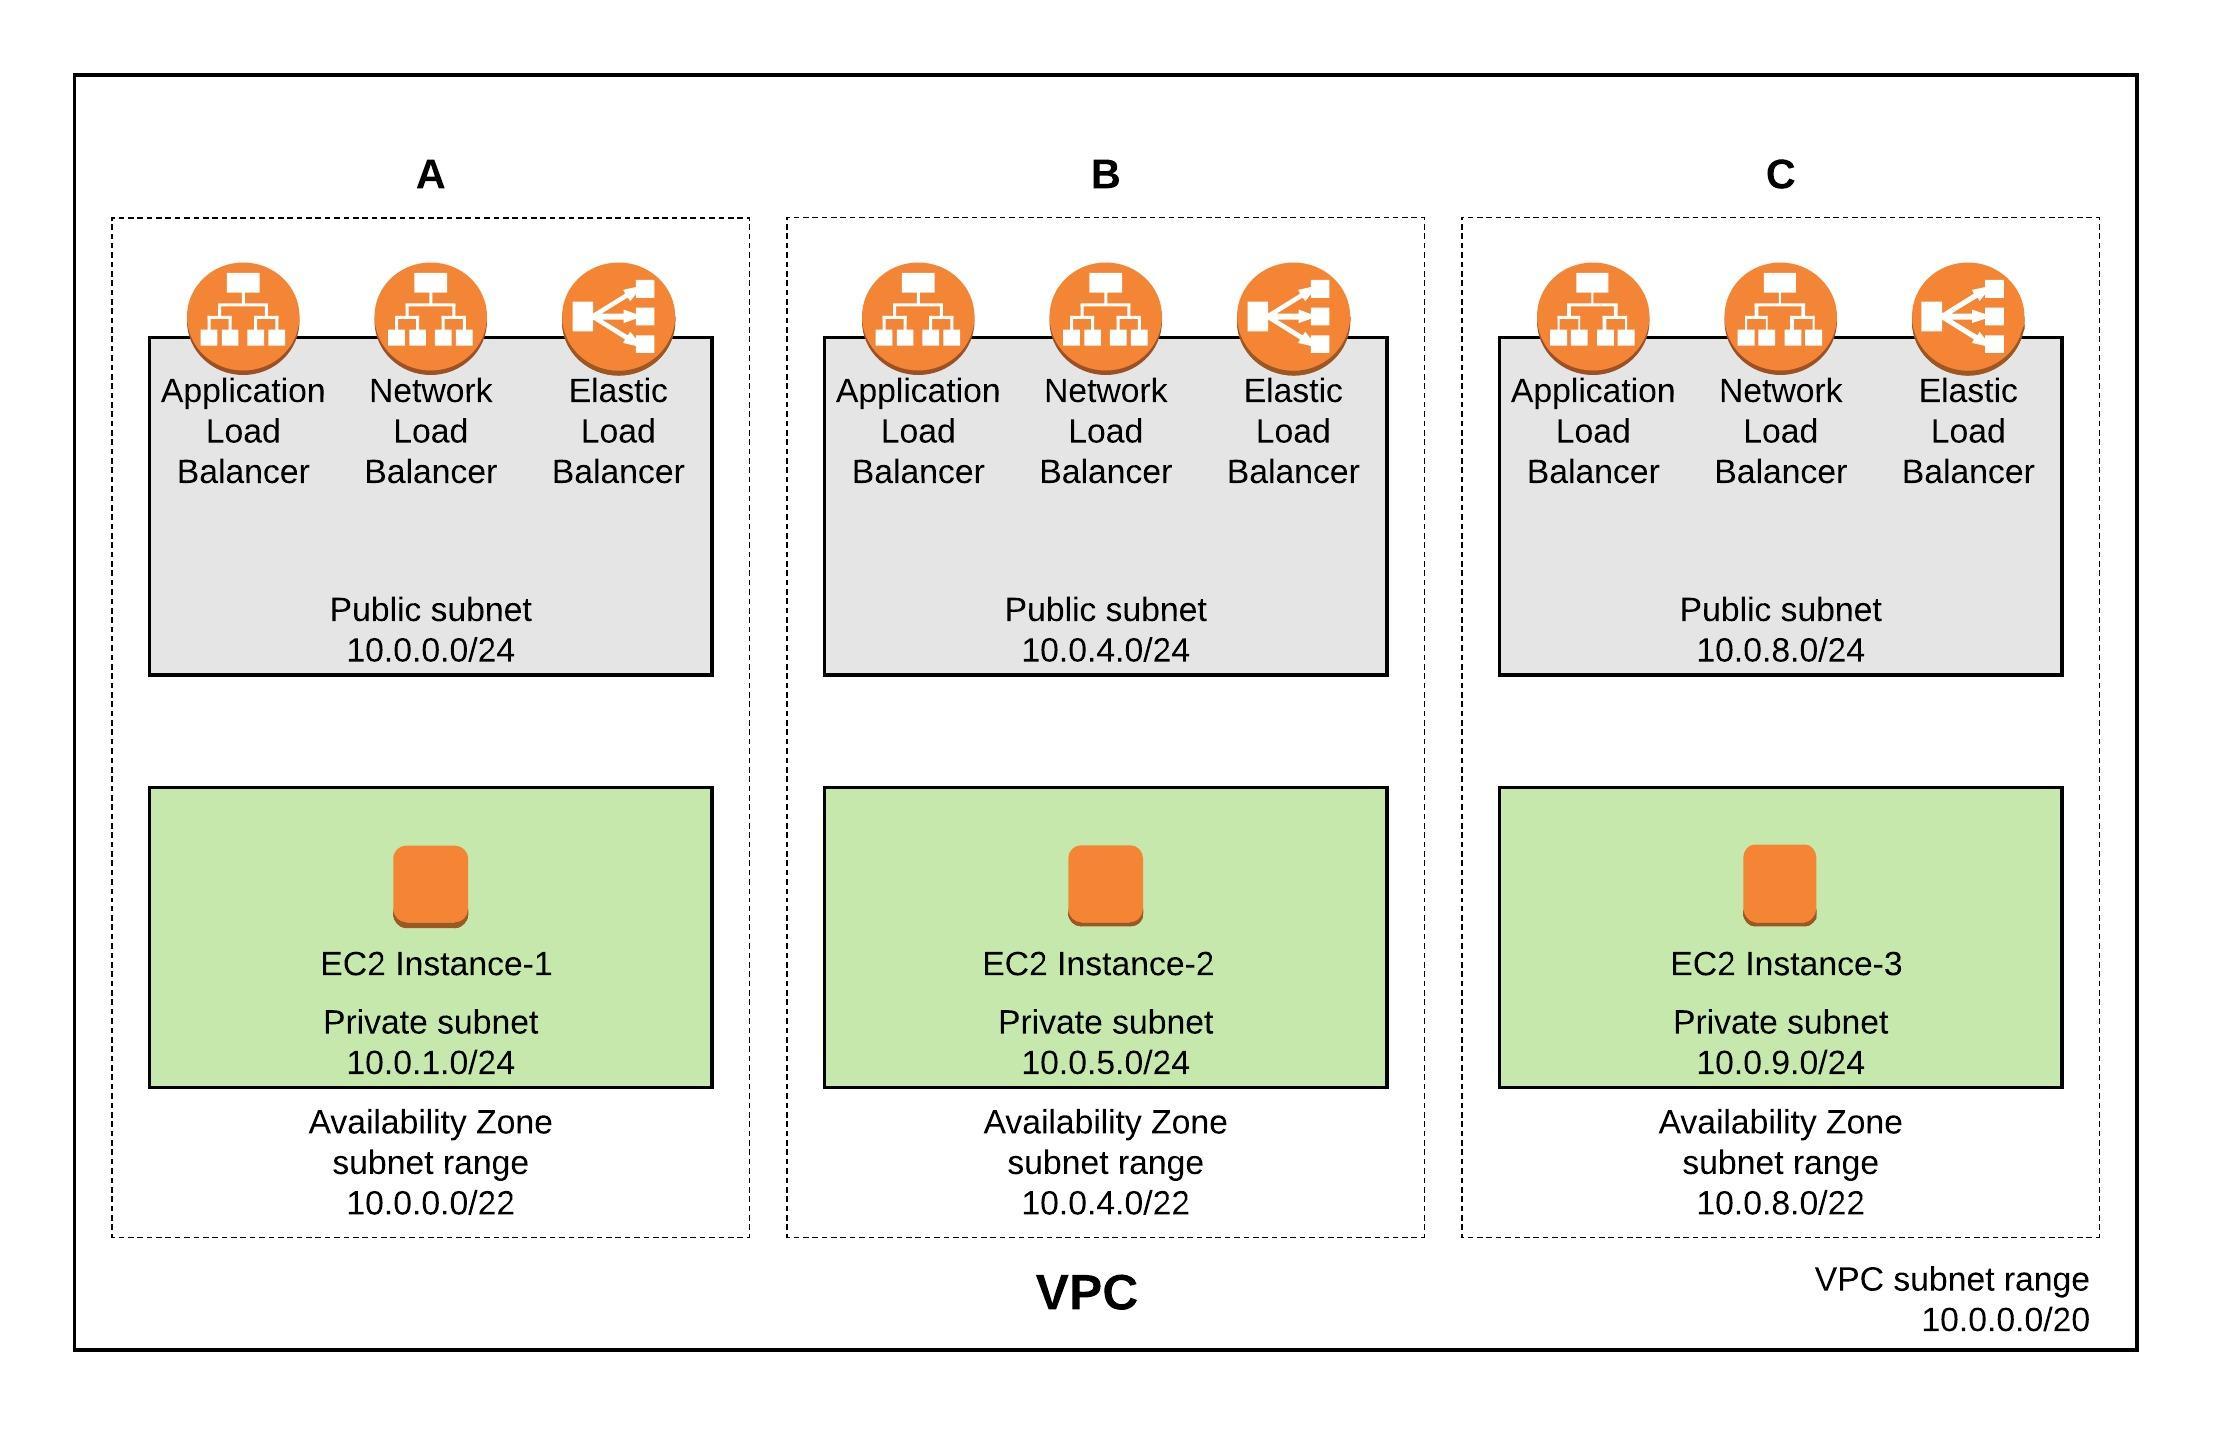
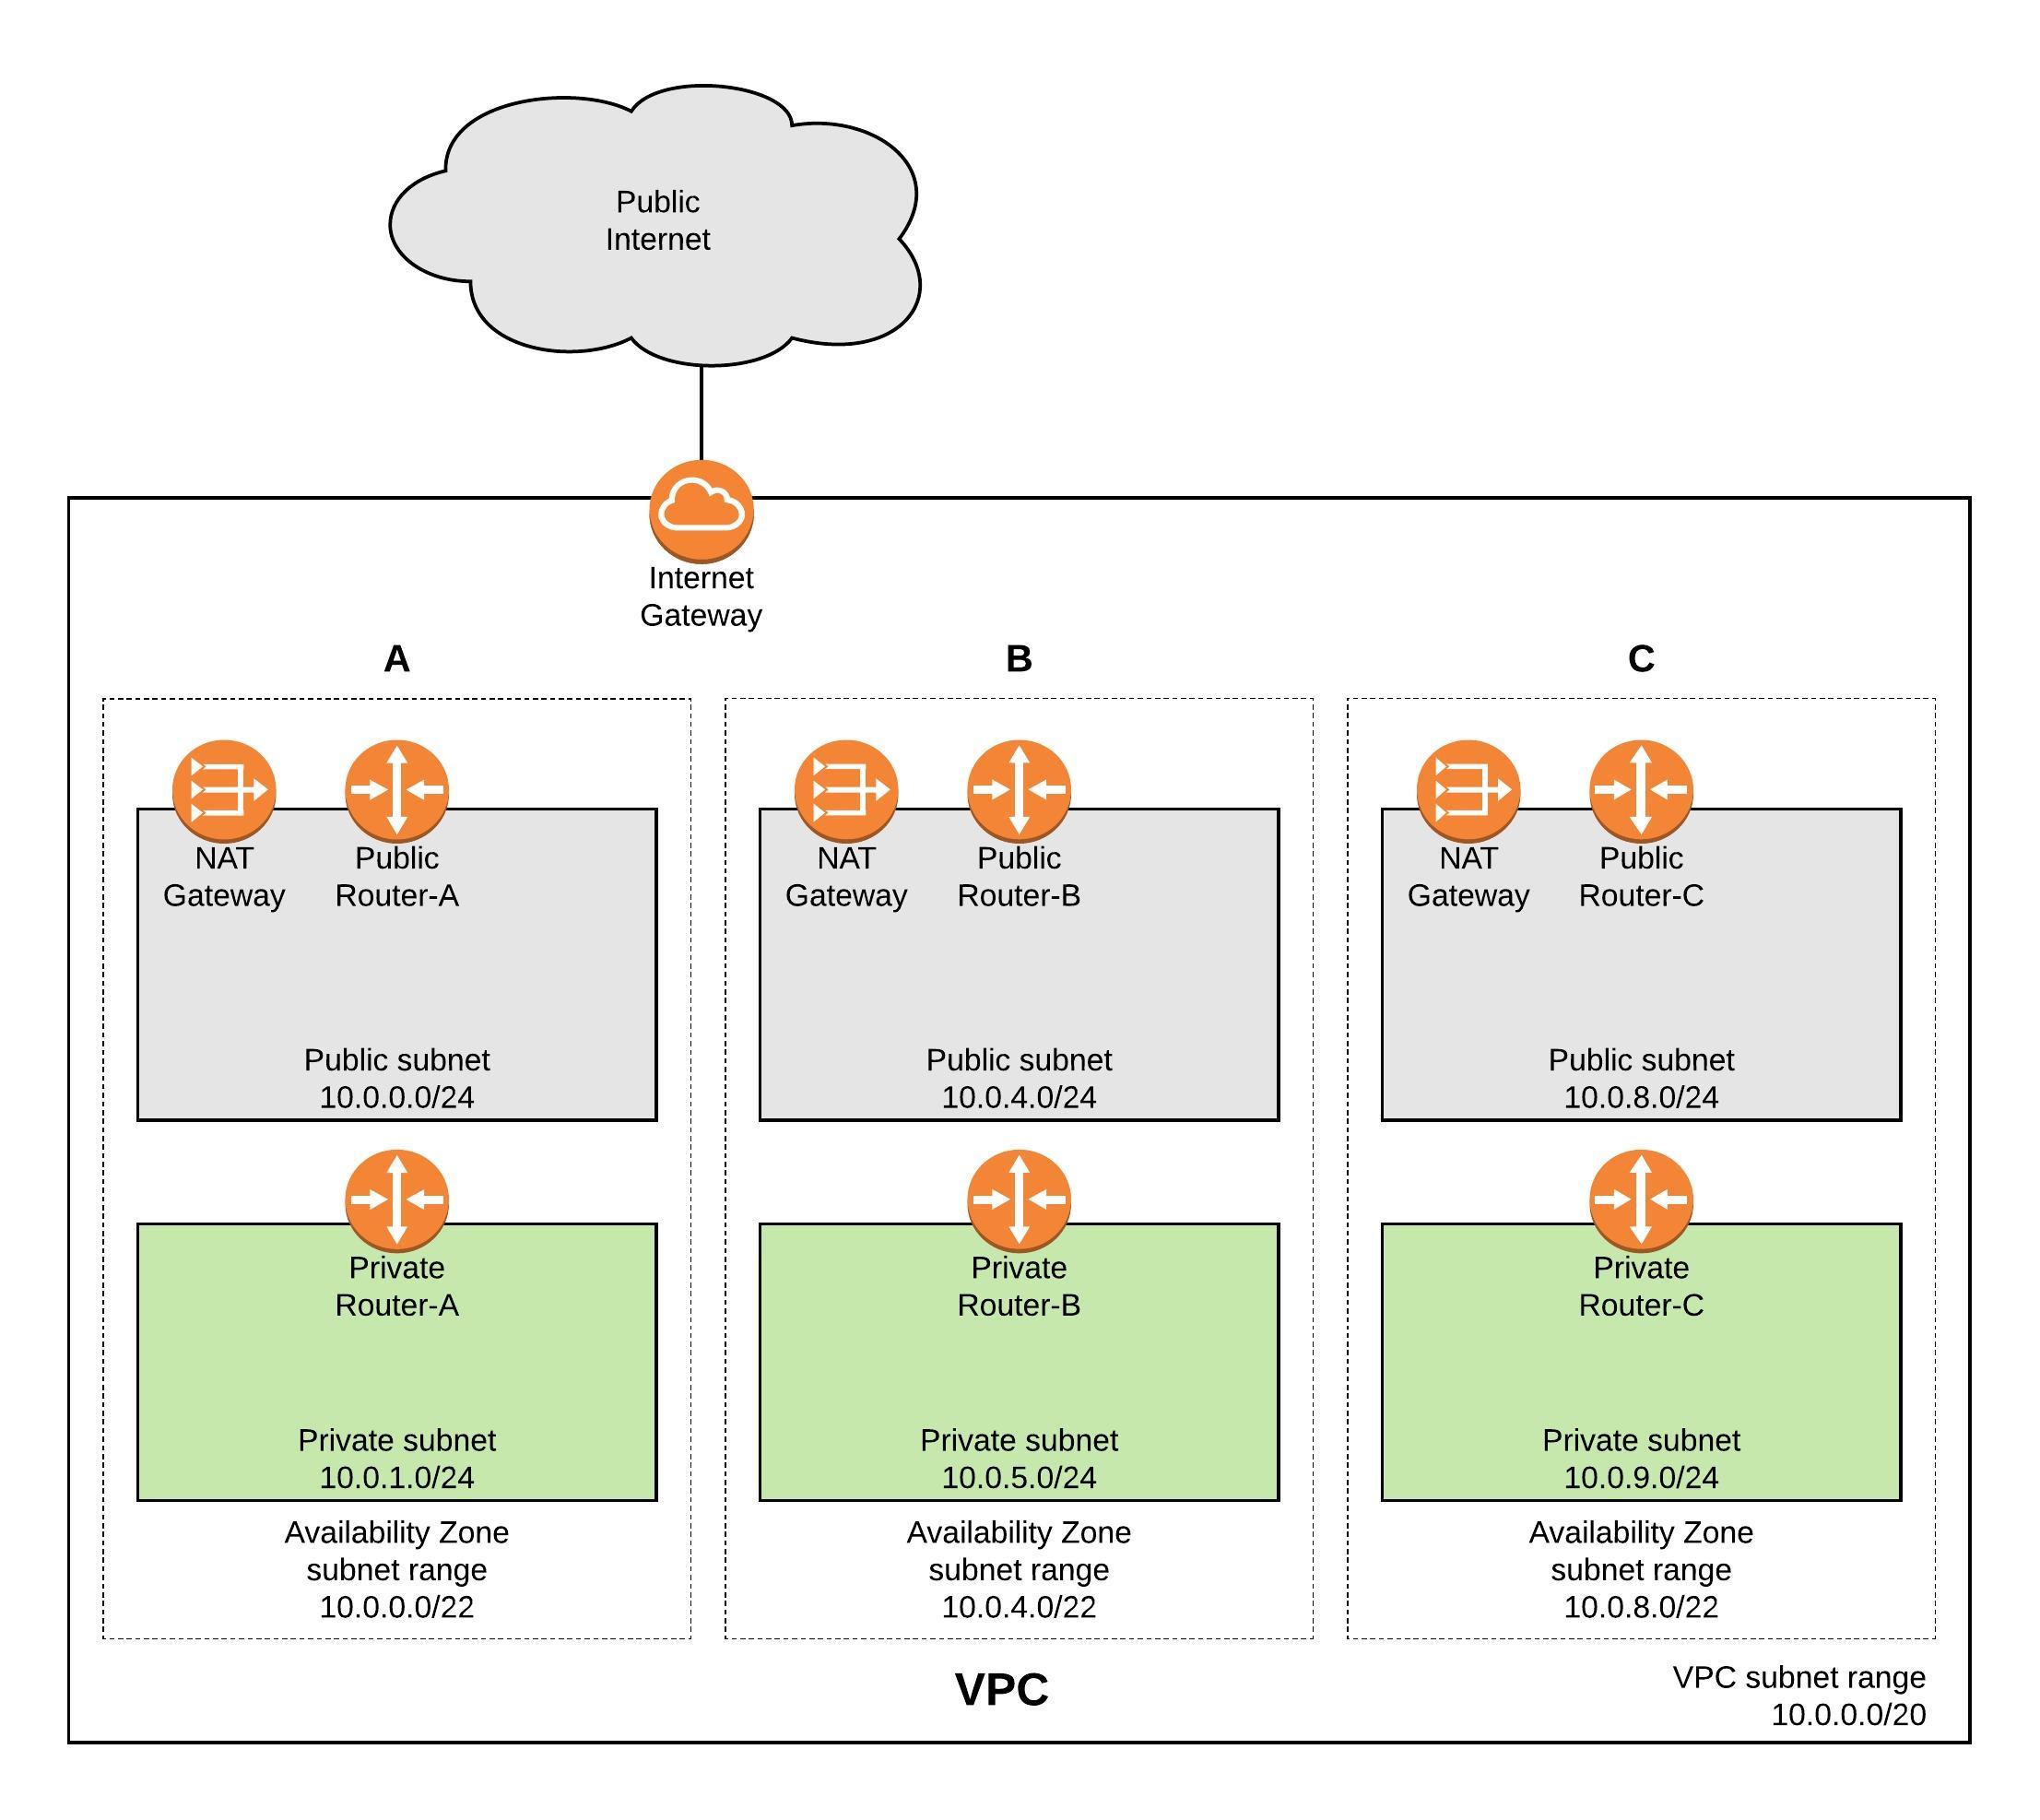
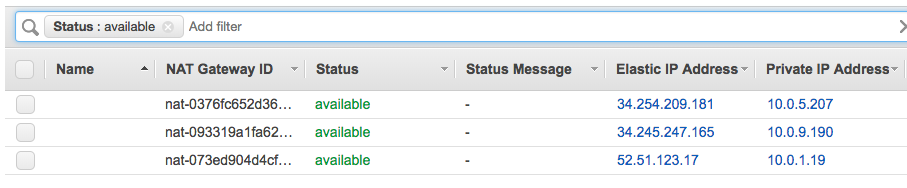
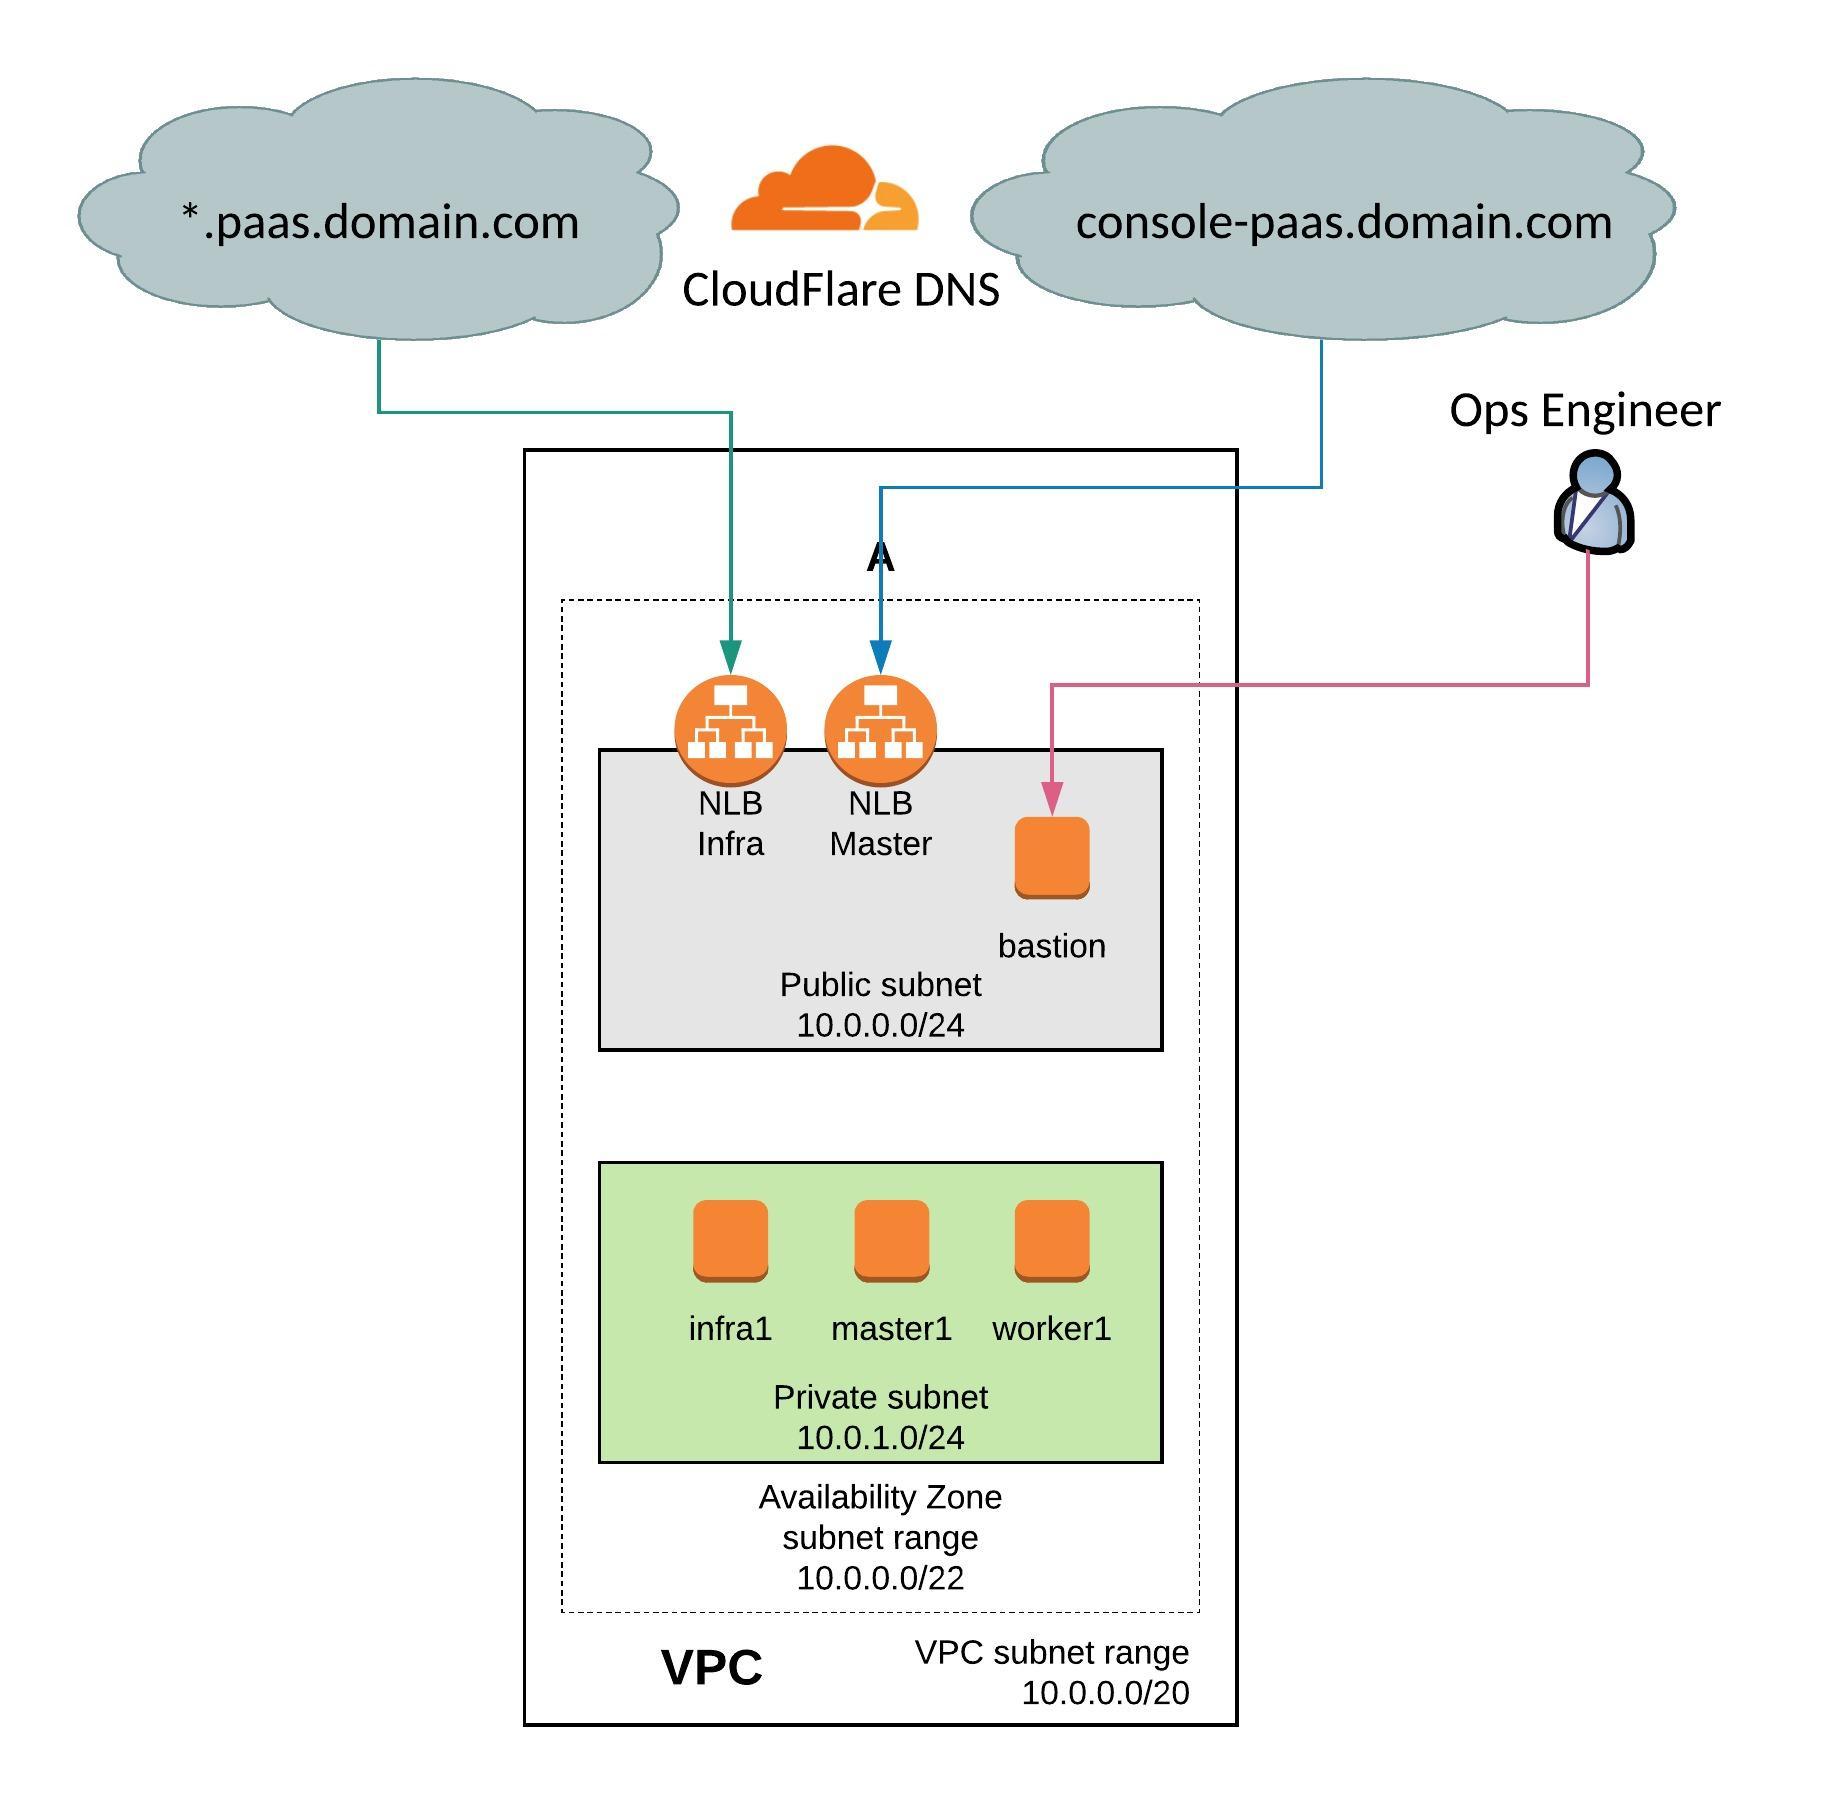
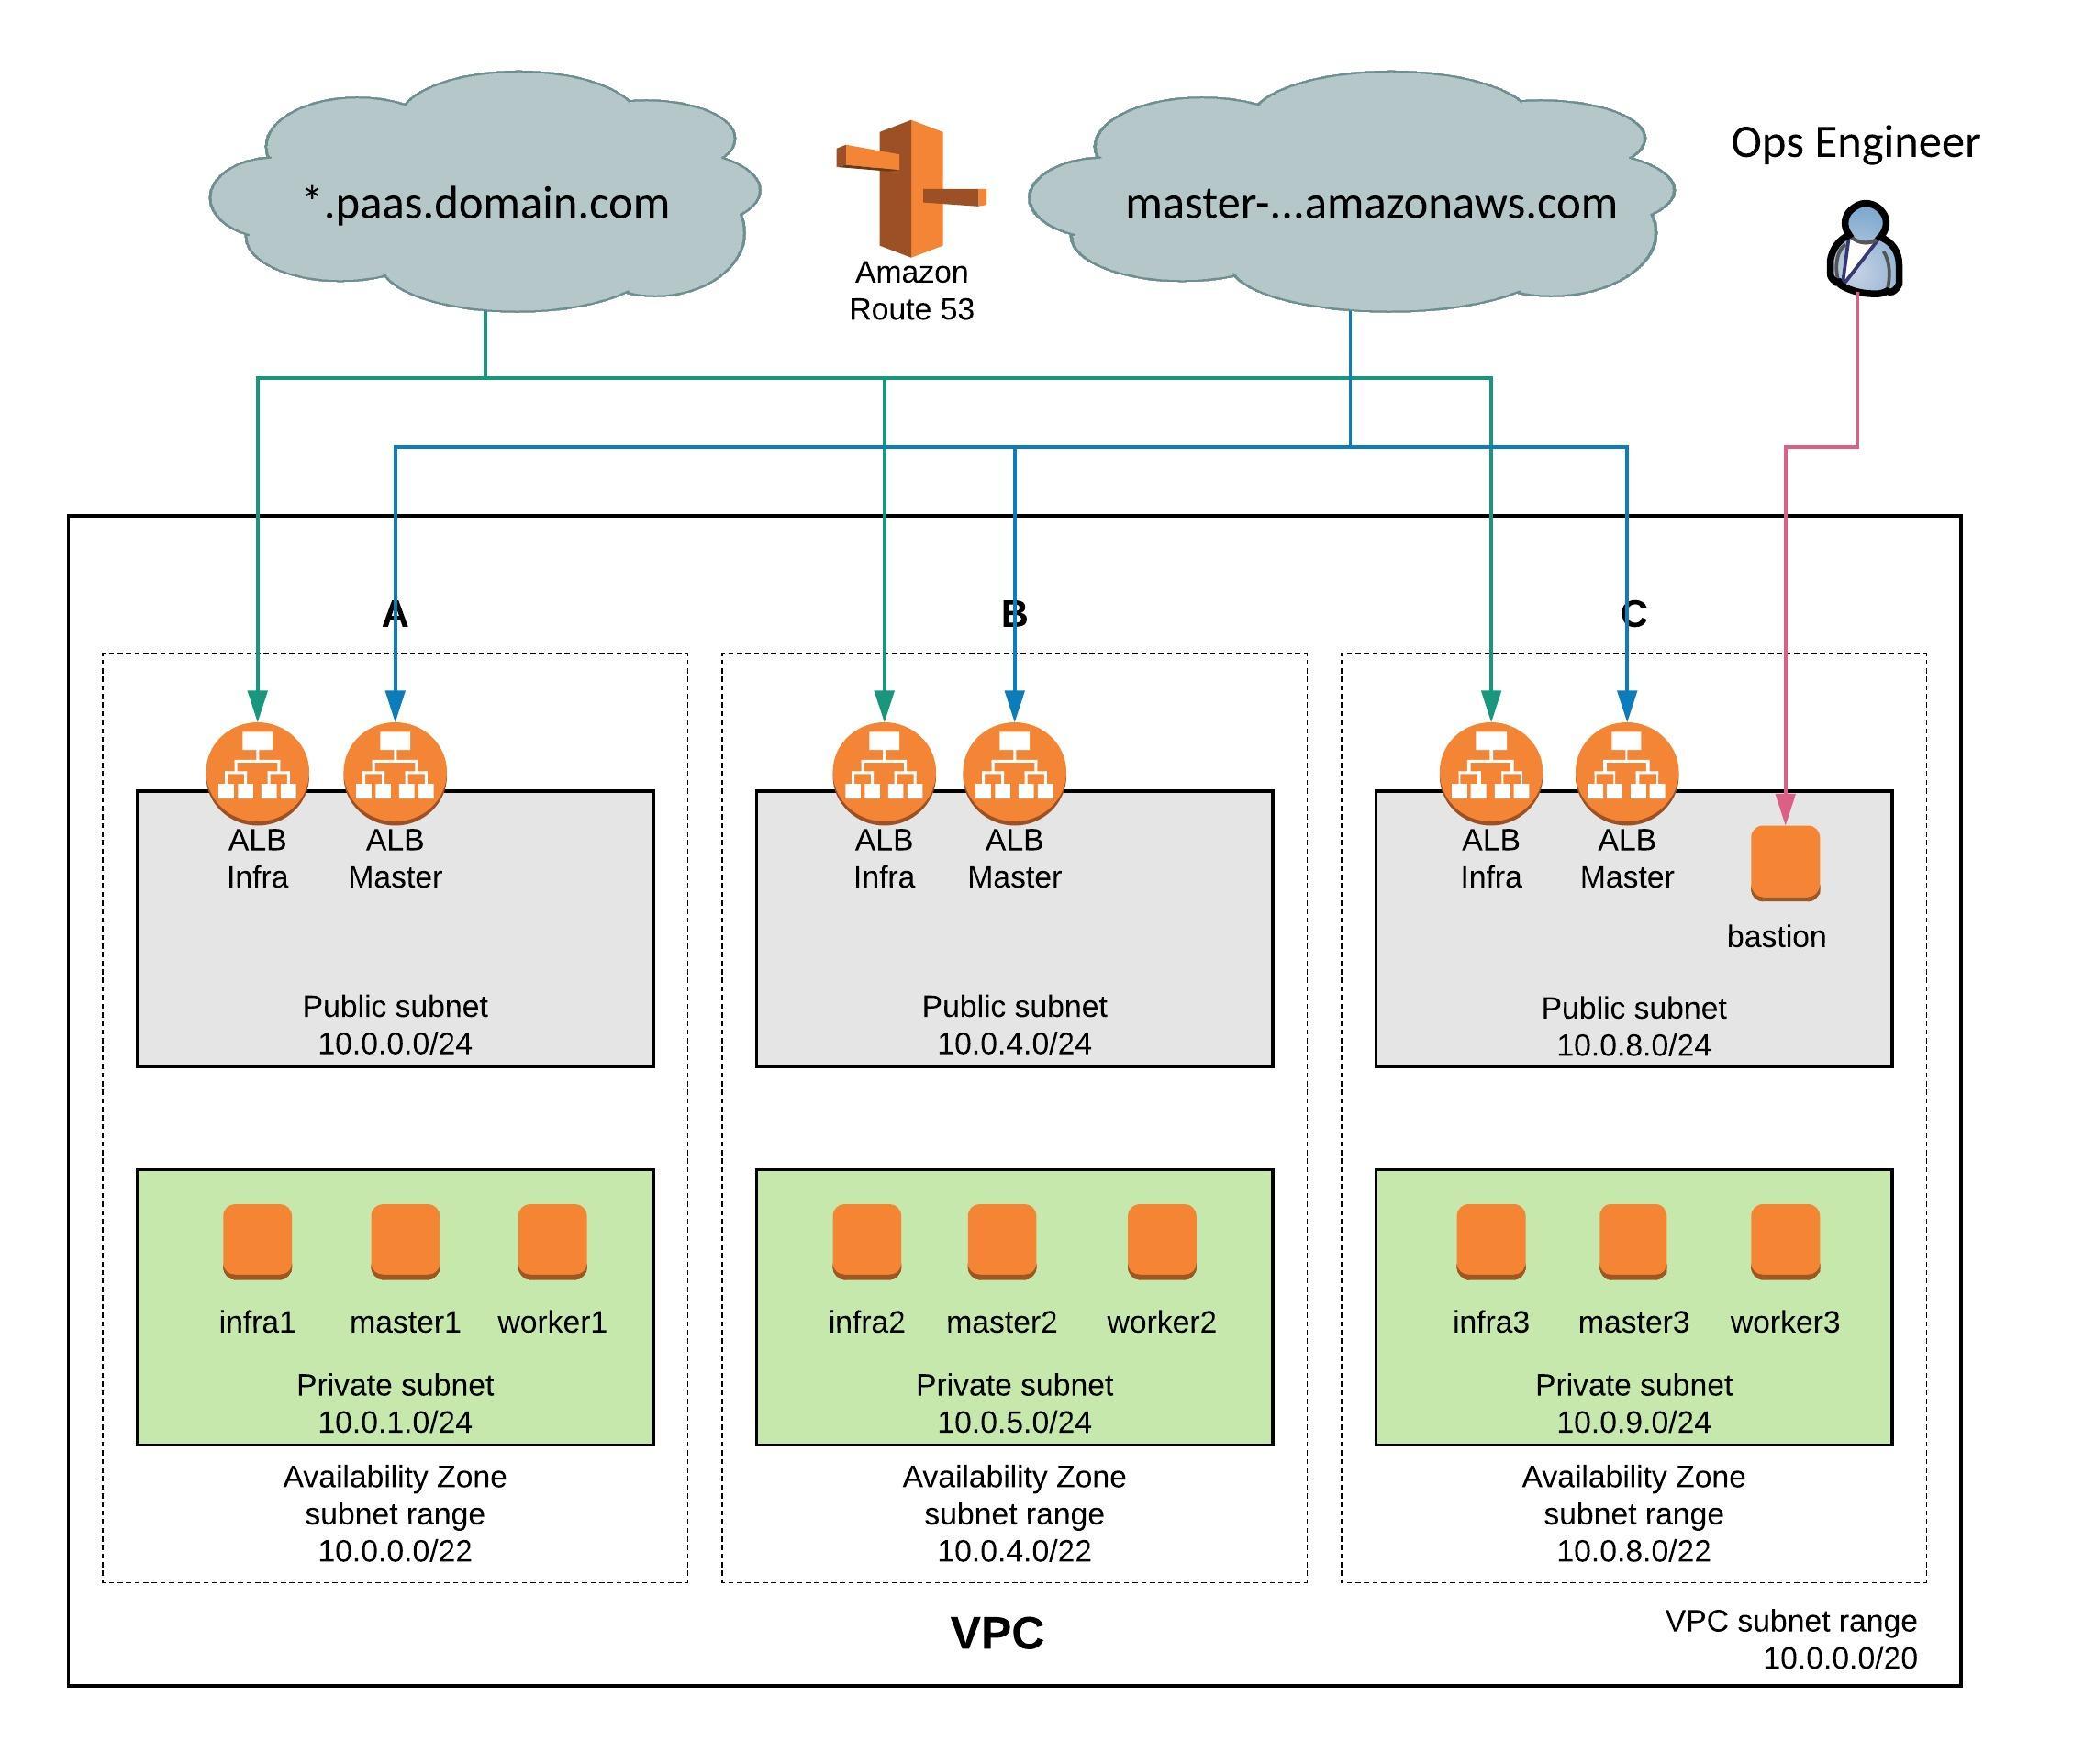
Before I start deploying the AWS VPC with HashCorp’s Terraform I want to explain the design of the Virtual Private Cloud. The main focus here is primarily for redundancy to ensure that if one Availability Zone (AZ) becomes unavailable that it is not interrupting the traffic and causing outages in your network, the NAT Gateway for example run per AZ so you need to make sure that these services are spread over multiple AZs.

AWS VPC network overview:

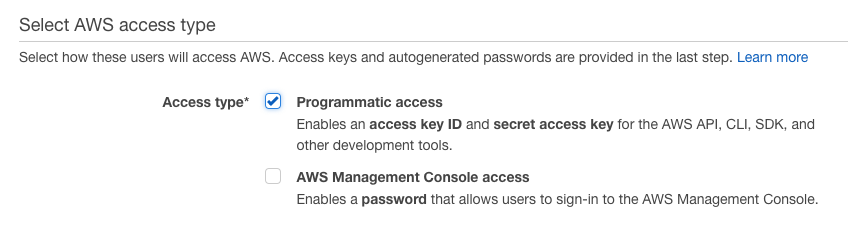
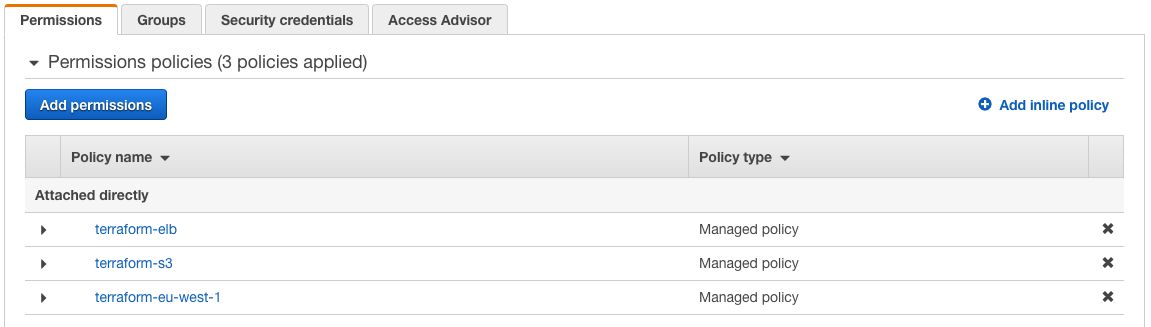
Before you start using Terraform you need to install the binary and it is also very useful to install the AWS command line interface. Please don’t forget to register the AWS CLI and add access and secure key.

pip install awscli --upgrade --user
wget https://releases.hashicorp.com/terraform/0.11.7/terraform_0.11.7_linux_amd64.zip
unzip terraform_0.11.7_linux_amd64.zip
sudo mv terraform /usr/local/bin/

Terraform is a great product and creates infrastructure as code, and is independent from any cloud provider so there is no need to use AWS CloudFormation like in my example. My repository for the Terraform files can be found here: https://github.com/berndonline/aws-terraform

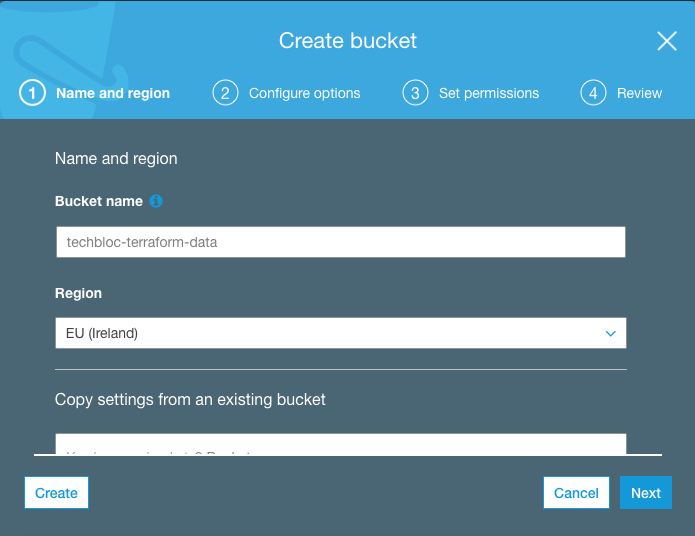
Let’s start with the variables file, which defines the needed settings for deploying the VPC. Basically you only need to change the variables to deploy the VPC to another AWS region:

...
variable "aws_region" {
  description = "AWS region to launch servers."
  default     = "eu-west-1"
}
...
variable "vpc_cidr" {
    default = "10.0.0.0/20"
  description = "the vpc cdir range"
}
variable "public_subnet_a" {
  default = "10.0.0.0/24"
  description = "Public subnet AZ A"
}
variable "public_subnet_b" {
  default = "10.0.4.0/24"
  description = "Public subnet AZ A"
}
variable "public_subnet_c" {
  default = "10.0.8.0/24"
  description = "Public subnet AZ A"
}
...

The vpc.tf file is the Terraform template which deploys the private and public subnets, the internet gateway, multiple NAT gateways and the different routing tables and adds the needed routes towards the internet:

# Create a VPC to launch our instances into
resource "aws_vpc" "default" {
    cidr_block = "${var.vpc_cidr}"
    enable_dns_support = true
    enable_dns_hostnames = true
    tags {
      Name = "VPC"
    }
}

resource "aws_subnet" "PublicSubnetA" {
  vpc_id = "${aws_vpc.default.id}"
  cidr_block = "${var.public_subnet_a}"
  tags {
        Name = "Public Subnet A"
  }
 availability_zone = "${data.aws_availability_zones.available.names[0]}"
}
...

In the main.tf you define which provider to use:

# Specify the provider and access details
provider "aws" {
  region = "${var.aws_region}"
}

# Declare the data source
data "aws_availability_zones" "available" {}

Now let’s start deploying the environment, first you need to initialise Terraform “terraform init“:

berndonline@lab:~/aws-terraform$ terraform init

Initializing provider plugins...
- Checking for available provider plugins on https://releases.hashicorp.com...
- Downloading plugin for provider "aws" (1.25.0)...

The following providers do not have any version constraints in configuration,
so the latest version was installed.

To prevent automatic upgrades to new major versions that may contain breaking
changes, it is recommended to add version = "..." constraints to the
corresponding provider blocks in configuration, with the constraint strings
suggested below.

* provider.aws: version = "~> 1.25"

Terraform has been successfully initialized!

You may now begin working with Terraform. Try running "terraform plan" to see
any changes that are required for your infrastructure. All Terraform commands
should now work.

If you ever set or change modules or backend configuration for Terraform,
rerun this command to reinitialize your working directory. If you forget, other
commands will detect it and remind you to do so if necessary.
berndonline@lab:~/aws-terraform$

Next, let’s do a dry run “terraform plan” to see all changes Terraform would apply:

berndonline@lab:~/aws-terraform$ terraform plan
Refreshing Terraform state in-memory prior to plan...
The refreshed state will be used to calculate this plan, but will not be
persisted to local or remote state storage.

data.aws_availability_zones.available: Refreshing state...

------------------------------------------------------------------------

An execution plan has been generated and is shown below.
Resource actions are indicated with the following symbols:
  + create

Terraform will perform the following actions:

  + aws_eip.natgw_a
      id:                                          
      allocation_id:                               
      association_id:                              
      domain:                                      
      instance:                                    
      network_interface:                           
      private_ip:                                  
      public_ip:                                   
      vpc:                                         "true"

...

  + aws_vpc.default
      id:                                          
      assign_generated_ipv6_cidr_block:            "false"
      cidr_block:                                  "10.0.0.0/20"
      default_network_acl_id:                      
      default_route_table_id:                      
      default_security_group_id:                   
      dhcp_options_id:                             
      enable_classiclink:                          
      enable_classiclink_dns_support:              
      enable_dns_hostnames:                        "true"
      enable_dns_support:                          "true"
      instance_tenancy:                            "default"
      ipv6_association_id:                         
      ipv6_cidr_block:                             
      main_route_table_id:                         
      tags.%:                                      "1"
      tags.Name:                                   "VPC"


Plan: 27 to add, 0 to change, 0 to destroy.

------------------------------------------------------------------------

Note: You didn't specify an "-out" parameter to save this plan, so Terraform
can't guarantee that exactly these actions will be performed if
"terraform apply" is subsequently run.

berndonline@lab:~/aws-terraform$

Because nothing is deployed, Terraform would apply 27 changes, so let’s do this by running “terraform apply“. Terraform will check the state and will ask you to confirm and then apply the changes:

berndonline@lab:~/aws-terraform$ terraform apply
data.aws_availability_zones.available: Refreshing state...

An execution plan has been generated and is shown below.
Resource actions are indicated with the following symbols:
  + create

Terraform will perform the following actions:

  + aws_eip.natgw_a
      id:                                          
      allocation_id:                               
      association_id:                              
      domain:                                      
      instance:                                    
      network_interface:                           
      private_ip:                                  
      public_ip:                                   
      vpc:                                         "true"

...

  + aws_vpc.default
      id:                                          
      assign_generated_ipv6_cidr_block:            "false"
      cidr_block:                                  "10.0.0.0/20"
      default_network_acl_id:                      
      default_route_table_id:                      
      default_security_group_id:                   
      dhcp_options_id:                             
      enable_classiclink:                          
      enable_classiclink_dns_support:              
      enable_dns_hostnames:                        "true"
      enable_dns_support:                          "true"
      instance_tenancy:                            "default"
      ipv6_association_id:                         
      ipv6_cidr_block:                             
      main_route_table_id:                         
      tags.%:                                      "1"
      tags.Name:                                   "VPC"


Plan: 27 to add, 0 to change, 0 to destroy.

Do you want to perform these actions?
  Terraform will perform the actions described above.
  Only 'yes' will be accepted to approve.

  Enter a value: yes

aws_eip.natgw_c: Creating...
  allocation_id:     "" => ""
  association_id:    "" => ""
  domain:            "" => ""
  instance:          "" => ""
  network_interface: "" => ""
  private_ip:        "" => ""
  public_ip:         "" => ""
  vpc:               "" => "true"
aws_eip.natgw_a: Creating...
  allocation_id:     "" => ""
  association_id:    "" => ""
  domain:            "" => ""
  instance:          "" => ""
  network_interface: "" => ""
  private_ip:        "" => ""
  public_ip:         "" => ""
  vpc:               "" => "true"

...

aws_route_table_association.PrivateSubnetB: Creation complete after 0s (ID: rtbassoc-174ba16c)
aws_nat_gateway.public_nat_c: Still creating... (1m40s elapsed)
aws_nat_gateway.public_nat_c: Still creating... (1m50s elapsed)
aws_nat_gateway.public_nat_c: Creation complete after 1m56s (ID: nat-093319a1fa62c3eda)
aws_route_table.private_route_c: Creating...
  propagating_vgws.#:                         "" => ""
  route.#:                                    "" => "1"
  route.4170986711.cidr_block:                "" => "0.0.0.0/0"
  route.4170986711.egress_only_gateway_id:    "" => ""
  route.4170986711.gateway_id:                "" => ""
  route.4170986711.instance_id:               "" => ""
  route.4170986711.ipv6_cidr_block:           "" => ""
  route.4170986711.nat_gateway_id:            "" => "nat-093319a1fa62c3eda"
  route.4170986711.network_interface_id:      "" => ""
  route.4170986711.vpc_peering_connection_id: "" => ""
  tags.%:                                     "" => "1"
  tags.Name:                                  "" => "Private Route C"
  vpc_id:                                     "" => "vpc-fdffb19b"
aws_route_table.private_route_c: Creation complete after 1s (ID: rtb-d64632af)
aws_route_table_association.PrivateSubnetC: Creating...
  route_table_id: "" => "rtb-d64632af"
  subnet_id:      "" => "subnet-17da194d"
aws_route_table_association.PrivateSubnetC: Creation complete after 1s (ID: rtbassoc-35749e4e)

Apply complete! Resources: 27 added, 0 changed, 0 destroyed.
berndonline@lab:~/aws-terraform$

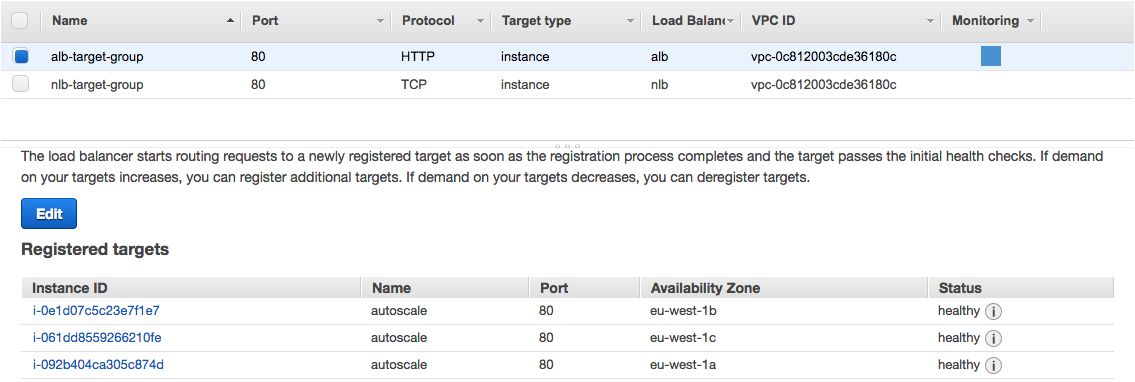
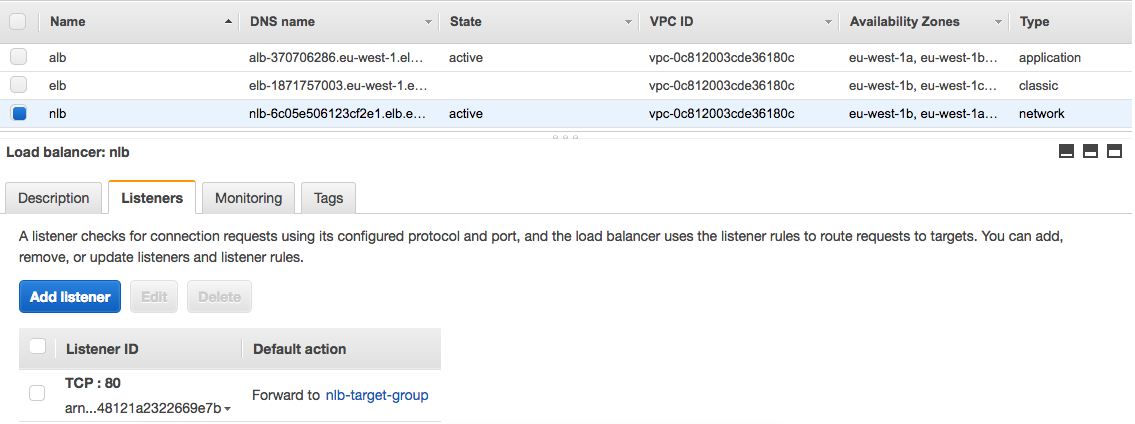
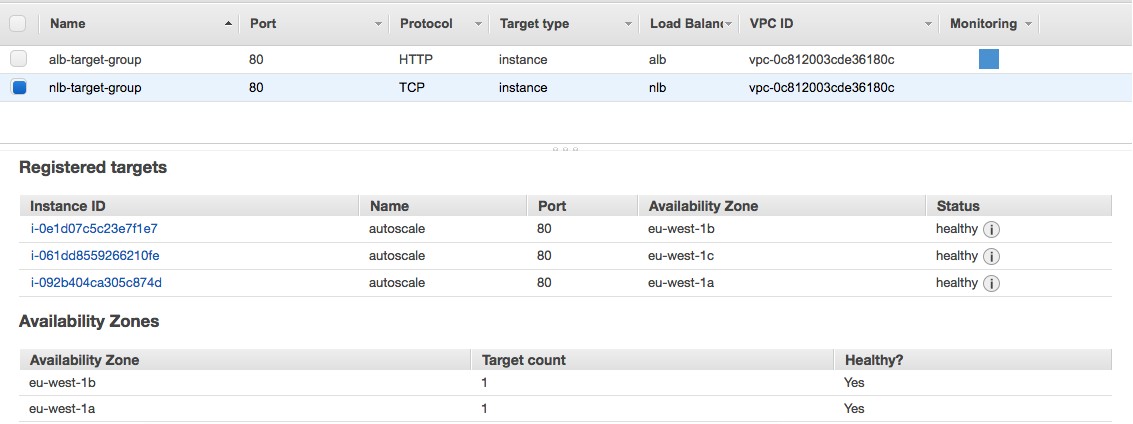
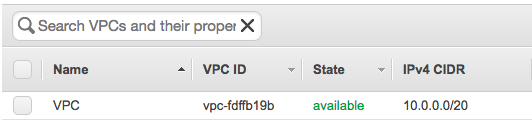
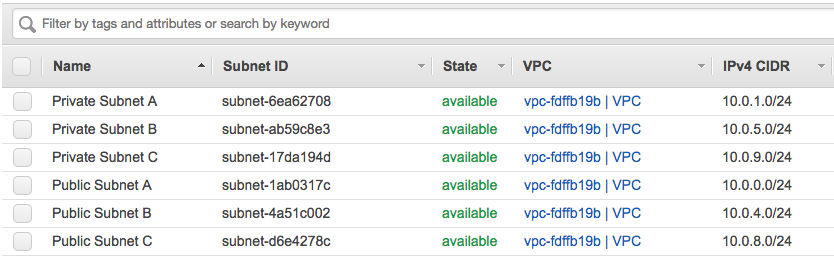
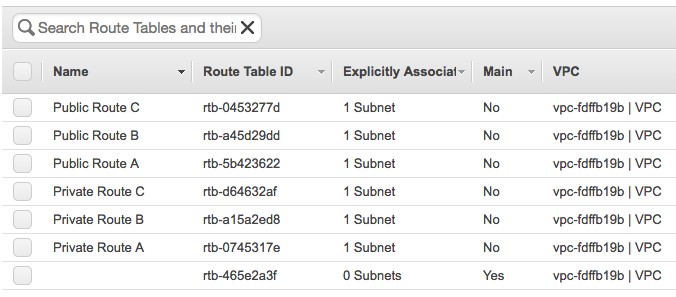
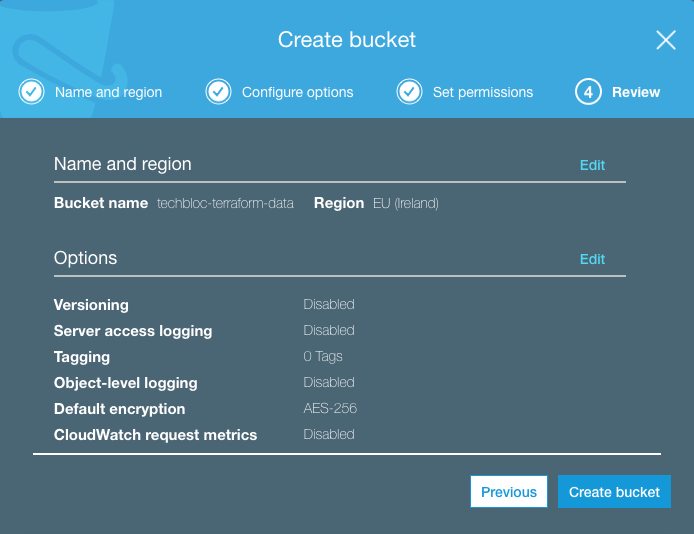
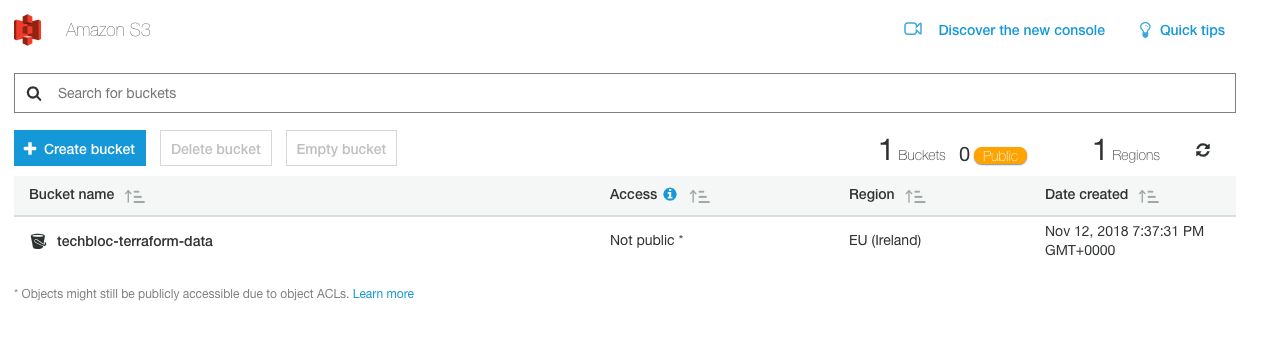
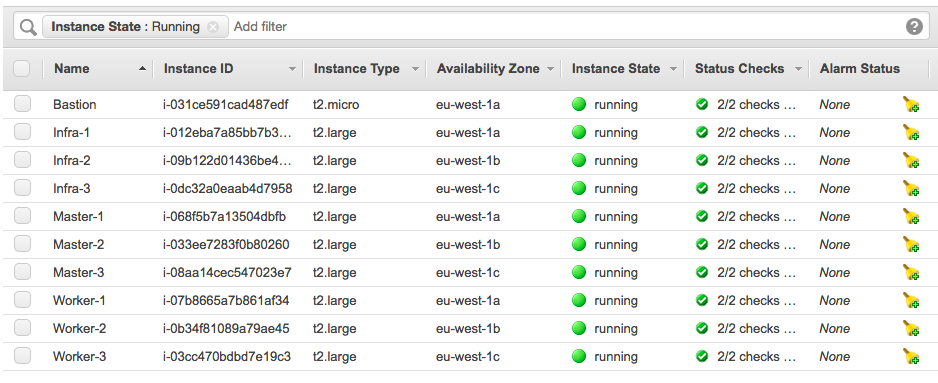
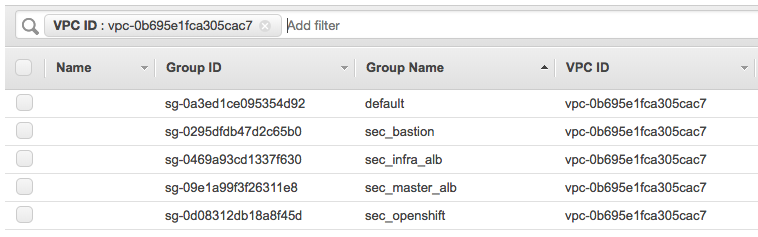
Terraform successfully applied all the changes so let’s have a quick look in the AWS web console:

You can change the environment and run “terraform apply” again and Terraform would deploy the changes you have made. In my example below I didn’t, so Terraform would do nothing because it tracks the state that is deployed and that I have defined in the vpc.tf:

berndonline@lab:~/aws-terraform$ terraform apply
aws_eip.natgw_c: Refreshing state... (ID: eipalloc-7fa0eb42)
aws_vpc.default: Refreshing state... (ID: vpc-fdffb19b)
aws_eip.natgw_a: Refreshing state... (ID: eipalloc-3ca7ec01)
aws_eip.natgw_b: Refreshing state... (ID: eipalloc-e6bbf0db)
data.aws_availability_zones.available: Refreshing state...
aws_subnet.PublicSubnetC: Refreshing state... (ID: subnet-d6e4278c)
aws_subnet.PrivateSubnetC: Refreshing state... (ID: subnet-17da194d)
aws_subnet.PrivateSubnetA: Refreshing state... (ID: subnet-6ea62708)
aws_subnet.PublicSubnetA: Refreshing state... (ID: subnet-1ab0317c)
aws_network_acl.all: Refreshing state... (ID: acl-c75f9ebe)
aws_internet_gateway.gw: Refreshing state... (ID: igw-27652940)
aws_subnet.PrivateSubnetB: Refreshing state... (ID: subnet-ab59c8e3)
aws_subnet.PublicSubnetB: Refreshing state... (ID: subnet-4a51c002)
aws_route_table.public_route_b: Refreshing state... (ID: rtb-a45d29dd)
aws_route_table.public_route_a: Refreshing state... (ID: rtb-5b423622)
aws_route_table.public_route_c: Refreshing state... (ID: rtb-0453277d)
aws_nat_gateway.public_nat_b: Refreshing state... (ID: nat-0376fc652d362a3b1)
aws_nat_gateway.public_nat_a: Refreshing state... (ID: nat-073ed904d4cf2d30e)
aws_route_table_association.PublicSubnetA: Refreshing state... (ID: rtbassoc-b14ba1ca)
aws_route_table_association.PublicSubnetB: Refreshing state... (ID: rtbassoc-277d975c)
aws_route_table.private_route_a: Refreshing state... (ID: rtb-0745317e)
aws_route_table.private_route_b: Refreshing state... (ID: rtb-a15a2ed8)
aws_route_table_association.PrivateSubnetB: Refreshing state... (ID: rtbassoc-174ba16c)
aws_route_table_association.PrivateSubnetA: Refreshing state... (ID: rtbassoc-60759f1b)
aws_nat_gateway.public_nat_c: Refreshing state... (ID: nat-093319a1fa62c3eda)
aws_route_table_association.PublicSubnetC: Refreshing state... (ID: rtbassoc-307e944b)
aws_route_table.private_route_c: Refreshing state... (ID: rtb-d64632af)
aws_route_table_association.PrivateSubnetC: Refreshing state... (ID: rtbassoc-35749e4e)

Apply complete! Resources: 0 added, 0 changed, 0 destroyed.
berndonline@lab:~/aws-terraform$

To remove the environment use run “terraform destroy“:

berndonline@lab:~/aws-terraform$ terraform destroy
aws_eip.natgw_c: Refreshing state... (ID: eipalloc-7fa0eb42)
data.aws_availability_zones.available: Refreshing state...
aws_eip.natgw_a: Refreshing state... (ID: eipalloc-3ca7ec01)
aws_vpc.default: Refreshing state... (ID: vpc-fdffb19b)
aws_eip.natgw_b: Refreshing state... (ID: eipalloc-e6bbf0db)

...

An execution plan has been generated and is shown below.
Resource actions are indicated with the following symbols:
  - destroy

Terraform will perform the following actions:

  - aws_eip.natgw_a

  - aws_eip.natgw_b

  - aws_eip.natgw_c

...

Plan: 0 to add, 0 to change, 27 to destroy.

Do you really want to destroy?
  Terraform will destroy all your managed infrastructure, as shown above.
  There is no undo. Only 'yes' will be accepted to confirm.

  Enter a value: yes

aws_network_acl.all: Destroying... (ID: acl-c75f9ebe)
aws_route_table_association.PrivateSubnetA: Destroying... (ID: rtbassoc-60759f1b)
aws_route_table_association.PublicSubnetC: Destroying... (ID: rtbassoc-307e944b)
aws_route_table_association.PublicSubnetA: Destroying... (ID: rtbassoc-b14ba1ca)
aws_route_table_association.PublicSubnetB: Destroying... (ID: rtbassoc-277d975c)
aws_route_table_association.PrivateSubnetC: Destroying... (ID: rtbassoc-35749e4e)
aws_route_table_association.PrivateSubnetB: Destroying... (ID: rtbassoc-174ba16c)
aws_route_table_association.PrivateSubnetB: Destruction complete after 0s

...

aws_internet_gateway.gw: Destroying... (ID: igw-27652940)
aws_eip.natgw_c: Destroying... (ID: eipalloc-7fa0eb42)
aws_subnet.PrivateSubnetC: Destroying... (ID: subnet-17da194d)
aws_subnet.PrivateSubnetC: Destruction complete after 1s
aws_eip.natgw_c: Destruction complete after 1s
aws_internet_gateway.gw: Still destroying... (ID: igw-27652940, 10s elapsed)
aws_internet_gateway.gw: Destruction complete after 11s
aws_vpc.default: Destroying... (ID: vpc-fdffb19b)
aws_vpc.default: Destruction complete after 0s

Destroy complete! Resources: 27 destroyed.
berndonline@lab:~/aws-terraform$

I hope this article was informative and explains how to deploy a VPC with Terraform. In the coming weeks I will add additional functions like deploying EC2 Instances and Load Balancing.

Please share your feedback and leave a comment.
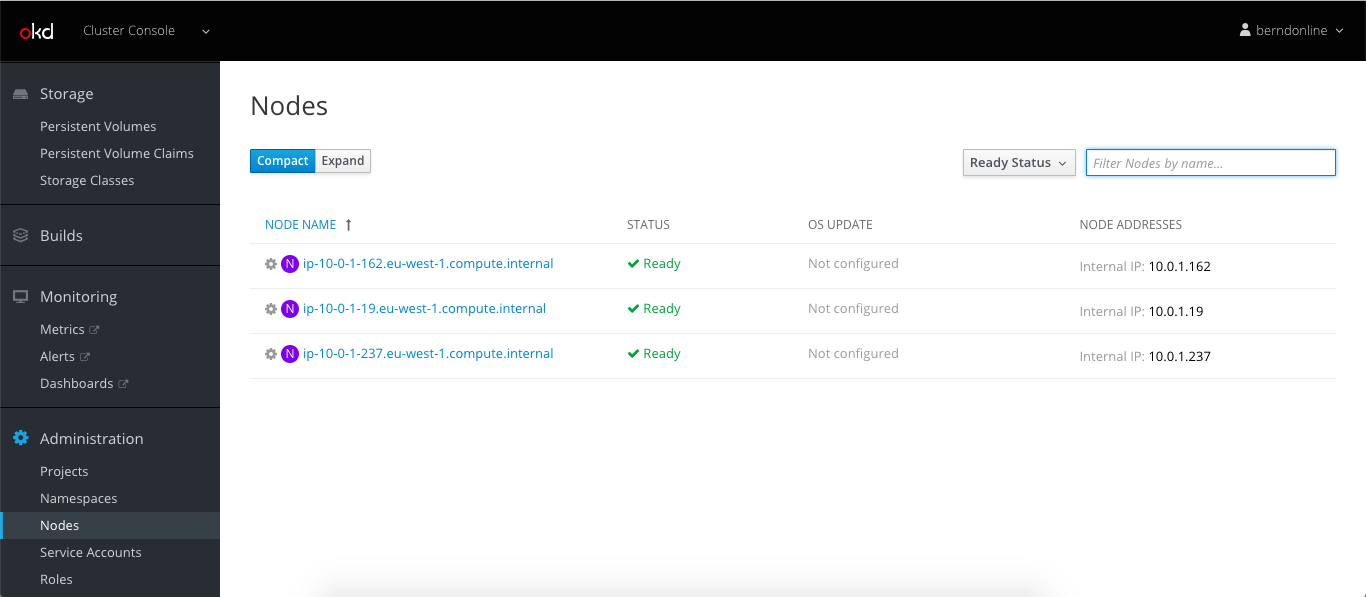