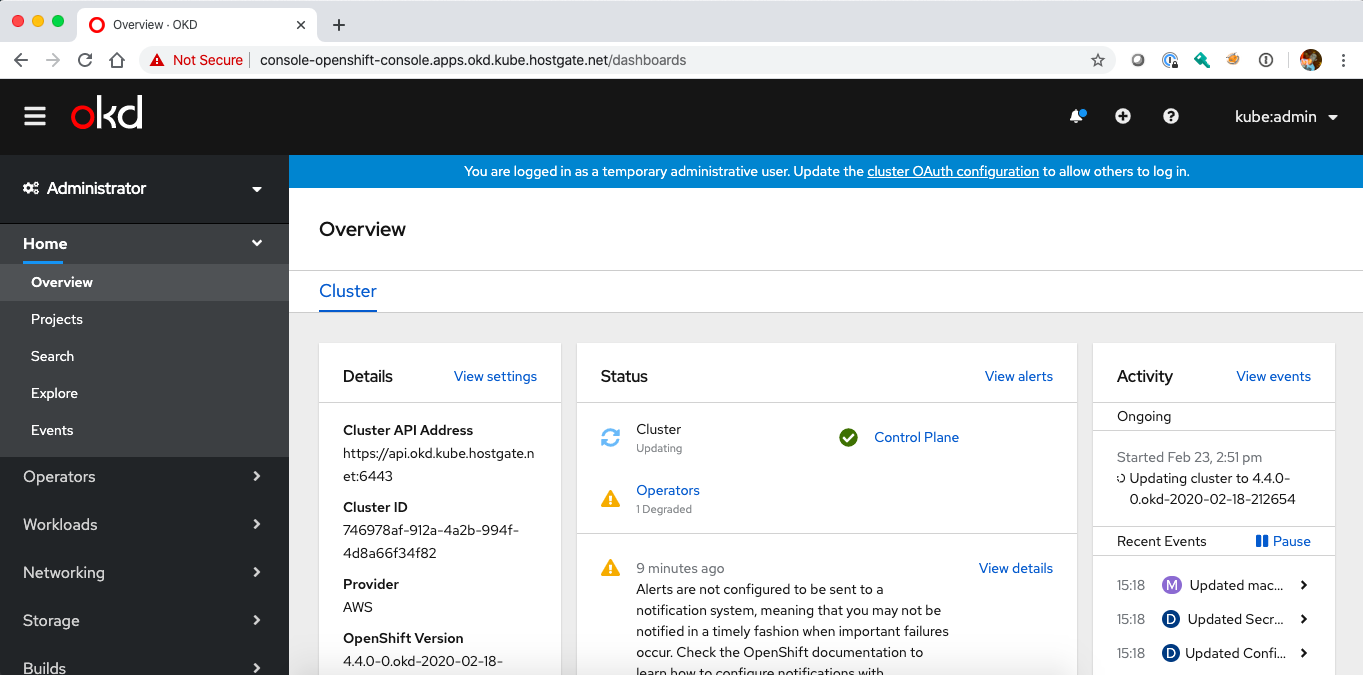
OpenShift / OKD 4.x Cluster Deployment using OpenShift Hive

Before you continue to deploy an OpenShift or OKD cluster please check out my other posts about OpenShift Hive – API driven OpenShift cluster provisioning and management operator and Getting started with OpenShift Hive  because you need a running OpenShift Hive operator.

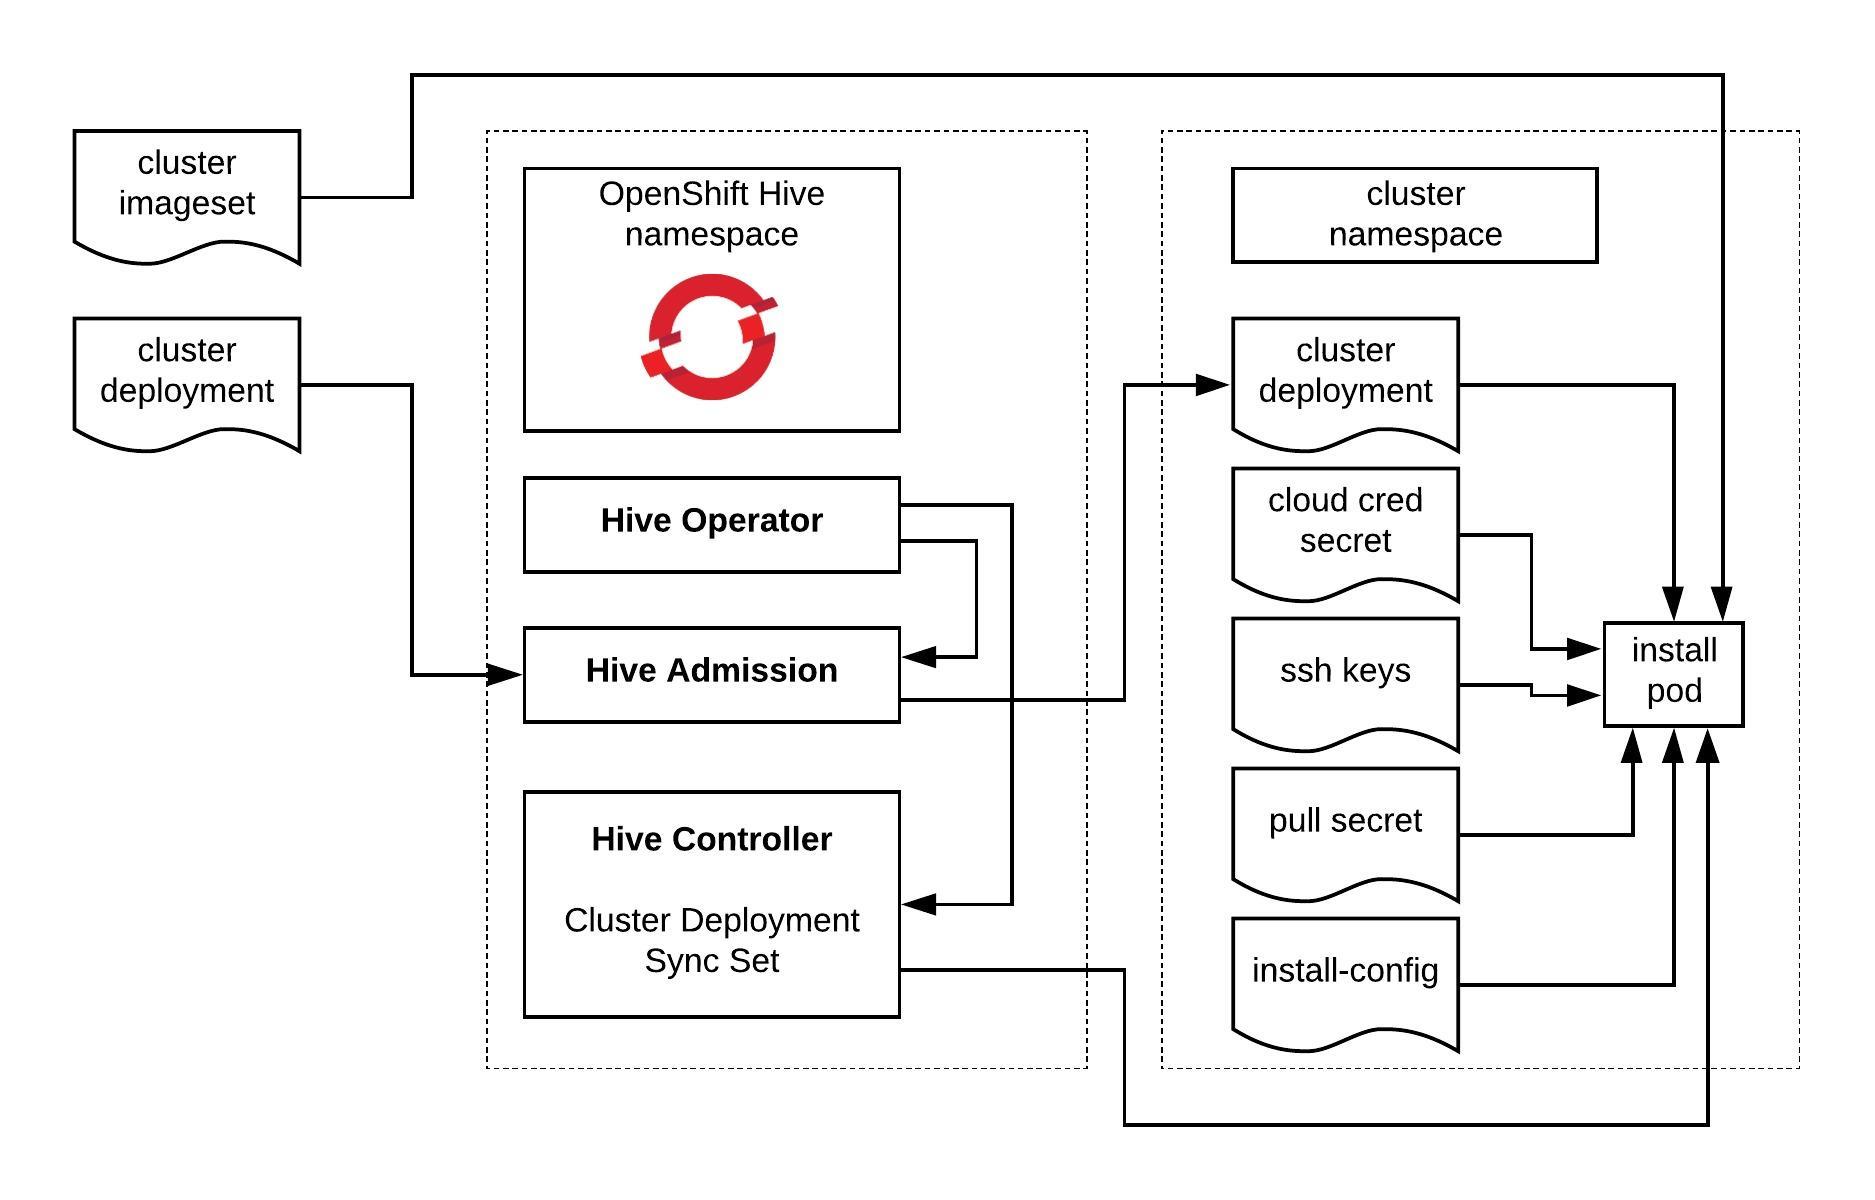
To install the OKD (OpenShift Origin Community Distribution) version we need a few things beforehand: a cluster namespace, AWS credentials, SSH keys, image pull secret, install-config, cluster image version and cluster deployment.
Let’s start to create the cluster namespace:

cat <<EOF | kubectl apply -f -
---
apiVersion: v1
kind: Namespace
metadata:
  name: okd

Create a secret with your ssh key:

$ kubectl create secret generic ssh-key -n okd --from-file=ssh-privatekey=/home/ubuntu/.ssh/id_rsa --from-file=ssh-publickey=/home/ubuntu/.ssh/id_rsa.pub

Create the AWS credential secret:

$ kubectl create secret generic aws-creds -n okd --from-literal=aws_secret_access_key=$AWS_SECRET_ACCESS_KEY --from-literal=aws_access_key_id=$AWS_ACCESS_KEY_ID

Create an image pull secret, this is not important for installing a OKD 4.x cluster but needs to be present otherwise Hive will not start the cluster deployment. If you have an RedHat Enterprise subscription for OpenShift then you need to add here your RedHat image pull secret:

$ kubectl create secret generic pull-secret -n okd --from-file=.dockerconfigjson=/home/ubuntu/.docker/config.json --type=kubernetes.io/dockerconfigjson 

Create a install-config.yaml for the cluster deployment and modify to your needs:

---
apiVersion: v1
baseDomain: kube.domain.com
compute:
- name: worker
  platform:
    aws:
      rootVolume:
        iops: 100
        size: 22
        type: gp2
      type: m4.xlarge
  replicas: 3
controlPlane:
  name: master
  platform:
    aws:
      rootVolume:
        iops: 100
        size: 22
        type: gp2
      type: m4.xlarge
replicas: 3
metadata:
  creationTimestamp: null
  name: okd
networking:
  clusterNetwork:
  - cidr: 10.128.0.0/14
    hostPrefix: 23
  machineCIDR: 10.0.0.0/16
  networkType: OpenShiftSDN
  serviceNetwork:
  - 172.30.0.0/16
platform:
  aws:
    region: eu-west-1
pullSecret: ""
sshKey: ""

Create the install-config secret for the cluster deployment:

$ kubectl create secret generic install-config -n okd --from-file=install-config.yaml=./install-config.yaml

Create the ClusterImageSet for OKD. In my example I am using the latest OKD 4.4.0 release. More information about the available OKD release versions you find here: https://origin-release.svc.ci.openshift.org/

cat <<EOF | kubectl apply -f -
---
apiVersion: hive.openshift.io/v1
kind: ClusterImageSet
metadata:
  name: okd-4-4-0-imageset
spec:
  releaseImage: registry.svc.ci.openshift.org/origin/release:4.4.0-0.okd-2020-02-18-212654
EOF 

Below is an example of a RedHat Enterprise OpenShift 4 ClusterImageSet:

---
apiVersion: hive.openshift.io/v1
kind: ClusterImageSet
metadata:
  name: openshift-4-3-0-imageset
spec:
  releaseImage: quay.io/openshift-release-dev/ocp-release:4.3.0-x86_64

For Hive to start with the cluster deployment, we need to modify the manifest below and add the references to the previous created secrets, install-config and cluster imageset version:

cat <<EOF | kubectl apply -f -
---
apiVersion: hive.openshift.io/v1
kind: ClusterDeployment
metadata:
  creationTimestamp: null
  name: okd
  namespace: okd
spec:
  baseDomain: kube.domain.com
  clusterName: okd
  controlPlaneConfig:
    servingCertificates: {}
  installed: false
  platform:
    aws:
      credentialsSecretRef:
        name: aws-creds
      region: eu-west-1
  provisioning:
    imageSetRef:
      name: okd-4-4-0-imageset
    installConfigSecretRef:
      name: install-config 
  pullSecretRef:
    name: pull-secret
  sshKey:
    name: ssh-key
status:
  clusterVersionStatus:
    availableUpdates: null
    desired:
      force: false
      image: ""
      version: ""
    observedGeneration: 0
    versionHash: ""
EOF

Once you submitted the ClusterDeployment manifest, the Hive operator will start to deploy the cluster straightaway:

$ kubectl get clusterdeployments.hive.openshift.io -n okd
NAME   CLUSTERNAME   CLUSTERTYPE   BASEDOMAIN          INSTALLED   INFRAID     AGE
okd    okd                         kube.domain.com     false       okd-jcdkd   107s

Hive will create the provision (install) pod for the cluster deployment and inject the installer configuration:

$ kubectl get pods -n okd
NAME                          READY   STATUS    RESTARTS   AGE
okd-0-tbm9t-provision-c5hpf   1/3     Running   0          57s

You can view the logs to check the progress of the cluster deployment. You will see the terraform output for creating the infrastructure resources and feedback from the installer about the installation progress. At the end you will see when the installation completed successfully:

$ kubectl logs okd-0-tbm9t-provision-c5hpf -n okd -c hive -f
...
time="2020-02-23T13:31:41Z" level=debug msg="module.dns.aws_route53_zone.int: Creating..."
time="2020-02-23T13:31:42Z" level=debug msg="aws_ami_copy.main: Still creating... [3m40s elapsed]"
time="2020-02-23T13:31:51Z" level=debug msg="module.dns.aws_route53_zone.int: Still creating... [10s elapsed]"
time="2020-02-23T13:31:52Z" level=debug msg="aws_ami_copy.main: Still creating... [3m50s elapsed]"
time="2020-02-23T13:32:01Z" level=debug msg="module.dns.aws_route53_zone.int: Still creating... [20s elapsed]"
time="2020-02-23T13:32:02Z" level=debug msg="aws_ami_copy.main: Still creating... [4m0s elapsed]"
time="2020-02-23T13:32:11Z" level=debug msg="module.dns.aws_route53_zone.int: Still creating... [30s elapsed]"
time="2020-02-23T13:32:12Z" level=debug msg="aws_ami_copy.main: Still creating... [4m10s elapsed]"
time="2020-02-23T13:32:21Z" level=debug msg="module.dns.aws_route53_zone.int: Still creating... [40s elapsed]"
time="2020-02-23T13:32:22Z" level=debug msg="aws_ami_copy.main: Still creating... [4m20s elapsed]"
time="2020-02-23T13:32:31Z" level=debug msg="module.dns.aws_route53_zone.int: Still creating... [50s elapsed]"
time="2020-02-23T13:32:32Z" level=debug msg="aws_ami_copy.main: Still creating... [4m30s elapsed]"
time="2020-02-23T13:32:41Z" level=debug msg="module.dns.aws_route53_zone.int: Still creating... [1m0s elapsed]"
time="2020-02-23T13:32:41Z" level=debug msg="module.dns.aws_route53_zone.int: Creation complete after 1m0s [id=Z10411051RAEUMMAUH39E]"
time="2020-02-23T13:32:41Z" level=debug msg="module.dns.aws_route53_record.etcd_a_nodes[0]: Creating..."
time="2020-02-23T13:32:41Z" level=debug msg="module.dns.aws_route53_record.api_internal: Creating..."
time="2020-02-23T13:32:41Z" level=debug msg="module.dns.aws_route53_record.api_external_internal_zone: Creating..."
time="2020-02-23T13:32:41Z" level=debug msg="module.dns.aws_route53_record.etcd_a_nodes[2]: Creating..."
time="2020-02-23T13:32:41Z" level=debug msg="module.dns.aws_route53_record.etcd_a_nodes[1]: Creating..."
time="2020-02-23T13:32:42Z" level=debug msg="aws_ami_copy.main: Still creating... [4m40s elapsed]"
time="2020-02-23T13:32:51Z" level=debug msg="module.dns.aws_route53_record.etcd_a_nodes[0]: Still creating... [10s elapsed]"
time="2020-02-23T13:32:51Z" level=debug msg="module.dns.aws_route53_record.api_internal: Still creating... [10s elapsed]"
time="2020-02-23T13:32:51Z" level=debug msg="module.dns.aws_route53_record.api_external_internal_zone: Still creating... [10s elapsed]"
time="2020-02-23T13:32:51Z" level=debug msg="module.dns.aws_route53_record.etcd_a_nodes[2]: Still creating... [10s elapsed]"
time="2020-02-23T13:32:51Z" level=debug msg="module.dns.aws_route53_record.etcd_a_nodes[1]: Still creating... [10s elapsed]"
time="2020-02-23T13:32:52Z" level=debug msg="aws_ami_copy.main: Still creating... [4m50s elapsed]"
...
time="2020-02-23T13:34:43Z" level=debug msg="Apply complete! Resources: 123 added, 0 changed, 0 destroyed."
time="2020-02-23T13:34:43Z" level=debug msg="OpenShift Installer unreleased-master-2446-gc108297de972e1a6a5fb502a7668079d16e501f9-dirty"
time="2020-02-23T13:34:43Z" level=debug msg="Built from commit c108297de972e1a6a5fb502a7668079d16e501f9"
time="2020-02-23T13:34:43Z" level=info msg="Waiting up to 20m0s for the Kubernetes API at https://api.okd.kube.domain.com:6443..."
time="2020-02-23T13:35:13Z" level=debug msg="Still waiting for the Kubernetes API: Get https://api.okd.kube.domain.com:6443/version?timeout=32s: dial tcp 52.17.210.160:6443: connect: connection refused"
time="2020-02-23T13:35:50Z" level=debug msg="Still waiting for the Kubernetes API: Get https://api.okd.kube.domain.com:6443/version?timeout=32s: dial tcp 52.211.227.216:6443: connect: connection refused"
time="2020-02-23T13:36:20Z" level=debug msg="Still waiting for the Kubernetes API: Get https://api.okd.kube.domain.com:6443/version?timeout=32s: dial tcp 52.17.210.160:6443: connect: connection refused"
time="2020-02-23T13:36:51Z" level=debug msg="Still waiting for the Kubernetes API: Get https://api.okd.kube.domain.com:6443/version?timeout=32s: dial tcp 52.211.227.216:6443: connect: connection refused"
time="2020-02-23T13:37:58Z" level=debug msg="Still waiting for the Kubernetes API: Get https://api.okd.kube.domain.com:6443/version?timeout=32s: dial tcp 52.211.227.216:6443: connect: connection refused"
time="2020-02-23T13:38:00Z" level=debug msg="Still waiting for the Kubernetes API: the server could not find the requested resource"
time="2020-02-23T13:38:30Z" level=debug msg="Still waiting for the Kubernetes API: the server could not find the requested resource"
time="2020-02-23T13:38:58Z" level=debug msg="Still waiting for the Kubernetes API: Get https://api.okd.kube.domain.com:6443/version?timeout=32s: dial tcp 52.211.227.216:6443: connect: connection refused"
time="2020-02-23T13:39:28Z" level=debug msg="Still waiting for the Kubernetes API: Get https://api.okd.kube.domain.com:6443/version?timeout=32s: dial tcp 63.35.50.149:6443: connect: connection refused"
time="2020-02-23T13:39:36Z" level=info msg="API v1.17.1 up"
time="2020-02-23T13:39:36Z" level=info msg="Waiting up to 40m0s for bootstrapping to complete..."
...
time="2020-02-23T13:55:14Z" level=debug msg="Still waiting for the cluster to initialize: Working towards 4.4.0-0.okd-2020-02-18-212654: 97% complete"
time="2020-02-23T13:55:24Z" level=debug msg="Still waiting for the cluster to initialize: Working towards 4.4.0-0.okd-2020-02-18-212654: 99% complete"
time="2020-02-23T13:57:39Z" level=debug msg="Still waiting for the cluster to initialize: Working towards 4.4.0-0.okd-2020-02-18-212654: 99% complete, waiting on authentication, console, monitoring"
time="2020-02-23T13:58:54Z" level=debug msg="Still waiting for the cluster to initialize: Working towards 4.4.0-0.okd-2020-02-18-212654: 99% complete"
time="2020-02-23T14:01:40Z" level=debug msg="Still waiting for the cluster to initialize: Working towards 4.4.0-0.okd-2020-02-18-212654: 100% complete, waiting on authentication"
time="2020-02-23T14:03:24Z" level=debug msg="Cluster is initialized"
time="2020-02-23T14:03:24Z" level=info msg="Waiting up to 10m0s for the openshift-console route to be created..."
time="2020-02-23T14:03:24Z" level=debug msg="Route found in openshift-console namespace: console"
time="2020-02-23T14:03:24Z" level=debug msg="Route found in openshift-console namespace: downloads"
time="2020-02-23T14:03:24Z" level=debug msg="OpenShift console route is created"
time="2020-02-23T14:03:24Z" level=info msg="Install complete!"
time="2020-02-23T14:03:24Z" level=info msg="To access the cluster as the system:admin user when using 'oc', run 'export KUBECONFIG=/output/auth/kubeconfig'"
time="2020-02-23T14:03:24Z" level=info msg="Access the OpenShift web-console here: https://console-openshift-console.apps.okd.kube.domain.com"
REDACTED LINE OF OUTPUT
time="2020-02-23T14:03:25Z" level=info msg="command completed successfully" installID=jcdkd
time="2020-02-23T14:03:25Z" level=info msg="saving installer output" installID=jcdkd
time="2020-02-23T14:03:25Z" level=debug msg="installer console log: level=info msg=\"Credentials loaded from default AWS environment variables\"\nlevel=info msg=\"Consuming Install Config from target directory\"\nlevel=warning msg=\"Found override for release image. Please be warned, this is not advised\"\nlevel=info msg=\"Consuming Master Machines from target directory\"\nlevel=info msg=\"Consuming Common Manifests from target directory\"\nlevel=info msg=\"Consuming OpenShift Install from target directory\"\nlevel=info msg=\"Consuming Worker Machines from target directory\"\nlevel=info msg=\"Consuming Openshift Manifests from target directory\"\nlevel=info msg=\"Consuming Master Ignition Config from target directory\"\nlevel=info msg=\"Consuming Worker Ignition Config from target directory\"\nlevel=info msg=\"Consuming Bootstrap Ignition Config from target directory\"\nlevel=info msg=\"Creating infrastructure resources...\"\nlevel=info msg=\"Waiting up to 20m0s for the Kubernetes API at https://api.okd.kube.domain.com:6443...\"\nlevel=info msg=\"API v1.17.1 up\"\nlevel=info msg=\"Waiting up to 40m0s for bootstrapping to complete...\"\nlevel=info msg=\"Destroying the bootstrap resources...\"\nlevel=error\nlevel=error msg=\"Warning: Resource targeting is in effect\"\nlevel=error\nlevel=error msg=\"You are creating a plan with the -target option, which means that the result\"\nlevel=error msg=\"of this plan may not represent all of the changes requested by the current\"\nlevel=error msg=configuration.\nlevel=error msg=\"\\t\\t\"\nlevel=error msg=\"The -target option is not for routine use, and is provided only for\"\nlevel=error msg=\"exceptional situations such as recovering from errors or mistakes, or when\"\nlevel=error msg=\"Terraform specifically suggests to use it as part of an error message.\"\nlevel=error\nlevel=error\nlevel=error msg=\"Warning: Applied changes may be incomplete\"\nlevel=error\nlevel=error msg=\"The plan was created with the -target option in effect, so some changes\"\nlevel=error msg=\"requested in the configuration may have been ignored and the output values may\"\nlevel=error msg=\"not be fully updated. Run the following command to verify that no other\"\nlevel=error msg=\"changes are pending:\"\nlevel=error msg=\"    terraform plan\"\nlevel=error msg=\"\\t\"\nlevel=error msg=\"Note that the -target option is not suitable for routine use, and is provided\"\nlevel=error msg=\"only for exceptional situations such as recovering from errors or mistakes, or\"\nlevel=error msg=\"when Terraform specifically suggests to use it as part of an error message.\"\nlevel=error\nlevel=info msg=\"Waiting up to 30m0s for the cluster at https://api.okd.kube.domain.com:6443 to initialize...\"\nlevel=info msg=\"Waiting up to 10m0s for the openshift-console route to be created...\"\nlevel=info msg=\"Install complete!\"\nlevel=info msg=\"To access the cluster as the system:admin user when using 'oc', run 'export KUBECONFIG=/output/auth/kubeconfig'\"\nlevel=info msg=\"Access the OpenShift web-console here: https://console-openshift-console.apps.okd.kube.domain.com\"\nREDACTED LINE OF OUTPUT\n" installID=vxghr9br
time="2020-02-23T14:03:25Z" level=info msg="install completed successfully" installID=jcdkd

After the installation of the cluster deployment has finished, the Installed value is set to True:

$ kubectl get clusterdeployments.hive.openshift.io  -n okd
NAME   CLUSTERNAME   CLUSTERTYPE   BASEDOMAIN          INSTALLED   INFRAID      AGE
okd    okd                         kube.domain.com     true        okd-jcdkd    54m

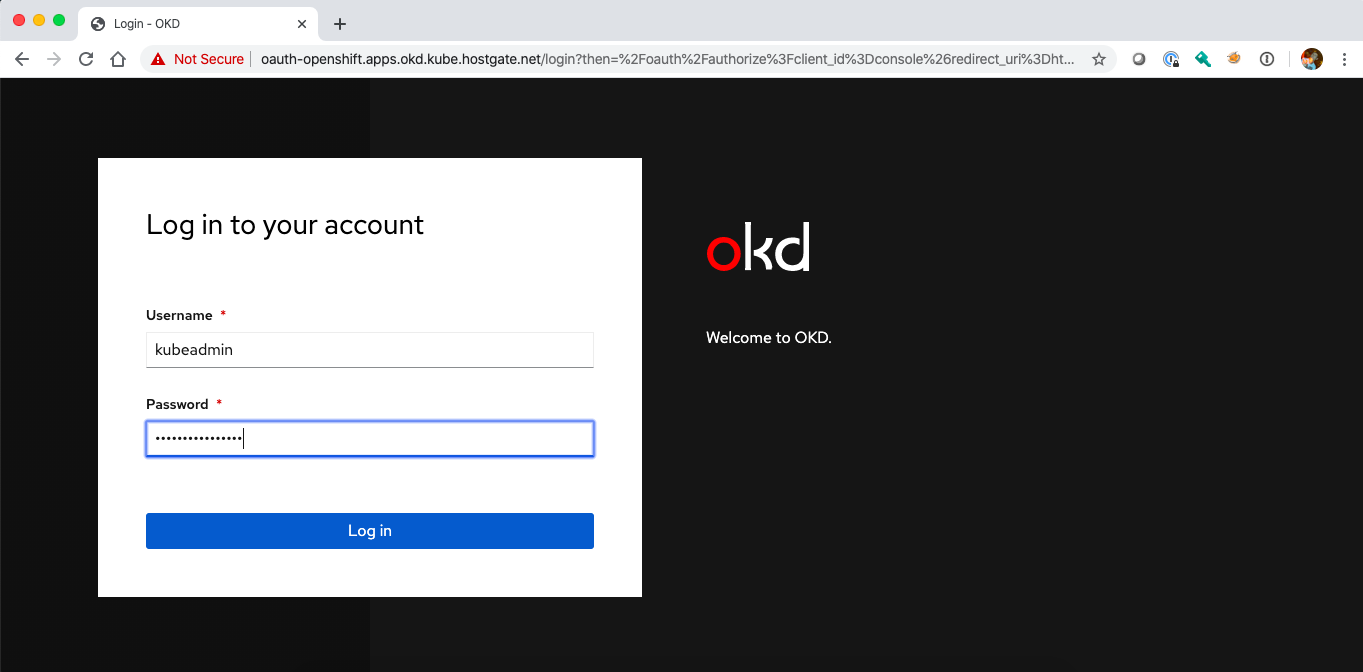
At this point you can start using the platform by getting the login credentials from the cluster credential secret Hive created during the installation:

$ kubectl get secrets -n okd okd-0-tbm9t-admin-password -o jsonpath='{.data.username}' | base64 -d
kubeadmin
$ kubectl get secrets -n okd okd-0-tbm9t-admin-password -o jsonpath='{.data.password}' | base64 -d
2T38d-aETpX-dj2YU-UBN4a

Log in via the command-line or the web console:
To delete the cluster simply delete the ClusterDeployment resources which initiates a cluster deprovision and will delete all related AWS resources. If the deprovision gets stuck, manually delete the uninstall finalizer allowing the cluster deployment to be deleted, but note that this may leave artifacts in your AWS account:

$ kubectl delete clusterdeployments.hive.openshift.io okd -n okd --wait=false
clusterdeployment.hive.openshift.io "okd" deleted

Please visit the OpenShift Hive documentation for more information about using Hive.

In the next article I will explain how you can use OpenShift Hive to create, update, delete, patch cluster resources using SyncSets.
Getting started with OpenShift Hive

If you don’t know OpenShift Hive I recommend having a look at the video of my talk at RedHat OpenShift Commons about OpenShift Hive where I also talk about how you can provision and manage the lifecycle of OpenShift 4 clusters using the Kubernetes API and the OpenShift Hive operator.

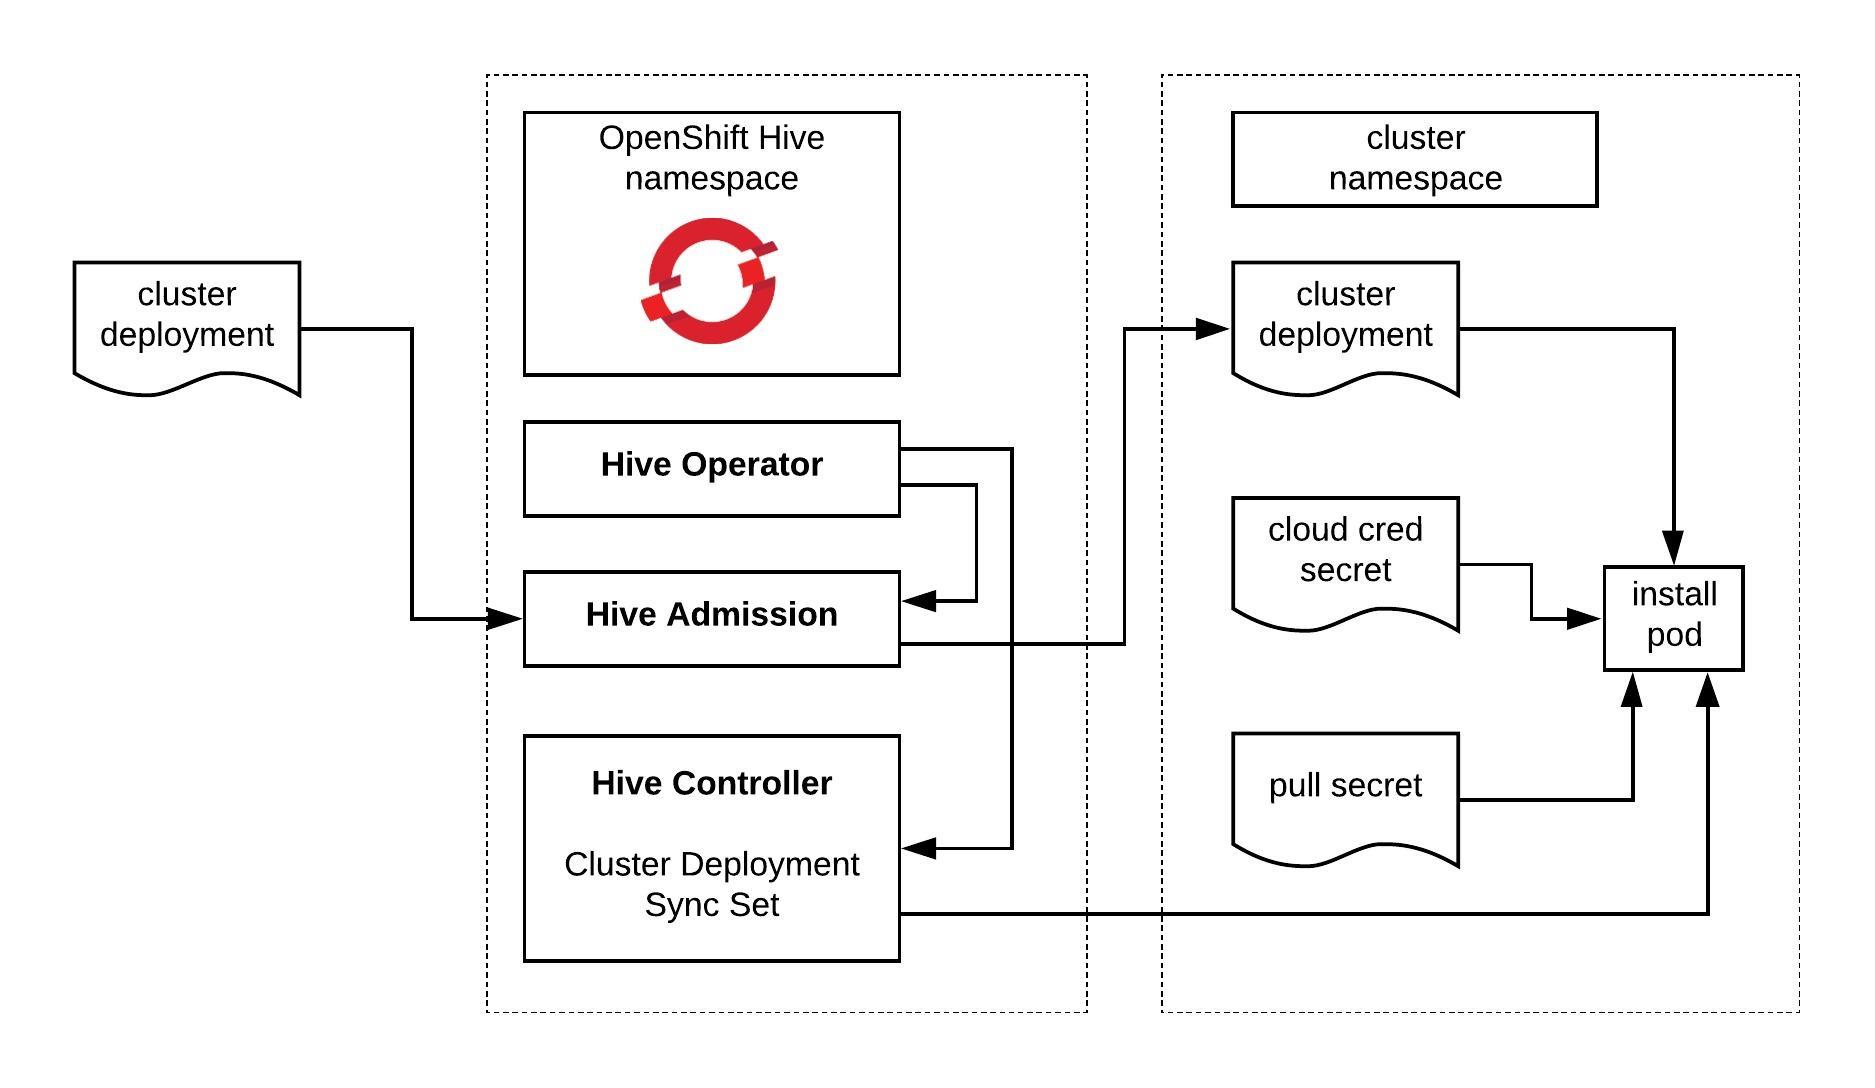
The Hive operator has three main components the admission controller,  the Hive controller and the Hive operator itself. For more information about the Hive architecture visit the Hive docs:

You can use an OpenShift or native Kubernetes cluster to run the operator, in my case I use a EKS cluster. Let’s go through the prerequisites which are required to generate the manifests and the hiveutil:

$ curl -s "https://raw.githubusercontent.com/\
> kubernetes-sigs/kustomize/master/hack/install_kustomize.sh"  | bash
$ sudo mv ./kustomize /usr/bin/
$ wget https://dl.google.com/go/go1.13.3.linux-amd64.tar.gz
$ tar -xvf go1.13.3.linux-amd64.tar.gz
$ sudo mv go /usr/local

To setup the Go environment copy the content below and add to your .profile:

export GOPATH="${HOME}/.go"
export PATH="$PATH:/usr/local/go/bin"
export PATH="$PATH:${GOPATH}/bin:${GOROOT}/bin"

Continue with installing the Go dependencies and clone the OpenShift Hive Github repository:

$ mkdir -p ~/.go/src/github.com/openshift/
$ go get github.com/golang/mock/mockgen
$ go get github.com/golang/mock/gomock
$ go get github.com/cloudflare/cfssl/cmd/cfssl
$ go get github.com/cloudflare/cfssl/cmd/cfssljson
$ cd ~/.go/src/github.com/openshift/
$ git clone https://github.com/openshift/hive.git
$ cd hive/
$ git checkout remotes/origin/master

Before we run make deploy I would recommend modifying the Makefile that we only generate the Hive manifests without deploying them to Kubernetes:

$ sed -i -e 's#oc apply -f config/crds# #' -e 's#kustomize build overlays/deploy | oc apply -f -#kustomize build overlays/deploy > hive.yaml#' Makefile
$ make deploy
# The apis-path is explicitly specified so that CRDs are not created for v1alpha1
go run tools/vendor/sigs.k8s.io/controller-tools/cmd/controller-gen/main.go crd --apis-path=pkg/apis/hive/v1
CRD files generated, files can be found under path /home/ubuntu/.go/src/github.com/openshift/hive/config/crds.
go generate ./pkg/... ./cmd/...
hack/update-bindata.sh
# Deploy the operator manifests:
mkdir -p overlays/deploy
cp overlays/template/kustomization.yaml overlays/deploy
cd overlays/deploy && kustomize edit set image registry.svc.ci.openshift.org/openshift/hive-v4.0:hive=registry.svc.ci.openshift.org/openshift/hivev1:hive
kustomize build overlays/deploy > hive.yaml
rm -rf overlays/deploy

Quick look at the content of the hive.yaml manifest:

$ cat hive.yaml
apiVersion: v1
kind: Namespace
metadata:
  name: hive
---
apiVersion: v1
kind: ServiceAccount
metadata:
  name: hive-operator
  namespace: hive

...

---
apiVersion: apps/v1
kind: Deployment
metadata:
  labels:
    control-plane: hive-operator
    controller-tools.k8s.io: "1.0"
  name: hive-operator
  namespace: hive
spec:
  replicas: 1
  revisionHistoryLimit: 4
  selector:
    matchLabels:
      control-plane: hive-operator
      controller-tools.k8s.io: "1.0"
  template:
    metadata:
      labels:
        control-plane: hive-operator
        controller-tools.k8s.io: "1.0"
    spec:
      containers:
      - command:
        - /opt/services/hive-operator
        - --log-level
        - info
        env:
        - name: CLI_CACHE_DIR
          value: /var/cache/kubectl
        image: registry.svc.ci.openshift.org/openshift/hive-v4.0:hive
        imagePullPolicy: Always
        livenessProbe:
          failureThreshold: 1
          httpGet:
            path: /debug/health
            port: 8080
          initialDelaySeconds: 10
          periodSeconds: 10
        name: hive-operator
        resources:
          requests:
            cpu: 100m
            memory: 256Mi
        volumeMounts:
        - mountPath: /var/cache/kubectl
          name: kubectl-cache
      serviceAccountName: hive-operator
      terminationGracePeriodSeconds: 10
      volumes:
      - emptyDir: {}
        name: kubectl-cache

Now we can apply the Hive custom resource definition (crds):

$ kubectl apply -f ./config/crds/
customresourcedefinition.apiextensions.k8s.io/checkpoints.hive.openshift.io created
customresourcedefinition.apiextensions.k8s.io/clusterdeployments.hive.openshift.io created
customresourcedefinition.apiextensions.k8s.io/clusterdeprovisions.hive.openshift.io created
customresourcedefinition.apiextensions.k8s.io/clusterimagesets.hive.openshift.io created
customresourcedefinition.apiextensions.k8s.io/clusterprovisions.hive.openshift.io created
customresourcedefinition.apiextensions.k8s.io/clusterstates.hive.openshift.io created
customresourcedefinition.apiextensions.k8s.io/dnszones.hive.openshift.io created
customresourcedefinition.apiextensions.k8s.io/hiveconfigs.hive.openshift.io created
customresourcedefinition.apiextensions.k8s.io/machinepools.hive.openshift.io created
customresourcedefinition.apiextensions.k8s.io/selectorsyncidentityproviders.hive.openshift.io created
customresourcedefinition.apiextensions.k8s.io/selectorsyncsets.hive.openshift.io created
customresourcedefinition.apiextensions.k8s.io/syncidentityproviders.hive.openshift.io created
customresourcedefinition.apiextensions.k8s.io/syncsets.hive.openshift.io created
customresourcedefinition.apiextensions.k8s.io/syncsetinstances.hive.openshift.io created

And continue to apply the hive.yaml manifest for deploying the OpenShift Hive operator and its components:

$ kubectl apply -f hive.yaml
namespace/hive created
serviceaccount/hive-operator created
clusterrole.rbac.authorization.k8s.io/hive-frontend created
clusterrole.rbac.authorization.k8s.io/hive-operator-role created
clusterrole.rbac.authorization.k8s.io/manager-role created
clusterrole.rbac.authorization.k8s.io/system:openshift:hive:hiveadmission created
rolebinding.rbac.authorization.k8s.io/extension-server-authentication-reader-hiveadmission created
clusterrolebinding.rbac.authorization.k8s.io/auth-delegator-hiveadmission created
clusterrolebinding.rbac.authorization.k8s.io/hive-frontend created
clusterrolebinding.rbac.authorization.k8s.io/hive-operator-rolebinding created
clusterrolebinding.rbac.authorization.k8s.io/hiveadmission-hive-hiveadmission created
clusterrolebinding.rbac.authorization.k8s.io/hiveapi-cluster-admin created
clusterrolebinding.rbac.authorization.k8s.io/manager-rolebinding created
deployment.apps/hive-operator created

For the Hive admission controller you need to generate a SSL certifcate:

$ ./hack/hiveadmission-dev-cert.sh
~/Dropbox/hive/hiveadmission-certs ~/Dropbox/hive
2020/02/03 22:17:30 [INFO] generate received request
2020/02/03 22:17:30 [INFO] received CSR
2020/02/03 22:17:30 [INFO] generating key: ecdsa-256
2020/02/03 22:17:30 [INFO] encoded CSR
certificatesigningrequest.certificates.k8s.io/hiveadmission.hive configured
certificatesigningrequest.certificates.k8s.io/hiveadmission.hive approved
-----BEGIN CERTIFICATE-----
MIICaDCCAVCgAwIBAgIQHvvDPncIWHRcnDzzoWGjQDANBgkqhkiG9w0BAQsFADAv
MS0wKwYDVQQDEyRiOTk2MzhhNS04OWQyLTRhZTAtYjI4Ny1iMWIwOGNmOGYyYjAw
HhcNMjAwMjAzMjIxNTA3WhcNMjUwMjAxMjIxNTA3WjAhMR8wHQYDVQQDExZoaXZl
YWRtaXNzaW9uLmhpdmUuc3ZjMFkwEwYHKoZIzj0CAQYIKoZIzj0DAQcDQgAEea4N
UPbvzM3VdtOkdJ7lBytekRTvwGMqs9HgG14CtqCVCOFq8f+BeqqyrRbJsX83iBfn
gMc54moElb5kIQNjraNZMFcwDAYDVR0TAQH/BAIwADBHBgNVHREEQDA+ghZoaXZl
YWRtaXNzaW9uLmhpdmUuc3ZjgiRoaXZlYWRtaXNzaW9uLmhpdmUuc3ZjLmNsdXN0
ZXIubG9jYWwwDQYJKoZIhvcNAQELBQADggEBADhgT3tNnFs6hBIZFfWmoESe6nnZ
fy9GmlmF9qEBo8FZSk/LYvV0peOdgNZCHqsT2zaJjxULqzQ4zfSb/koYpxeS4+Bf
xwgHzIB/ylzf54wVkILWUFK3GnYepG5dzTXS7VHc4uiNJe0Hwc5JI4HBj7XdL3C7
cbPm7T2cBJi2jscoCWELWo/0hDxkcqZR7rdeltQQ+Uhz87LhTTqlknAMFzL7tM/+
pJePZMQgH97vANsbk97bCFzRZ4eABYSiN0iAB8GQM5M+vK33ZGSVQDJPKQQYH6th
Kzi9wrWEeyEtaWozD5poo9s/dxaLxFAdPDICkPB2yr5QZB+NuDgA+8IYffo=
-----END CERTIFICATE-----
secret/hiveadmission-serving-cert created
~/Dropbox/hive

Afterwards we can check if all the pods are running, this might take a few seconds:

$ kubectl get pods -n hive
NAME                                READY   STATUS    RESTARTS   AGE
hive-controllers-7c6ccc84b9-q7k7m   1/1     Running   0          31s
hive-operator-f9f4447fd-jbmkh       1/1     Running   0          55s
hiveadmission-6766c5bc6f-9667g      1/1     Running   0          27s
hiveadmission-6766c5bc6f-gvvlq      1/1     Running   0          27s

The Hive operator is successfully installed on your Kubernetes cluster but we are not finished yet. To create the required Cluster Deployment manifests we need to generate the hiveutil binary:

$ make hiveutil
go generate ./pkg/... ./cmd/...
hack/update-bindata.sh
go build -o bin/hiveutil github.com/openshift/hive/contrib/cmd/hiveutil

To generate Hive Cluster Deployment manifests just run the following hiveutil command below, I output the definition with -o into yaml:

$ bin/hiveutil create-cluster --base-domain=mydomain.example.com --cloud=aws mycluster -o yaml
apiVersion: v1
items:
- apiVersion: hive.openshift.io/v1
  kind: ClusterImageSet
  metadata:
    creationTimestamp: null
    name: mycluster-imageset
  spec:
    releaseImage: quay.io/openshift-release-dev/ocp-release:4.3.2-x86_64
  status: {}
- apiVersion: v1
  kind: Secret
  metadata:
    creationTimestamp: null
    name: mycluster-aws-creds
  stringData:
    aws_access_key_id: <-YOUR-AWS-ACCESS-KEY->
    aws_secret_access_key: <-YOUR-AWS-SECRET-KEY->
  type: Opaque
- apiVersion: v1
  data:
    install-config.yaml: <-BASE64-ENCODED-OPENSHIFT4-INSTALL-CONFIG->
  kind: Secret
  metadata:
    creationTimestamp: null
    name: mycluster-install-config
  type: Opaque
- apiVersion: hive.openshift.io/v1
  kind: ClusterDeployment
  metadata:
    creationTimestamp: null
    name: mycluster
  spec:
    baseDomain: mydomain.example.com
    clusterName: mycluster
    controlPlaneConfig:
      servingCertificates: {}
    installed: false
    platform:
      aws:
        credentialsSecretRef:
          name: mycluster-aws-creds
        region: us-east-1
    provisioning:
      imageSetRef:
        name: mycluster-imageset
      installConfigSecretRef:
        name: mycluster-install-config
  status:
    clusterVersionStatus:
      availableUpdates: null
      desired:
        force: false
        image: ""
        version: ""
      observedGeneration: 0
      versionHash: ""
- apiVersion: hive.openshift.io/v1
  kind: MachinePool
  metadata:
    creationTimestamp: null
    name: mycluster-worker
  spec:
    clusterDeploymentRef:
      name: mycluster
    name: worker
    platform:
      aws:
        rootVolume:
          iops: 100
          size: 22
          type: gp2
        type: m4.xlarge
    replicas: 3
  status:
    replicas: 0
kind: List
metadata: {}

I hope this post is useful in getting you started with OpenShift Hive. In my next article I will go through the details of the OpenShift 4 cluster deployment with Hive.

Read my new article about OpenShift / OKD 4.x Cluster Deployment using OpenShift Hive

Using Kubernetes Impersonate (sudo) for least-privilege

It has become very easy and simple to deploy Kubernetes services using the various cloud offerings like EKS or GKE, after you created your cluster and have the cluster-admin privileges to apply changes as you like. This model is great for development because you can start consuming Kubernetes services right away but this doesn’t work well for production clusters and gets more challenging when running PCI compliant workloads.

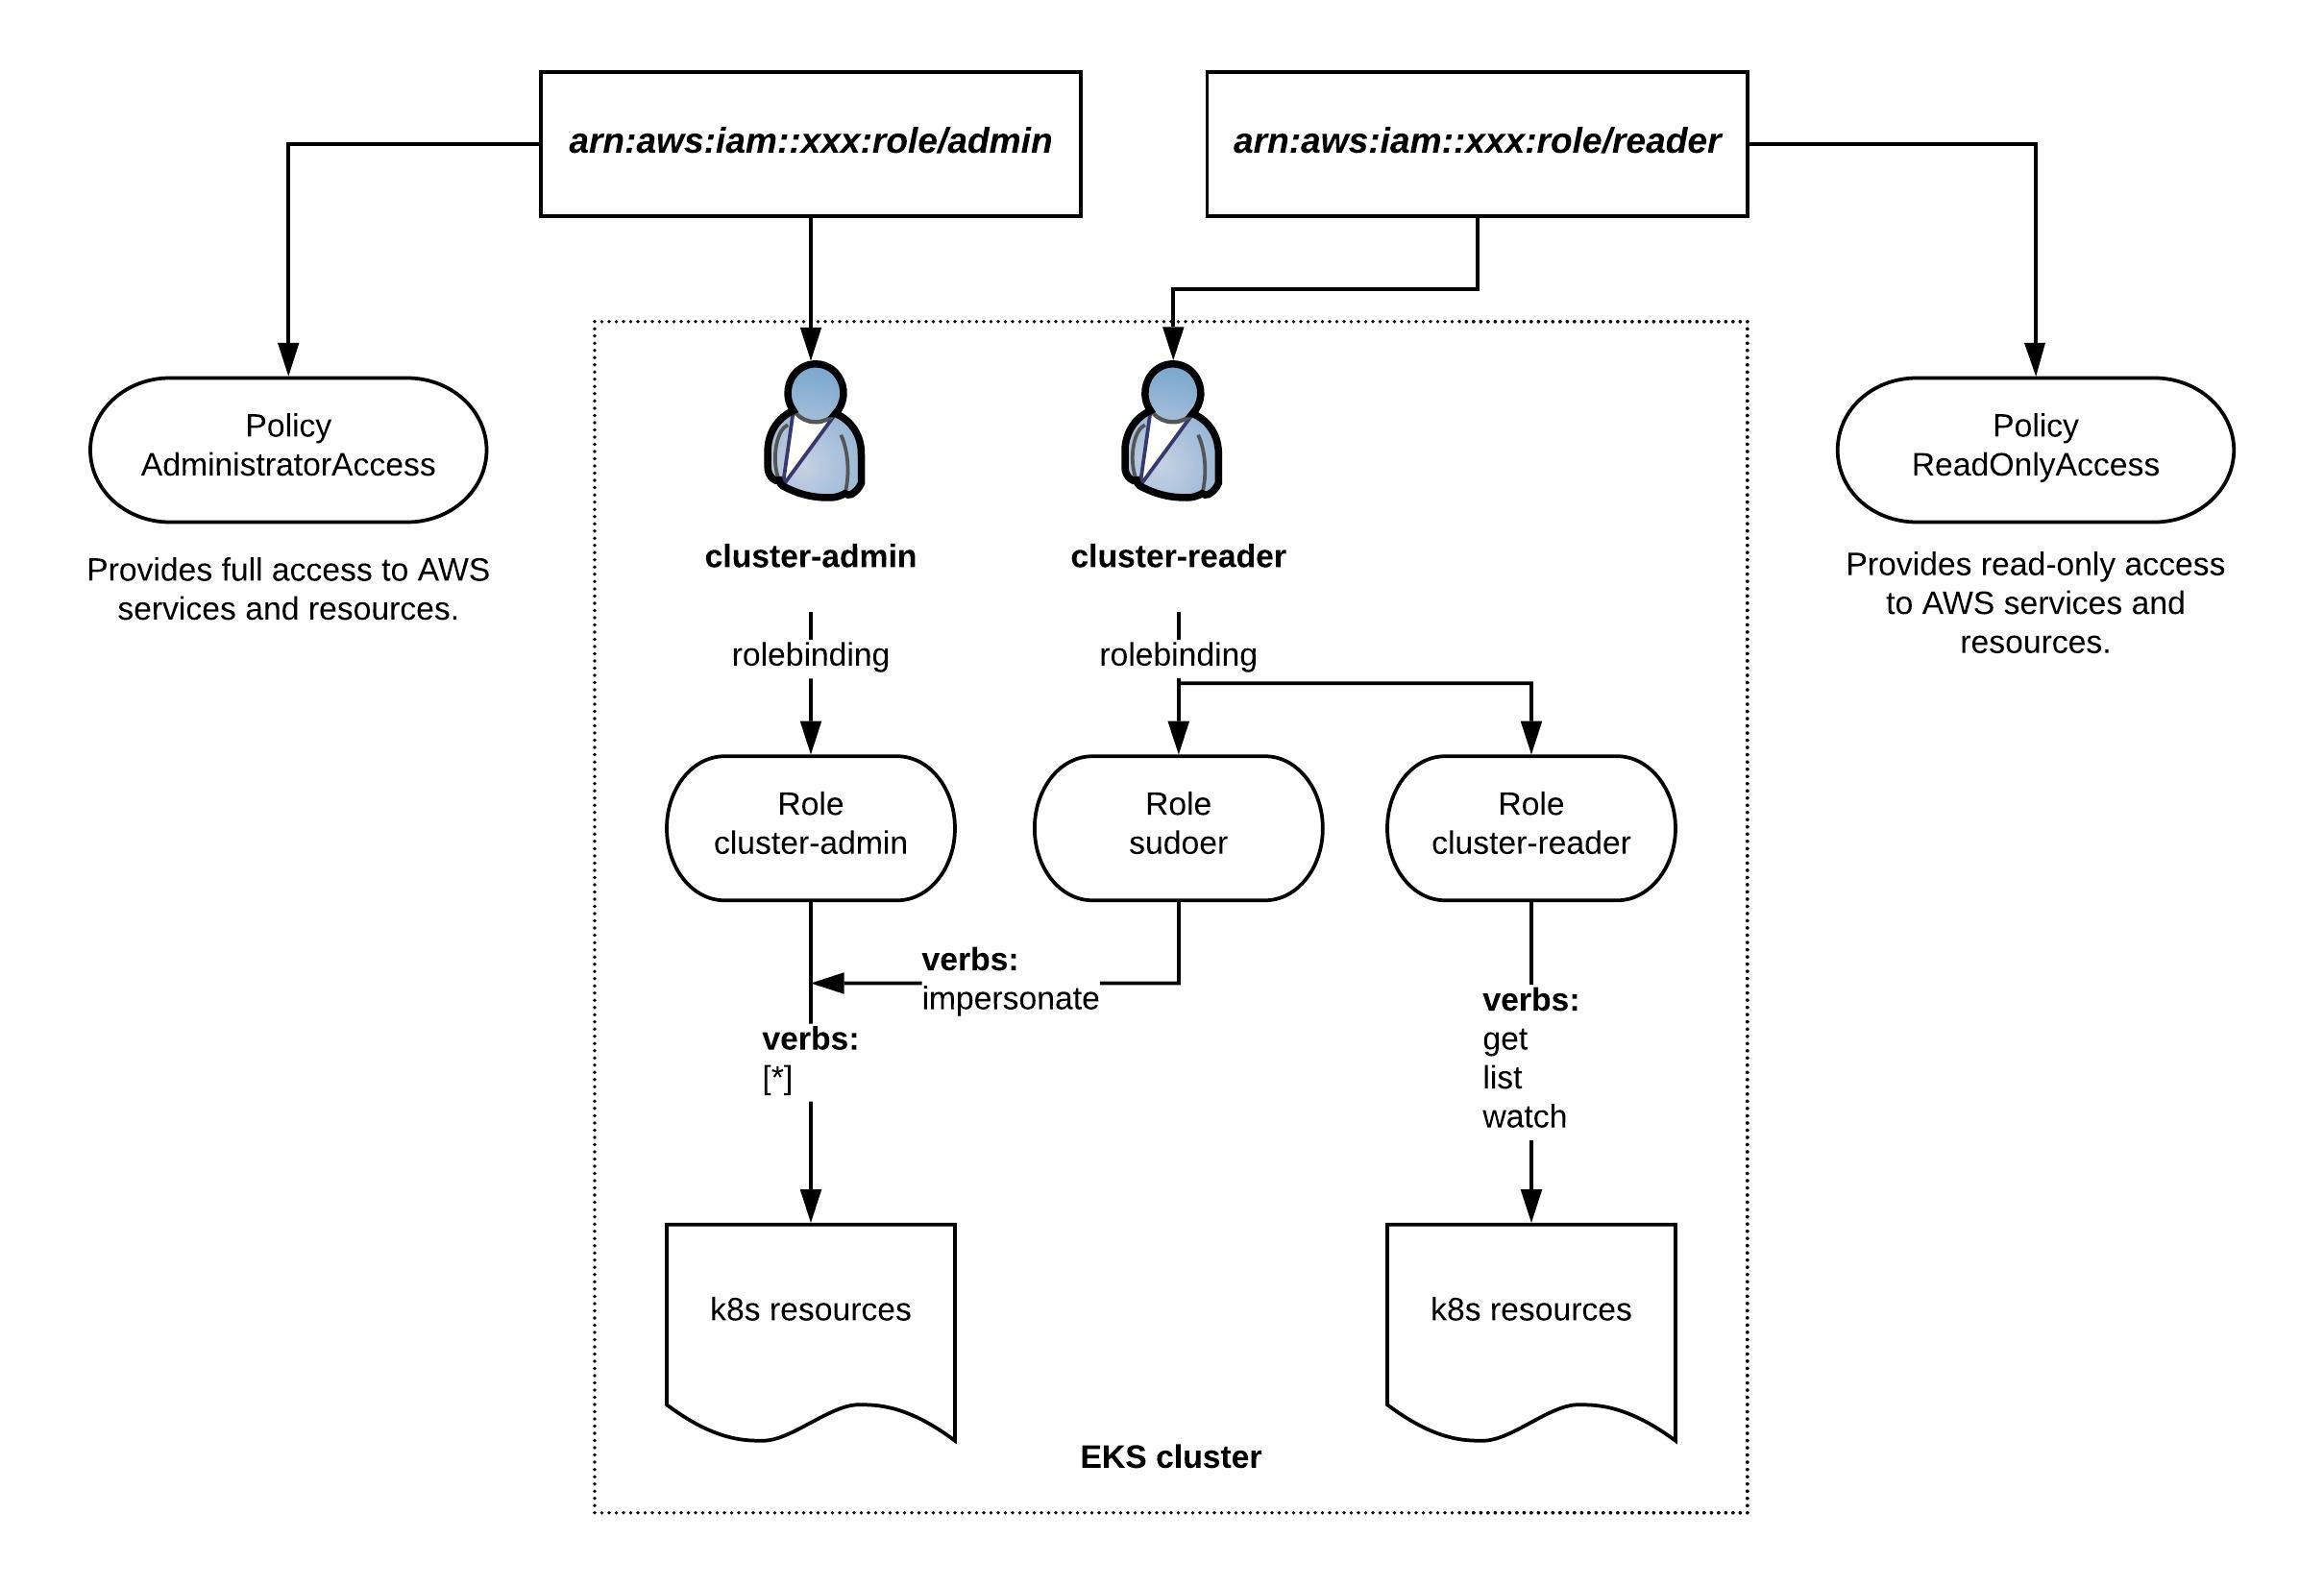
I want to explain a bit how to apply a least-privilege principle for Elastic Kubernetes Services (EKS) using the AWS integrated IAM. The diagram below is a simple example showing two IAM roles for admin and reader privileges for AWS resources. On the Kubernetes cluster the IAM roles are bound to the k8s cluster-admin and reader roles. The k8s sudoer role allows to impersonate cluster-admin privileges for cluster readers:

Normally you would add your DevOps team to the IAM reader role. This way the DevOps team has the default read permissions for AWS and Kubernetes resources but they can also elevate Kubernetes permissions to cluster-admin level when required without having full access to the AWS resources.

Let’s look at the EKS aws-auth ConfigMap where you need to define the IAM role mapping for admin and reader to internal Kubernetes groups:

apiVersion: v1
kind: ConfigMap
metadata:
  name: aws-auth
  namespace: kube-system
data:
  mapRoles: |
    - rolearn: arn:aws:iam::xxx:role/admin
      username: cluster-admin
      groups:
        - system:masters
    - rolearn: arn:aws:iam::xxx:role/reader
      username: cluster-reader
      groups:
        - cluster-reader
    - rolearn: arn:aws:iam::555555555555:role/devel-worker-nodes-NodeInstanceRole-74RF4UBDUKL6
      username: system:node:{{EC2PrivateDNSName}}
      groups:
        - system:bootstrappers
        - system:nodes
  mapUsers: |
    []

The system:masters group is a Kubernetes default role and rolebinding and requires no additional configuration. For the cluster-reader we need to apply a ClusterRole and a ClusterRoleBinding:

apiVersion: rbac.authorization.k8s.io/v1
kind: ClusterRole
metadata:
  name: cluster-reader
rules:
- apiGroups:
  - ""
  resources:
  - componentstatuses
  - nodes
  - nodes/status
  - persistentvolumeclaims/status
  - persistentvolumes
  - persistentvolumes/status
  - pods/binding
  - pods/eviction
  - podtemplates
  - securitycontextconstraints
  - services/status
  verbs:
  - get
  - list
  - watch
- apiGroups:
  - admissionregistration.k8s.io
  resources:
  - mutatingwebhookconfigurations
  - validatingwebhookconfigurations
  verbs:
  - get
  - list
  - watch
- apiGroups:
  - apps
  resources:
  - controllerrevisions
  - daemonsets/status
  - deployments/status
  - replicasets/status
  - statefulsets/status
  verbs:
  - get
  - list
  - watch
- apiGroups:
  - apiextensions.k8s.io
  resources:
  - customresourcedefinitions
  - customresourcedefinitions/status
  verbs:
  - get
  - list
  - watch
- apiGroups:
  - apiregistration.k8s.io
  resources:
  - apiservices
  - apiservices/status
  verbs:
  - get
  - list
  - watch
- apiGroups:
  - autoscaling
  resources:
  - horizontalpodautoscalers/status
  verbs:
  - get
  - list
  - watch
- apiGroups:
  - batch
  resources:
  - cronjobs/status
  - jobs/status
  verbs:
  - get
  - list
  - watch
- apiGroups:
  - coordination.k8s.io
  resources:
  - leases
  verbs:
  - get
  - list
  - watch
- apiGroups:
  - extensions
  resources:
  - daemonsets/status
  - deployments/status
  - horizontalpodautoscalers
  - horizontalpodautoscalers/status
  - ingresses/status
  - jobs
  - jobs/status
  - podsecuritypolicies
  - replicasets/status
  - replicationcontrollers
  - storageclasses
  - thirdpartyresources
  verbs:
  - get
  - list
  - watch
- apiGroups:
  - events.k8s.io
  resources:
  - events
  verbs:
  - get
  - list
  - watch
- apiGroups:
  - policy
  resources:
  - poddisruptionbudgets/status
  - podsecuritypolicies
  verbs:
  - get
  - list
  - watch
- apiGroups:
  - rbac.authorization.k8s.io
  resources:
  - clusterrolebindings
  - clusterroles
  - rolebindings
  - roles
  verbs:
  - get
  - list
  - watch
- apiGroups:
  - settings.k8s.io
  resources:
  - podpresets
  verbs:
  - get
  - list
  - watch
- apiGroups:
  - storage.k8s.io
  resources:
  - storageclasses
  - volumeattachments
  - volumeattachments/status
  verbs:
  - get
  - list
  - watch
- apiGroups:
  - scheduling.k8s.io
  resources:
  - priorityclasses
  verbs:
  - get
  - list
  - watch
- apiGroups:
  - certificates.k8s.io
  resources:
  - certificatesigningrequests
  - certificatesigningrequests/approval
  - certificatesigningrequests/status
  verbs:
  - get
  - list
  - watch
- apiGroups:
  - authorization.k8s.io
  resources:
  - localsubjectaccessreviews
  - selfsubjectaccessreviews
  - selfsubjectrulesreviews
  - subjectaccessreviews
  verbs:
  - create
- apiGroups:
  - authentication.k8s.io
  resources:
  - tokenreviews
  verbs:
  - create
- apiGroups:
  - ""
  resources:
  - podsecuritypolicyreviews
  - podsecuritypolicyselfsubjectreviews
  - podsecuritypolicysubjectreviews
  verbs:
  - create
- apiGroups:
  - ""
  resources:
  - nodes/metrics
  - nodes/spec
  verbs:
  - get
- apiGroups:
  - ""
  resources:
  - nodes/stats
  verbs:
  - create
  - get
- nonResourceURLs:
  - '*'
  verbs:
  - get
- apiGroups:
  - networking.k8s.io
  resources:
  - ingresses/status
  verbs:
  - get
- apiGroups:
  - networking.k8s.io
  resources:
  - ingresses/status
  verbs:
  - list
- apiGroups:
  - networking.k8s.io
  resources:
  - ingresses/status
  verbs:
  - watch
- apiGroups:
  - node.k8s.io
  resources:
  - runtimeclasses
  verbs:
  - get
- apiGroups:
  - node.k8s.io
  resources:
  - runtimeclasses
  verbs:
  - list
- apiGroups:
  - node.k8s.io
  resources:
  - runtimeclasses
  verbs:
  - watch
- apiGroups:
  - storage.k8s.io
  resources:
  - csidrivers
  verbs:
  - get
- apiGroups:
  - storage.k8s.io
  resources:
  - csidrivers
  verbs:
  - list
- apiGroups:
  - storage.k8s.io
  resources:
  - csidrivers
  verbs:
  - watch
- apiGroups:
  - storage.k8s.io
  resources:
  - csinodes
  verbs:
  - get
- apiGroups:
  - storage.k8s.io
  resources:
  - csinodes
  verbs:
  - list
- apiGroups:
  - storage.k8s.io
  resources:
  - csinodes
  verbs:
  - watch
- apiGroups:
  - operators.coreos.com
  resources:
  - clusterserviceversions
  - catalogsources
  - installplans
  - subscriptions
  - operatorgroups
  verbs:
  - get
  - list
  - watch
- apiGroups:
  - packages.operators.coreos.com
  resources:
  - packagemanifests
  - packagemanifests/icon
  verbs:
  - get
  - list
  - watch
- apiGroups:
  - packages.operators.coreos.com
  resources:
  - packagemanifests
  verbs:
  - get
  - list
  - watch
- apiGroups:
  - ""
  resources:
  - namespaces
  verbs:
  - get
- apiGroups:
  - ""
  resources:
  - configmaps
  - endpoints
  - persistentvolumeclaims
  - pods
  - replicationcontrollers
  - replicationcontrollers/scale
  - serviceaccounts
  - services
  verbs:
  - get
  - list
  - watch
- apiGroups:
  - ""
  resources:
  - bindings
  - events
  - limitranges
  - namespaces/status
  - pods/log
  - pods/status
  - replicationcontrollers/status
  - resourcequotas
  - resourcequotas/status
  verbs:
  - get
  - list
  - watch
- apiGroups:
  - ""
  resources:
  - namespaces
  verbs:
  - get
  - list
  - watch
- apiGroups:
  - apps
  resources:
  - controllerrevisions
  - daemonsets
  - deployments
  - deployments/scale
  - replicasets
  - replicasets/scale
  - statefulsets
  - statefulsets/scale
  verbs:
  - get
  - list
  - watch
- apiGroups:
  - autoscaling
  resources:
  - horizontalpodautoscalers
  verbs:
  - get
  - list
  - watch
- apiGroups:
  - batch
  resources:
  - cronjobs
  - jobs
  verbs:
  - get
  - list
  - watch
- apiGroups:
  - extensions
  resources:
  - daemonsets
  - deployments
  - deployments/scale
  - ingresses
  - networkpolicies
  - replicasets
  - replicasets/scale
  - replicationcontrollers/scale
  verbs:
  - get
  - list
  - watch
- apiGroups:
  - policy
  resources:
  - poddisruptionbudgets
  verbs:
  - get
  - list
  - watch
- apiGroups:
  - networking.k8s.io
  resources:
  - networkpolicies
  verbs:
  - get
  - list
  - watch
- apiGroups:
  - networking.k8s.io
  resources:
  - ingresses
  verbs:
  - get
- apiGroups:
  - networking.k8s.io
  resources:
  - ingresses
  verbs:
  - list
- apiGroups:
  - networking.k8s.io
  resources:
  - ingresses
  verbs:
  - watch
- apiGroups:
  - metrics.k8s.io
  resources:
  - pods
  verbs:
  - get
  - list
  - watch
- apiGroups:
  - ""
  resources:
  - resourcequotausages
  verbs:
  - get
  - list
  - watch

After you created the ClusterRole you need to create the ClusterRoleBinding:

apiVersion: rbac.authorization.k8s.io/v1
kind: ClusterRoleBinding
metadata:
  name: cluster-reader
roleRef:
  apiGroup: rbac.authorization.k8s.io
  kind: ClusterRole
  name: cluster-reader
subjects:
- apiGroup: rbac.authorization.k8s.io
  kind: Group
  name: cluster-reader

To give a cluster-reader impersonate permissions you need to create the sudoer ClusterRole with the right to impersonate system:admin:

apiVersion: rbac.authorization.k8s.io/v1
kind: ClusterRole
metadata:
  name: sudoer
rules:
- apiGroups:
  - ""
  resourceNames:
  - system:admin
  resources:
  - systemusers
  - users
  verbs:
  - impersonate
- apiGroups:
  - ""
  resourceNames:
  - system:masters
  resources:
  - groups
  - systemgroups
  verbs:
  - impersonate

Create the ClusterRoleBinding:

apiVersion: rbac.authorization.k8s.io/v1
kind: ClusterRoleBinding
metadata:
  name: sudoer
roleRef:
  apiGroup: rbac.authorization.k8s.io
  kind: ClusterRole
  name: sudoer
subjects:
- apiGroup: rbac.authorization.k8s.io
  kind: Group
  name: cluster-reader

For a cluster-reader to impersonate and get cluster-admin privileges you use the following kubectl options –as-group and –as:

kubectl get nodes --as-group system:masters --as system:admin

You want to restrict the membership of the IAM admin role as much as possible as everyone should only use the read permissions to not accidentally delete Kubernetes or AWS resources.

How to manage Kubernetes clusters the GitOps way with Flux CD

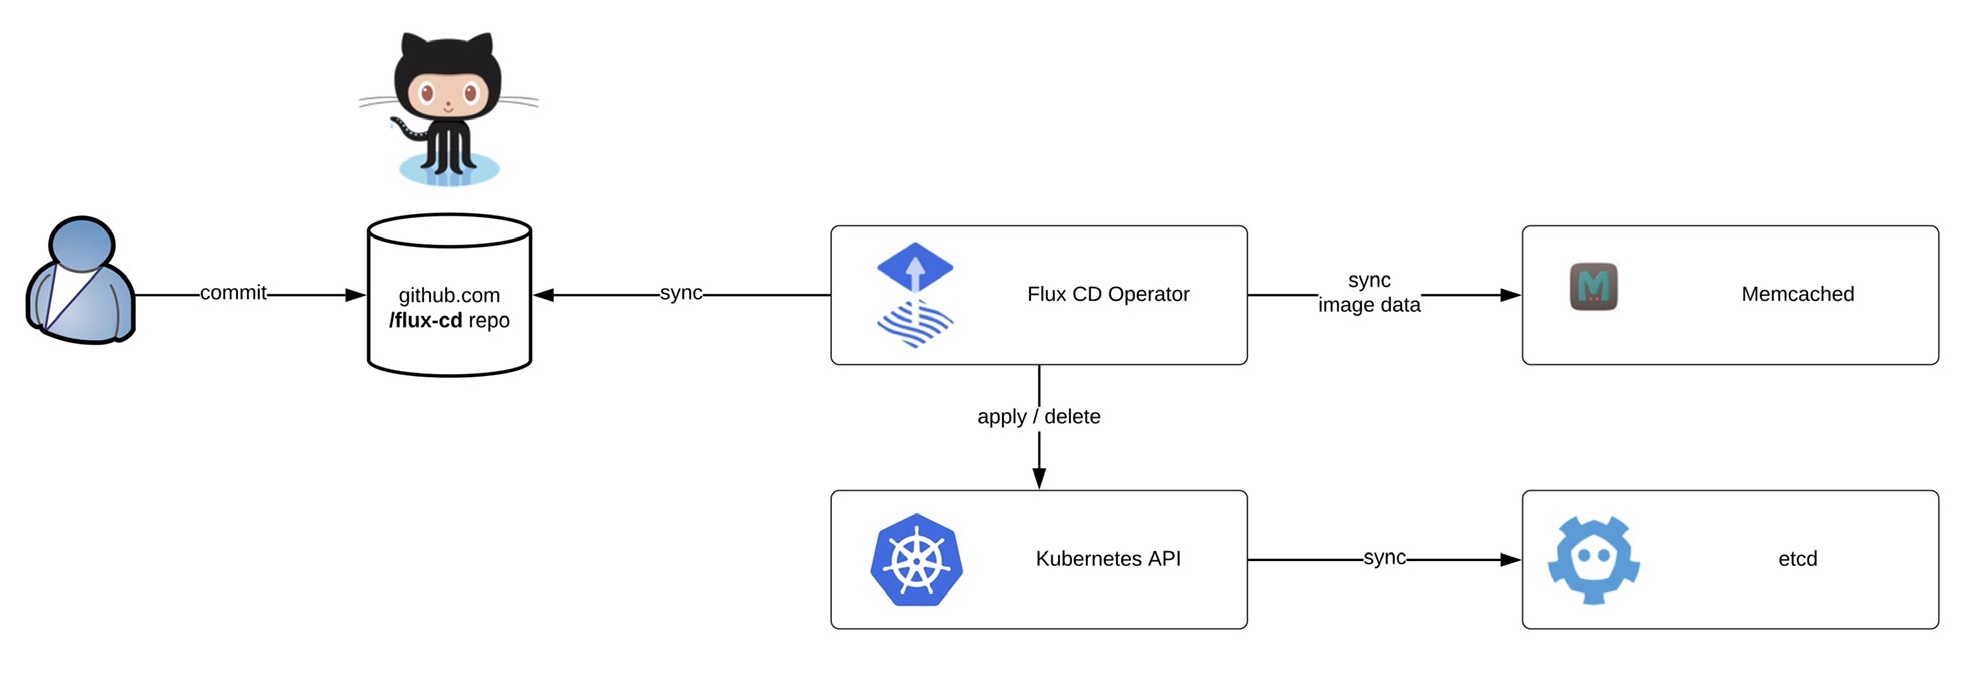
Kubernetes is becoming more and more popular, and so is managing clusters at scale. This article is about how to manage Kubernetes clusters the GitOps way using the Flux CD operator.

Flux can monitor container image and code repositories that you specify and trigger deployments to automatically change the configuration state of your Kubernetes cluster. The cluster configuration is centrally managed and stored in declarative form in Git, and there is no need for an administrator to manually apply manifests, the Flux operator synchronise to apply or delete the cluster configuration.

Before we start deploying the operator we need to install the fluxctl command-line utility and create the namespace:
sudo wget -O /usr/local/bin/fluxctl https://github.com/fluxcd/flux/releases/download/1.18.0/fluxctl_linux_amd64
sudo chmod 755 /usr/local/bin/fluxctl
kubectl create ns flux

Deploying the Flux operator is straight forward and requires a few options like git repository and git path. The path is important for my example because it tells the operator in which folder to look for manifests:

$ fluxctl install [email protected] [email protected]:berndonline/flux-cd.git --git-path=clusters/gke,common/stage --manifest-generation=true --git-branch=master --namespace=flux --registry-disable-scanning | kubectl apply -f -
deployment.apps/memcached created
service/memcached created
serviceaccount/flux created
clusterrole.rbac.authorization.k8s.io/flux created
clusterrolebinding.rbac.authorization.k8s.io/flux created
deployment.apps/flux created
secret/flux-git-deploy created

After you have applied the configuration, wait until the Flux pods are up and running:

$ kubectl get pods -n flux
NAME                       READY   STATUS    RESTARTS   AGE
flux-85cd9cd746-hnb4f      1/1     Running   0          74m
memcached-5dcd7579-d6vwh   1/1     Running   0          20h

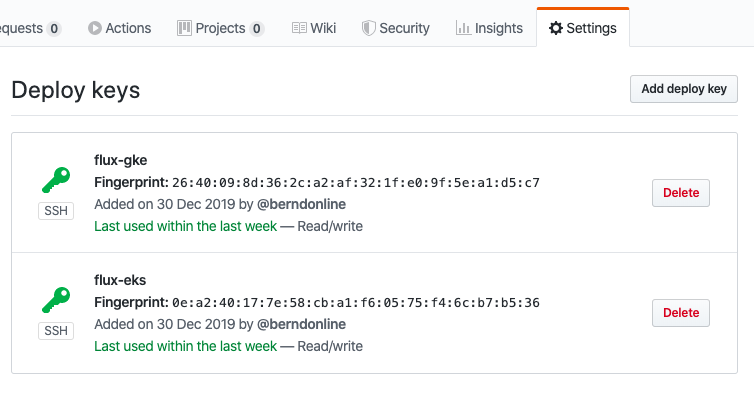
The last step is to get the Flux operator deploy keys and copy the output to add to your Git repository:

fluxctl identity --k8s-fwd-ns flux

Now you are ready to synchronise the Flux operator with the repository. By default Flux automatically synchronises every 5 minutes to apply configuration changes:
$ fluxctl sync --k8s-fwd-ns flux
Synchronizing with [email protected]:berndonline/flux-cd.git
Revision of master to apply is 726944d
Waiting for 726944d to be applied ...
Done.

You are able to list workloads which are managed by the Flux operator:

$ fluxctl list-workloads --k8s-fwd-ns=flux -a
WORKLOAD                             CONTAINER         IMAGE                            RELEASE  POLICY
default:deployment/hello-kubernetes  hello-kubernetes  paulbouwer/hello-kubernetes:1.5  ready    automated

How do we manage the configuration for multiple Kubernetes clusters?

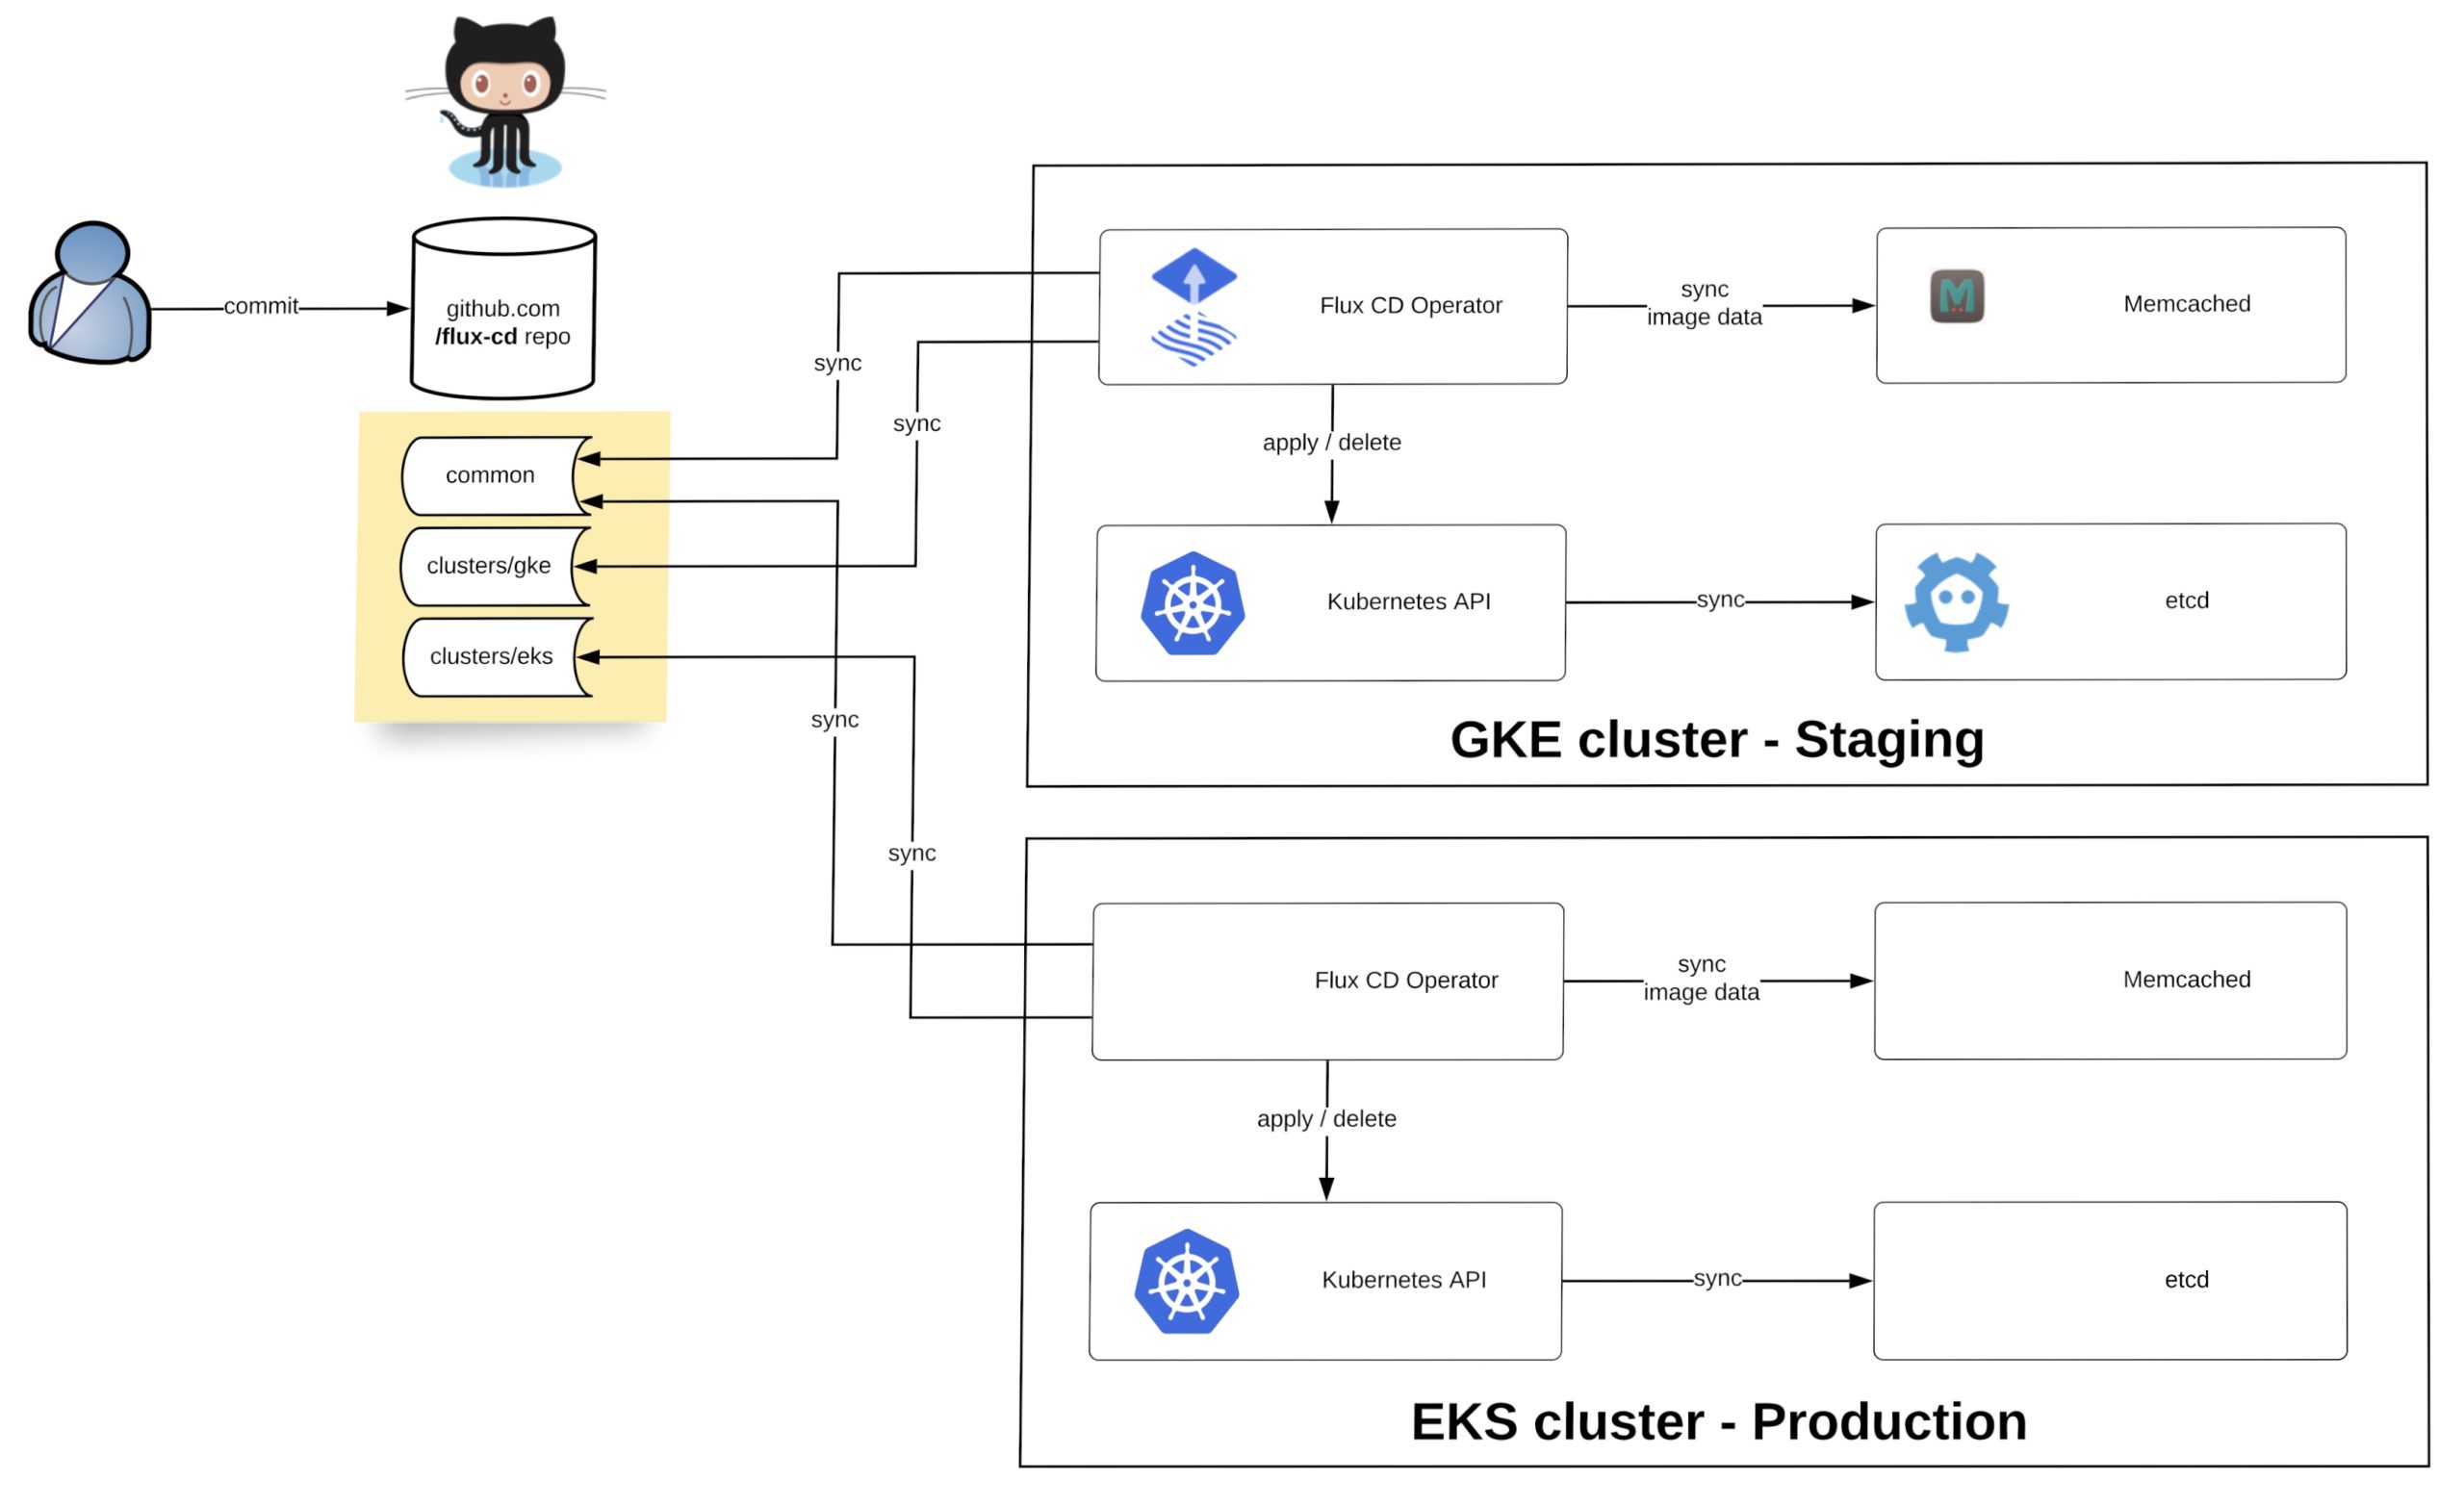
I want to show you a simple example using Kustomize to manage multiple clusters across two environments (staging and production) with Flux. Basically you have a single repository and multiple clusters synchronising the configuration depending how you configure the –git-path variable of the Flux operator. The option –manifest-generation enables Kustomize for the operator and it is required to add a .flux.yaml to run Kustomize build on the cluster directories and to apply the generated manifests.

Let’s look at the repository file and folder structure. We have the base folder containing the common deployment configuration, the common folder with the environment separation for stage and prod overlays and the clusters folder which contains more cluster specific configuration:

├── .flux.yaml 
├── base
│   └── common
│       ├── deployment.yaml
│       ├── kustomization.yaml
│       ├── namespace.yaml
│       └── service.yaml
├── clusters
│   ├── eks
|   |   ├── eks-app1
│   │   |   ├── deployment.yaml
|   |   |   ├── kustomization.yaml
│   │   |   └── service.yaml
|   |   └── kustomization.yaml
│   ├── gke
|   |   ├── gke-app1
│   │   |   ├── deployment.yaml
|   |   |   ├── kustomization.yaml
│   │   |   └── service.yaml
|   |   ├── gke-app2
│   │   |   ├── deployment.yaml
|   |   |   ├── kustomization.yaml
│   │   |   └── service.yaml
|   |   └── kustomization.yaml
└── common
    ├── prod
    |   ├── prod.yaml
    |   └── kustomization.yaml
    └── stage
        ├──  team1
        |    ├── deployment.yaml
        |    ├── kustomization.yaml
        |    ├── namespace.yaml
        |    └── service.yaml
        ├── stage.yaml
        └── kustomization.yaml

If you are new to Kustomize I would recommend reading the article Kustomize – The right way to do templating in Kubernetes.

The last thing we need to do is to deploy the Flux operator to the two Kubernetes clusters. The only difference between both is the git-path variable which points the operator to the cluster and common directories were Kustomize applies the overlays based what is specified in kustomize.yaml. More details about the configuration you find in my example repository: https://github.com/berndonline/flux-cd

Flux config for Google GKE staging cluster:

fluxctl install [email protected] [email protected]:berndonline/flux-cd.git --git-path=clusters/gke,common/stage --manifest-generation=true --git-branch=master --namespace=flux | kubectl apply -f -

Flux config for Amazon EKS production cluster:

fluxctl install [email protected] [email protected]:berndonline/flux-cd.git --git-path=clusters/eks,common/prod --manifest-generation=true --git-branch=master --namespace=flux | kubectl apply -f -

After a few minutes the configuration is applied to the two clusters and you can validate the configuration.

Google GKE stage workloads:

$ fluxctl list-workloads --k8s-fwd-ns=flux -a
WORKLOAD                   CONTAINER         IMAGE                            RELEASE  POLICY
common:deployment/common   hello-kubernetes  paulbouwer/hello-kubernetes:1.5  ready    automated
default:deployment/gke1    hello-kubernetes  paulbouwer/hello-kubernetes:1.5  ready    
default:deployment/gke2    hello-kubernetes  paulbouwer/hello-kubernetes:1.5  ready    
team1:deployment/team1     hello-kubernetes  paulbouwer/hello-kubernetes:1.5  ready
$ kubectl get svc --all-namespaces | grep LoadBalancer
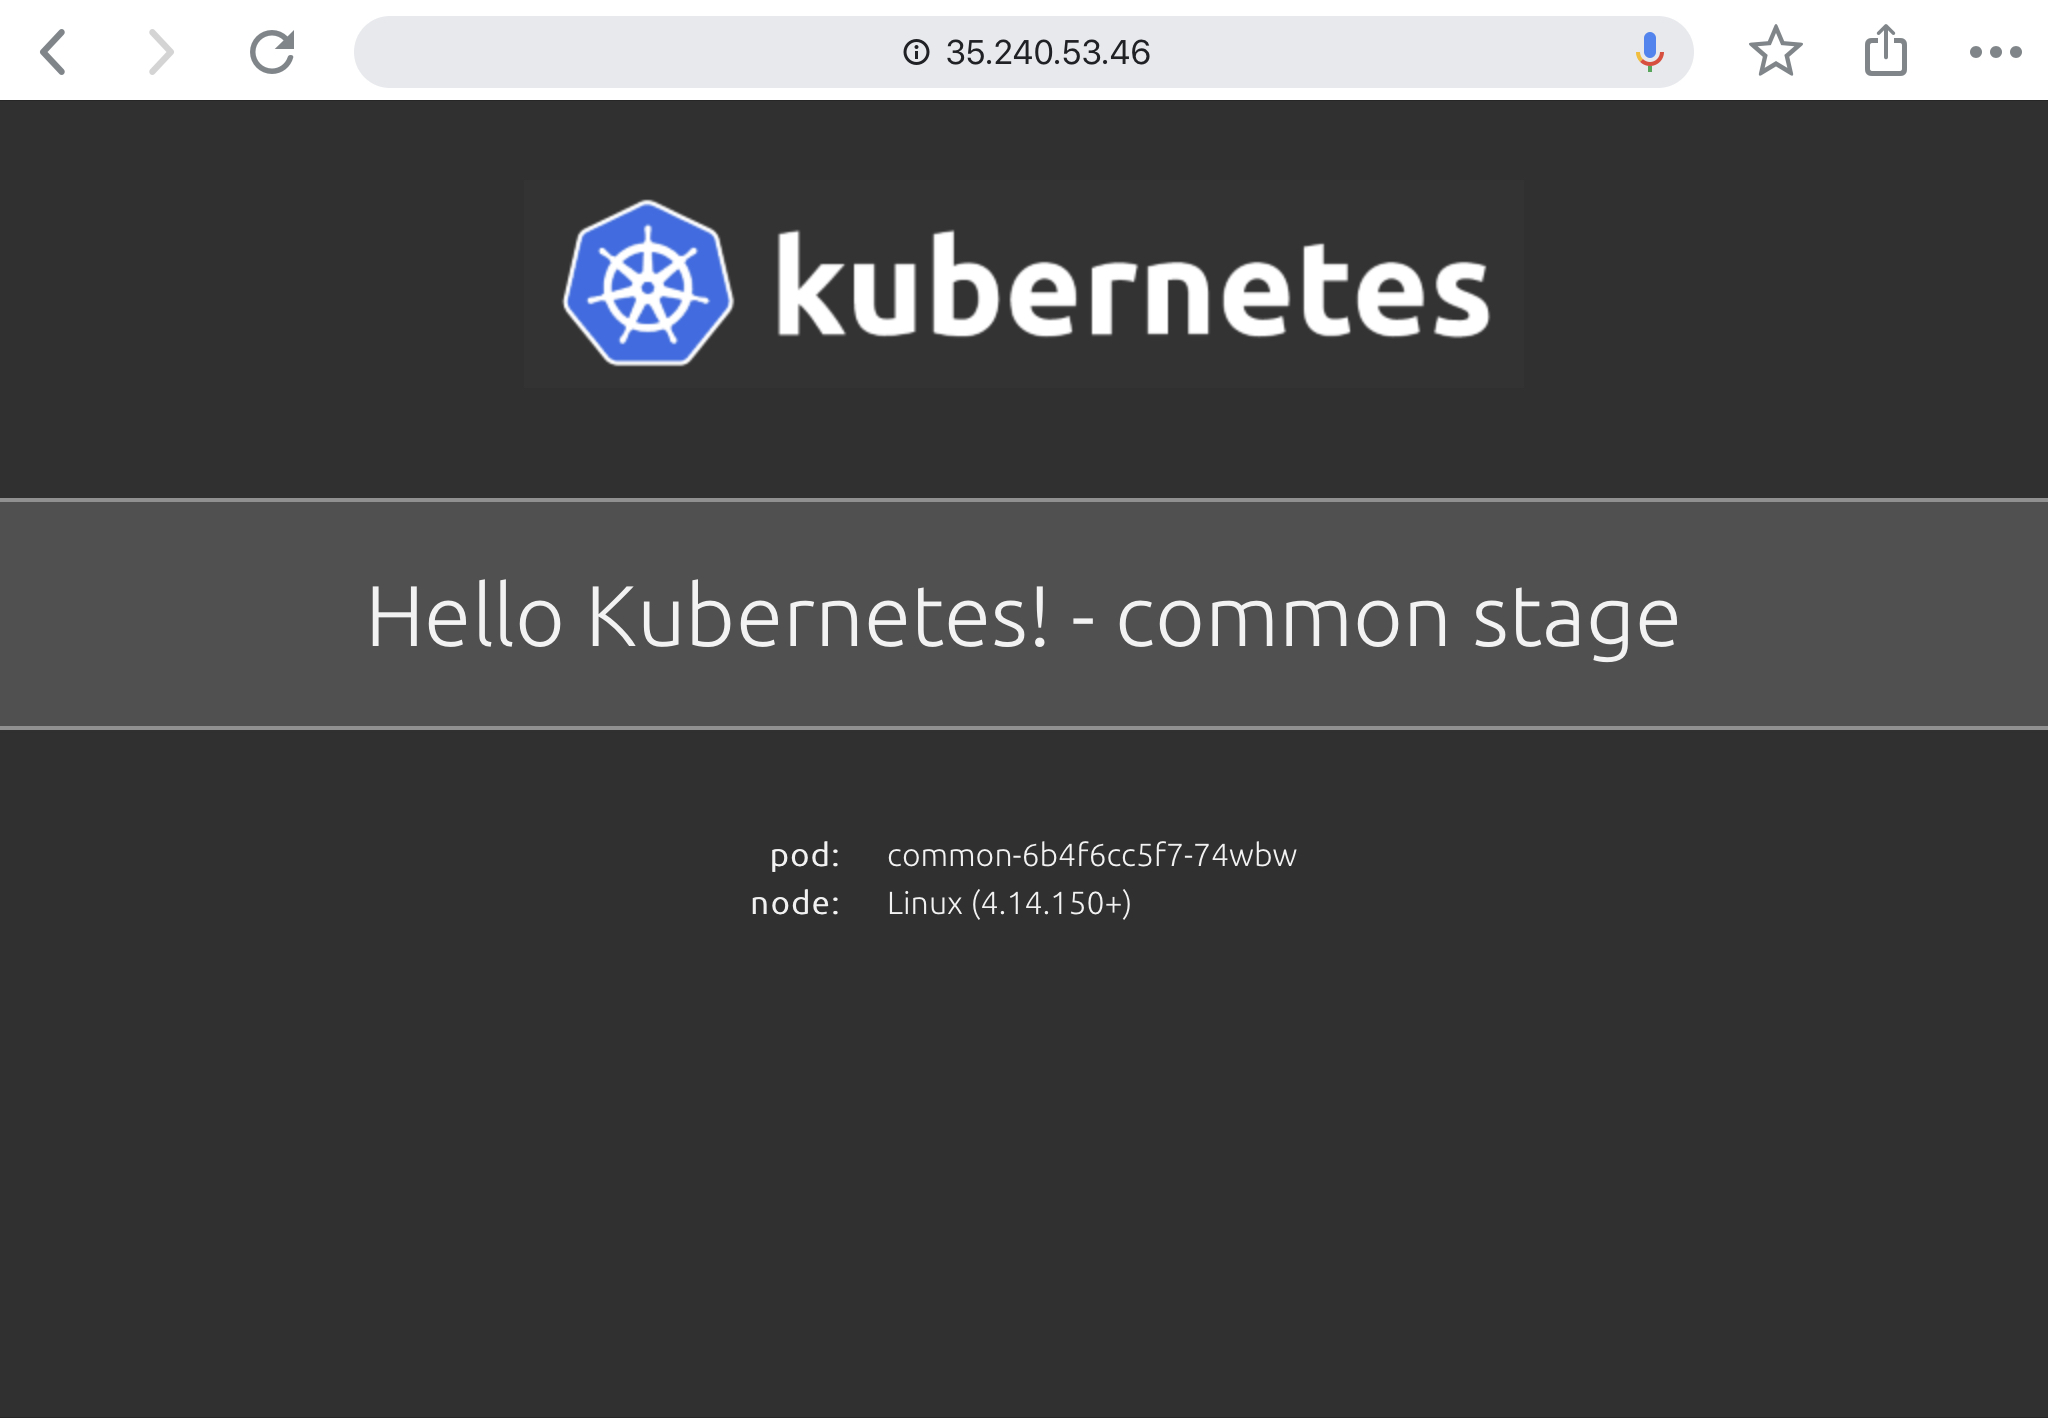
common        common                 LoadBalancer   10.91.14.186   35.240.53.46     80:31537/TCP    16d
default       gke1                   LoadBalancer   10.91.7.169    35.195.241.46    80:30218/TCP    16d
default       gke2                   LoadBalancer   10.91.10.239   35.195.144.68    80:32589/TCP    16d
team1         team1                  LoadBalancer   10.91.1.178    104.199.107.56   80:31049/TCP    16d

GKE common stage application:

Amazon EKS prod workloads:

$ fluxctl list-workloads --k8s-fwd-ns=flux -a
WORKLOAD                          CONTAINER         IMAGE                                                                RELEASE  POLICY
common:deployment/common          hello-kubernetes  paulbouwer/hello-kubernetes:1.5                                      ready    automated
default:deployment/eks1           hello-kubernetes  paulbouwer/hello-kubernetes:1.5                                      ready
$ kubectl get svc --all-namespaces | grep LoadBalancer
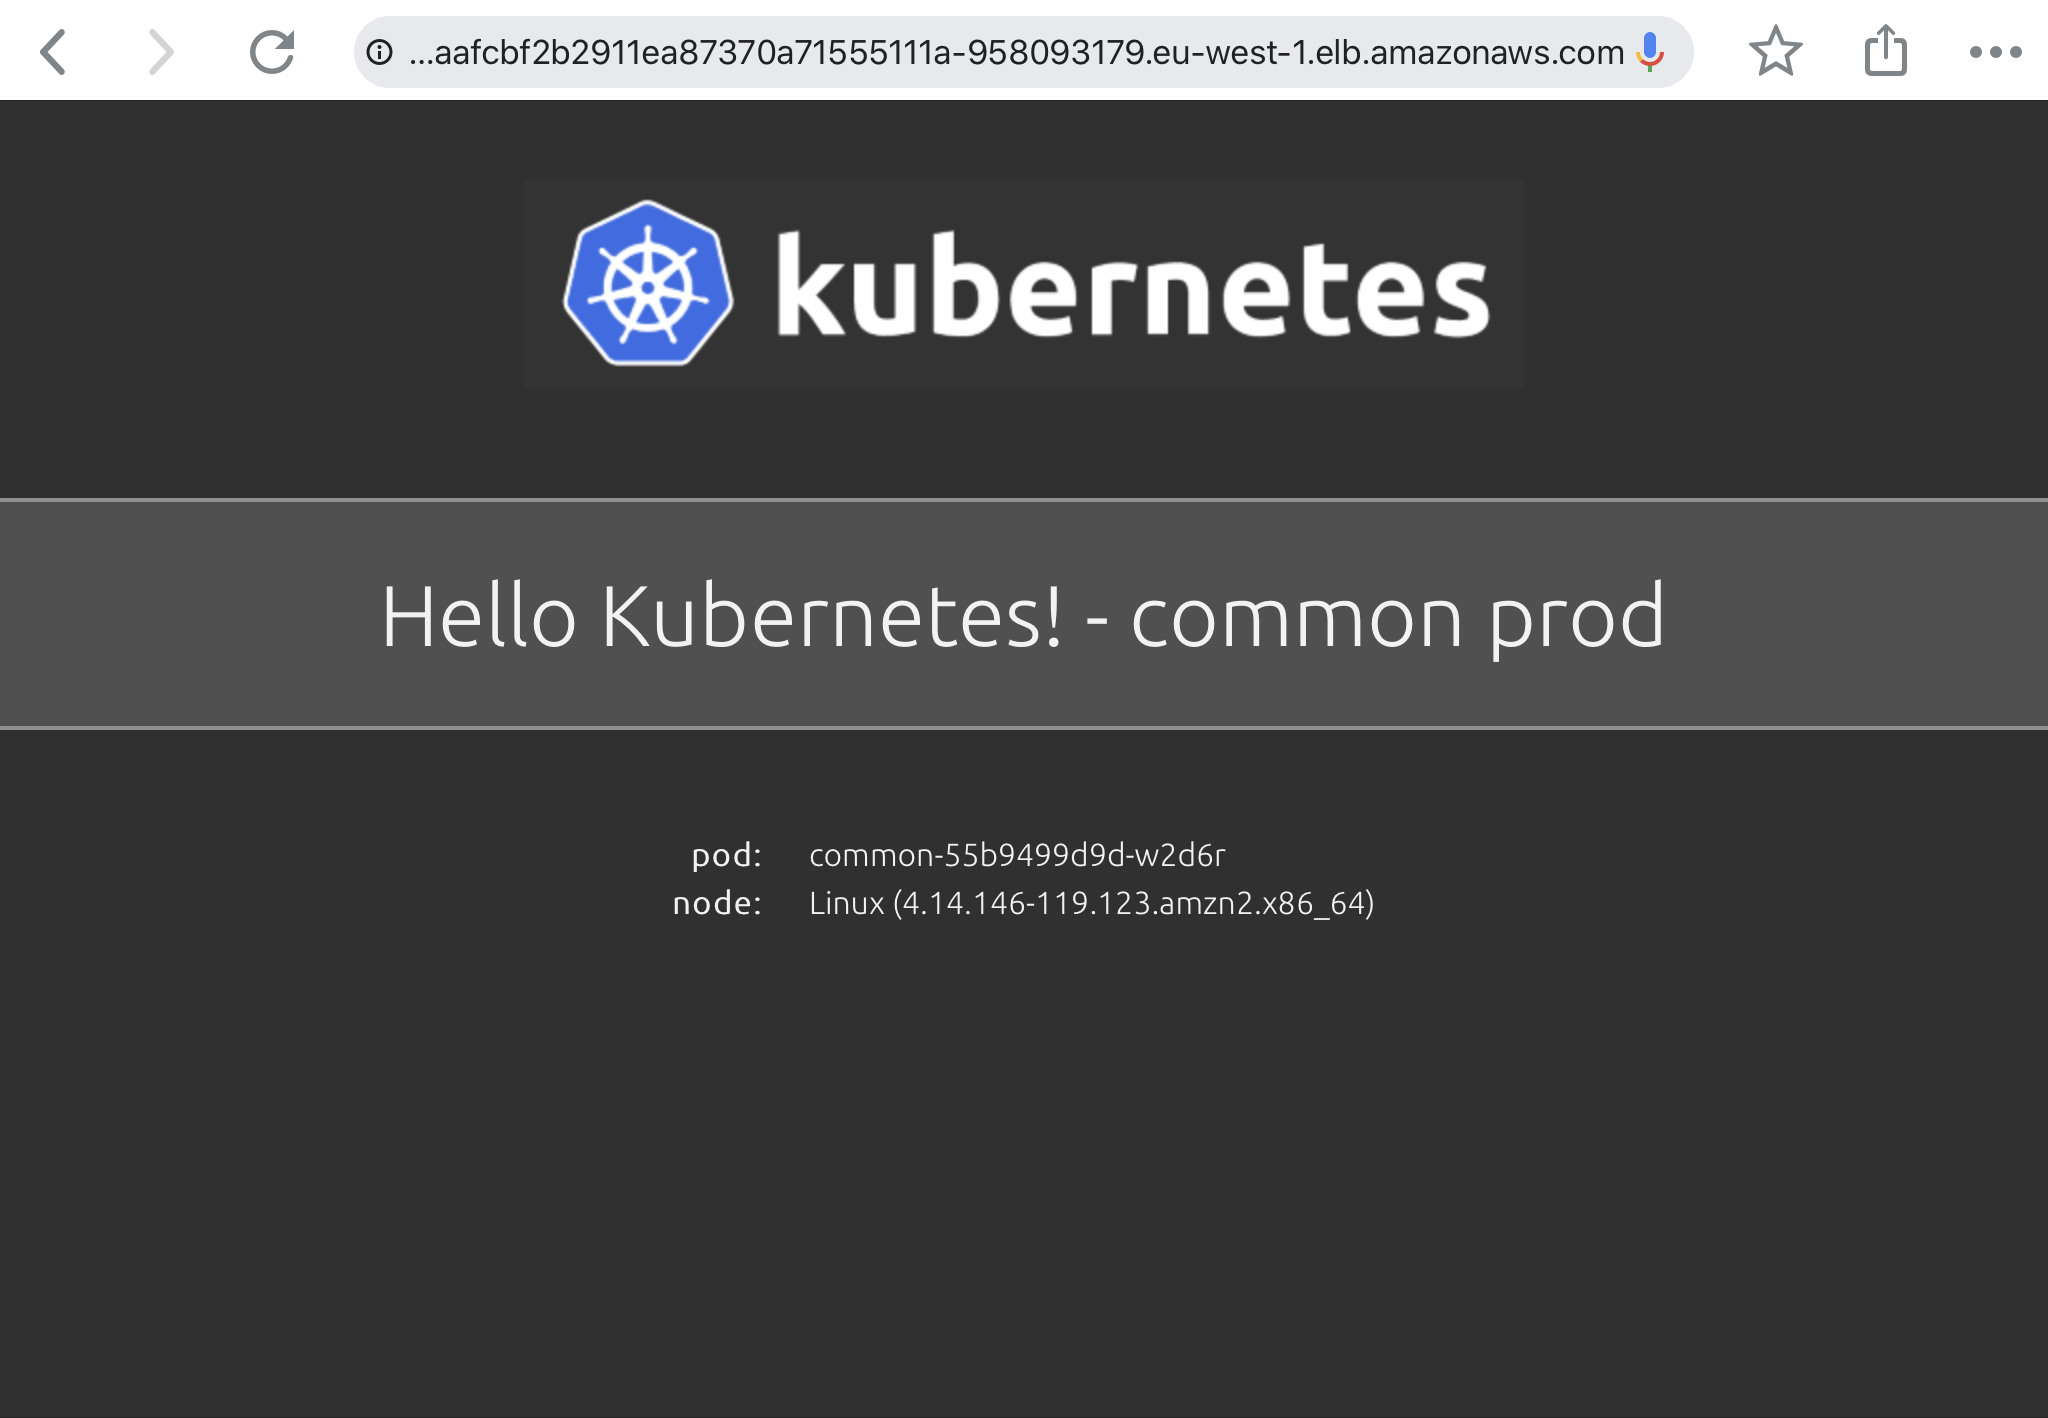
common        common       LoadBalancer   10.100.254.171   a4caafcbf2b2911ea87370a71555111a-958093179.eu-west-1.elb.amazonaws.com    80:32318/TCP    3m8s
default       eks1         LoadBalancer   10.100.170.10    a4caeada52b2911ea87370a71555111a-1261318311.eu-west-1.elb.amazonaws.com   80:32618/TCP    3m8s

EKS common prod application:

I hope this article is useful to get started with GitOps and the Flux operator. In the future, I would like to see Flux being able to watch git tags which will make it easier to promote changes and manage clusters with version tags.

For more technical information have a look at the Flux CD documentation.

Create and manage AWS EKS cluster using eksctl command-line

A few month back I stumbled across the Weave.works command-line tool eksctl.io to create and manage AWS EKS clusters. Amazon recently announced eksctl.io is the official command-line tool for managing AWS EKS clusters. It follows a similar approach what we have seen with the new openshift-installer to create an OpenShift 4 cluster or with the Google Cloud Shell to create a GKE cluster with a single command and I really like the simplicity of these tools.

Before we start creating a EKS cluster, see below the IAM user policy to set the required permissions for eksctl.

{
    "Version": "2012-10-17",
    "Statement": [
        {
            "Sid": "VisualEditor0",
            "Effect": "Allow",
            "Action": [
                "iam:CreateInstanceProfile",
                "iam:DeleteInstanceProfile",
                "iam:GetRole",
                "iam:GetInstanceProfile",
                "iam:RemoveRoleFromInstanceProfile",
                "iam:CreateRole",
                "iam:DeleteRole",
                "iam:AttachRolePolicy",
                "iam:PutRolePolicy",
                "iam:ListInstanceProfiles",
                "iam:AddRoleToInstanceProfile",
                "iam:ListInstanceProfilesForRole",
                "iam:PassRole",
                "iam:CreateServiceLinkedRole",
                "iam:DetachRolePolicy",
                "iam:DeleteRolePolicy",
                "iam:DeleteServiceLinkedRole",
                "ec2:DeleteInternetGateway",
                "iam:GetOpenIDConnectProvider",
                "iam:GetRolePolicy"
            ],
            "Resource": [
                "arn:aws:iam::552276840222:instance-profile/eksctl-*",
                "arn:aws:iam::552276840222:oidc-provider/oidc.eks*",
                "arn:aws:iam::552276840222:role/eksctl-*",
                "arn:aws:ec2:*:*:internet-gateway/*"
            ]
        },
        {
            "Sid": "VisualEditor1",
            "Effect": "Allow",
            "Action": [
                "ec2:AuthorizeSecurityGroupIngress",
                "ec2:DeleteSubnet",
                "ec2:AttachInternetGateway",
                "ec2:DeleteRouteTable",
                "ec2:AssociateRouteTable",
                "ec2:DescribeInternetGateways",
                "autoscaling:DescribeAutoScalingGroups",
                "ec2:CreateRoute",
                "ec2:CreateInternetGateway",
                "ec2:RevokeSecurityGroupEgress",
                "autoscaling:UpdateAutoScalingGroup",
                "ec2:DeleteInternetGateway",
                "ec2:DescribeKeyPairs",
                "ec2:DescribeRouteTables",
                "ec2:ImportKeyPair",
                "ec2:DescribeLaunchTemplates",
                "ec2:CreateTags",
                "ec2:CreateRouteTable",
                "ec2:RunInstances",
                "cloudformation:*",
                "ec2:DetachInternetGateway",
                "ec2:DisassociateRouteTable",
                "ec2:RevokeSecurityGroupIngress",
                "ec2:DescribeImageAttribute",
                "ec2:DeleteNatGateway",
                "autoscaling:DeleteAutoScalingGroup",
                "ec2:DeleteVpc",
                "ec2:CreateSubnet",
                "ec2:DescribeSubnets",
                "eks:*",
                "autoscaling:CreateAutoScalingGroup",
                "ec2:DescribeAddresses",
                "ec2:DeleteTags",
                "ec2:CreateNatGateway",
                "autoscaling:DescribeLaunchConfigurations",
                "ec2:CreateVpc",
                "ec2:DescribeVpcAttribute",
                "autoscaling:DescribeScalingActivities",
                "ec2:DescribeAvailabilityZones",
                "ec2:CreateSecurityGroup",
                "ec2:ModifyVpcAttribute",
                "ec2:ReleaseAddress",
                "ec2:AuthorizeSecurityGroupEgress",
                "ec2:DeleteLaunchTemplate",
                "ec2:DescribeTags",
                "ec2:DeleteRoute",
                "ec2:DescribeLaunchTemplateVersions",
                "elasticloadbalancing:*",
                "ec2:DescribeNatGateways",
                "ec2:AllocateAddress",
                "ec2:DescribeSecurityGroups",
                "autoscaling:CreateLaunchConfiguration",
                "ec2:DescribeImages",
                "ec2:CreateLaunchTemplate",
                "autoscaling:DeleteLaunchConfiguration",
                "iam:ListOpenIDConnectProviders",
                "ec2:DescribeVpcs",
                "ec2:DeleteSecurityGroup"
            ],
            "Resource": "*"
        }
    ]
}

Now let’s create the EKS cluster with the following command:

$ eksctl create cluster --name=cluster-1 --region=eu-west-1 --nodes=3 --auto-kubeconfig
[ℹ]  eksctl version 0.10.2
[ℹ]  using region eu-west-1
[ℹ]  setting availability zones to [eu-west-1a eu-west-1c eu-west-1b]
[ℹ]  subnets for eu-west-1a - public:192.168.0.0/19 private:192.168.96.0/19
[ℹ]  subnets for eu-west-1c - public:192.168.32.0/19 private:192.168.128.0/19
[ℹ]  subnets for eu-west-1b - public:192.168.64.0/19 private:192.168.160.0/19
[ℹ]  nodegroup "ng-b17ac84f" will use "ami-059c6874350e63ca9" [AmazonLinux2/1.14]
[ℹ]  using Kubernetes version 1.14
[ℹ]  creating EKS cluster "cluster-1" in "eu-west-1" region
[ℹ]  will create 2 separate CloudFormation stacks for cluster itself and the initial nodegroup
[ℹ]  if you encounter any issues, check CloudFormation console or try 'eksctl utils describe-stacks --region=eu-west-1 --cluster=cluster-1'
[ℹ]  CloudWatch logging will not be enabled for cluster "cluster-1" in "eu-west-1"
[ℹ]  you can enable it with 'eksctl utils update-cluster-logging --region=eu-west-1 --cluster=cluster-1'
[ℹ]  Kubernetes API endpoint access will use default of {publicAccess=true, privateAccess=false} for cluster "cluster-1" in "eu-west-1"
[ℹ]  2 sequential tasks: { create cluster control plane "cluster-1", create nodegroup "ng-b17ac84f" }
[ℹ]  building cluster stack "eksctl-cluster-1-cluster"
[ℹ]  deploying stack "eksctl-cluster-1-cluster"
[ℹ]  building nodegroup stack "eksctl-cluster-1-nodegroup-ng-b17ac84f"
[ℹ]  --nodes-min=3 was set automatically for nodegroup ng-b17ac84f
[ℹ]  --nodes-max=3 was set automatically for nodegroup ng-b17ac84f
[ℹ]  deploying stack "eksctl-cluster-1-nodegroup-ng-b17ac84f"
[✔]  all EKS cluster resources for "cluster-1" have been created
[✔]  saved kubeconfig as "/home/ubuntu/.kube/eksctl/clusters/cluster-1"
[ℹ]  adding identity "arn:aws:iam::xxxxxxxxxx:role/eksctl-cluster-1-nodegroup-ng-b17-NodeInstanceRole-1DK2K493T8OM7" to auth ConfigMap
[ℹ]  nodegroup "ng-b17ac84f" has 0 node(s)
[ℹ]  waiting for at least 3 node(s) to become ready in "ng-b17ac84f"
[ℹ]  nodegroup "ng-b17ac84f" has 3 node(s)
[ℹ]  node "ip-192-168-5-192.eu-west-1.compute.internal" is ready
[ℹ]  node "ip-192-168-62-86.eu-west-1.compute.internal" is ready
[ℹ]  node "ip-192-168-64-47.eu-west-1.compute.internal" is ready
[ℹ]  kubectl command should work with "/home/ubuntu/.kube/eksctl/clusters/cluster-1", try 'kubectl --kubeconfig=/home/ubuntu/.kube/eksctl/clusters/cluster-1 get nodes'
[✔]  EKS cluster "cluster-1" in "eu-west-1" region is ready

Alternatively there is the option to create the EKS cluster in an existing VPC without eksctl creating the full-stack, you are required to specify the subnet IDs for private and public subnets:

eksctl create cluster --name=cluster-1 --region=eu-west-1 --nodes=3 \
       --vpc-private-subnets=subnet-0ff156e0c4a6d300c,subnet-0426fb4a607393184,subnet-0426fb4a604827314 \
       --vpc-public-subnets=subnet-0153e560b3129a696,subnet-009fa0199ec203c37,subnet-0426fb4a412393184

The option –auto-kubeconfig stores the kubeconfig under the users home directory in ~/.kube/eksctl/clusters/<-cluster-name-> or you can obtain cluster credentials at any point in time with the following command:

$ eksctl utils write-kubeconfig --cluster=cluster-1
[ℹ]  eksctl version 0.10.2
[ℹ]  using region eu-west-1
[✔]  saved kubeconfig as "/home/ubuntu/.kube/config"

Using kubectl to connect and manage the EKS cluster:

$ kubectl get nodes
NAME                                          STATUS   ROLES    AGE     VERSION
ip-192-168-5-192.eu-west-1.compute.internal   Ready    <none>   3m42s   v1.14.7-eks-1861c5
ip-192-168-62-86.eu-west-1.compute.internal   Ready    <none>   3m43s   v1.14.7-eks-1861c5
ip-192-168-64-47.eu-west-1.compute.internal   Ready    <none>   3m41s   v1.14.7-eks-1861c5

You are able to view the created EKS clusters:

$ eksctl get clusters
NAME		REGION
cluster-1	eu-west-1

As easy it is to create an EKS cluster you can also delete the cluster with a single command:

$ eksctl delete cluster --name=cluster-1 --region=eu-west-1
[ℹ]  eksctl version 0.10.2
[ℹ]  using region eu-west-1
[ℹ]  deleting EKS cluster "cluster-1"
[✔]  kubeconfig has been updated
[ℹ]  cleaning up LoadBalancer services
[ℹ]  2 sequential tasks: { delete nodegroup "ng-b17ac84f", delete cluster control plane "cluster-1" [async] }
[ℹ]  will delete stack "eksctl-cluster-1-nodegroup-ng-b17ac84f"
[ℹ]  waiting for stack "eksctl-cluster-1-nodegroup-ng-b17ac84f" to get deleted
[ℹ]  will delete stack "eksctl-cluster-1-cluster"
[✔]  all cluster resources were deleted

I can only recommend checking out eksctl.io because it has lot of potentials and the move towards an GitOps model to manage EKS clusters in a declarative way using a cluster manifests or hopefully in the future an eksctld operator to do the job. RedHat is working on a similar tool for OpenShift 4 called OpenShift Hive which I will write about very soon.