Over the Christmas holidays, I was working just for fun on an Arista vEOS Vagrant topology and Ansible Playbook. I reused my Ansible Playbook from my previous post about an Ansible Playbook for Cumulus Linux BGP IP-Fabric and Cumulus NetQ Validation.
Arista only has a Virtualbox vEOS image and there is an ISO image to boot the virtual appliance which I don’t understand why they have done this, rather I prefer the way Cumulus provide their VX images for testing to use with Virtualbox or KVM.
I found an interesting blog post on how to run vEOS images with KVM (Libvirt). I tried it and I could run vEOS in KVM but unfortunately, it wasn’t stable enough to run more complex virtual network topologies so I had to switch back to Virtualbox. I will give it a try again in a few month because I prefer KVM over Virtualbox.
Anyway, you’ll find more information about how to use vEOS with Virtualbox and Vagrant.
My Virtualbox Vagrantfile can be found in my Github repository: https://github.com/berndonline/arista-lab-vagrant
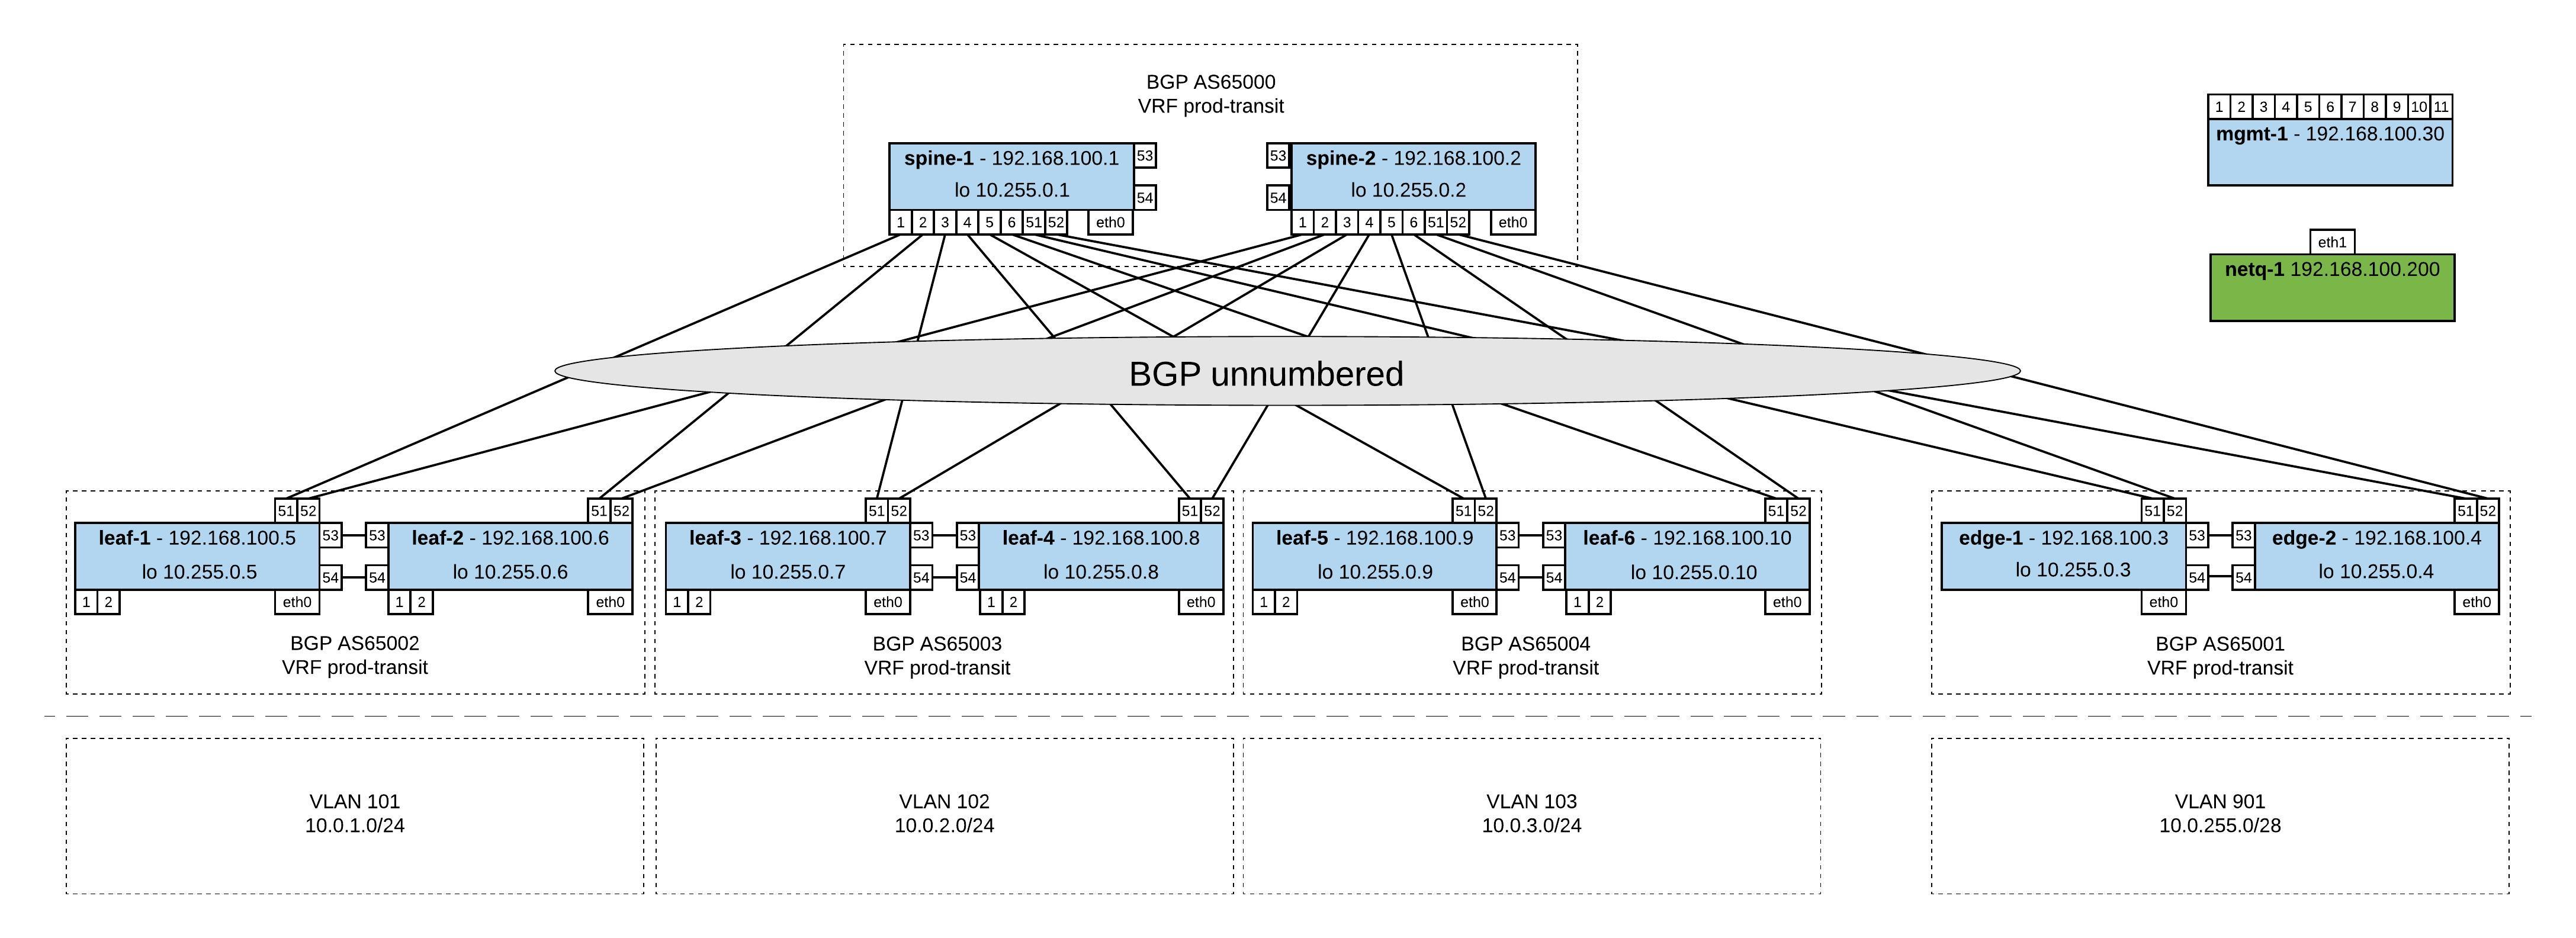
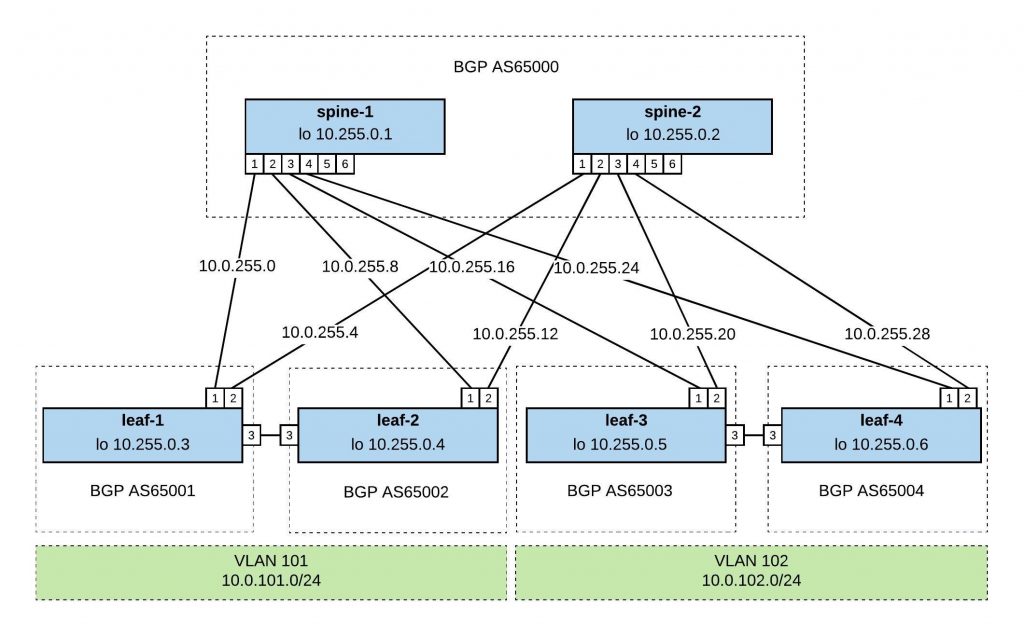
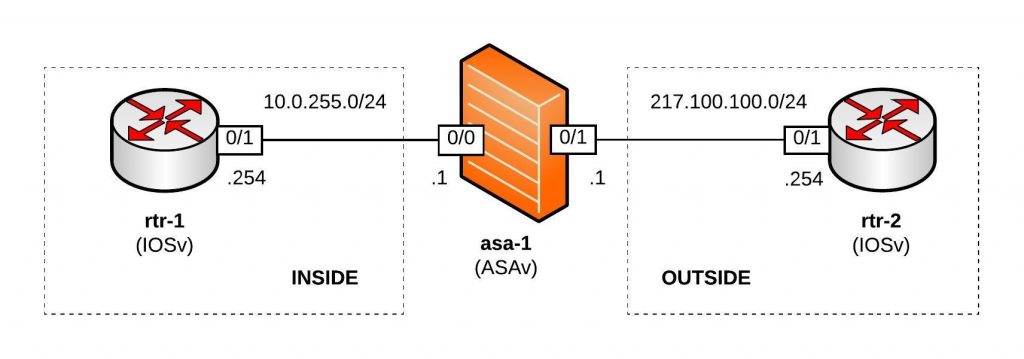
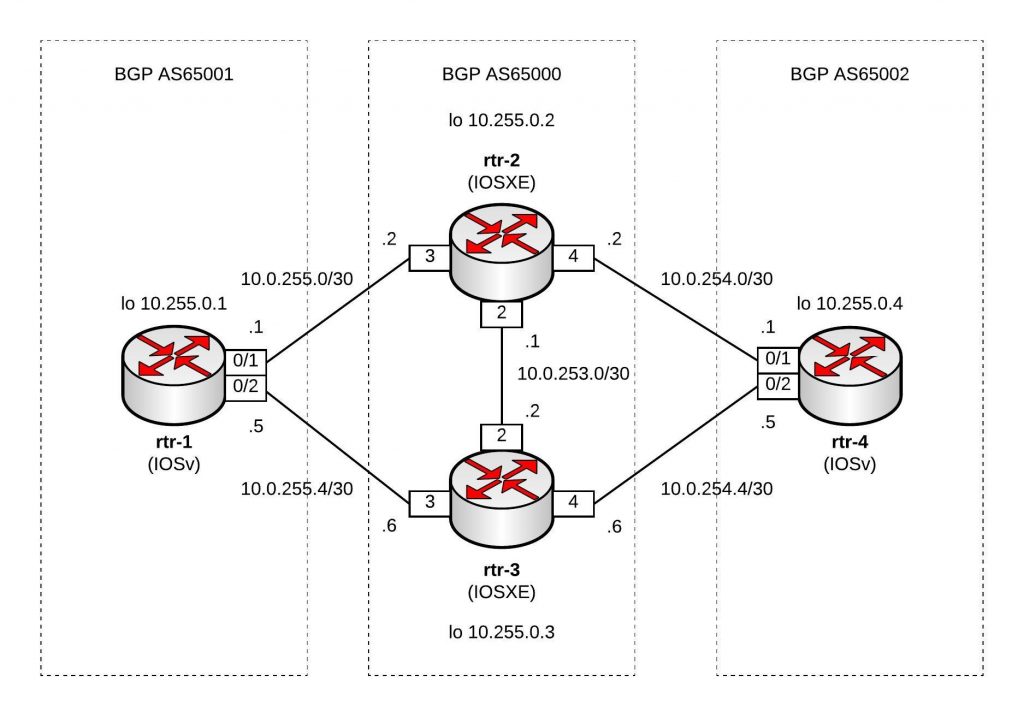
Network overview:
Ansible Playbook:
As I have mentioned before I tried to be close as possible to my Cumulus Linux Ansible Playbook and tried to keep the variables and roles the same. They are differences of course in the Jinja2 templates and tasks but the overall structure is similar.
Here you’ll find the repository with the Ansible Playbook: https://github.com/berndonline/arista-lab-provision
Because Arista didn’t prepare the images very well and only created a vagrant user without adding the ssh key for authentication I needed to use a CLI provider with a username and password. But this is only a minor issue otherwise it works the same. See the site.yml below:
---

- hosts: network

  connection: local
  gather_facts: 'False'

  vars:
    cli:
      username: vagrant
      password: vagrant

  roles:
    - leafgroups
    - hostname
    - interfaces
    - routing
    - ntp
In the roles, I have used the Arista EOS Ansible modules eos_config and eos_system.
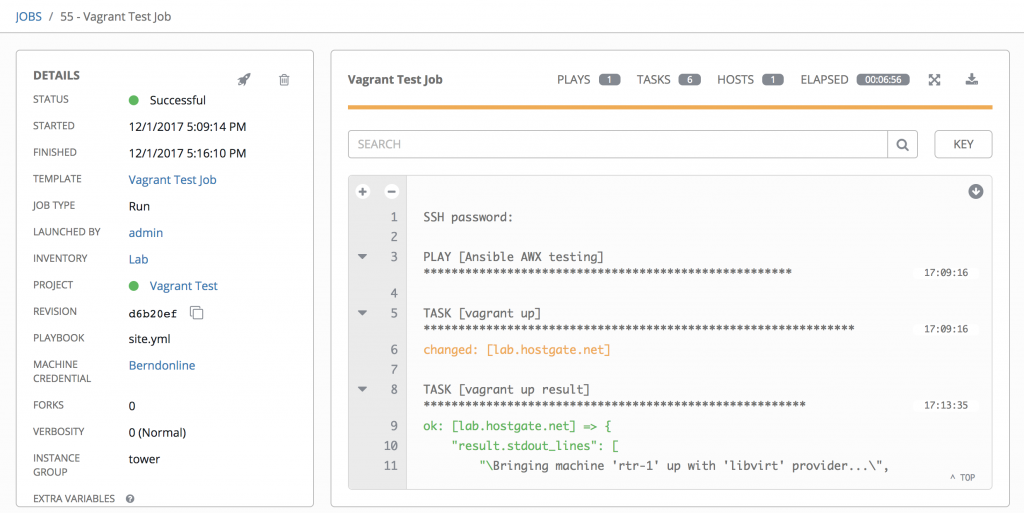
Boot up the Vagrant environment and then run the Playbook afterwards:
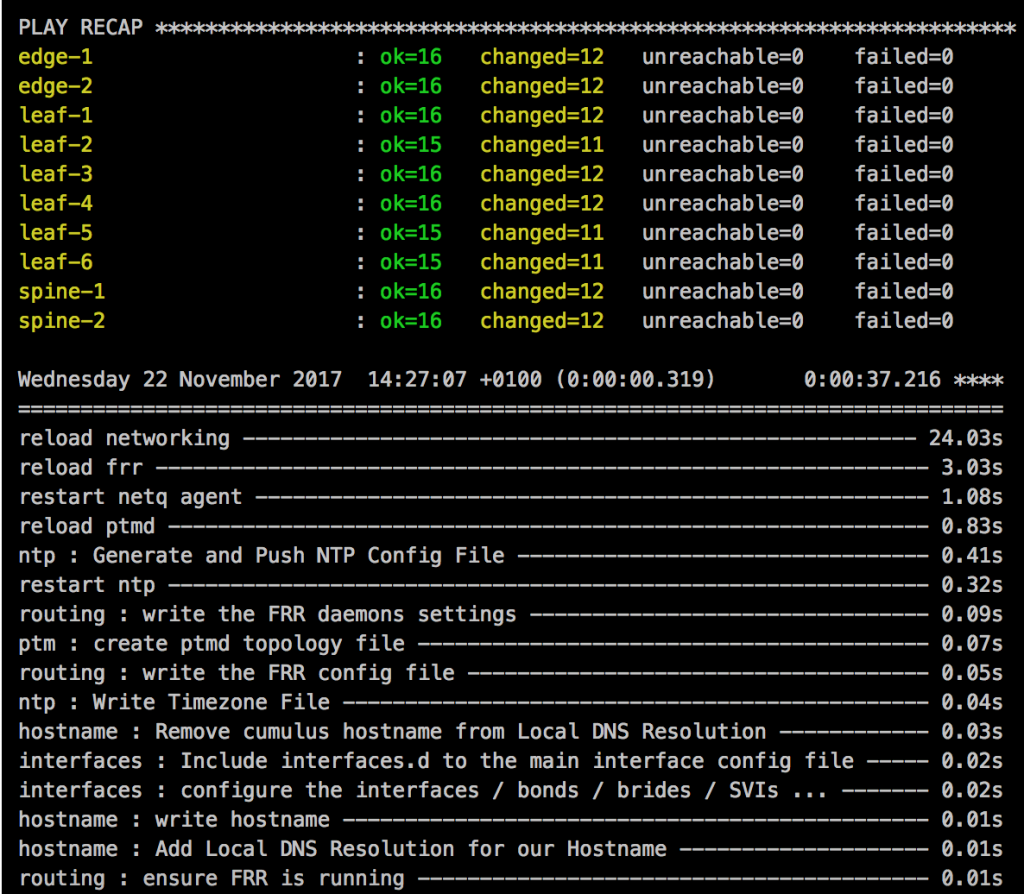
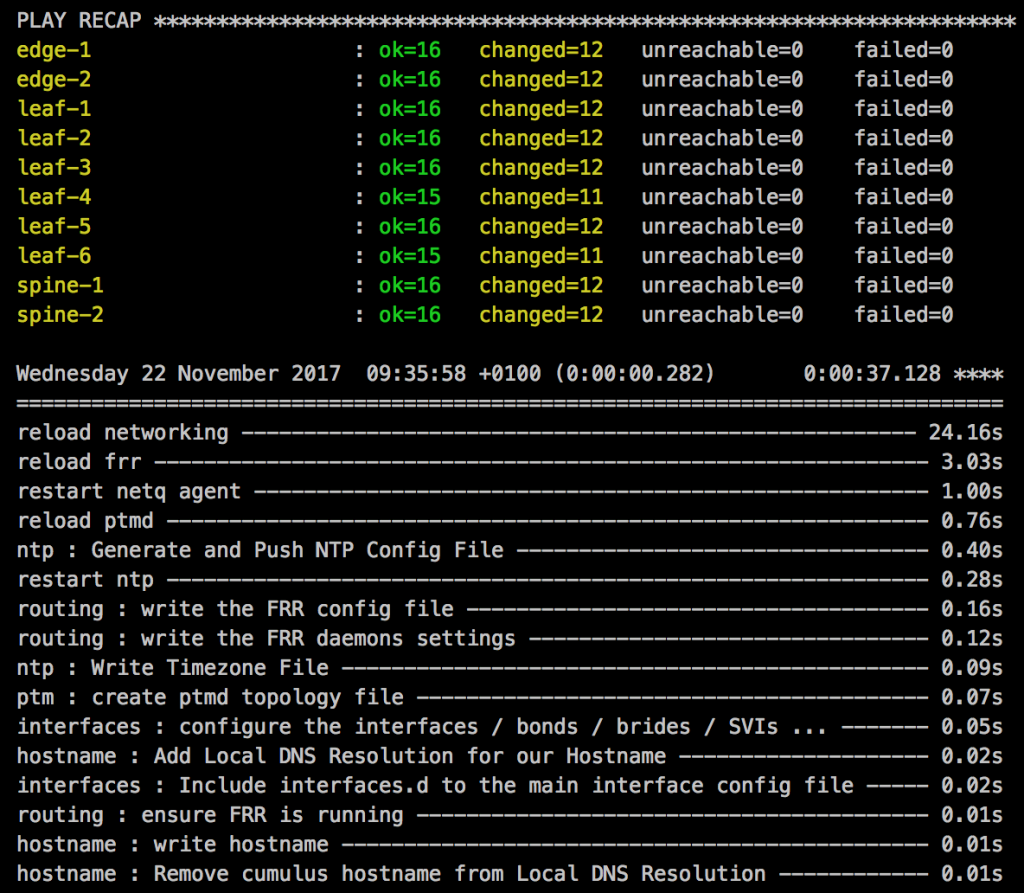
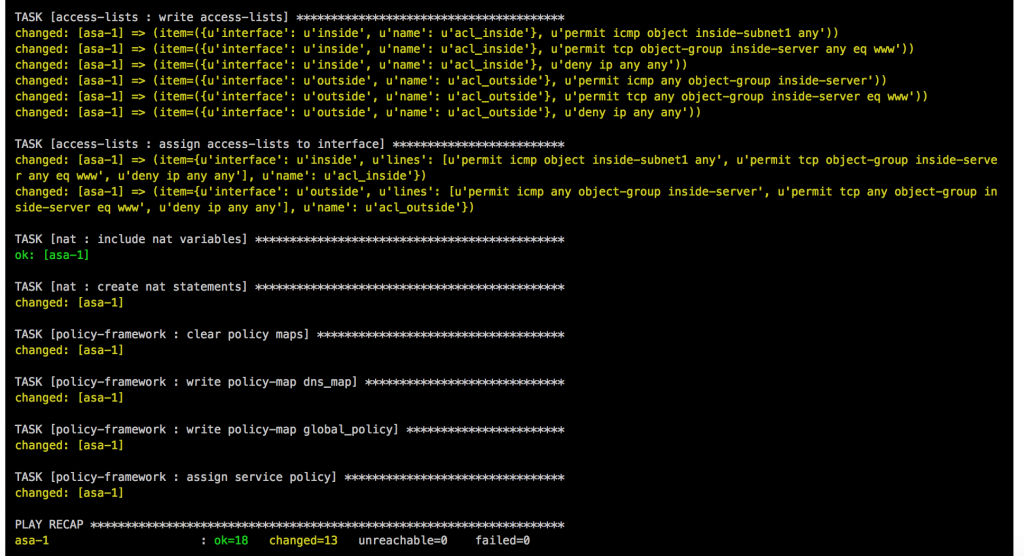
PLAY [network] *****************************************************************

TASK [leafgroups : create leaf groups based on clag_pairs] *********************
ok: [leaf-1] => (item=(u'leafgroup1', [u'leaf-1', u'leaf-2']))
skipping: [leaf-1] => (item=(u'leafgroup2', [u'leaf-3', u'leaf-4']))
skipping: [leaf-3] => (item=(u'leafgroup1', [u'leaf-1', u'leaf-2']))
ok: [leaf-3] => (item=(u'leafgroup2', [u'leaf-3', u'leaf-4']))
skipping: [leaf-4] => (item=(u'leafgroup1', [u'leaf-1', u'leaf-2']))
ok: [leaf-2] => (item=(u'leafgroup1', [u'leaf-1', u'leaf-2']))
skipping: [leaf-2] => (item=(u'leafgroup2', [u'leaf-3', u'leaf-4']))
ok: [leaf-4] => (item=(u'leafgroup2', [u'leaf-3', u'leaf-4']))
skipping: [spine-1] => (item=(u'leafgroup1', [u'leaf-1', u'leaf-2']))
skipping: [spine-1] => (item=(u'leafgroup2', [u'leaf-3', u'leaf-4']))
skipping: [spine-2] => (item=(u'leafgroup1', [u'leaf-1', u'leaf-2']))
skipping: [spine-2] => (item=(u'leafgroup2', [u'leaf-3', u'leaf-4']))

TASK [leafgroups : include leaf group variables] *******************************
ok: [leaf-1] => (item=(u'leafgroup1', [u'leaf-1', u'leaf-2']))
skipping: [leaf-3] => (item=(u'leafgroup1', [u'leaf-1', u'leaf-2']))
skipping: [leaf-1] => (item=(u'leafgroup2', [u'leaf-3', u'leaf-4']))
skipping: [leaf-4] => (item=(u'leafgroup1', [u'leaf-1', u'leaf-2']))
skipping: [spine-1] => (item=(u'leafgroup1', [u'leaf-1', u'leaf-2']))
skipping: [spine-1] => (item=(u'leafgroup2', [u'leaf-3', u'leaf-4']))
ok: [leaf-3] => (item=(u'leafgroup2', [u'leaf-3', u'leaf-4']))
ok: [leaf-2] => (item=(u'leafgroup1', [u'leaf-1', u'leaf-2']))
skipping: [leaf-2] => (item=(u'leafgroup2', [u'leaf-3', u'leaf-4']))
ok: [leaf-4] => (item=(u'leafgroup2', [u'leaf-3', u'leaf-4']))
skipping: [spine-2] => (item=(u'leafgroup1', [u'leaf-1', u'leaf-2']))
skipping: [spine-2] => (item=(u'leafgroup2', [u'leaf-3', u'leaf-4']))

TASK [hostname : write hostname and domain name] *******************************
changed: [leaf-4]
changed: [spine-1]
changed: [leaf-1]
changed: [leaf-3]
changed: [leaf-2]
changed: [spine-2]

TASK [interfaces : write interface configuration] ******************************
changed: [spine-1]
changed: [leaf-2]
changed: [leaf-4]
changed: [leaf-3]
changed: [leaf-1]
changed: [spine-2]

TASK [routing : write routing configuration] ***********************************
changed: [leaf-1]
changed: [leaf-4]
changed: [spine-1]
changed: [leaf-2]
changed: [leaf-3]
changed: [spine-2]

TASK [ntp : write ntp configuration] *******************************************
changed: [leaf-2] => (item=216.239.35.8)
changed: [leaf-1] => (item=216.239.35.8)
changed: [leaf-3] => (item=216.239.35.8)
changed: [spine-1] => (item=216.239.35.8)
changed: [leaf-4] => (item=216.239.35.8)
changed: [spine-2] => (item=216.239.35.8)

PLAY RECAP *********************************************************************
leaf-1                     : ok=6    changed=4    unreachable=0    failed=0
leaf-2                     : ok=6    changed=4    unreachable=0    failed=0
leaf-3                     : ok=6    changed=4    unreachable=0    failed=0
leaf-4                     : ok=6    changed=4    unreachable=0    failed=0
spine-1                    : ok=4    changed=4    unreachable=0    failed=0
spine-2                    : ok=4    changed=4    unreachable=0    failed=0
I didn’t use the leafgroups role for variables in my Playbook but I left it just in case.
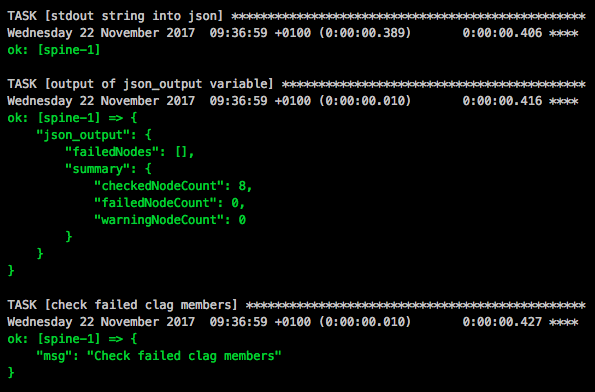
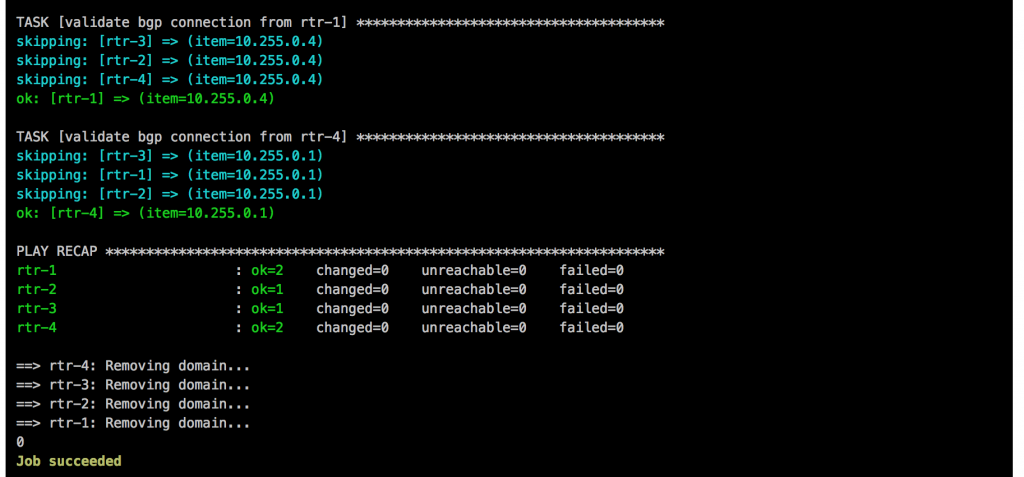
Because Arista has nothing similar to Cumulus NetQ to validate the configuration I create a simple arista_check_icmp.yml playbook and use ping from the leaf switches to test if the configuration is successfully deployed.
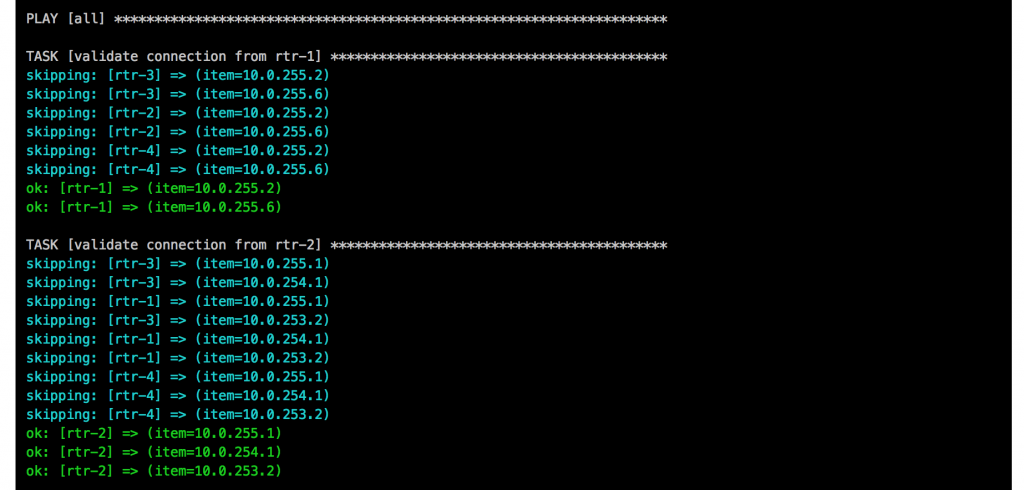
PLAY [leaf] ********************************************************************

TASK [validate connection from leaf-1] *****************************************
skipping: [leaf-3] => (item=10.255.0.4)
skipping: [leaf-3] => (item=10.255.0.5)
skipping: [leaf-3] => (item=10.255.0.6)
skipping: [leaf-2] => (item=10.255.0.4)
skipping: [leaf-2] => (item=10.255.0.5)
skipping: [leaf-2] => (item=10.255.0.6)
skipping: [leaf-3] => (item=10.0.102.252)
skipping: [leaf-4] => (item=10.255.0.4)
skipping: [leaf-3] => (item=10.0.102.253)
skipping: [leaf-3] => (item=10.0.102.254)
skipping: [leaf-4] => (item=10.255.0.5)
skipping: [leaf-2] => (item=10.0.102.252)
skipping: [leaf-4] => (item=10.255.0.6)
skipping: [leaf-2] => (item=10.0.102.253)
skipping: [leaf-2] => (item=10.0.102.254)
skipping: [leaf-4] => (item=10.0.102.252)
skipping: [leaf-4] => (item=10.0.102.253)
skipping: [leaf-4] => (item=10.0.102.254)
ok: [leaf-1] => (item=10.255.0.4)
ok: [leaf-1] => (item=10.255.0.5)
ok: [leaf-1] => (item=10.255.0.6)
ok: [leaf-1] => (item=10.0.102.252)
ok: [leaf-1] => (item=10.0.102.253)
ok: [leaf-1] => (item=10.0.102.254)

TASK [validate connection from leaf-2] *****************************************
skipping: [leaf-1] => (item=10.255.0.3)
skipping: [leaf-3] => (item=10.255.0.3)
skipping: [leaf-1] => (item=10.255.0.5)
skipping: [leaf-3] => (item=10.255.0.5)
skipping: [leaf-1] => (item=10.255.0.6)
skipping: [leaf-3] => (item=10.255.0.6)
skipping: [leaf-1] => (item=10.0.102.252)
skipping: [leaf-1] => (item=10.0.102.253)
skipping: [leaf-4] => (item=10.255.0.3)
skipping: [leaf-3] => (item=10.0.102.252)
skipping: [leaf-1] => (item=10.0.102.254)
skipping: [leaf-3] => (item=10.0.102.253)
skipping: [leaf-3] => (item=10.0.102.254)
skipping: [leaf-4] => (item=10.255.0.5)
skipping: [leaf-4] => (item=10.255.0.6)
skipping: [leaf-4] => (item=10.0.102.252)
skipping: [leaf-4] => (item=10.0.102.253)
skipping: [leaf-4] => (item=10.0.102.254)
ok: [leaf-2] => (item=10.255.0.3)
ok: [leaf-2] => (item=10.255.0.5)
ok: [leaf-2] => (item=10.255.0.6)
ok: [leaf-2] => (item=10.0.102.252)
ok: [leaf-2] => (item=10.0.102.253)
ok: [leaf-2] => (item=10.0.102.254)

TASK [validate connection from leaf-3] *****************************************
skipping: [leaf-1] => (item=10.255.0.3)
skipping: [leaf-1] => (item=10.255.0.4)
skipping: [leaf-2] => (item=10.255.0.3)
skipping: [leaf-1] => (item=10.255.0.6)
skipping: [leaf-1] => (item=10.0.101.252)
skipping: [leaf-2] => (item=10.255.0.4)
skipping: [leaf-2] => (item=10.255.0.6)
skipping: [leaf-1] => (item=10.0.101.253)
skipping: [leaf-4] => (item=10.255.0.3)
skipping: [leaf-2] => (item=10.0.101.252)
skipping: [leaf-4] => (item=10.255.0.4)
skipping: [leaf-1] => (item=10.0.101.254)
skipping: [leaf-4] => (item=10.255.0.6)
skipping: [leaf-2] => (item=10.0.101.253)
skipping: [leaf-4] => (item=10.0.101.252)
skipping: [leaf-2] => (item=10.0.101.254)
skipping: [leaf-4] => (item=10.0.101.253)
skipping: [leaf-4] => (item=10.0.101.254)
ok: [leaf-3] => (item=10.255.0.3)
ok: [leaf-3] => (item=10.255.0.4)
ok: [leaf-3] => (item=10.255.0.6)
ok: [leaf-3] => (item=10.0.101.252)
ok: [leaf-3] => (item=10.0.101.253)
ok: [leaf-3] => (item=10.0.101.254)

TASK [validate connection from leaf-4] *****************************************
skipping: [leaf-1] => (item=10.255.0.3)
skipping: [leaf-3] => (item=10.255.0.3)
skipping: [leaf-1] => (item=10.255.0.4)
skipping: [leaf-3] => (item=10.255.0.4)
skipping: [leaf-1] => (item=10.255.0.5)
skipping: [leaf-2] => (item=10.255.0.3)
skipping: [leaf-3] => (item=10.255.0.5)
skipping: [leaf-3] => (item=10.0.101.252)
skipping: [leaf-2] => (item=10.255.0.4)
skipping: [leaf-1] => (item=10.0.101.252)
skipping: [leaf-2] => (item=10.255.0.5)
skipping: [leaf-2] => (item=10.0.101.252)
skipping: [leaf-3] => (item=10.0.101.253)
skipping: [leaf-1] => (item=10.0.101.253)
skipping: [leaf-1] => (item=10.0.101.254)
skipping: [leaf-3] => (item=10.0.101.254)
skipping: [leaf-2] => (item=10.0.101.253)
skipping: [leaf-2] => (item=10.0.101.254)
ok: [leaf-4] => (item=10.255.0.3)
ok: [leaf-4] => (item=10.255.0.4)
ok: [leaf-4] => (item=10.255.0.5)
ok: [leaf-4] => (item=10.0.101.252)
ok: [leaf-4] => (item=10.0.101.253)
ok: [leaf-4] => (item=10.0.101.254)

PLAY RECAP *********************************************************************
leaf-1                     : ok=1    changed=0    unreachable=0    failed=0
leaf-2                     : ok=1    changed=0    unreachable=0    failed=0
leaf-3                     : ok=1    changed=0    unreachable=0    failed=0
leaf-4                     : ok=1    changed=0    unreachable=0    failed=0
I don’t usually work with Arista devices and this was a try to use a different switch vendor but still keep using the type of Ansible Playbook.
Please tell me if you like it and share your feedback.


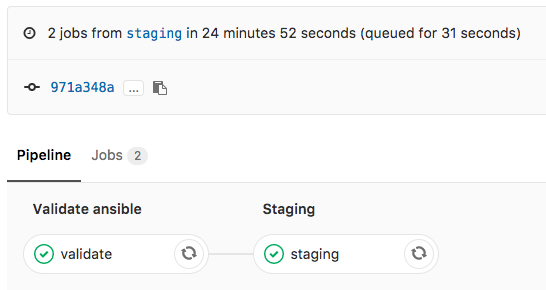
 I will continue to improve the Playbook and the CICD pipeline so come back later to check it out.