Over a year has gone by since my first article about Getting started with OpenShift Hive and my talk at the RedHat OpenShift Gathering when the first stable OpenShift Hive v1 version got released. In between a lot has happened and OpenShift Hive v1.1.1 was released a few weeks ago. So I wanted to look into the new functionalities of OpenShift Hive.
- Operator Lifecycle Manager (OLM) installation
Hive is now available through the Operator Hub community catalog and can be installed on both OpenShift or native Kubernetes cluster through the OLM. The install is straightforward by adding the operator-group and subscription manifests:
---
apiVersion: operators.coreos.com/v1alpha2
kind: OperatorGroup
metadata:
  name: operatorgroup
  namespace: hive
---
apiVersion: operators.coreos.com/v1alpha1
kind: Subscription
metadata:
  name: hive
  namespace: hive
spec:
  channel: alpha
  name: hive-operator
  source: operatorhubio-catalog
  sourceNamespace: olm
Alternatively the Hive subscription can be configured with a manual install plan. In this case the OLM will not automatically upgrade the Hive operator when a new version is released – I highly recommend this for production deployments!
---
apiVersion: operators.coreos.com/v1alpha1
kind: Subscription
metadata:
  name: hive
  namespace: hive
spec:
  channel: alpha
  name: hive-operator
  installPlanApproval: Manual
  source: operatorhubio-catalog
  sourceNamespace: olm
After a few seconds you see an install plan being added.
$ k get installplan
NAME            CSV                    APPROVAL   APPROVED
install-9drmh   hive-operator.v1.1.0   Manual     false
Edit the install plan and set approved value to true – the OLM will start and install or upgrade the Hive operator automatically.
...
spec:
  approval: Manual
  approved: true
  clusterServiceVersionNames:
  - hive-operator.v1.1.0
  generation: 1
...
After the Hive operator is installed you need to apply the Hiveconfig object for the operator to install all of the needed Hive components. On non-OpenShift installs (native Kubernetes) you still need to generate Hiveadmission certificates for the admission controller pods to start otherwise they are missing the hiveadmission-serving-cert secret.
- Hiveconfig – Velero backup and delete protection
There are a few small but also very useful changes in the Hiveconfig object. You can now enable the deleteProtection option which prevents administrators from accidental deletions of ClusterDeployments or SyncSets. Another great addition is that you can enable automatic configuration of Velero to backup your cluster namespaces, meaning you’re not required to configure backups separately.
---
apiVersion: hive.openshift.io/v1
kind: HiveConfig
metadata:
  name: hive
spec:
  logLevel: info
  targetNamespace: hive
  deleteProtection: enabled
  backup:
    velero:
      enabled: true
      namespace: velero
Backups are configured in the Velero namespace as specified in the Hiveconfig.
$ k get backups -n velero
NAME                              AGE
backup-okd-2021-03-26t11-57-32z   3h12m
backup-okd-2021-03-26t12-00-32z   3h9m
backup-okd-2021-03-26t12-35-44z   154m
backup-okd-2021-03-26t12-38-44z   151m
...
With the deletion protection enabled in the hiveconfig, the controller automatically adds the annotation hive.openshift.io/protected-delete: “true” to all resources and prevents these from accidental deletions:
$ k delete cd okd --wait=0
The ClusterDeployment "okd" is invalid: metadata.annotations.hive.openshift.io/protected-delete: Invalid value: "true": cannot delete while annotation is present
- ClusterSync and Scaling Hive controller
To check applied resources through SyncSets and SelectorSyncSets, where Hive has previously used Syncsetnstance but these no longer exists. This now has move to ClusterSync to collect status information about applied resources:
$ k get clustersync okd -o yaml
apiVersion: hiveinternal.openshift.io/v1alpha1
kind: ClusterSync
metadata:
  name: okd
  namespace: okd
spec: {}
status:
  conditions:
  - lastProbeTime: "2021-03-26T16:13:57Z"
    lastTransitionTime: "2021-03-26T16:13:57Z"
    message: All SyncSets and SelectorSyncSets have been applied to the cluster
    reason: Success
    status: "False"
    type: Failed
  firstSuccessTime: "2021-03-26T16:13:57Z"
...
It is also possible to horizontally scale the Hive controller to change the synchronisation frequency for running larger OpenShift deployments.
---
apiVersion: hive.openshift.io/v1
kind: HiveConfig
metadata:
  name: hive
spec:
  logLevel: info
  targetNamespace: hive
  deleteProtection: enabled
  backup:
    velero:
      enabled: true
      namespace: velero
  controllersConfig:
    controllers:
    - config:
        concurrentReconciles: 10
        replicas: 3
      name: clustersync
Please checkout the scaling test script which I found in the Github repo, you can simulate fake clusters by adding the annotation “hive.openshift.io/fake-cluster=true” to your ClusterDeployment.
- Hibernating clusters
RedHat introduced that you can hibernate (shutdown) clusters in OpenShift 4.5 when they are not needed and switch them easily back on when you need them. This is now possible with OpenShift Hive: you can hibernate and change the power state of a cluster deployment.
$ kubectl patch cd okd --type='merge' -p $'spec:\n powerState: Hibernating'
Checking the cluster deployment and power state change to stopping.
$ kubectl get cd
NAME   PLATFORM   REGION      CLUSTERTYPE   INSTALLED   INFRAID     VERSION   POWERSTATE   AGE
okd    aws        eu-west-1                 true        okd-jpqgb   4.7.0     Stopping     44m
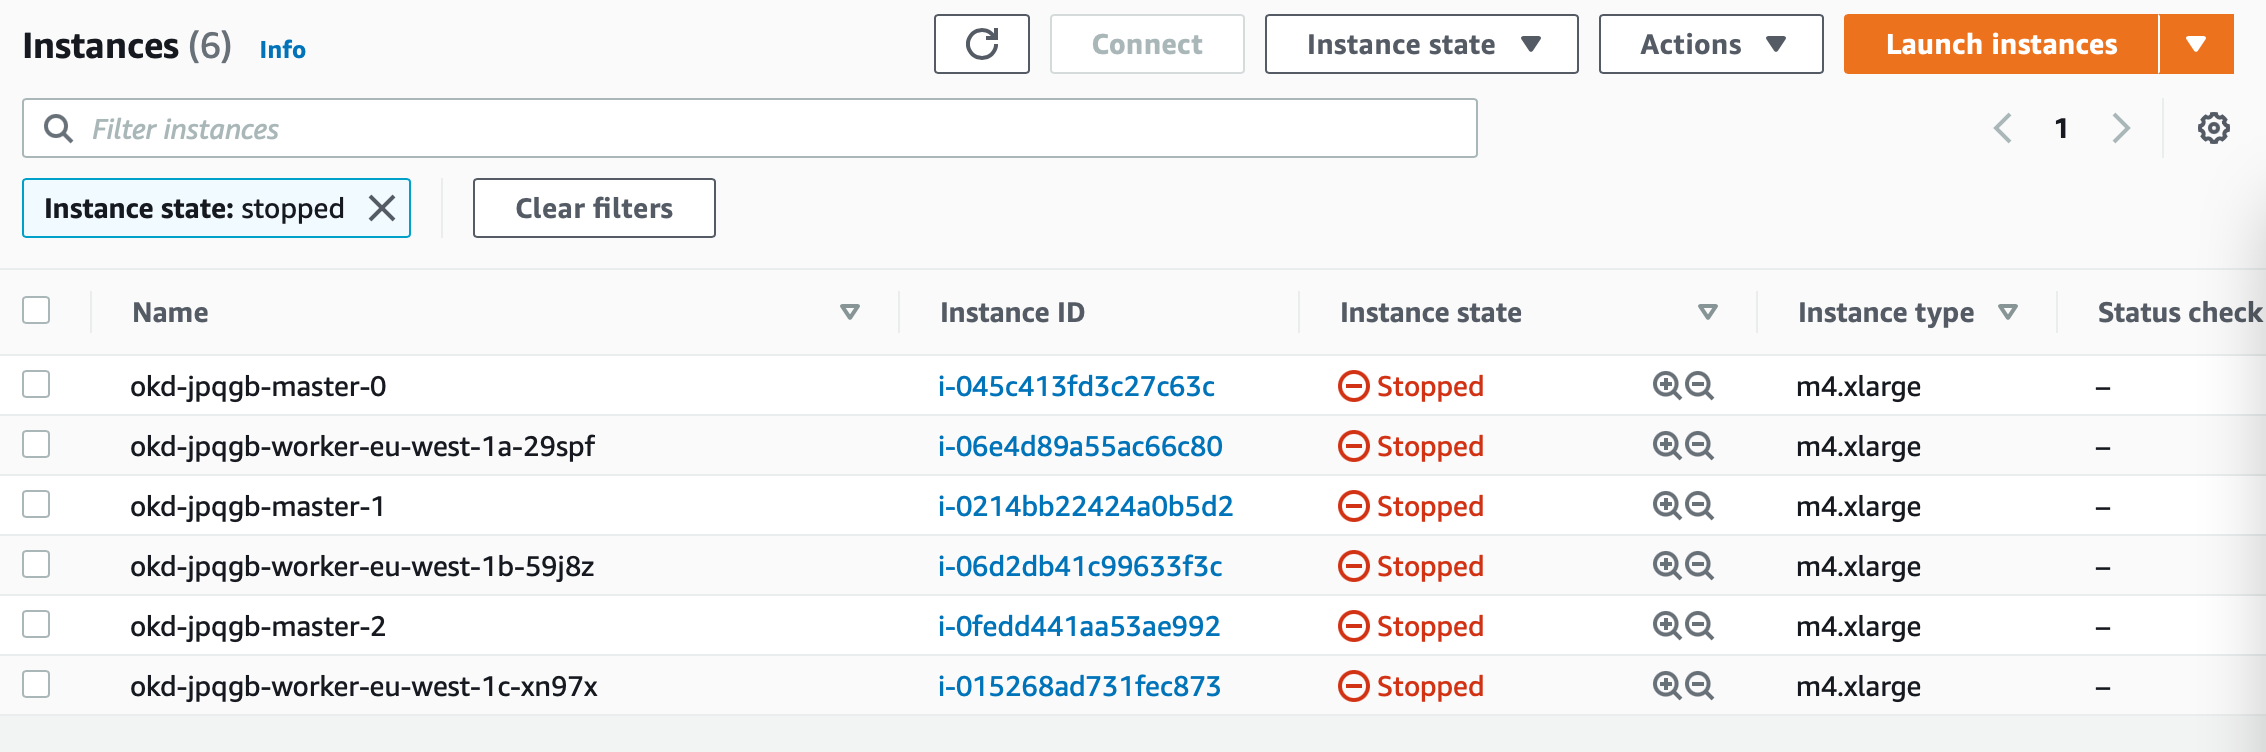
After a couple of minutes the power state of the cluster nodes will change to hibernating.
$ kubectl get cd
NAME   PLATFORM   REGION      CLUSTERTYPE   INSTALLED   INFRAID     VERSION   POWERSTATE    AGE
okd    aws        eu-west-1                 true        okd-jpqgb   4.7.0     Hibernating   47m
In the AWS console you see the cluster instances as stopped.
When turning the cluster back online, change the power state in the cluster deployment to running.
$ kubectl patch cd okd --type='merge' -p $'spec:\n powerState: Running'
Again the power state changes to resuming.
$ kubectl get cd
NAME   PLATFORM   REGION      CLUSTERTYPE   INSTALLED   INFRAID     VERSION   POWERSTATE   AGE
okd    aws        eu-west-1                 true        okd-jpqgb   4.7.0     Resuming     49m
A few minutes later the cluster changes to running and is ready to use again.
$ k get cd
NAME   PLATFORM   REGION      CLUSTERTYPE   INSTALLED   INFRAID     VERSION   POWERSTATE   AGE
okd    aws        eu-west-1                 true        okd-jpqgb   4.7.0     Running      61m
- Cluster pools
Cluster pools is something which came together with the hibernating feature which allows you to pre-provision OpenShift clusters without actually allocating them and after the provisioning they will hibernate until you claim a cluster. Again a nice feature and ideal use-case for ephemeral type development or integration test environments which allows you to have clusters ready to go to claim when needed and dispose them afterwards.
Create a ClusterPool custom resource which is similar to a cluster deployment.
apiVersion: hive.openshift.io/v1
kind: ClusterPool
metadata:
  name: okd-eu-west-1
  namespace: hive
spec:
  baseDomain: okd.domain.com
  imageSetRef:
    name: okd-4.7-imageset
  installConfigSecretTemplateRef:
    name: install-config
  skipMachinePools: true
  platform:
    aws:
      credentialsSecretRef:
        name: aws-creds
      region: eu-west-1
  pullSecretRef:
    name: pull-secret
  size: 3
To claim a cluster from a pool, apply the ClusterClaim resource.
apiVersion: hive.openshift.io/v1
kind: ClusterClaim
metadata:
  name: okd-claim
  namespace: hive
spec:
  clusterPoolName: okd-eu-west-1
  lifetime: 8h
I haven’t tested this yet but will definitely start using this in the coming weeks. Have a look at the Hive documentation on using ClusterPool and ClusterClaim.
- Cluster relocation
For me, having used OpenShift Hive for over one and half years to run OpenShift 4 cluster, this is a very useful functionality because at some point you might need to rebuild or move your management services to a new Hive cluster. The ClusterRelocator object gives you the option to do this.
$ kubectl create secret generic new-hive-cluster-kubeconfig -n hive --from-file=kubeconfig=./new-hive-cluster.kubeconfig
Create the ClusterRelocator object and specify the kubeconfig of the remote Hive cluster, and also add a clusterDeploymentSelector:
apiVersion: hive.openshift.io/v1
kind: ClusterRelocate
metadata:
  name: migrate
spec:
  kubeconfigSecretRef:
    namespace: hive
    name: new-hive-cluster-kubeconfig
  clusterDeploymentSelector:
    matchLabels:
      migrate: cluster
To move cluster deployments, add the label migrate=cluster to your OpenShift clusters you want to move.
$ kubectl label clusterdeployment okd migrate=cluster
The cluster deployment will move to the new Hive cluster and will be removed from the source Hive cluster without the de-provision. It’s important to keep in mind that you need to copy any other resources you need, such as secrets, syncsets, selectorsyncsets and syncidentiyproviders, before moving the clusters. Take a look at the Hive documentation for the exact steps.
- Useful annotation
Pause SyncSets by adding the annotation “hive.openshift.io/syncset-pause=true” to the clusterdeployment which stops the reconcile of defined resources and great for troubleshooting.
In a cluster deployment you can set the option to preserve cluster on delete which allows the user to disconnect a cluster from Hive without de-provisioning it.
$ kubectl patch cd okd --type='merge' -p $'spec:\n preserveOnDelete: true'
This sums up the new features and functionalities you can use with the latest OpenShift Hive version.
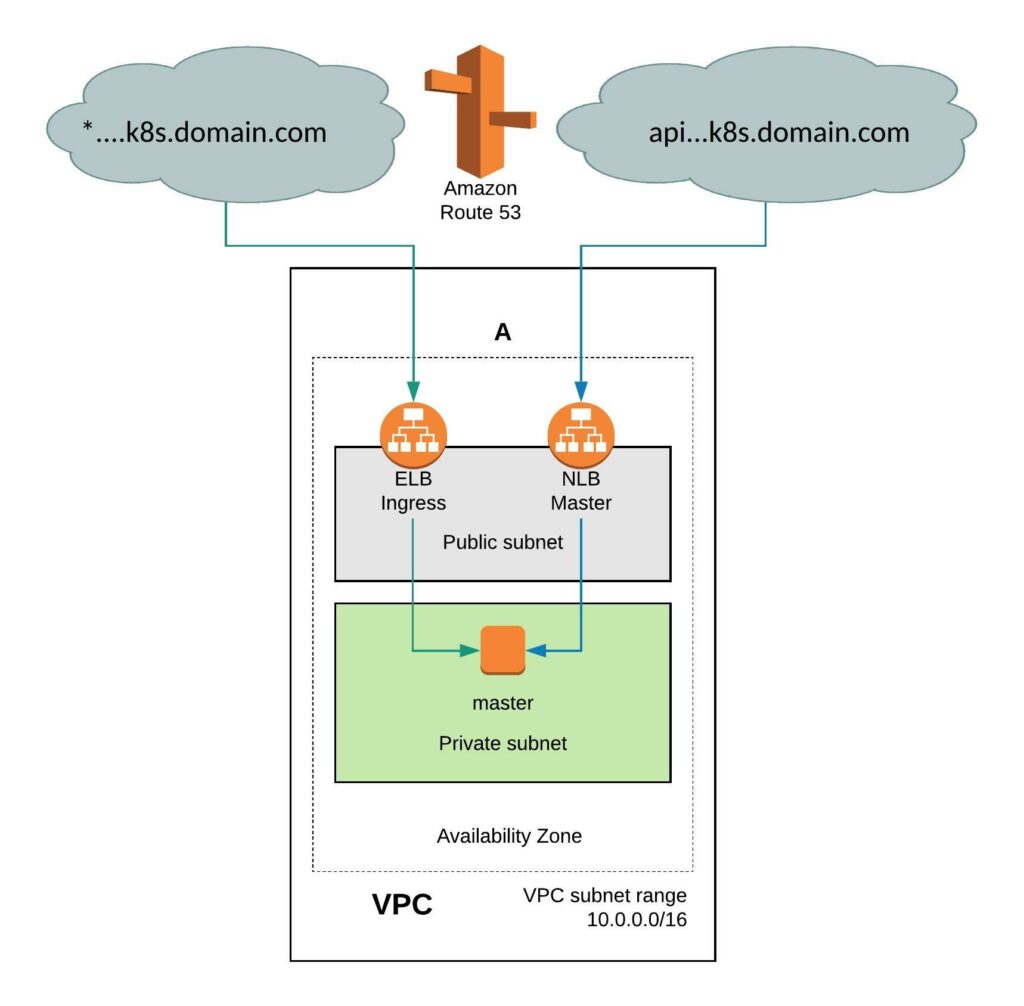 It requires a few simple modifications in the install-config. You need to add the Availability Zone you want where the instance will be created. When doing this the VPC will only have two subnets, one public and one private subnet in eu-west-1. You can also install the single-node cluster into an existing VPC you just have to specify subnet ids. Change the compute worker node replicas zero and control-plane replicas to one. Make sure to have an instance size with enough CPU and memory for all OpenShift components because they need to fit onto the single node. The rest of the install-config is pretty much standard.