In my previous post about the Ansible Playbook for VyOS and BGP Routing, I wrote that I was looking for some Open Source alternatives for software routers to use in AWS Transit VPCs.
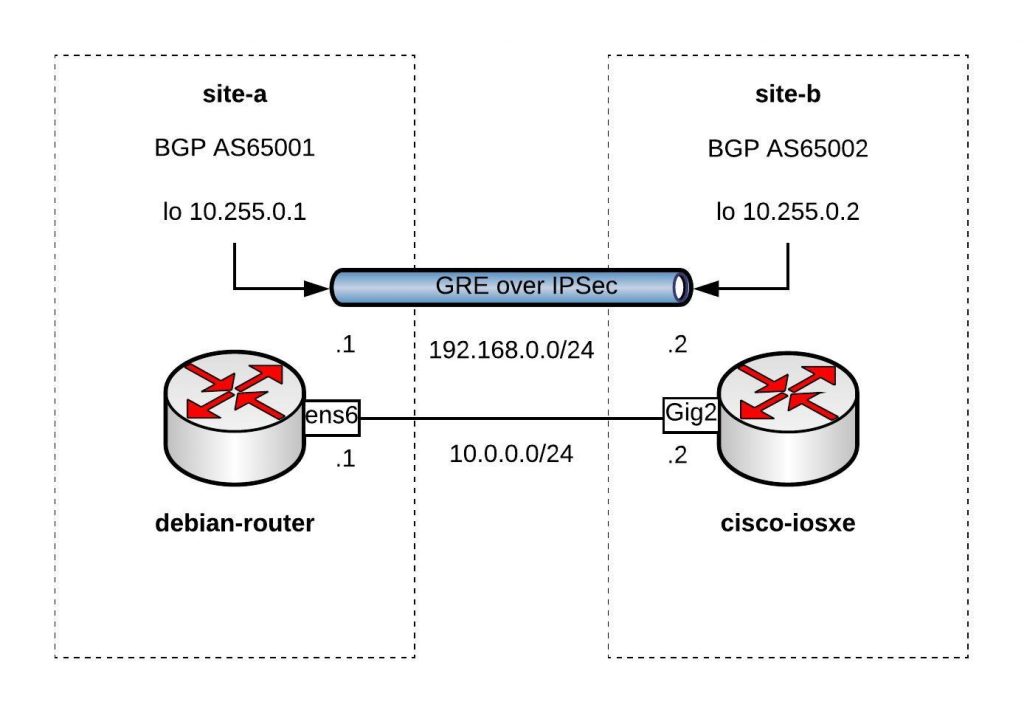
Here is the example using a Debian Linux, FRR (Free Range Routing) and StrongSwan connecting over a GRE over IPSec tunnel to a Cisco IOS-XE (CSRv) router:

You can find the Vagrantfile in my Github repo https://github.com/berndonline/debian-router-vagrant. During the boot Ansible runs and pre-configures both nodes but continue reading about the detailed configuration:
sudo apt-get update
sudo apt-get upgrade -y
Enable IP routing by adding the following line to /etc/sysctl.conf:
sudo vi /etc/sysctl.conf
net.ipv4.ip_forward = 1
sudo sysctl -p /etc/sysctl.conf
Download the latest FRR release for Debian 9 x86_64 from https://github.com/FRRouting/frr/releases
Install FRR and don’t worry about any dependency errors from the first command, the second command will install the missing dependencies. Next, enable the needed FRR daemons and start the service:
wget https://github.com/FRRouting/frr/releases/download/frr-3.0.3/frr_3.0.3-1_debian9.1_amd64.deb
wget https://github.com/FRRouting/frr/releases/download/frr-3.0.3/frr-pythontools_3.0.3-1_debian9.1_all.deb
wget https://github.com/FRRouting/frr/releases/download/frr-3.0.3/frr-doc_3.0.3-1_debian9.1_all.deb
sudo dpkg -i frr_3.0.3-1_debian9.1_amd64.deb frr-pythontools_3.0.3-1_debian9.1_all.deb frr-doc_3.0.3-1_debian9.1_all.deb
sudo apt-get install -f -y

sudo bash -c 'cat << EOF > /etc/frr/daemons
zebra=yes
bgpd=yes
ospfd=no
ospf6d=no
ripd=no
ripngd=no
isisd=no
pimd=no
ldpd=no
nhrpd=no
EOF'

sudo bash -c 'cat << EOF > /etc/frr/frr.conf
!
frr version 3.0.3
frr defaults traditional
no ipv6 forwarding
!
router bgp 65001
 neighbor 192.168.0.2 remote-as 65002
 !
 address-family ipv4 unicast
  network 10.255.0.1/32
 exit-address-family
 vnc defaults
  response-lifetime 3600
  exit-vnc
!
line vty
!
EOF'

sudo systemctl enable frr
sudo systemctl start frr
Install StrongSwan and change a few settings before you can enable and start the service:
sudo apt-get install -y strongswan-swanctl charon-systemd

sudo bash -c 'cat << EOF > /etc/strongswan.d/charon/connmark.conf
connmark {

    # Disable connmark plugin
    # Needed for tunnels - see https://wiki.strongswan.org/projects/strongswan/wiki/RouteBasedVPN
    load = no

}
EOF'
sudo bash -c 'cat << EOF > /etc/strongswan.d/charon.conf
charon {

    # Cisco IKEv2 wants to use reauth - need to set make_before_break otherwise
    # strongSwan will have a very brief outage during IKEv2 reauth
    make_before_break = yes

    # Needed for tunnels - see https://wiki.strongswan.org/projects/strongswan/wiki/RouteBasedVPN
    install_routes = no

}
EOF'

sudo systemctl enable strongswan-swanctl
sudo systemctl start strongswan-swanctl
Setting TCP MSS to path MTU with iptables:
sudo DEBIAN_FRONTEND=noninteractive apt-get install -y -q iptables-persistent

sudo bash -c 'cat << EOF > /etc/iptables/rules.v4
*filter
:INPUT ACCEPT [0:0]
:FORWARD ACCEPT [0:0]
:OUTPUT ACCEPT [0:0]
COMMIT
*mangle
:PREROUTING ACCEPT [0:0]
:INPUT ACCEPT [0:0]
:FORWARD ACCEPT [0:0]
:OUTPUT ACCEPT [0:0]
:POSTROUTING ACCEPT [0:0]
-A FORWARD -p tcp --tcp-flags SYN,RST SYN -j TCPMSS --clamp-mss-to-pmtu
COMMIT
EOF'
Let us continue with the Debian router interface configuration, here you also find the GRE tunnel settings:
sudo bash -c 'cat << EOF > /etc/network/interfaces
source-directory /etc/network/interfaces.d
auto lo
iface lo inet loopback

auto lo:1
iface lo:1 inet static
      address 10.255.0.1
      netmask 255.255.255.255

auto ens5
iface ens5 inet dhcp

auto ens6
iface ens6 inet static
      address 10.0.0.1
      netmask 255.255.255.0

auto gre1
iface gre1 inet tunnel
      address 192.168.0.1
      netmask 255.255.255.0
      mode gre
      endpoint 10.0.0.2
EOF'

sudo systemctl restart networking
In StrongSwan you configure the IPSec settings:
sudo bash -c 'cat << EOF > /etc/swanctl/swanctl.conf
connections {
    my-vpn {
        remote_addrs = 10.0.0.2
        version = 1
        proposals = aes256-sha1-modp1536
        reauth_time = 1440m
        local-1 {
            auth = psk
            id = debian-router.domain.com
        }
        remote-1 {
            # id field here is inferred from the remote address
            auth = psk
        }
        children {
            my-vpn-1 {
                local_ts = 10.0.0.1/32[gre]
                remote_ts = 10.0.0.2/32[gre]
                mode = transport
                esp_proposals = aes128-sha1-modp1536
                rekey_time = 60m
                start_action = trap
                dpd_action = restart
            }
        }
    }

}
secrets {
    ike-my-vpn-1 {
        id-1 = cisco-iosxe.domain.com
        id-2 = 10.0.0.2
        secret = "secret"
    }
}
EOF'

sudo systemctl restart strongswan-swanctl
We finished the Debian host configuration and continue with the Cisco router configuration to connect the Debian router to the tunnel 0 interface on the Cisco router:
conf t
hostname cisco-iosxe

crypto keyring my-keyring
  pre-shared-key address 10.0.0.1 key secret
  exit

crypto isakmp policy 20
 encr aes 256
 authentication pre-share
 group 5
crypto isakmp identity hostname
crypto isakmp profile my-isakmp-profile
   keyring my-keyring
   match identity host debian-router.domain.com
   exit
crypto ipsec transform-set my-transform-set esp-aes esp-sha-hmac
 mode transport
 exit
crypto ipsec profile my-ipsec-profile
 set transform-set my-transform-set
 set pfs group5
 set isakmp-profile my-isakmp-profile
 exit

interface Loopback1
 ip address 10.255.0.2 255.255.255.255
 exit

interface Tunnel0
 ip address 192.168.0.2 255.255.255.0
 tunnel source GigabitEthernet2
 tunnel destination 10.0.0.1
 tunnel protection ipsec profile my-ipsec-profile
 no shut
 exit

interface GigabitEthernet2
 ip address 10.0.0.2 255.255.255.0
 no shut
 exit

router bgp 65002
 bgp log-neighbor-changes
 neighbor 192.168.0.1 remote-as 65001
 address-family ipv4
  network 10.255.0.2 mask 255.255.255.255
  neighbor 192.168.0.1 activate
 exit-address-family
 exit

exit
wr mem
Clone my Github repo https://github.com/berndonline/debian-router-vagrant and boot the environment with “./vagrant_up.sh”. After the two VMs are booted wait a few seconds and run the validation playbook to check the connectivity between the nodes:
berndonline@lab:~/debian-router-vagrant$ ansible-playbook ./validate_connectivity.yml

PLAY [debian-router] ***********************************************************************************************************************************************

TASK [check connectivity from debian router] ***********************************************************************************************************************
changed: [debian-router]

PLAY [cisco-iosxe] *************************************************************************************************************************************************

TASK [check connectivity from cisco iosxe] *************************************************************************************************************************
ok: [cisco-iosxe]

PLAY RECAP *********************************************************************************************************************************************************
cisco-iosxe                : ok=1    changed=0    unreachable=0    failed=0
debian-router              : ok=1    changed=1    unreachable=0    failed=0

berndonline@lab:~/debian-router-vagrant$
I will continue improving the config, and do some more testing with AWS VPN gateways (VGW).
Please share your feedback.