OpenShift Container Platform Troubleshooting Guide

On the first look OpenShift/Kubernetes seems like a very complex platform but once you start to get to know the different components and what they are doing, you will see it gets easier and easier. The purpose of this article to give you an every day guide based on my experience on how to successfully troubleshoot issues on OpenShift.

  • OpenShift service logging
# OpenShift 3.1 to OpenShift 3.9:
/etc/sysconfig/atomic-openshift-master-controllers
/etc/sysconfig/atomic-openshift-master-api
/etc/sysconfig/atomic-openshift-node

# OpenShift 3.10 and later versions:
/etc/origin/master/master.env # for API and Controllers
/etc/sysconfig/atomic-openshift-node

The log levels for the OpenShift services can be controlled via the –loglevel parameter in the service options.

0 – Errors and warnings only
2 – Normal information
4 – Debugging information
6 – API- debugging information (request / response)
8 – Body API debugging information

For example add or edit the line in /etc/sysconfig/atomic-openshift-node to OPTIONS=’–loglevel=4′ and afterward restart the service with systemctl restart atomic-openshift-node.

Viewing OpenShift service logs:

# OpenShift 3.1 to OpenShift 3.9:
journalctl -u atomic-openshift-master-api
journalctl -u atomic-openshift-master-controllers
journalctl -u atomic-openshift-node
journalctl -u etcd # or 'etcd_container' for containerized install

# OpenShift 3.10 and later versions:
/usr/local/bin/master-logs api api
/usr/local/bin/master-logs controllers controllers
/usr/local/bin/master-logs etcd etcd
journalctl -u atomic-openshift-node
  • Docker service logging

Change the docker daemon log level and add the parameter –log-level for the OPTIONS variable in dockers service file located in /etc/sysconfig/docker.

The available log levels are: ( debug, info, warn, error, fatal )

See the example below; to enable debug logging in /etc/sysconfig/docker to set log level equal to debug (After making the changes on the docker service you need to will restart with systemctl restart docker.):

OPTIONS='--insecure-registry=172.30.0.0/16 --selinux-enabled --log-level=debug'
  • OC command logging

The oc and oadm command also accept a loglevel option that can help get additional information. Value between 6 and 8 will provide extensive logging, API requests (loglevel 6), API headers (loglevel 7) and API responses received (loglevel 8):

oc whoami --loglevel=8
  • OpenShift SkyDNS

SkyDNS is the internal service discovery for OpenShift and DNS is important for OpenShift to function:

# Test full qualified cluster domain name
nslookup docker-registry.default.svc.cluster.local
# OR
dig +short docker-registry.default.svc.cluster.local

# Check if clusterip match the previous result
oc get svc/docker-registry -n default

# Test short name
nslookup docker-registry.default.svc
nslookup <endpoint-name>.<project-name>.svc

If short name doesn’t work look out if cluster.local is missing in dns search suffix. If resolution doesn’t work at all before enable debug logging, check if Dnsmasq service running and correctly configured. OpenShift uses a dispatcher script to maintain the DNS configuration of a node.

Add the options “–logspec ‘dns=10’” to the /etc/sysconfig/atomic-openshift-node service configuration on a node running skydns and restart the atomic-openshift-node service afterwards. There will then be skydns debug information in the journalctl logs.

OPTIONS="--loglevel=2 --logspec dns*=10"
  • OpenShift Master API and Web Console

In the following example, the internal-master.domain.com is used by the internal cluster, and the master.domain.com is used by external clients

# Run the following commands on any node host
curl https://internal-master.domain.com:443/version
curl -k https://master.domain.com:443/healthz

# The OpenShift API service runs on all master instances. To see the status of the service, view the master-api pods in the kube-system project:
oc get pod -n kube-system -l openshift.io/component=api
oc get pod -n kube-system -o wide
curl -k --insecure https://$HOSTNAME:8443/healthz
  • OpenShift Controller role

The OpenShift Container Platform controller service is available on all master nodes. The service runs in active/passive mode, which means it should only be running on one master.

# Verify the master host running the controller service
oc get -n kube-system cm openshift-master-controllers -o yaml
    • OpenShift Certificates

During the installation of OpenShift the playbooks generates a CA to sign every certificate in the cluster. One of the most common issues are expired node certificates. Below are a list of important certificate files:

# Is the OpenShift Certificate Authority, and it signs every other certificate unless specified otherwise.
/etc/origin/master/ca.crt

# Contains a bundle with the current and the old CA's (if exists) to trust them all. If there has been only one ca.crt, then this file is the same as ca.crt.
/etc/origin/master/ca-bundle.crt

# The internal API, also known as cluster internal address or the variable masterURL here all the internal components authenticates to access the API, such as nodes, routers and other services.
/etc/origin/master/master.server.crt

# Master controller certificate authenticates to kubernetes as a client using the admin.kubeconfig
/etc/origin/master/admin.crt

# Node certificates
/etc/origin/node/ca.crt                   # to be able to trust the API, a copy of masters CA bundle is placed in:
/etc/origin/node/server.crt               # to secure this communication
/etc/origin/node/system:node:{fqdn}.crt   # Nodes needs to authenticate to the Kubernetes API as a client. 

# Etcd certificates
/etc/etcd/ca.crt                          # is the etcd CA, it is used to sign every certificate.
/etc/etcd/server.crt                      # is used by the etcd to listen to clients.
/etc/etcd/peer.crt                        # is used by etcd to authenticate as a client.

# Master certificates to auth to etcd
/etc/origin/master/master.etcd-ca.crt     # is a copy of /etc/etcd/ca.crt. Used to trust the etcd cluster.
/etc/origin/master/master.etcd-client.crt # is used to authenticate as a client of the etcd cluster.

# Services ca certificate. All self-signed internal certificates are signed by this CA.
/etc/origin/master/service-signer.crt

Here’s an example to check the validity of the master server certificate:

cat /etc/origin/master/master.server.crt | openssl x509 -text | grep -i Validity -A2
# OR
openssl x509 -enddate -noout -in /etc/origin/master/master.server.crt

It’s worth checking the documentation about how to re-deploy certificates on OpenShift.

  • OpenShift etcd

On the etcd node (master) set source to etcd.conf file for most of the needed variables.

source /etc/etcd/etcd.conf
export ETCDCTL_API=3

# Set endpoint variable to include all etcd endpoints
ETCD_ALL_ENDPOINTS=` etcdctl  --cert=$ETCD_PEER_CERT_FILE --key=$ETCD_PEER_KEY_FILE --cacert=$ETCD_TRUSTED_CA_FILE --endpoints=$ETCD_LISTEN_CLIENT_URLS --write-out=fields   member list | awk '/ClientURL/{printf "%s%s",sep,$3; sep=","}'`

# Cluster status and health checks
etcdctl  --cert=$ETCD_PEER_CERT_FILE --key=$ETCD_PEER_KEY_FILE --cacert=$ETCD_TRUSTED_CA_FILE --endpoints=$ETCD_LISTEN_CLIENT_URLS --write-out=table  member list
etcdctl  --cert=$ETCD_PEER_CERT_FILE --key=$ETCD_PEER_KEY_FILE --cacert=$ETCD_TRUSTED_CA_FILE --endpoints=$ETCD_ALL_ENDPOINTS  --write-out=table endpoint status
etcdctl  --cert=$ETCD_PEER_CERT_FILE --key=$ETCD_PEER_KEY_FILE --cacert=$ETCD_TRUSTED_CA_FILE --endpoints=$ETCD_ALL_ENDPOINTS endpoint health

Check etcd database key entries:

etcdctl  --cert=$ETCD_PEER_CERT_FILE --key=$ETCD_PEER_KEY_FILE --cacert=$ETCD_TRUSTED_CA_FILE --endpoints="https://$(hostname):2379" get /openshift.io --prefix --keys-only
  • OpenShift Registry

To get detailed information about the pods running the internal registry run the following command:

oc get pods -n default | grep registry | awk '{ print $1 }' | xargs -i oc describe pod {}

For a basic health check that the internal registry is running and responding you need to “curl” the /healthz path. Normally this should return a 200 HTTP response:

Registry=$(oc get svc docker-registry -n default -o 'jsonpath={.spec.clusterIP}:{.spec.ports[0].port}')

curl -vk $Registry/healthz
# OR
curl -vk https://$Registry/healthz

If a persistent volume is attached to the registry make sure that the registry can write to the volume.

oc project default 
oc rsh `oc get pods -o name -l docker-registry`

$ touch /registry/test-file
$ ls -la /registry/ 
$ rm /registry/test-file
$ exit

If the registry is insecure make sure you have edited the /etc/sysconfig/docker file and add –insecure-registry 172.30.0.0/16 to the OPTIONS parameter on the nodes.

For more information about testing the internal registry please have a look at the documentation about Accessing the Registry.

  • OpenShift Router 

To increase the log level for OpenShift router pod, set loglevel=4 in the container args:

# Increase logging level
oc patch dc -n default router -p '[{"op": "add", "path": "/spec/template/spec/containers/0/args", "value":["--loglevel=4"]}]' --type=json 

# View logs
oc logs <router-pod-name> -n default

# Remove logging change 
oc patch dc -n default router -p '[{"op": "remove", "path": "/spec/template/spec/containers/0/args", "value":["--loglevel=4"]}]' --type=json

OpenShift router image version 3.3 and later, the logging for http requests can be forwarded to an external syslog server:

oc set env dc/router ROUTER_SYSLOG_ADDRESS=<syslog-server-ip> ROUTER_LOG_LEVEL=debug

If you are facing issues with ingress routes to your application run the below command to collect more information:

oc logs dc/router -n default
oc get dc/router -o yaml -n default
oc get route <route-name> -n <project-name> 
oc get endpoints --all-namespaces 
oc exec -it <router-pod-name> -- ls -la 
oc exec -it <router-pod-name> -- find /var/lib/haproxy -regex ".*\(.map\|config.*\|.json\)" -print -exec cat {} \; > haproxy_configs_and_maps

Check if your application domain is /paas.domain.com/ and dig for an ANSWER containing the load balancer VIP address:

dig \*.paas.domain.com

Confirm that certificates are being severed out correctly by running the following:

echo -n | openssl s_client -connect :443 -servername myapp.paas.domain.com 2>&1 | openssl x509 -noout -text
curl -kv https://myapp.paas.domain.com 
  • OpenShift SDN

Please checkout the official Troubleshooting OpenShift SDN documentation

To get OpenFlow table export, connect to the openvswitch container and run following command:

docker exec openvswitch ovs-ofctl -O OpenFlow13 dump-flows br0
  • OpenShift Namespace events

Useful to collect events from the namespace to identify pod creation issues before you did in the container logs:

oc get events [-n |--all-namespaces]

In the default namespace you find relevant events for monitoring or auditing a cluster, such as Node and resource events related to the OpenShift platform.

  • OpenShift Pod and Container Logs

Container/pod logs can be viewed using the OpenShift oc command line. Add option “-p” to print the logs for the previous instance of the container in a pod if it exists and add option “-f” to stream the logs:

oc logs <pod-name> [-f]

The logs are saved to the worker nodes disk where the container/pod is running and it is located at:
/var/lib/docker/containers/<container-id>/<container-id>-json.log.

For setting the log file limits for containers on a worker node the –log-opt can be configured with max-size and max-file so that a containers logs are rolled over:

# cat /etc/sysconfig/docker 
OPTIONS='--insecure-registry=172.30.0.0/16 --selinux-enabled --log-opt max-size=50m --log-opt max-file=5'

# Restart docker service for the changes to take effect.
systemctl restart docker 

To remove all logs from a given container run the following commands:

cat /dev/null > /var/lib/docker/containers/<container-id>/<container-id>-json.log
# OR
cat /dev/null >  $(docker inspect --format='{{.LogPath}}' <container-id> )

To generate a list of the largest files run the following commands:

# Log files
find /var/lib/docker/ -name "*.log" -exec ls -sh {} \; | sort -n -r | head -20

# All container files
du -aSh /var/lib/docker/ | sort -n -r | head -n 10

Finding out the veth# interface of a docker container and use tcpdump to capture traffic more easily. The iflink of the container is the same as the ifindex of the veth#. You can get the iflink of the container as follows:

docker exec -it <container-name>  bash -c 'cat /sys/class/net/eth0/iflink'

# Let's say that the results in 14, then grep for 14
grep -l 14 /sys/class/net/veth*/ifindex

# Which will give a unique result on the worker node
/sys/class/net/veth12c4982/ifindex

Here a simple bash script to get the container and veth id’s:

#!/bin/bash
for container in $(docker ps -q); do
    iflink=`docker exec -it $container bash -c 'cat /sys/class/net/eth0/iflink'`
    iflink=`echo $iflink|tr -d '\r'`
    veth=`grep -l $iflink /sys/class/net/veth*/ifindex`
    veth=`echo $veth|sed -e 's;^.*net/\(.*\)/ifindex$;\1;'`
    echo $container:$veth
done
  • OpenShift Builder Pod Logs

If you want to troubleshoot a particular build of “myapp” you can view logs with:

oc logs [bc/|dc/]<name> [-f]

To increase the logging level add a BUILD_LOGLEVEL environment variable to the BuildConfig strategy:

sourceStrategy:
...
  env:
    - name: "BUILD_LOGLEVEL"
      value: "5"

I hope you found this article useful and that it helped you troubleshoot OpenShift. Please let me know what you think and leave a comment.

Continuous Integration and Delivery for Networking with Cisco devices

This post is about continuous integration and continuous delivery (CICD) for Cisco devices and how to use network simulation to test automation before deploying this to production environments. That was one of the main reasons for me to use Vagrant for simulating the network because the virtual environment can be created on-demand and thrown away after the scripts run successful. Please read before my post about Cisco network simulation using Vagrant: Cisco IOSv and XE network simulation using Vagrant and Cisco ASAv network simulation using Vagrant.

Same like in my first post about Continuous Integration and Delivery for Networking with Cumulus Linux, I am using Gitlab.com and their Gitlab-runner for the continuous integration and delivery (CICD) pipeline.

  • You need to register your Gitlab-runner with the Gitlab repository:

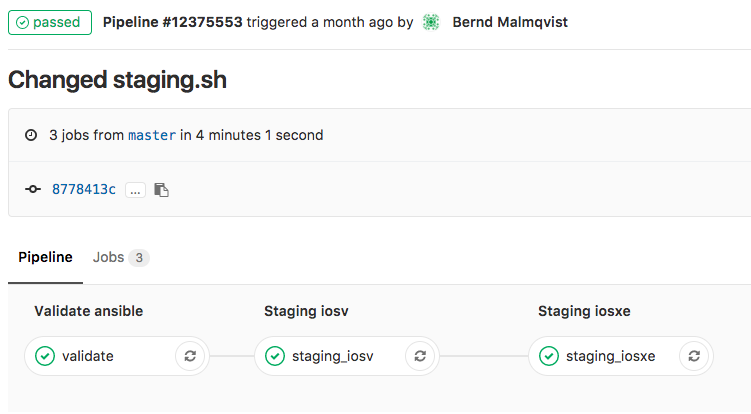
  • The next step is to create your .gitlab-ci.yml which defines your CI-pipeline.
---
stages:
    - validate ansible
    - staging iosv
    - staging iosxe
validate:
    stage: validate ansible
    script:
        - bash ./linter.sh
staging_iosv:
    before_script:
        - git clone https://github.com/berndonline/cisco-lab-vagrant.git
        - cd cisco-lab-vagrant/
        - cp Vagrantfile-IOSv Vagrantfile
    stage: staging iosv
    script:
        - bash ../staging.sh
staging_iosxe:
    before_script:
        - git clone https://github.com/berndonline/cisco-lab-vagrant.git
        - cd cisco-lab-vagrant/
        - cp Vagrantfile-IOSXE Vagrantfile
    stage: staging iosxe
    script:
        - bash ../staging.sh

I clone the cisco vagrant lab which I use to spin-up a virtual staging environment and run the Ansible playbook against the virtual lab. The stages IOSv and IOSXE are just examples in my case depending what Cisco IOS versions you want to test.

The production stage would be similar to staging only that you run the Ansible playbook against your physical environment.

  • Basically any commit or merge in the Gitlab repo triggers the pipeline which is defined in the gitlab-ci.

  • The first stage is only to validate that the YAML files have the correct syntax.

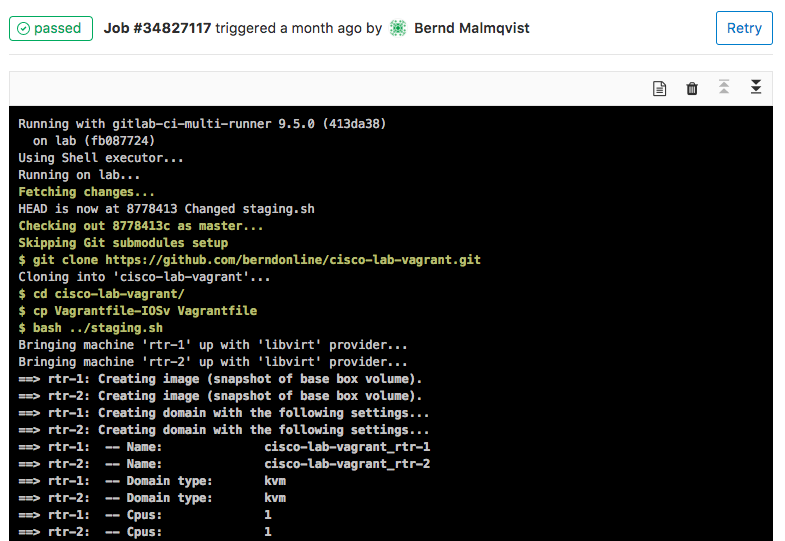
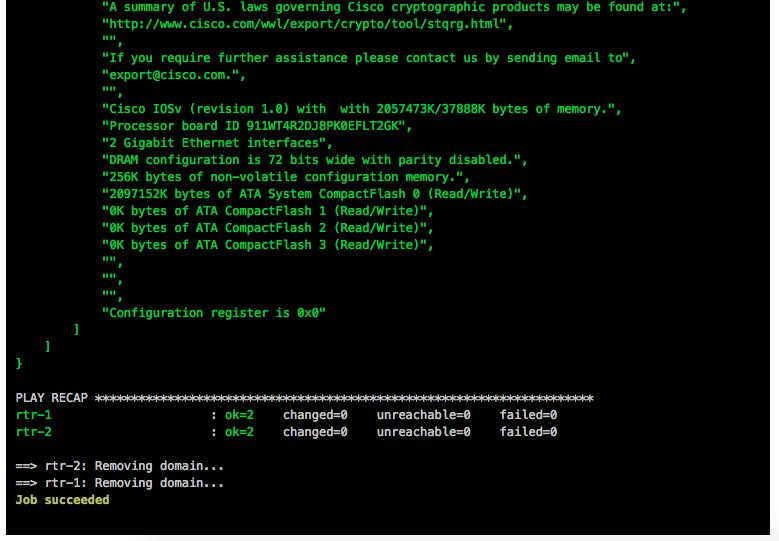
  • Here the details of a job and when everything goes well the job succeeded.

This is an easy way to test your Ansible playbooks against a virtual Cisco environment before deploying this to a production system.

Here again my two repositories I use:

https://github.com/berndonline/cisco-lab-vagrant

https://github.com/berndonline/cisco-lab-provision

Read my new posts about Ansible Playbook for Cisco ASAv Firewall Topology or Ansible Playbook for Cisco BGP Routing Topology.

Strange ARP issue between ASA and Cisco router

Recently I had a strange ARP problem between an Cisco ASA firewall and an Cisco router (provider router) on an internet line in one of our remote offices. Periodically the office lost the network connectivity.

From the first look the ARP table seemed fine:

# sh arp | i OUTSIDE
OUTSIDE 212.0.107.169 000f.e28a.1f7a 348

The ARP resolution was not working properly, the firewall was waiting for responses or even lost the ARP entry from the router. From the debugging output you can see that the firewall was in pending state and waiting for the router to respond:

# clear arp OUTSIDE 212.0.107.169
arp-req: generating request for 212.0.107.169 at interface OUTSIDE
arp-send: arp request built from 212.0.107.170 0a00.0a00.0010 for 212.0.107.169 at 3637391690
arp-req: generating request for 212.0.107.169 at interface OUTSIDE
arp-req: request for 212.0.107.169 still pending
arp-req: generating request for 212.0.107.169 at interface OUTSIDE
arp-req: request for 212.0.107.169 still pending
arp-req: generating request for 212.0.107.169 at interface OUTSIDE
arp-req: request for 212.0.107.169 still pending
arp-in: response at OUTSIDE from 212.0.107.169 000f.e28a.1f7a for 212.0.107.170 0a00.0a00.0010
arp-set: added arp OUTSIDE 212.0.107.169 000f.e28a.1f7a and updating NPs at 3637391710
arp-in: resp from 212.0.107.169 for 212.0.107.170 on OUTSIDE at 3637391710
arp-send: sending all saved block to OUTSIDE 212.0.107.169 at 3637391710

The same happen to normal ARP updates and the reason why we lost periodically the connectivity because the router didnt respond at all.

Our provider quickly figured out that there was a problem with the device and replaced the router.

ARP table output:

# sh arp | i OUTSIDE
OUTSIDE 212.0.107.169 000f.e28a.1f7a 303

Here the normal ARP behaviour ones the router was replaced,  the router responded directly to ARP requests:

# clear arp OUTSIDE 212.0.107.169
arp-req: generating request for 212.0.107.169 at interface OUTSIDE
arp-send: arp request built from 212.0.107.170 0a00.0a00.0010 for 212.0.107.169 at 3717553710
arp-in: response at OUTSIDE from 212.0.107.169 000f.e28a.1f7a for 212.0.107.170 0a00.0a00.0010
arp-set: added arp OUTSIDE 212.0.107.169 000f.e28a.1f7a and updating NPs at 3717553710
arp-in: resp from 212.0.107.169 for 212.0.107.170 on OUTSIDE at 3717553710

Normal ARP updates:

arp-in: request at OUTSIDE from 212.0.107.169 000f.e28a.1f7a for 212.0.107.171 0000.0000.0000
arp-set: added arp OUTSIDE 212.0.107.169 000f.e28a.1f7a and updating NPs at 3717983740


Ansible Playbook for Cisco Lab

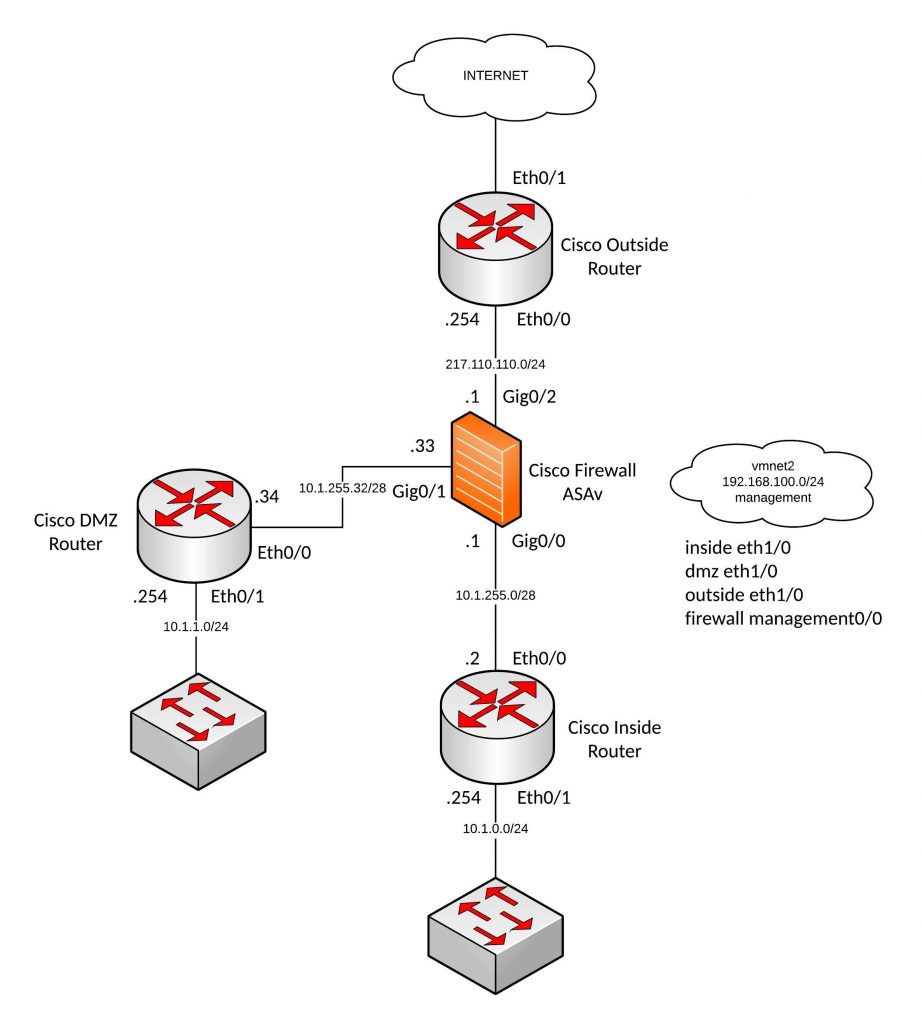
From my recent posts, you can see that I use Ansible a lot for automating the device configuration deployment. Here my firewall lab (Cisco routers and Cisco ASA firewall) which I use to test different things in GNS3:

Before you can start deploying configs via Ansible you need to manually configure your management interfaces and device remote access. I run VMware Fusion Pro and use my VMNET2 network as management network because I have additional VMs for Ansible and Monitoring.

Here the config to prep your Cisco routers that you can afterwards deploy the rest of the config via Ansible:

conf t
ip vrf vrf-mgmt
	rd 1:1
	exit

interface Ethernet1/0
 description management
 ip vrf forwarding vrf-mgmt
 ip address 192.168.100.201 255.255.255.0
 no shutdown
 exit

ip domain-name localdomain

aaa new-model
aaa authentication login default local
aaa authorization exec default local 

username ansible privilege 15 secret 5 $1$xAJX$D99QcH02Splr1L3ktrvh41

crypto key generate rsa general-keys modulus 2048 

ip ssh version 2
ip ssh authentication-retries 5

line vty 0 4
 transport input ssh
 exit

exit
write mem

The same you need to do for your Cisco ASA firewall:

conf t
enable password 2KFQnbNIdI.2KYOU encrypted

interface Management0/0
 nameif management
 security-level 0
 ip address 192.168.100.204 255.255.255.0
 
aaa authentication ssh console LOCAL

ssh 0.0.0.0 0.0.0.0 management

username ansible password xsxRJKdxDzf9Ctr8 encrypted privilege 15
exit
write mem

Now you are ready to deploy the basic lab configuration to all the devices but before we start we need hosts and vars files and the main Ansible Playbook (yaml) file.

In the host’s file I define all the interface variables, there are different ways of doing it but this one is the easiest.

./hosts

[router]
inside
dmz
outside
[firewall]
firewall

In the group_vars file is the global variables.

./group_vars/all.yml

---
username: "ansible"
password: "cisco"
secret: "cisco"
default_gw_inside: "10.1.255.1"
default_gw_dmz: "10.1.255.33"
default_gw_firewall: "217.110.110.254"

Here the Ansible Playbook with the basic device configuration:

./interfaces.yml

- name: Deploy Cisco lab configuration part 1
  connection: local
  hosts: router
  gather_facts: false
  vars:
    cli:
      username: "{{ username }}"
      password: "{{ password }}"
      host: "{{ device_ip }}"
  tasks:
    - name: deploy inside router configuration
      when: ansible_host not in "outside"
      ios_config:
        provider: "{{ cli }}"
        before:
          - "default interface {{ item.interface }}"
        lines:
          - "ip address {{ item.address }}"
        after:
          - no shutdown
        parents: "interface {{ item.interface }}"
        match: strict
      with_items:
        - { interface : Ethernet0/0, address : "{{ eth_00_ip }} {{ eth_00_mask }}" }
        - { interface : Ethernet0/1, address : "{{ eth_01_ip }} {{ eth_01_mask }}" }
    - name: deploy outside router configuration
      when: ansible_host not in "inside,dmz"
      ios_config:
        provider: "{{ cli }}"
        before:
          - "default interface {{ item.interface }}"
        lines:
          - "ip address {{ item.address }}"
        after:
          - no shutdown
        parents: "interface {{ item.interface }}"
        match: strict
      with_items:
        - { interface : Ethernet0/0, address : "{{ eth_00_ip }} {{ eth_00_mask }}" }
        - { interface : Ethernet0/1, address : "{{ eth_01_ip }}" }

- name: Deploy Cisco lab configuration part 2
  connection: local
  hosts: firewall
  gather_facts: false
  vars:
      cli:
       username: "{{ username }}"
       password: "{{ password }}"
       auth_pass: "{{ secret }}"
       authorize: yes
       host: "{{ device_ip }}"
  tasks:
    - name: deploy firewall configuration
      when: ansible_host not in "inside,dmz,outside"
      asa_config:
        provider: "{{ cli }}"
        lines:
          - "nameif {{ item.nameif }}"
          - "ip address {{ item.address }}"
        after:
          - no shutdown
        parents: "interface {{ item.interface }}"
        match: line
      with_items:
        - { interface : GigabitEthernet0/0, nameif : "{{ eth_00_nameif }}", address : "{{ eth_00_ip }} {{ eth_00_mask }}" }
        - { interface : GigabitEthernet0/1, nameif : "{{ eth_01_nameif }}", address : "{{ eth_01_ip }} {{ eth_01_mask }}" }
        - { interface : GigabitEthernet0/2, nameif : "{{ eth_02_nameif }}", address : "{{ eth_02_ip }} {{ eth_02_mask }}" }

In the playbook, I needed to separate the outside router because one interface is configured to dhcp otherwise I could have used only one task for all three routers.

The 2nd part is for the Cisco ASA firewall configuration because it uses a different Ansible module and variables.

Now let us deploy the config and see the output from Ansible:

[berndonline@ansible firewall]$ ansible-playbook interfaces.yml -i hosts

PLAY [Deploy firewall lab configuration part 1] ********************************

TASK [deploy inside router configuration] **************************************
skipping: [outside] => (item={u'interface': u'Ethernet0/1', u'address': u'dhcp '})
skipping: [outside] => (item={u'interface': u'Ethernet0/0', u'address': u'217.110.110.254 255.255.255.0'})
changed: [dmz] => (item={u'interface': u'Ethernet0/0', u'address': u'10.1.255.34 255.255.255.240'})
changed: [inside] => (item={u'interface': u'Ethernet0/0', u'address': u'10.1.255.2 255.255.255.240'})
changed: [dmz] => (item={u'interface': u'Ethernet0/1', u'address': u'10.1.1.254 255.255.255.0'})
changed: [inside] => (item={u'interface': u'Ethernet0/1', u'address': u'10.1.0.254 255.255.255.0'})

TASK [deploy outside router configuration] *************************************
skipping: [inside] => (item={u'interface': u'Ethernet0/1', u'address': u'10.1.0.254'})
skipping: [inside] => (item={u'interface': u'Ethernet0/0', u'address': u'10.1.255.2 255.255.255.240'})
skipping: [dmz] => (item={u'interface': u'Ethernet0/1', u'address': u'10.1.1.254'})
skipping: [dmz] => (item={u'interface': u'Ethernet0/0', u'address': u'10.1.255.34 255.255.255.240'})
changed: [outside] => (item={u'interface': u'Ethernet0/0', u'address': u'217.110.110.254 255.255.255.0'})
changed: [outside] => (item={u'interface': u'Ethernet0/1', u'address': u'dhcp'})

PLAY [Deploy firewall lab configuration part 2] ********************************

TASK [deploy firewall configuration] *******************************************
changed: [firewall] => (item={u'interface': u'GigabitEthernet0/0', u'nameif': u'inside', u'address': u'10.1.255.1 255.255.255.240'})
changed: [firewall] => (item={u'interface': u'GigabitEthernet0/1', u'nameif': u'dmz', u'address': u'10.1.255.33 255.255.255.240'})
changed: [firewall] => (item={u'interface': u'GigabitEthernet0/2', u'nameif': u'outside', u'address': u'217.110.110.1 255.255.255.0'})

PLAY RECAP *********************************************************************
dmz                        : ok=1    changed=1    unreachable=0    failed=0
firewall                   : ok=1    changed=1    unreachable=0    failed=0
inside                     : ok=1    changed=1    unreachable=0    failed=0
outside                    : ok=1    changed=1    unreachable=0    failed=0

[berndonline@ansible firewall]$

Quick check if Ansible deployed the interface configuration:

inside#sh ip int brief
Interface                  IP-Address      OK? Method Status                Protocol
Ethernet0/0                10.1.255.2      YES manual up                    up
Ethernet0/1                10.1.0.254      YES manual up                    up
Ethernet1/0                192.168.100.201 YES NVRAM  up                    up
inside#

dmz#sh ip int brief
Interface                  IP-Address      OK? Method Status                Protocol
Ethernet0/0                10.1.255.34     YES manual up                    up
Ethernet0/1                10.1.1.254      YES manual up                    up
Ethernet1/0                192.168.100.202 YES NVRAM  up                    up
dmz#

outside#sh ip int brief
Interface                  IP-Address      OK? Method Status                Protocol
Ethernet0/0                217.110.110.254 YES manual up                    up
Ethernet0/1                172.16.191.23   YES DHCP   up                    up
Ethernet1/0                192.168.100.203 YES NVRAM  up                    up
outside#

firewall# sho ip address
Current IP Addresses:
Interface                Name                   IP address      Subnet mask     Method
GigabitEthernet0/0       inside                 10.1.255.1      255.255.255.240 manual
GigabitEthernet0/1       dmz                    10.1.255.33     255.255.255.240 manual
GigabitEthernet0/2       outside                217.110.110.1   255.255.255.0   manual
Management0/0            management             192.168.100.204 255.255.255.0   CONFIG
firewall#

As you can see Ansible deployed the interface configuration correctly. If I run Ansible again nothing will be deployed because the configuration is already present:

[berndonline@ansible firewall]$ ansible-playbook interfaces.yml -i hosts

PLAY [Deploy firewall lab configuration part 1] ********************************

TASK [deploy inside router configuration] **************************************
skipping: [outside] => (item={u'interface': u'Ethernet0/1', u'address': u'dhcp '})
skipping: [outside] => (item={u'interface': u'Ethernet0/0', u'address': u'217.110.110.254 255.255.255.0'})
ok: [dmz] => (item={u'interface': u'Ethernet0/0', u'address': u'10.1.255.34 255.255.255.240'})
ok: [dmz] => (item={u'interface': u'Ethernet0/1', u'address': u'10.1.1.254 255.255.255.0'})
ok: [inside] => (item={u'interface': u'Ethernet0/0', u'address': u'10.1.255.2 255.255.255.240'})
ok: [inside] => (item={u'interface': u'Ethernet0/1', u'address': u'10.1.0.254 255.255.255.0'})

TASK [deploy outside router configuration] *************************************
skipping: [inside] => (item={u'interface': u'Ethernet0/1', u'address': u'10.1.0.254'})
skipping: [inside] => (item={u'interface': u'Ethernet0/0', u'address': u'10.1.255.2 255.255.255.240'})
skipping: [dmz] => (item={u'interface': u'Ethernet0/1', u'address': u'10.1.1.254'})
skipping: [dmz] => (item={u'interface': u'Ethernet0/0', u'address': u'10.1.255.34 255.255.255.240'})
ok: [outside] => (item={u'interface': u'Ethernet0/0', u'address': u'217.110.110.254 255.255.255.0'})
ok: [outside] => (item={u'interface': u'Ethernet0/1', u'address': u'dhcp'})

PLAY [Deploy firewall lab configuration part 2] ********************************

TASK [deploy firewall configuration] *******************************************
ok: [firewall] => (item={u'interface': u'GigabitEthernet0/0', u'nameif': u'inside', u'address': u'10.1.255.1 255.255.255.240'})
ok: [firewall] => (item={u'interface': u'GigabitEthernet0/1', u'nameif': u'dmz', u'address': u'10.1.255.33 255.255.255.240'})
ok: [firewall] => (item={u'interface': u'GigabitEthernet0/2', u'nameif': u'outside', u'address': u'217.110.110.1 255.255.255.0'})

PLAY RECAP *********************************************************************
dmz                        : ok=1    changed=0    unreachable=0    failed=0
firewall                   : ok=1    changed=0    unreachable=0    failed=0
inside                     : ok=1    changed=0    unreachable=0    failed=0
outside                    : ok=1    changed=0    unreachable=0    failed=0

[berndonline@ansible firewall]$

In my GNS3 labs, I normally not save the device configuration except the management IPs because with Ansible I can deploy everything again within seconds and use different Playbooks depending what I want to test. It gets even cooler if you use Semaphore (see my blog post: Ansible Semaphore) because you just click ones on the Playbook you want to deploy.

Comment below if you have questions or problems.

Read my new posts about Ansible Playbook for Cisco ASAv Firewall Topology or Ansible Playbook for Cisco BGP Routing Topology.

GNS3 Network Simulator

Found something really cool today 🙂

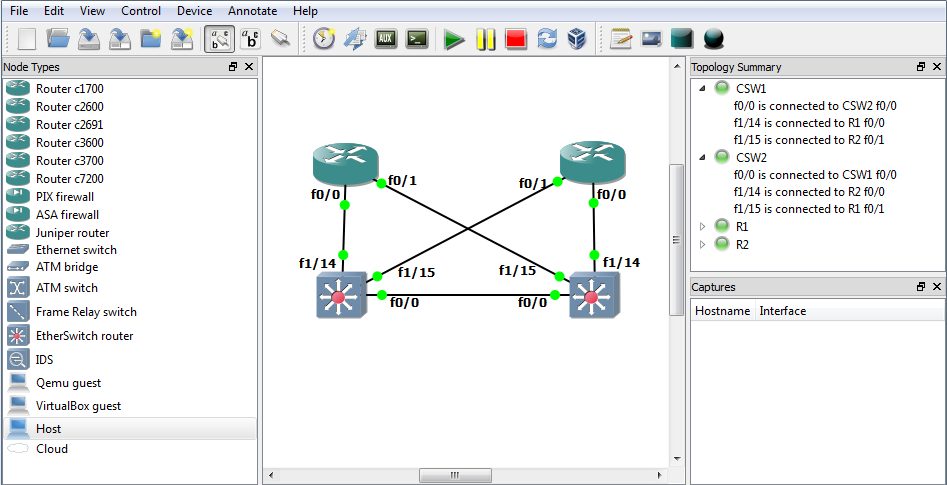
GNS3 is a graphical network simulator where you can set-up complex virtual networks and run Cisco and Juniper routers or switches. The best is that you can also integrate Qemu and Virtualbox into your virtual lab environment what I really love. You can easily test new configurations on devices without having to set-up all these in hardware.

The only little problem is that you need a quite power system to do all of that. Otherwise I tested GNS3 on an 3 year old laptop with Intel Core2Duo and 4 GB RAM and run up to 6 Cisco routers without any big problems what’s enough for me at the moment.

Ah I forgot, you can of course also use Wireshark to capture packets on an link between two devices.

Here the link to the website: www.gns3.net