Using HashiCorp Terraform to deploy Amazon AWS VPC

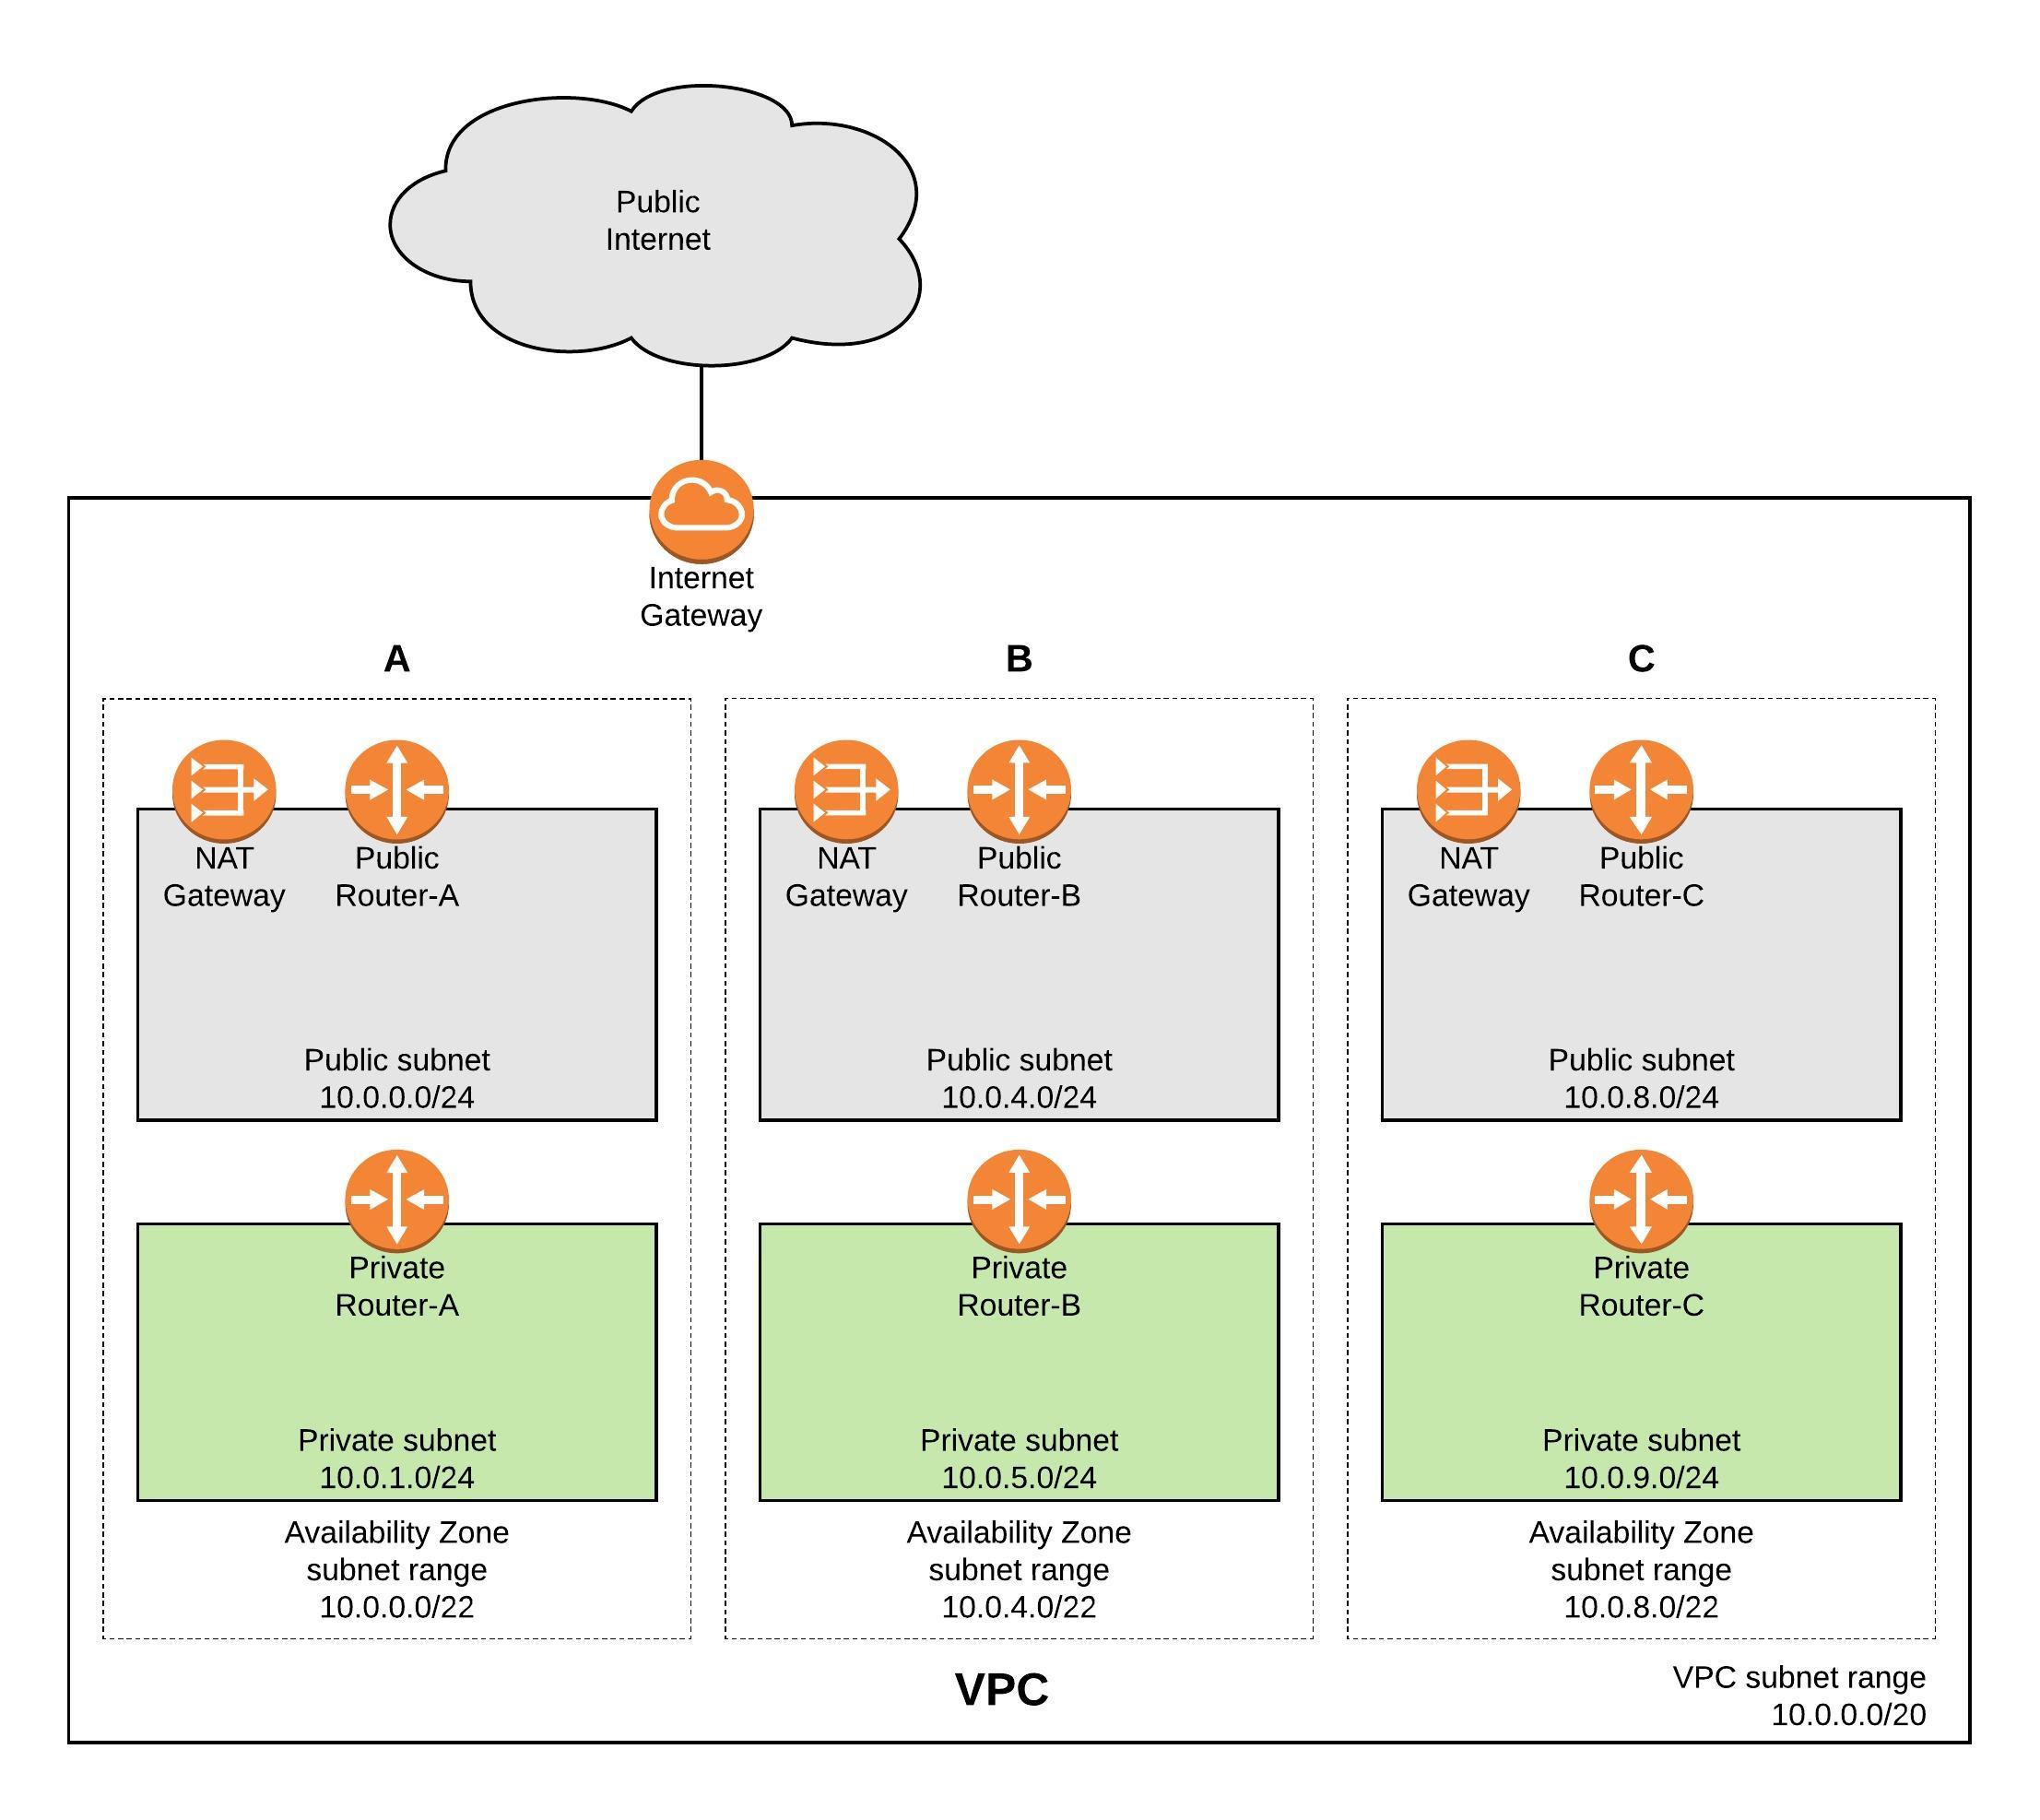
Before I start deploying the AWS VPC with HashCorp’s Terraform I want to explain the design of the Virtual Private Cloud. The main focus here is primarily for redundancy to ensure that if one Availability Zone (AZ) becomes unavailable that it is not interrupting the traffic and causing outages in your network, the NAT Gateway for example run per AZ so you need to make sure that these services are spread over multiple AZs.

AWS VPC network overview:
Before you start using Terraform you need to install the binary and it is also very useful to install the AWS command line interface. Please don’t forget to register the AWS CLI and add access and secure key.

pip install awscli --upgrade --user
wget https://releases.hashicorp.com/terraform/0.11.7/terraform_0.11.7_linux_amd64.zip
unzip terraform_0.11.7_linux_amd64.zip
sudo mv terraform /usr/local/bin/

Terraform is a great product and creates infrastructure as code, and is independent from any cloud provider so there is no need to use AWS CloudFormation like in my example. My repository for the Terraform files can be found here: https://github.com/berndonline/aws-terraform

Let’s start with the variables file, which defines the needed settings for deploying the VPC. Basically you only need to change the variables to deploy the VPC to another AWS region:

...
variable "aws_region" {
  description = "AWS region to launch servers."
  default     = "eu-west-1"
}
...
variable "vpc_cidr" {
    default = "10.0.0.0/20"
  description = "the vpc cdir range"
}
variable "public_subnet_a" {
  default = "10.0.0.0/24"
  description = "Public subnet AZ A"
}
variable "public_subnet_b" {
  default = "10.0.4.0/24"
  description = "Public subnet AZ A"
}
variable "public_subnet_c" {
  default = "10.0.8.0/24"
  description = "Public subnet AZ A"
}
...

The vpc.tf file is the Terraform template which deploys the private and public subnets, the internet gateway, multiple NAT gateways and the different routing tables and adds the needed routes towards the internet:

# Create a VPC to launch our instances into
resource "aws_vpc" "default" {
    cidr_block = "${var.vpc_cidr}"
    enable_dns_support = true
    enable_dns_hostnames = true
    tags {
      Name = "VPC"
    }
}

resource "aws_subnet" "PublicSubnetA" {
  vpc_id = "${aws_vpc.default.id}"
  cidr_block = "${var.public_subnet_a}"
  tags {
        Name = "Public Subnet A"
  }
 availability_zone = "${data.aws_availability_zones.available.names[0]}"
}
...

In the main.tf you define which provider to use:

# Specify the provider and access details
provider "aws" {
  region = "${var.aws_region}"
}

# Declare the data source
data "aws_availability_zones" "available" {}

Now let’s start deploying the environment, first you need to initialise Terraform “terraform init“:

berndonline@lab:~/aws-terraform$ terraform init

Initializing provider plugins...
- Checking for available provider plugins on https://releases.hashicorp.com...
- Downloading plugin for provider "aws" (1.25.0)...

The following providers do not have any version constraints in configuration,
so the latest version was installed.

To prevent automatic upgrades to new major versions that may contain breaking
changes, it is recommended to add version = "..." constraints to the
corresponding provider blocks in configuration, with the constraint strings
suggested below.

* provider.aws: version = "~> 1.25"

Terraform has been successfully initialized!

You may now begin working with Terraform. Try running "terraform plan" to see
any changes that are required for your infrastructure. All Terraform commands
should now work.

If you ever set or change modules or backend configuration for Terraform,
rerun this command to reinitialize your working directory. If you forget, other
commands will detect it and remind you to do so if necessary.
berndonline@lab:~/aws-terraform$

Next, let’s do a dry run “terraform plan” to see all changes Terraform would apply:

berndonline@lab:~/aws-terraform$ terraform plan
Refreshing Terraform state in-memory prior to plan...
The refreshed state will be used to calculate this plan, but will not be
persisted to local or remote state storage.

data.aws_availability_zones.available: Refreshing state...

------------------------------------------------------------------------

An execution plan has been generated and is shown below.
Resource actions are indicated with the following symbols:
  + create

Terraform will perform the following actions:

  + aws_eip.natgw_a
      id:                                          
      allocation_id:                               
      association_id:                              
      domain:                                      
      instance:                                    
      network_interface:                           
      private_ip:                                  
      public_ip:                                   
      vpc:                                         "true"

...

  + aws_vpc.default
      id:                                          
      assign_generated_ipv6_cidr_block:            "false"
      cidr_block:                                  "10.0.0.0/20"
      default_network_acl_id:                      
      default_route_table_id:                      
      default_security_group_id:                   
      dhcp_options_id:                             
      enable_classiclink:                          
      enable_classiclink_dns_support:              
      enable_dns_hostnames:                        "true"
      enable_dns_support:                          "true"
      instance_tenancy:                            "default"
      ipv6_association_id:                         
      ipv6_cidr_block:                             
      main_route_table_id:                         
      tags.%:                                      "1"
      tags.Name:                                   "VPC"


Plan: 27 to add, 0 to change, 0 to destroy.

------------------------------------------------------------------------

Note: You didn't specify an "-out" parameter to save this plan, so Terraform
can't guarantee that exactly these actions will be performed if
"terraform apply" is subsequently run.

berndonline@lab:~/aws-terraform$

Because nothing is deployed, Terraform would apply 27 changes, so let’s do this by running “terraform apply“. Terraform will check the state and will ask you to confirm and then apply the changes:

berndonline@lab:~/aws-terraform$ terraform apply
data.aws_availability_zones.available: Refreshing state...

An execution plan has been generated and is shown below.
Resource actions are indicated with the following symbols:
  + create

Terraform will perform the following actions:

  + aws_eip.natgw_a
      id:                                          
      allocation_id:                               
      association_id:                              
      domain:                                      
      instance:                                    
      network_interface:                           
      private_ip:                                  
      public_ip:                                   
      vpc:                                         "true"

...

  + aws_vpc.default
      id:                                          
      assign_generated_ipv6_cidr_block:            "false"
      cidr_block:                                  "10.0.0.0/20"
      default_network_acl_id:                      
      default_route_table_id:                      
      default_security_group_id:                   
      dhcp_options_id:                             
      enable_classiclink:                          
      enable_classiclink_dns_support:              
      enable_dns_hostnames:                        "true"
      enable_dns_support:                          "true"
      instance_tenancy:                            "default"
      ipv6_association_id:                         
      ipv6_cidr_block:                             
      main_route_table_id:                         
      tags.%:                                      "1"
      tags.Name:                                   "VPC"


Plan: 27 to add, 0 to change, 0 to destroy.

Do you want to perform these actions?
  Terraform will perform the actions described above.
  Only 'yes' will be accepted to approve.

  Enter a value: yes

aws_eip.natgw_c: Creating...
  allocation_id:     "" => ""
  association_id:    "" => ""
  domain:            "" => ""
  instance:          "" => ""
  network_interface: "" => ""
  private_ip:        "" => ""
  public_ip:         "" => ""
  vpc:               "" => "true"
aws_eip.natgw_a: Creating...
  allocation_id:     "" => ""
  association_id:    "" => ""
  domain:            "" => ""
  instance:          "" => ""
  network_interface: "" => ""
  private_ip:        "" => ""
  public_ip:         "" => ""
  vpc:               "" => "true"

...

aws_route_table_association.PrivateSubnetB: Creation complete after 0s (ID: rtbassoc-174ba16c)
aws_nat_gateway.public_nat_c: Still creating... (1m40s elapsed)
aws_nat_gateway.public_nat_c: Still creating... (1m50s elapsed)
aws_nat_gateway.public_nat_c: Creation complete after 1m56s (ID: nat-093319a1fa62c3eda)
aws_route_table.private_route_c: Creating...
  propagating_vgws.#:                         "" => ""
  route.#:                                    "" => "1"
  route.4170986711.cidr_block:                "" => "0.0.0.0/0"
  route.4170986711.egress_only_gateway_id:    "" => ""
  route.4170986711.gateway_id:                "" => ""
  route.4170986711.instance_id:               "" => ""
  route.4170986711.ipv6_cidr_block:           "" => ""
  route.4170986711.nat_gateway_id:            "" => "nat-093319a1fa62c3eda"
  route.4170986711.network_interface_id:      "" => ""
  route.4170986711.vpc_peering_connection_id: "" => ""
  tags.%:                                     "" => "1"
  tags.Name:                                  "" => "Private Route C"
  vpc_id:                                     "" => "vpc-fdffb19b"
aws_route_table.private_route_c: Creation complete after 1s (ID: rtb-d64632af)
aws_route_table_association.PrivateSubnetC: Creating...
  route_table_id: "" => "rtb-d64632af"
  subnet_id:      "" => "subnet-17da194d"
aws_route_table_association.PrivateSubnetC: Creation complete after 1s (ID: rtbassoc-35749e4e)

Apply complete! Resources: 27 added, 0 changed, 0 destroyed.
berndonline@lab:~/aws-terraform$

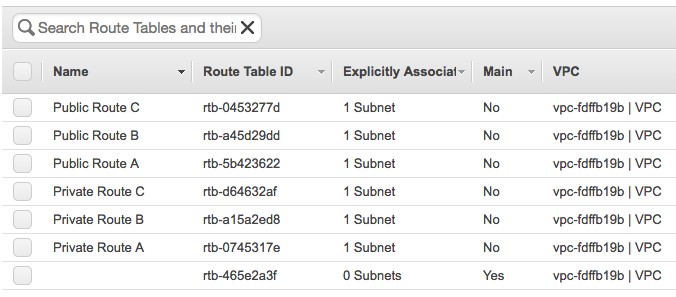
Terraform successfully applied all the changes so let’s have a quick look in the AWS web console:

You can change the environment and run “terraform apply” again and Terraform would deploy the changes you have made. In my example below I didn’t, so Terraform would do nothing because it tracks the state that is deployed and that I have defined in the vpc.tf:

berndonline@lab:~/aws-terraform$ terraform apply
aws_eip.natgw_c: Refreshing state... (ID: eipalloc-7fa0eb42)
aws_vpc.default: Refreshing state... (ID: vpc-fdffb19b)
aws_eip.natgw_a: Refreshing state... (ID: eipalloc-3ca7ec01)
aws_eip.natgw_b: Refreshing state... (ID: eipalloc-e6bbf0db)
data.aws_availability_zones.available: Refreshing state...
aws_subnet.PublicSubnetC: Refreshing state... (ID: subnet-d6e4278c)
aws_subnet.PrivateSubnetC: Refreshing state... (ID: subnet-17da194d)
aws_subnet.PrivateSubnetA: Refreshing state... (ID: subnet-6ea62708)
aws_subnet.PublicSubnetA: Refreshing state... (ID: subnet-1ab0317c)
aws_network_acl.all: Refreshing state... (ID: acl-c75f9ebe)
aws_internet_gateway.gw: Refreshing state... (ID: igw-27652940)
aws_subnet.PrivateSubnetB: Refreshing state... (ID: subnet-ab59c8e3)
aws_subnet.PublicSubnetB: Refreshing state... (ID: subnet-4a51c002)
aws_route_table.public_route_b: Refreshing state... (ID: rtb-a45d29dd)
aws_route_table.public_route_a: Refreshing state... (ID: rtb-5b423622)
aws_route_table.public_route_c: Refreshing state... (ID: rtb-0453277d)
aws_nat_gateway.public_nat_b: Refreshing state... (ID: nat-0376fc652d362a3b1)
aws_nat_gateway.public_nat_a: Refreshing state... (ID: nat-073ed904d4cf2d30e)
aws_route_table_association.PublicSubnetA: Refreshing state... (ID: rtbassoc-b14ba1ca)
aws_route_table_association.PublicSubnetB: Refreshing state... (ID: rtbassoc-277d975c)
aws_route_table.private_route_a: Refreshing state... (ID: rtb-0745317e)
aws_route_table.private_route_b: Refreshing state... (ID: rtb-a15a2ed8)
aws_route_table_association.PrivateSubnetB: Refreshing state... (ID: rtbassoc-174ba16c)
aws_route_table_association.PrivateSubnetA: Refreshing state... (ID: rtbassoc-60759f1b)
aws_nat_gateway.public_nat_c: Refreshing state... (ID: nat-093319a1fa62c3eda)
aws_route_table_association.PublicSubnetC: Refreshing state... (ID: rtbassoc-307e944b)
aws_route_table.private_route_c: Refreshing state... (ID: rtb-d64632af)
aws_route_table_association.PrivateSubnetC: Refreshing state... (ID: rtbassoc-35749e4e)

Apply complete! Resources: 0 added, 0 changed, 0 destroyed.
berndonline@lab:~/aws-terraform$

To remove the environment use run “terraform destroy“:

berndonline@lab:~/aws-terraform$ terraform destroy
aws_eip.natgw_c: Refreshing state... (ID: eipalloc-7fa0eb42)
data.aws_availability_zones.available: Refreshing state...
aws_eip.natgw_a: Refreshing state... (ID: eipalloc-3ca7ec01)
aws_vpc.default: Refreshing state... (ID: vpc-fdffb19b)
aws_eip.natgw_b: Refreshing state... (ID: eipalloc-e6bbf0db)

...

An execution plan has been generated and is shown below.
Resource actions are indicated with the following symbols:
  - destroy

Terraform will perform the following actions:

  - aws_eip.natgw_a

  - aws_eip.natgw_b

  - aws_eip.natgw_c

...

Plan: 0 to add, 0 to change, 27 to destroy.

Do you really want to destroy?
  Terraform will destroy all your managed infrastructure, as shown above.
  There is no undo. Only 'yes' will be accepted to confirm.

  Enter a value: yes

aws_network_acl.all: Destroying... (ID: acl-c75f9ebe)
aws_route_table_association.PrivateSubnetA: Destroying... (ID: rtbassoc-60759f1b)
aws_route_table_association.PublicSubnetC: Destroying... (ID: rtbassoc-307e944b)
aws_route_table_association.PublicSubnetA: Destroying... (ID: rtbassoc-b14ba1ca)
aws_route_table_association.PublicSubnetB: Destroying... (ID: rtbassoc-277d975c)
aws_route_table_association.PrivateSubnetC: Destroying... (ID: rtbassoc-35749e4e)
aws_route_table_association.PrivateSubnetB: Destroying... (ID: rtbassoc-174ba16c)
aws_route_table_association.PrivateSubnetB: Destruction complete after 0s

...

aws_internet_gateway.gw: Destroying... (ID: igw-27652940)
aws_eip.natgw_c: Destroying... (ID: eipalloc-7fa0eb42)
aws_subnet.PrivateSubnetC: Destroying... (ID: subnet-17da194d)
aws_subnet.PrivateSubnetC: Destruction complete after 1s
aws_eip.natgw_c: Destruction complete after 1s
aws_internet_gateway.gw: Still destroying... (ID: igw-27652940, 10s elapsed)
aws_internet_gateway.gw: Destruction complete after 11s
aws_vpc.default: Destroying... (ID: vpc-fdffb19b)
aws_vpc.default: Destruction complete after 0s

Destroy complete! Resources: 27 destroyed.
berndonline@lab:~/aws-terraform$

I hope this article was informative and explains how to deploy a VPC with Terraform. In the coming weeks I will add additional functions like deploying EC2 Instances and Load Balancing.

Please share your feedback and leave a comment.
Ansible Playbook for Arista vEOS BGP IP-Fabric

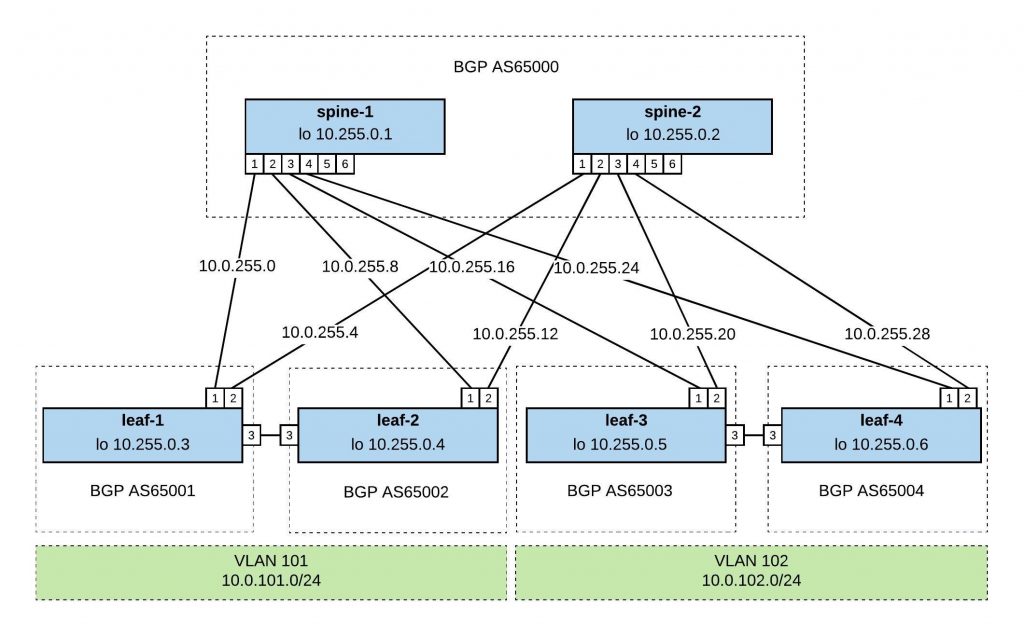
Over the Christmas holidays, I was working just for fun on an Arista vEOS Vagrant topology and Ansible Playbook. I reused my Ansible Playbook from my previous post about an Ansible Playbook for Cumulus Linux BGP IP-Fabric and Cumulus NetQ Validation.

Arista only has a Virtualbox vEOS image and there is an ISO image to boot the virtual appliance which I don’t understand why they have done this, rather I prefer the way Cumulus provide their VX images for testing to use with Virtualbox or KVM.

I found an interesting blog post on how to run vEOS images with KVM (Libvirt). I tried it and I could run vEOS in KVM but unfortunately, it wasn’t  stable enough to run more complex virtual network topologies so I had to switch back to Virtualbox. I will give it a try again in a few month because I prefer KVM over Virtualbox.

Anyway, you’ll find more information about how to use vEOS with Virtualbox and Vagrant.

My Virtualbox Vagrantfile can be found in my Github repository: https://github.com/berndonline/arista-lab-vagrant

Network overview:

Ansible Playbook:

As I have mentioned before I tried to be close as possible to my Cumulus Linux Ansible Playbook and tried to keep the variables and roles the same. They are differences of course in the Jinja2 templates and tasks but the overall structure is similar.

Here you’ll find the repository with the Ansible Playbook: https://github.com/berndonline/arista-lab-provision

Because Arista didn’t prepare the images very well and only created a vagrant user without adding the ssh key for authentication I needed to use a CLI provider with a username and password. But this is only a minor issue otherwise it works the same. See the site.yml below:

---

- hosts: network

  connection: local
  gather_facts: 'False'

  vars:
    cli:
      username: vagrant
      password: vagrant

  roles:
    - leafgroups
    - hostname
    - interfaces
    - routing
    - ntp

In the roles, I have used the Arista EOS Ansible modules eos_config and eos_system.

Boot up the Vagrant environment and then run the Playbook afterwards:

PLAY [network] *****************************************************************

TASK [leafgroups : create leaf groups based on clag_pairs] *********************
ok: [leaf-1] => (item=(u'leafgroup1', [u'leaf-1', u'leaf-2']))
skipping: [leaf-1] => (item=(u'leafgroup2', [u'leaf-3', u'leaf-4'])) 
skipping: [leaf-3] => (item=(u'leafgroup1', [u'leaf-1', u'leaf-2'])) 
ok: [leaf-3] => (item=(u'leafgroup2', [u'leaf-3', u'leaf-4']))
skipping: [leaf-4] => (item=(u'leafgroup1', [u'leaf-1', u'leaf-2'])) 
ok: [leaf-2] => (item=(u'leafgroup1', [u'leaf-1', u'leaf-2']))
skipping: [leaf-2] => (item=(u'leafgroup2', [u'leaf-3', u'leaf-4'])) 
ok: [leaf-4] => (item=(u'leafgroup2', [u'leaf-3', u'leaf-4']))
skipping: [spine-1] => (item=(u'leafgroup1', [u'leaf-1', u'leaf-2'])) 
skipping: [spine-1] => (item=(u'leafgroup2', [u'leaf-3', u'leaf-4'])) 
skipping: [spine-2] => (item=(u'leafgroup1', [u'leaf-1', u'leaf-2'])) 
skipping: [spine-2] => (item=(u'leafgroup2', [u'leaf-3', u'leaf-4'])) 

TASK [leafgroups : include leaf group variables] *******************************
ok: [leaf-1] => (item=(u'leafgroup1', [u'leaf-1', u'leaf-2']))
skipping: [leaf-3] => (item=(u'leafgroup1', [u'leaf-1', u'leaf-2'])) 
skipping: [leaf-1] => (item=(u'leafgroup2', [u'leaf-3', u'leaf-4'])) 
skipping: [leaf-4] => (item=(u'leafgroup1', [u'leaf-1', u'leaf-2'])) 
skipping: [spine-1] => (item=(u'leafgroup1', [u'leaf-1', u'leaf-2'])) 
skipping: [spine-1] => (item=(u'leafgroup2', [u'leaf-3', u'leaf-4'])) 
ok: [leaf-3] => (item=(u'leafgroup2', [u'leaf-3', u'leaf-4']))
ok: [leaf-2] => (item=(u'leafgroup1', [u'leaf-1', u'leaf-2']))
skipping: [leaf-2] => (item=(u'leafgroup2', [u'leaf-3', u'leaf-4'])) 
ok: [leaf-4] => (item=(u'leafgroup2', [u'leaf-3', u'leaf-4']))
skipping: [spine-2] => (item=(u'leafgroup1', [u'leaf-1', u'leaf-2'])) 
skipping: [spine-2] => (item=(u'leafgroup2', [u'leaf-3', u'leaf-4'])) 

TASK [hostname : write hostname and domain name] *******************************
changed: [leaf-4]
changed: [spine-1]
changed: [leaf-1]
changed: [leaf-3]
changed: [leaf-2]
changed: [spine-2]

TASK [interfaces : write interface configuration] ******************************
changed: [spine-1]
changed: [leaf-2]
changed: [leaf-4]
changed: [leaf-3]
changed: [leaf-1]
changed: [spine-2]

TASK [routing : write routing configuration] ***********************************
changed: [leaf-1]
changed: [leaf-4]
changed: [spine-1]
changed: [leaf-2]
changed: [leaf-3]
changed: [spine-2]

TASK [ntp : write ntp configuration] *******************************************
changed: [leaf-2] => (item=216.239.35.8)
changed: [leaf-1] => (item=216.239.35.8)
changed: [leaf-3] => (item=216.239.35.8)
changed: [spine-1] => (item=216.239.35.8)
changed: [leaf-4] => (item=216.239.35.8)
changed: [spine-2] => (item=216.239.35.8)

PLAY RECAP *********************************************************************
leaf-1                     : ok=6    changed=4    unreachable=0    failed=0   
leaf-2                     : ok=6    changed=4    unreachable=0    failed=0   
leaf-3                     : ok=6    changed=4    unreachable=0    failed=0   
leaf-4                     : ok=6    changed=4    unreachable=0    failed=0   
spine-1                    : ok=4    changed=4    unreachable=0    failed=0   
spine-2                    : ok=4    changed=4    unreachable=0    failed=0   

I didn’t use the leafgroups role for variables in my Playbook but I left it just in case.

Because Arista has nothing similar to Cumulus NetQ to validate the configuration I create a simple arista_check_icmp.yml playbook and use ping from the leaf switches to test if the configuration is successfully deployed.

PLAY [leaf] ********************************************************************

TASK [validate connection from leaf-1] *****************************************
skipping: [leaf-3] => (item=10.255.0.4) 
skipping: [leaf-3] => (item=10.255.0.5) 
skipping: [leaf-3] => (item=10.255.0.6) 
skipping: [leaf-2] => (item=10.255.0.4) 
skipping: [leaf-2] => (item=10.255.0.5) 
skipping: [leaf-2] => (item=10.255.0.6) 
skipping: [leaf-3] => (item=10.0.102.252) 
skipping: [leaf-4] => (item=10.255.0.4) 
skipping: [leaf-3] => (item=10.0.102.253) 
skipping: [leaf-3] => (item=10.0.102.254) 
skipping: [leaf-4] => (item=10.255.0.5) 
skipping: [leaf-2] => (item=10.0.102.252) 
skipping: [leaf-4] => (item=10.255.0.6) 
skipping: [leaf-2] => (item=10.0.102.253) 
skipping: [leaf-2] => (item=10.0.102.254) 
skipping: [leaf-4] => (item=10.0.102.252) 
skipping: [leaf-4] => (item=10.0.102.253) 
skipping: [leaf-4] => (item=10.0.102.254) 
ok: [leaf-1] => (item=10.255.0.4)
ok: [leaf-1] => (item=10.255.0.5)
ok: [leaf-1] => (item=10.255.0.6)
ok: [leaf-1] => (item=10.0.102.252)
ok: [leaf-1] => (item=10.0.102.253)
ok: [leaf-1] => (item=10.0.102.254)

TASK [validate connection from leaf-2] *****************************************
skipping: [leaf-1] => (item=10.255.0.3) 
skipping: [leaf-3] => (item=10.255.0.3) 
skipping: [leaf-1] => (item=10.255.0.5) 
skipping: [leaf-3] => (item=10.255.0.5) 
skipping: [leaf-1] => (item=10.255.0.6) 
skipping: [leaf-3] => (item=10.255.0.6) 
skipping: [leaf-1] => (item=10.0.102.252) 
skipping: [leaf-1] => (item=10.0.102.253) 
skipping: [leaf-4] => (item=10.255.0.3) 
skipping: [leaf-3] => (item=10.0.102.252) 
skipping: [leaf-1] => (item=10.0.102.254) 
skipping: [leaf-3] => (item=10.0.102.253) 
skipping: [leaf-3] => (item=10.0.102.254) 
skipping: [leaf-4] => (item=10.255.0.5) 
skipping: [leaf-4] => (item=10.255.0.6) 
skipping: [leaf-4] => (item=10.0.102.252) 
skipping: [leaf-4] => (item=10.0.102.253) 
skipping: [leaf-4] => (item=10.0.102.254) 
ok: [leaf-2] => (item=10.255.0.3)
ok: [leaf-2] => (item=10.255.0.5)
ok: [leaf-2] => (item=10.255.0.6)
ok: [leaf-2] => (item=10.0.102.252)
ok: [leaf-2] => (item=10.0.102.253)
ok: [leaf-2] => (item=10.0.102.254)

TASK [validate connection from leaf-3] *****************************************
skipping: [leaf-1] => (item=10.255.0.3) 
skipping: [leaf-1] => (item=10.255.0.4) 
skipping: [leaf-2] => (item=10.255.0.3) 
skipping: [leaf-1] => (item=10.255.0.6) 
skipping: [leaf-1] => (item=10.0.101.252) 
skipping: [leaf-2] => (item=10.255.0.4) 
skipping: [leaf-2] => (item=10.255.0.6) 
skipping: [leaf-1] => (item=10.0.101.253) 
skipping: [leaf-4] => (item=10.255.0.3) 
skipping: [leaf-2] => (item=10.0.101.252) 
skipping: [leaf-4] => (item=10.255.0.4) 
skipping: [leaf-1] => (item=10.0.101.254) 
skipping: [leaf-4] => (item=10.255.0.6) 
skipping: [leaf-2] => (item=10.0.101.253) 
skipping: [leaf-4] => (item=10.0.101.252) 
skipping: [leaf-2] => (item=10.0.101.254) 
skipping: [leaf-4] => (item=10.0.101.253) 
skipping: [leaf-4] => (item=10.0.101.254) 
ok: [leaf-3] => (item=10.255.0.3)
ok: [leaf-3] => (item=10.255.0.4)
ok: [leaf-3] => (item=10.255.0.6)
ok: [leaf-3] => (item=10.0.101.252)
ok: [leaf-3] => (item=10.0.101.253)
ok: [leaf-3] => (item=10.0.101.254)

TASK [validate connection from leaf-4] *****************************************
skipping: [leaf-1] => (item=10.255.0.3) 
skipping: [leaf-3] => (item=10.255.0.3) 
skipping: [leaf-1] => (item=10.255.0.4) 
skipping: [leaf-3] => (item=10.255.0.4) 
skipping: [leaf-1] => (item=10.255.0.5) 
skipping: [leaf-2] => (item=10.255.0.3) 
skipping: [leaf-3] => (item=10.255.0.5) 
skipping: [leaf-3] => (item=10.0.101.252) 
skipping: [leaf-2] => (item=10.255.0.4) 
skipping: [leaf-1] => (item=10.0.101.252) 
skipping: [leaf-2] => (item=10.255.0.5) 
skipping: [leaf-2] => (item=10.0.101.252) 
skipping: [leaf-3] => (item=10.0.101.253) 
skipping: [leaf-1] => (item=10.0.101.253) 
skipping: [leaf-1] => (item=10.0.101.254) 
skipping: [leaf-3] => (item=10.0.101.254) 
skipping: [leaf-2] => (item=10.0.101.253) 
skipping: [leaf-2] => (item=10.0.101.254) 
ok: [leaf-4] => (item=10.255.0.3)
ok: [leaf-4] => (item=10.255.0.4)
ok: [leaf-4] => (item=10.255.0.5)
ok: [leaf-4] => (item=10.0.101.252)
ok: [leaf-4] => (item=10.0.101.253)
ok: [leaf-4] => (item=10.0.101.254)

PLAY RECAP *********************************************************************
leaf-1                     : ok=1    changed=0    unreachable=0    failed=0   
leaf-2                     : ok=1    changed=0    unreachable=0    failed=0   
leaf-3                     : ok=1    changed=0    unreachable=0    failed=0   
leaf-4                     : ok=1    changed=0    unreachable=0    failed=0   

I don’t usually work with Arista devices and this was a try to use a different switch vendor but still keep using the type of Ansible Playbook.

Please tell me if you like it and share your feedback.

Leave a comment

Ansible Playbook for Cisco BGP Routing Topology

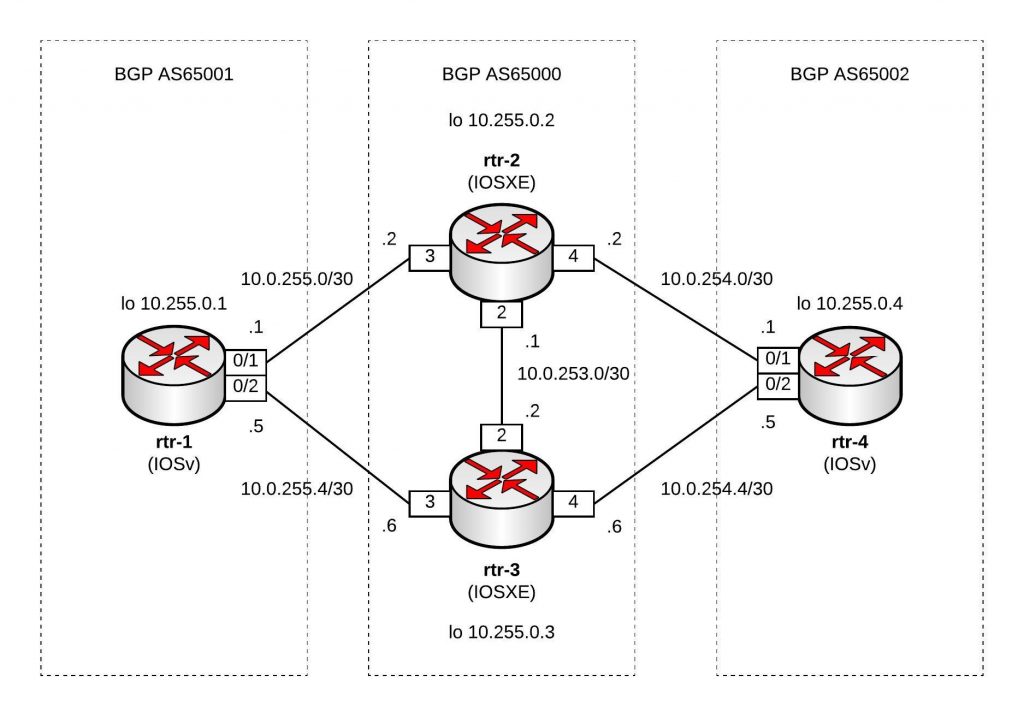
This is my Ansible Playbook for a simple Cisco BGP routing topology and using a CICD pipeline for integration testing. The virtual network environment is created on-demand by using Vagrant, see my post about Cisco IOSv and XE network simulation using Vagrant.

Network overview:

Here’s my Github repository where you can find the complete Ansible Playbook: https://github.com/berndonline/cisco-lab-provision

You can find all the variables for the interface and routing configuration under host_vars. Below is an example for router rtr-1:

---

hostname: rtr-1
domain_name: lab.local

loopback:
  address: 10.255.0.1
  mask: 255.255.255.255

interfaces:
  0/1:
    alias: connection rtr-2
    address: 10.0.255.1
    mask: 255.255.255.252

  0/2:
    alias: connection rtr-3
    address: 10.0.255.5
    mask: 255.255.255.252

bgp:
  asn: 65001
  neighbor:
    - {address: 10.0.255.2, remote_as: 65000}
    - {address: 10.0.255.6, remote_as: 65000}
  networks:
    - {network: 10.0.255.0, mask: 255.255.255.252}
    - {network: 10.0.255.4, mask: 255.255.255.252}
    - {network: 10.255.0.1, mask: 255.255.255.255}
  maxpath: 2

Roles:

  • Hostname: The task in main.yml uses the Ansible module ios_system and configures hostname, domain name and disables dns lookups.
  • Interfaces: This role uses the Ansible module ios_config to deploy the template interfaces.j2 to configure the interfaces. In the main.yml is a second task to enable the interfaces when the previous template applied the configuration.
  • Routing: Very similar to the interfaces role and uses also the ios_config module to deploy the template routing.j2 for the BGP routing configuration.

Main Ansible Playbook site.yml:

---

- hosts: all

  connection: local
  user: vagrant
  gather_facts: 'no'

  roles:
    - hostname
    - interfaces
    - routing

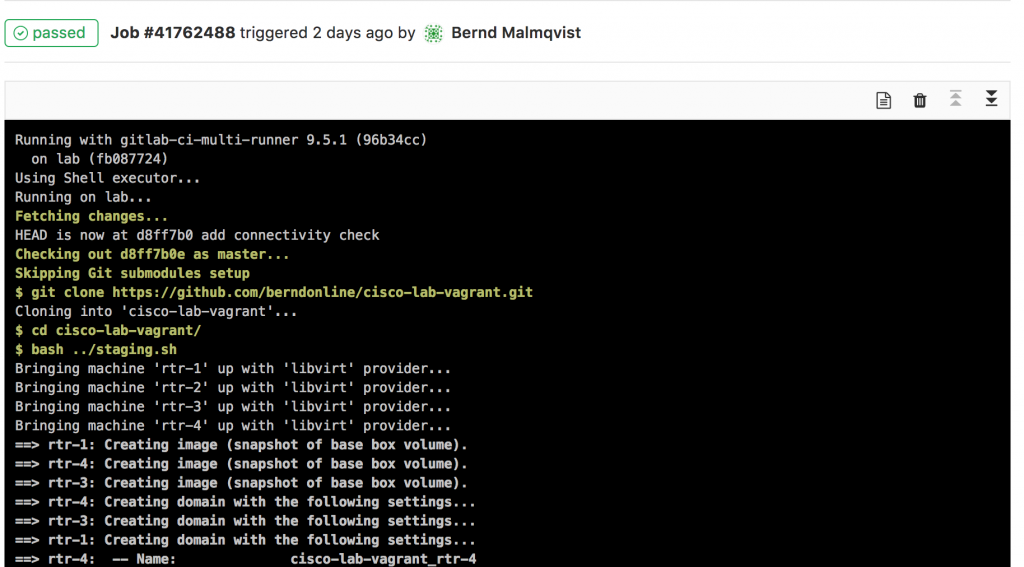
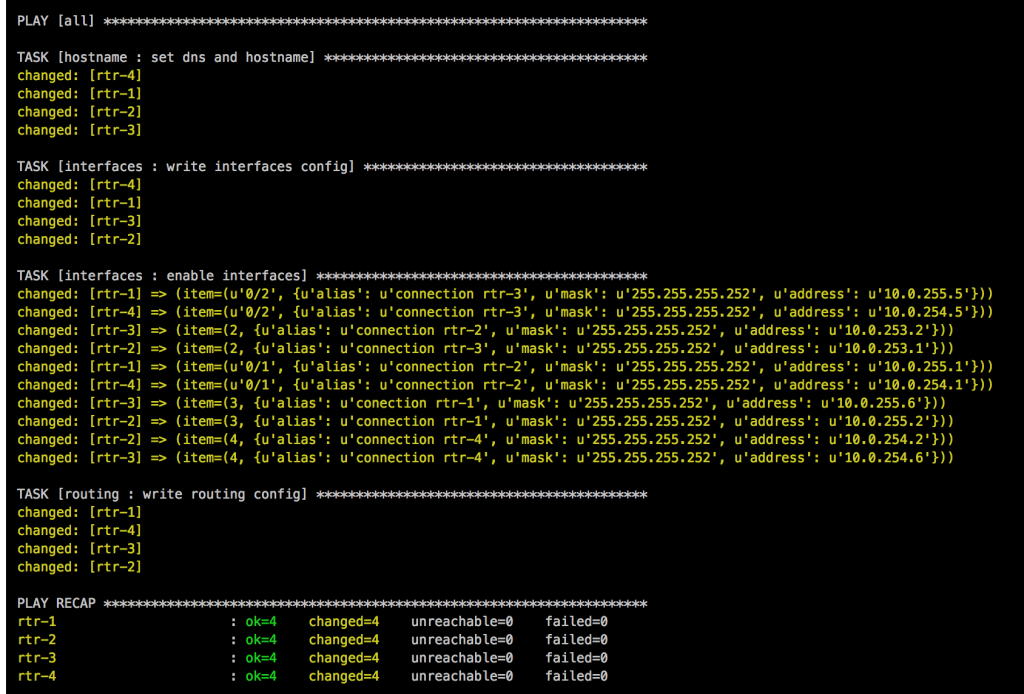
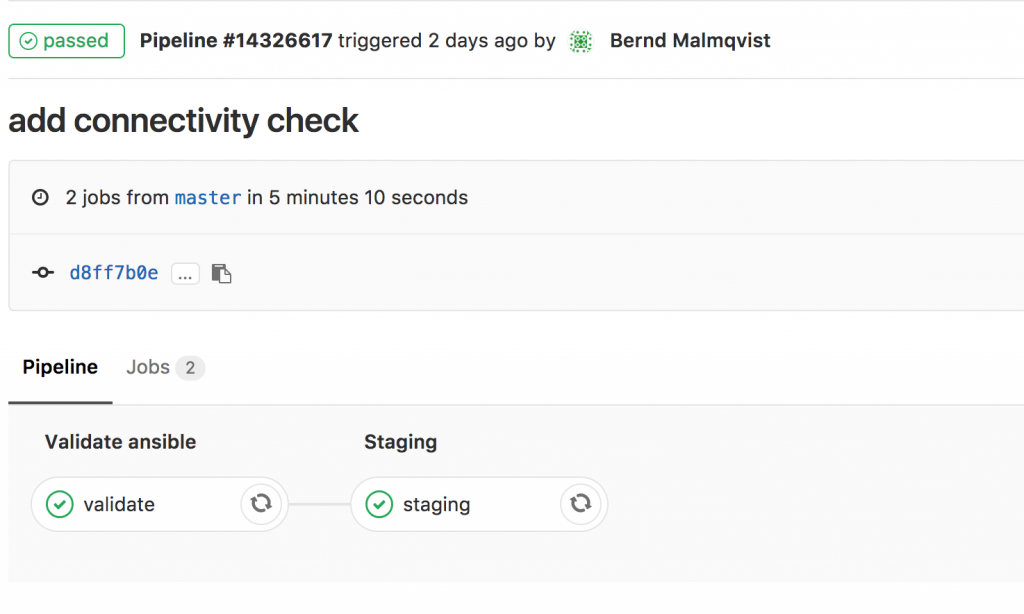
When a change triggers the gitlab-ci pipeline it spins up the Vagrant instances and executes the main Ansible Playbook:

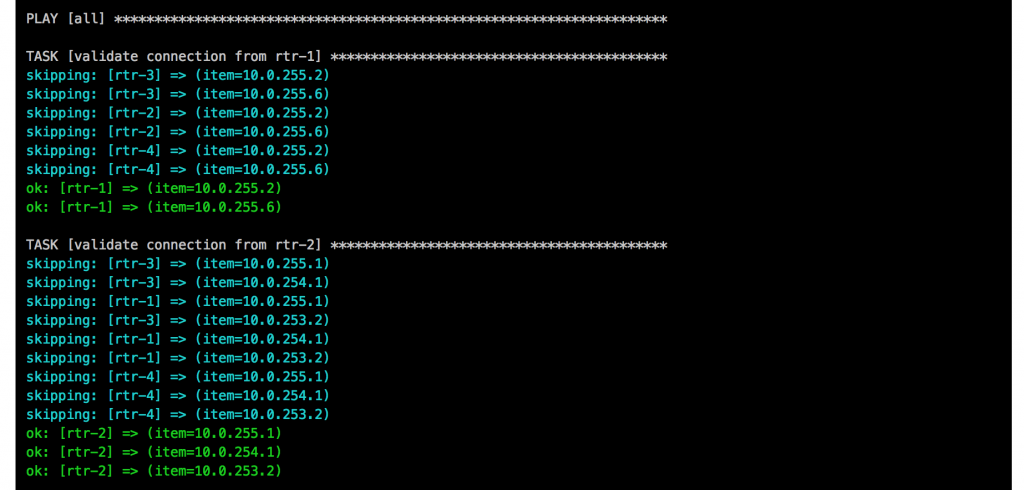
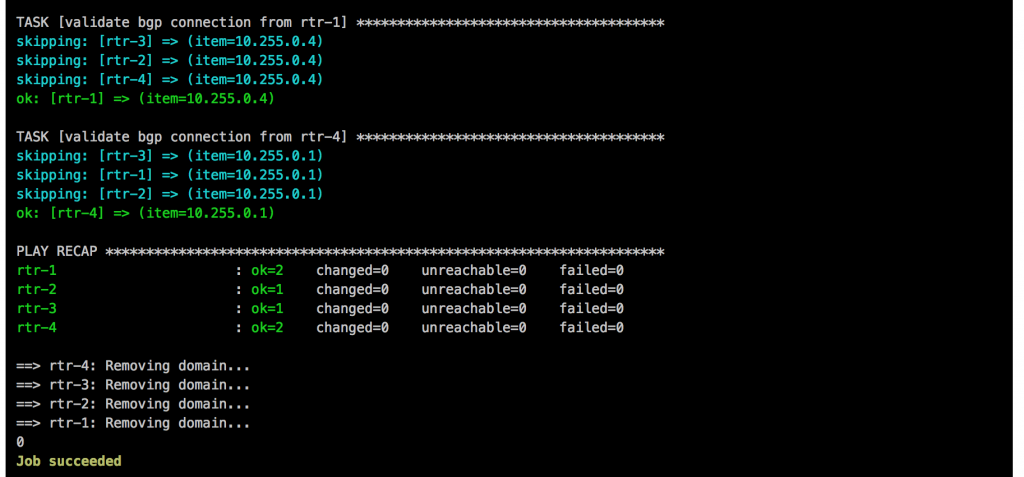
After the main site.yml ran, a second Playbook is executed for basic connectivity testing cisco_check_icmp.yml. This uses the Ansible module ios_ping and can be useful in my case to validate if the configuration was correctly applied:

If everything goes well, like in this example, the job is successful:

I will continue to improve the Playbook and the CICD pipeline so come back later to check it out.
Leave a comment

Ansible Playbook for Cumulus Linux (Layer 2 Fabric)

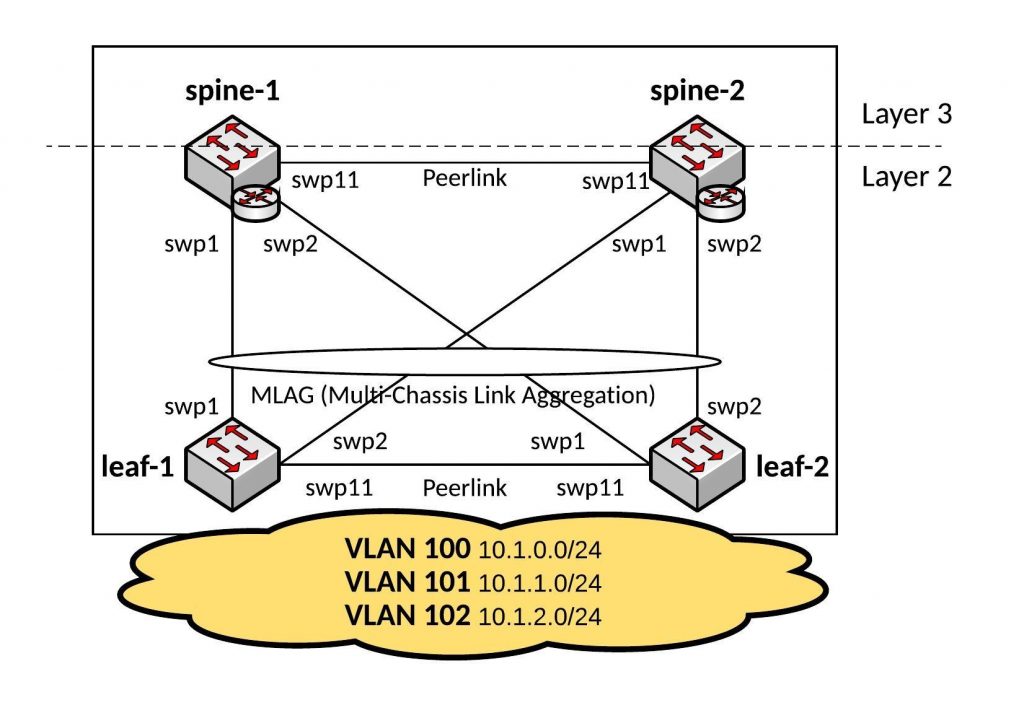
Here a basic Ansible Playbook for a Cumulus Linux lab which I use for testing. Similar spine and leaf configuration I used in my recent data centre redesign, the playbook includes one VRF and all SVIs are joined the VRF.

I use the Cumulus VX appliance under GNS3 which you can get for free at Cumulus: https://cumulusnetworks.com/products/cumulus-vx/

The first step is to configure the management interface of the Cumulus switches, edit /etc/network/interfaces and afterwards run “ifreload -a” to appy the config changes:

auto eth0
iface eth0
	address 192.168.100.20x/24
	gateway 192.168.100.2

Hosts file:

[spine]
spine-1 
spine-2
[leaf]
leaf-1 
leaf-2 

Before you start, you should push your ssh keys and set the hostname to prepare the switches.

Now we are ready to deploy the interface configuration for the Layer 2 Fabric, below the interfaces.yml file.

---
- hosts: all
  remote_user: cumulus
  gather_facts: no
  become: yes
  vars:
    ansible_become_pass: "CumulusLinux!"
    spine_interfaces:
      - { clag: bond1, desc: downlink-leaf, clagid: 1, port: swp1 swp2 }
    spine_bridge_ports: "peerlink bond1"
    bridge_vlans: "100-199"
    spine_vrf: "vrf-prod"
    spine_bridge:
      - { desc: web, vlan: 100, address: "{{ vlan100_address }}", address_virtual: "00:00:5e:00:01:00 10.1.0.254/24", vrf: vrf-prod }
      - { desc: app, vlan: 101, address: "{{ vlan101_address }}", address_virtual: "00:00:5e:00:01:01 10.1.1.254/24", vrf: vrf-prod }
      - { desc: db, vlan: 102, address: "{{ vlan102_address }}", address_virtual: "00:00:5e:00:01:02 10.1.2.254/24", vrf: vrf-prod }
    leaf_interfaces:
      - { clag: bond1, desc: uplink-spine, clagid: 1, port: swp1 swp2 }
    leaf_access_interfaces:
      - { desc: web-server, vlan: 100, port: swp3 }
      - { desc: app-server, vlan: 101, port: swp4 }
      - { desc: db-server, vlan: 102, port: swp5 }
    leaf_bridge_ports: "bond1 swp3 swp4 swp5"
  handlers:
    - name: ifreload
      command: ifreload -a
  tasks:
    - name: deploys spine interface configuration
      template: src=templates/spine_interfaces.j2 dest=/etc/network/interfaces
      when: "'spine' in group_names"
      notify: ifreload
    - name: deploys leaf interface configuration
      template: src=templates/leaf_interfaces.j2 dest=/etc/network/interfaces
      when: "'leaf' in group_names"
      notify: ifreload

I use Jinja2 templates for the interfaces configuration.

Here the output from the Ansible Playbook which only takes a few seconds to run:

[root@ansible cumulus]$ ansible-playbook interfaces.yml -i hosts

PLAY [all] *********************************************************************

TASK [deploys spine interface configuration] ***********************************
skipping: [leaf-2]
skipping: [leaf-1]
changed: [spine-2]
changed: [spine-1]

TASK [deploys leaf interface configuration] ************************************
skipping: [spine-1]
skipping: [spine-2]
changed: [leaf-1]
changed: [leaf-2]

RUNNING HANDLER [ifreload] *****************************************************
changed: [leaf-2]
changed: [leaf-1]
changed: [spine-2]
changed: [spine-1]

PLAY RECAP *********************************************************************
leaf-1                     : ok=2    changed=2    unreachable=0    failed=0
leaf-2                     : ok=2    changed=2    unreachable=0    failed=0
spine-1                    : ok=2    changed=2    unreachable=0    failed=0
spine-2                    : ok=2    changed=2    unreachable=0    failed=0

[root@ansible cumulus]$

Lets quickly verify the configuration:

cumulus@spine-1:~$ net show int

    Name           Master    Speed      MTU  Mode           Remote Host    Remote Port    Summary
--  -------------  --------  -------  -----  -------------  -------------  -------------  ---------------------------------
UP  lo             None      N/A      65536  Loopback                                     IP: 127.0.0.1/8, ::1/128
UP  eth0           None      1G        1500  Mgmt           cumulus        eth0           IP: 192.168.100.205/24
UP  bond1          bridge    2G        1500  Bond/Trunk                                   Bond Members: swp1(UP), swp2(UP)
UP  bridge         None      N/A       1500  Bridge/L2                                    Untagged Members: bond1, peerlink
UP  bridge-100-v0  vrf-prod  N/A       1500  Interface/L3                                 IP: 10.1.0.254/24
UP  bridge-101-v0  vrf-prod  N/A       1500  Interface/L3                                 IP: 10.1.1.254/24
UP  bridge-102-v0  vrf-prod  N/A       1500  Interface/L3                                 IP: 10.1.2.254/24
UP  bridge.100     vrf-prod  N/A       1500  SVI/L3                                       IP: 10.1.0.252/24
UP  bridge.101     vrf-prod  N/A       1500  SVI/L3                                       IP: 10.1.1.252/24
UP  bridge.102     vrf-prod  N/A       1500  SVI/L3                                       IP: 10.1.2.252/24
UP  peerlink       bridge    1G        1500  Bond/Trunk                                   Bond Members: swp11(UP)
UP  peerlink.4094  None      1G        1500  SubInt/L3                                    IP: 169.254.1.1/30
UP  vrf-prod       None      N/A      65536  NotConfigured

cumulus@spine-1:~$

cumulus@spine-1:~$ net show lldp

LocalPort    Speed    Mode        RemotePort    RemoteHost    Summary
-----------  -------  ----------  ------------  ------------  ----------------------
eth0         1G       Mgmt        eth0          cumulus       IP: 192.168.100.205/24
                                  ====          eth0          spine-2
                                  ====          eth0          leaf-1
                                  ====          eth0          leaf-2
swp1         1G       BondMember  swp1          leaf-1        Master: bond1(UP)
swp2         1G       BondMember  swp2          leaf-2        Master: bond1(UP)
swp11        1G       BondMember  swp11         spine-2       Master: peerlink(UP)
cumulus@spine-1:~$
cumulus@leaf-1:~$ net show int

    Name           Master    Speed      MTU  Mode        Remote Host    Remote Port    Summary
--  -------------  --------  -------  -----  ----------  -------------  -------------  --------------------------------
UP  lo             None      N/A      65536  Loopback                                  IP: 127.0.0.1/8, ::1/128
UP  eth0           None      1G        1500  Mgmt        cumulus        eth0           IP: 192.168.100.207/24
UP  swp3           bridge    1G        1500  Access/L2                                 Untagged VLAN: 100
UP  swp4           bridge    1G        1500  Access/L2                                 Untagged VLAN: 101
UP  swp5           bridge    1G        1500  Access/L2                                 Untagged VLAN: 102
UP  bond1          bridge    2G        1500  Bond/Trunk                                Bond Members: swp1(UP), swp2(UP)
UP  bridge         None      N/A       1500  Bridge/L2                                 Untagged Members: bond1, swp3-5
UP  peerlink       None      1G        1500  Bond                                      Bond Members: swp11(UP)
UP  peerlink.4093  None      1G        1500  SubInt/L3                                 IP: 169.254.1.1/30

cumulus@leaf-1:~$ net show lldp

LocalPort    Speed    Mode        RemotePort    RemoteHost    Summary
-----------  -------  ----------  ------------  ------------  ----------------------
eth0         1G       Mgmt        eth0          cumulus       IP: 192.168.100.207/24
                                  ====          eth0          spine-2
                                  ====          eth0          spine-1
                                  ====          eth0          leaf-2
swp1         1G       BondMember  swp1          spine-1       Master: bond1(UP)
swp2         1G       BondMember  swp1          spine-2       Master: bond1(UP)
swp11        1G       BondMember  swp11         leaf-2        Master: peerlink(UP)
cumulus@leaf-1:~$

As you can see the configuration is correctly deployed and you can start testing.

The configuration for a real datacentre Fabric is of course, more complex (multiple VRFs, SVIs and complex Routing) but with Ansible you can quickly deploy and manage hundreds of switches.

In one of the next posts, I will write an Ansible Playbook for a Layer 3 datacentre Fabric configuration using BGP and ECMP routing on Quagga.

Read my new post about an Ansible Playbook for Cumulus Linux BGP IP-Fabric and Cumulus NetQ Validation.