If you don’t know OpenShift Hive I recommend having a look at the video of my talk at RedHat OpenShift Commons about OpenShift Hive where I also talk about how you can provision and manage the lifecycle of OpenShift 4 clusters using the Kubernetes API and the OpenShift Hive operator.
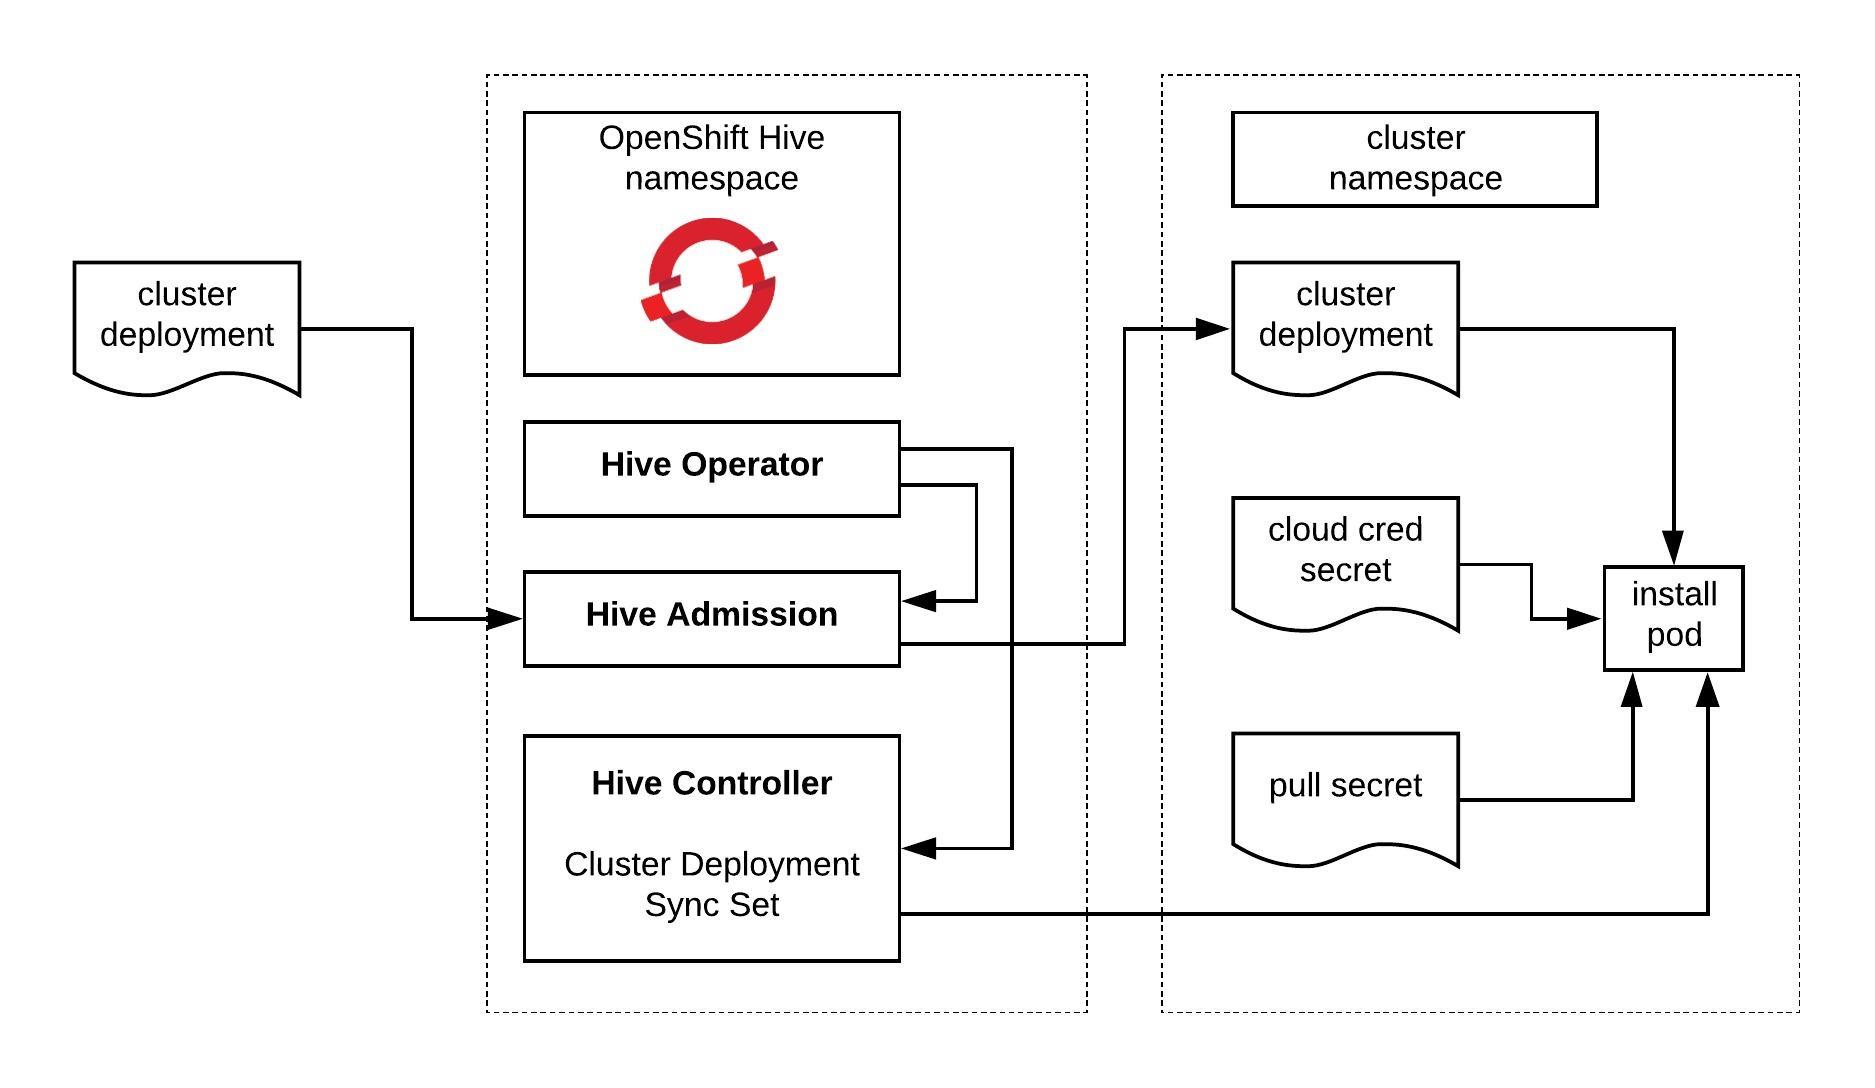
The Hive operator has three main components the admission controller, the Hive controller and the Hive operator itself. For more information about the Hive architecture visit the Hive docs:
You can use an OpenShift or native Kubernetes cluster to run the operator, in my case I use a EKS cluster. Let’s go through the prerequisites which are required to generate the manifests and the hiveutil:
$ curl -s "https://raw.githubusercontent.com/\
> kubernetes-sigs/kustomize/master/hack/install_kustomize.sh"  | bash
$ sudo mv ./kustomize /usr/bin/
$ wget https://dl.google.com/go/go1.13.3.linux-amd64.tar.gz
$ tar -xvf go1.13.3.linux-amd64.tar.gz
$ sudo mv go /usr/local
To setup the Go environment copy the content below and add to your .profile:
export GOPATH="${HOME}/.go"
export PATH="$PATH:/usr/local/go/bin"
export PATH="$PATH:${GOPATH}/bin:${GOROOT}/bin"
Continue with installing the Go dependencies and clone the OpenShift Hive Github repository:
$ mkdir -p ~/.go/src/github.com/openshift/
$ go get github.com/golang/mock/mockgen
$ go get github.com/golang/mock/gomock
$ go get github.com/cloudflare/cfssl/cmd/cfssl
$ go get github.com/cloudflare/cfssl/cmd/cfssljson
$ cd ~/.go/src/github.com/openshift/
$ git clone https://github.com/openshift/hive.git
$ cd hive/
$ git checkout remotes/origin/master
Before we run make deploy I would recommend modifying the Makefile that we only generate the Hive manifests without deploying them to Kubernetes:
$ sed -i -e 's#oc apply -f config/crds# #' -e 's#kustomize build overlays/deploy | oc apply -f -#kustomize build overlays/deploy > hive.yaml#' Makefile
$ make deploy
# The apis-path is explicitly specified so that CRDs are not created for v1alpha1
go run tools/vendor/sigs.k8s.io/controller-tools/cmd/controller-gen/main.go crd --apis-path=pkg/apis/hive/v1
CRD files generated, files can be found under path /home/ubuntu/.go/src/github.com/openshift/hive/config/crds.
go generate ./pkg/... ./cmd/...
hack/update-bindata.sh
# Deploy the operator manifests:
mkdir -p overlays/deploy
cp overlays/template/kustomization.yaml overlays/deploy
cd overlays/deploy && kustomize edit set image registry.svc.ci.openshift.org/openshift/hive-v4.0:hive=registry.svc.ci.openshift.org/openshift/hivev1:hive
kustomize build overlays/deploy > hive.yaml
rm -rf overlays/deploy
Quick look at the content of the hive.yaml manifest:
$ cat hive.yaml
apiVersion: v1
kind: Namespace
metadata:
  name: hive
---
apiVersion: v1
kind: ServiceAccount
metadata:
  name: hive-operator
  namespace: hive

...

---
apiVersion: apps/v1
kind: Deployment
metadata:
  labels:
    control-plane: hive-operator
    controller-tools.k8s.io: "1.0"
  name: hive-operator
  namespace: hive
spec:
  replicas: 1
  revisionHistoryLimit: 4
  selector:
    matchLabels:
      control-plane: hive-operator
      controller-tools.k8s.io: "1.0"
  template:
    metadata:
      labels:
        control-plane: hive-operator
        controller-tools.k8s.io: "1.0"
    spec:
      containers:
      - command:
        - /opt/services/hive-operator
        - --log-level
        - info
        env:
        - name: CLI_CACHE_DIR
          value: /var/cache/kubectl
        image: registry.svc.ci.openshift.org/openshift/hive-v4.0:hive
        imagePullPolicy: Always
        livenessProbe:
          failureThreshold: 1
          httpGet:
            path: /debug/health
            port: 8080
          initialDelaySeconds: 10
          periodSeconds: 10
        name: hive-operator
        resources:
          requests:
            cpu: 100m
            memory: 256Mi
        volumeMounts:
        - mountPath: /var/cache/kubectl
          name: kubectl-cache
      serviceAccountName: hive-operator
      terminationGracePeriodSeconds: 10
      volumes:
      - emptyDir: {}
        name: kubectl-cache
Now we can apply the Hive custom resource definition (crds):
$ kubectl apply -f ./config/crds/
customresourcedefinition.apiextensions.k8s.io/checkpoints.hive.openshift.io created
customresourcedefinition.apiextensions.k8s.io/clusterdeployments.hive.openshift.io created
customresourcedefinition.apiextensions.k8s.io/clusterdeprovisions.hive.openshift.io created
customresourcedefinition.apiextensions.k8s.io/clusterimagesets.hive.openshift.io created
customresourcedefinition.apiextensions.k8s.io/clusterprovisions.hive.openshift.io created
customresourcedefinition.apiextensions.k8s.io/clusterstates.hive.openshift.io created
customresourcedefinition.apiextensions.k8s.io/dnszones.hive.openshift.io created
customresourcedefinition.apiextensions.k8s.io/hiveconfigs.hive.openshift.io created
customresourcedefinition.apiextensions.k8s.io/machinepools.hive.openshift.io created
customresourcedefinition.apiextensions.k8s.io/selectorsyncidentityproviders.hive.openshift.io created
customresourcedefinition.apiextensions.k8s.io/selectorsyncsets.hive.openshift.io created
customresourcedefinition.apiextensions.k8s.io/syncidentityproviders.hive.openshift.io created
customresourcedefinition.apiextensions.k8s.io/syncsets.hive.openshift.io created
customresourcedefinition.apiextensions.k8s.io/syncsetinstances.hive.openshift.io created
And continue to apply the hive.yaml manifest for deploying the OpenShift Hive operator and its components:
$ kubectl apply -f hive.yaml
namespace/hive created
serviceaccount/hive-operator created
clusterrole.rbac.authorization.k8s.io/hive-frontend created
clusterrole.rbac.authorization.k8s.io/hive-operator-role created
clusterrole.rbac.authorization.k8s.io/manager-role created
clusterrole.rbac.authorization.k8s.io/system:openshift:hive:hiveadmission created
rolebinding.rbac.authorization.k8s.io/extension-server-authentication-reader-hiveadmission created
clusterrolebinding.rbac.authorization.k8s.io/auth-delegator-hiveadmission created
clusterrolebinding.rbac.authorization.k8s.io/hive-frontend created
clusterrolebinding.rbac.authorization.k8s.io/hive-operator-rolebinding created
clusterrolebinding.rbac.authorization.k8s.io/hiveadmission-hive-hiveadmission created
clusterrolebinding.rbac.authorization.k8s.io/hiveapi-cluster-admin created
clusterrolebinding.rbac.authorization.k8s.io/manager-rolebinding created
deployment.apps/hive-operator created
For the Hive admission controller you need to generate a SSL certifcate:
$ ./hack/hiveadmission-dev-cert.sh
~/Dropbox/hive/hiveadmission-certs ~/Dropbox/hive
2020/02/03 22:17:30 [INFO] generate received request
2020/02/03 22:17:30 [INFO] received CSR
2020/02/03 22:17:30 [INFO] generating key: ecdsa-256
2020/02/03 22:17:30 [INFO] encoded CSR
certificatesigningrequest.certificates.k8s.io/hiveadmission.hive configured
certificatesigningrequest.certificates.k8s.io/hiveadmission.hive approved
-----BEGIN CERTIFICATE-----
MIICaDCCAVCgAwIBAgIQHvvDPncIWHRcnDzzoWGjQDANBgkqhkiG9w0BAQsFADAv
MS0wKwYDVQQDEyRiOTk2MzhhNS04OWQyLTRhZTAtYjI4Ny1iMWIwOGNmOGYyYjAw
HhcNMjAwMjAzMjIxNTA3WhcNMjUwMjAxMjIxNTA3WjAhMR8wHQYDVQQDExZoaXZl
YWRtaXNzaW9uLmhpdmUuc3ZjMFkwEwYHKoZIzj0CAQYIKoZIzj0DAQcDQgAEea4N
UPbvzM3VdtOkdJ7lBytekRTvwGMqs9HgG14CtqCVCOFq8f+BeqqyrRbJsX83iBfn
gMc54moElb5kIQNjraNZMFcwDAYDVR0TAQH/BAIwADBHBgNVHREEQDA+ghZoaXZl
YWRtaXNzaW9uLmhpdmUuc3ZjgiRoaXZlYWRtaXNzaW9uLmhpdmUuc3ZjLmNsdXN0
ZXIubG9jYWwwDQYJKoZIhvcNAQELBQADggEBADhgT3tNnFs6hBIZFfWmoESe6nnZ
fy9GmlmF9qEBo8FZSk/LYvV0peOdgNZCHqsT2zaJjxULqzQ4zfSb/koYpxeS4+Bf
xwgHzIB/ylzf54wVkILWUFK3GnYepG5dzTXS7VHc4uiNJe0Hwc5JI4HBj7XdL3C7
cbPm7T2cBJi2jscoCWELWo/0hDxkcqZR7rdeltQQ+Uhz87LhTTqlknAMFzL7tM/+
pJePZMQgH97vANsbk97bCFzRZ4eABYSiN0iAB8GQM5M+vK33ZGSVQDJPKQQYH6th
Kzi9wrWEeyEtaWozD5poo9s/dxaLxFAdPDICkPB2yr5QZB+NuDgA+8IYffo=
-----END CERTIFICATE-----
secret/hiveadmission-serving-cert created
~/Dropbox/hive
Afterwards we can check if all the pods are running, this might take a few seconds:
$ kubectl get pods -n hive
NAME                                READY   STATUS    RESTARTS   AGE
hive-controllers-7c6ccc84b9-q7k7m   1/1     Running   0          31s
hive-operator-f9f4447fd-jbmkh       1/1     Running   0          55s
hiveadmission-6766c5bc6f-9667g      1/1     Running   0          27s
hiveadmission-6766c5bc6f-gvvlq      1/1     Running   0          27s
The Hive operator is successfully installed on your Kubernetes cluster but we are not finished yet. To create the required Cluster Deployment manifests we need to generate the hiveutil binary:
$ make hiveutil
go generate ./pkg/... ./cmd/...
hack/update-bindata.sh
go build -o bin/hiveutil github.com/openshift/hive/contrib/cmd/hiveutil
To generate Hive Cluster Deployment manifests just run the following hiveutil command below, I output the definition with -o into yaml:
$ bin/hiveutil create-cluster --base-domain=mydomain.example.com --cloud=aws mycluster -o yaml
apiVersion: v1
items:
- apiVersion: hive.openshift.io/v1
  kind: ClusterImageSet
  metadata:
    creationTimestamp: null
    name: mycluster-imageset
  spec:
    releaseImage: quay.io/openshift-release-dev/ocp-release:4.3.2-x86_64
  status: {}
- apiVersion: v1
  kind: Secret
  metadata:
    creationTimestamp: null
    name: mycluster-aws-creds
  stringData:
    aws_access_key_id: <-YOUR-AWS-ACCESS-KEY->
    aws_secret_access_key: <-YOUR-AWS-SECRET-KEY->
  type: Opaque
- apiVersion: v1
  data:
    install-config.yaml: <-BASE64-ENCODED-OPENSHIFT4-INSTALL-CONFIG->
  kind: Secret
  metadata:
    creationTimestamp: null
    name: mycluster-install-config
  type: Opaque
- apiVersion: hive.openshift.io/v1
  kind: ClusterDeployment
  metadata:
    creationTimestamp: null
    name: mycluster
  spec:
    baseDomain: mydomain.example.com
    clusterName: mycluster
    controlPlaneConfig:
      servingCertificates: {}
    installed: false
    platform:
      aws:
        credentialsSecretRef:
          name: mycluster-aws-creds
        region: us-east-1
    provisioning:
      imageSetRef:
        name: mycluster-imageset
      installConfigSecretRef:
        name: mycluster-install-config
  status:
    clusterVersionStatus:
      availableUpdates: null
      desired:
        force: false
        image: ""
        version: ""
      observedGeneration: 0
      versionHash: ""
- apiVersion: hive.openshift.io/v1
  kind: MachinePool
  metadata:
    creationTimestamp: null
    name: mycluster-worker
  spec:
    clusterDeploymentRef:
      name: mycluster
    name: worker
    platform:
      aws:
        rootVolume:
          iops: 100
          size: 22
          type: gp2
        type: m4.xlarge
    replicas: 3
  status:
    replicas: 0
kind: List
metadata: {}
I hope this post is useful in getting you started with OpenShift Hive. In my next article I will go through the details of the OpenShift 4 cluster deployment with Hive.
Read my new article about OpenShift / OKD 4.x Cluster Deployment using OpenShift Hive