Kubernetes Cluster API – Machine Health Check and AWS Spot instances

In my first article about the Kubernetes Cluster API and provisioning of AWS workload clusters I mentioned briefly configuring Machine Health Check for the data-place/worker nodes. The Cluster API also supports Machine Health Check for control-plane/master nodes and can automatically remediate any node issues by replacing and provision new instances. The configuration is the same, only the label selector is different for the node type.

Let’s take a look again at the Machine Health Check for data-plane/worker nodes, the selector label is set to nodepool: nodepool-0 to match the label which is configured in the MachineDeployment.

---
apiVersion: cluster.x-k8s.io/v1alpha3
kind: MachineHealthCheck
metadata:
  name: cluster-1-node-unhealthy-5m
  namespace: k8s
spec:
  clusterName: cluster-1
  maxUnhealthy: 40%
  nodeStartupTimeout: 10m
  selector:
    matchLabels:
      nodepool: nodepool-0
  unhealthyConditions:
  - type: Ready
    status: Unknown
    timeout: 300s
  - type: Ready
    status: "False"
    timeout: 300s

To configure Machine Health Check for your control-plane/master add the label cluster.x-k8s.io/control-plane: “” as selector.

---
apiVersion: cluster.x-k8s.io/v1alpha3
kind: MachineHealthCheck
metadata:
  name: cluster-1-master-unhealthy-5m
spec:
  clusterName: cluster-1
  maxUnhealthy: 30%
  selector:
    matchLabels:
      cluster.x-k8s.io/control-plane: ""
  unhealthyConditions:
    - type: Ready
      status: Unknown
      timeout: 300s
    - type: Ready
      status: "False"
      timeout: 300s

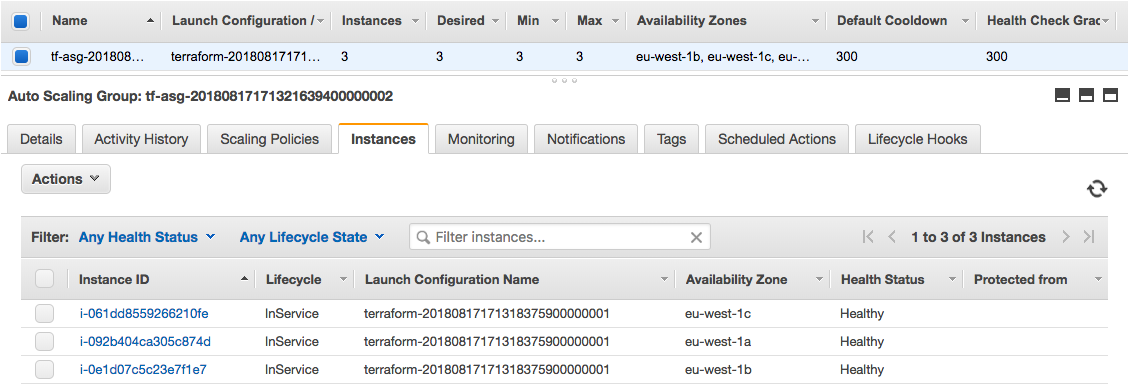
When both are applied you see the two node groups and the status of available nodes and expected/desired state.

$ kubectl get machinehealthcheck
NAME                                       MAXUNHEALTHY   EXPECTEDMACHINES   CURRENTHEALTHY
cluster-1-node-unhealthy-5m                40%            3                  3
cluster-1-master-unhealthy-5m              30%            3                  3

If you terminate one control- and data-plane node, the Machine Health Check identifies these after a couple of minutes and starts the remediation by provisioning new instances to replace the faulty ones. This takes around 5 to 10 min and your cluster is back into the desired state. The management cluster automatically repaired the workload cluster without manual intervention.

$ kubectl get machinehealthcheck
NAME                            MAXUNHEALTHY   EXPECTEDMACHINES   CURRENTHEALTHY
cluster-1-node-unhealthy-5m     40%            3                  2
cluster-1-master-unhealthy-5m   30%            3                  2

More information about Machine Health Check you can find in the Cluster API documentation.

However, a few ago, I didn’t test running the data-plane/worker nodes on AWS EC2 spot instances which is also supported option in the AWSMachineTemplate. Spot instances for control-plane nodes are not supported and don’t make sense because you need the master nodes available at all time.

Using spot instances can reduce the cost of running your workload cluster and you can see a cost saving of up to 60% – 70% compared to the on-demand price. Although AWS can reclaim these instance by terminating your spot instance at any point in time, they are reliable enough in combination with the Cluster API Machine Health Check that you could run production on spot instances with huge cost savings.

To use spot instances simply add the spotMarketOptions to the AWS Machine Template of the data-plane nodes and the Cluster API will automatically issue spot instance requests for these. If you don’t specify the maxPrice and leave this value blank, this will automatically put the on-demand price as max value for the requested instance type. It makes sense to leave this empty because you cannot be outbid if the marketplace of spot instance suddenly changes because of increasing compute demand.

---
apiVersion: infrastructure.cluster.x-k8s.io/v1alpha3
kind: AWSMachineTemplate
metadata:
  name: cluster-1-data-plane-0
  namespace: k8s
spec:
  template:
    spec:
      iamInstanceProfile: nodes.cluster-api-provider-aws.sigs.k8s.io
      instanceType: t3.small
      sshKeyName: default
      spotMarketOptions:
        maxPrice: ""

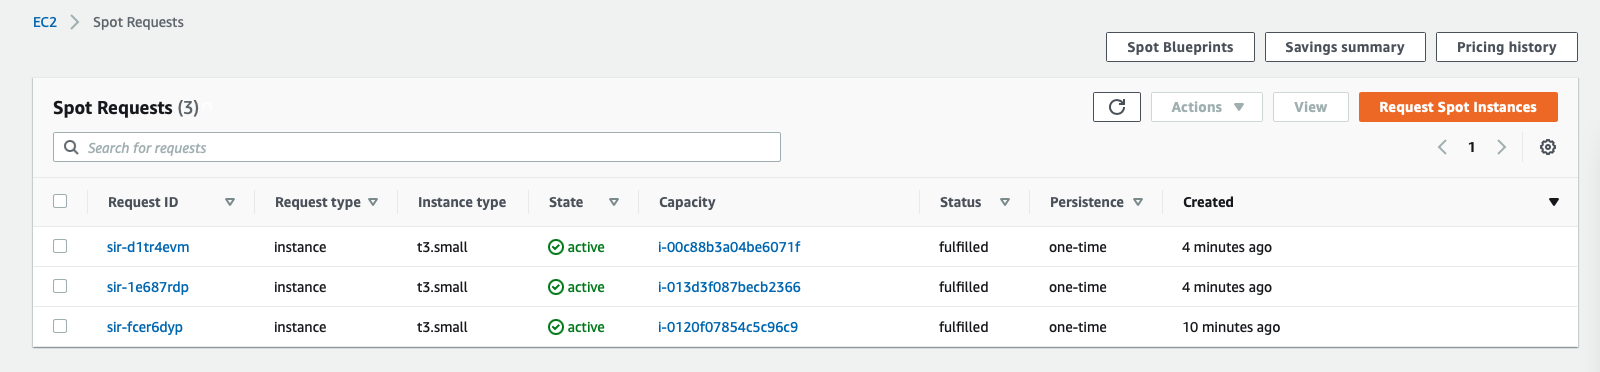
In the AWS console you see the spot instance requests.

This is great in combination with the Machine Health Check that I explained earlier: if AWS suddenly does reclaim one or multiple of your spot instances, the Machine Health Check will automatically starts to remediate for these missing nodes by requesting new spot instance.

Deploy Amazon EC2 Autoscaling Group and AWS Load Balancers with Terraform

This is the next article about using Terraform to create EC2 autoscaling group and the different load balancing options for EC2 instances. This setup depends on my previous blog post about using Terraform to deploy a AWS VPC so please read this first. In my Github repository you will find all the needed Terraform files ec2.tf and vpc.tf to deploy the full environment.

EC2 resource overview:

Let’s start with the launch configuration and creating the autoscaling group. I am using eu-west-1 and a standard Ubuntu 16.04 AMI. The instances are created in the private subnet and don’t get a public IP address assigned but have internet access via the NAT gateway:

resource "aws_launch_configuration" "autoscale_launch" {
  image_id = "${lookup(var.aws_amis, var.aws_region)}"
  instance_type = "t2.micro"
  security_groups = ["${aws_security_group.sec_web.id}"]
  key_name = "${aws_key_pair.auth.id}"
  user_data = <<-EOF
              #!/bin/bash
              sudo apt-get -y update
              sudo apt-get -y install nginx
              EOF
  lifecycle {
    create_before_destroy = true
  }
}

resource "aws_autoscaling_group" "autoscale_group" {
  launch_configuration = "${aws_launch_configuration.autoscale_launch.id}"
  vpc_zone_identifier = ["${aws_subnet.PrivateSubnetA.id}","${aws_subnet.PrivateSubnetB.id}","${aws_subnet.PrivateSubnetC.id}"]
  load_balancers = ["${aws_elb.elb.name}"]
  min_size = 3
  max_size = 3
  tag {
    key = "Name"
    value = "autoscale"
    propagate_at_launch = true
  }
}

I also created a few security groups to allow the traffic,  please have look for more detail in the ec2.tf.

Autoscaling Group

Now the configuration for a AWS Elastic (Classic) Load Balancer:

resource "aws_elb" "elb" {
  name = "elb"
  security_groups = ["${aws_security_group.sec_lb.id}"]
  subnets            = ["${aws_subnet.PublicSubnetA.id}","${aws_subnet.PublicSubnetB.id}","${aws_subnet.PublicSubnetC.id}"]
  cross_zone_load_balancing   = true
  health_check {
    healthy_threshold = 2
    unhealthy_threshold = 2
    timeout = 3
    interval = 30
    target = "HTTP:80/"
  }
  listener {
    lb_port = 80
    lb_protocol = "http"
    instance_port = "80"
    instance_protocol = "http"
  }
}

Elastic Load Balancer (Classic LB)

Use the Application Load Balancing (ALB) for more advanced web load balancing which only support http and https protocols. You start with creating the ALB resource, afterwards creating the target group where you can define stickiness and health checks. The listener defines which protocol type the ALB uses and assigns the target group. In the end you attach the target- with the autoscaling group:

resource "aws_lb" "alb" {  
  name            = "alb"  
  subnets         = ["${aws_subnet.PublicSubnetA.id}","${aws_subnet.PublicSubnetB.id}","${aws_subnet.PublicSubnetC.id}"]
  security_groups = ["${aws_security_group.sec_lb.id}"]
  internal        = false 
  idle_timeout    = 60   
  tags {    
    Name    = "alb"    
  }   
}

resource "aws_lb_target_group" "alb_target_group" {  
  name     = "alb-target-group"  
  port     = "80"  
  protocol = "HTTP"  
  vpc_id   = "${aws_vpc.default.id}"   
  tags {    
    name = "alb_target_group"    
  }   
  stickiness {    
    type            = "lb_cookie"    
    cookie_duration = 1800    
    enabled         = true 
  }   
  health_check {    
    healthy_threshold   = 3    
    unhealthy_threshold = 10    
    timeout             = 5    
    interval            = 10    
    path                = "/"    
    port                = 80
  }
}

resource "aws_lb_listener" "alb_listener" {  
  load_balancer_arn = "${aws_lb.alb.arn}"  
  port              = 80  
  protocol          = "http"
  
  default_action {    
    target_group_arn = "${aws_lb_target_group.alb_target_group.arn}"
    type             = "forward"  
  }
}

resource "aws_autoscaling_attachment" "alb_autoscale" {
  alb_target_group_arn   = "${aws_lb_target_group.alb_target_group.arn}"
  autoscaling_group_name = "${aws_autoscaling_group.autoscale_group.id}"
}

Application Load Balancer (ALB)

ALB Target Group

The Network Load Balancing (NLB) is very similar to the configuration like the ALB only that it supports the TCP protocol which should be only used for performance because of the limited health check functionality:

resource "aws_lb" "nlb" {
  name               = "nlb"
  internal           = false
  load_balancer_type = "network"
  subnets            = ["${aws_subnet.PublicSubnetA.id}","${aws_subnet.PublicSubnetB.id}","${aws_subnet.PublicSubnetC.id}"]
  enable_cross_zone_load_balancing  = true
  tags {
    Name = "nlb"
  }
}

resource "aws_lb_target_group" "nlb_target_group" {  
  name     = "nlb-target-group"  
  port     = "80"  
  protocol = "TCP"  
  vpc_id   = "${aws_vpc.default.id}"   
  tags {    
    name = "nlb_target_group"    
  }     
}

resource "aws_lb_listener" "nlb_listener" {  
  load_balancer_arn = "${aws_lb.nlb.arn}"  
  port              = 80  
  protocol          = "TCP"
  
  default_action {    
    target_group_arn = "${aws_lb_target_group.nlb_target_group.arn}"
    type             = "forward"  
  }
}

resource "aws_autoscaling_attachment" "nlb_autoscale" {
  alb_target_group_arn   = "${aws_lb_target_group.nlb_target_group.arn}"
  autoscaling_group_name = "${aws_autoscaling_group.autoscale_group.id}"
}

Network Load Balancer (NLB)

NLB Target Group

Let’s run terraform apply:

berndonline@lab:~/aws-terraform$ terraform apply
data.aws_availability_zones.available: Refreshing state...

An execution plan has been generated and is shown below.
Resource actions are indicated with the following symbols:
  + create

Terraform will perform the following actions:

  + aws_autoscaling_attachment.alb_autoscale
      id:                                          
      alb_target_group_arn:                        "${aws_lb_target_group.alb_target_group.arn}"
      autoscaling_group_name:                      "${aws_autoscaling_group.autoscale_group.id}"

  + aws_autoscaling_attachment.nlb_autoscale
      id:                                          
      alb_target_group_arn:                        "${aws_lb_target_group.nlb_target_group.arn}"
      autoscaling_group_name:                      "${aws_autoscaling_group.autoscale_group.id}"

...

Plan: 41 to add, 0 to change, 0 to destroy.

Do you want to perform these actions?
  Terraform will perform the actions described above.
  Only 'yes' will be accepted to approve.

  Enter a value: yes

...

aws_lb.nlb: Creation complete after 2m53s (ID: arn:aws:elasticloadbalancing:eu-west-1:...:loadbalancer/net/nlb/235e69c61779b723)
aws_lb_listener.nlb_listener: Creating...
  arn:                               "" => ""
  default_action.#:                  "" => "1"
  default_action.0.target_group_arn: "" => "arn:aws:elasticloadbalancing:eu-west-1:552276840222:targetgroup/nlb-target-group/7b3c10cbdd411669"
  default_action.0.type:             "" => "forward"
  load_balancer_arn:                 "" => "arn:aws:elasticloadbalancing:eu-west-1:552276840222:loadbalancer/net/nlb/235e69c61779b723"
  port:                              "" => "80"
  protocol:                          "" => "TCP"
  ssl_policy:                        "" => ""
aws_lb_listener.nlb_listener: Creation complete after 0s (ID: arn:aws:elasticloadbalancing:eu-west-1:.../nlb/235e69c61779b723/dfde2530387b470f)

Apply complete! Resources: 41 added, 0 changed, 0 destroyed.

Outputs:

alb_dns_name = alb-1295224636.eu-west-1.elb.amazonaws.com
elb_dns_name = elb-611107604.eu-west-1.elb.amazonaws.com
nlb_dns_name = nlb-235e69c61779b723.elb.eu-west-1.amazonaws.com
berndonline@lab:~/aws-terraform$

Together with the VPC configuration from my previous article, this deploys the different load balancers and provides you the DNS names as an output and ready to use.

Over the coming weeks I will optimise the Terraform code and move some of the resource settings into the variables.tf file to make this more scaleable.

If you like this article, please share your feedback and leave a comment.