Bin some month since I started working with Citrix NetScaler and so far I really like the NetScaler. I will not go into the deep how Global Server Load Balancing (GSLB) works and only explain my configuration. I use Exchange OWA as an example for GSLB, I will also not explain how to set-up a virtual server for Exchange OWA, please have a look at my previous blog post: NetScaler Exchange 2013 Load Balancing.
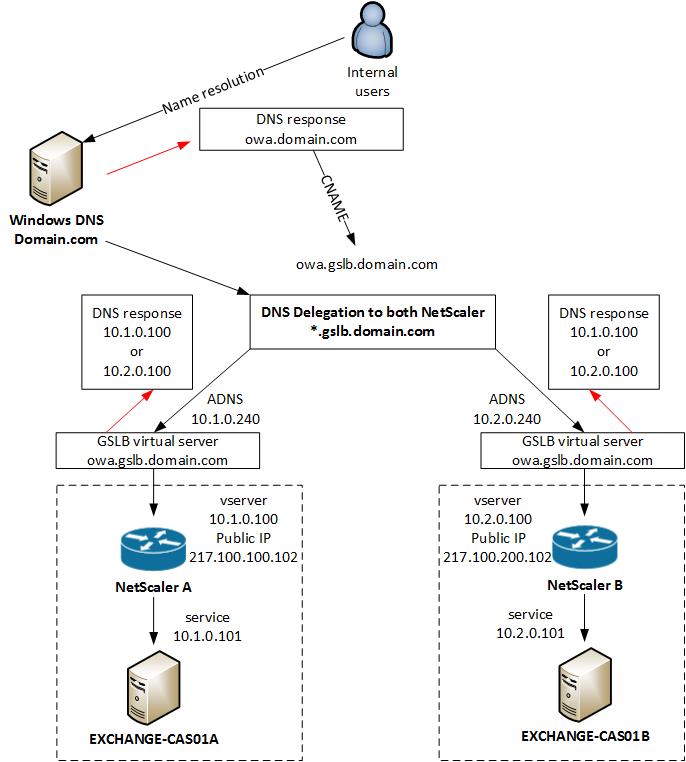
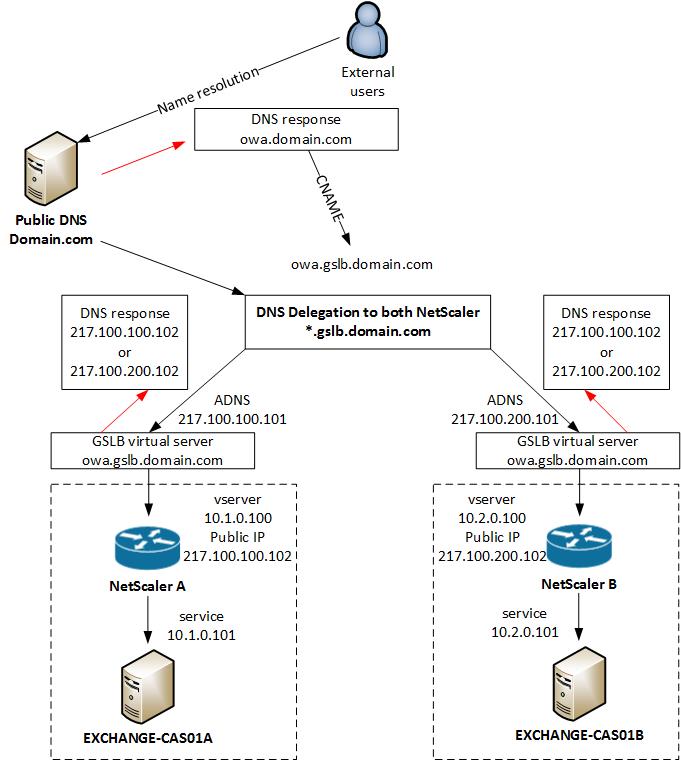
In my configuration I will use the same GSLB virtual server for internal and external access to Exchange OWA. The NetScaler see’s if you are coming from the internal network and give you a private IP address back, or when you are external you get a public IP address back for the same DNS entry.
Internal GSLB
External GSLB
Before you start you have to delegate a Subdomains in Microsoft DNS or BIND for Global Server Load Balancing on a NetScaler Appliance, more information how to do that you find here: http://support.citrix.com/article/CTX121713
VPX A
Enable GSLB on the NetScaler in location A and configure sites and ADNS service
enable ns feature GSLB

add gslb site site-A 10.1.0.200
add gslb site site-B 10.2.0.200

set ns rpcNode 10.1.0.200 -password ***key*** -srcIP * -secure YES
set ns rpcNode 10.2.0.200 -password ***key*** -srcIP * -secure YES

add service service-ADNS_53 10.1.0.240 ADNS 53 -gslb NONE -maxClient 0 -maxReq 0 -cip DISABLED -usip YES -useproxyport NO -sp OFF -cltTimeout 120 -svrTimeout 120 -CustomServerID "\"None\"" -CKA NO -TCPB NO -CMP NO
add service service-ADNS_TCP53 10.1.0.240 ADNS_TCP 53 -gslb NONE -maxClient 0 -maxReq 0 -cip DISABLED -usip YES -useproxyport YES -sp OFF -cltTimeout 180 -svrTimeout 360 -CustomServerID "\"None\"" -CKA NO -TCPB NO -CMP NO

add dns addRec ns01-a.gslb.domain.com 217.100.100.101
add dns soaRec gslb.domain.com -originServer ns01-a.gslb.domain.com -contact hostmaster.gslb.domain.com
add dns nsRec gslb.domain.com ns01-a.gslb.domain.com -TTL 300
add dns addRec ns01-a.gslb.domain.com 217.100.100.101 add dns zone gslb.domain.com -proxyMode NO
VPX B
Enable GSLB on the NetScaler in location B and configure sites and ADNS service
enable ns feature GSLB

add gslb site site-A 10.1.0.200
add gslb site site-B 10.2.0.200

set ns rpcNode 10.1.0.200 -password ***key*** -srcIP * -secure YES
set ns rpcNode 10.2.0.200 -password ***key*** -srcIP * -secure YES

add service service-ADNS_53 10.2.0.240 ADNS 53 -gslb NONE -maxClient 0 -maxReq 0 -cip DISABLED -usip YES -useproxyport NO -sp OFF -cltTimeout 120 -svrTimeout 120 -CustomServerID "\"None\"" -CKA NO -TCPB NO -CMP NO
add service service-ADNS_TCP53 10.2.0.240 ADNS_TCP 53 -gslb NONE -maxClient 0 -maxReq 0 -cip DISABLED -usip YES -useproxyport YES -sp OFF -cltTimeout 180 -svrTimeout 360 -CustomServerID "\"None\"" -CKA NO -TCPB NO -CMP NO

add dns addRec ns01-b.gslb.domain.com 217.100.200.101
add dns soaRec gslb.domain.com -originServer ns01-b.gslb.domain.com -contact hostmaster.gslb.domain.com
add dns nsRec gslb.domain.com ns01-b.gslb.domain.com -TTL 300
add dns addRec ns01-b.gslb.domain.com 217.100.200.101 add dns zone gslb.domain.com -proxyMode NO
VPX A
Configure GSLB service and virtual server in location A
add server vserver-EXCHANGE-OWA-A 10.1.0.100
add server vserver-EXCHANGE-OWA-B 10.2.0.100

add gslb vserver vserver-GSLB-EXCHANGE-OWA SSL -backupLBMethod ROUNDROBIN -tolerance 0 -EDR ENABLED -appflowLog DISABLED
set gslb vserver vserver-GSLB-EXCHANGE-OWA -backupLBMethod ROUNDROBIN -tolerance 0 -EDR ENABLED -appflowLog DISABLED

add gslb service service-GSLB-EXCHANGE-OWA-A_443 vserver-EXCHANGE-OWA-A SSL 443 -publicIP 217.100.100.102 -publicPort 443 -maxClient 0 -siteName site-A -cltTimeout 180 -svrTimeout 360 -downStateFlush DISABLED
add gslb service service-GSLB-EXCHANGE-OWA-B_443 vserver-EXCHANGE-OWA-B SSL 443 -publicIP 217.100.200.102 -publicPort 443 -maxClient 0 -siteName site-B -cltTimeout 180 -svrTimeout 360 -downStateFlush DISABLED

bind gslb vserver vserver-GSLB-EXCHANGE-OWA_443 -serviceName service-GSLB-EXCHANGE-OWA-A_443
bind gslb vserver vserver-GSLB-EXCHANGE-OWA_443 -serviceName service-GSLB-EXCHANGE-OWA-B_443
bind gslb vserver vserver-GSLB-EXCHANGE-OWA_443 -domainName owa.gslb.domain.com -TTL 5 -sitedomainTTL 300
bind gslb service service-GSLB-EXCHANGE-OWA-D_443 -monitorName https
bind gslb service service-GSLB-EXCHANGE-OWA-C_443 -monitorName https
VPX B
Configure GSLB service and virtual server in location B
add server vserver-EXCHANGE-OWA-A 10.1.0.100
add server vserver-EXCHANGE-OWA-B 10.2.0.100

add gslb vserver vserver-GSLB-EXCHANGE-OWA SSL -backupLBMethod ROUNDROBIN -tolerance 0 -EDR ENABLED -appflowLog DISABLED
set gslb vserver vserver-GSLB-EXCHANGE-OWA -backupLBMethod ROUNDROBIN -tolerance 0 -EDR ENABLED -appflowLog DISABLED

add gslb service service-GSLB-EXCHANGE-OWA-A_443 vserver-EXCHANGE-OWA-A SSL 443 -publicIP 217.100.100.102 -publicPort 443 -maxClient 0 -siteName site-A -cltTimeout 180 -svrTimeout 360 -downStateFlush DISABLED
add gslb service service-GSLB-EXCHANGE-OWA-B_443 vserver-EXCHANGE-OWA-B SSL 443 -publicIP 217.100.200.102 -publicPort 443 -maxClient 0 -siteName site-B -cltTimeout 180 -svrTimeout 360 -downStateFlush DISABLED

bind gslb vserver vserver-GSLB-EXCHANGE-OWA_443 -serviceName service-GSLB-EXCHANGE-OWA-A_443
bind gslb vserver vserver-GSLB-EXCHANGE-OWA_443 -serviceName service-GSLB-EXCHANGE-OWA-B_443
bind gslb vserver vserver-GSLB-EXCHANGE-OWA_443 -domainName owa.gslb.domain.com -TTL 5 -sitedomainTTL 300
bind gslb service service-GSLB-EXCHANGE-OWA-A_443 -monitorName https
bind gslb service service-GSLB-EXCHANGE-OWA-B_443 -monitorName https
Now you need to create an DNS view because we assign the public IP to the GSLB service and everybody gets the public IP as DNS response. With the internal DNS view, internal users get the internal private IP address back.
VPX A
add dns view view-INTERNAL
add dns action action-DNS-INTERNAL ViewName -viewName view-INTERNAL
add dns policy policy-DNS-INTERNAL "client.IP.SRC.IN_SUBNET(10.0.0.0/8)" action-DNS-INTERNAL
bind dns global policy-DNS-INTERNAL 100 -gotoPriorityExpression END -type REQ_DEFAULT

bind gslb service service-GSLB-EXCHANGE-OWA-A_443 -viewName view-INTERNAL 10.1.0.100
bind gslb service service-GSLB-EXCHANGE-OWA-B_443 -viewName view-INTERNAL 10.2.0.100
VPX B
add dns view view-INTERNAL
add dns action action-DNS-INTERNAL ViewName -viewName view-INTERNAL
add dns policy policy-DNS-INTERNAL "client.IP.SRC.IN_SUBNET(10.0.0.0/8)" action-DNS-INTERNAL
bind dns global policy-DNS-INTERNAL 100 -gotoPriorityExpression END -type REQ_DEFAULT

bind gslb service service-GSLB-EXCHANGE-OWA-A_443 -viewName view-INTERNAL 10.1.0.100
bind gslb service service-GSLB-EXCHANGE-OWA-B_443 -viewName view-INTERNAL 10.2.0.100
That’s it from the configuration for GSLB, quite easy and straight forward 🙂
Here you find a very detailed PDF from Citrix about GSLB: http://support.citrix.com/servlet/KbServlet/download/22506-102-671576/gslb-primer_FINAL_1019.pdf
