Synchronize Cluster Configuration using OpenShift Hive – SyncSets and SelectorSyncSets

It has been some time since my last post but I want to continue my OpenShift Hive article series about Getting started with OpenShift Hive and how to Deploy OpenShift/OKD 4.x clusters using Hive. In this blog post I want to explain how you can use Hive to synchronise cluster configuration using SyncSets. There are two different types of SyncSets, the SyncSet (namespaced custom resource), which you assign to a specific cluster name in the Cluster Deployment Reference, and a SelectorSyncSet (cluster-wide custom resource) using the Cluster Deployment Selector, which uses a label selector to apply configuration to a set of clusters matching the label across cluster namespaces.
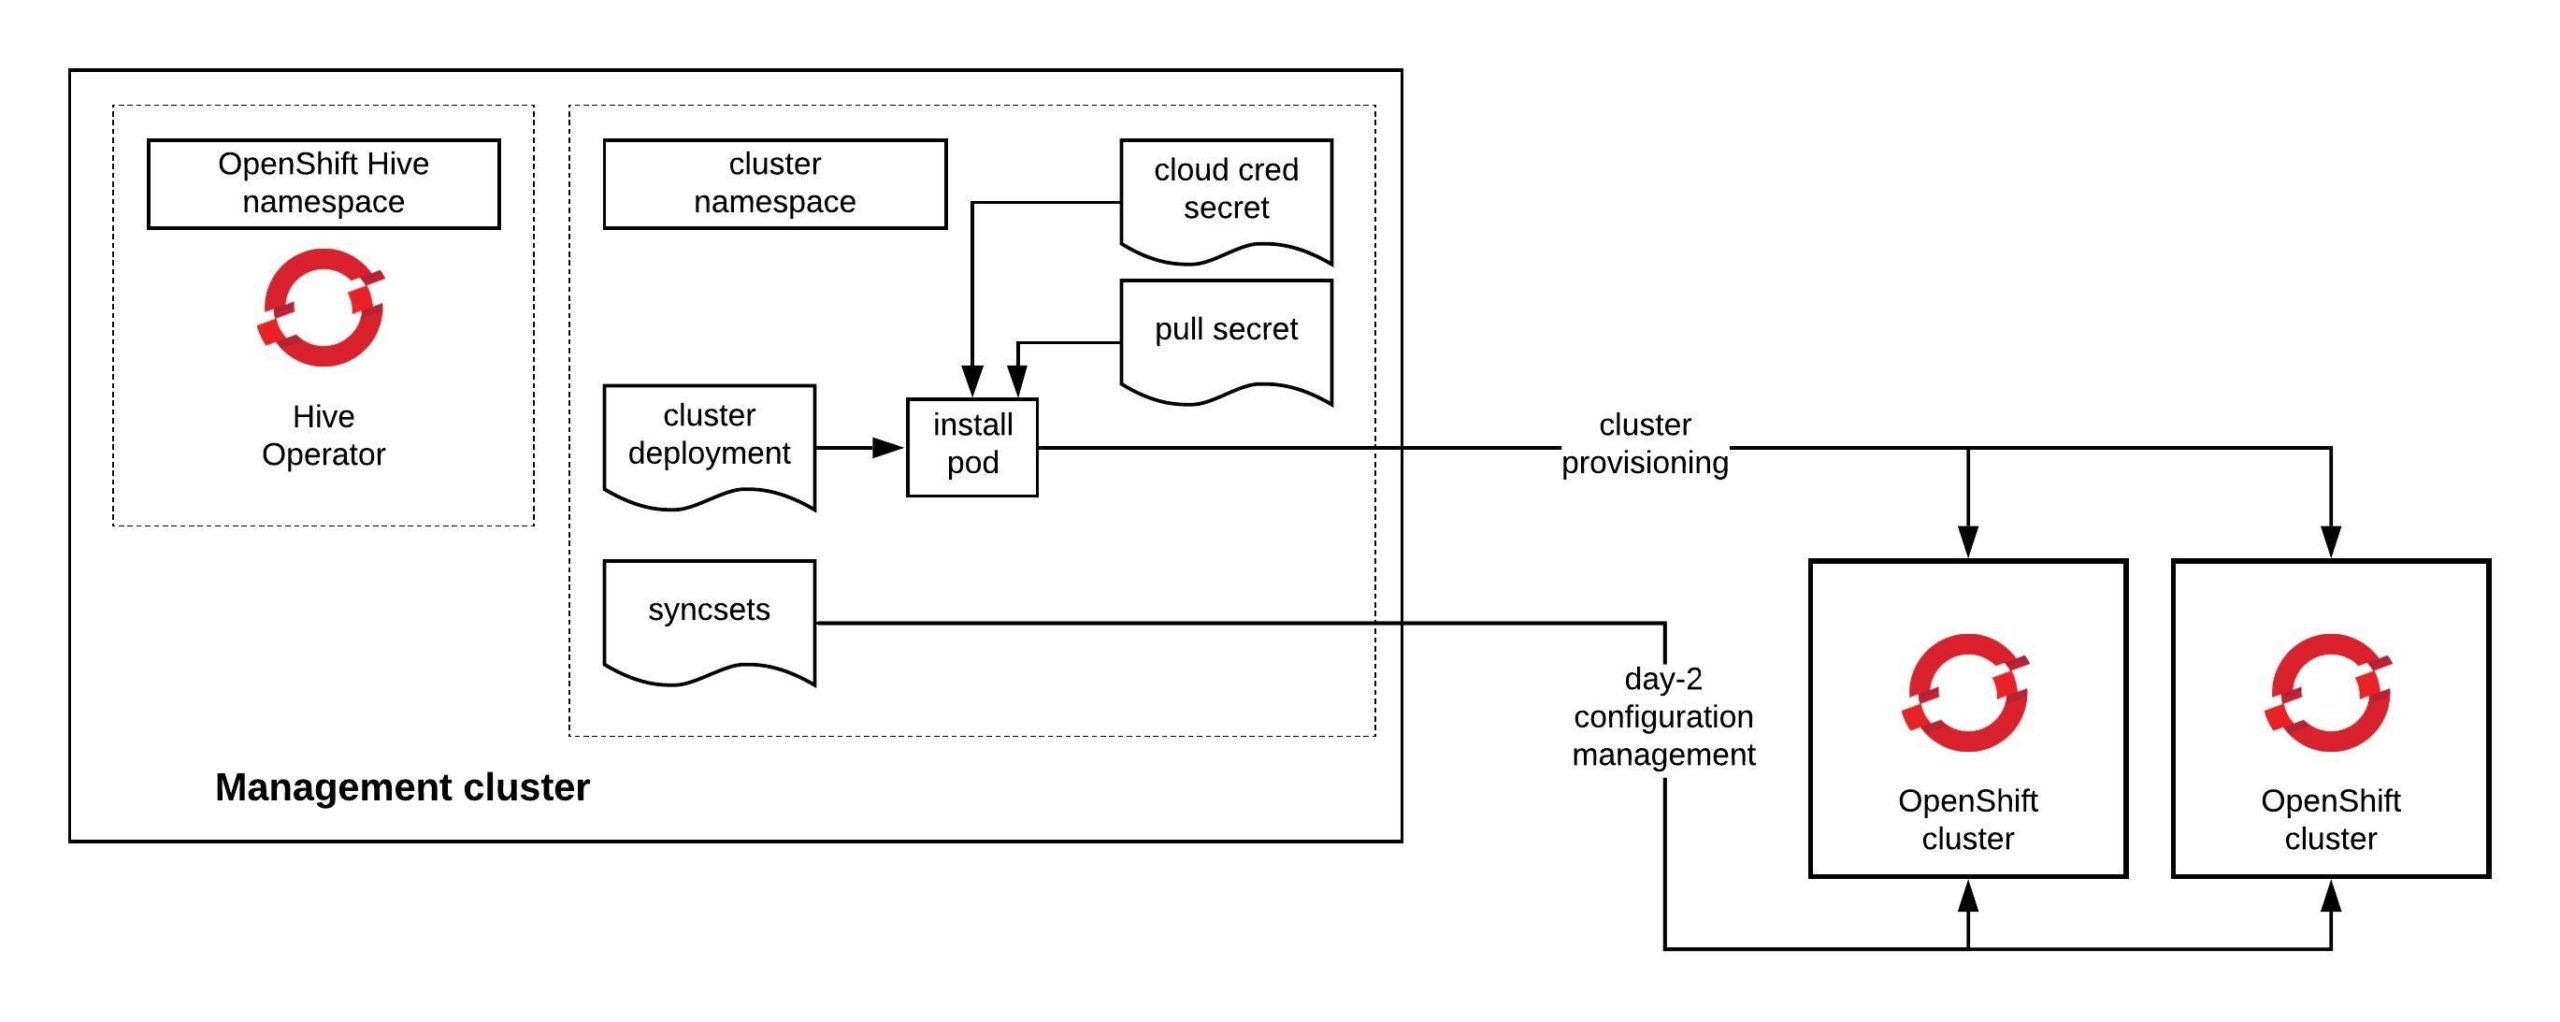
Let’s look at the first example of a SyncSet (namespaced resource), which you can see in the example below. In the clusterDeploymentRefs you need to match a cluster name which is created in the same namespace where you create the SyncSet. In SyncSet there are sections where you can create resources or apply patches to a cluster. The last section is secretReference which you use to apply secrets to a cluster without having them in clear text written in the SyncSet:

apiVersion: hive.openshift.io/v1
kind: SyncSet
metadata:
  name: example-syncset
  namespace: okd
spec:
  clusterDeploymentRefs:
  - name: okd
  resources:
  - apiVersion: v1
    kind: Namespace
    metadata:
      name: myproject
  patches:
  - kind: Config
    apiVersion: imageregistry.operator.openshift.io/v1
    name: cluster
    applyMode: AlwaysApply
    patch: |-
      { "spec": { "defaultRoute": true }}
    patchType: merge
  secretReferences:
  - source:
      name: mysecret
      namespace: okd
    target:
      name: mysecret
      namespace: myproject

The second SyncSet example for an SelectorSyncSet (cluster-wide resource) is very similar to the previous example but more flexible because you can use a label selector clusterDeploymentSelector and the configuration can be applied to multiple clusters matching the label across cluster namespaces. Great use-case for common or environment configuration which is the same for all OpenShift clusters:

---
apiVersion: hive.openshift.io/v1
kind: SelectorSyncSet
metadata:
  name: mygroup
spec:
  resources:
  - apiVersion: v1
    kind: Namespace
    metadata:
      name: myproject
  resourceApplyMode: Sync
  clusterDeploymentSelector:
    matchLabels:
      cluster-group: okd

The problem with SyncSets is that they can get pretty large and it is complicated to write them by yourself depending on the size of configuration. My colleague Matt wrote a syncset generator which solves the problem and automatically generates a  SelectorSyncSet, please checkout his github repository:

$ wget -O syncset-gen https://github.com/matt-simons/syncset-gen/releases/download/v0.5/syncset-gen_linux_amd64 && chmod +x ./syncset-gen
$ sudo mv ./syncset-gen /usr/bin/
$ syncset-gen view -h
Parses a manifest directory and prints a SyncSet/SelectorSyncSet representation of the objects it contains.

Usage:
  ss view [flags]

Flags:
  -c, --cluster-name string   The cluster name used to match the SyncSet to a Cluster
  -h, --help                  help for view
  -p, --patches string        The directory of patch manifest files to use
  -r, --resources string      The directory of resource manifest files to use
  -s, --selector string       The selector key/value pair used to match the SelectorSyncSet to Cluster(s)

Next we need a repository to store the configuration for the OpenShift/OKD clusters. Below you can see a very simple example. The ./config folder contains common configuration which is using a SelectorSyncSet with a clusterDeploymentSelector:

$ tree
.
└── config
    ├── patch
    │   └── cluster-version.yaml
    └── resource
        └── namespace.yaml

To generate a SelectorSyncSet from the ./config folder, run the syncset-gen and the following command options:

$ syncset-gen view okd-cluster-group-selectorsyncset --selector cluster-group/okd -p ./config/patch/ -r ./config/resource/
{
    "kind": "SelectorSyncSet",
    "apiVersion": "hive.openshift.io/v1",
    "metadata": {
        "name": "okd-cluster-group-selectorsyncset",
        "creationTimestamp": null,
        "labels": {
            "generated": "true"
        }
    },
    "spec": {
        "resources": [
            {
                "apiVersion": "v1",
                "kind": "Namespace",
                "metadata": {
                    "name": "myproject"
                }
            }
        ],
        "resourceApplyMode": "Sync",
        "patches": [
            {
                "apiVersion": "config.openshift.io/v1",
                "kind": "ClusterVersion",
                "name": "version",
                "patch": "{\"spec\": {\"channel\": \"stable-4.3\",\"desiredUpdate\": {\"version\": \"4.3.0\", \"image\": \"quay.io/openshift-release-dev/ocp-release@sha256:3a516480dfd68e0f87f702b4d7bdd6f6a0acfdac5cd2e9767b838ceede34d70d\"}}}",
                "patchType": "merge"
            },
            {
                "apiVersion": "rbac.authorization.k8s.io/v1",
                "kind": "ClusterRoleBinding",
                "name": "self-provisioners",
                "patch": "{\"subjects\": null}",
                "patchType": "merge"
            }
        ],
        "clusterDeploymentSelector": {
            "matchExpressions": [
                {
                    "key": "cluster-group/okd",
                    "operator": "Exists"
                }
            ]
        }
    },
    "status": {}
}

To debug SyncSets use the below command in the cluster deployment namespace which can give you a status of whether the configuration has successfully applied or if it has failed to apply:

$ oc get syncsetinstance -n <namespace>
$ oc get syncsetinstances <synsetinstance name> -o yaml

I hope this was useful to get you started using OpenShift Hive and SyncSets to apply configuration to OpenShift/OKD clusters. More information about SyncSets can be found in the OpenShift Hive repository.

Create and run Ansible Operator on OpenShift

Since RedHat announced the new OpenShift version 4.0 they said it will be a very different experience to install and operate the platform, mostly because of Operators managing the components of the cluster. A few month back RedHat officially released the Operator-SDK and the Operator Hub to create your own operators and to share them.

I did some testing around the Ansible Operator which I wanted to share in this article but before we dig into creating our own operator we need to first install operator-sdk:

# Make sure you are able to use docker commands
sudo groupadd docker
sudo usermod -aG docker centos
ls -l /var/run/docker.sock
sudo chown root:docker /var/run/docker.sock

# Download Go
wget https://dl.google.com/go/go1.10.3.linux-amd64.tar.gz
sudo tar -C /usr/local -xzf go1.10.3.linux-amd64.tar.gz

# Modify bash_profile
vi ~/.bash_profile
export PATH=$PATH:/usr/local/go/bin:$HOME/go
export GOPATH=$HOME/go

# Load bash_profile
source ~/.bash_profile

# Install Go dep
mkdir -p /home/centos/go/bin
curl https://raw.githubusercontent.com/golang/dep/master/install.sh | sh
sudo cp /home/centos/go/bin/dep /usr/local/go/bin/

# Download and install operator framework
mkdir -p $GOPATH/src/github.com/operator-framework
cd $GOPATH/src/github.com/operator-framework
git clone https://github.com/operator-framework/operator-sdk
cd operator-sdk
git checkout master
make dep
make install
sudo cp /home/centos/go/bin/operator-sdk /usr/local/bin/

Let’s start creating our Ansible Operator using the operator-sdk command line which create a blank operator template which we will modify. You can create three different types of operators: Go, Helm or Ansible – check out the operator-sdk repository:

operator-sdk new helloworld-operator --api-version=hello.world.com/v1alpha1 --kind=Helloworld --type=ansible --cluster-scoped
cd ./helloworld-operator/

I am using the Ansible k8s module to create a Hello OpenShift deployment configuration in tasks/main.yml.

---
# tasks file for helloworld

- name: create deployment config
  k8s:
    definition:
      apiVersion: apps.openshift.io/v1
      kind: DeploymentConfig
      metadata:
        name: '{{ meta.name }}'
        labels:
          app: '{{ meta.name }}'
        namespace: '{{ meta.namespace }}'
...

Please have a look at my Github repository openshift-helloworld-operator for more details.

After we have modified the Ansible Role we can start and build operator which will create container we can afterwards push to a container registry like Docker Hub:

$ operator-sdk build berndonline/openshift-helloworld-operator:v0.1
INFO[0000] Building Docker image berndonline/openshift-helloworld-operator:v0.1
Sending build context to Docker daemon   192 kB
Step 1/3 : FROM quay.io/operator-framework/ansible-operator:v0.5.0
Trying to pull repository quay.io/operator-framework/ansible-operator ...
v0.5.0: Pulling from quay.io/operator-framework/ansible-operator
a02a4930cb5d: Already exists
1bdeea372afe: Pull complete
3b057581d180: Pull complete
12618e5abaa7: Pull complete
6f75beb67357: Pull complete
b241f86d9d40: Pull complete
e990bcb94ae6: Pull complete
3cd07ac53955: Pull complete
3fdda52e2c22: Pull complete
0fd51cfb1114: Pull complete
feaebb94b4da: Pull complete
4ff9620dce03: Pull complete
a428b645a85e: Pull complete
5daaf234bbf2: Pull complete
8cbdd2e4d624: Pull complete
fa8517b650e0: Pull complete
a2a83ad7ba5a: Pull complete
d61b9e9050fe: Pull complete
Digest: sha256:9919407a30b24d459e1e4188d05936b52270cafcd53afc7d73c89be02262f8c5
Status: Downloaded newer image for quay.io/operator-framework/ansible-operator:v0.5.0
 ---> 1e857f3522b5
Step 2/3 : COPY roles/ ${HOME}/roles/
 ---> 6e073916723a
Removing intermediate container cb3f89ba1ed6
Step 3/3 : COPY watches.yaml ${HOME}/watches.yaml
 ---> 8f0ee7ba26cb
Removing intermediate container 56ece5b800b2
Successfully built 8f0ee7ba26cb
INFO[0018] Operator build complete.

$ docker push berndonline/openshift-helloworld-operator:v0.1
The push refers to a repository [docker.io/berndonline/openshift-helloworld-operator]
2233d56d407b: Pushed
d60aa100721d: Pushed
a3a57fad5e76: Pushed
ab38e57f8581: Pushed
79b113b67633: Pushed
9cf5b154cadd: Pushed
b191ffbd3c8d: Pushed
5e21ced2d28b: Pushed
cdadb746680d: Pushed
d105c72f21c1: Pushed
1a899839ab25: Pushed
be81e9b31e54: Pushed
63d9d56008cb: Pushed
56a62cb9d96c: Pushed
3f9dc45a1d02: Pushed
dac20332f7b5: Pushed
24f8e5ff1817: Pushed
1bdae1c8263a: Pushed
bc08b53be3d4: Pushed
071d8bd76517: Mounted from openshift/origin-node
v0.1: digest: sha256:50fb222ec47c0d0a7006ff73aba868dfb3369df8b0b16185b606c10b2e30b111 size: 4495

After we have pushed the container to the registry we can continue on OpenShift and create the operator project together with the custom resource definition:

oc new-project helloworld-operator
oc create -f deploy/crds/hello_v1alpha1_helloworld_crd.yaml

Before we apply the resources let’s review and edit operator image configuration to point to our newly create operator container image:

$ cat deploy/operator.yaml
apiVersion: apps/v1
kind: Deployment
metadata:
  name: helloworld-operator
spec:
  replicas: 1
  selector:
    matchLabels:
      name: helloworld-operator
  template:
    metadata:
      labels:
        name: helloworld-operator
    spec:
      serviceAccountName: helloworld-operator
      containers:
        - name: helloworld-operator
          # Replace this with the built image name
          image: berndonline/openshift-helloworld-operator:v0.1
          imagePullPolicy: Always
          env:
            - name: WATCH_NAMESPACE
              value: ""
            - name: POD_NAME
              valueFrom:
                fieldRef:
                  fieldPath: metadata.name
            - name: OPERATOR_NAME
              value: "helloworld-operator"

$ cat deploy/role_binding.yaml
kind: ClusterRoleBinding
apiVersion: rbac.authorization.k8s.io/v1
metadata:
  name: helloworld-operator
subjects:
- kind: ServiceAccount
  name: helloworld-operator
  # Replace this with the namespace the operator is deployed in.
  namespace: helloworld-operator
roleRef:
  kind: ClusterRole
  name: helloworld-operator
  apiGroup: rbac.authorization.k8s.io

$ cat deploy/role_user.yaml
apiVersion: rbac.authorization.k8s.io/v1
kind: ClusterRole
metadata:
  creationTimestamp: null
  name: helloworld-operator-execute
rules:
- apiGroups:
  - hello.world.com
  resources:
  - '*'
  verbs:
  - '*'

Afterwards we can deploy the required resources:

oc create -f deploy/operator.yaml \
          -f deploy/role_binding.yaml \
          -f deploy/role.yaml \
          -f deploy/service_account.yaml

Create a cluster-role for the custom resource definition and add bind user to a cluster-role to be able to create a custom resource:

oc create -f deploy/role_user.yaml 
oc adm policy add-cluster-role-to-user helloworld-operator-execute berndonline

If you forget to do this you will see the following error message:

Now we can login as your openshift user and create the custom resource in the namespace myproject:

$ oc create -n myproject -f deploy/crds/hello_v1alpha1_helloworld_cr.yaml
helloworld.hello.world.com/hello-openshift created
$ oc describe Helloworld/hello-openshift -n myproject
Name:         hello-openshift
Namespace:    myproject
Labels:       
Annotations:  
API Version:  hello.world.com/v1alpha1
Kind:         Helloworld
Metadata:
  Creation Timestamp:  2019-03-16T15:33:25Z
  Generation:          1
  Resource Version:    19692
  Self Link:           /apis/hello.world.com/v1alpha1/namespaces/myproject/helloworlds/hello-openshift
  UID:                 d6ce75d7-4800-11e9-b6a8-0a238ec78c2a
Spec:
  Size:  1
Status:
  Conditions:
    Last Transition Time:  2019-03-16T15:33:25Z
    Message:               Running reconciliation
    Reason:                Running
    Status:                True
    Type:                  Running
Events:                    

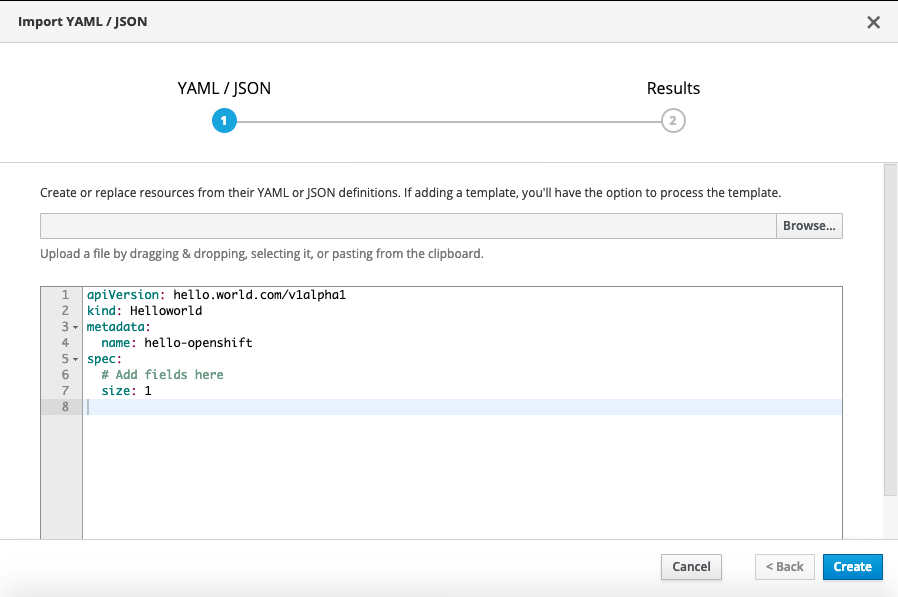
You can also create the custom resource via the web console:

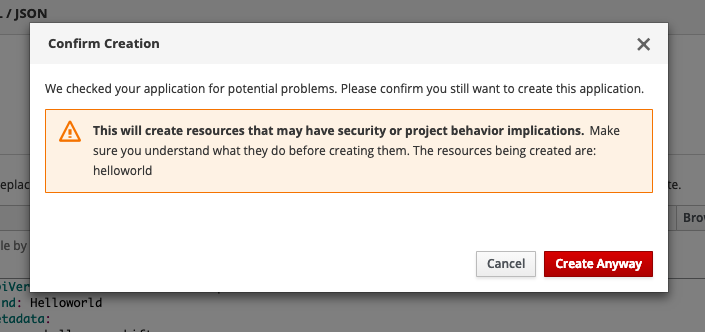
You will get a security warning which you need to confirm to apply the custom resource:

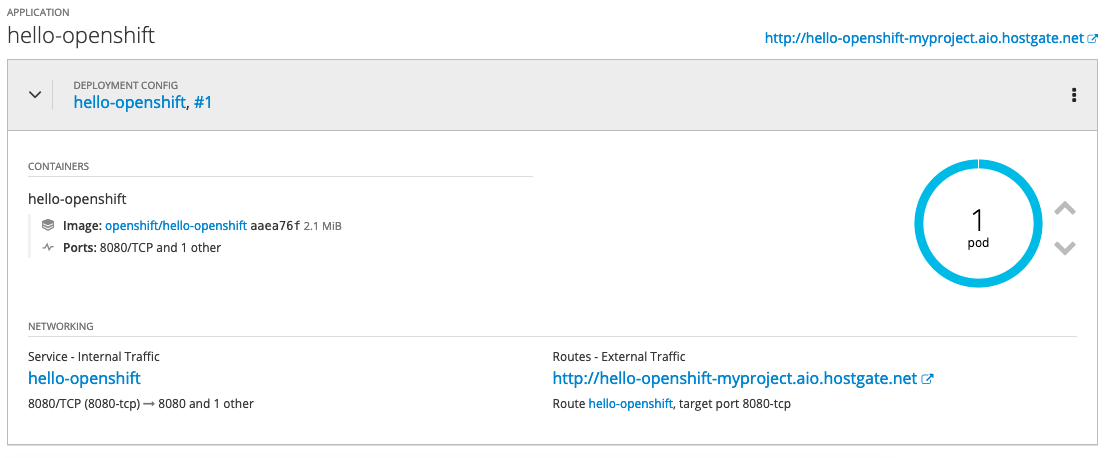
After a few minutes the operator will create the deploymentconfig and will deploy the hello-openshift pod:

$ oc get dc
NAME              REVISION   DESIRED   CURRENT   TRIGGERED BY
hello-openshift   1          1         1         config,image(hello-openshift:latest)

$ oc get pods
NAME                      READY     STATUS    RESTARTS   AGE
hello-openshift-1-pjhm4   1/1       Running   0          2m

We can modify custom resource and change the spec size to three:

$ oc edit Helloworld/hello-openshift
...
spec:
  size: 3
...

$ oc describe Helloworld/hello-openshift
Name:         hello-openshift
Namespace:    myproject
Labels:       
Annotations:  
API Version:  hello.world.com/v1alpha1
Kind:         Helloworld
Metadata:
  Creation Timestamp:  2019-03-16T15:33:25Z
  Generation:          2
  Resource Version:    24902
  Self Link:           /apis/hello.world.com/v1alpha1/namespaces/myproject/helloworlds/hello-openshift
  UID:                 d6ce75d7-4800-11e9-b6a8-0a238ec78c2a
Spec:
  Size:  3
Status:
  Conditions:
    Last Transition Time:  2019-03-16T15:33:25Z
    Message:               Running reconciliation
    Reason:                Running
    Status:                True
    Type:                  Running
Events:                    
~ centos(ocp: myproject) $

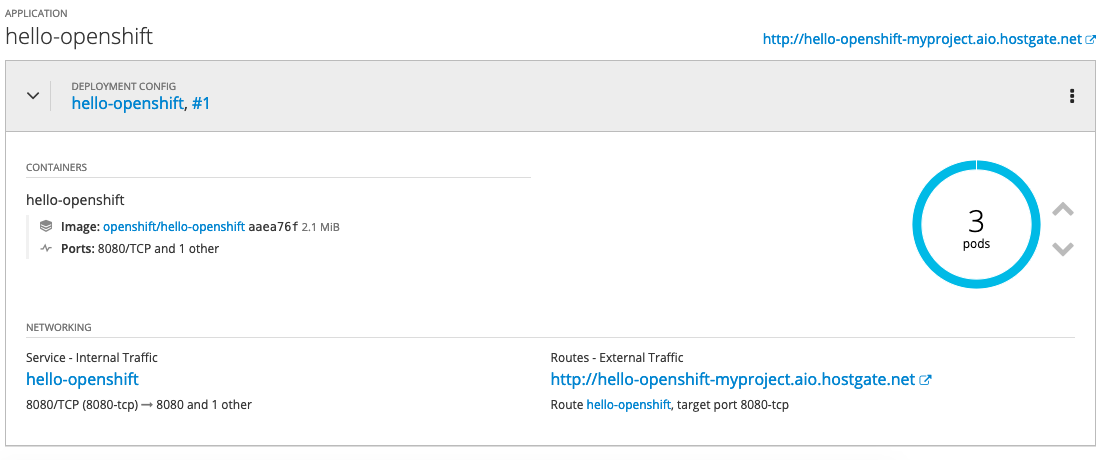
The operator will change the deployment config and change the desired state to three pods:

$ oc get dc
NAME              REVISION   DESIRED   CURRENT   TRIGGERED BY
hello-openshift   1          3         3         config,image(hello-openshift:latest)

$ oc get pods
NAME                      READY     STATUS    RESTARTS   AGE
hello-openshift-1-pjhm4   1/1       Running   0          32m
hello-openshift-1-qhqgx   1/1       Running   0          3m
hello-openshift-1-qlb2q   1/1       Running   0          3m

To clean-up and remove the deployment config you need to delete the custom resource

oc delete Helloworld/hello-openshift -n myproject
oc adm policy remove-cluster-role-from-user helloworld-operator-execute berndonline

I hope this is a good and simple example to show how powerful operators are on OpenShift / Kubernetes.