Deploy Amazon EC2 Autoscaling Group and AWS Load Balancers with Terraform

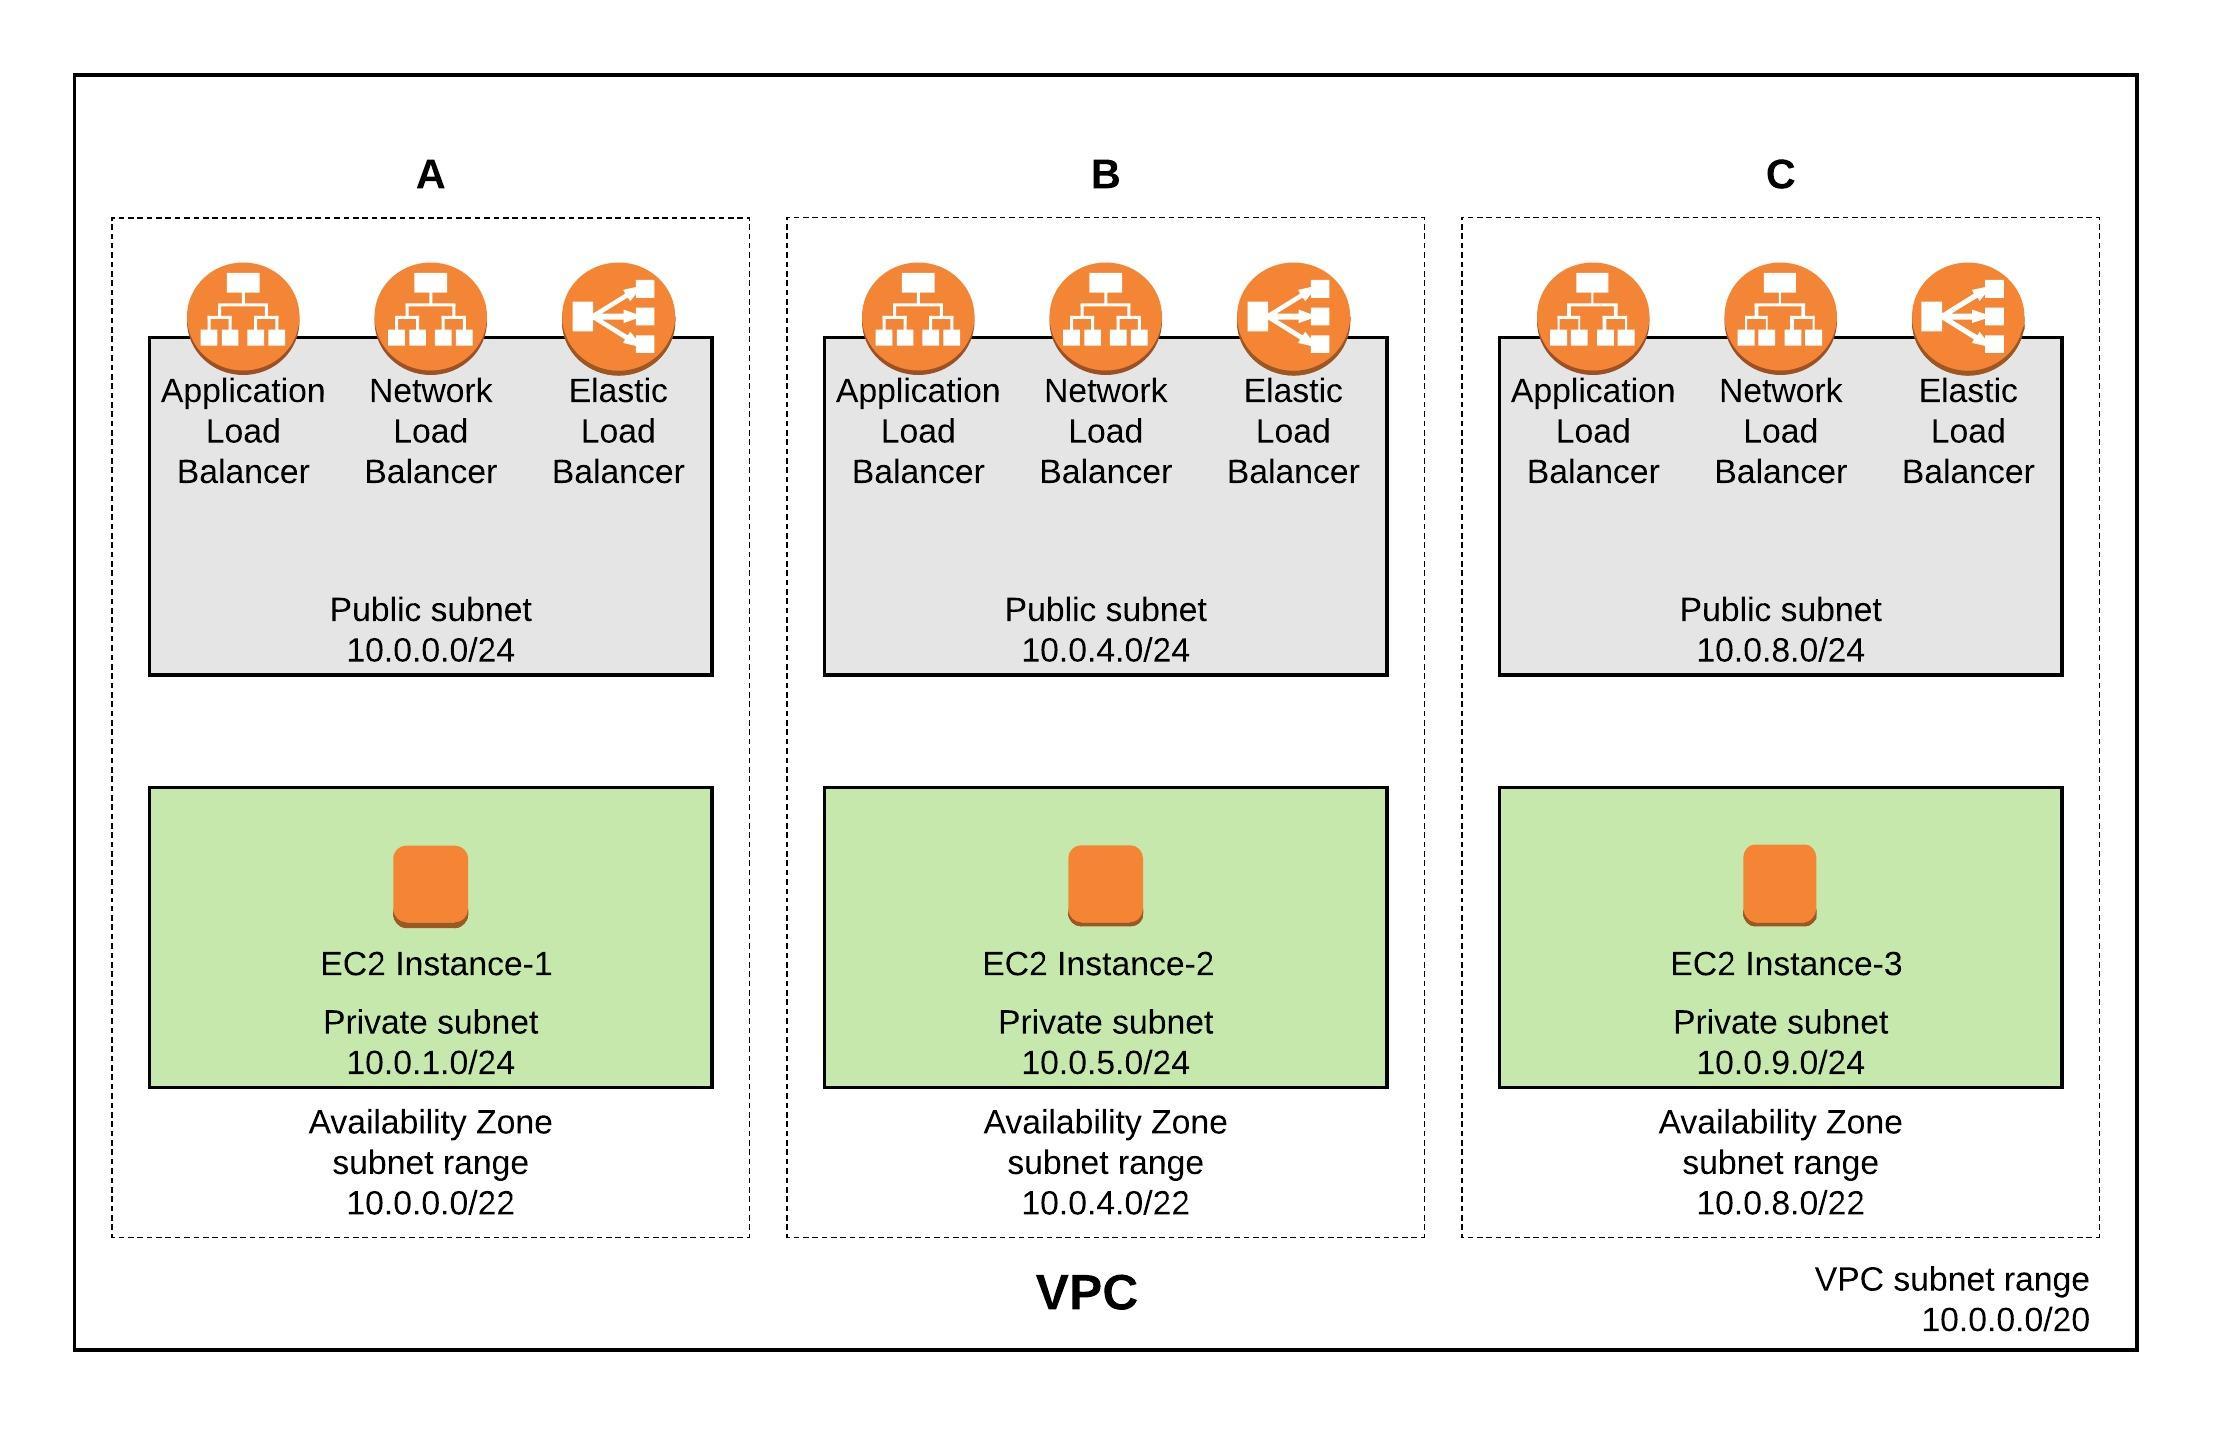
This is the next article about using Terraform to create EC2 autoscaling group and the different load balancing options for EC2 instances. This setup depends on my previous blog post about using Terraform to deploy a AWS VPC so please read this first. In my Github repository you will find all the needed Terraform files ec2.tf and vpc.tf to deploy the full environment.

EC2 resource overview:

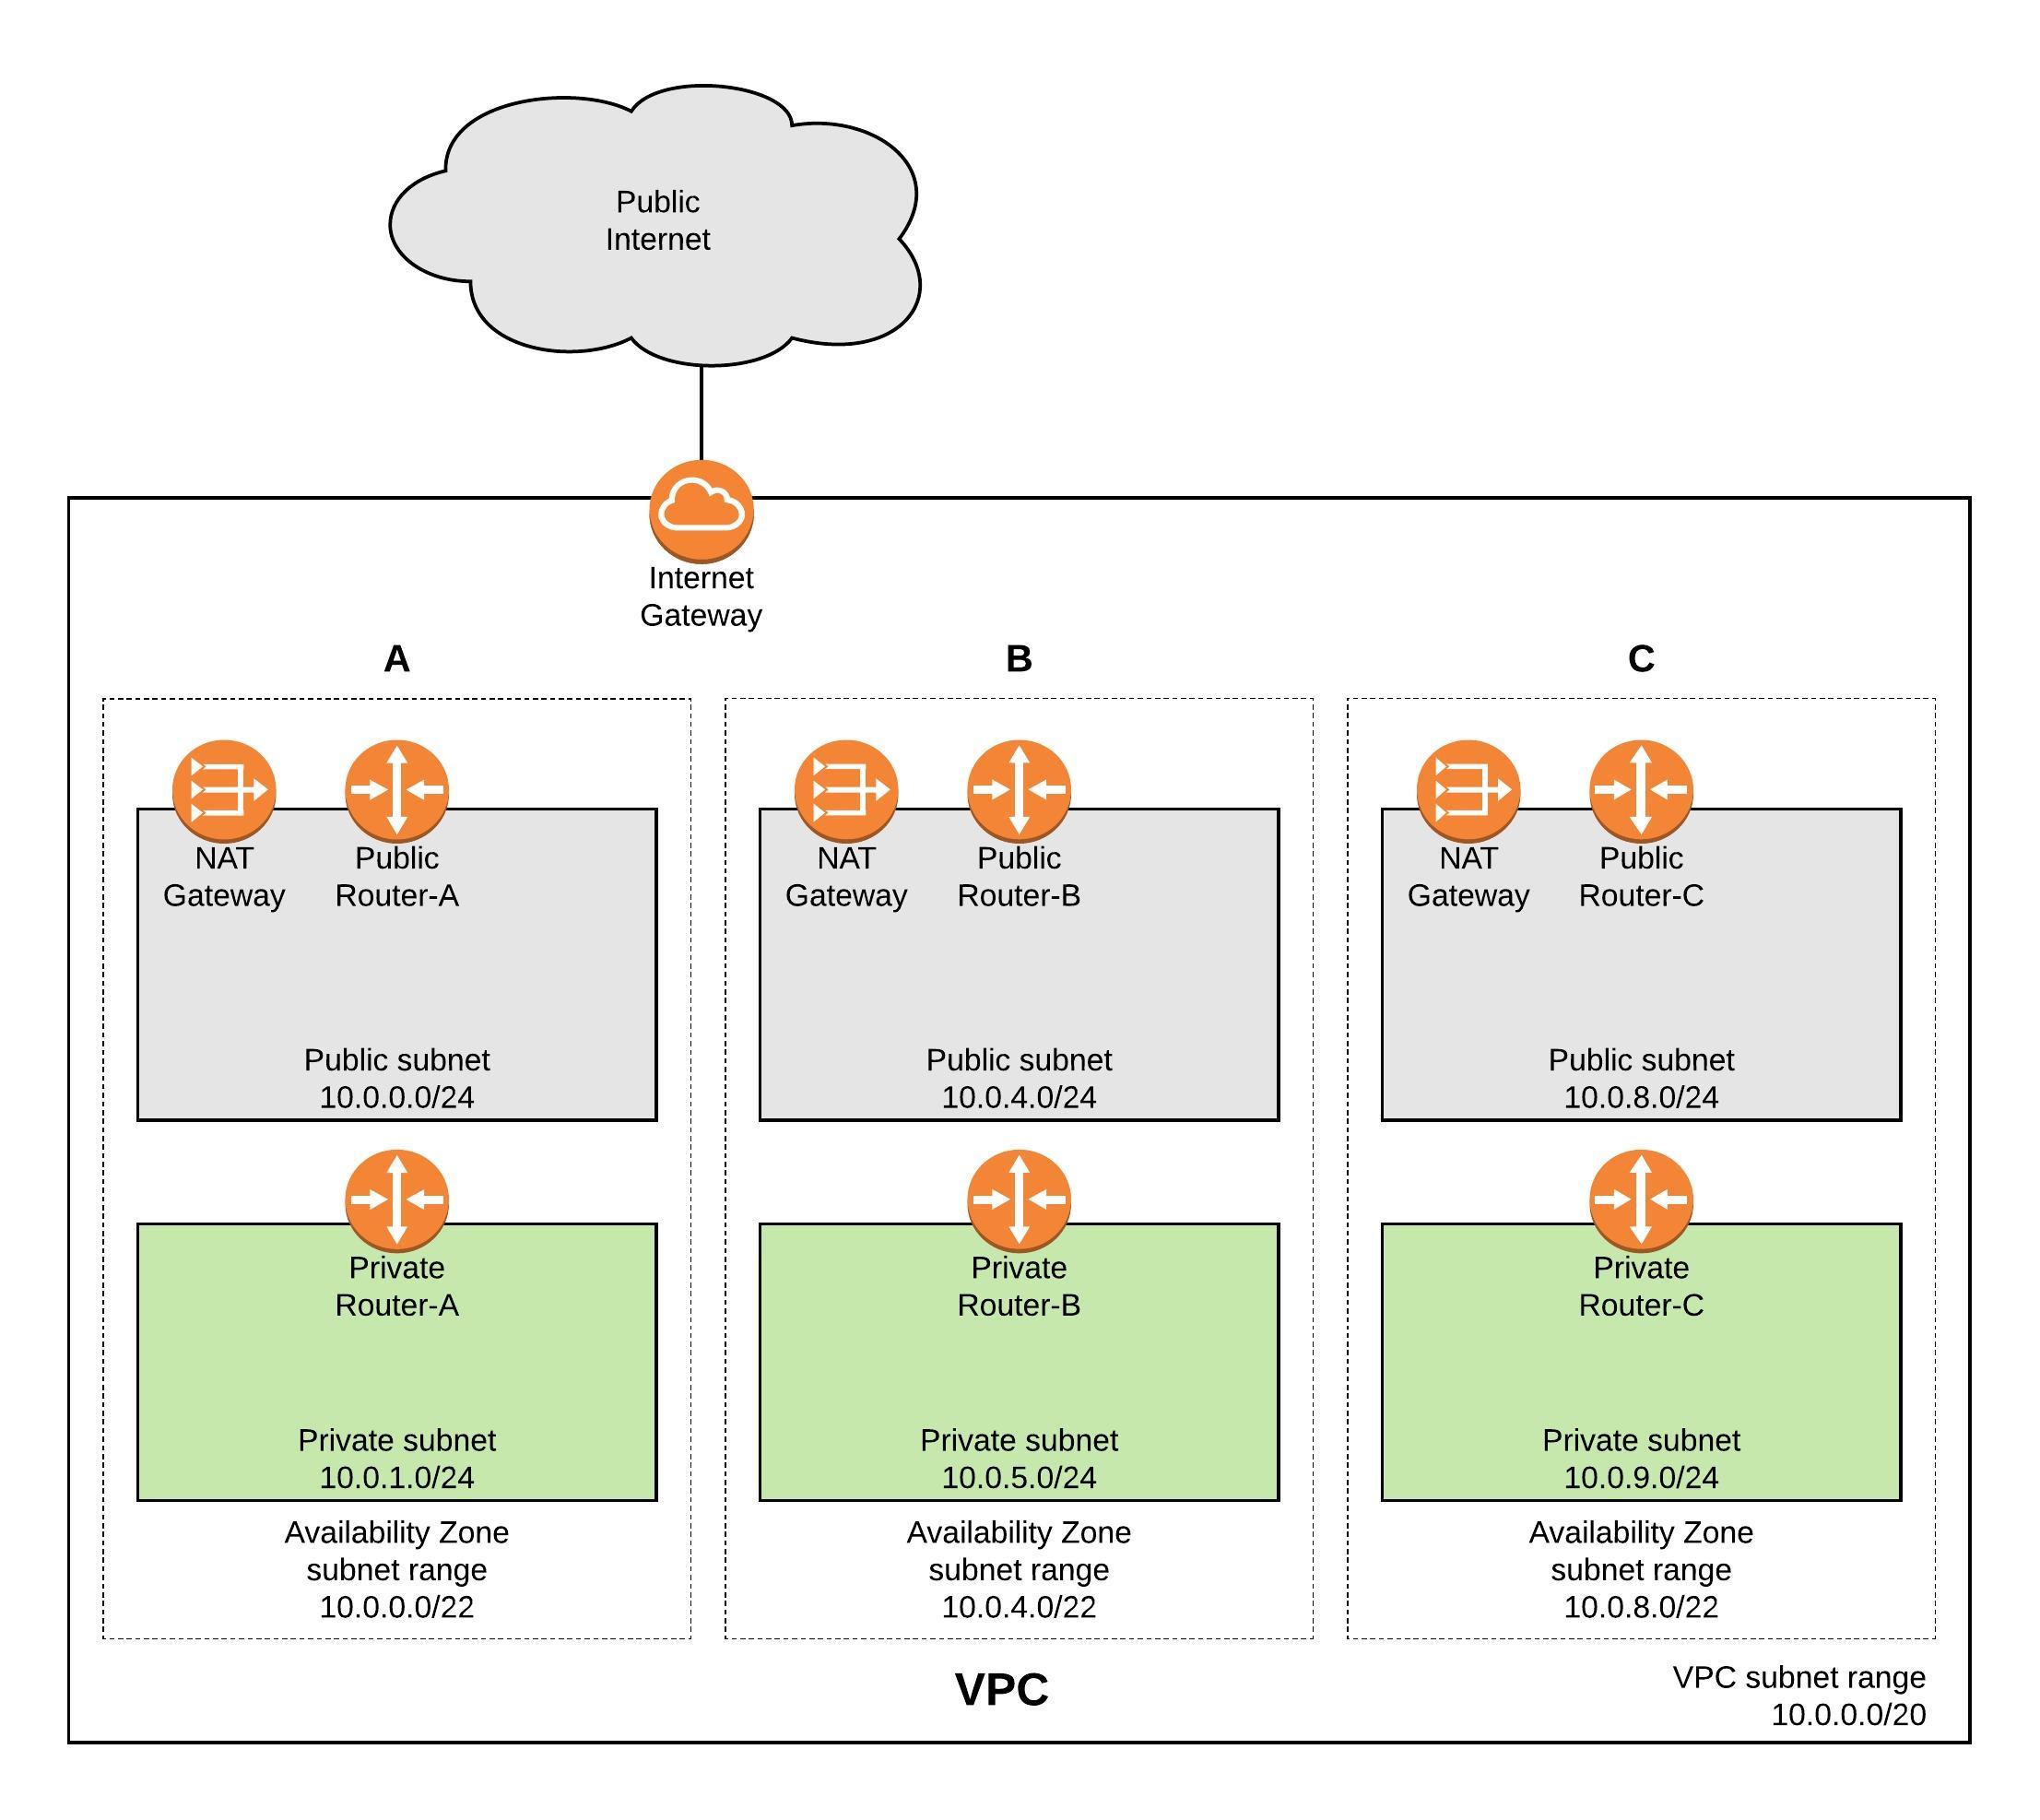
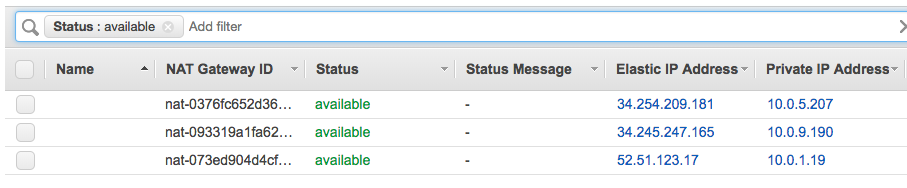
Let’s start with the launch configuration and creating the autoscaling group. I am using eu-west-1 and a standard Ubuntu 16.04 AMI. The instances are created in the private subnet and don’t get a public IP address assigned but have internet access via the NAT gateway:

resource "aws_launch_configuration" "autoscale_launch" {
  image_id = "${lookup(var.aws_amis, var.aws_region)}"
  instance_type = "t2.micro"
  security_groups = ["${aws_security_group.sec_web.id}"]
  key_name = "${aws_key_pair.auth.id}"
  user_data = <<-EOF
              #!/bin/bash
              sudo apt-get -y update
              sudo apt-get -y install nginx
              EOF
  lifecycle {
    create_before_destroy = true
  }
}

resource "aws_autoscaling_group" "autoscale_group" {
  launch_configuration = "${aws_launch_configuration.autoscale_launch.id}"
  vpc_zone_identifier = ["${aws_subnet.PrivateSubnetA.id}","${aws_subnet.PrivateSubnetB.id}","${aws_subnet.PrivateSubnetC.id}"]
  load_balancers = ["${aws_elb.elb.name}"]
  min_size = 3
  max_size = 3
  tag {
    key = "Name"
    value = "autoscale"
    propagate_at_launch = true
  }
}

I also created a few security groups to allow the traffic,  please have look for more detail in the ec2.tf.
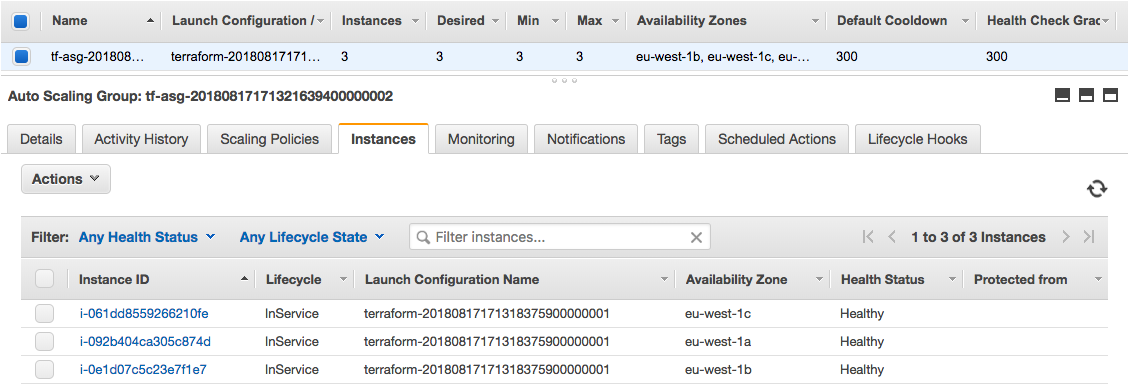
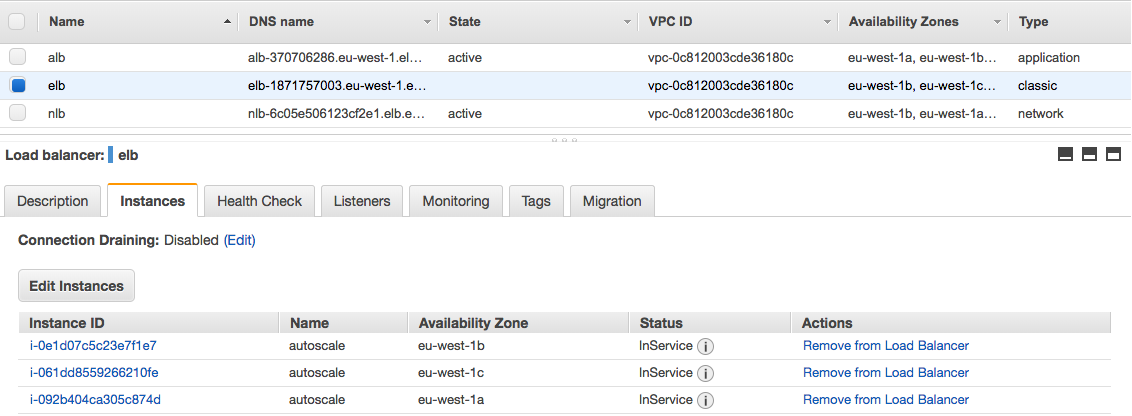
Autoscaling Group

Now the configuration for a AWS Elastic (Classic) Load Balancer:

resource "aws_elb" "elb" {
  name = "elb"
  security_groups = ["${aws_security_group.sec_lb.id}"]
  subnets            = ["${aws_subnet.PublicSubnetA.id}","${aws_subnet.PublicSubnetB.id}","${aws_subnet.PublicSubnetC.id}"]
  cross_zone_load_balancing   = true
  health_check {
    healthy_threshold = 2
    unhealthy_threshold = 2
    timeout = 3
    interval = 30
    target = "HTTP:80/"
  }
  listener {
    lb_port = 80
    lb_protocol = "http"
    instance_port = "80"
    instance_protocol = "http"
  }
}

Elastic Load Balancer (Classic LB)

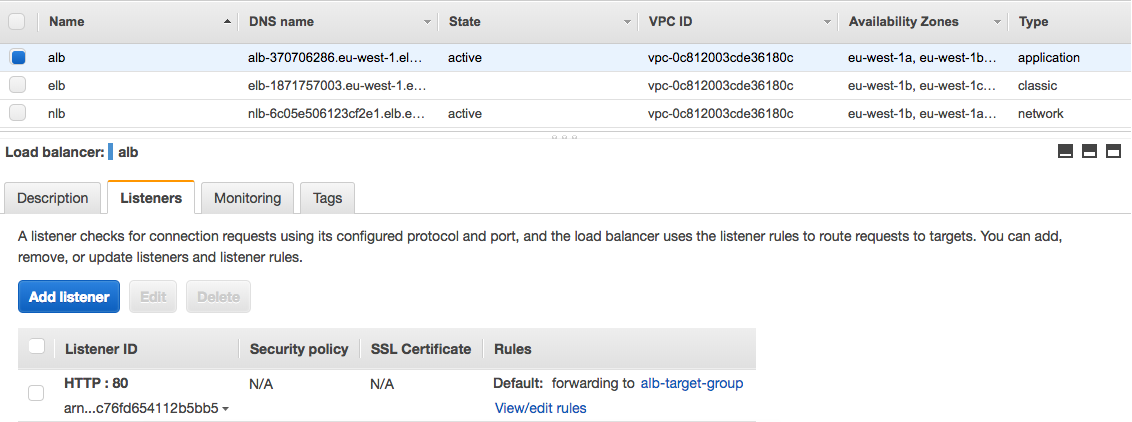
Use the Application Load Balancing (ALB) for more advanced web load balancing which only support http and https protocols. You start with creating the ALB resource, afterwards creating the target group where you can define stickiness and health checks. The listener defines which protocol type the ALB uses and assigns the target group. In the end you attach the target- with the autoscaling group:

resource "aws_lb" "alb" {  
  name            = "alb"  
  subnets         = ["${aws_subnet.PublicSubnetA.id}","${aws_subnet.PublicSubnetB.id}","${aws_subnet.PublicSubnetC.id}"]
  security_groups = ["${aws_security_group.sec_lb.id}"]
  internal        = false 
  idle_timeout    = 60   
  tags {    
    Name    = "alb"    
  }   
}

resource "aws_lb_target_group" "alb_target_group" {  
  name     = "alb-target-group"  
  port     = "80"  
  protocol = "HTTP"  
  vpc_id   = "${aws_vpc.default.id}"   
  tags {    
    name = "alb_target_group"    
  }   
  stickiness {    
    type            = "lb_cookie"    
    cookie_duration = 1800    
    enabled         = true 
  }   
  health_check {    
    healthy_threshold   = 3    
    unhealthy_threshold = 10    
    timeout             = 5    
    interval            = 10    
    path                = "/"    
    port                = 80
  }
}

resource "aws_lb_listener" "alb_listener" {  
  load_balancer_arn = "${aws_lb.alb.arn}"  
  port              = 80  
  protocol          = "http"
  
  default_action {    
    target_group_arn = "${aws_lb_target_group.alb_target_group.arn}"
    type             = "forward"  
  }
}

resource "aws_autoscaling_attachment" "alb_autoscale" {
  alb_target_group_arn   = "${aws_lb_target_group.alb_target_group.arn}"
  autoscaling_group_name = "${aws_autoscaling_group.autoscale_group.id}"
}

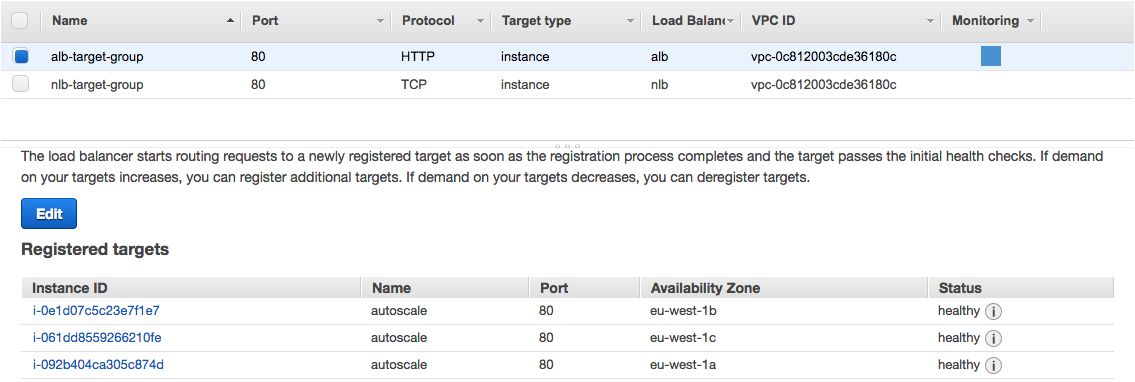
Application Load Balancer (ALB)

ALB Target Group

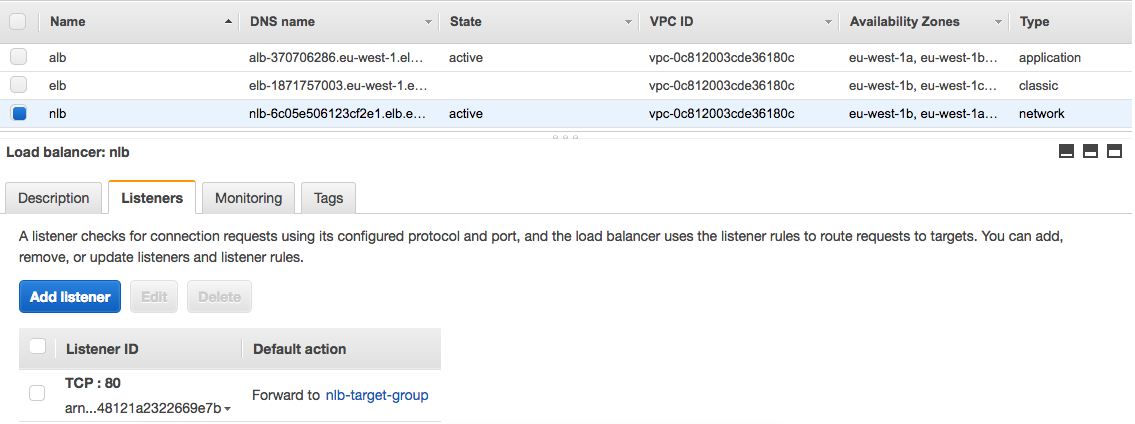
The Network Load Balancing (NLB) is very similar to the configuration like the ALB only that it supports the TCP protocol which should be only used for performance because of the limited health check functionality:

resource "aws_lb" "nlb" {
  name               = "nlb"
  internal           = false
  load_balancer_type = "network"
  subnets            = ["${aws_subnet.PublicSubnetA.id}","${aws_subnet.PublicSubnetB.id}","${aws_subnet.PublicSubnetC.id}"]
  enable_cross_zone_load_balancing  = true
  tags {
    Name = "nlb"
  }
}

resource "aws_lb_target_group" "nlb_target_group" {  
  name     = "nlb-target-group"  
  port     = "80"  
  protocol = "TCP"  
  vpc_id   = "${aws_vpc.default.id}"   
  tags {    
    name = "nlb_target_group"    
  }     
}

resource "aws_lb_listener" "nlb_listener" {  
  load_balancer_arn = "${aws_lb.nlb.arn}"  
  port              = 80  
  protocol          = "TCP"
  
  default_action {    
    target_group_arn = "${aws_lb_target_group.nlb_target_group.arn}"
    type             = "forward"  
  }
}

resource "aws_autoscaling_attachment" "nlb_autoscale" {
  alb_target_group_arn   = "${aws_lb_target_group.nlb_target_group.arn}"
  autoscaling_group_name = "${aws_autoscaling_group.autoscale_group.id}"
}

Network Load Balancer (NLB)
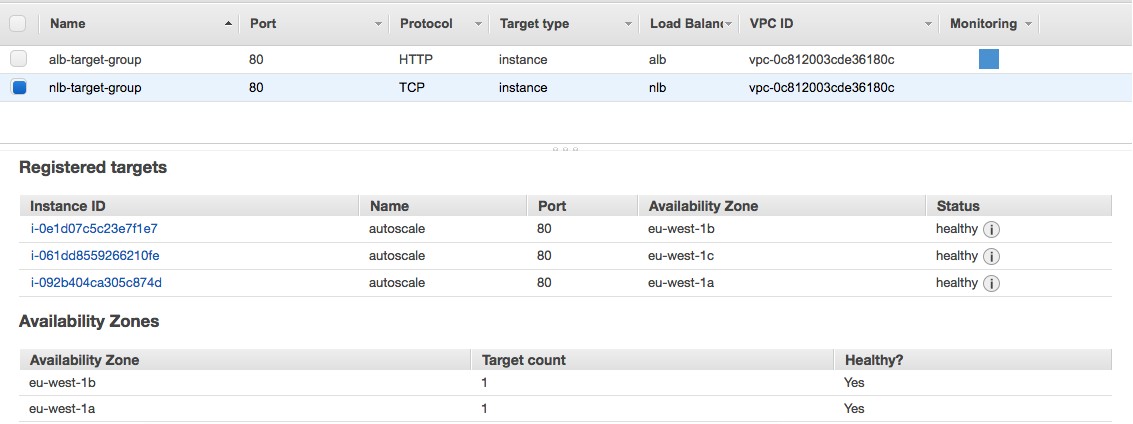
NLB Target Group

Let’s run terraform apply:

berndonline@lab:~/aws-terraform$ terraform apply
data.aws_availability_zones.available: Refreshing state...

An execution plan has been generated and is shown below.
Resource actions are indicated with the following symbols:
  + create

Terraform will perform the following actions:

  + aws_autoscaling_attachment.alb_autoscale
      id:                                          
      alb_target_group_arn:                        "${aws_lb_target_group.alb_target_group.arn}"
      autoscaling_group_name:                      "${aws_autoscaling_group.autoscale_group.id}"

  + aws_autoscaling_attachment.nlb_autoscale
      id:                                          
      alb_target_group_arn:                        "${aws_lb_target_group.nlb_target_group.arn}"
      autoscaling_group_name:                      "${aws_autoscaling_group.autoscale_group.id}"

...

Plan: 41 to add, 0 to change, 0 to destroy.

Do you want to perform these actions?
  Terraform will perform the actions described above.
  Only 'yes' will be accepted to approve.

  Enter a value: yes

...

aws_lb.nlb: Creation complete after 2m53s (ID: arn:aws:elasticloadbalancing:eu-west-1:...:loadbalancer/net/nlb/235e69c61779b723)
aws_lb_listener.nlb_listener: Creating...
  arn:                               "" => ""
  default_action.#:                  "" => "1"
  default_action.0.target_group_arn: "" => "arn:aws:elasticloadbalancing:eu-west-1:552276840222:targetgroup/nlb-target-group/7b3c10cbdd411669"
  default_action.0.type:             "" => "forward"
  load_balancer_arn:                 "" => "arn:aws:elasticloadbalancing:eu-west-1:552276840222:loadbalancer/net/nlb/235e69c61779b723"
  port:                              "" => "80"
  protocol:                          "" => "TCP"
  ssl_policy:                        "" => ""
aws_lb_listener.nlb_listener: Creation complete after 0s (ID: arn:aws:elasticloadbalancing:eu-west-1:.../nlb/235e69c61779b723/dfde2530387b470f)

Apply complete! Resources: 41 added, 0 changed, 0 destroyed.

Outputs:

alb_dns_name = alb-1295224636.eu-west-1.elb.amazonaws.com
elb_dns_name = elb-611107604.eu-west-1.elb.amazonaws.com
nlb_dns_name = nlb-235e69c61779b723.elb.eu-west-1.amazonaws.com
berndonline@lab:~/aws-terraform$

Together with the VPC configuration from my previous article, this deploys the different load balancers and provides you the DNS names as an output and ready to use.

Over the coming weeks I will optimise the Terraform code and move some of the resource settings into the variables.tf file to make this more scaleable.

If you like this article, please share your feedback and leave a comment.

Using HashiCorp Terraform to deploy Amazon AWS VPC

Before I start deploying the AWS VPC with HashCorp’s Terraform I want to explain the design of the Virtual Private Cloud. The main focus here is primarily for redundancy to ensure that if one Availability Zone (AZ) becomes unavailable that it is not interrupting the traffic and causing outages in your network, the NAT Gateway for example run per AZ so you need to make sure that these services are spread over multiple AZs.

AWS VPC network overview:

Before you start using Terraform you need to install the binary and it is also very useful to install the AWS command line interface. Please don’t forget to register the AWS CLI and add access and secure key.

pip install awscli --upgrade --user
wget https://releases.hashicorp.com/terraform/0.11.7/terraform_0.11.7_linux_amd64.zip
unzip terraform_0.11.7_linux_amd64.zip
sudo mv terraform /usr/local/bin/

Terraform is a great product and creates infrastructure as code, and is independent from any cloud provider so there is no need to use AWS CloudFormation like in my example. My repository for the Terraform files can be found here: https://github.com/berndonline/aws-terraform

Let’s start with the variables file, which defines the needed settings for deploying the VPC. Basically you only need to change the variables to deploy the VPC to another AWS region:

...
variable "aws_region" {
  description = "AWS region to launch servers."
  default     = "eu-west-1"
}
...
variable "vpc_cidr" {
    default = "10.0.0.0/20"
  description = "the vpc cdir range"
}
variable "public_subnet_a" {
  default = "10.0.0.0/24"
  description = "Public subnet AZ A"
}
variable "public_subnet_b" {
  default = "10.0.4.0/24"
  description = "Public subnet AZ A"
}
variable "public_subnet_c" {
  default = "10.0.8.0/24"
  description = "Public subnet AZ A"
}
...

The vpc.tf file is the Terraform template which deploys the private and public subnets, the internet gateway, multiple NAT gateways and the different routing tables and adds the needed routes towards the internet:

# Create a VPC to launch our instances into
resource "aws_vpc" "default" {
    cidr_block = "${var.vpc_cidr}"
    enable_dns_support = true
    enable_dns_hostnames = true
    tags {
      Name = "VPC"
    }
}

resource "aws_subnet" "PublicSubnetA" {
  vpc_id = "${aws_vpc.default.id}"
  cidr_block = "${var.public_subnet_a}"
  tags {
        Name = "Public Subnet A"
  }
 availability_zone = "${data.aws_availability_zones.available.names[0]}"
}
...

In the main.tf you define which provider to use:

# Specify the provider and access details
provider "aws" {
  region = "${var.aws_region}"
}

# Declare the data source
data "aws_availability_zones" "available" {}

Now let’s start deploying the environment, first you need to initialise Terraform “terraform init“:

berndonline@lab:~/aws-terraform$ terraform init

Initializing provider plugins...
- Checking for available provider plugins on https://releases.hashicorp.com...
- Downloading plugin for provider "aws" (1.25.0)...

The following providers do not have any version constraints in configuration,
so the latest version was installed.

To prevent automatic upgrades to new major versions that may contain breaking
changes, it is recommended to add version = "..." constraints to the
corresponding provider blocks in configuration, with the constraint strings
suggested below.

* provider.aws: version = "~> 1.25"

Terraform has been successfully initialized!

You may now begin working with Terraform. Try running "terraform plan" to see
any changes that are required for your infrastructure. All Terraform commands
should now work.

If you ever set or change modules or backend configuration for Terraform,
rerun this command to reinitialize your working directory. If you forget, other
commands will detect it and remind you to do so if necessary.
berndonline@lab:~/aws-terraform$

Next, let’s do a dry run “terraform plan” to see all changes Terraform would apply:

berndonline@lab:~/aws-terraform$ terraform plan
Refreshing Terraform state in-memory prior to plan...
The refreshed state will be used to calculate this plan, but will not be
persisted to local or remote state storage.

data.aws_availability_zones.available: Refreshing state...

------------------------------------------------------------------------

An execution plan has been generated and is shown below.
Resource actions are indicated with the following symbols:
  + create

Terraform will perform the following actions:

  + aws_eip.natgw_a
      id:                                          
      allocation_id:                               
      association_id:                              
      domain:                                      
      instance:                                    
      network_interface:                           
      private_ip:                                  
      public_ip:                                   
      vpc:                                         "true"

...

  + aws_vpc.default
      id:                                          
      assign_generated_ipv6_cidr_block:            "false"
      cidr_block:                                  "10.0.0.0/20"
      default_network_acl_id:                      
      default_route_table_id:                      
      default_security_group_id:                   
      dhcp_options_id:                             
      enable_classiclink:                          
      enable_classiclink_dns_support:              
      enable_dns_hostnames:                        "true"
      enable_dns_support:                          "true"
      instance_tenancy:                            "default"
      ipv6_association_id:                         
      ipv6_cidr_block:                             
      main_route_table_id:                         
      tags.%:                                      "1"
      tags.Name:                                   "VPC"


Plan: 27 to add, 0 to change, 0 to destroy.

------------------------------------------------------------------------

Note: You didn't specify an "-out" parameter to save this plan, so Terraform
can't guarantee that exactly these actions will be performed if
"terraform apply" is subsequently run.

berndonline@lab:~/aws-terraform$

Because nothing is deployed, Terraform would apply 27 changes, so let’s do this by running “terraform apply“. Terraform will check the state and will ask you to confirm and then apply the changes:

berndonline@lab:~/aws-terraform$ terraform apply
data.aws_availability_zones.available: Refreshing state...

An execution plan has been generated and is shown below.
Resource actions are indicated with the following symbols:
  + create

Terraform will perform the following actions:

  + aws_eip.natgw_a
      id:                                          
      allocation_id:                               
      association_id:                              
      domain:                                      
      instance:                                    
      network_interface:                           
      private_ip:                                  
      public_ip:                                   
      vpc:                                         "true"

...

  + aws_vpc.default
      id:                                          
      assign_generated_ipv6_cidr_block:            "false"
      cidr_block:                                  "10.0.0.0/20"
      default_network_acl_id:                      
      default_route_table_id:                      
      default_security_group_id:                   
      dhcp_options_id:                             
      enable_classiclink:                          
      enable_classiclink_dns_support:              
      enable_dns_hostnames:                        "true"
      enable_dns_support:                          "true"
      instance_tenancy:                            "default"
      ipv6_association_id:                         
      ipv6_cidr_block:                             
      main_route_table_id:                         
      tags.%:                                      "1"
      tags.Name:                                   "VPC"


Plan: 27 to add, 0 to change, 0 to destroy.

Do you want to perform these actions?
  Terraform will perform the actions described above.
  Only 'yes' will be accepted to approve.

  Enter a value: yes

aws_eip.natgw_c: Creating...
  allocation_id:     "" => ""
  association_id:    "" => ""
  domain:            "" => ""
  instance:          "" => ""
  network_interface: "" => ""
  private_ip:        "" => ""
  public_ip:         "" => ""
  vpc:               "" => "true"
aws_eip.natgw_a: Creating...
  allocation_id:     "" => ""
  association_id:    "" => ""
  domain:            "" => ""
  instance:          "" => ""
  network_interface: "" => ""
  private_ip:        "" => ""
  public_ip:         "" => ""
  vpc:               "" => "true"

...

aws_route_table_association.PrivateSubnetB: Creation complete after 0s (ID: rtbassoc-174ba16c)
aws_nat_gateway.public_nat_c: Still creating... (1m40s elapsed)
aws_nat_gateway.public_nat_c: Still creating... (1m50s elapsed)
aws_nat_gateway.public_nat_c: Creation complete after 1m56s (ID: nat-093319a1fa62c3eda)
aws_route_table.private_route_c: Creating...
  propagating_vgws.#:                         "" => ""
  route.#:                                    "" => "1"
  route.4170986711.cidr_block:                "" => "0.0.0.0/0"
  route.4170986711.egress_only_gateway_id:    "" => ""
  route.4170986711.gateway_id:                "" => ""
  route.4170986711.instance_id:               "" => ""
  route.4170986711.ipv6_cidr_block:           "" => ""
  route.4170986711.nat_gateway_id:            "" => "nat-093319a1fa62c3eda"
  route.4170986711.network_interface_id:      "" => ""
  route.4170986711.vpc_peering_connection_id: "" => ""
  tags.%:                                     "" => "1"
  tags.Name:                                  "" => "Private Route C"
  vpc_id:                                     "" => "vpc-fdffb19b"
aws_route_table.private_route_c: Creation complete after 1s (ID: rtb-d64632af)
aws_route_table_association.PrivateSubnetC: Creating...
  route_table_id: "" => "rtb-d64632af"
  subnet_id:      "" => "subnet-17da194d"
aws_route_table_association.PrivateSubnetC: Creation complete after 1s (ID: rtbassoc-35749e4e)

Apply complete! Resources: 27 added, 0 changed, 0 destroyed.
berndonline@lab:~/aws-terraform$

Terraform successfully applied all the changes so let’s have a quick look in the AWS web console:

You can change the environment and run “terraform apply” again and Terraform would deploy the changes you have made. In my example below I didn’t, so Terraform would do nothing because it tracks the state that is deployed and that I have defined in the vpc.tf:

berndonline@lab:~/aws-terraform$ terraform apply
aws_eip.natgw_c: Refreshing state... (ID: eipalloc-7fa0eb42)
aws_vpc.default: Refreshing state... (ID: vpc-fdffb19b)
aws_eip.natgw_a: Refreshing state... (ID: eipalloc-3ca7ec01)
aws_eip.natgw_b: Refreshing state... (ID: eipalloc-e6bbf0db)
data.aws_availability_zones.available: Refreshing state...
aws_subnet.PublicSubnetC: Refreshing state... (ID: subnet-d6e4278c)
aws_subnet.PrivateSubnetC: Refreshing state... (ID: subnet-17da194d)
aws_subnet.PrivateSubnetA: Refreshing state... (ID: subnet-6ea62708)
aws_subnet.PublicSubnetA: Refreshing state... (ID: subnet-1ab0317c)
aws_network_acl.all: Refreshing state... (ID: acl-c75f9ebe)
aws_internet_gateway.gw: Refreshing state... (ID: igw-27652940)
aws_subnet.PrivateSubnetB: Refreshing state... (ID: subnet-ab59c8e3)
aws_subnet.PublicSubnetB: Refreshing state... (ID: subnet-4a51c002)
aws_route_table.public_route_b: Refreshing state... (ID: rtb-a45d29dd)
aws_route_table.public_route_a: Refreshing state... (ID: rtb-5b423622)
aws_route_table.public_route_c: Refreshing state... (ID: rtb-0453277d)
aws_nat_gateway.public_nat_b: Refreshing state... (ID: nat-0376fc652d362a3b1)
aws_nat_gateway.public_nat_a: Refreshing state... (ID: nat-073ed904d4cf2d30e)
aws_route_table_association.PublicSubnetA: Refreshing state... (ID: rtbassoc-b14ba1ca)
aws_route_table_association.PublicSubnetB: Refreshing state... (ID: rtbassoc-277d975c)
aws_route_table.private_route_a: Refreshing state... (ID: rtb-0745317e)
aws_route_table.private_route_b: Refreshing state... (ID: rtb-a15a2ed8)
aws_route_table_association.PrivateSubnetB: Refreshing state... (ID: rtbassoc-174ba16c)
aws_route_table_association.PrivateSubnetA: Refreshing state... (ID: rtbassoc-60759f1b)
aws_nat_gateway.public_nat_c: Refreshing state... (ID: nat-093319a1fa62c3eda)
aws_route_table_association.PublicSubnetC: Refreshing state... (ID: rtbassoc-307e944b)
aws_route_table.private_route_c: Refreshing state... (ID: rtb-d64632af)
aws_route_table_association.PrivateSubnetC: Refreshing state... (ID: rtbassoc-35749e4e)

Apply complete! Resources: 0 added, 0 changed, 0 destroyed.
berndonline@lab:~/aws-terraform$

To remove the environment use run “terraform destroy“:

berndonline@lab:~/aws-terraform$ terraform destroy
aws_eip.natgw_c: Refreshing state... (ID: eipalloc-7fa0eb42)
data.aws_availability_zones.available: Refreshing state...
aws_eip.natgw_a: Refreshing state... (ID: eipalloc-3ca7ec01)
aws_vpc.default: Refreshing state... (ID: vpc-fdffb19b)
aws_eip.natgw_b: Refreshing state... (ID: eipalloc-e6bbf0db)

...

An execution plan has been generated and is shown below.
Resource actions are indicated with the following symbols:
  - destroy

Terraform will perform the following actions:

  - aws_eip.natgw_a

  - aws_eip.natgw_b

  - aws_eip.natgw_c

...

Plan: 0 to add, 0 to change, 27 to destroy.

Do you really want to destroy?
  Terraform will destroy all your managed infrastructure, as shown above.
  There is no undo. Only 'yes' will be accepted to confirm.

  Enter a value: yes

aws_network_acl.all: Destroying... (ID: acl-c75f9ebe)
aws_route_table_association.PrivateSubnetA: Destroying... (ID: rtbassoc-60759f1b)
aws_route_table_association.PublicSubnetC: Destroying... (ID: rtbassoc-307e944b)
aws_route_table_association.PublicSubnetA: Destroying... (ID: rtbassoc-b14ba1ca)
aws_route_table_association.PublicSubnetB: Destroying... (ID: rtbassoc-277d975c)
aws_route_table_association.PrivateSubnetC: Destroying... (ID: rtbassoc-35749e4e)
aws_route_table_association.PrivateSubnetB: Destroying... (ID: rtbassoc-174ba16c)
aws_route_table_association.PrivateSubnetB: Destruction complete after 0s

...

aws_internet_gateway.gw: Destroying... (ID: igw-27652940)
aws_eip.natgw_c: Destroying... (ID: eipalloc-7fa0eb42)
aws_subnet.PrivateSubnetC: Destroying... (ID: subnet-17da194d)
aws_subnet.PrivateSubnetC: Destruction complete after 1s
aws_eip.natgw_c: Destruction complete after 1s
aws_internet_gateway.gw: Still destroying... (ID: igw-27652940, 10s elapsed)
aws_internet_gateway.gw: Destruction complete after 11s
aws_vpc.default: Destroying... (ID: vpc-fdffb19b)
aws_vpc.default: Destruction complete after 0s

Destroy complete! Resources: 27 destroyed.
berndonline@lab:~/aws-terraform$

I hope this article was informative and explains how to deploy a VPC with Terraform. In the coming weeks I will add additional functions like deploying EC2 Instances and Load Balancing.

Please share your feedback and leave a comment.

Open Source Routing GRE over IPSec with StrongSwan and Cisco IOS-XE

In my previous post about the Ansible Playbook for VyOS and BGP Routing, I wrote that I was looking for some Open Source alternatives for software routers to use in AWS Transit VPCs.

Here is the example using a Debian Linux,  FRR (Free Range Routing) and StrongSwan connecting over a GRE over IPSec tunnel to a Cisco IOS-XE (CSRv) router:

You can find the Vagrantfile in my Github repo https://github.com/berndonline/debian-router-vagrant. During the boot Ansible runs and pre-configures both nodes but continue reading about the detailed configuration:

sudo apt-get update
sudo apt-get upgrade -y

Enable IP routing by adding the following line to /etc/sysctl.conf:

sudo vi /etc/sysctl.conf
net.ipv4.ip_forward = 1
sudo sysctl -p /etc/sysctl.conf

Download the latest FRR release for Debian 9 x86_64 from https://github.com/FRRouting/frr/releases

Install FRR and don’t worry about any dependency errors from the first command, the second command will install the missing dependencies. Next, enable the needed FRR daemons and start the service:

wget https://github.com/FRRouting/frr/releases/download/frr-3.0.3/frr_3.0.3-1_debian9.1_amd64.deb
wget https://github.com/FRRouting/frr/releases/download/frr-3.0.3/frr-pythontools_3.0.3-1_debian9.1_all.deb
wget https://github.com/FRRouting/frr/releases/download/frr-3.0.3/frr-doc_3.0.3-1_debian9.1_all.deb
sudo dpkg -i frr_3.0.3-1_debian9.1_amd64.deb frr-pythontools_3.0.3-1_debian9.1_all.deb frr-doc_3.0.3-1_debian9.1_all.deb
sudo apt-get install -f -y

sudo bash -c 'cat << EOF > /etc/frr/daemons
zebra=yes
bgpd=yes
ospfd=no
ospf6d=no
ripd=no
ripngd=no
isisd=no
pimd=no
ldpd=no
nhrpd=no
EOF'

sudo bash -c 'cat << EOF > /etc/frr/frr.conf
!
frr version 3.0.3
frr defaults traditional
no ipv6 forwarding
!
router bgp 65001
 neighbor 192.168.0.2 remote-as 65002
 !
 address-family ipv4 unicast
  network 10.255.0.1/32
 exit-address-family
 vnc defaults
  response-lifetime 3600
  exit-vnc
!
line vty
!
EOF'

sudo systemctl enable frr
sudo systemctl start frr

Install StrongSwan and change a few settings before you can enable and start the service:

sudo apt-get install -y strongswan-swanctl charon-systemd

sudo bash -c 'cat << EOF > /etc/strongswan.d/charon/connmark.conf
connmark {
 
    # Disable connmark plugin
    # Needed for tunnels - see https://wiki.strongswan.org/projects/strongswan/wiki/RouteBasedVPN
    load = no
 
}
EOF'
sudo bash -c 'cat << EOF > /etc/strongswan.d/charon.conf
charon {
 
    # Cisco IKEv2 wants to use reauth - need to set make_before_break otherwise
    # strongSwan will have a very brief outage during IKEv2 reauth
    make_before_break = yes
 
    # Needed for tunnels - see https://wiki.strongswan.org/projects/strongswan/wiki/RouteBasedVPN
    install_routes = no
 
}
EOF'

sudo systemctl enable strongswan-swanctl
sudo systemctl start strongswan-swanctl

Setting TCP MSS to path MTU with iptables:

sudo DEBIAN_FRONTEND=noninteractive apt-get install -y -q iptables-persistent

sudo bash -c 'cat << EOF > /etc/iptables/rules.v4
*filter
:INPUT ACCEPT [0:0]
:FORWARD ACCEPT [0:0]
:OUTPUT ACCEPT [0:0]
COMMIT
*mangle
:PREROUTING ACCEPT [0:0]
:INPUT ACCEPT [0:0]
:FORWARD ACCEPT [0:0]
:OUTPUT ACCEPT [0:0]
:POSTROUTING ACCEPT [0:0]
-A FORWARD -p tcp --tcp-flags SYN,RST SYN -j TCPMSS --clamp-mss-to-pmtu
COMMIT
EOF'

Let us continue with the Debian router interface configuration, here you also find the GRE tunnel settings:

sudo bash -c 'cat << EOF > /etc/network/interfaces
source-directory /etc/network/interfaces.d
auto lo
iface lo inet loopback

auto lo:1
iface lo:1 inet static
      address 10.255.0.1
      netmask 255.255.255.255

auto ens5
iface ens5 inet dhcp

auto ens6
iface ens6 inet static
      address 10.0.0.1
      netmask 255.255.255.0

auto gre1
iface gre1 inet tunnel
      address 192.168.0.1
      netmask 255.255.255.0
      mode gre
      endpoint 10.0.0.2
EOF'

sudo systemctl restart networking

In StrongSwan you configure the IPSec settings:

sudo bash -c 'cat << EOF > /etc/swanctl/swanctl.conf
connections {
    my-vpn {
        remote_addrs = 10.0.0.2
        version = 1
        proposals = aes256-sha1-modp1536
        reauth_time = 1440m
        local-1 {
            auth = psk
            id = debian-router.domain.com
        }
        remote-1 {
            # id field here is inferred from the remote address
            auth = psk
        }
        children {
            my-vpn-1 {
                local_ts = 10.0.0.1/32[gre]
                remote_ts = 10.0.0.2/32[gre]
                mode = transport
                esp_proposals = aes128-sha1-modp1536
                rekey_time = 60m
                start_action = trap
                dpd_action = restart
            }
        }
    }

}
secrets {
    ike-my-vpn-1 {
        id-1 = cisco-iosxe.domain.com
        id-2 = 10.0.0.2
        secret = "secret"
    }
}
EOF'

sudo systemctl restart strongswan-swanctl

We finished the Debian host configuration and continue with the Cisco  router configuration to connect the Debian router to the tunnel 0 interface on the Cisco router:

conf t
hostname cisco-iosxe

crypto keyring my-keyring  
  pre-shared-key address 10.0.0.1 key secret
  exit

crypto isakmp policy 20
 encr aes 256
 authentication pre-share
 group 5
crypto isakmp identity hostname
crypto isakmp profile my-isakmp-profile
   keyring my-keyring
   match identity host debian-router.domain.com
   exit
crypto ipsec transform-set my-transform-set esp-aes esp-sha-hmac
 mode transport
 exit
crypto ipsec profile my-ipsec-profile
 set transform-set my-transform-set
 set pfs group5
 set isakmp-profile my-isakmp-profile
 exit

interface Loopback1
 ip address 10.255.0.2 255.255.255.255
 exit

interface Tunnel0
 ip address 192.168.0.2 255.255.255.0
 tunnel source GigabitEthernet2
 tunnel destination 10.0.0.1
 tunnel protection ipsec profile my-ipsec-profile
 no shut
 exit

interface GigabitEthernet2
 ip address 10.0.0.2 255.255.255.0
 no shut
 exit

router bgp 65002
 bgp log-neighbor-changes
 neighbor 192.168.0.1 remote-as 65001
 address-family ipv4
  network 10.255.0.2 mask 255.255.255.255
  neighbor 192.168.0.1 activate
 exit-address-family
 exit

exit
wr mem

Clone my Github repo https://github.com/berndonline/debian-router-vagrant and boot the environment with “./vagrant_up.sh”. After the two VMs are booted wait a few seconds and run the validation playbook to check the connectivity between the nodes:

berndonline@lab:~/debian-router-vagrant$ ansible-playbook ./validate_connectivity.yml

PLAY [debian-router] ***********************************************************************************************************************************************

TASK [check connectivity from debian router] ***********************************************************************************************************************
changed: [debian-router]

PLAY [cisco-iosxe] *************************************************************************************************************************************************

TASK [check connectivity from cisco iosxe] *************************************************************************************************************************
ok: [cisco-iosxe]

PLAY RECAP *********************************************************************************************************************************************************
cisco-iosxe                : ok=1    changed=0    unreachable=0    failed=0
debian-router              : ok=1    changed=1    unreachable=0    failed=0

berndonline@lab:~/debian-router-vagrant$

I will continue improving the config, and do some more testing with AWS VPN gateways (VGW).

Please share your feedback.

Leave a comment